Gast JUN-AIR 120R-40B User manual
Part No. 6190760 (Rev A)
Compressor
120R-40B, 120R-40BQ3
2x120R-90BQ6
6190760 | REV A
® Registered Trademark/™ Trademark of JUN-AIR Inc. ©Copyright 2022 JUN-AIR Manufacturing Inc. All Rights Reserved.
WWW
.
JUN
-
AIR
.
COM
ISO 9001 CERTIFIED
A BRAND OF
®
A BRAND OF
®

2
6190760 (Rev A) 120R Basic Compressor User Guide
© 2022 JUN-AIR
We reserve the right to make any alterations which may be due to any technical improvements
Printed in the USA
Table of Contents
DB Operating Manual ................................................................................................. 5
DE Betriebsanweisung ............................................................................................... 5
FR Mode d’emploi .................................................................................................... 5
ES Modo de empleo................................................................................................... 5
NL Gebruiksaanwijzing ................................................................................................ 5
DK Betjeningsforskrift ................................................................................................ 5
Technical specifications
Technische Daten
Caracteristiques techniques
Detalles téchnicos
Technische gegevens
Tekniske specifikationer
Diagrams
Zeichnungen
Dessins
Diagramas
Tekeningen
Diagrammer
Spare parts
Ersatzteile
Pieces detachées
Piezas de recambio
Onderdelenlijst
Reservedele

3
© 2022, JUN-AIR
We reserve the right to make any alterations which may be due to any technical improvements
Printed in the USA
120 Basic Compressor User Guide 6190760 (Rev A)
Warranty
Provided that the instructions for operation, maintenance and
service have been carried out, your JUN-AIR compressor is
guaranteed against faulty material or workmanship for 2 years.
The air receiver is guaranteed for 5 years.
The guarantee does not cover damage caused by violence,
misuse, incorrect repairs or use of unoriginal spare parts. Costs
of transportation of parts/equipment are not covered by the
guarantee.
JUN-AIR’s Conditions for Sale and Delivery will generally apply.
JUN-AIR International A/S reserves the right to change technical
specifications/constructions.
DE – Garantie
Vorausgesetzt, dass die Anweisungen für Betrieb und
Wartungerfüllt sind, gewährt JUN-AIR 2 Jahre Garantie bei
Materialoder Fertigungsfehlern.
Auf den Druckbehälter gewährt JUN-AIR 5 Jahre Garantie.
Ausgenommen von Garantieleistungen sind Schäden die durch
Gewalt, falsche Bedienung, nicht fachgerechte Reparaturen oder
durch Verwendung nicht originaler Ersatzteile verursacht wurden.
Transportkosten sind von der Garantie ausgeschlossen.
Es gelten die allgemeinen Geschäfts- und Lieferbedingungen von
JUN-AIR.
JUN-AIR behält sich das Recht von technischen Änderungen vor.
FR – Garantie
Celle-ci s’applique à toutes les pièces défectueuses et les vices
de fabrication pendant 2 ans d’utilisation, à condition que les
instructions d’emploi aient été correctement appliquées.
La garantie sur la cuve est de 5 ans.
Sont exclus de la garantie: L’utilisation de pièces détachées non
d’origine. Les dommages résultant de réparations négligées, d’un
manque d’entretie’n, d’utilisation incorrecte ou de violence. Les
frais de transport de pièces/matériel ne sont pas couverts par la
garantie.
Sauf accord contraire, les Conditions Générales de Vente et de
Livraison de JUN-AIR International A/S seront appliquées.
JUN-AIR International A/S se réserve le droit de changer les
spécifications techniques/la construction.
ES – Garantia
Su compresor JUN-AIR está garantizado durante 2 años contra
fallos de materiales o de construcción, siempre que se cumplan
las instrucciones de uso.
El tanque está garantizado durante 5 años.
La garantia no cubre los daños causados por violencia, mala
utilización, reparaciones incorrectas o uso de recambios no
originales. El coste de transporte de recambios o equipos no está
cubierto por la garantia.
Las Condiciones Generales de Venta y Entrega de JUN-AIR
International A/S serán aplicables.
JUN-AIR International A/S se reserva el derecho a cambiar las
especificaciones técnicas o de construcción sin aviso.
NL – Garantie
Op de JUN-AIR compressor geven wij een garantie van 2 jaar op
materiaal- en constructiefouten, onder de voorwaarde dat u zich
aan de gebruiksaanwijzing heeft gehouden.
De garantie op het drukvat bedraagt 5 jaar.
De garantie is niet van toepassing op schade die het gevolg is van
geweld, onjuist gebruik, onvakkundige reparaties of gebruik van
niet originele onderdelen. Kosten van transport van onderdelen
vallen niet onder de garantie.
De verkoop- en leveringsvoorwaarden van JUN-AIR International
A/S zijn van toepassing.
JUN-AIR International A/S behoudt zich het recht voor
technische gegevens te wijzigen.
DK – Garanti
Under forudsætning af at alle betjenings- og serviceforskrifter
overholdes, ydes der 2 års garanti for alle materiale- og
fabrikationsfejl.
Dog ydes der 5 års garanti for beholdergennemtæring.
Garantien omfatter ikke skader, som skyldes vold, misbrug,
fejlagtige reparationer eller uoriginale reservedele.
Transportomkostninger er ikke omfattet af garantien.
For Skandinavien gælder i øvrigt NL 92 Salgs- og
Leveringsbetingelser.
JUN-AIR International A/S forbeholder sig retten til ændringer i
tekniske specifikationer og konstruktion.

4
6190760 (Rev A) 120R Basic Compressor User Guide
© 2022 JUN-AIR
We reserve the right to make any alterations which may be due to any technical improvements
Printed in the USA
SAFETY
Important - read this first!
Please read the following information and operating instructions
included with this product before use. This information is for your
safety and it is important that you follow these instructions. It will
also help prevent damage to the product. Failure to operate the unit
in accordance with the instructions or using JUN-AIR unauthorized
spare parts can cause damage to the unit and could cause serious
injury.
CAUTION: To reduce risk of electric shock
• Only authorized service agents should carry out service.
Removing parts or attempting repairs can create an electric
shock. Refer all servicing to qualified service agents.
• If this unit is supplied with a three-pin plug, connect with a
properly earthed outlet only.
WARNING: To reduce risk of electrocution
• Do not use this unit with electrical voltages other than stated
on the rating plate.
• Always unplug this unit immediately after use and store in a dry
place.
• Do not use this product in or near liquid or where it can fall or
be pulled into water or other liquids.
• Do not reach for this product if it has fallen into liquid. Unplug
immediately.
• This unit is not weatherproof. Never operate outdoors in the
rain or in a wet area.
DANGER: To reduce risk of explosion or fire
• During spraying with combustible liquids, risk of explosion may
arise, particularly in closed rooms.
• Do not use this product in or near explosive atmospheres or
where aerosol products are being used.
• Do not pump any other gases other than atmospheric air.
• Do not pump combustible liquids or vapours with this product;
do not use it in or near areas with combustible or explosive
liquids or vapours.
• Do not use this unit near open flames..
CAUTION: To prevent injury
• Compressed air can be dangerous; do not direct airflow at
a person’s head or body.
• Always keep the system out of reach of children.
• Never operate this product if it has a damaged power lead or
plug, if it has been dropped or damaged, or if it has fallen into
water. Return the product to a service center for examination
and repair.
• Keep the electrical cable away from hot surfaces.
• Ensure all openings are kept free of restriction and never
restart when the unit cools and the overload resets.
Never place the system on a soft surface where
the openings may be blocked. Keep all openings free from
dust, dirt and other particles.
• Never leave this product unattended when plugged in.
• Never insert fingers or any other objects into fans.
• This unit is thermally protected and can automatically restart
when the overload resets.
• Wear safety glasses, when servicing this product.
• Use only in well ventilated areas.
• This product may only be connected to units or tools with a
max. pressure rating higher or equal to that of the compressor.
• The surface of the compressor can get hot. Do not touch
compressor motor during operation.
Failure to observe the safety precautions could result in severe
bodily injury, including death in extreme cases.
IMPORTANT: General directions for use
• Protect compressor against rain, moisture, frost and dust.
• The compressor is constructed and approved for a max.
pressure as stated under Technical Specifications.
• Do not operate the compressor at ambient temperatures
exceeding 40°C/104°F or falling below 0°C/32°F.
• If the supply power lead on the compressor is defective, an
authorized Jun-Air distributor or other qualified personnel
must carry out the repair.

5
© 2022, JUN-AIR
We reserve the right to make any alterations which may be due to any technical improvements
Printed in the USA
120 Basic Compressor User Guide 6190760 (Rev A)
OPERATION
• If the compressor has been stored at an extremely low
temperature, allow it to heat to room temperature before
switching it on.
• If the compressor is supplied with a receiver, connect equipment
and open the filter regulator on the receiver.
• Turn on the compressor on the pressure switch.
• The compressor will automatically stop when the preset cut-out
pressure is reached.
• If the compressor does not start, there might be pressure in
the receiver. The compressor will automatically start when the
pressure drops.
• The cut-in and cut-out pressure is preset from the factory and
it is normally not necessary to change this. However, if it is
necessary to change the preset settings, the instructions of this
manual shall be followed carefully.
• All AC compressors are designed for 100% duty but 50%
operation is recommendable to prolong the lifetime.
• Do not remove the protection covers during operation as it may
cause electric shock or other personal injury.
• Do not lubricate the oil-less motor with oil, as it will destroy
important components.
MAINTENANCE
To ensure a long lifetime of the compressor, it is important that
inspection and maintenance is carried out regularly as described in
the following.
Preventive maintenance
Activity Weekly Monthly
One a year,
or every
2000 hours
aDrain condensate •
bCheck filter regulator •
cCheck for leaks •
dClean the unit •
eCheck safety valve •
fCheck inlet filter •
gCheck non-return
valve •
a) Drain condensate
Drain condensate by opening the drain cock on the receiver.
If mounted with auto drain, condensate will be drained
automatically. If drain bottle is installed, empty when necessary.
b) Check filter regulator
If a filter regulator is installed, check weekly and drain for
condensate by pressing the button at the bottom.
If auto drain is installed, the filter will be emptied automatically.
Check and change the filter and filter element in accordance with
the instructions in “Installation and maintenance instructions” for
the filter in question.
c) Check for leaks
Check motor, hoses and equipment for leaks.
Check the pumping time.
d) Clean the unit
Clean the unit when needed with a soft, damp cloth. If necessary,
use paraffin to remove adhesions. Dust and dirt prevent cooling.
e) Check safety valve
Check the safety valve with pressure in the receiver. The safety valve
is operated by pulling the ring (1) or turning the screw (2) depending
on the valve type.

6
6190760 (Rev A) 120R Basic Compressor User Guide
© 2022 JUN-AIR
We reserve the right to make any alterations which may be due to any technical improvements
Printed in the USA
f) Check intake filter
Check the intake filter and change it if necessary.
Remove the filter and replace.
g) Check the non-return valve
Turn off the compressor on the mains switch and pull out the
plug.
Empty the receiver for compressed air by operating the safety
valve. When the receiver is empty, the reading of the pressure
gauge is bar.
Dismount the non-return valve from the receiver.
Disassemble the non-return valve and remove the O-ring ()
from the piston.
Clean the non-return valve.
Mount a new O-ring and re-assemble the non-return valve.
Re-install the non-return valve.Service
Please note that all service must be carried out by a qualified
person.
Adjustment of pressure switch
The working presure has ben preset from the factory, and it is
normally not necessary to change this.
However, if it is necessary to change the preset settings, the
instructions mentioned below should be followed carefully.
Warning
The compressor is constructed and approved for a max.
pressure as stated under Technical Specifications - do not
adjust to a higher pressure.
Higher working pressure will reduce the lifetime of the
compressor.
The compressor will stop at max. pressure (stop pressure) and
start again at min. pressure (start pressure). The difference
between max. and min. pressure is the differens pressure.
Unscrew the lid of the pressure switch. Adjust max. pressure
adjusting the two springs marked A (clockwise: higher pressure).
Adjust the two springs identically.
Adjust the differens pressure adjusting the spring marked B
(clockwise: higher differens pressure, start pressure maintained).
Test of pumping time
The pumping time indicates the condition of the compressor.
. Check that there are no leaks in the system.
. Empty the air receiver of compressed air so that the
pressure gauge shows bar.
. Close the filter regulator and check that the drain valve is
closed.
. Start the compressor and note the time it takes until it is
turned off again by the pressure switch. Check that the
pumping time agrees with the technical specifications for
the actual compressor system.
Please note that the pumping time in this manual is given for to
max pressure. Deviations from this result in deviating results.
Important
Always test the pumping time when cold. If the compressor is
warm, the pumping time will be considerably longer.

7
© 2022, JUN-AIR
We reserve the right to make any alterations which may be due to any technical improvements
Printed in the USA
120 Basic Compressor User Guide 6190760 (Rev A)
FAULT FINDING AND REPAIR
Important
Switch off and isolate from electrical supply before removing
any parts from the pump. Empty air receiver of air before
performing any operation on the compressors’ pressure
system.
1. Compressor does not start
a. The air receiver is pressurized. The motor will start when
the pressure has dropped to the preset start pressure.
Empty the receiver.
b. Check that the mains supply agrees with the motor
label.
c. No power from mains. Check fuses and plug.
d. Bad connection or broken cable.
e. The motor is overheated and the thermal protection
has switched it off. When cooled the motor will turn on
automatically. Go to section .
f. The compressor has not been unloaded and there
is back pressure on the piston. Ensure that the
compressor is unloaded each time it stops.
g. The motor is blocked.
h. Defective capacitor.
2. The compressor makes a buzzing sound but does not start
a. Leaky non-return valve. Dismount the pressure pipe and
check if air leaks from the non-return valve. Clean and
replace.
b. The motor is blocked.
3. The compressor runs but the pressure does not increase
a. Intake filter clogged. Replace.
b. Non-return valve is clocked. Clean or replace.
c. Leaks in fittings, tubes or pneumatic equipment. Check
with soapy water or by letting unit stay over night
disconnected from mains. Pressure drop should not
exceed bar.
d. Check the piston gaskets. Replace if necessary.
e. Defective valve plate. Contact your JUN-AIR distributor.
4. The motor gets very hot
a. The ambient temperature is too high. If the motor is
installed in a cabinet sufficient ventilation must be
ensured.
b. Leaks in fittings, tubes or pneumatic equipment. Check
with soapy water or by letting unit stay over night
disconnected from mains. Pressure drop should not
exceed bar.
c. The compressor is overloaded.
5. The compressor runs even if no air is tapped
a. Leaks in fittings, tubes or pneumatic equipment. Check
with soapy water or by letting unit stay over night
disconnected from mains. Pressure drop should not
exceed bar.
6. The compressor does not start at min pressure or does not
stop at max pressure.
a. Defective pressure switch. Replace.
PRESSURE VESSEL
Pressure tested at I4-25 litre 24 bar
4-50 litre 18.3 bar
Directions for use
Application Receiver for compressed air
Receiver specifications See name plate
Installation Tubes, etc. must be installed with
suitable materials
Placement
Observe the working temperature of
the receiver
Ensure sufficient room for inspec-
tion and maintenance
The receiver must be kept in a hori-
zontal position
Corrosion protection
The surface treatment must be
maintained as required
Internal inspection at least every
five years
Drain condensate at least once a
week
Alternation/repair No welding must be made on pres-
surized parts
Safety valve
Ensures that PS will not be ex-
ceeded
Never adjust to a higher pressure
than PS
The capacity of the valve must be
calculated in accordance with teh
volume of air supplied by the com-
pressor
PS - Maximum working pressure of
the receiver
8
6190760 (Rev A) 120R Basic Compressor User Guide
© 2022 JUN-AIR
We reserve the right to make any alterations which may be due to any technical improvements
Printed in the USA
Technical Data & Specifications
Specifications 120R-40B 120R-40BQ3 2x120R-90BQ6
Tank size liter 40 40 90
U.S. gallon 10.6 10.6 24
Weight kg 55 66 102
lbs 120 144 225
Dimensions
(LxWxH)****
mm 556 x 443 x 678 556 x 581 x 678 1026 x 592 x 890
in 21.9 x 17.4 x 26.7 21.9 x 22.9 x 26.7 40.4 x 23.3 x 35.0
Pumping time @ 50 Hz 85 sec. 110 sec. 124 sec.
@ 60 Hz 72 sec. 95 sec. 107 sec.
Noise level @ 1 m @ 50 Hz 76 dB(a) 76 dB(a) 79 dB(a)
@ 60 Hz 79 dB(a) 79 dB(a) 82 dB(a)
**** Three-phase units are appoximately 100 mm wider than one-phase units.
Technical modifications reserved.
9
© 2022, JUN-AIR
We reserve the right to make any alterations which may be due to any technical improvements
Printed in the USA
120 Basic Compressor User Guide 6190760 (Rev A)
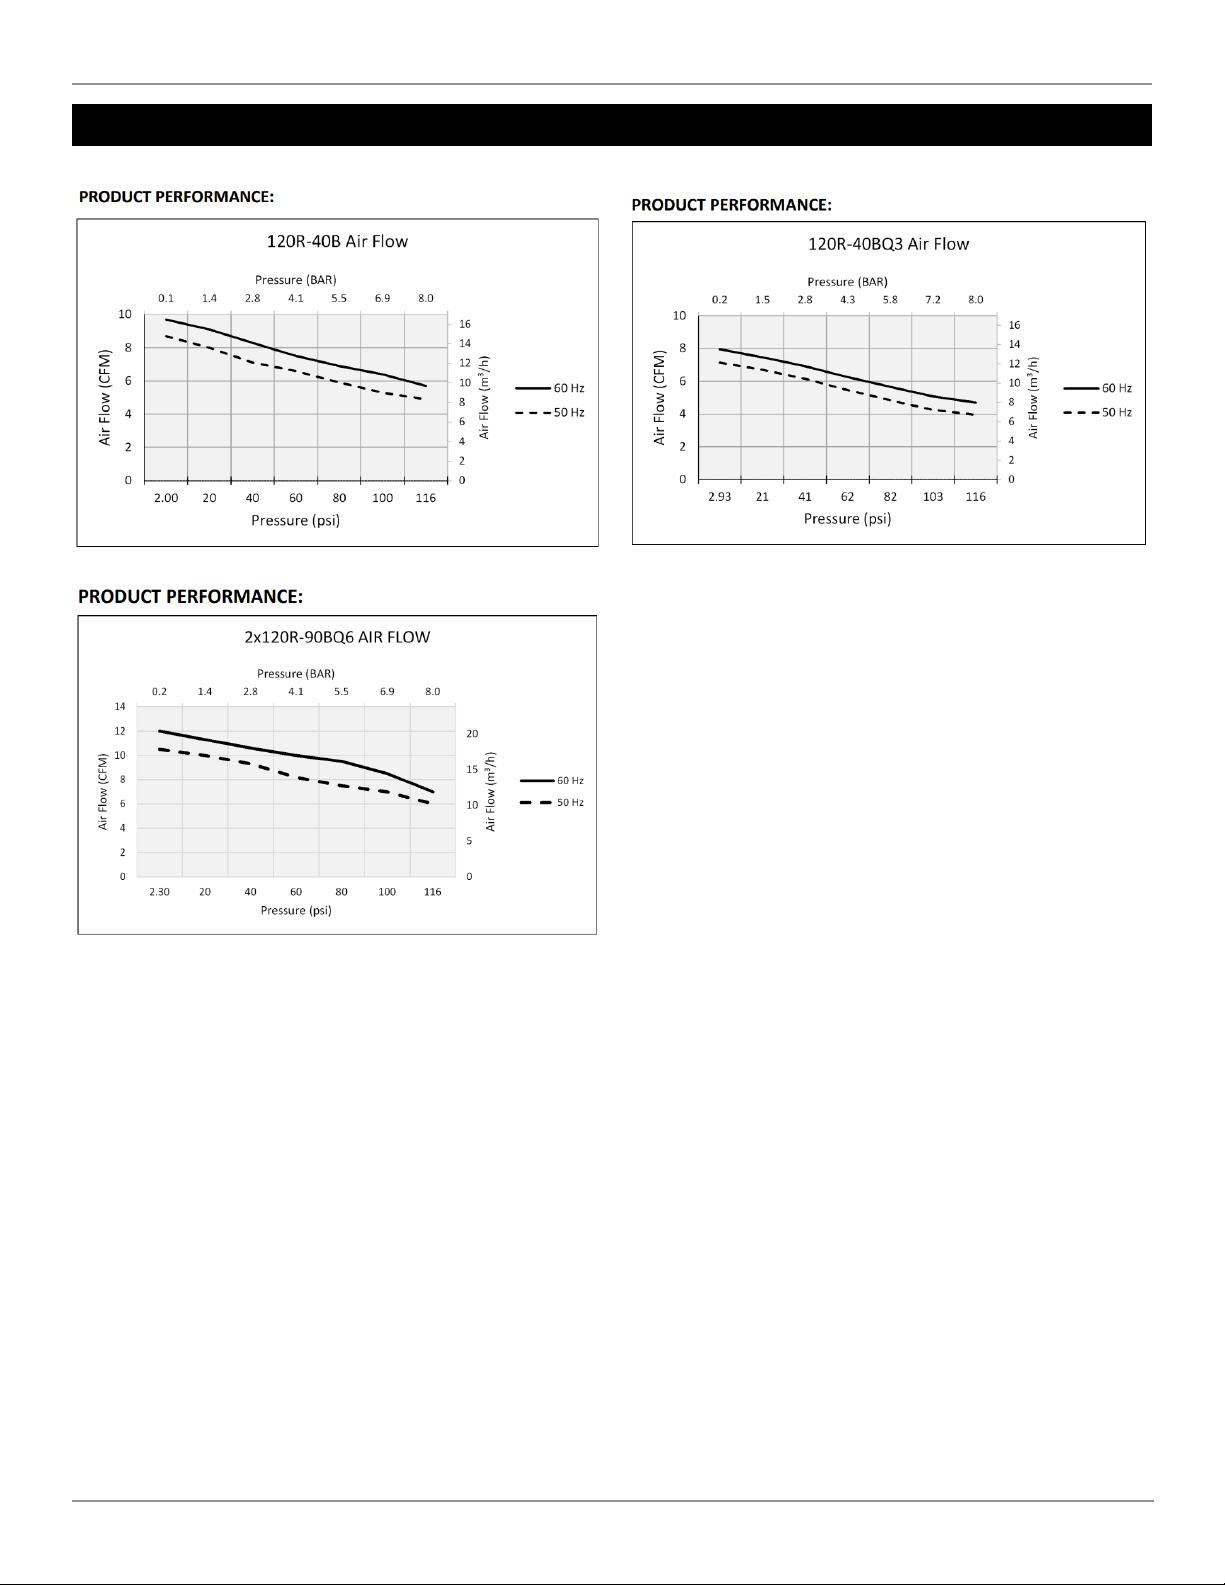
Performance Curves
10
6190760 (Rev A) 120R Basic Compressor User Guide
© 2022 JUN-AIR
We reserve the right to make any alterations which may be due to any technical improvements
Printed in the USA
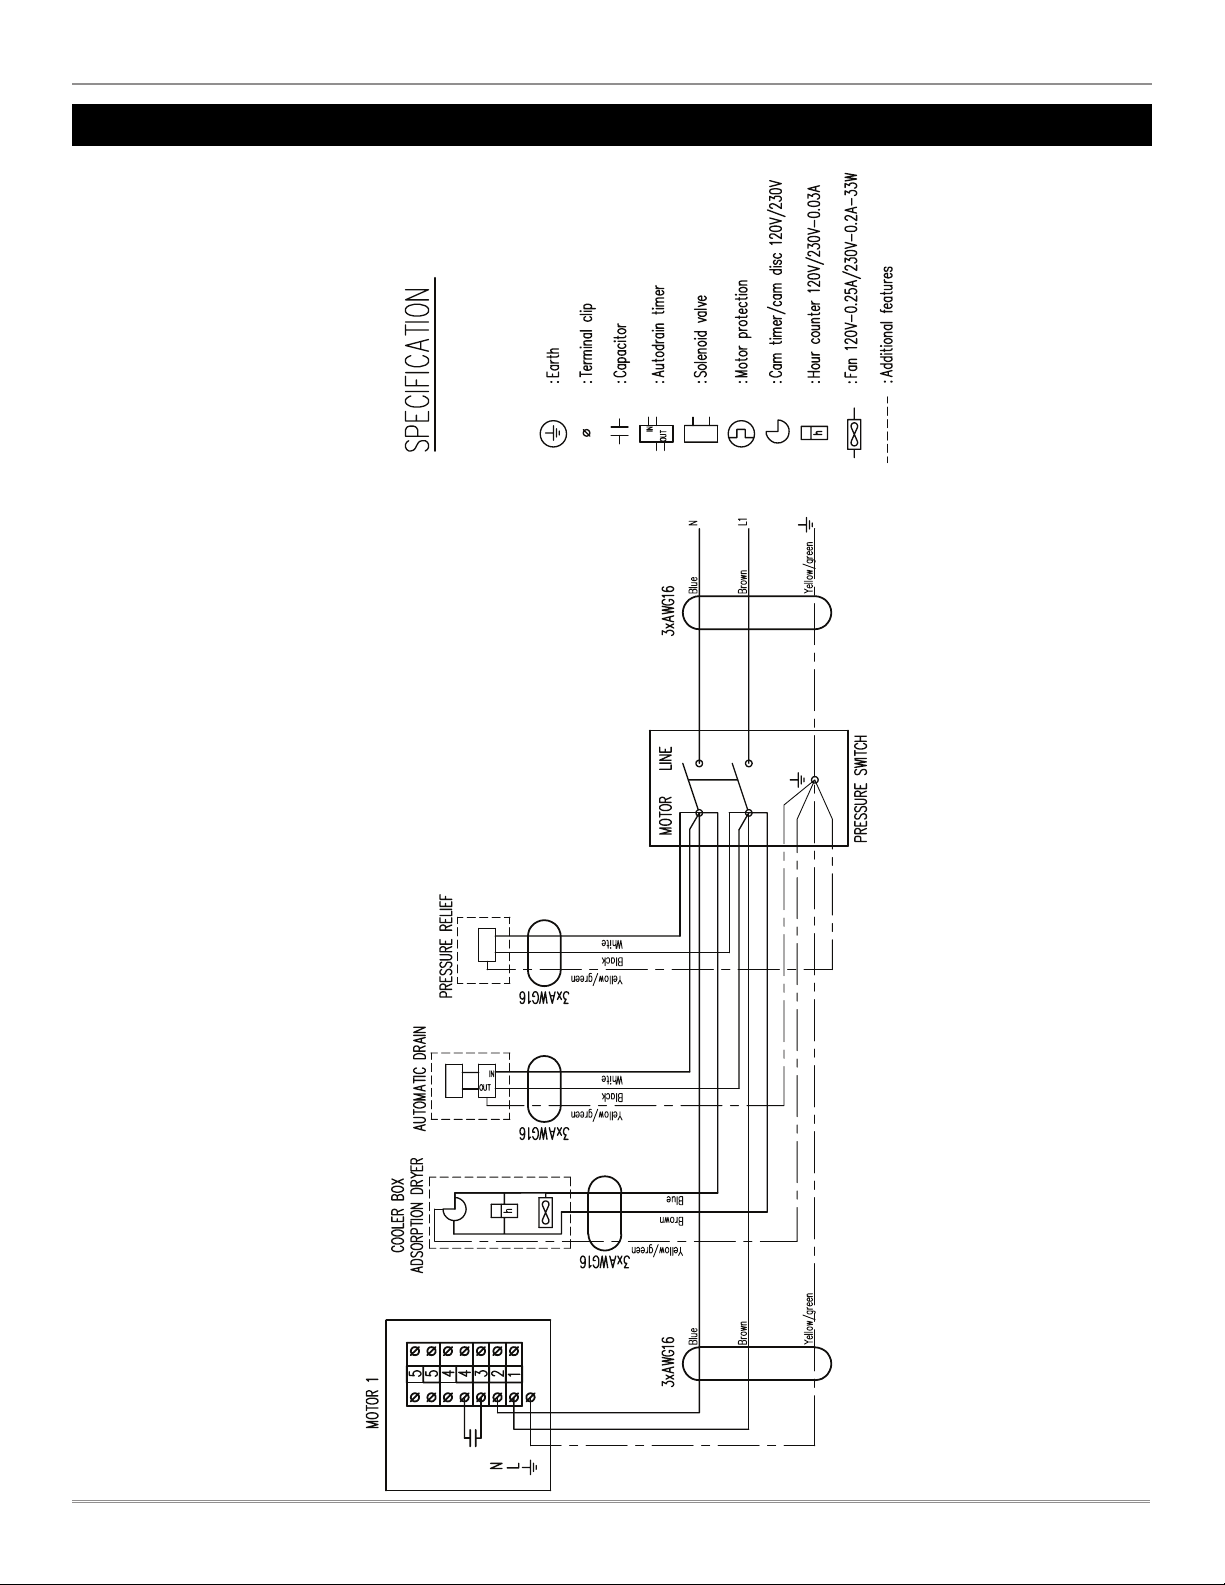
Electrical Drawing Model R-B – V, / Hz
Motor Spec.
120R, 230 V~50 Hz – 8 A
120R, 230 V`60 Hz – 10 A

11
© 2022, JUN-AIR
We reserve the right to make any alterations which may be due to any technical improvements
Printed in the USA
120 Basic Compressor User Guide 6190760 (Rev A)
Electrical Drawing Model R-BQ
Motor Spec.
120R, 230 V~50 Hz – 8 A
120R, 230 V`60 Hz – 10 A

12
6190760 (Rev A) 120R Basic Compressor User Guide
© 2022 JUN-AIR
We reserve the right to make any alterations which may be due to any technical improvements
Printed in the USA
Pneumatic Diagram Model R-B
13
© 2022, JUN-AIR
We reserve the right to make any alterations which may be due to any technical improvements
Printed in the USA
120 Basic Compressor User Guide 6190760 (Rev A)
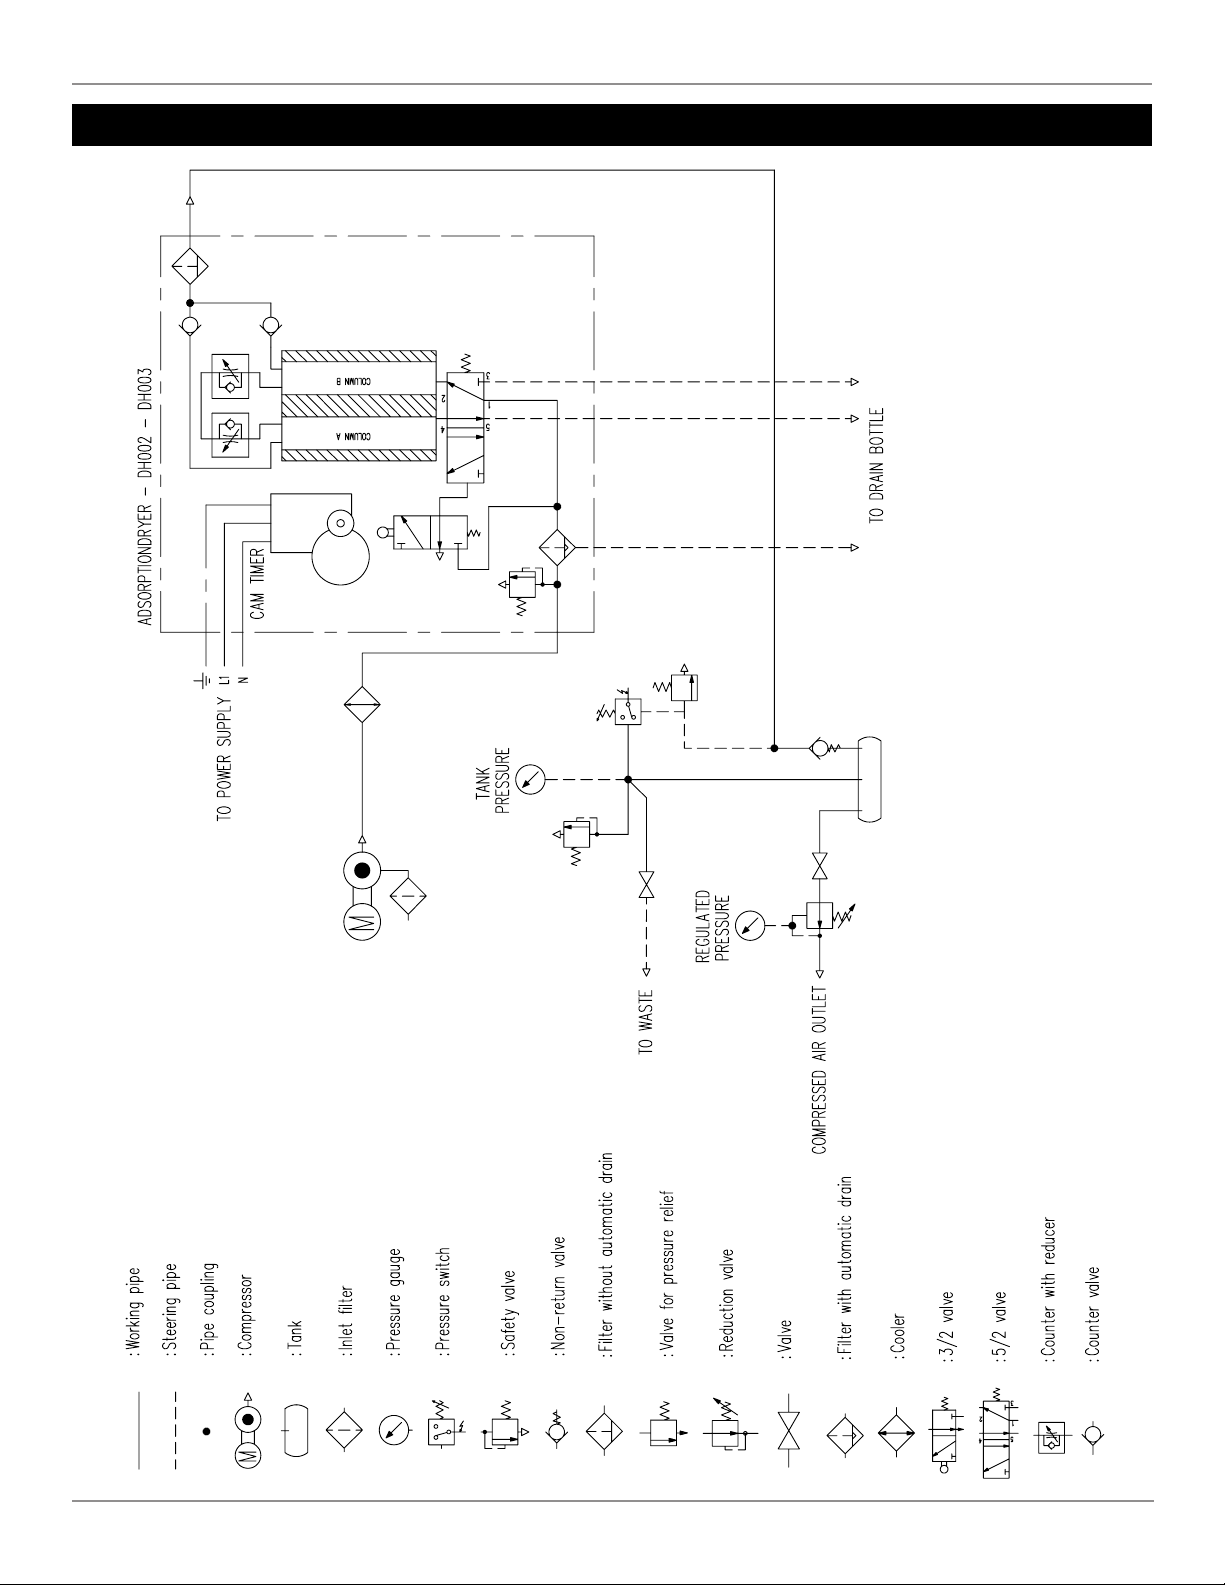
Pneumatic Diagram Model R-BQ

14
6190760 (Rev A) 120R Basic Compressor User Guide
© 2022 JUN-AIR
We reserve the right to make any alterations which may be due to any technical improvements
Printed in the USA
Pneumatic Diagram Model R-BQ

15
© 2022, JUN-AIR
We reserve the right to make any alterations which may be due to any technical improvements
Printed in the USA
120 Basic Compressor User Guide 6190760 (Rev A)
Compressor system
R-
PM-
NNX
Compressor, V, /Hz
Receiver l horizontal CE/ASME
Receiver l silver w/inspection plug internally coated CE/ASME
Receiver l w/inspection plug, CE, silver and internally coated
Regulator R--RNMG, bar
Filter regulator um w/manual drain
Dryer f/xOF-BD/OF-BD - OX - bar
Dryer f/xOF-BD/OF-BD - OX - bar
Dryer /xOF - OX - bar
Rapid fitting Ø mm x Ø mm elbow
Box for motor protector M
Contact . kW V/V
Thermo relay .-.A Danfoss
Box for motor protection -
Connector .Q yellow/green
Connector .Q grey
Plate f/connector
Cage clamp connector
Pressure switch MDR / -way compl.
Pressure switch MDR / w/unloader
Pressure switch MDR / w/unloader
Pressure switch MDR / -way UL
Gauge Ø - bar /” down
Non return valve
Safety valve bar / psi
Safety valve bar / psi
Safety valve bar / psi
Drain cock /” l
Drain cock /” l (new)
Drain cock /” no tube
Outlet cock /”
Safety valve TÜV bar
Safety valve TÜV . bar
Connecting piece /”
Radiator & fan MOF w/camtimer V CE/UL
Randiator & fan xOF-BD with camtimer V
Radiator & fan xOF-BD without camtimer V CE/UL
Drain bottle l multi excl. accessories
Spring f/non return valve
O-ring f/” plug - x mm
O-ring Ø.x. mm
O-ring Ø.x. mm brown f/non-return valve
O-ring f/plug Ø.x. f/OF
O-ring Øx f/ /” plug
O-ring f/” plug
Rubber base Ø
Rubber base complete f/- models
Vibration damper OF
Nut Mx. brass
Screw jointM UL/CSA
Grommet black / mm
Cable grommet black Øxxmm
Cable grommet black Øxxmm
Cable grommet black Ø//xmm
Nut M DIN-
Unbraco plug /”
Washer Ø.xØx. FZB
Flex hose /” () cm
Flex hose /” () cm
Teflon hose /” cm
Teflon hose /” cm
Teflon hose /” cm
Teflon hose /” cm
Teflon hose /” cm with elbow
Teflon hose /” cm with elbow
Teflon hose /” cm with elbow
Teflon hose /” cm with elbow
Unloader complete cm with noise reduction
Unloader valve w/. mm needle
Unloader valve w/silencer OF
Silencer f/unloader valve OF
Double nipple /” L= mm
Double nipple /” w/o-ring track
Double nipple /” L= mm
Connection piece f/non-return valve model
T-piece /”
T-piece /” (xinternal/external)
T-piece Condor
Extension piece f/cock long
Extension piece w/through /”
Plug ” f/inspection
Plug /” f/inspection ASME
Plug ” galvanized
Miscellaneous
Compressor Motor
Capacitor, uF
K Preventative Maintenance Kit
K Service Kit
K Spare Parts Kit
Parts & Accessories List

16
6190760 (Rev A) 120R Basic Compressor User Guide
© 2022 JUN-AIR
We reserve the right to make any alterations which may be due to any technical improvements
Printed in the USA
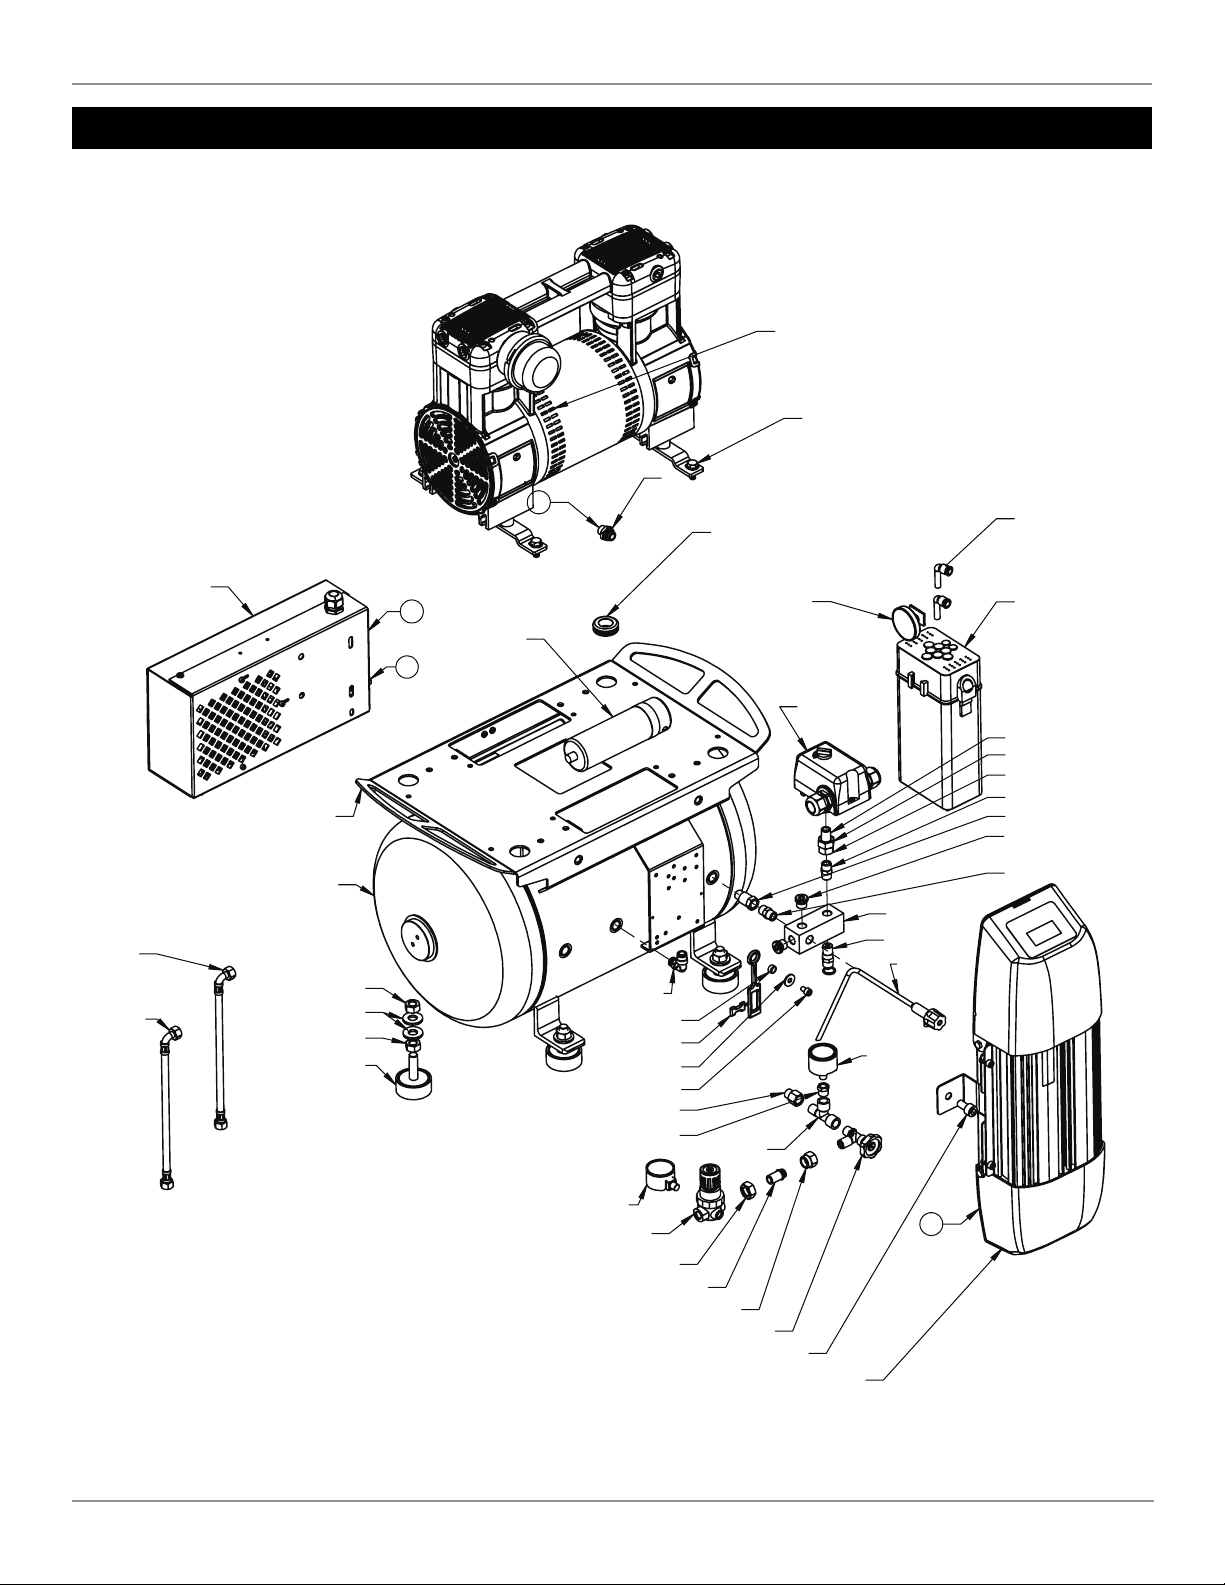
Spare Parts: OF-B
A
A-A
6457065
B-B
645708
0
8111930
3512150
6317000
6253200
5240612
6359000
6317000
120R689-T102-N800NX
6295830
5075010
5427000
7565000
7071000
5414500
5960000
7540000
6357100
6341800
5421004
5140000
7565000
7071601
542400
0
5427001
5427002
5427003
5130000
4071020
5416100
7024000
5424630
7167201
7167201
7024000
7566200
17
© 2022, JUN-AIR
We reserve the right to make any alterations which may be due to any technical improvements
Printed in the USA
120 Basic Compressor User Guide 6190760 (Rev A)
Spare Parts: R-BQ
7024002
O-RING - 6243710
A
5445235
COMPLETE
A-A
645706
5
B-B
645708
0
8111930
3512150
6317000
6253200
5240612
4094150
COMPLETE
5075011
5427003
7024000
7566200
7167201
O-RING 6243710
7024000
5424630
5416100
5421004
4146200
7540000
5960000
6357100
6341800
5140000
7566000
7565000 7071601
5130000
4071020
5427003
5427002
5427001
5424000
6344501
B
A
B
6359000
6317000
5427001
5427002
120R689-T102-N800NX
6342250
6295830
4785900
4146458
5615003

18
6190760 (Rev A) 120R Basic Compressor User Guide
© 2022 JUN-AIR
We reserve the right to make any alterations which may be due to any technical improvements
Printed in the USA
Spare Parts: xR-BQ
A
B
C
D
E
F
G
H
120R689-T102-N800N
X
6342250
4521146
6314200
8110747
8111902
5612328
7565000
5414500
7071500
5445241
6357100
6341800
6357100
6341800
4094212
6355500
6343100
6343100
6355500
8111937
5445240
7180000
3936267
G
D
HOSE FROM PS SIDE MOTOR TO FAN/RADIATOR BOX W/UNLOADER VALVE
BRAIDED HOSE CONNECTING FAN/RADIATOR BOXES
B
E
CABLE FROM PRESSURE SWITCH TO DRYER
NON-RETURN VALVES W/T-FITTING CONNECTING 1 HOSE FROM EACH MOTOR
CABLE FROM DRYER TO FAN/RADIATOR BOX W/UNLOADER VALVE
CABLES FROM MOTOR(S) TO CAPACITOR(S) & TERMINAL BOX
C
LETTER
F
A
BRAIDED HOSE TO DRYER
CABLE FROM TERMINAL BOX TO DRYER
H
ATTACHMENT OR PASS THRU LOCATION

Gast Manufacturing
2300 M139 Highway
Benton Harbor, MI 49023
Ph: 269-926-6171
Fax: 269-927-0808
www.JUN-AIR.com
Gast Group Ltd.
Unit 11, The I O Centre
Nash Road
Redditch, B98 7AS
United Kingdom
Phone +44 (0)1527-504040
Fax +44 (0)1527-525262
® Registered Trademark/™ Trademark of JUN-AIR Inc. ©Copyright 2022 JUN-AIR Manufacturing Inc. All Rights Reserved.
WWW
.
JUN
-
AIR
.
COM
ISO 9001 CERTIFIED
A BRAND OF
®
This manual suits for next models
2
Table of contents
Other Gast Air Compressor manuals


Popular Air Compressor manuals by other brands


Campbell Hausfeld
Campbell Hausfeld HL540200 Operating instructions and parts manual

Boge
Boge EO Series operating instructions

Powerex
Powerex SBBSS030020SD09 operating & maintenance manual

WilTec
WilTec AS196A instruction manual

Urrea
Urrea COMP9303 User's Manual and Warrantly

Prematic
Prematic AIRSTAR 45 Original instructions


