Gastrorag DK04B User manual

INSTRUCTION MANUAL
MANUAL DE INSTRUCCIONES
Dispensador de Café
Percolator
DK04B


Lo felicitamos por su compra de un Dispensador de Café
Gastrorag DK. Estamos seguros de que nuestro producto
satisfará sus más altas exigencias y se convertirá en un
asistente confiable en su cocina. Por favor, lea este manual
detenidamente antes de operar.
Si sigue estas instrucciones, su dispensador de café le será
útil durante mucho tiempo.
¡Gracias por su elección!
Best wishes,
GASTRORAG TEAM
Los mejores deseos,
EQUIPO DE GASTRORAG
Thank you for your choice!
for a very long time.
If you follow the instructions, our percolator will serve you
kitchen. Please read this manual carefully before operating.
highest demands and become a reliable assistant in your
Percolator DK. We are sure that our product will meet your
We congratulate you on your purchase of Gastrorag

Please read the instruction manual carefully before using
and well keep this in a safe place for future reference.
Some figures in this manual may not match with the real
object, just for reference only.
Por favor lea detenidamente el manual de instrucciones
antes de usar el producto y guárdelo en un lugar seguro
para futuras referencias.
Es probable que algunas figuras en el manual no coincidan
con el artículo real, estás son solo una referencia.
Contents
Technical specifications 5
Design 6
Turning on the appliance 7
Caution 9
Cleaning and maintenance 10
Decalcifying 11
Important safety
instructions 12
Environment friendly disposal 14
Warranty 15
Contenido
Especificaciones técnicas 16
Diseño 17
Encender el aparato 18
Precaución 20
Limpieza y mantenimiento 21
Descalcificación 22
Instrucciones de seguridad
importantes 23
Amigable con el medioambiente 25
Garantía 26

EN
5
Electrical parameters: 120V, 60 Hz
Power: 800W
Volume: 1 cup = 5 fl oz
4 cups / 20 fl oz
Gastrorag DK04B Percolator
Technical specifications

EN Design
6
Design
Stainless
Steel Body
Ready Indicator
Light
Handle
On/Off button
Removable
Power Cord
Clear Glass Knob
Lid
Filter cover
Coffee Level
Marking
Coffee Filter
Water Pipe

EN
7
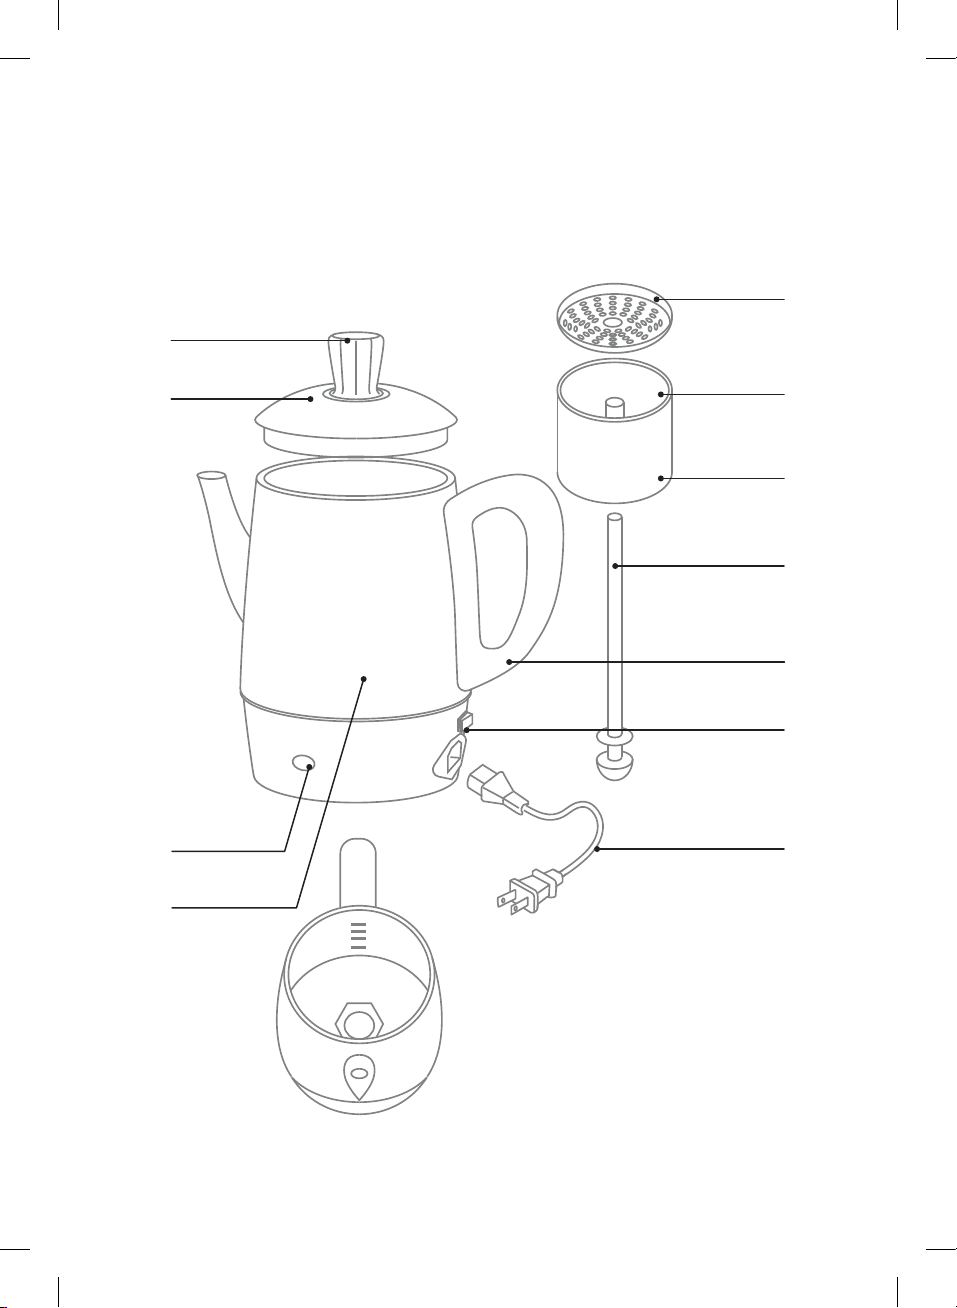
inside the heating element (heating cup).
tube in the body of percolator so that the base
of the tube fits
part of the water pipe, install the coffee filter with the
percolation
3. I
nsert the water pipe into the coffee filter. By holding the
top
coffee filter by at least 4/5
inches.
the coffee filter. The coffee level
should be below the edge of the
be evenly distributed over the filter.Do not put too much coffee in
grinds may sift through the holes of the
coffee filter! Coffee should
grind designed for percolator coffee, or use
a coarse grind. Finer
from sifting through the holes in the coffee filter,be sure to use a
amount of coffee to suit your taste. To prevent small
coffee grounds
water into the coffee filter. For stronger or milder coffee,adjust
2. P
our 2/5 ounces of medium-ground coffee per 20 fl oz (4 cups)of
percolator.
be monitored by means of the measuring markers
inside the body of
must not exceed the maximum level. The filling level of
the body can
drinking water. Do not fill the body with hot water! The water
level
the water pipe from the appliance body. Fill the body with cold
1. R
emove the lid. Remove the coffee filter along with its cover and
Turning on the appliance
instructions in section "Cleaning and maintenance".
3. Cleaning and maintenance is carried out in accordance with the
protective film from the stainless steel surfaces.
2. Remove the accessories from the packaging. Remove the
of 25-35 inches with a flat horizontal surface.
1. Unpack the appliance and place it on a stable stand with a height
BEFORE FIRST USE
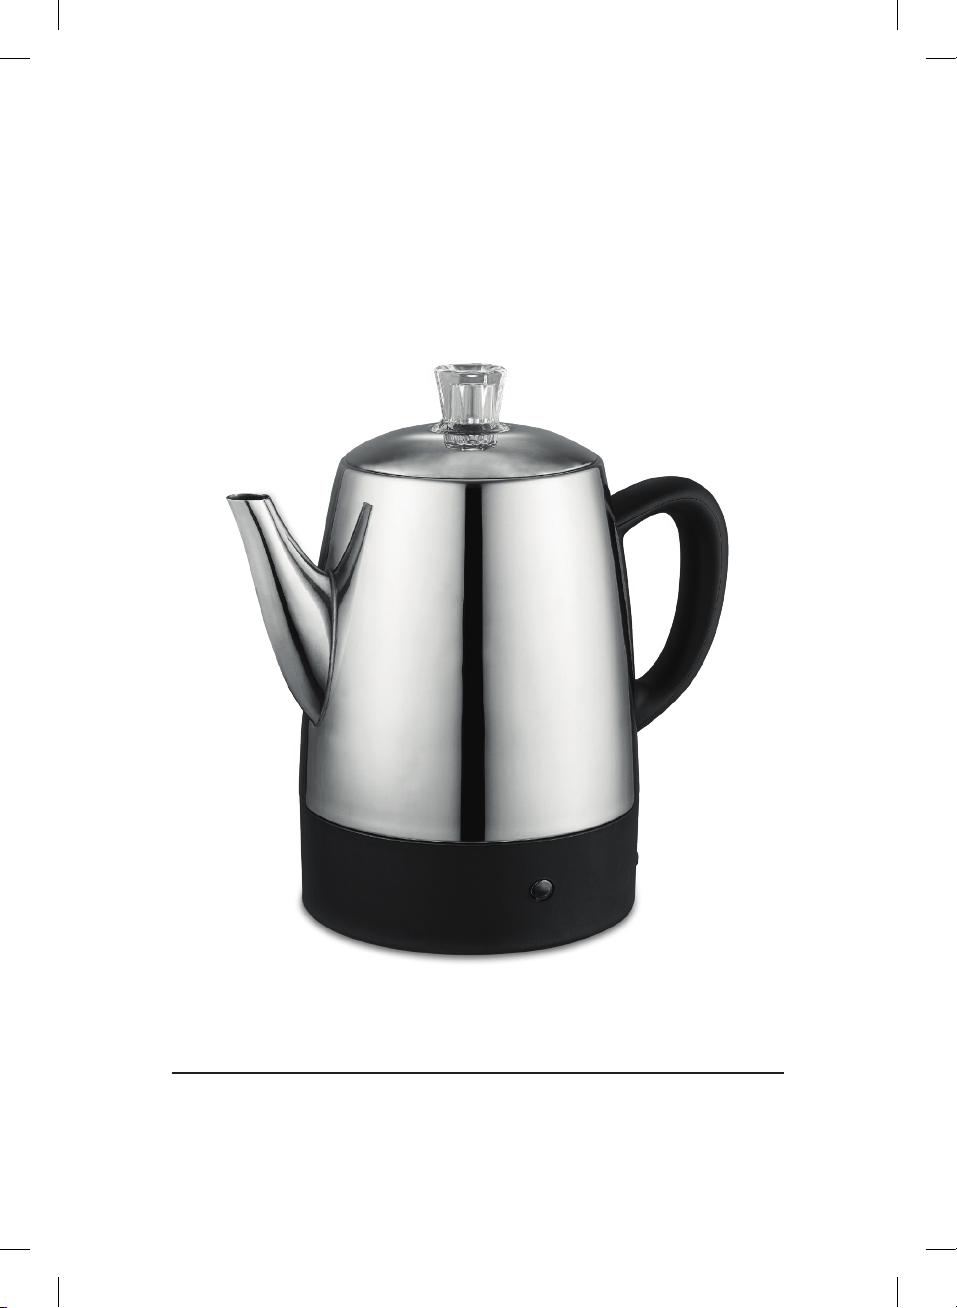
Know your percolator
Turning on the appliance

EN
Turning on the appliance
8
Replace the percolator lid, press down to lock it. Do not
remove the lid while making coffee!
4. Plug one side of the power cord into the socket of the percolator,
and then plug another side into a standard household 120 V/AC
wall outlet.
5. Turn on the power switch. The brew cycle starts within a few
seconds. Ensure the percolating process has stopped completely
before removing the cover!
6. When the coffee is ready, the blue indicator light will turn on
and the appliance will automatically enter the drink heating
mode to keep the coffee hot. Normally, the ready-to-serve
temperature will be around 194 °F, and then the percolator will
switch to keep warm function. When you unplug the cord from
the base of the percolator to serve the coffee, the temperature
of the coffee will decrease, and if the temperature decreases
by more than 68 °F and then you plug in the cord again, the
percolator will start brewing coffee again. On the other hand,
if the coffee temperature decreases by less than 68 °F, the
percolator will stay on keep warm function when you plug in the
power cord again.
7. Unplug the percolator after use or when you do not want to use
the keep warm function.
TURNING OFF THE APPLIANCE
1. Turn off the power switch.
2. Disconnect the power plug from the outlet.

EN
Caution
9
Caution
For household use only!
Remove all protective wrappings before brewing!
Do not touch the body of percolator, as it gets hot during operation!
To reduce the risk of fire or electric shock, do not remove the
bottom cover!
No user serviceable parts inside. Repair should be carried out by
authorized service staff!
THIS MANUAL INCLUDES THE FOLLOWING WARNING
SYMBOLS THAT CAN BE FOUND ON THE DEVICE.
Indicates a potentially hazardous situation/action which, if
not avoided, may result in serious injury or death
Indicates a potentially hazardous situation/action which, if
not avoided, may result in heavy burns due to contact with
hot surfaces or liquids
Indicates a potentially hazardous situation/action which,
if not avoided, may result in personal injury, equipment or
environmental damage
They indicate important information. Please read it carefully.

EN
Cleaning and maintenance
10
Cleaning and maintenance
Always make sure that the appliance is unplugged and cooled
down to room temperature before cleaning it!
Do not use abrasive materials, piercing and cutting objects,
aggressive cleaning agents, gasoline, acids, alkalis and solvents
to clean equipment. Wipe the main part of the appliance
regularly with a clean, damp cloth or sponge. The brewing unit,
percolation tube and lid should be washed daily with warm
soapy water and thoroughly rinsed with clean water at the end
of work.
Do not immerse the main body, control box, power cord or
plug in any liquid!
Clean the internal surface of the percolator after each use.
Always keep the percolator base dry.
MAIN TIPS
• Clean the percolator body with a damp cloth.
• Clean the lid, the coffee filter, the water pipe with warm water.
The coffee filter, filter cover and water pipe are top-rack
dishwasher safe!
• Pour some clean water into the pot, clean the inside surface
and the heating cup gently with a soft brush.
• To clean the surface of the control box, unplug the power cord
prior to cleaning and use a dry cloth to wipe it off.
Any other servicing should be performed by an authorized
service representative.
NOTE
WARNING

EN
Decalcifying
11
Decalcifying
Scale ("water stone") may build up inside the coffee machine.
Special cleaning of your percolator is recommended at least twice
a year, depending on frequency of use and quality of water used
in the unit. If water in your area is especially hard, the following
cleaning procedure should be performed more often, since minerals
in water can affect the coffee flavor and possibly increase the
brewing time.
FOR DECALCIFYING, PROCEED AS FOLLOWS:
1. Fill the percolator with 1 part white vinegar to 3 parts cold water
up to the 4-cup level.
2. Close the lid, press down to lock it.
3. Plug one side of the power cord into the socket of the percolator,
then plug another side into an appropriate outlet.
4. Turn on the power switch.
5. When the blue indicator light turns on, turn off and unplug the unit.
6. Discard water.
7. Follow the same procedure as step 1 to 5 using clean water only
and repeat three times or until water is clean and fresh and no
residual vinegar odor or flavor remains.
8. Unplug the coffee maker when not in use.
9. Dry parts thoroughly. Wipe the percolator’s exterior with a dry
cloth.
STORING INSTRUCTIONS
1. Unplug the unit and allow to cool down.
2. Never wrap cord tightly around the appliance. Do not put any
stress on the cord where it enters the unit, as it could cause the
cord to fray and break.

EN
Important safety instructions
12
3. Store the filter with the unit.
4. Store the percolator in a cool, dry place.
5. Never store the unit while it is still plugged in.
Important safety instructions
When using electrical appliances, basic safety precautions
should always be followed to reduce the risk of fire, electric
shock and/or injury to persons, including the following:
ELECTRICAL SHOCK HAZARD:
1. Make sure that your outlet voltage corresponds to the voltage
stated on the rating label of the Coffee Urn.
2. To protect against electric shock, do not immerse the cord, plug,
or any part of the Coffee Urn in water or other liquid.
3. The appliance has a polarized plug (one blade is wider than the
other). To reduce the risk of electric shock, this plug is intended
to fit into a polarized outlet only one way. If the plug does not
fit fully into the outlet, reverse the plug. If it still does not fit,
contact a qualified electrician. Do not attempt to modify the
plug in any way.
HEALTH HAZARD:
1. The use of accessory attachments not recommended by the
appliance manufacturer may cause injuries.
2. To protect against fire, electric shock or injury to person, do not
immerse the cord or plug in water or other liquids.
3. Close supervision is necessary when the coffee maker is in use or
when coffee is hot. Do not allow children to use coffee maker or
use near children.
4. Scalding may occur if the lid is removed during the brewing cycles.
5. Do not open the lid when the coffee maker is heating, or the
boiling water will spray out.

EN
Important safety instructions
13
HOT SURFACE HAZARD:
The surfaces may get hot during the use. Use handles or knobs only.
IMPORTANT SAFETY INSTRUCTIONS:
1. Unplug unit from the outlet when not in use and before cleaning.
Allow to cool before putting on or taking off parts, and before
cleaning the coffee urn.
2. Do not use any appliance with a damaged cord or plug, or in
abnormal state. If its main cord is damaged, it must be replaced
by a qualified person.
3. To disconnect, switch to the ‘off’ position, then remove the plug
from wall outlet.
4. Do not let the cord hang over the edge of the table or counter,
or touch hot surface.
5. Do not place on or near a hot gas or electric burner,
or in a heated oven.
6. Do not use the appliance for other than its intended use.
7. Never plug on the coffee maker without any water inside its pot,
or the appliance will turn off automatically, in which case you
must unplug the appliance and let it cool down. Heating element
may be damaged after day heating.
8. Do not pour water beyond the max. level.
9. Do not move the coffee maker while in use or when coffee is still hot.
10. The appliance is not intended for operating by means of an
external timer or separate remote- control system.
11. Don’t use the appliance outdoors.
12. Use water only in this appliance. Do not put any other liquids or
food products in this appliance. Do not mix or add anything to
the water placed in this appliance, except as instructed in the
User Maintenance Instructions to clean the appliance.

EN
Environment friendly disposal
14
13. A short power cord is to be provided to reduce the risk resulting
from becoming entangled in tripping over a long cord.
• A short power-supply cord (or detachable power-supply
cord) is to be provided to reduce the risk resulting from
becoming entangled in or tripping over a longer cord.
• Longer detachable power-supply cords or extension cords
are available and may be used if care is exercised in their use.
• If a longer detachable power-supply cord or extension cord
is used, 1) The marked electrical rating of the cord set or
extension cord should be at least as great as the electrical
rating of the appliance, and 2) The cord should be arranged
so that it will not drape over the countertop or tabletop
where it can be pulled on by children or tripped over
unintentionally.
14. SAVE THESE INSTRUCTIONS
Environment friendly disposal
You can help protect the environment!
Please remember to respect the local regulations: hand in
the non-working electrical equipments to an appropriate
waste disposal centre.

EN
Warranty
15
Warranty
ARE YOU SATISFIED WITH OUR PRODUCT?
YES That's great to know. We would love to hear more from
you. Please, share your feedback and post your reviews on
Amazon to tell us what do you think about our product.
Simply log into your account and leave a review.
NO If for any reason there is ANYTHING missing, incorrect,
not fitting, different than you expected, PLEASE reach out
to us. We'd love to have the opportunity to take care of
you and provide total satisfaction. Simply go to your order
page, and send us a message.
WE PROVIDE 1 YEAR QUALITY WARRANTY FOR FREE
If you have any questions about our after sales warranty service
please contact us on Amazon or via email service@gastrorag.com
Free after sale service won't be provided under the following
circumstances:
• Artificial damage;
• The damage caused by inappropriate preservation, maintain, or
the usage;
• The damage caused by the manipulation that has not followed
the User Manual;
• Warranty period expired.

ES
16
Especificaciones técnicas
Parámetros eléctricos: 120V, 60 Hz
Potencia: 800W
Volumen: 1 taza = 5 fl oz
4 tazas / 20 fl oz
Gastrorag DK04B
Dispensador de Café

ES
17
Diseño
Diseño
Tanque de Acero
Inoxidable
Luz Indicadora
de Preparado
Mango
Boton de
Encendido/Apagado
Cable de Alimentación
ExtraíblePower Cord
Perilla de Vidrio
Tapa
Cubierta
del Filtro
Marcador de
Nivel de Café
Filtro de Café
Tubo de Agua

ES
18
Encender el aparato
Conoce a tu dispensador
de café
ANTES DE SU PRIMER USO
1. Desempaque el artefacto y colóquelo en un soporte estable
a una altura de 25-35 pulgadas con una superficie horizontal
plana.
2. Retire los accesorios del empaque. Retire la cinta protectora de
las superficies de acero inoxidable.
3. La limpieza y mantenimiento se debe realizar siguiendo las
instrucciones de la sección "Limpieza y mantenimiento".
Encender el aparato
1
. Retire la tapa. Retire el filtro de café junto con la tapa y la tubería
de agua del tanque del aparato. Llena el tanque con agua fría
potable. ¡No llene el tanque con agua caliente! El nivel del agua
no debe exceder el nivel máximo. El nivel de llenado del tanque
puede controlarse mediante los marcadores de medición dentro
del tanque del percolador.
2. Vierta 2/5 onzas de café por 20 fl oz (4 tazas) medio molido
en el filtro de café. Para un café más fuerte o más suave, ajuste
la cantidad de café a su gusto. Para evitar que los granos de
café pequeños se filtren a través de los agujeros en el filtro de
café, asegúrese de usar un molido diseñado para percolador
de café, o use un molido grueso. ¡Las más finas pueden pasar
por los agujeros del filtro de café! El café debe distribuirse
uniformemente sobre el filtro. No ponga demasiado café en el
filtro. El nivel del café debe estar al menos 4/5 pulgadas por
debajo del borde del filtro de café.
3. Inserte la tubería de agua en el filtro de café. Sosteniendo la
parte superior de la tubería de agua, instale el filtro de café con

ES
19
Encender el aparato
el tubo de percolación en el cuerpo del percolador haciendo
que la base del tubo encaje dentro del elemento calentador
(taza calefactora). Vuelva a colocar la tapa del percolador,
presione hacia abajo para bloquearla. ¡No quite la tapa mientras
este en funcionamiento!
4. Enchufe un lado del cable de alimentación al percolador y luego
enchufe el otro lado a un toma de corriente doméstico estándar
de 120 V/CA.
5. Presione el interruptor de encendido. El ciclo de preparación
comenzará en unos pocos segundos. ¡Asegúrese de que el
proceso de filtración se haya detenido por completo antes de
quitar la tapa!
6. Cuando el café esté listo, la luz indicadora azul se encenderá
y el aparato entrará automáticamente en modo de
calentamiento de bebidas para mantener el café caliente.
Normalmente, la temperatura adecuada para servir será
de alrededor de 194 °F, y luego el percolador cambiará de
función para mantener la temperatura. Cuando desconecte
el cable de la base del percolador para servir el café,
la temperatura del café disminuirá, y si la temperatura
disminuye a más de 68 °F y luego vuelve a enchufar el cable,
el percolador comenzará a preparar café de nuevo. Por otro
lado, si la temperatura del café disminuye a menos de 68 °F,
el percolador permanecerá encendido para mantener la
función de calentamiento cuando vuelva a enchufar el cable
de alimentación.
7. Desenchufe el percolador después de usarlo o cuando no quiera
usar la función de mantener caliente.
APAGAR EL APARATO
1.
Apague el interruptor de encendido.
2. Desconecte el enchufe del tomacorriente.

ES
20
Precaución
Precaución
¡Solo para uso doméstico!
¡Retire todas las envolturas protectoras antes de encender!
¡No toque el cuerpo del percolador, ya que se calienta durante el
funcionamiento!
Para prevenir el riesgo de incendio o descargas eléctricas, ¡no retire
la cubierta inferior!
No cambie las piezas internas por otras ni haga reparaciones por si
mismo. ¡La reparación debe ser realizada por personal de servicio
autorizado!
EL MANUAL INCLUYE LOS SIGUIENTES SÍMBOLOS DE
ADVERTENCIA QUE SE PUEDEN ENCONTRAR EN EL
DISPOSITIVO.
Indica una situación/acción potencialmente peligrosa que,
si no se evita, puede provocar lesiones graves o la muerte
Indica una situacion/accion potencialmente peligrosa que,
si no se evita, puede provocar quemaduras graves debido
al contacto con superficies calientes o liquidos
Indica una situacion/accion potencialmente peligrosa que,
si no se evita, puede provocar lesiones a personas, equipos
o danos al medio ambiente
Destacan información importante. Por favor léalo atentamente.
Table of contents
Languages: