Gater GHDVR355 User manual

QUICK START GUIDE
GHDVR355
gatordriverassist.com
For more information
on the Gator range
go to our website
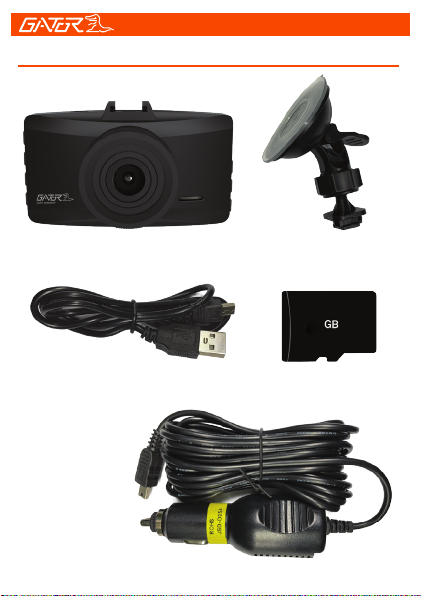
INCLUSIONS:
Dash Cam, Suction Mount, USB cable
12/24V In-Car Charger, 16GB Micro SD Card

2
Table of contents
Table of contents.......................................................2
Product information...................................................3
Product features........................................................3
System contents........................................................4
Optional accessories.................................................5
Product structure.......................................................6
Fixing the Dash Cam.................................................8
Installation of Dash Cam...........................................8
Video recording mode.............................................10
Video mode setting & setup.....................................10
Photo mode.............................................................11
Video & photo playback...........................................11
Loop recording function...........................................12
G-Sensor function....................................................12
Formating the SD card.............................................13
Internal battery.........................................................13
Factory reset............................................................13
Connecting to a PC..................................................14
Locking video footage.............................................14
Product specifications..............................................15
Trouble shooting guide............................................16
Safety information & warnings.................................22
Infringement of copyright warning...........................23
Technical assistance...............................................23

3
Product information
For more information, videos and user guides, visit our
website, gatordriverassist.com/GHDVR355 or scan the
following QR code:
!
Please ensure that you have
read the products quick start
guide and instructions prior to
installation and use.
Failure to do so may result in the
product incorrectly operating or
an installation that renders the
device unusable.
Product features
HD 1920 x 1080P
3.0" High-resolution LCD screen
100 Degree wide angle lens
Time and date stamp
Mini USB interface
G-Sensor function
Seamless cycle loop recording
Suction car mount
DC 12/24V car charger
16GB Memory card included
Supports Micro SD card class10 up to 32GB
4
!
System contents
Suction Mount
USB to Mini USB
Car Charger
16GB Micro Memory
GHDVR355 Dash Cam
16
!
5
!
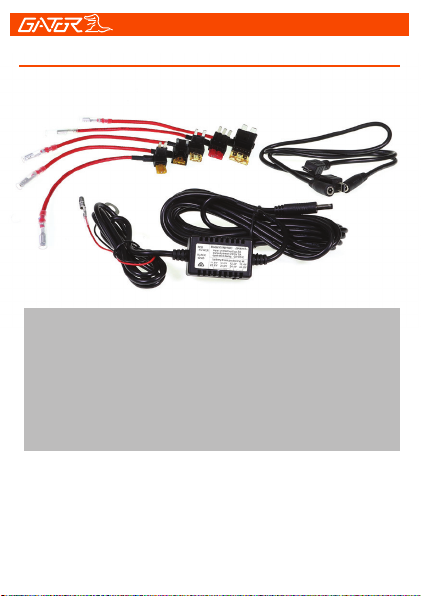
NOTE: The GUNIHWC Hardwire Kit is a simple plug
and play solution to hardwire any Dash Cam or device
using Mini or Micro USB for power. The GUNIHWC
replaces the cigarette plug function and allows any
unsightly cables to be hidden. The Hardwire Kit is
compatible with 12V/24V DC for car or truck
installations.
Optional accessories (Sold separately)
6
1
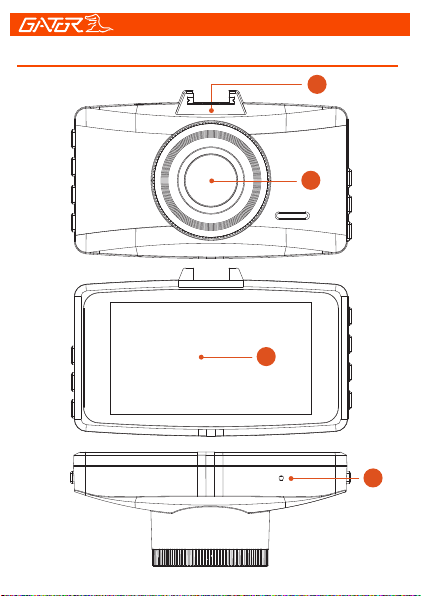
Product structure
1) Mounting Slot
2) Lens
3) Screen
4) Reset hole
2
3
4
7
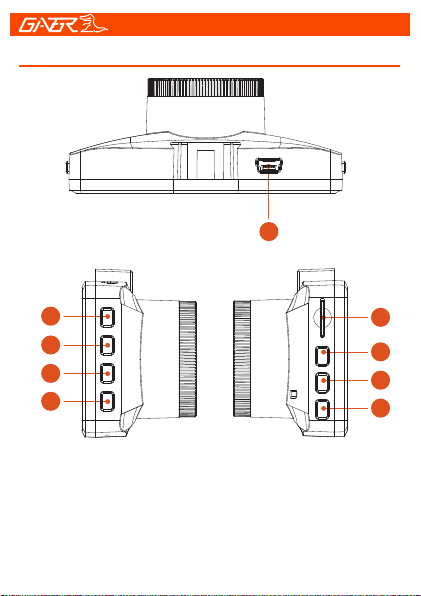
Product structure
5) Mini USB input
6) OK Button
7) Mode Button
8) Emergency Lock
9) Power On/Off button
10) Micro SD Card Slot
11) Up arrow button
12) Menu Button
13) Down arrow button
5
6
7
8
9
10
11
12
13
8
Suggested
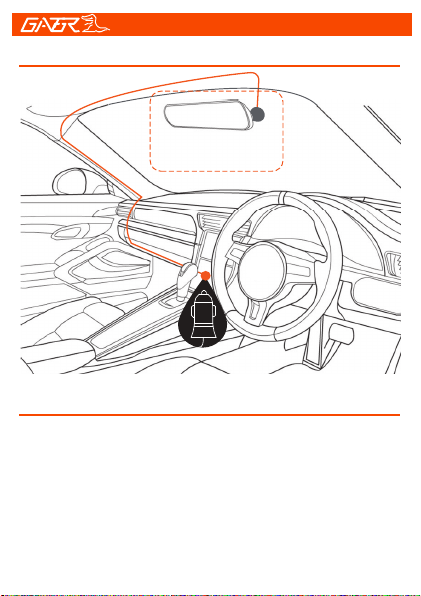
Fixing the Dash Cam
Installation of Dash Cam
1. Check orientation of the Dash Cam camera first before
installation.
2. Ensure windscreen is clean and free of debris. Use an
Alcohol wipe to enhance adhesion.
3. Place the suction mount bracket on the Dash Cam.

9
4. Fix the suction mount where the vision is not blocked
(Place close to rear-view mirror is recommended) and lock
in place. Do not install the device on airbag or within its
working range.
5. Insert Micro SD card into the Dash Cam
6. Insert Mini USB end of the power cord into the Mini USB
interface/ charging point of the Dash Cam. Connect
charging end of the cable into 12/24V power socket of
vehicle.
7. Adjust the mounting bracket and rotate the camera
direction to get the best view. Ensure 1/4 of the vehicles
bonnet is visible from the bottom of the screen for
alignment.
8. Turn vehicles ignition to accessories and the Dash Cam
will power ON and start recording automatically, you will
hear an audible tone once powered.
9. A red circle will also flash on the screen and a red timer
will appear when recording has started.
10. For the Dash Cam to work it must receive power from
the charging adapter. Once power is removed or turned off
the Dash Cam will save the current file and turn off.

10
Video Recording mode
Video mode settings & setup
There is a video camera icon at the top left corner of the
LCD to signify you are on video mode. A red circle will
flash on the screen and a red timer will appear when
recording has started.
-To stop the recording, simply press the [OK] button.
-To resume press recording press [OK] button.
-When recording press the [Lock] button to lock and
unlock the recorded video. A key symbol will appear when
activated.
-Press the [Up] button,turn on/off the audio record
Note: To see how to use and adjust settings, go to the
product page on our website to view the How To Video.
To enter the video settings, stop the recording. Press the
[Menu] button. Press the [Up] and [Down] arrow buttons
to navigate the sub menus. Press the [OK] button to enter
the settings of each sub menu. Use the [Up] and [Down]
arrow buttons to select different settings and press the
[OK] button to confirm selections.
-To enter the video setup, stop the recording. Press the
[Menu] button twice. To navigate and change setup is the
same as mentioned above.
-To exit the menu’s press the [Menu] button

11
Photo mode
Press the [Mode] button to change from video to camera
mode. There is a photo camera icon at the top left corner
of the LCD to signify you are in photo mode.
-To take a photo press the [OK] button and you will hear a
shutter click sound.
Video and photo playback
To view your recorded videos and photos press the
[Mode] button.
Press the [Up] and [Down] arrow buttons to scroll through
recorded videos and photos.
Press the [OK] button to play/pause the video.
Short press the [Up] and [Down] arrow buttons to
increase and decrease playback volume.
Press the [Menu] button to display options to delete or
protect the locked file.

12
Loop recording function
G-Sensor function
This feature allows you to set the size of the files your
Dash Cam will record before saving and creating a new
file. It allows the Dash Cam to record over the oldest
recorded files once the card is full. This can be turned
OFF, or record 1, 2, 3, 5 or 10 minute video files. If you
want to keep any of the files it is best to upload them to
your computer. We recommend the Dash Cam to be set
to ‘3’ minute files.
Note: With this function turned off it may fill up the
SD card as no files will be overridden. Once the
card is full the Dash Cam will stop recording.
This function activates in the case of a car accident by
determining the gravitational acceleration (1g = 9.8
meters/second^2). When this function activates the
Dash Cam will automatically sync a 10 second video
clip and save it to the Event folder on the SD card. We
recommend Low Sensitivity to avoid false triggers.
Note: With this function turned on it may fill up the
SD card with locked video files. Re-format the SD
card to create space. The device does NOT
guarantee video recording of all accidents as
built-in impact sensor may not be activated due to
combination of user settings and the level of impact
during the collision.

13
Formatting the SD card
Internal battery
The internal battery is small and only designed to provide
enough power to securely save the last recording when
power is disconnected and to retain date and time settings.
The Dash Cam is designed to be connected to power at all
times when operating. If the Dash Cam is not used for an
extended period of time the battery may become
completely discharged which will cause the time and date
on the device to default to the factory settings. If this
occurs please completely recharge the Dash Cam before
use.
You should do this at least every 2 to 3 months
It is recommended you do this to keep the card in good
running order and to ensure you purge any locked footage
that may have been saved in the past that you no longer
need and is taking up space. Note: Back up files you wish
to keep prior to formatting, as formatting will delete ALL
files on the SD Card.
To hard reset the device back to its original settings in the
case of a system jam or crash. Insert a fine point paper clip
into the reset hole next to Micro SD card input with the
Dash Cam on.
Factory reset

14
Connecting to a PC
To access video and images from your Dash Cam, connect
the USB cable to your computer. Two options will appear
on the Dash Cam screen. Press the (OK) button select
Mass storage and a folder called No-Name will appear on
your computer. Select PC camera to use Dash Cam as a
web cam.
Or alternatively remove the SD card from the Dash Cam
and the SD card into a card reader to connect to your
computer. Again a folder called No-Name will appear on
your computer. Inside this folder will be your recorded
movie files (AVI), and picture files (JPG)
Locking video footage
Press [Lock] button on the side of the Dash Cam to
activate the lock footage function. A key icon will display on
the screen. This will lock the file currently being recorded to
prevent it being recorded over. To remove locked footage
from the Dash Cam you must format the card on the device
or a computer.

15
Product specifications
GPL6248 + GC2023DSP + Sensor
3-inch LCD screenDisplay
BlackColor
AVIVideo
Resolution 1080 HD 1920x1080 at 24fps
12MPicture
JPGPicture format
100 degree view angleViewing Angle
G-Sensor, Loop recordingFunctions
MultipleOSD Language
Built-in Microphone and speakerAudio
Micro SD card (16GB included)
Up to 32GB Class 10 Max
Storage
Mini USB
Input / Output
Lithium Battery 200mAh, 3.7VBattery
5.0*8.0*4.0CM(H*W*D)Dimension
Car mount, Car charger, USB cableAccessories

16
Under normal operating conditions, if there are problems
with the device, please refer to the following methods to
resolve them.
Problem: Cannot take pictures or record video?
Solution: • This kind of issue is almost ALWAYS an issue
related to the Memory card. Please check whether there is
enough space on the micro SD. As mentioned earlier some
footage is write protected and accumulates on the SD card
over time.
• Format the SD card to be sure the card is no longer full of
write protected footage.
• If the device keeps Stopping automatically while
recording or it is recording Jumpy footage with dropped
frames, this may be due to the SD cards write speed.
• You must use a high-speed micro SD card. To tell if you
have the required high-speed card, check if it has the
‘Micro SDHC/XC’ logo on the SD card. Cards are often
labelled as HD video capable but that is not always true.
HD recording requires a Card with class 10, the card
should have this printed on it somewhere.
Trouble shooting guide

17
PLEASE NOTE: SD cards have a finite life. Their life is
based on the amount of times the card is written to.
The SD card WILL eventual wear out over time.
Dash Cams are very heavy users of the SD card
because they are constantly writing to memory. Some
cards have a longer life than others. The longest life
cards are often labelled as “ENDURANCE” or “HEAVY
DUTY”
Trouble shooting guide

18
Troubleshooting guide
Problem: The suction mount will not stay attached to the
windscreen
Solution: • Ensure windscreen is clean and free of debris,
use glass cleaner or an alcohol swab to clean.
• Ensure that the plastic film has been removed from the
suction mount.
• When mounting hold the bracket firmly to the windscreen
before rotating the tightening lock.
Problem: The Dash Cam will not power on
Solution: • Vehicle Accessory Socket - Check the vehicle
accessory socket has power, simply plug another device
and see if it powers up (or use a test light / multimeter to
check for power).
• Dash Cam Power Cable - Check the fuse in the tip of the
accessory plug, it may need to be replaced.
• Dash Cam - Connect the Dash Cam to a computer via the
USB cable to see if it powers up.
Problem: The Dash Cam shuts down when connected to
the vehicle and the battery will not charge
Solution: • The battery will only charge while the vehicle is
switched on.
• If the vehicle is not frequently used the Dash Cam battery
will fully discharge and may need to be connected to a
domestic USB charger (such as a smartphone charger) for
approximately 4 hours to fully charge.

19
Troubleshooting guide
Problem: The Dash Cam battery only lasts for a few
minutes when power is disconnected
Solution: • This is normal. Batteries in Dash Cams only
hold enough power to safely shut down the Dash Cam,
securely save the last file when power is disconnected and
retain settings.
• The Dash Cam is designed to be connected to power at
all times while being used.
Problem: The time & date settings reset every time the
Dash Cam is powered on
Solution: • The time and date settings will reset when the
Dash Cams battery is flat. Make sure the Dash Cams
battery is fully charged in order to retain the time and date
settings.
Problem: The Dash Cam menu cannot be accessed
Solution: • While the Dash Cam is recording the Menu can
not be accessed. Stop recording before pressing the Menu
button.
Problem: The Dash Cam screen turns off after a few
minutes when the Dash Cam is powered on
Solution: • Dash Cams have an automatic screen saver
feature. This helps reduce heat in the Dash Cam and also
makes the Dash Cam less distracting to the driver.
• If you prefer the screen remain on, this can be changed in
the Dash Cam settings under “Screen Saver”.

20
Troubleshooting guide
Problem: The Dash Cam feels warm when it is operating
Solution: • It is normal for the Dash Cam to feel warm to
the touch during typical use, especially when it is recording
HD video.
Problem: The Dash Cam stops automatically while
recording
Solution: • Check to see whether there is enough space
on the Micro SD card.
• Ensure correct Micro SD card is being used, 8-32Gb
Class 10 or above Micro SDHC is recommended. Other
types of Micro SD cards may not be suitable for use in
Dash Cams.
• If the correct Micro SD Card is being used, format the
Micro SD Card in a computer.
• Micro SD cards have a limited lifespan and become
corrupt after a period of time. This is due to the continuous
loop recording function. If this has occurred, you will need
to replace you Micro SD Card.
Problem: The Micro SD card is not recognised by the
Dash Cam
Solution: • Format the Micro SD card before using. Be
sure the Micro SD card is compatible with the device, see
“Stops automatically while recording” fault.
Table of contents
Other Gater Dashcam manuals


