Gator GTRACK 4G Operational manual

1
+

2
Introduction
Thank you for purchasing the Gator GTRACK GPS Tracker.
Please ensure that you have read the product manual and
instructions in full, prior to installation and use. Failure to
do so may result in product failure/damage or incorrect
operation and therefore impact the product performance.
Product Overview
The Gator GTRACK GPS Tracker has been designed to offer
an efficient, effective vehicle tracking system for managing
your business fleet. A 3G/4G GPS tracking solution allows
you to locate and track the whereabouts of your vehicle in
real time via the Internet on a Computer Web Browser or
Smartphone.
Product Features
- 3G/4G telco network compatible
- Requires active Mobile SIM card
(not included)
- Real-time tracking with history
route
- Lithium-ion rechargeable battery
- 3 hour battery backup
- Built-in motion/shock sensor
- Alert modes; shock,
displacement, low battery, power
off, over speed alert
- Built-in cellular and GPS
antennas
- Main power cut off alert
- ACC on detection
- Power saving sleep mode
- Geo-fence capable
- Remote vehicle immobilisation
- A-GPS locating
- Device dimension 75x40x12mm
- Device weight 39.5g

3
Document Contents
Page Section
2 Introduction
2 Product Overview
2 Product Features
3 Document Contents
4 Product Box Contents
5 SIM card Information
6 SIM Plan Checklist
7 Device Setup
8 Device Installation
9 Installation Wiring
10 Device Configuration
11 SMS commands
12 Installation and Setup Checklist
13 App and Website Interfaces
14-19 Smartphone App
20 Troubleshooting Guide
21 Cautions
21 Specifications
22 Technical Assistance

4
1x Tracker Device
1x Immobiliser
Relay + Wiring
Harness (optional
to install)
1x Main Power
Harness with
Inline Fuse
1x Adhesive Pad
for mounting
1x Product User Manual
Product Box Contents

5
SIM Card Information
The GTRACK device requires an active SIM card installed in
order to connect to the internet for communication to your
preferred interface.
A 3G capable SIM card is required, most SIM cards in the
market today are 4G with 3G backwards compatibility, so
almost every SIM will work.
The SIM plan you choose will need to include all Voice, Data
and SMS facilities, just a Data SIM will not function. The SIM
plan you choose can be either a pre-paid or post-paid plan,
depending on usage usually $5-$10 per month is sufficient for
pre-paid.
The SIM card must be of the “Standard SIM” variety. This
Standard SIM form factor is about 25mm by 15mm in size.
Don’t insert any Mini or Nano SIM cards into the slot unless
secure in a Standard size adapter.
The GTRACK4G operating frequency is: WCDMA
850/900/1900/2100 MHz. If the tracker SIM is outside of this
frequency range it will not work. For best coverage use Optus/
Virgin & Vodafone. Telstra will only work in areas where the
operating frequency is 2100MHz (generally built up/metro
areas).
Depending on the network provider, you may need to first
install the SIM Card into a mobile phone to receive the SIM
card activation SMS. Please ensure the SIM card is activated
before installing it into the GTRACK.
Always ensure that the SIM Card has sufficient SMS & Data
credit/allowance so that the system will maintain it’s full
functionality.

6
SIM Plan Checklist
Follow this checklist as you are choosing which SIM plan
and provider you will go with.
SIM plan must have Voice, Data and SMS facilities
Service provider has good mobile coverage in your
local region (where the vehicle will be most often)
SIM card is of the Standard size form factor
SIM plan must work on at least one of these
frequencies; 850/900/1900/2100 MHz.
If you have a GTRACK3G and wish to use Telstra,
please ensure the SIM will work on at least one of
these frequencies; 900/1900/2100 MHz.
SIM plan must have at least 2GB of Data allowance
Choose a Service provider who plan to maintain
their 3G network coverage for longer

7
Device Setup
Insert the SIM card
Hold the Tracker in the orientation shown below.
Hold the SIM card as shown with the copper
contacts facing up and the cut-off notch to the
forward right.
Fully insert the SIM card into the card slot and close the
rubber cover.
Note: This USB
port is only for
service use and
should not be
connected to.
The two indicator LEDs can show you the
communication activity of the tracker once installed:
GREEN/YELLOW BLUE
Solid = No Data connection Searching for satellites
Flashing = Active Data connection Active Satellite connection
Off = Powered off/Sleep mode Powered off/Sleep mode

8
Device Installation
The installation location must be
chosen with a clear radio line of
sight to the orbiting satellites.
That is to say, the install location
can’t have any metal panels or
chassis between the tracker and
the sky above.
Any plastic or glass vehicle parts
do not interfere with the
communication signals and do
not need to be avoided.
Please consider these factors
when choosing an appropriate
installation location.
1. Can be seen by passerby.
2. Hidden, signals not blocked.
3. Signals blocked by metal.
Mount the tracker in the vehicle
The tracker can now be installed somewhere in the target
vehicle where it can easily be accessed for service
purposes, but still inconspicuous enough that it won’t be
known to or located by others who might interfere with
the vehicle.
METALWORK
GLASS
PLASTIC
1
2
3

9
Installation Wiring
Tracker Wiring:
Red = Vehicle battery
positive (constant 12V)
Black = Vehicle chassis
ground (0V)
Orange = Vehicle ACC
circuit (switched 12V)
Yellow = Trigger wire to
yellow relay wire (when
fitted)
Relay Wiring:
(optional)
Red = Vehicle battery
positive (constant 12V)
Green = Relay wire
Green = Relay wire
Yellow = Trigger wire
from yellow tracker wire
To install the relay for the
immobiliser function; first cut
a suitable circuit from the
vehicle battery to the ignition
(or similar) and connect in
the two green relays wires at
the cut point.

10
Device Configuration
Step 1 - Phone number administration
The first command tells the tracker the number of your phone, the phone it will be talking to. In
this example we will use the phone number “0491570110”, substitute your actual phone number
for “0491570110” below.
You will need to enter your correct password as well. In this example we will use the default
password of “123456”. If your password is different, substitute it for “123456” below.
Send the text below as an SMS to your tracker’s phone number exactly as shown:
admin123456 0491570110
These instructions are for configuring the GTRACK on the original tracker server only.
For instructions for migrating your tracker to the new Australian server, please go to gator.net.au
All configuration commands will be sent from your phone to the tracker via SMS messaging.
All commands should be sent to the phone number of the SIM card in the tracker device.
All commands are case and grammar sensitive. Please make sure to type the commands exactly
as shown.
Please ensure that your tracker’s SIM is active on the mobile network and has sufficient credit
where applicable.
Step 2 - SIM provider APN
The second command tells the tracker the network APN of the tracer’s SIM. This enables the
tracker to access the internet. Each mobile network provider has a unique APN and must be
configured in the tracker according to your SIM’s network.
Please ensure you enter the correct APN at this step, contact your service provider if you are
unsure. In this example we will use the default password of “123456”. If your password is
different, substitute it for “123456” below.
Send only 1 of the commands below as an SMS to your tracker’s phone number exactly as
shown:
apn123456 telstra.internet (For SIMs on the Telstra network)
or
apn123456 connect (For SIMs on the Optus network)
or
apn123456 live.vodafone.com (For SIMs on the Vodafone network)
Step 3 - IP address administration
The third command tells the tracker the IP address to talk to on the internet, this is how it will
connect to the app on your phone.
In this example we will use the default password of “123456”. If your password is different,
substitute it for “123456” below.
Send the text below as an SMS to your tracker’s phone number exactly as shown:
adminip123456 043.249.029.060 7700

11
SMS Commands
Here is a list of all of the SMS commands you can send to the tracker as an SMS.
Please remember that all commands are case and grammar sensitive, please type exactly as shown.
Ensure to add spaces in the commands where indicated.
All SMS commands will assume the default password and may use generic details for the example.
Some commands might have modifier text, this will be be explained in the notes column for each
command.
FUNCTION
COMMAND SMS
REPLY
MESSAGE
NOTES
Admin - User Phone
Number
admin123456 0491570110
admin ok
Replace “0491570110” with the number of
your phone, the one you use to configure the
tracker.
Admin - IP address
adminip123456 043.249.029.060 7700
admin ok
This is the IP address that the tracker will
connect to on the internet.
APN Set
apn123456 connect
apn ok
Substitute “connect” for your provider’s APN.
Time Zone Set
timezone123456 -10
timezone ok
Substitute “-10” for your local GMT time.
Negative numbers require a “-“, positive
number need no sign.
Password Change
password123456 654321
Substitute “123456” for your current
password. Substitute “654321” for the new
one.
The password must be six digits long.
Parameter Query 1
param1
[parameters]
This contains your IMEI and current IP among
other information.
Parameter Query 2
param2
[parameters]
Status Query
status
[status info]
GPRS Query
gprs123456
gprs ok
This indicates the tracker’s Data connection is
working or not.
Sleep Mode - Time
sleep123456 time
sleep time ok
Sleep Mode - Shock
sleep123456 shock
sleep shock ok
Sleep Mode - Off
sleep123456 off
sleep off ok
Restart
rst
Reboots the tracker.
Format
format
The tracker will
immediately restore
factory settings…
Used to restore all tracker settings to default.
The tracker will need to be configured again
from blank.
Tracker Mode
tracker123456
tracker ok
Puts the device in “Tracker Mode”
Monitor Mode
monitor123456
monitor ok
Puts the device in “Monitor Mode”
Arm
111
Arms the tracker.
Disarm
000
Disarms the tracker.
Immobilise Vehicle
555
cut oil ok
This triggers the relay (optional) in the system
to immobilise the vehicle.
Mobilise Vehicle
666
resume oil ok
Releases the relay trigger.
Location Query
where
[google maps link]
Replies with a google maps link of the current
tracker location.
Geofence Input
stockade123456 long, lat; long, lat …
stockage ok
Sets up a geofence between two or more
coordinates.
For example;
stockade123456 114.116500e, 22.600000n;
114.117000e, 22.650000n
Use a “;” between each set of long & lat.

12
Installation and Setup Checklist
Follow this checklist as you Install and Setup your tracker
to ensure you haven’t missed anything.
SIM plan is appropriate, page 5 & 6
SIM is activated and working on the mobile network
SIM card installed correctly, page 7
Tracker is installed in a good location, page 8
Wiring is all correct, and specific wires are insulated
if not being used, page 9
The vehicle voltage circuits are at correct levels
The tracker is properly configured, page 10
You are getting a flashing Blue LED (GPS ok)
You are getting a flashing Green LED (Data ok)
You can successfully log into the tracker on the app
or website and get an accurate location fix

13
App and Website Interfaces
There are two ways to login to your tracker for real time tracking, historical
data and device control.
You can either use the Smartphone App on your mobile device, or the
Webpage Interface in any internet browser.
With both methods there is an option to log in by Username, this option is
not currently implemented and can’t be used. You must log in with the
tracker’s unique IMEI number and the current password.
Download the app from your phone’s app store and run.
Select “Log in by IMEI/ID” in the bottom right corner.
Enter your tracker’s IMEI number and password, press
the “Log in” button.
Your IMEI number is printed on the back of the tracker
itself, or can be found by sending the param1
command to the tracker as an SMS.
The IMEI number is a ten digit number starting with a 4.
Your password will be “123456” unless already changed.
You can alternatively log in
to your tracker in any web
browser.
Go to gtrack3g.com and
select “IMEI no.”
Enter your IMEI and
password to log in
Scan one of these
QR codes for a link
to the app in your
app store:
14
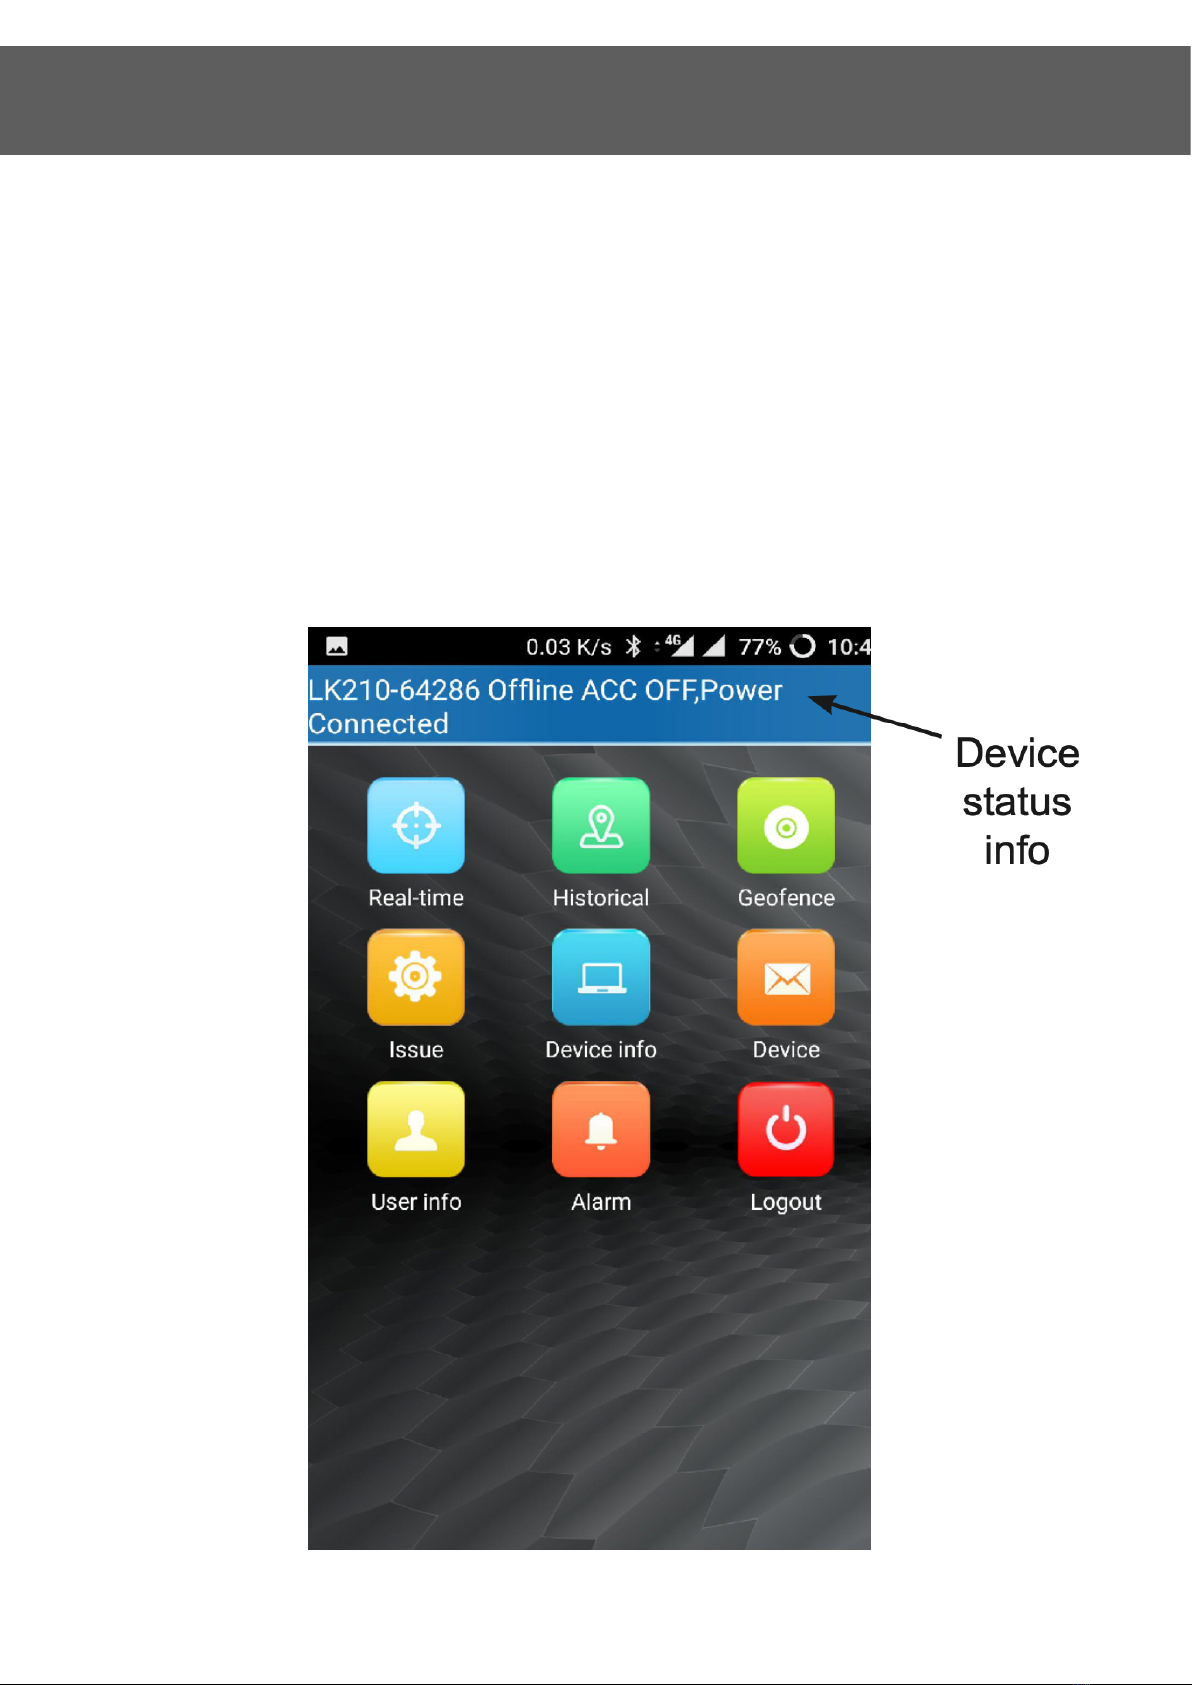
Smartphone App Features
On the main page of the GTRACK app you will find the current status of
the tracker you are logged into, as well as several icons for various
functions.
The blue “Real-time” icon will show you a live map with the trackers
current location.
The red “Logout” button will log out of your current tracker if you wish to
login to a different tracker.
The green “Historical” icon will enable you to go back and see where and
when the tracker was at other locations.
The second green “Geofence” icon will enable you to set up a geofence on
top of the map view, for use in geofence alerts.
The other sections will be explored in the next few pages.

15
Historical Route Feature
In the Historical Route section, you can go back and see a record
of the locations and times where the vehicle was during the
selected timeframe.
You can either select “Today” or “Yesterday” at the top, or create
a “Custom” timeframe with different time and date settings.

16
Geofence Feature
In the Geofence section, you can create a geofence for alerts on
the map view itself.
Select the vehicle or self targets in the lower left to centre on one
of those locations.
Zoom in or out with the controls on screen.
Give the geofence a name and press “OK” to save.

17
Issue Command Feature
In the Issue section, you can select commands from the app to
send to your tracker by either SMS or Data.

18
Device Feature
In the Device section, you can view Common commands, as well
as General commands. You can Edit Device info, and view
records.

19
Alarm Setting Feature
In the Alarm section, you can enable and disable various Alarm
Types, and toggle the Alert Settings.

20
Troubleshooting Guide
ISSUE
ACTION TO TAKE
I can’t log in
Make sure the IMEI number is correct. You can find the IMEI
by sending the param1 command to the tracker’s phone
number. Look for a ten digit number starting with a 4.
Make sure your password is correct.
If you have forgotten your password, you may need to
format the device to defaults and configure again.
There is no data, or I
can’t track my vehicle
Make sure you have set the correct APN for your SIM service
provider. Check your current APN setting with the param1
command. If you are not sure of the correct APN, please
contact your service provider for more information.
Your tracker might not be wired into the vehicle correctly.
Double check all connections are correct and stable.
Ensure your SIM card has Voice, Data and SMS facilities
enabled.
Please check with your service provider for further
assistance.
Won’t get a location fix
Drive the vehicle around for 5 mins to get a good GPS fix.
My APP is tracking my
phone and not my
vehicle
You will need to format the device to defaults and configure
again, refer to page 9.
My tracking frequently
drops out or is inactive
at times
Make sure you have installed the tracker in a suitable
location in the vehicle as to avoid signal shielding, refer to
page 7.
You might have poor mobile reception in your area or spotty
network coverage.
Please contact your service provider for more information.
Everything was
working yesterday but
now it has stopped
Please check your SIM account has credit or is not over it’s
Data limit etc.
Some wiring may have come loose from the vehicle, you will
need to check the wiring.
Your tracker might have gone faulty. Please contact the
Gator support line mentioned on page 22.
You can format the device to defaults and configure again,
refer to page 9.
Table of contents
Other Gator GPS manuals

Gator
Gator PT350 User manual

Gator
Gator M518 User manual

Gator
Gator iDriveZ Navi 430 User manual

Gator
Gator GTRAKPRO User guide

Gator
Gator M508 User manual

Gator
Gator M508 User manual

Gator
Gator M588T User manual

Gator
Gator GTRACK3G User manual

Gator
Gator GTRACK4G Operational manual

Gator
Gator GTKPRO2 User manual


