Gazelle SPRINTER User manual

Occasionally our products contain components that are pre-lubricated at the
factory. We recommend that you protect ooring, or anything else the parts
may contact, with newspaper or cloth.
axle tube bolts
(crossbar bolts)
wrenches
allen wrench +
screwdriver
spare C
washers
wire
holders
spare bolts
for handle
screws
for wheels
Tools Required for Assembly:
1 Allen Wrench & Screwdriver (provided)
2 Wrenches (provided)
fastener pack
ASSEMBLY INSTRUCTIONS
A. Laythetwoframeassemblies&swingarmassembliesontheoor
as shown. Make sure the rear frame is on top & that the cables pass
freely above all the frame tubes.
Note: Be careful you do not allow the cables to get behind
the swing arms.
B. Remove all the bolts from the bottom of the frame assembly.
Note: There are two on the rear frame & two on the
underside on the front frame.
C. Slide the left & right wheel holder onto the rear frame as shown,
line up holes & insert the screws (tighten).
D. Slide the right & left bottom frame assemblies together
& hand tighten only the bolts removed in Step B.
cables
B
front
frame
rear frame
(curved)
© 2022, 2017 Gazelle Home, LLC. Gazelle® is a registered trademark. All rights reserved.
No part of this document may be reproduced or utilized in any form, by any means electronic, mechanical or otherwise without the express written consent of the copyright holder.
GAZSPRINTERASBLY1022
cover
cover
When the two halves of the cover are placed
together & fastened to the frame tubes, the
locking tab will automatically lock together.
This view shows tab on the inside cover.
Attach the covers to the top & bottom of the
frametube.Makesureallsurfacestsnugly
around the tubes.
Front & back cover used on both the left & right
swing arm. Note the locking tab.
This is how the covers look after
installation. Installation is the same
for the left & right side of the frame.
locking tab
front cover back cover
locking tab
cover ts snug
to frame
COVER INSTRUCTIONS FOR SWING ARM LIMITER
WARNING: The covers must be attached to the frame to shield your ngers
from the swing arm limiter. Failure to do so could result in crushed ngers.
Tools Required: Phillips Screwdriver Parts Included: Covers for Limiter (4 pieces)
4 Screws
12
34
left
swing arm
assembly
right
swing arm
assembly
wheels
handgrips axle tube
tness
computer
device
holder
left
frame
assembly
right
frame
assembly
hydraulic
storage clips
covers
insert
screws
TOP OF UNIT
BOTTOM
wheel
holders
C
B
D
C
C
D

J. HYDRAULIC CYLINDERS
Attaching the Cylinders
1) Raise the hydraulic cylinder towards the top of the
swing arm.
2) Using a strong grip, pull the eye of the cylinder &
extend inner rod out (Note: First time loosening this
partmaybedifcult.Theprovidedallenwrench+
screwdriver may be inserted through the eye & used
as a “handle” to assist in pulling the rod outward.
After initial assembly, this should no longer be a
concern).
3) Guide the eye of the cylinder through the hook on
the swing arm (as shown). You may need to move
the swing arm slightly forward or back for proper
alignment, then insert the safety pin (located on
lanyard) into hook hole securing cylinder into place.
4) Repeat steps J1-J3 on opposite side.
Note: Ensure that the safety pin is fully engaged
through the hook. You will see the end of the
pin protrude through the bottom of hook.
Note: Attaching the cylinders also engages
the resistance.
Attaching the Hydraulic Storage Clips
5) Place the hydraulic storage clip on the front frame
below the cylinder & secure with the phillips bolt &
screwdriver included. Repeat on opposite side.
Storing the Cylinders
Remove safety pin (on lanyard) from hook. Carefully
disengage the eye of the cylinder from hook on swing
arm. Push rod back into cylinder. Lower hydraulic
cylinder down & push it gently into the hydraulic
cylinder storage clip. Repeat on opposite side.
CAUTION: Hydraulic cylinders MUST be disconnected
& in storage clip position prior to folding
unit. See Owner’s Manual for “Storing Your
Gazelle” instructions.
WARNING: When in use, the cylinders get very hot.
DO NOT touch & please keep children
away.
E. AXLE TUBE ASSEMBLY
1) Slide the axle tube through the left &
right swing arms & align axle tube to
properlytintoframes.Important –
the screw on the axle tube should be
angled facing up (as shown). This will
help will proper alignment of the
tness computer.
2) Insert bolts & washers into each frame
& axle tube end. Hand tighten only.
F. STAND THE UNIT UP
1) Lock the cable holders onto swing arms.
2) Stand the unit up as shown by lifting up
on the axle tube.
3) Spread the unit out & be sure frame
cables are tight.
4) Release the cable holders so the foot
platforms lower.
5) Be sure the swing cables hang straight
down, allowing the cables & swing arms
to move freely.
G. TIGHTEN BOLTS
1) Before tightening the axle tube,
make sure the screw in the center
of the axle tube faces angled up
(as shown). This will help for proper
alignmentofthetnesscomputer.
2) When tightening the axle tube, it may
be necessary to use both wrenches
simultaneously to tighten these bolts
securely.
3) Tighten front & rear frame bolts at the
bottom of the unit.
F5
swing cables
should hang
straight down
G3
G2
G2
F3
frame cables
should be tight
F3
spread
unit out
F2
lift from here
F4
lower foot
platforms
G3
Note: If you notice any gaps after
tightening, or extra space in the top
crossbar, use enclosed spare “C” washers.
Do not put “C” washers between center
sleeve & swing arms. (“C” washers can be
placed between swing arms & frames).
H. HANDGRIP ASSEMBLY
1) Remove the bolts & washers from each handgrip. Slide left
&righthandgripsintoswingarmsmakingsurethetness
computer wires face toward the center of the unit.
2) Line up holes & insert washers & bolts that were removed in
step H1. Tighten with the wrench provided.
TOP OF UNIT
E2
E2
left
frame
assembly
axle tube right
swing
arm
left
swing
arm
right
frame
assembly
cable holders locked
onto swing arms
bumper
swing arm
cable
holder
foot
platform
F1
E1 E1
G1
H1 H1
H2
hydraulic
storage
clip
swing
arms
hydraulic
cylinder
phillips
bolt
eye
hook
safety pin
J3
J1
J5
inner rod
hook
eye
inner rod
J2

INSTALLATION OF FITNESS COMPUTER
NOTE: Be sure to follow the instructions below to correctly mount the computer to the Gazelle® unit prior to
operating. INCLUDES: Computer, Magnet Cluster, Batteries & M6 Screw (if installing device holder attachment,
the M6 screw will be replaced with the larger loose screw that comes with the device holder attachment).
STEP 5: Place the bottom case of the computer
underneath the bar. Insert the M6 Screw into the center
hole on the bottom housing & the hole on the bottom
side of the axle tube. Tighten the screw.
STEP 2: Push in release tabs on both sides to separate
top & bottom of computer.
STEP 3: Connect electronics plug from bottom housing
to inside of top housing as shown.
STEP 4: Install two AAA batteries in the top of the
computer housing. Match + on battery with the + on
battery housing.
Boss
Magnets facing in
Magnet Cluster
STEP 1: Push the Magnet Cluster over the left section
of tubing, then work the boss into its mating hole in
the tubing. (Make sure magnets face in as shown).
Insert M6 Screw
into center hole.
Press in release
tabs on both
sides to open.
Electronics Plug
STEP 6: Align the top half of the case with the bottom
half & snap them together.
Connectors
NOTE: If your display screen cannot be easily read
when using the unit, you can adjust it by loosening the
bolts at both ends of the axle tubes. Reposition the
computer & retighten the bolts.
STEP 7: Insert wires from handlebars into connectors
on both sides of the electronics. NOTE: Excess wire
can be pushed back into the handlebars or inside the
electronics housing. Be careful not to damage wires.
Clip wire holders on the top of the swing arms to hold
any loose wires in place.
Over Please
You may nd it easier to
assemble the tness computer
together with the device
holder attachment.

© 2022, 2017 Gazelle Home, LLC. Gazelle® is a registered trademark. All rights reserved.
No part of this document may be reproduced or utilized in any form, by any means electronic, mechanical or otherwise without the express written consent of the copyright holder.
GAZSPRINTERCOMP1022
FEATURES
The computer offers seven features, & the
function of each is detailed below.
1. Speed Feature: The computer will display your
approximate current exercising speed.
2. Distance Feature: Your computer can display the
distance traveled in either miles or kilometers. To
switch between miles or kilometers.
a) Remove upper case by pressing in the release
tabs on both sides then lift off.
b) Remove batteries.
c) Position switch to K for kilometers or M for miles.
d) Replace batteries & reassemble computer
cover.
3. Auto Scan Feature: The computer will scan
through each function every 6 seconds. (When
activated it will display scan/time together.)
4. Time Feature: The computer registers the length
of time of your current workout session.
5. Odometer Feature: The computer displays the
total accumulated distance. This information will
remain in memory unless computer loses power
(batteries replaced).
6. Calorie Feature: The computer registers the
approximate number of calories you have burned
during your current workout session. (Calorie
Display is only half of estimated calories burned).
7. Pulse Rate Feature: The computer registers
& displays your estimated heart rate in beats per
minute. To use pulse, push the button on your
computer until the heart icon appears on the display
screen. Extend arms & gently grab both metal pulse
sensors on both handlebars. Wait 6 seconds. When
used properly, the pulse sensors & display monitor
provide a reasonably accurate estimate of your actual
heart rate. This estimate is not exact & persons
with medical conditions &/or a specic need for
accurate heart rate monitoring should not rely on the
estimations provided.
OPERATING INSTRUCTIONS
This computer is equipped with an auto on/ auto off
function. The computer will come on automatically if
the exercise machine is in motion. If not exercising for
over 4 minutes, the computer will turn itself off.
•The computer will begin operating when you begin
moving on your Gazelle®. To scan through the
functions, depress the button & hold until the
arrow points to the Scan/Time. Release the button
& the computer will automatically scan through
each feature every 30 seconds, holding each
individual display for approximately 6 seconds.
•To move to a function quickly, depress & release
the button until the arrow indicates the computer
has moved to the desired function. The computer
will remain at the function you have chosen unless
you depress the button & move to another
function.
•To reset all values, hold down the button for several
seconds until cleared & all values returned to zero
(except the Odometer Feature).
•The computer will automatically shut off if your unit
is inactive for 4 minutes or longer.
BATTERY REPLACEMENT
1. Remove upper case by pressing in the release tabs
on both sides then lift off.
2. Replace the two batteries with two new AAA
batteries.
3. Ensure that the batteries are correctly tted.
4. If the display is illegible or partial segments appear,
please remove the batteries. Wait for 15 seconds,
& then reinstall them.
5. Removal of batteries will reset all values to zero.
M K

INSTALLATION OF DEVICE HOLDER ATTACHMENT
1 device holder attachment
1 loose screw & 1 metal sleeve (see arrow)
1. Pass the screw through the back
of the device holder & place the
metal sleeve onto the screw.
2. Align the inserted screw of
the device holder with the
screw hole on the back of the
tness computer. If the tness
computer was previously
installed, you will need to
replace the tness computer’s
M6 screw with the larger loose
screw that comes with the
device holder attachment.
3. Once screw & hole are
aligned, use the provided allen
wrench to lock device holder
attachment into place on the
back of the tness computer.
© 2022, 2017 Gazelle Home, LLC. Gazelle®is a registered trademark. All rights reserved.
No part of this document may be reproduced or utilized in any form, by any means electronic, mechanical or otherwise without the express written consent of the copyright holder.
GAZDEVHOL1022
Screw
Sleeve
NOTE: Diagram below represents the installation of the device holder attachment & how it mounts to the back of the tness
computer. Please follow the three simple steps to complete installation. INCLUDES: 1 Device Holder Attachment, 1 Loose Screw
& 1 Metal Sleeve (the loose screw that comes with the device holder attachment replaces the M6 screw that comes with the
tness computer).
You may nd it easier to assemble the device holder
attachment together with the tness computer.
This is what it looks like once
installation is complete.

For Maximum
Effectiveness & Safety,
Please Read This
Owner’s Manual
Before Using
Your Gazelle® Sprinter.
OWNER’S MANUAL

TABLE OF CONTENTS
Important Safety Tips ...............................................................................4
Specications & Parts ............................................................................. 5
Introduction.....................................................................................................6
Exercise Guidelines ............................................................................... 7-8
Warm-Up & Cool Down Stretches .............................................. 9-10
Target Heart Rate Zone .......................................................................... 11
Getting Started........................................................................................... 12
Workout Guidelines ...........................................................................13-14
Gazelle®Sprinter Exercises ...........................................................15-17
Care, Storage & Resistance ......................................................... 18-19
Total Fitness Program............................................................................. 19
Workout Progress Charts............................................................. 20-21
Exercise Data Chart ................................................................................. 22
Warranty Information............................................ Inside Back Cover
TABLE OF CONTENTS

4 5
BEFORE STARTING THIS OR ANY OTHER EXERCISE PROGRAM, CONSULT
YOUR PHYSICIAN, who can assist you in determining the target heart
rate zone appropriate for your age & physical condition. Certain exercises,
programs or types of equipment may not be appropriate for all people. This
is especially important for persons over the age of 35, pregnant women, or
those with pre-existing health problems or balance impairments.
START OUT SLOWLY & PROGRESS SENSIBLY. Progress at a pace that
is comfortable for you.
MONITOR YOUR HEART RATE WHILE YOU EXERCISE & KEEP YOUR
ESTIMATED PULSE RATE WITHIN YOUR TARGET HEART RATE ZONE.
Follow the instructions on page 11 in this manual regarding heart rate
monitoring & determining your appropriate target heart rate zone.
DO NOT OVER EXERT YOURSELF WITH THIS OR ANY OTHER EXERCISE
PROGRAM. Listen to your body & respond to any reactions you may be having.
You must distinguish “good” pain, like fatigue, from “bad” pain, which hurts.
If you experience any pain or tightness in your chest, an irregular heartbeat
or shortness of breath, stop exercising immediately. Consult your physician
before continuing.
USE CARE WHEN STEPPING ON & OFF EQUIPMENT. Set-up & use your
Gazelle®Sprinter on a solid, level, carpeted surface. Follow the instructions on
page 12 in this manual for proper entry & exit techniques.
HAVE PLENTY OF CLEARANCE BEHIND & IN FRONT OF YOUR GAZELLE®
SPRINTER. It is important to keep children, pets, furniture & other objects out
of the way of the swinging foot platforms. You should have a minimum of 3 feet
of clearance both in front of & behind your Gazelle®Sprinter.
WEAR APPROPRIATE CLOTHING WHEN EXERCISING. Workout clothing
should be comfortable & lightweight. Wear athletic shoes, such as running
or aerobic shoes. Do not use this product with bare feet.
GAZELLE®SPRINTER IS NOT INTENDED FOR USE BY CHILDREN. Keep this
& all tness equipment out of the reach of children.
REMEMBER - REVIEW THIS OWNER’S MANUAL
THOROUGHLY BEFORE STARTING YOUR WORKOUT!
IMPORTANT: SEE PAGE 5 FOR PLACEMENT OF THE
FOLLOWING WARNING LABEL ON YOUR UNIT.
SPECIFICATIONS:
Product Weight: Approx. 40 lbs.
Max. User Weight: 300 lbs.
Length: 43”
Width: 28”
Height: 53.75”
IMPORTANT SAFETY TIPS
SPECIFICATIONS & PARTS
ALSO INCLUDES:
•Exercise Wall Chart
•Nutrition Guide
Fitness
Computer
Handlebars
End Cap
Front
Crossbar
Top Cable Holders
Swing Arms
Right Frame
Assembly
Left Frame
Assembly
Rear Swing
Cables
Frame
Cables
Bottom
Cable
Holders
Front Feet
Device
Holder
Attachment
End Cap
Pulse
Sensors
Hydraulic
Cylinders
Rollers
ON FRONT
OF FRAME
WARNING
LABEL 1
ON FRONT
OF BOTH
HYDRAULIC
CYLINDERS
WARNING
LABEL 2
ON FRONT
OF BOTH
HYDRAULIC
CYLINDERS
CAUTION
LABEL 1
Wheels
Bumpers
Foot
Platforms
Cover
Hydraulic
Storage Clip
WARNING
FAILURE TO READ & FOLLOW THE SAFETY INSTRUCTIONS STATED IN THE
OWNER’S MANUAL MAY RESULT IN POSSIBLE SERIOUS INJURY OR DEATH.
KEEP CHILDREN AWAY. MAXIMUM USER WEIGHT 300 LBS. REPLACE THIS LABEL
IF DAMAGED, ILLEGIBLE OR REMOVED. FOR HOUSEHOLD USE ONLY.

6 7
Congratulations on your purchase of the Gazelle®Sprinter! You’ve just taken
an important step toward achieving your tness goals. Whether that means
strengthening your heart & lungs, toning muscles, or a combination of these,
the Gazelle®Sprinter will help you achieve those goals.
Working out on comfortable, efcient equipment that allows you to start &
progress at the level that’s appropriate for you is a vital element in sticking
with a program of regular exercise. With your Gazelle®Sprinter, you’ll use the
muscles of both your upper & lower body in a pleasant, easy gliding motion
to burn calories, rm muscles, & improve your cardiovascular endurance. All
of the exercises are easy to do & should feel good, not painful or exhausting.
You’ll be able to step onto your Gazelle®Sprinter & begin your workout – just
what you need to improve your tness the healthy, easy way!
One hour a week – three fun 20 minute sessions – is all it takes to begin
experiencing the health benets of aerobic exercise. With regular use of
your Gazelle®Sprinter, you may soon notice some important changes in
yourself, such as:
•More endurance & stamina.
•Less body fat & excess weight (if you also follow the Nutrition Guide).
•Improved muscle tone in both upper & lower body.
•Increased energy for daily tasks.
•Less stress & a more positive outlook.
If you increase your exercise program to just 20 minutes each day, you
can accelerate these benets dramatically. An impressive return on your
investment!
Many studies show that a combination of low fat, sensible meals & exercise
is the optimum weight loss plan.
We’re so sure that you will be completely satised with your Gazelle®
Sprinter, that we encourage you to share with us your comments &
suggestions. If, during the course of using your system, you have any
questions about the program, please contact our Customer Service
Specialists at the email address or phone number listed below.
As always, you have our quality assurance that we want only your
complete satisfaction. After all, your success is our success too!
Sincerely,
Customer Service
service@gazelleglider.com
1.800.519.8061
Monday–Thursday | 8:30 AM–5 PM EST
IMPORTANT: This owner’s manual is the authoritative source of
information about your Gazelle®Sprinter. Please read it carefully &
follow all the instructions.
If you are just starting an exercise program, choose a time of day that’s good
for you & then stick closely to it. Try to do your Gazelle®Sprinter workout
three times per week at rst, & then gradually progress to four or ve
days a week. Choose a time when you feel energetic, when there are few
interruptions, & when you have not eaten a heavy meal for approximately
two hours.
MOTIVATIONAL TIPS
Keep your motivation & interest high by remembering these simple tips:
• Set Goals For Yourself that are challenging but realistic. Remember,
it may take a few weeks to be able to complete the entire workout
easily, or to see changes in your weight or tness level. Just ve
minutes of exercise, done several times per day, can change your
health. Break your overall goals down into small, measurable steps.
• Record Your Progress by using the charts provided at the end of
this booklet.
• Celebrate Your Successes - even the small ones! Give yourself
incentives for reaching each of your goals, & reward yourself often.
• Take Setbacks In Stride. If you miss a day on your schedule (or even
a week), it’s not too late to get back on track. If you are having trouble
sticking to your goals, review them & make sure they are realistic.
Make adjustments as you think they are needed.
YOUR WORKOUT WILL CONSIST OF THREE PHASES:
WARM-UP
To prevent injury & maximize performance, we recommend that you begin
each workout with at least 5 to 10 minutes of exercise that gradually
increases your heart rate & warms up your muscles. You can do this by
practicing all of the basic Gazelle®Sprinter movements at a slow tempo &
easy range of motion.
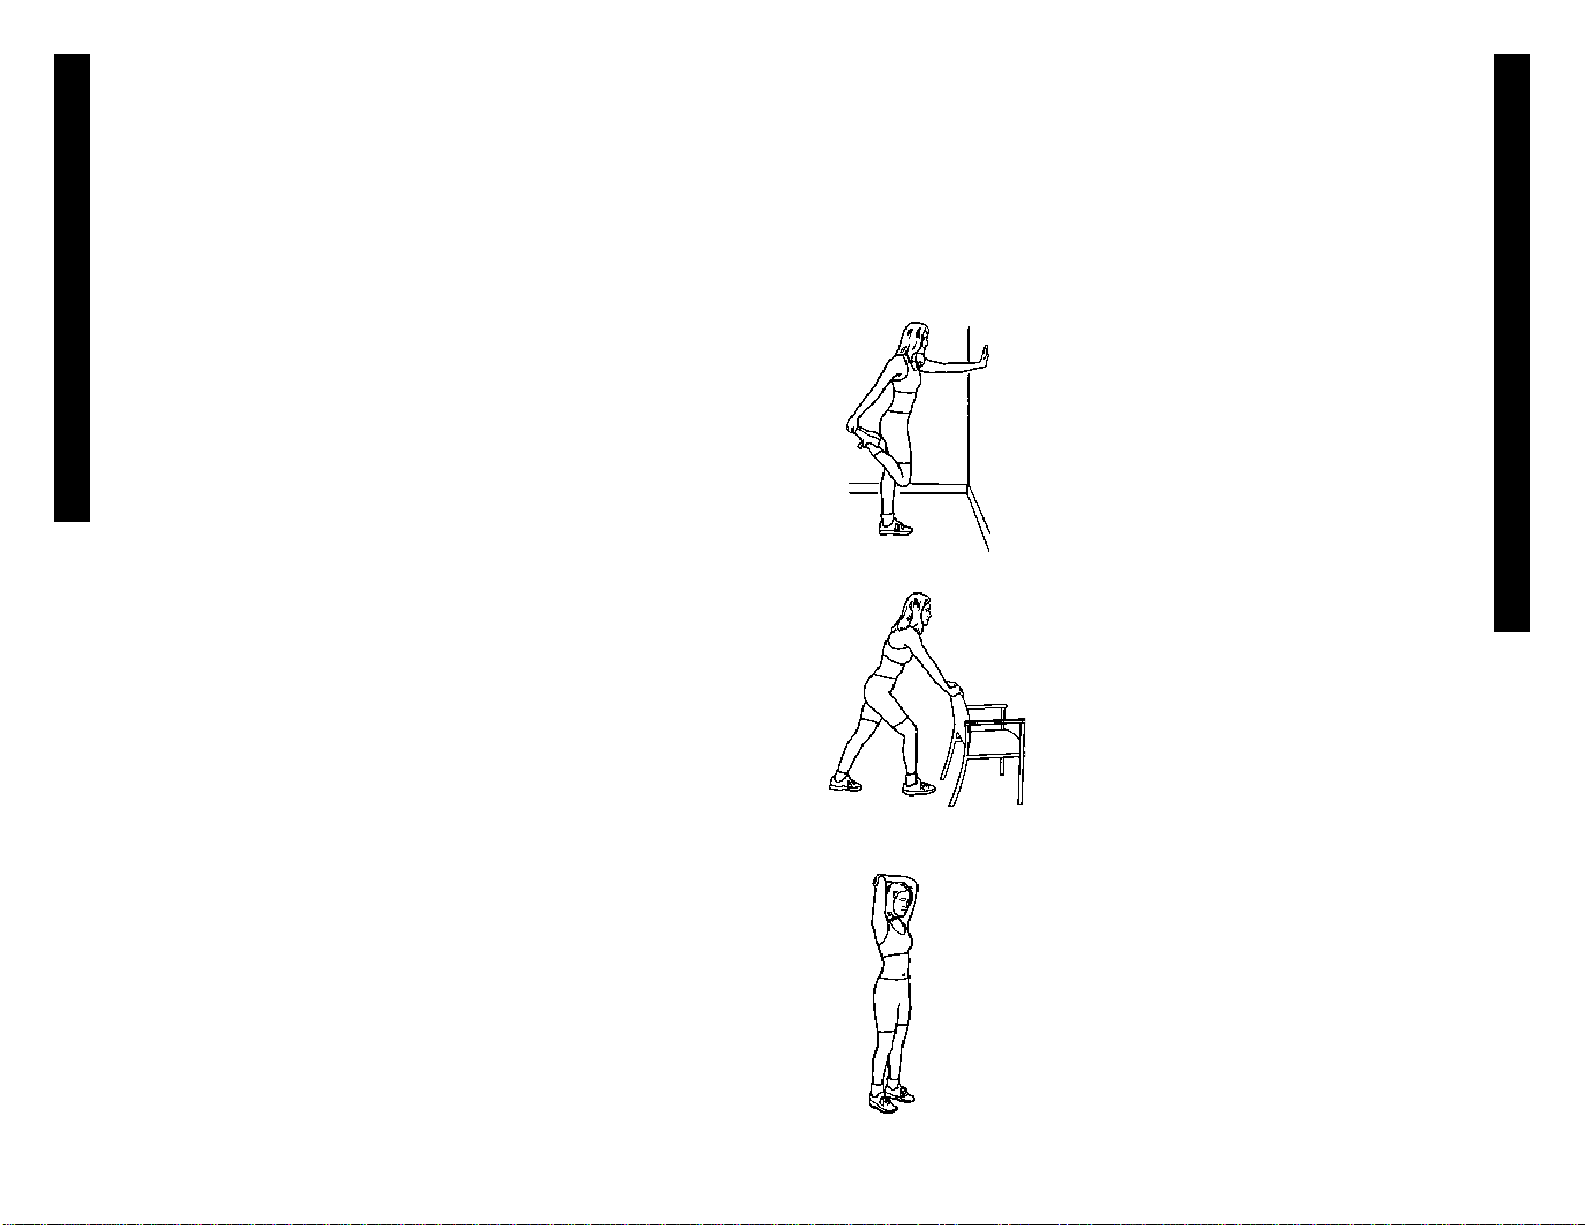
Stretching exercises are always an important part of any exercise program.
We suggest that you do stretching exercises for your calves, hamstrings,
hip exors, triceps, shoulders, quads & back.
AEROBIC & MUSCLE TONING WORKOUT
To gain the health & tness benets that you seek, the warm-up should be
followed by 15 to 20 minutes of Gazelle®Sprinter gliding exercises. Build up
to this amount as your current tness level allows, & progress at a rate that is
comfortable to you. As your tness level increases you may want to gradually
increase the length of your workouts to a total of 30 minutes per day. Start
with 2 or 3 workouts per week. If losing weight is one of your goals, you may
want to gradually increase your workouts to 5 or 6 days per week. More
frequent workouts & longer durations require the body to burn more calories
& use stored fat for energy.
INTRODUCTION
EXERCISE GUIDELINES
(continued on next page)

8 9
Once the basic Gazelle®Sprinter workout is comfortable for you, interval
training offers the opportunity for greater workout variety, cardiovascular
benets & increased calorie burning. Interval training means alternating
short periods of higher intensity gliding, with periods of lower intensity
gliding. When you perform the high intensity exercises, you will work at
a level that is at the high end of your Target Heart Rate Zone. The lower
intensity exercises are at the low end of your Target Heart Rate.
Monitor your estimated heart rate throughout your workout. It can help you
determine the level of exertion that may be most appropriate for you, &
serve as a good measure of your progress toward improved tness.
Beginners can use interval training to simply alternate periods of moderate
gliding with rest periods of easy gliding. If you are having difculty
completing 20 minutes of non-stop gliding, work for 3 or 4 minutes then
rest with a very small glide for 1 minute. Repeat this until your 15 to 20
minutes are complete.
There are three variables that will help you control the intensity of
your Gazelle®Sprinter workout & keep your heart rate at a safe &
appropriate level:
• The range of motion of your legs & arms. A wider glide will be
higher intensity than a small or narrow glide. Gliding with your knees
in a neutral or straight position is easier than gliding with your knees
bent in a low position.
• Your hand position. A high or low hand grip will allow your arms or
legs to alternately work harder. A neutral or middle hand grip will be
easier than a high grip because the legs & arms will share the
workload evenly.
• The speed at which you glide. As you glide at faster tempos your
effort will increase. Slowing down the tempo at any time will make
your workout easier.
COOL DOWN & STRETCHING
Stretches can help improve exibility & relieve the tightness in muscles
that results from repetitive Sprinter movements. 10 to 15 minutes of daily
stretching is recommended. This should be done after warming up & cooling
down. Finish your workout by doing the stretches that follow.
Stretches can help improve exibility & relieve the tightness in muscles
that results from repetitive Sprinter movements. 10 to 12 minutes of daily
stretching is recommended. This should be done when warming up &
cooling down. When performing these stretches, your movements should
be slow & smooth, with no bouncing or jerking. Move into the stretch until
you feel a slight tension, not pain, in the muscle & hold the stretch for 20 to
30 seconds. Breathe slowly & rhythmically. Be sure not to hold your breath.
Remember that all stretches must be done for both sides of your body.
1. Quadriceps Stretch
Stand close to a wall, chair or other solid object. Use
one hand to assist your balance. Bend the opposite
knee & lift your heel towards your buttocks. Reach
back & grasp the top of your foot with the same side
hand. Keeping your inner thighs close together, slowly
pull your foot towards your buttocks until you feel a
gentle stretch in the front of your thigh. You do not
have to touch your buttocks with your heel. Stop pulling
when you feel the stretch. Keep your kneecap pointing
straight down & keep your knees close together. (Do
not let the lifted knee swing outward.) Hold the stretch
for 20 to 30 seconds. Repeat for the other leg.
2. Calf & Achilles Stretch
Stand approximately one arms length away from a
wall or chair with your feet hip width apart. Keeping
your toes pointed forward, move one leg in close to
the chair while extending the other leg behind you.
Bending the leg closest to the chair & keeping the
other leg straight, place your hands on the chair.
Keep the heel of the back leg on the ground & move
your hips forward. Slowly lean forward from the
ankle, keeping your back leg straight until you feel a
stretch in your calf muscles. Hold for 20 to
30 seconds. Repeat for the opposite leg.
3. Overhead/Triceps Stretch
Stand with your feet shoulder width apart & your knees
slightly bent. Lift one arm overhead & bend your elbow,
reaching down behind your head with your hand toward the
opposite shoulder blade. Walk your ngertips down your
back as far as you can. Hold this position. Reach up with your
opposite hand & grasp your exed elbow. Gently assist the
stretch by pulling on the elbow. Hold for 20 to 30 seconds.
Repeat for the opposite arm.
EXERCISE GUIDELINES
WARM-UP & COOL DOWN STRETCHES
(continued on next page)

10 11
BEFORE STARTING THIS OR ANY
OTHER EXERCISE PROGRAM,
CONSULT YOUR PHYSICIAN, who
can assist you in determining the target
heart rate zone appropriate for your age
& physical condition. Certain exercises,
programs or types of equipment may
not be appropriate for all people. This is
especially important for persons over
the age of 35, pregnant women, or those
with pre-existing health problems or
balance impairments.
MONITOR YOUR HEART RATE WHILE
YOU EXERCISE & KEEP YOUR
ESTIMATED PULSE RATE WITHIN
YOUR TARGET HEART RATE ZONE.
Follow the instructions below regarding
heart rate monitoring & determining
your appropriate target heart rate zone.
Effective aerobic training to improve
your tness & health requires working
out at an exercise intensity that raises
your pulse to a level that safely challenges
your heart & lungs. This level can range
between 50% - 80% of your maximum
heart rate & is called your Target Heart
Rate Zone. If you are new to exercise or
out of shape, 50% - 60% may be adequate
to promote good cardiovascular conditioning.
A well conditioned athlete may prefer to work
up to an 80% - 85% rate.
Using your estimated heart rate as an indicator of your tness level provides a
built-in work intensier. If you’re untrained, you’ll require less effort to reach your
target heart rate zone. As your cardiovascular tness improves & you become
stronger, it will require more effort for you to reach your target heart rate zone.
The chart illustrates the predicted minimum & maximum target heart rate zones
for cardiovascular tness for the average individual in good health. To use the
chart, nd your age & the corresponding minimum & maximum target heart
rate zones.
DETERMINING YOUR ESTIMATED HEART RATE
To determine your heart rate:
♥Pause just long enough from your exercise to take your pulse at your wrist.
Take a ten second reading & multiply it by six. Check the chart to see if you
are within your range according to your age.
♥Use an electronic heart rate monitor. You can purchase an electronic heart
rate monitor at a local tness store.
Remember that target heart rate zones are predictions & based on averages.
Regardless of your estimated heart rate readout, you should slow down if you
are breathless & cannot carry on a short conversation.
Age adjusted heart rate (beats per minute).
TARGET HEART RATE ZONE
Age
20
22
24
26
28
30
32
34
36
38
40
45
50
55
60
65+
100
99
98
97
96
95
94
93
92
91
90
87
85
83
80
77
160
158
157
155
154
152
150
149
147
146
144
140
136
132
128
124
Minimum
(50%) Maximum
(80%)
TARGET HEART RATE ZONE
4. Back Stretch
Stand with your legs shoulder width apart & your knees
slightly bent. Bend forward from your waist with your
arms extending loosely in front of your body. Gently bend
from the waist exing your body as far forward as it will
go. Hold for 20 to 30 seconds. Straighten up & repeat.
5. Standing Hamstrings Stretch
Stand with your legs hip width apart. Extend one leg out
in front of you & keep that foot at against the ground.
With your hands resting lightly on your thighs, bend
your back leg & lean forward slightly from your hips until
you feel a stretch in the back of your thigh. Be sure to
lean forward from the hip joint rather than bending at
your waist. Hold for 20 to 30 seconds. Repeat for the
opposite leg.
6. Buttocks, Hips & Abdominal Stretch
Lay at on your back with your hips relaxed against the
oor. Bend one leg at the knee. Keeping both shoulders
at on the oor, gently grasp the bent knee
with your hands & pull it over your body
& towards the ground. You should feel a
stretch in your hips, abdominals & lower
back. Hold for 20 to 30 seconds & release.
Repeat for opposite side.
7. Inner Thigh Stretch
Sit on the oor & bend your legs so that the soles of your
feet are together. Place your hands on your ankles. Lean
forward from the waist & press down lightly on the inside
of your knees. You should feel a stretch in the muscles of
your inside thigh. Hold for 20 to 30 seconds & release.
8. Arm Pullback
Stand with your feet shoulder width apart & toes
pointing forward & with your knees slightly bent.
Let your arms hang relaxed on either side of your body.
Expand your chest & pull your shoulders back. Bend
your elbows slightly & clasp your hands behind your
back. Slowly straighten your arms as you lift your hands
upward. Raise your hands upward until you feel mild
tension in your shoulder & chest region. Hold for 20
to 30 seconds. Lower your arms to their original position
& bend your elbows. Release your hands & return them
to your sides.
WARM-UP & COOL DOWN STRETCHES

12 13
GETTING STARTED
Once your Gazelle®Sprinter is assembled, make sure it is on a solid, level,
carpeted surface with plenty of clearance space behind & in front of the
swinging foot platforms. Practice getting on & off your unit a few times
until you are comfortable with this movement.
GETTING ON
Stand behind your unit facing the front
crossbar. Place one hand on each back
bar & place your left foot centered
behind the two foot platforms. Transfer
your hands, one at a time, to the front
crossbar. Keep your hands on the front
crossbar until you are completely on the
unit. Carefully place your right foot on the
right foot platform & step on. Next, bring
your left foot up to the left foot platform
& step on. Keep your hands in place
until you feel completely comfortable
& balanced. Now you are ready to
start gliding.
LEARNING TO GLIDE
Stand upright, with good posture, on the foot platforms.
Hold onto the front crossbar with your hands placed
just inside the handlebars. Begin to move your feet
back & forth in a very small, controlled glide. When
you are comfortable with this leg motion & feel
balanced, increase your stride width slightly. Keep your
knees “soft” or slightly exed & your posture upright
throughout the motion. This movement is called the
“Basic Glide”. Use this “Basic Glide” with your hands
on the front crossbar to get started, or if you want to
decrease your effort at any point during your workout.
Be sure to read the exercises explained in this manual
before doing any further gliding.
GETTING OFF
Bring your unit to a complete stop & make
sure that you feel balanced on both foot
platforms. Place both of your hands on
the front crossbar. Keep them in place
until you have completely dismounted.
Carefully bring your right foot down
& place it centered behind the two
platforms. Then, carefully bring your left
foot down behind the back bar & place it
securely on the oor. Let go of the front
crossbar, straighten up & lift your right
foot out & away from the machine.
GETTING STARTED
FOOT PLACEMENT
You will notice that your feet shift a little bit when using your Gazelle®
Sprinter. It is recommended that beginners keep their toes against the toe
plate until they feel comfortable with their balance.
HAND POSITIONS
The position of your hands on the handlebar grips will allow you to vary
the intensity of your workouts & change the emphasis from lower body to
upper body. There are four positions that are used throughout your
Gazelle®Sprinter workout.
Front Bar Grip
Place your hands on the front crossbar, just to the
inside of the handlebars. Use a rm grip without
“white knuckles”. Be sure to keep your wrists straight
& avoid leaning hard on the arms or bending at your
wrists. This grip may be used during any “Basic Glide”
exercise. Use this grip when learning to glide, or
during your warm-up & cool down.
Low Grip
Place your hands at the bottom of the handlebars.
Be sure to keep your hands on the black handlebar
grips, not on the front crossbar. This grip will decrease
the work in your upper body.
Neutral Grip
Place your hands midway between the bottom & top
of the handlebars. Use a rm grip, but try to avoid
“white knuckles”. This grip will help you attain more
equal work for both the upper & lower body.
High Grip
Place your hands at the top of the handlebars. Use a
rm grip, but try to avoid “white knuckles”. This grip
will increase the work in your upper body.
WORKOUT GUIDELINES
(continued on next page)

14 15
Hands Free (Advanced Position)
Stand in an upright position on the foot platforms
with your hands on the front crossbar. When you feel
balanced, release your hands from the crossbar &
bring them into a bent elbow position at your sides
as if you were running or power walking. Practice this
position with your feet stationary, then progress to a
“Basic Glide”.
Note: Exercising without holding onto the
handlebars poses a risk of losing your balance
& falling, resulting in possible serious injury,
& should be done with care.
GENERAL WORKOUT RECOMMENDATIONS
On the following pages are eight exercises that will comprise your basic
Gazelle® Sprinter workout. Before performing any of the exercises, rst
read through these instructions for correct exercise execution.
When you are ready to begin your workout, be sure your equipment is
set-up correctly & you’ve warmed up adequately. Begin with the rst
exercise & continue through all of the exercises in one continuous cycle,
unless you need to take a break. We recommend that you perform 20 to
40 gliding repetitions of each exercise. A single repetition is counted when
both legs have glided forward & back (R + L = 1 repetition). Take time to
cool down & stretch at the end of your workout.
Remember, you will notice that your feet shift a little bit when using your
unit. It is recommended that beginners keep their toes against the toe plate
until they feel comfortable with their balance.
BE SURE TO DRINK PLENTY OF WATER BEFORE,
DURING & AFTER YOUR WORKOUT.
SWING ARM LIMITER
To help prevent over-extended strides, the unit has been equipped with a
swing arm limiter. The limiter will stop the swing arm from moving past a
certain point. During normal use of the unit, the swing arm should not come
into contact with the limiter. If the unit is being used in an excessive or
uncontrolled manner, however, the swing arm may be contacted. If this
occurs, the forward motion of the swing arm will be abruptly stopped &
may cause you to fall resulting in serious injury. Therefore, it is important
that you always use a controlled stride & gradually increase your stride
length. To determine how far the swing arm will move before coming into
contact with the limiter, you should stand on the side of the unit & slowly
pull back on the handlebar closest to you. The handlebar will stop moving
forward once it reaches the limiter. Slowly return the handlebar to its
original position.
WORKOUT GUIDELINES
1) BASIC GLIDE
Stand upright on the foot platforms with your
hands in the neutral position. Your knees
should be “soft”, not locked. Glide your feet
back & forth in a controlled manner. The front
of each foot platform should glide slightly
past the base of the unit frame. Push & pull
gently with your arms to assist the leg motion.
Maintain good, upright posture throughout
this exercise, with your shoulders aligned
directly over your hips. This exercise can be
performed with the neutral, low or high hand
grip positions.
2) WIDE GLIDE
Start with a Basic Glide movement. Gradually
increase the length of your stride as far as
you comfortably can. Your heels will naturally
lift slightly as each leg moves to the back. Do
not attempt to keep your heel pressed to the
foot platform, but allow this lifting motion
to occur. Maintain good, upright posture
throughout this exercise, & a “soft” knee
position. Glide only as wide as you can while
maintaining good balance & posture. This
exercise can be performed with the neutral
or low hand grip positions.
3) LOW GLIDE
Start with a Basic Glide movement. Gradually
bend your knees deeper & increase the
length of your glide. Let your heels naturally
lift as each leg moves to the back. Maintain
upright posture throughout this exercise,
with your shoulders aligned over your hips.
Avoid bending your knees so deeply that
they bump against the front swing arms. This
exercise can be performed with the neutral
or low hand grip positions. You will feel
additional emphasis in your thighs during
this exercise.
GAZELLE®SPRINTER EXERCISES
(continued on next page)

16 17
5) FORWARD PUSH
(Advanced Exercise)
Begin with a Basic Glide or Wide Glide. Move
your hands to a high grip position. As you glide,
slowly lean forward until you feel more weight
in your arms. Keeping your wrists straight, press
forward rmly with alternating arms. Try to fully
extend each arm as you push. If you are not
able to fully extend each arm, adjust your body
position so that you have less forward lean.
Make sure you are leaning forward from your
ankles, a full body lean, rather than rounding
your back. Allow your heels to lift naturally as
each leg glides back. This exercise can be performed with the high or neutral
hand grip position. You will feel additional emphasis in the chest, front shoulder,
& the back of the upper arm during this exercise. This is an advanced exercise
that should be performed only after prociency is attained on the rst four
basic exercises. Note: Exercising while leaning forward poses a risk of losing
your balance & falling, resulting in possible serious injury, & should be done
with care.
4) HIGH GLIDE
Start with a Basic Glide movement. Lift your
heels (rise up on your toes) as you glide,
maintaining upright posture. Avoid letting
your ankles roll outward as your heels lift.
Concentrate on lifting up through the entire
body, & pulling your abdominals in to help
maintain balance. Your heels should remain
lifted throughout the exercise. This exercise
can be performed with the neutral or low hand
grip positions. You will feel additional emphasis
in your calf muscles during this exercise.
6) BACKWARD LEAN
(Advanced Exercise)
Begin with a Basic Glide. Move your hands to a
high grip position. As you glide, slowly lean back
until you feel more weight in your arms. Your
legs will glide in front of your body. Keeping your
wrists straight, pull back rmly with alternating
arms. Make sure you are leaning back from your
ankles, a full body lean, rather than rounding your
back or “sitting”. This exercise can be performed
with the high or neutral hand grip position. You
will feel additional emphasis in the upper back,
back shoulders, & the biceps during this
exercise. This is an advanced exercise that should be performed only after
prociency is attained on the rst four basic exercises. Note: Exercising
while leaning forward poses a risk of losing your balance & falling,
resulting in possible serious injury, & should be done with care.
GAZELLE®SPRINTER EXERCISES
7) POWER GLIDE
(Advanced Exercise)
Begin with a Wide Glide. Adjust your hands to
a neutral or high grip hand position. Gradually
increase the length of your stride as far as you
comfortably can. Your heels will naturally lift
slightly as each leg moves to the back. As you
glide, allow your shoulders & torso to rotate
slightly side to side, pressing & pulling rmly
with your arms. Maintain good, upright posture
throughout this exercise, & a “soft” knee
position. Avoid over rotating your torso which
could effect balance. This exercise can be
performed with the neutral or high hand grip positions. Glide only as wide as
you can while maintaining good balance & posture. This is an advanced
exercise that should be performed only after prociency is attained on
the rst four basic exercises.
8) POWER JOG
(Advanced Exercise)
Begin with a Basic Glide. When you feel
comfortable & balanced, slowly release your
hands & bring them into your sides in a “jog”
position. Allow your arms to pump naturally
as if you were jogging. Maintain good, upright
posture throughout this exercise, & a “soft”
knee position. Glide only as wide as you can
while maintaining good balance & posture. Be
careful not to get your head or shoulders in
the way of the swinging handlebars. Upright
posture will prevent this from happening.
This is an advanced exercise that should be performed only after
prociency is attained on the rst four basic exercises. Note: Exercising
while leaning forward poses a risk of losing your balance & falling,
resulting in possible serious injury, & should be done with care.
GAZELLE®SPRINTER EXERCISES
WATCH TONY LITTLE’S
GAZELLE® GLIDER WORKOUT VIDEOS
ON OUR YOUTUBE CHANNEL!
Scan the QR code with your smart device camera
to launch channel. Be sure to click subscribe
& stay up-to-date on new releases.

18 19
Unit is ready
for storage.
Lock the foot platforms
into place by snapping
cable holders onto
swing arms.
Remove
safety pin &
disconnect
both hydraulic
cylinders.
Clip both hydraulic
cylinders into place
before folding.
CARING FOR YOUR GAZELLE®SPRINTER
Your unit has been carefully designed to require minimum maintenance.
To ensure this, we recommend that you do the following:
•Keep your unit clean by wiping sweat, dust or other residue off with a
soft, clean cloth after each use.
•Wipe your handlebar grips down with a soft, damp cloth frequently to
prevent accumulation of sweat & dirt.
•If squeaks or other noises develop over time, we recommend the
following:
a) Lubricate all moving parts. For best results we recommend using
white lithium grease. You may also apply clear household grease
(i.e. petroleum jelly) to axle tube.
b) Spray cable holders (top & bottom) with WD-40® or equivalent.
c) Check to be sure that the screws on the bottom of the foot
platforms are tight.
STORING YOUR GAZELLE®SPRINTER
Your unit conveniently folds down for easy storage. To fold your unit:
a) IMPORTANT: Before folding, rst disconnect hydraulic cylinders for
storage position. Clip into the hydraulic cylinder clips.
b) Fold foot platforms & lock into place by snapping lower cable holders
onto swing arms.
c) Place foot on rear frame tube (to hold in place) & slide front frame
tube toward you by grabbing front swing arms.
d) Carefully lower the unit toward the ground until the wheels engage &
roll unit out of the way.
Store your equipment in an area away from children & high trafc areas.
RESISTANCE
Your Gazelle comes with added resistance. Once you have reached your
maximum benets with no resistance, you may progress to a more efcient
workout with resistance.
To engage resistance, simply lift the cylinders toward the top of the swing
arms & lock the hydraulic cylinders into place.
IMPORTANT: See “Assembly Instructions” booklet for hydraulic cylinder
set-up. When in use, the cylinders get very hot. Do not touch & please keep
children away.
TOTAL FITNESS PROGRAM
A Total Fitness Program is more than exercise & more than eating right. It is
a “tness for life” plan that goes hand in hand with an overall healthy lifestyle.
This includes regular check-ups & exercise, now & for the rest of your life.
Your total tness program consists of three parts:
•Aerobic exercise to burn calories.
•Strength conditioning exercises to tone & shape your muscles,
increase your metabolic rate, & strengthen your bones.
•A diet that is safe, sensible & healthy.
Today, all tness research recommends both aerobic exercise & strength
conditioning to achieve balanced tness. By improving your aerobic tness
you will strengthen your heart & lungs, increase your stamina & endurance
& help with weight loss. Strength conditioning adds lean muscle to your
body, increasing your body’s metabolism. In this process, your body burns
more calories, even while you rest. When you combine aerobic workouts
with strength conditioning, you can burn more fat & calories than with just
aerobic exercise alone.
The Gazelle® Sprinter workout will help with the rst two parts of your Total
Fitness Program, but you need to make healthy, low-fat eating a big priority
as well. If you need help making healthy eating a part of your life, then please
refer to the Nutrition Guide that is included.
Consult with your physician about an eating plan that’s right
for you. Healthy eating habits & exercise will help you reach your goal.
We recommend that you follow dietary guidelines approved by the U.S.
Department of Agriculture & the U.S. Department of Health &
Human Services.
TOTAL FITNESS PROGRAM
CAUTION
YOU MUST DISCONNECT THE HYDRAULIC CYLINDERS BEFORE FOLDING. TAKE CAUTION
WHEN LOWERING THE UNIT TOWARDS YOU AS THE HYDRAULICS CAN SWING FREELY.
CARE, STORAGE & RESISTANCE
WARNING
CYLINDERS GET VERY HOT DURING USE. DO NOT TOUCH
& PLEASE KEEP CHILDREN AWAY.

20 21
DATE WEIGHT CHEST BICEPS WAIST ABDOMEN HIPS THIGHS CALVES
RESTING
HEART
RATE
TARGET
HEART
RATE
ACTUAL
HEART
RATE
Use the chart below & the charts on the following pages to keep track of
your progress over time. Before writing on them, make as many copies as
you think you’ll need. We suggest you keep these in a notebook. You will nd
it both informative & motivational to look back at what you’ve done, & this
data will help you to chart future tness goals as you progress. Every
two weeks, measure yourself to rechart your progress.
Chest
Waist
Abdomen
Hips
Calves
(L/R)
Thighs
(L/R)
Biceps
(L/R)
WORKOUT PROGRESS CHART
DATE WEIGHT CHEST BICEPS WAIST ABDOMEN HIPS THIGHS CALVES
RESTING
HEART
RATE
TARGET
HEART
RATE
ACTUAL
HEART
RATE
DATE WEIGHT CHEST BICEPS WAIST ABDOMEN HIPS THIGHS CALVES
RESTING
HEART
RATE
TARGET
HEART
RATE
ACTUAL
HEART
RATE
Measuring Sites:

22 23
Update once a week
_______________
_______________
_______________
_______________
_______________
_______________
_______________
_______________
_______________
_______________
_______________
_______________
_______________
_______________
_______________
_______________
_______________
_______________
_______________
_______________
_______________
_______________
_______________
_______________
_______________
_______________
_______________
_______________
_______________
_______________
_______________
_______________
_______________
_______________
_______________
_______________
_______________
_______________
_______________
_______________
_______________
_______________
_______________
_______________
_______________
_______________
_______________
_______________
_______________
_______________
_______________
Week #Of Total
(Date) Workouts Workout Time
EXERCISE DATA CHART
GAZELLE HOME, LLC |Limited Warranty
For a period of 12 months from date of receipt, Gazelle Home, LLC
warrants that this product will be free from defects in materials &
workmanship. This warranty applies only when purchase of the product
is from an authorized dealer & is for personal or household use, but not
when the sale or any resale is for commercial use. THIS WARRANTY IS
VALID ONLY FOR THE ORIGINAL OWNER & IS NOT TRANSFERABLE.
EXCEPT FOR THE LIMITED EXPRESS WARRANTY STATED
HEREIN, GAZELLE HOME, LLC DISCLAIMS ALL OTHER EXPRESS
OR IMPLIED WARRANTIES, INCLUDING BUT NOT LIMITED TO
IMPLIED WARRANTIES OF MERCHANTABILITY & FITNESS FOR A
PARTICULAR PURPOSE. Gazelle Home, LLC will not be liable for any
loss or damage, including incidental or consequential damages of any
kind, whether based on warranty, contract or negligence, & arising in
connection with the sale, use or repair of the product.
SOME STATES DO NOT ALLOW LIMITATIONS ON HOW LONG AN
IMPLIED WARRANTY (INCLUDING IMPLIED WARRANTIES OF
MERCHANTABILITY & FITNESS FOR A PARTICULAR PURPOSE)
LASTS, OR THE EXCLUSION OR LIMITATION OF INCIDENTAL OR
CONSEQUENTIAL DAMAGES, SO THE ABOVE LIMITATION OR
EXCLUSION MAY NOT APPLY TO YOU. This warranty gives you specic
legal rights & you may have other rights that vary from state to state.
This warranty is valid in the U.S. & Canada only.
In the event of failure of this product to conform to this warranty during
the warranty period, please contact our Customer Service Department
at 1-800-519-8061. Customer Service will determine whether the
defective part needs to be returned for repair or replacement. Any
required product returns are at the owner’s expense, unless otherwise
approved by us in advance. Gazelle Home, LLC will repair or replace, at
its own option, the product or any covered part, except that this warranty
does not cover defects or damage caused by: accident (including in
transit), repairs or attempted repairs by any person not authorized by
Gazelle Home, LLC; vandalism, misuse, abuse or alteration; or the use
of parts not manufactured or approved by Gazelle Home, LLC. This
warranty does not cover any separately sold items, parts, or accessories.
To register your Limited Warranty, visit GazelleGlider.com/Warranty
Save your sales receipt. You may wish to staple it into this manual.
WARRANTY INFORMATION

© 2022, 2017 Gazelle Home, LLC. Gazelle®is a registered trademark.
All rights reserved. No part of this booklet may be reproduced or utilized in any form, by any means
electronic, mechanical or otherwise without the express written consent of the copyright holder.
GAZSPRINTEROM1022
DO YOU LOVE YOUR GAZELLE
& HAVE A GREAT SUCCESS
STORY TO SHARE?
We’d love to hear from you!
gazelleglider.com/submit-your-success-story/
Table of contents
Other Gazelle Fitness Equipment manuals