gbo Medizintechnik Duodynator User manual
Duodynator
and
Combination Duodynator-Neoserv
Instructions for use

2
Duodynator
gbo Medizintechnik AG Version 1.2
This manual was created by gbo Medizintechnik AG and checked for accuracy.
However, it does not claim to be complete. All information and data is subject to
change without notice.
No part of this manual may be reproduced for any purpose without the express
written permission of gbo Medizintechnik AG, regardless in which way or by any
means, electronic or mechanical, are used.
© gbo Medizintechnik AG
Part-No: 032-7-0018
Edition Version: 1.2
Date of issue: 2015-01-21
Manufacturer:
gbo Medizintechnik AG
Kleiststraße 6
D-64668 Rimbach

Duodynator
3
gbo Medizintechnik AG Version 1.2
Contents
1INTRODUCTION...................................................................................... 6
1.1 Intended use ......................................................................................... 6
1.2 Note concerning the operating personnel.............................................. 6
1.3 Admission.............................................................................................. 6
1.4 Device description Duodynator.............................................................. 6
1.5 Device description Neoserv................................................................... 7
2START OF OPERATION........................................................................ 8
2.1 Unpacking, transport and installation..................................................... 8
2.2 Combination with the Neoserv............................................................... 8
2.3 Connect and switch on.......................................................................... 8
2.4 Placing out of operation......................................................................... 9
3OPERATION.......................................................................................... 10
3.1 Overview............................................................................................. 10
3.1.1 Touchscreen display .................................................................................10
3.1.2 Knob..........................................................................................................11
3.1.3 Home screen in the single-circuit operation..............................................11
3.1.4 Home screen panels in the interference operation....................................12
3.1.5 Screen for selecting an indication .............................................................13
3.1.6 Screen for selecting other therapies..........................................................13
3.2 Suction flyout....................................................................................... 14
3.3 Direct help........................................................................................... 15
3.4 Settings............................................................................................... 16
4THERAPY.............................................................................................. 18
4.1 General guidelines for therapy............................................................. 18
4.2 Selection of therapies.......................................................................... 18
4.2.1 Selection of therapy by Other therapies....................................................18
4.2.2 Selection of therapy by indications...........................................................18
4.2.3 Selection of therapy from the favorites list ................................................19
4.2.4 Individual settings......................................................................................19
4.3 Implementation of the treatment.......................................................... 20
4.3.1 Treatment with interference currents.........................................................20
4.3.2 Therapy with single channel currents........................................................20
4.4 Combination therapy with ultrasound .................................................. 21
4.4.1 General information...................................................................................21
4.4.2 Procedure for combination therapy...........................................................22
5ELECTRODES....................................................................................... 23
5.1 Electrode positioning........................................................................... 23
5.2 Single-pole electrodes......................................................................... 24
5.3 Suction electrodes............................................................................... 25

4
Duodynator
gbo Medizintechnik AG Version 1.2
5.4 Bipolar electrodes................................................................................ 26
6MAINTENANCE..................................................................................... 27
6.1 Duodynator.......................................................................................... 27
6.2 Neoserv............................................................................................... 27
6.3 Safety checks...................................................................................... 28
6.4 Disposal of equipment and accessories .............................................. 28
6.5 Cleaning, Disinfection and carePreventive inspection ......................... 29
6.5.1 Cleaning the unit .......................................................................................29
6.5.2 Cleaning of the Electrodes........................................................................29
6.5.3 Disinfecting the Electrodes........................................................................29
6.5.4 Cleaning of the Suction Electrodes...........................................................29
6.5.5 Disinfecting of the Suction Electrodes.......................................................30
6.5.6 Cleaning of the elastic straps....................................................................30
6.5.7 Cleaning of the Electrode Sponges and Electrode Pockets......................30
7WARNINGS AND HAZARDS................................................................ 31
8CONTRAINDICATIONS......................................................................... 32
9EXPLANATION OF SYMBOLS USED.................................................. 33
10 TECHNICAL DATA ............................................................................... 34
11 ACCESSORIES DUODYNATOR........................................................... 35
12 ACCESSORIES NEOSERV................................................................... 36
13 TROUBLESHOUTING........................................................................... 37
13.1 Further errors ................................................................................... 37
15 EMC HINTS ........................................................................................... 38
16 ANNEX I LIST OF LOW FREQUENCY CURRENTS............................. 41
17 ANNEX II LIST OF THE MEDIUM-FREQUENCY-CURRENTS ............. 42
18 ANNEX III LIST OF MEDIUM-FREQUENCY-PROGRAMS................... 43
19 INDEX.................................................................................................... 44

Duodynator
5
gbo Medizintechnik AG Version 1.2
Warnings and Notes
Warning!
Warnings which must be observed!
Attention!
Read the instruction!
!!
Note!
Information that will facilitate the work.

6
Duodynator
gbo Medizintechnik AG Version 1.2
1Introduction
1.1 Intended use
Therapy with low-, medium- and interference currents.
1.2 Note concerning the operating personnel
The operation of the device must be performed only by trained medical professionals.
1.3 Admission
We recommend that the operator should be trained when using the unit.
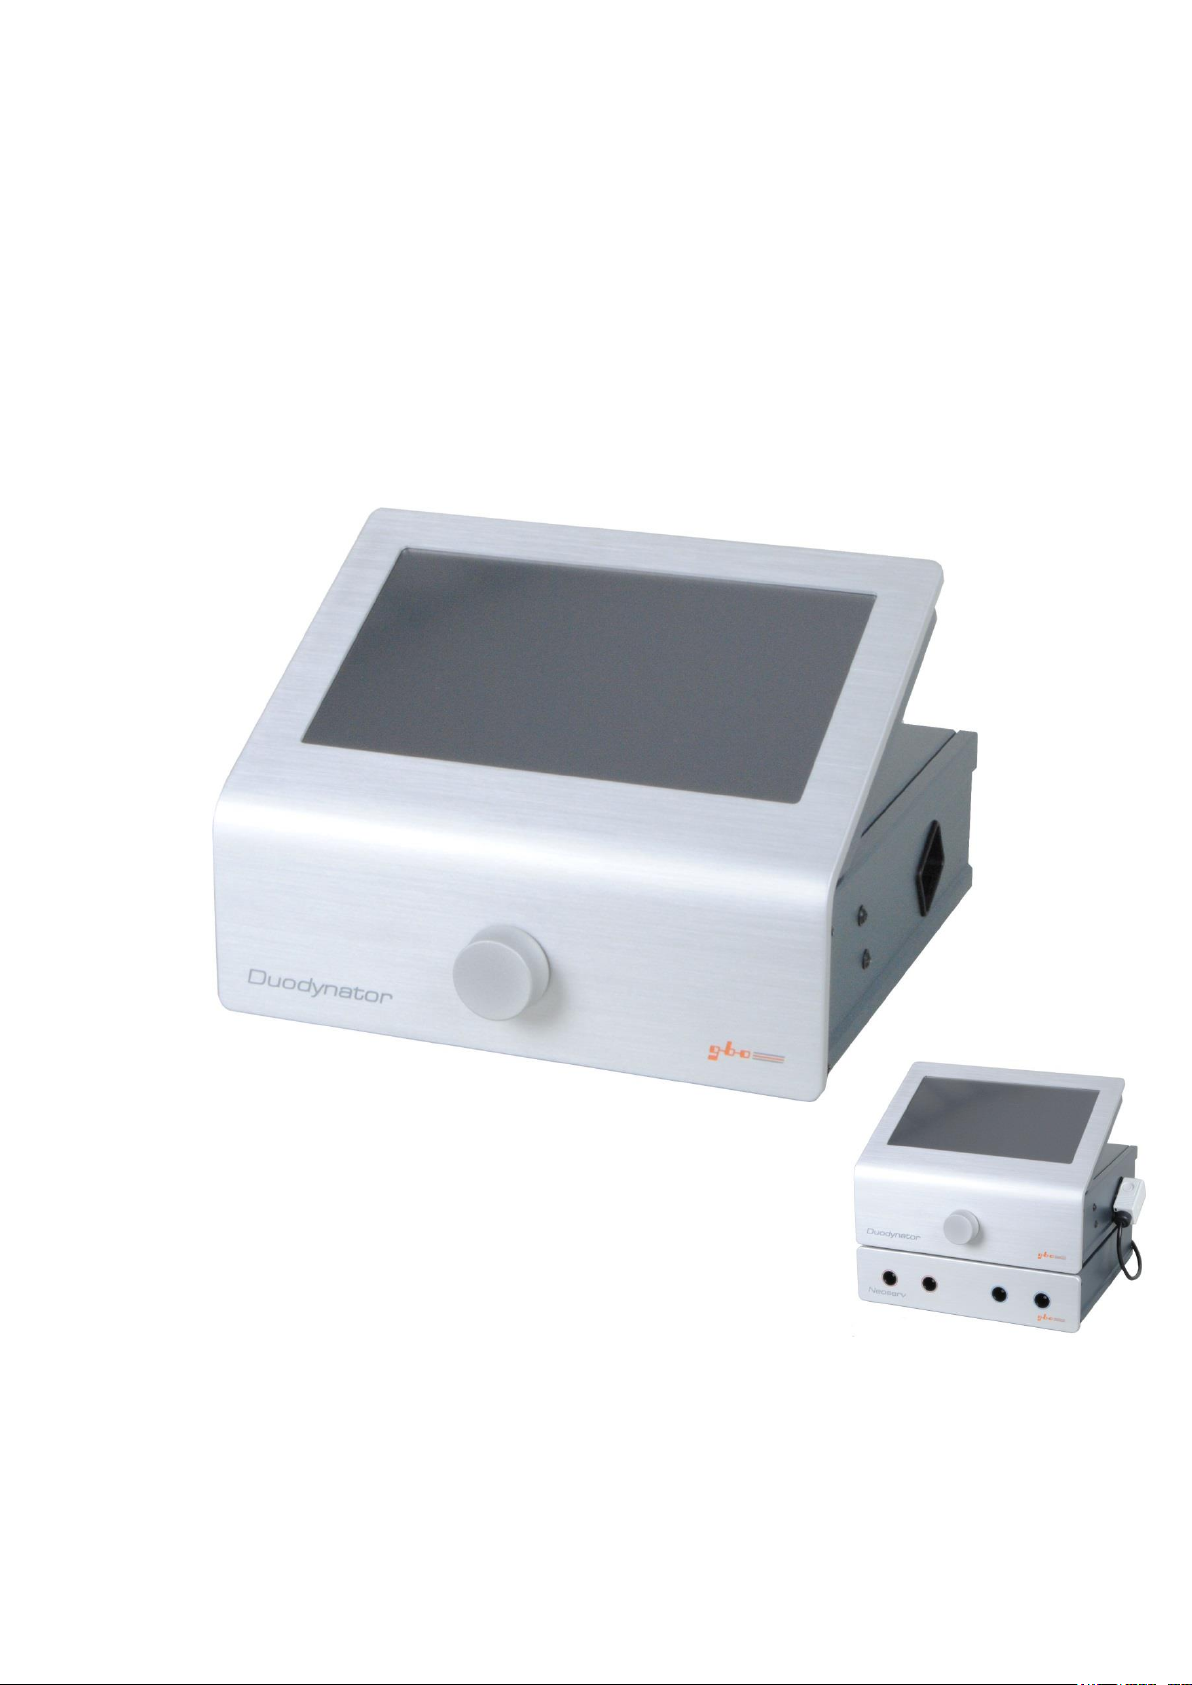
1.4 Device description Duodynator
The Duodynator is a microprocessor controlled electrical stimulation device for
electrotherapy. The application makes the device ideal for use in the physiotherapy
department of hospitals and in the modern and well-equipped practice.
The Duodynator is a therapeutic device for the classic electro-therapy with single-
circuit currents, particularly in multi-channel operation, as well as for therapy with
two-dimensional interference currents.
If two middle-frequency electrical circuits of different frequencies, or those which are
phase shifted towards each other, transpose, a new frequency –the interference
frequency –is generated at the intersection point through superpositioning of the
superposed amplitudes. Duodynator uses this two-dimensional interference method.
This allows the desired highest possible low-frequency stimulation from the
immediate area surrounding the electrode to be shifted into deeper regions, since this
is where it is generated.
Apart from the two-dimensional interference currents, Duodynator offers a selection
of single circuit currents and provides a therapy with medium sine waves. This
therapy is absolutely free of d.c. components. There are two channels available The
carrier frequency can be set from 4000 to 10000 Hz in steps of 2000 Hz.
Furthermore, the Duodynator offers the classical Low Frequency currents including
the galvanic current (d.c.). The galvanic current is used to stimulate the circulation in
the area to be treated.

Duodynator
7
gbo Medizintechnik AG Version 1.2
The Duodynator thus is well suited for:
Pain
Muscle relaxation
Muscle training
Muscle stimulation (increase energy consumption)
Rehabilitation and mobilization
Lymphatic drainage
Lipolysis (breakdown of fat cells in the epidermis tissue)
Cellulite Treatment
Edema treatment
Fat burning.
Also the operation of the Duodynator is facilitated by programs, which
automatically adjust the therapeutic frequencies and the treatment time.
1.5 Device description Neoserv
The Neoserv is a suction-wave therapy unit designed for use with 1 - 4 suction
electrodes. The device is especially useful as an accessory for Duodynator and in the
combined operation “stimulation current with ultrasound“ additionally, with the
ultrasound therapy device Sonostat.
The Neoserv works as suction wave massage unit. Liquids, dirt or bacteria which are
sucked up by the suction electrodes are caught in a space-consuming and frequently-
to-be-drained water separator.
In the areas where the suction electrodes are applied, increased hyperemia occurs. As
a consequence, tissue conductivity is improved beneath the electrodes. Moreover, the
patient’s sensitivity to the electric current is significantly masked by the pulsating
sucking action of the electrodes - a fact that makes the device particularly useful in
cases where electro stimulation treatment needs to be administered to patients who
are specially sensitive to electric currents.
The suction electrodes can be applied in a fast and easy manner, and they also
pleasantly adapt themselves to the skin surface. Optimum skin contact is ensured by
the flexible edges of the electrodes.
Because the Neoserv is an accessory device for Duodynator, which may not work
alone, it is described within this manual.

8
Duodynator
gbo Medizintechnik AG Version 1.2
2Start of operation
2.1 Unpacking, transport and installation
After unpacking check all components for external integrity.
The unit may be placed on any flat surface. It must not be placed on the floor. Keep a
wall distance of at least 20 cm. The device should neither be placed in front of radiators
nor should it be covered by pillows or blankets while in operation. The device is not
made for outdoor operation.
Duodynator and Neoserv meet the requirements for electrical safety according to
EN 60601-1 and are both devices of protection class I. Within the scope of the
Medical Devices Directive (MDD), Class IIa is assigned for the Duodynator. The
Neoserv is an accessory for Duodynator. The combination Duodynator-Neoserv is
in Class IIa
Warning! Note for use in the clinical area:
The unit is not designed to be operated in places with the inherent
risk of explosions. If it is used in dangerous areas of anesthesia
departments, the possibility of an explosion cannot be excluded.
If the patient and/or the patient cable is directly exposed to a radiator
of a medical device for high frequency heat therapy, damage of the
device or danger to the patient cannot be excluded. As a rule, a
clearance distance of 3 m is sufficient.
2.2 Combination with the Neoserv
When the Neoserv is used as an accessory, Duodynator must be placed above the
Neoserv and screwed on the back. Do this, slide the Duodynator from behind the
retaining tab on the lid of Neoserv. Align both devices and screw the two devices on
the back of each other.
In the case of the combination with Neoserv the Duodynator is supplied with mains
voltage from Neoserv. Thus, a line input on Neoserv is enough to power both
devices.
A detailed pictorial instruction is supplied with the Neoserv.
2.3 Connect and switch on
The Duodynator and the combination Duodynator-Neoserv are designed for
connection to a supply voltage of 100 to 240 V and are automatically set to the
correct mains voltage.
Regardless of the supply voltage, the device is suited for power frequencies of 50 to
60 Hz.
Duodynator
9
gbo Medizintechnik AG Version 1.2
Warning!
To avoid the risk of electric shock, the Duodynator and also the
combination of devices Duodynator-Neoserv must only be
connected to the mains with protective earth!
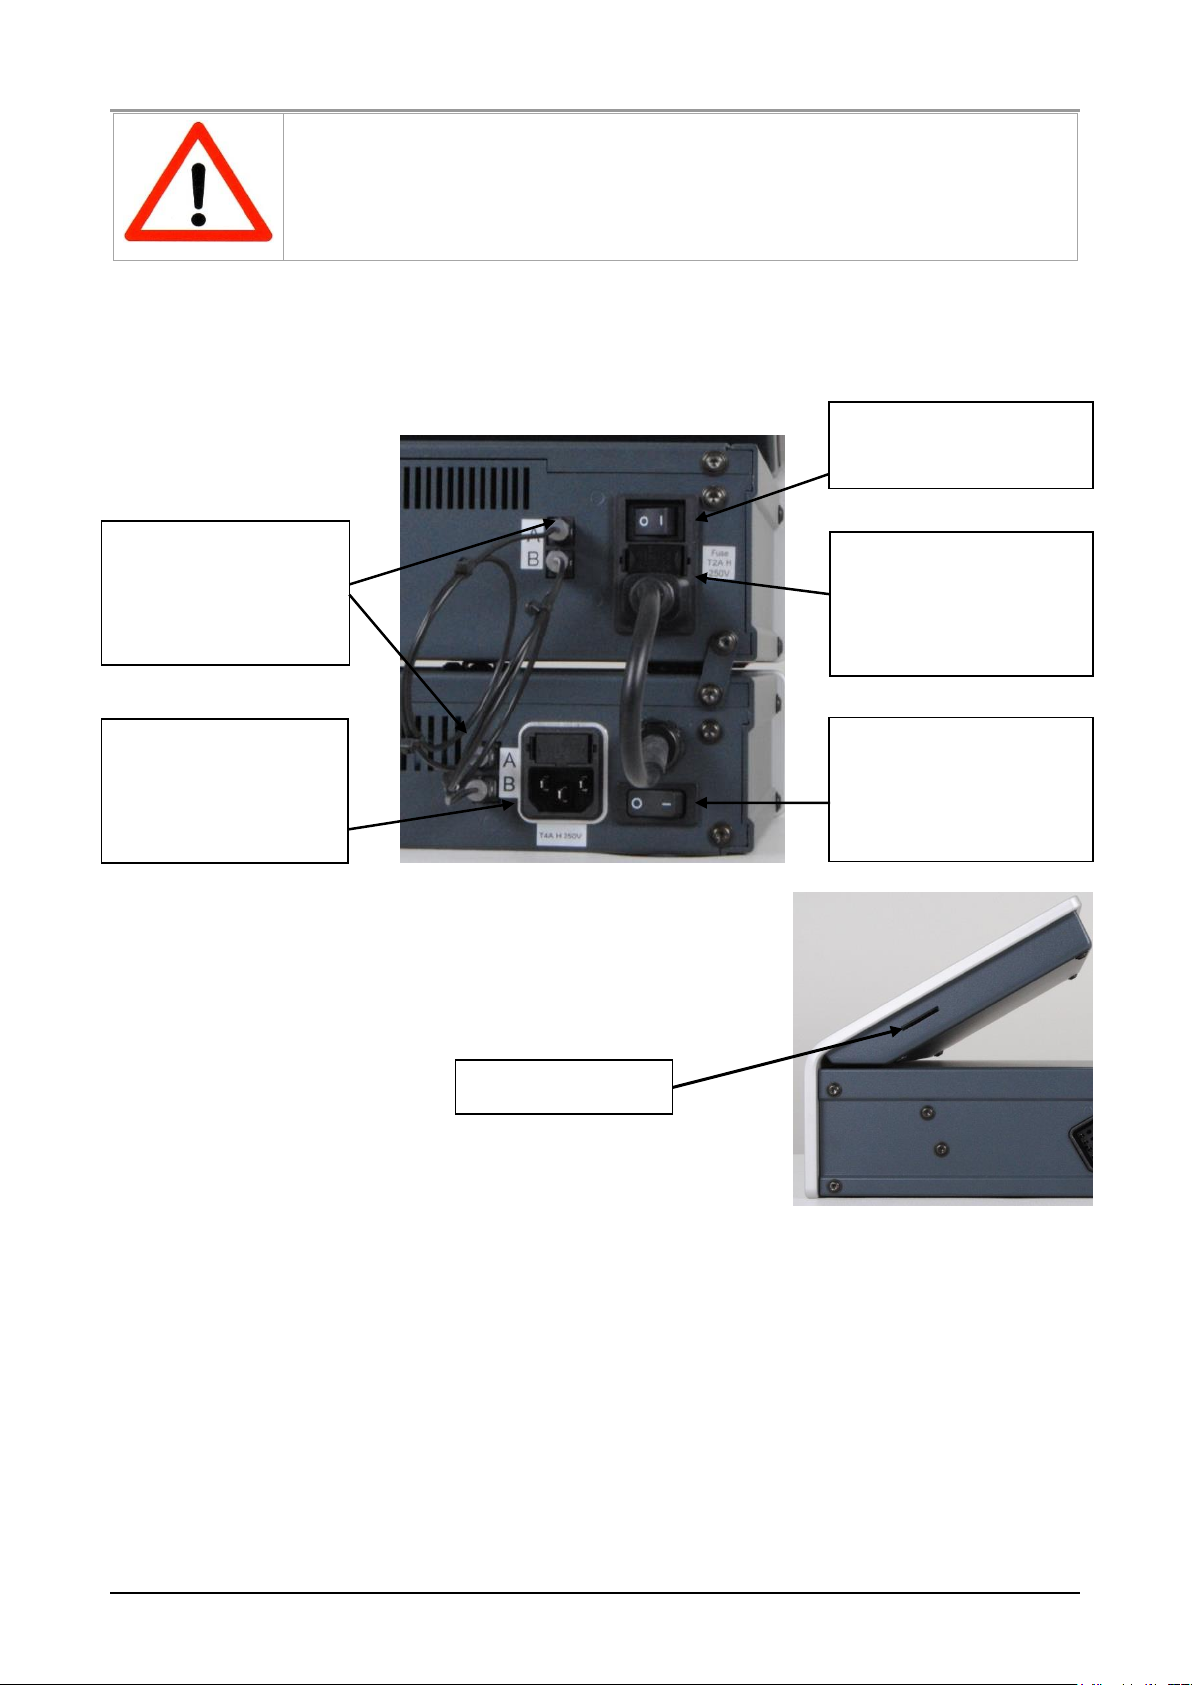
Turn on the Duodynator by the power button on the rear panel. When Neoserv is
connected and should also be used, it must also be turned on using the power switch
on the back.
The Duodynator is equipped with a SD card slot, located
to the right of the display. This port is intended only for
service purposes.
2.4 Placing out of operation
In order to disconnect the device just disconnect it from the mains power supply. No
other measures are to be taken.
SD card slot
AC power connector
with fuse for Neoserv
ON / Off switch for
Neoserv
ON / Off switch for
Duodynator
Data connection
between Duodynator
and Neoserv
AC power connector
with fuse for
Duodynator
10
Duodynator
gbo Medizintechnik AG Version 1.2
3Operation
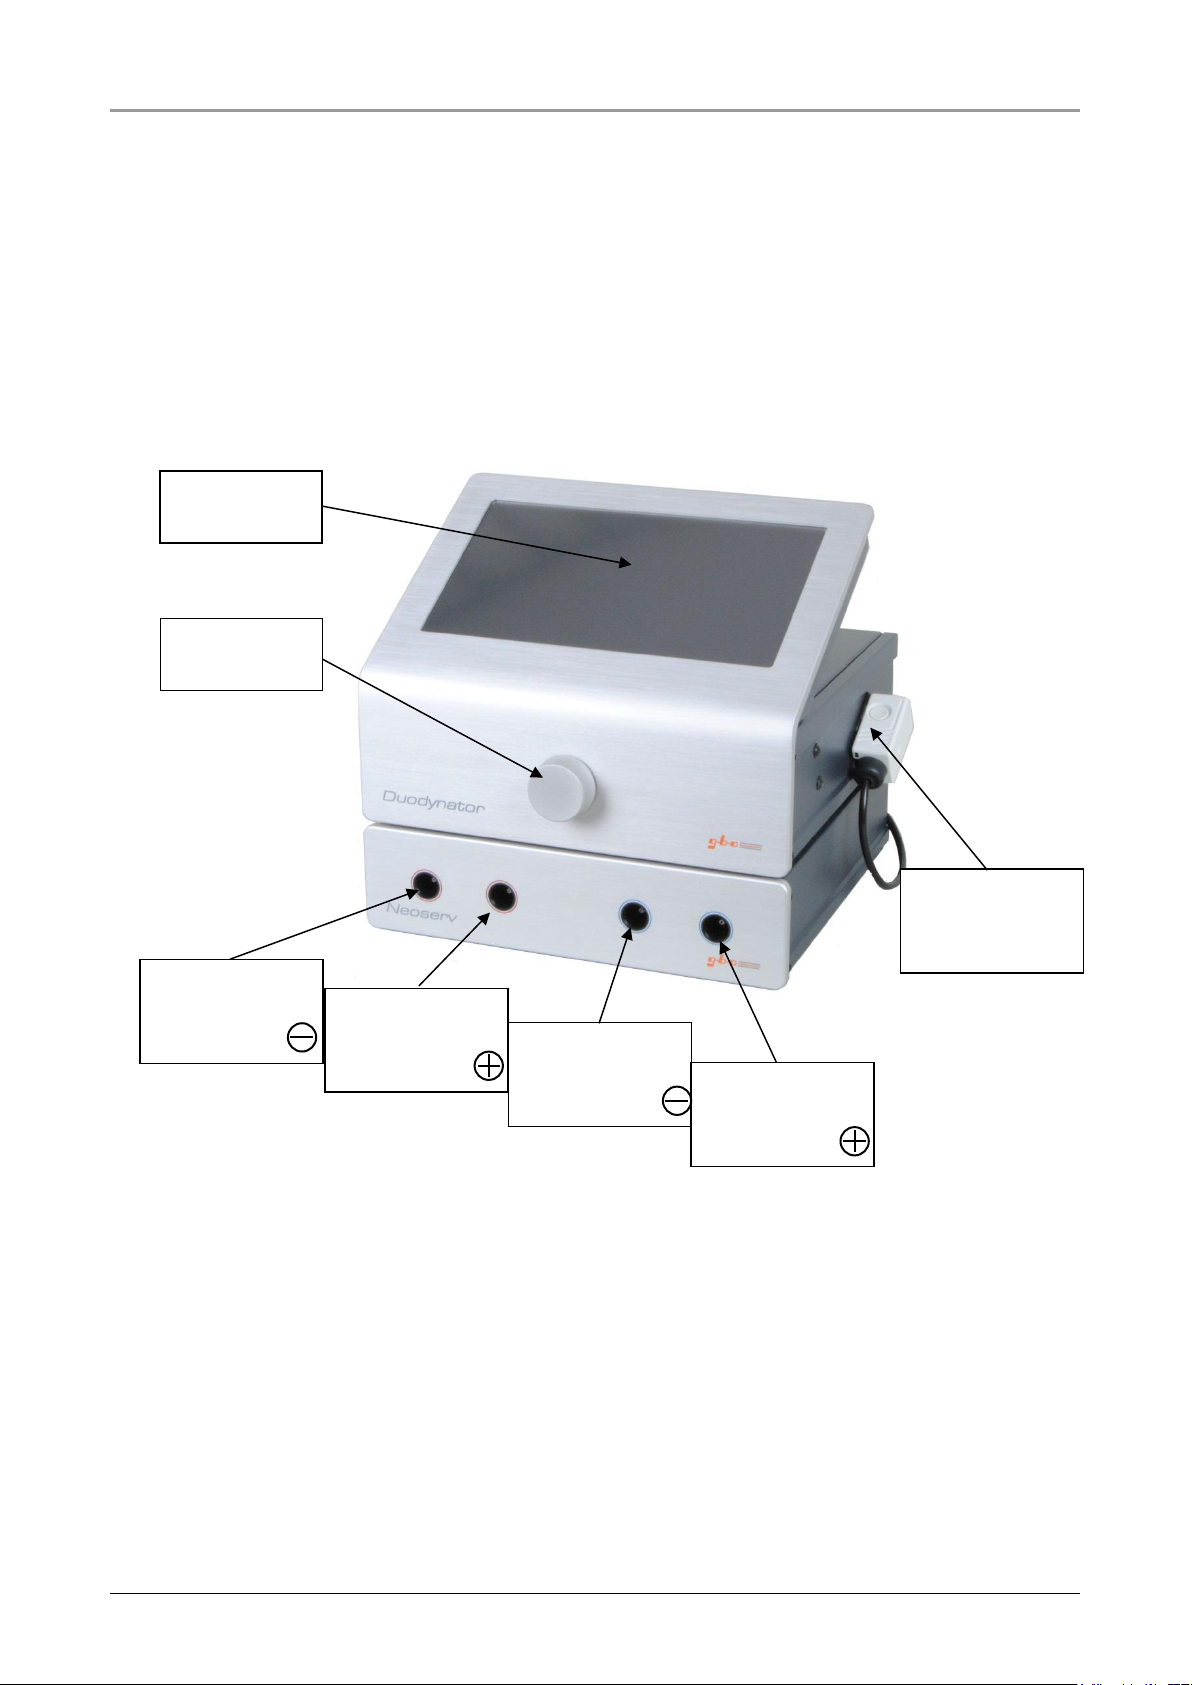
The Duodynator has a touchscreen display, a knob, an on/off switch and a socket for
a patient cable or Neoserv.
The operation of the Duodynator is done by the controls of the touch screen and the
knob.
Is the Neoserv connected and shall be used, its operation is realized in Duodynator.
3.1 Overview
3.1.1 Touchscreen display
The touch screen should be operated with a distinct pressure of the fingertip. Sharp
objects are unsuitable for operation and can damage the screen.
The individual panels (buttons) are clearly labeled. Visually accessible buttons are
distinguished from non-use buttons.
Touchscreen
Display
Knob
Connection for
patient cable or
Neoserv
Connection for
suction lines
for channel 1
Connection for
suction lines
for channel 2
Connection for
suction lines
for channel 1
Connection for
suction lines
for channel 2

Duodynator
11
gbo Medizintechnik AG Version 1.2
3.1.2 Knob
The knob is located on the front panel and is used as an intensity knob to adjust the
output voltage as well as a modification controller for changing therapy parameters
such as treatment duration or frequency.
The intensity controller is activated by the selection of the corresponding channel.
After a timeout of 20 seconds, the intensity controller becomes inactive and must be
released for a further intensity change again with the appropriate channel button.
The Knob will be used as a modification knob after pressing a button, such as the
changeable frequency. When the button is pressed, it is provided with a blue border
and may be operated for 3 seconds.
3.1.3 Home screen in the single-circuit operation
After power-up, and ready for operation, the device displays the home screen.
Achilondynie
Tennis elbow
Direct aid
Button
Button
settings
Suction
Button
Channel I selection
and information
button
Selection
Favourite list
Selection
More
therapies
Selection
Indications
Detailed Settings
therapy parameters
Swelling parameters
with activated swelling
Therapy
duration
Selection
Single-circuit
interference
Channel II selection
and information
button
Save the set therapy parameters
as "own therapy"
Single-circuit is
selected (green)
12
Duodynator
gbo Medizintechnik AG Version 1.2
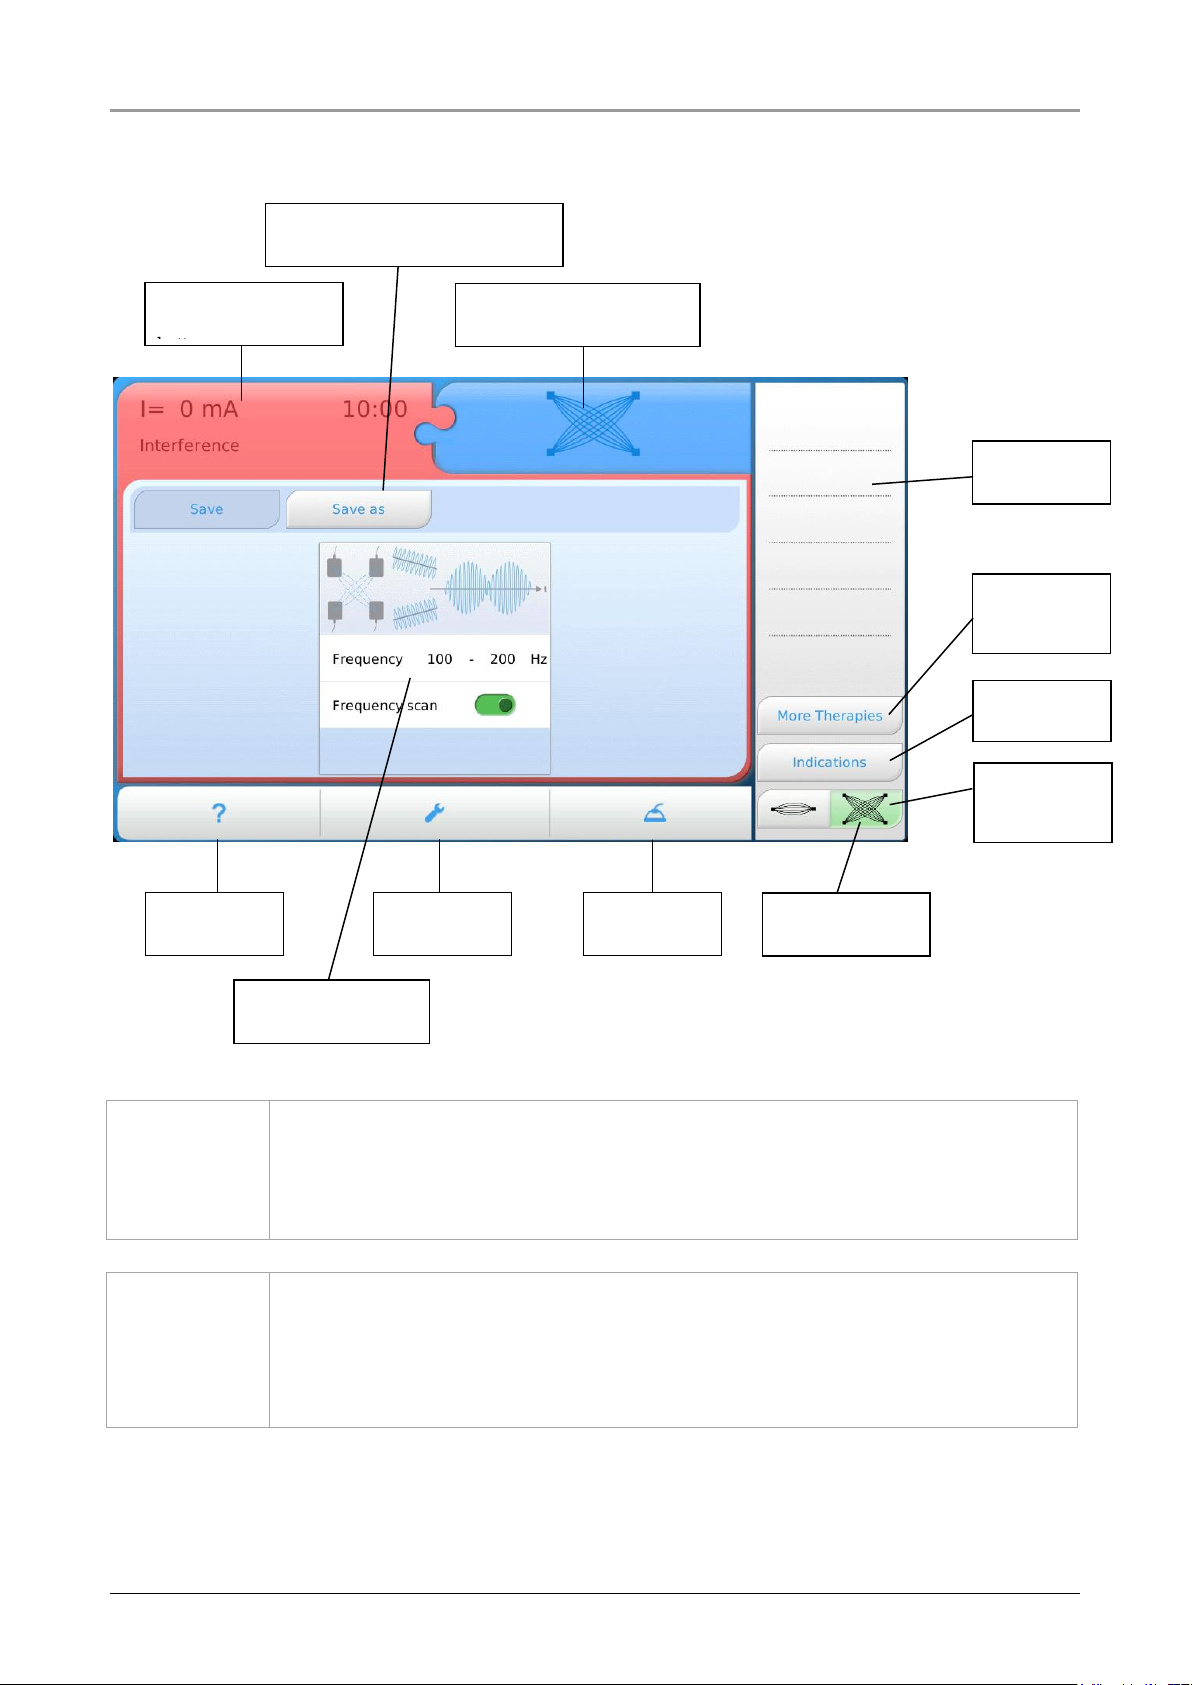
3.1.4 Home screen panels in the interference operation
After power-up, and ready for operation, the device displays the home screen.
!
Note!
In the interference mode, both channels are adjusted simultaneously with
the intensity controller.
!
Note!
If the Neoserv is switched on and connected to the current
stimulation output of Duodynator, suction will automatically
switched on when selecting a current from the Favorite list.
Achilondynie
Tennis elbow
Direct aid
Button
Button
settings
Suction
Button
Channel selection
and information
button
Selection
Favourite list
Selection
More
therapies
Selection
Indications
Detailed Settings
therapy parameters
Selection
Single-circuit
interference
Here is presented
linking both channels
Save the set therapy parameters
as "own therapy"
Interference is
selected (green)

Duodynator
13
gbo Medizintechnik AG Version 1.2
3.1.5 Screen for selecting an indication
After pressing the button “indications”, the device displays the following screen.
3.1.6 Screen for selecting other therapies
After pressing the button “other therapies”, the device displays the following screen.
Indication image
Display of electrode
placement
Indication list in
alphabetical order
Range selection to
restrict the list of
indications
Return to the
Home screen
without saving the
indication
Return to the
Home screen with
the acquisition of
indication
List of own therapies
in alphabetical order
Parameters for the
selected list entry
Return to the
Home screen
without applying
their own therapy
Return to the
Home screen with
assumption of
personal therapy
Delete the selected
therapy
Rename the
selected therapy
Pre-selection of the
current type

14
Duodynator
gbo Medizintechnik AG Version 1.2
3.2 Suction flyout
When using the Duodynator together with the Neoserv the suction operation will be
activated after the Neoserv is switched on. Pressing the suction button, a flyout
folded up in which you can set the parameters for the suction.
The suction, which means the negative pressure in the suction electrodes, can be
adjusted from -40 to -300 mbar.
The suction massage can be adjusted between 0 and 20 pulses / minute.
!
Note!
If the suction is to be used, the Neoserv must be switched on with its
power switch on the back of the unit before.
If the Duodynator is switched off using the power switch, the
Neoserv sounds a warning signal which indicates that the Neoserv is
still on and must be switched off.
!
Note!
If the Neoserv is switched on and connected to the current
stimulation output of Duodynator, suction will automatically
switched on when selecting a current from the Favorite list.
Suction strength
suction massage
Suction on-off
switch
Suction
Button

Duodynator
15
gbo Medizintechnik AG Version 1.2
3.3 Direct help
The user of the Duodynator is guided on the screen. The direct help menu provides
information about the selected buttons directly on the screen.
To open the direct help menu, first touch the “?“-button and then the button about which
you desire information. A window opens where the information is shown. Touch to the
help window in order to close it.
!!
Note!
Available buttons are indicated in light grey. Unavailable buttons are
indicated in dark grey. If you push an unavailable button, information
about the use of this button is shown on the screen automatically.
Direct Help window
Example here:
Button requency
16
Duodynator
gbo Medizintechnik AG Version 1.2
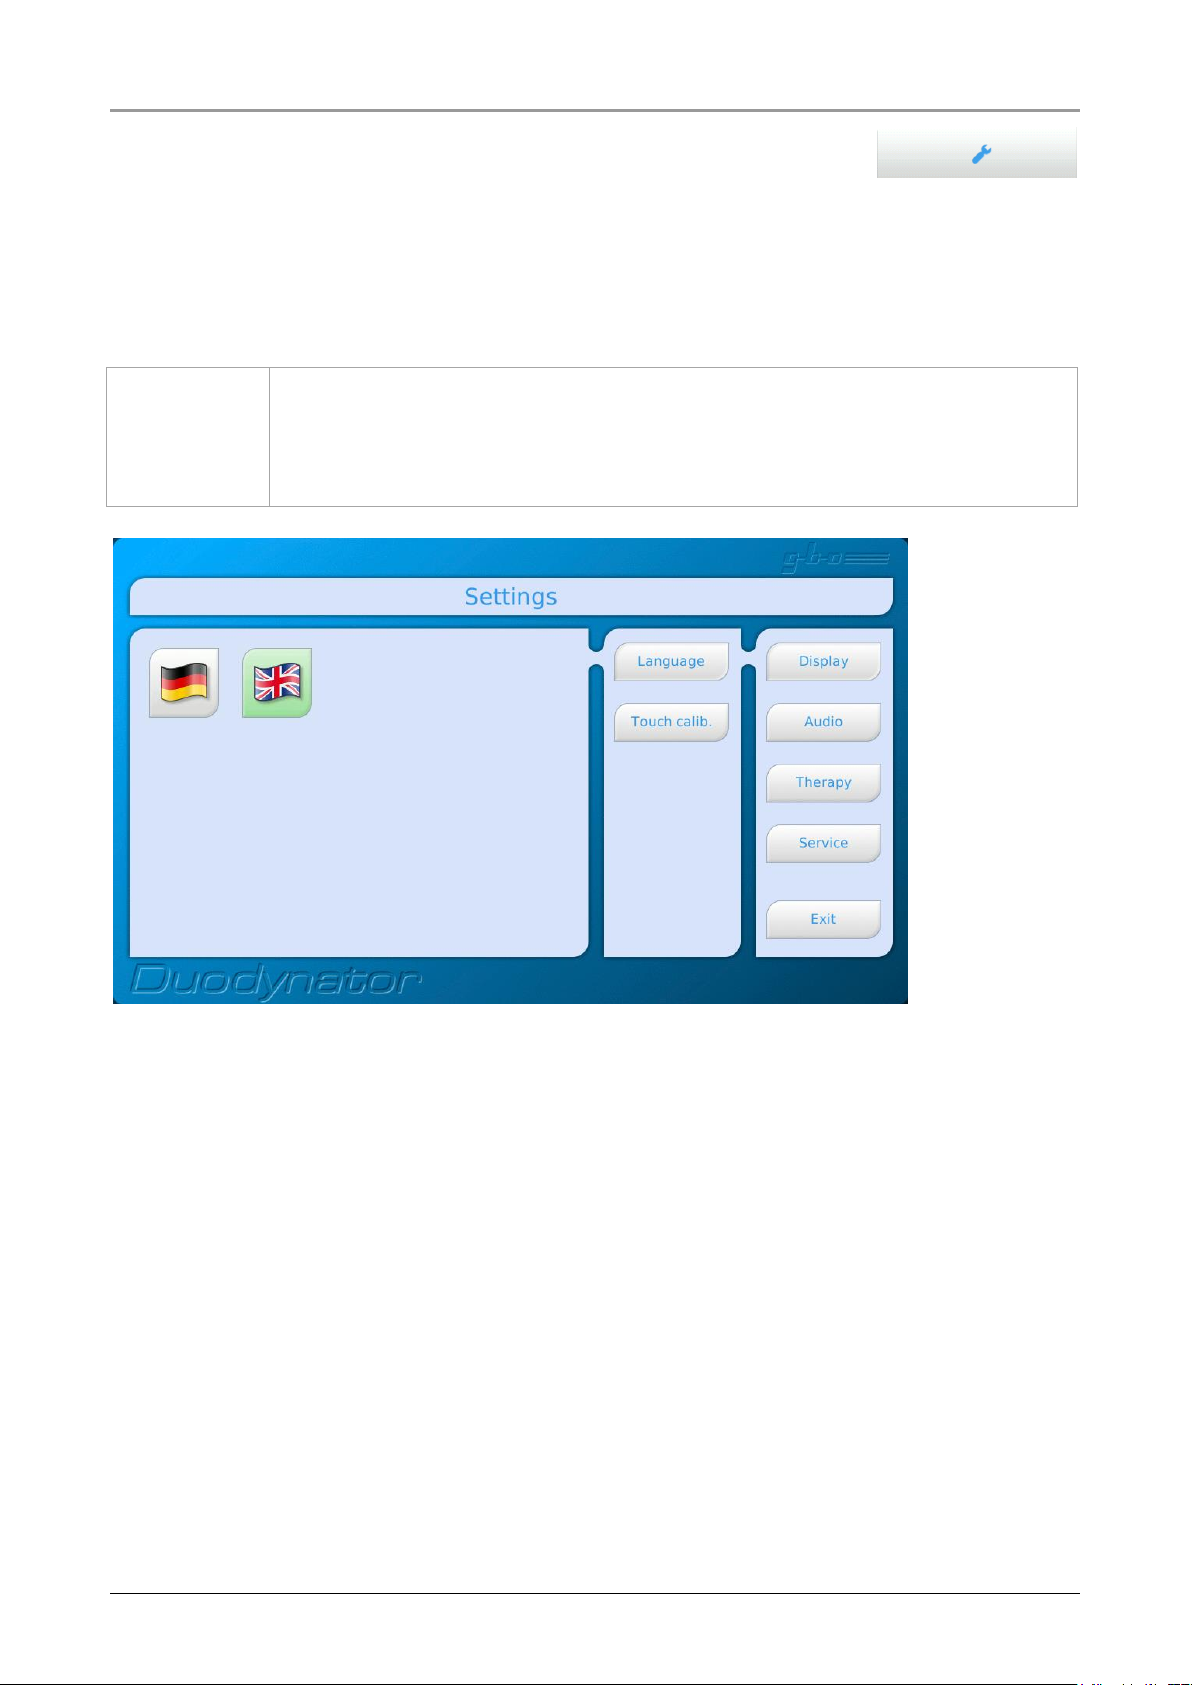
3.4 Settings
Using the Settings button to access the setup menu of the Duodynator. In this menu,
parameters such as languages, output of different sounds, eg for the end of treatment
and various treatment parameters are defined.
Also the access to service is located in the settings menu.
Only if no therapy is active, you can switch to the setup menu.
!!
Note!
Only if no therapy is working, you can switch to the setup menu.
The following items are available in the Settings menu:
Display
-Setting the national language
-Calibration of the touch screen.
Audio
-Setting the system sounds like the end of therapy-tone, error tone, etc. The
sounds can be heard and assigned to the corresponding functions. A sound can
also be switched off.
-Repetition of the therapy end sound (Never, 2 Minutes, 10 Minutes)
-Breaks between the repeated therapy end sound (Yes/No)
-Repetition of the error sound (Never, 2 Minutes, 10 Minutes)
-Breaks between the repeated error sound (Yes/No)

Duodynator
17
gbo Medizintechnik AG Version 1.2
Therapy
-Setting the carrier frequency (2 to 10 kHz in 2 kHz steps)
-Temporary deactivation of the intensity monitoring until the next switching on
the device (On/Off)
-Automatic pump stop after the end of treatment. (On/Off)
-Automatic switch on the pump when selecting a current from the Favorites list
(On/Off)
Service
-Access to the service area
Service area with access to service. The service is reserved for service partners
and helps in the search for faults in the hardware. Release of the software.
Resetting to the factory settings.

18
Duodynator
gbo Medizintechnik AG Version 1.2
4Therapy
4.1 General guidelines for therapy
Always observe the instructions given to the electrode positioning (see Chapter5.1).
The maximum output power per channel is 5000 mW. When this value is reached,
the intensity can not be further increased. Depending on the selected current type
limits for the current value can be considered (see Appendix for details).
Please note the maximum current density for the electrode which are defined in Table
1, Table 2 and Table 3.
Depending on the particular application plate electrodes or the suction electrodes can
be used. When plate electrodes are used, they are connected to the patient cable.
Channel I is indicated by the red color.
Channel II is indicated by a blue color.
According to the used channel the red or blue channel must be selected on the unit to
change the current for this channel.
If suction electrodes are used, a Neoserv must be present and connected. Instead of
the patient cable, the cable of the Neoserv is connected to the socket of the
Duodynator. The suction function is operated using the suction flyout. In the suction
flyout the suction can be switched on and off, the suction strength can be chosen
within certain limits and the suction massage frequency can be set.
4.2 Selection of therapies
4.2.1 Selection of therapy by Other therapies
In this selection all low, all medium-and all self-defined currents are filed. The
selection is made from a list which is filtered. Thus, only low-frequency monophasic,
only low-frequency biphasic, only medium frequency or user-defined currents can be
displayed from the appropriate list and then selected.
If Interference is used, the selection is only between standard and Own therapies.
4.2.2 Selection of therapy by indications
In Duodynator an indication menu is integrated. This provides a list of programs
with pictures indication to the electrode positioning specify the parameters (current
form, possibly modulating frequency and duration). This treatment parameters are
indicative and recommendations are the responsibility of the treating physician.
Duodynator
19
gbo Medizintechnik AG Version 1.2
4.2.3 Selection of therapy from the favorites list
The Favorites list can be filled by the user as desired. Thus, the users
can define the order of his frequently used therapies by himself.
Indications own therapies and individual treatment settings may be
transferred to the Favorites list. A simple push on the button loads the
therapy from the favorite list as current therapy.
The Favorites list can be easily filled. Select a treatment from the list
of indications, the list of other therapies or set the parameters
individually. This therapy can now be selected by pressing and
holding (2.5 seconds) the corresponding button on the right location
of the favorites list. One no longer required entry can be easily deleted
by push away to the right.
4.2.4 Individual settings
In the home screen there is the possibility to change parameters for a selected current
waveform within certain limits. The duration can be changed accordingly. The
current form as newly generated can be directly applied. It can be stored in the
Favorite list. There is also the possibility to save this modified current form as "Own
Therapy" under a user-specified name. These self-defined therapies can then be
retrieved by the use of the button "Other therapies" with the sub-selection "Own
therapies".
!!
Note!
After switching on the device the therapy last used will be loaded
automatically.
!!
Note!
After the change between single-circuit and interference therapies and
therapies previously used will be reloaded each.
!!
Note!
For the polarity of the connection cable applies:
White cable connector or the interrupted circle on Neoserv
Black cable connector or closed circle on Neoserv
Spondylitis
Achilondynie
Tennis elbow
This manual suits for next models
1
Table of contents
Other gbo Medizintechnik Medical Equipment manuals


Popular Medical Equipment manuals by other brands


Getinge
Getinge Arjohuntleigh Nimbus 3 Professional Instructions for use

Mettler Electronics
Mettler Electronics Sonicator 730 Maintenance manual

Pressalit Care
Pressalit Care R1100 Mounting instruction

Denas MS
Denas MS DENAS-T operating manual

bort medical
bort medical ActiveColor quick guide

AccuVein
AccuVein AV400 user manual


