manuals.online logo
Brands
  1. Home
  2. •
  3. Brands
  4. •
  5. GCX
  6. •
  7. TV Mount
  8. •
  9. GCX M Series User manual

GCX M Series User manual

DU-FLP-0010-20 Rev A 10/9/13 GCX Corp Page 1 of 4
3875 Cypress Drive Petaluma, CA 94954 800.228.2555 707.773.1100 Fax 707.773.1180 www.gcx.com
Installation Guide
M Series Flush Large Flat Panel/TV Mount
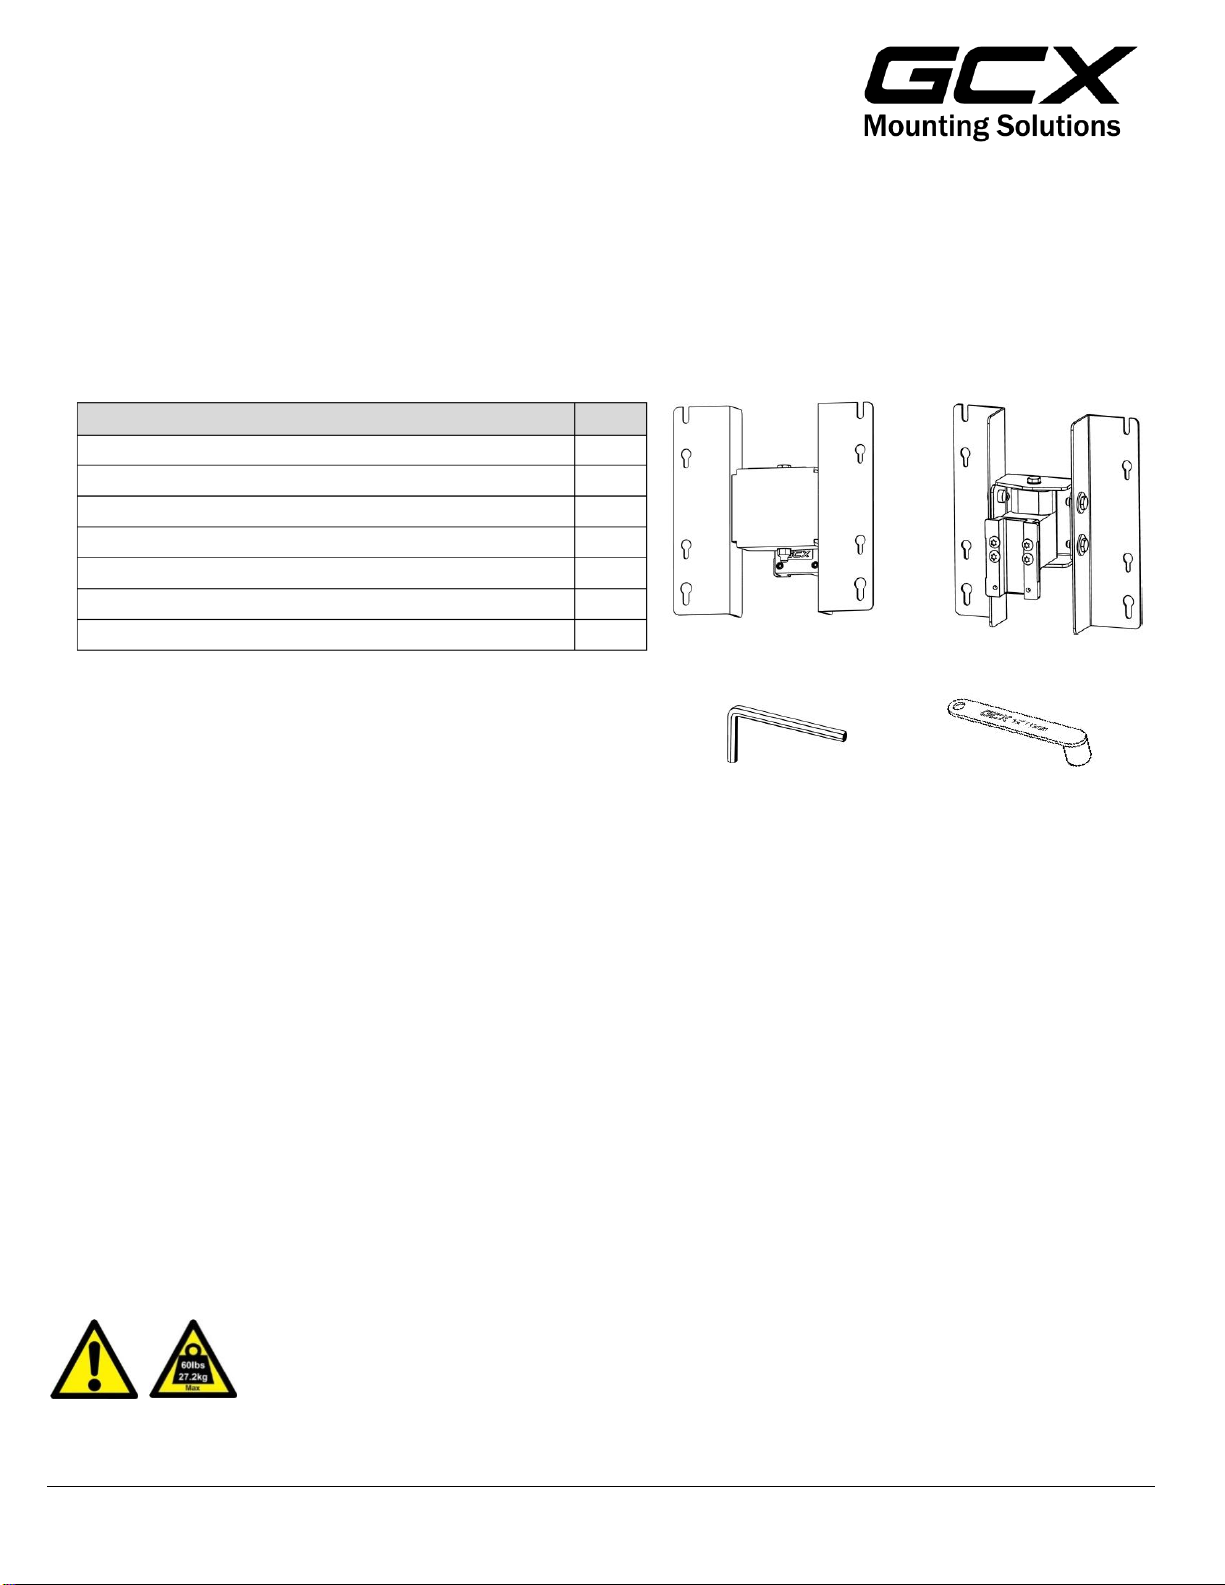
Parts Reference
The following parts and hardware are included with this installation kit:
Tools Required:
Phillips Screwdriver (not provided)
1/8” Hex Wrench (provided)
5mm Hex Wrench (not provided)
1/2” Socket Wrench (provided)
Installation Note: Mount accommodates 100 x 200 and 200 x 200 VESA mounting patterns.
Description
Qty
TV Flush Mount
1
M6 x 14mm Socket Head Cap Screw (SHCS)
4
M6 x 16mm Socket head Cap Screw (SHCS)
4
M4 x 10mm Pan Head Machine Screw (PHMS)
4
M4 x 12mm Pan Head Machine Screw (PHMS)
4
1/8” Hex Wrench
1
1/2” Socket Wrench
1
Max. Load 60lbs/27.2kg
Installation and Maintenance Warnings
Back View
Front View
This section must be read in its entirety before installing and maintaining the mount. Failure to follow these warnings may
result in damage to equipment or injury to personnel.
•Please consider carefully the mounted equipment and proximity to other equipment, hospital personnel and the patient.
•Periodically inspect components and fasteners for looseness. Tighten as required for optimal operation and safety.
•A second person may be needed to install Flat Panel/TV.
•Ensure that the weight of the Flat Panel/TV being mounted does not exceed the 60 lbs. load rating of the flush mount.
1/2" Socket Wrench
1/8” Hex Wrench
Warning- This mounting kit provides an assortment of M4 and M6 hardware for a wide variety of display-mounting
applications. It is the responsibility of the installer of this product to ensure that all screws used to mount the display have
a minimum thread engagement of four (4) 360º turns into threaded inserts in rear of display. It is also the responsibility of
the installer to ensure that screws are not inserted too far into the display, causing damage to internal components.
Failure to adhere to this warning could result in damage to equipment or injury to patients or personnel.
DU-FLP-0010-20 Rev A 10/9/13 GCX Corp Page 2 of 4
Tighten the (2) set screws with a 1/8” hex wrench to
secure position in channel.
2
Guide the Slide (back of Flush Mount) into the top of
GCX channel and move to desired mounting position.
1
Install (4) M4 screws to Flat Panel/TV VESA pattern
leaving 5mm of exposed thread. Then align Flat
Panel/TV with slots on flush mount, drop into place.
1
Tighten screws to secure Flat Panel/TV.
2
1/8”
Mounting Flat Panel/TV with a 100 x 200 mounting pattern
Installing Mount into channel
X2
5mm
DU-FLP-0010-20 Rev A 10/9/13 GCX Corp Page 3 of 4
On larger Flat Panel/TV with 200 x 200 VESA, install
(2) M6 screws in top holes leaving 5mm of exposed
thread. Lower the Flat Panel/TV onto the flush
mount using the top edge mount holes.
1
Install the lower (2) M6 screws. Using a 5mm hex
wrench, tighten all screws to secure Flat Panel/TV.
2
Loosen the 2X (per side) 1/2” bolts shown on side view.
Tilt the Flat Panel/TV to desired position. There are 10
degrees up/down of adjustment. Tighten the 1/2" bolts to
secure the Flat Panel/TV position.
Tilt Adjustment
Using a 1/2” wrench on both ends of the swivel tension
bolt, tighten or loosen tension bolt until desired tension is
achieved.
Swivel Adjustment
Mounting Flat Panel/TV with a 200 x 200 VESA mounting pattern
Tilt Adjustment Bolts
Swivel Tension Bolt
5mm
5mm
5mm
DU-FLP-0010-20 Rev A 10/9/13 GCX Corp Page 4 of 4
Routine Maintenance
Periodically inspect all fasteners associated with the mounting system. Tighten or adjust fasteners as necessary for
optimal operation and safety.
Cleaning the Mounting Assembly
1. The mounting assembly may be cleaned with most mild, non-abrasive solutions commonly used in the hospital
environment (e.g. diluted bleach, ammonia, or alcohol solutions).
2. The surface finish will be permanently damaged by strong chemicals and solvents such as acetone or trichloroethylene.
3. Do not use Steel wool or other abrasive material.
4. Damage caused by the use of unapproved substances or processes will not be warranted. It is recommended that you
test any cleaning solution on a small area of the mounting assembly that is not visible to verify compatibility.
5. Never submerge or allow liquids to enter the mounting assembly. Wipe any cleaning agents off of the arm immediately,
using water dampened cloth. Dry the assembly thoroughly after cleaning.
CAUTION: GCX makes no claims regarding the efficacy of the listed chemicals or processes as a means for controlling
infection. Consult your hospital’s infection control officer or epidemiologist. To clean or sterilize mounted devices or
accessory equipment, refer to the specific instructions delivered with those products.

Other manuals for M Series

4

Other GCX TV Mount manuals

GCX M Series User manual

GCX

GCX M Series User manual

GCX M Series Installation instructions

GCX

GCX M Series Installation instructions

GCX VHRS User manual

GCX

GCX VHRS User manual

Popular TV Mount manuals by other brands

Kimex 013-3145 installation manual

Kimex

Kimex 013-3145 installation manual

BalanceBox 400 installation manual

BalanceBox

BalanceBox 400 installation manual

Novus NVB-5100JBB user manual

Novus

Novus NVB-5100JBB user manual

Humminbird 530516-1_D Installation

Humminbird

Humminbird 530516-1_D Installation

Dynex DX-TVM111 Quick setup guide

Dynex

Dynex DX-TVM111 Quick setup guide

Sanus New VisionMount VST15-B1 Brochure & specs

Sanus

Sanus New VisionMount VST15-B1 Brochure & specs

PDi PD181-660 manual

PDi

PDi PD181-660 manual

VOGELS Elite 5445 Series Full Installation Guide

VOGELS

VOGELS Elite 5445 Series Full Installation Guide

Omnimount OL200FT instruction manual

Omnimount

Omnimount OL200FT instruction manual

Sim-Lab XB-1 instruction manual

Sim-Lab

Sim-Lab XB-1 instruction manual

New Star PLASMA-W040 instruction manual

New Star

New Star PLASMA-W040 instruction manual

New Star NS-PLXPROTECT1 instruction manual

New Star

New Star NS-PLXPROTECT1 instruction manual

Delta ARM-0350 user manual

Delta

Delta ARM-0350 user manual

VOGELS EFA6895 instruction manual

VOGELS

VOGELS EFA6895 instruction manual

VOGELS Original VLB 450 Mounting instructions

VOGELS

VOGELS Original VLB 450 Mounting instructions

VOGELS TVM 1220 Series Full Installation Guide

VOGELS

VOGELS TVM 1220 Series Full Installation Guide

B-Tech BTB441 Installation guide & parts list

B-Tech

B-Tech BTB441 Installation guide & parts list

One Forall Dynamic WM5660 Quick installation guide

One Forall

One Forall Dynamic WM5660 Quick installation guide

manuals.online logo
manuals.online logoBrands
  • About & Mission
  • Contact us
  • Privacy Policy
  • Terms and Conditions

Copyright 2025 Manuals.Online. All Rights Reserved.