GE JP328 Original instructions

www. GEAppliances.com
Safety Information ...... 9-4
Operating Instructions ..... 5
Care and Cleaning
Control I4mobs ............ 6
Drip Pans ................. 8
Glass Control Panel ......... 6
Lift-Up Cooktop ........... 8
Metal Parts ................ 8
Packaging Tape ............ 6
Porcelain Enamel Cooktop . . 7
Stainless Steel Cooktop ...... 7
Surface Units .............. 8
Installation Indructions
Electrical Connections ..... l l
Electrical Requirements .... 10
Installation of the Cooktop . .11
Location ................ 10
Tools You Will Need ........ 9
Troubleshooting Tips ..... 19
Consumer Support
Consumer Support ........ 14
X4'arranty ................ 13
Write the model and serial
numbers here:
Model #
Serial #
You can find them on a label
trader the cooktop.
iliiiiH
164D4290P111
JP328
JP626
49-80154 08-02 Jfl

IMPORTANTSAFETYINFORMATION.
READALLINSTRUCTIONSBEFOREUSING.
WARNING!
For your safe_ the information in this manual must be followed to minimize the risk of fire or
explosion, electric shock, or to prevent property damage, personal injury, or loss of life.
SAFETYPRECAUTIONS
When using electrical appfiances, basic safety precautions should be followed, including the following:
iiiiiiiiiiii_iii
iiiiiiiiiiii_iii
iiiiiiiiiiii_iii
Use this appliance only %r its intended use
as descrihed ira this manual.
Do not attempt to repair or replace any
part of your cooktop unless it is specifically
recommended ira this manual. All other
servicing should he refened to a qualified
technician.
Be%re per%nning any service,
disconnect dae cooktop power supply
at the honsehold distt-ihntion panel hy
removing tim fltse or switching off the
citvuit hreaket:
Be snre yonr appliance is properly installed
and grounded hy a qualified technician ira
accordance with the provided installation
instructions.
Haxe the installer show you the location of
the circuit hreaker or fltse. Mark it for easy
reference.
Do not leme children alone---<'hildren
should not he left alone or unatmnded ira
an area where an appliance is in use. They
should nex>r he allowed to sit or stand on
any part of the appliance.
Teach children not to pl W with flae
controls or any other part of the cooktop.
Do trot allow anyone to climh, stand or
hang on the cooktop.
CAUTION:temsofinterest1o
children should not he stored ira cabinets
abox> a cooktop--- children climhing on
the cooktop to reach items could he
seriously irljtlred.
Always keep combustihle wall cox>ring,
curtains or drapes a safe distance from
your cooktop.
Always keep dish towels, dish cloflas, pot
holders and oflaer linens a safe distance
away fiom your cooktop.
Always keep wooden and plastic utensils
and canned food a sat) distance away
fiom your cooktop.
Never wear loose-fitung or hanging
g'annents while using the appliance.
Flammable material could be ignited if
hronght ira coratact wifla hot surPace units
and may cause severe hurlas.
Use only dUpot holders--moist or damp
pot holders on hot snrthces may result ira
1)m_asfrom steam. Do not let pot holders
touch hot snrl_ace units. Do not use a towel
or other bulky cloth. Such cloths can catch
fire on a hot surfiace unit.
COOKMEATANDPOULTRYTHOROUGHLY...
Cookmeatandpoultry thoroughly--meat to at least anINTERNALtemperatureof 16O°Eandpoultry
toat least an INTERNALtemperatureof 180°ECookingto thesetemperaturesusuallyprotectsagainst
foodbomeillness.
2

WARNING!
SAFETYPRECAUTIONS
For your safeR; ne_er use your appliance
for wai_ning or heating the room.
Do not use water on grease fires. Never
pick/l I) a flaming pan. Turn the conuols
off: Smother a flaming pan on a surl_ace
unit by covering the pan complemly with
well fitting lid, cookie sheet or fiat u W. Use
a multi-puli)ose dUchemical or foam-type
exfinguishen
Flaming grease outside a pan can be put
out by covering widl baking soda oi, if
available, by using a multi-purpose d U
chemical or foam-type file exdnguishen
_llen p_eparing flaming foods nnder tile
hood, uml the fan on.
Do not let cooking grease or other
flammable mamrials accumulam on
the cooktop.
Do not touch surl_ace units. These surl_aces
may be hot enough to bunl e\'en though
they are dark ill colon Dining and after
use, do not touch, or let clothing or other
flammable mamrials contact the surt_ace
units or aieas nearby the surface units;
allow sufficient time for cooling first.
Pomnfially hot surl_aces include the
cookmp and areas facing the cooktop.
To minimize tile possibility of bnlIlS,
ignition of flammable mamrials and
spillage, die handle of a container
should be turned toward tile cenmr of
the cookmp without extending over ally'
nearby surface units.
www.GEAppliances.com
Always tu_l the surl_ace unit contIol to off
be%re removing tile cookware.
To mold tile possibility of a burn or
elecuic shock, alwws be certain that the
connols for all surl_ace units are at off
position and all coils are cool before
atmmpdng to lilt or remove file unit.
Do not immerse or soak removable surface
units. Do not put them ill a dishwashen
Use proper pan size--Select cookware
having fiat bottoms large enongh m cover
file sniPace unit heating element. Tile use
of nndersized cookware will expose a
portion of the surface unit to diIect
contact and may Iesuh ill ignition of
cloflfing. Proper relationship of cookwaie
m burner will also improve efficienc>
Nex>r leme surface units unattended
at high heat seuings. Boilox_rs cause
smoking and greasy spillo_ers that m W
catch on file.
Be sure tile drip pans are not covered and
are ill place. Tileir absence during cooking
could damage cooktop parts and wiling.
Do not use alun/inum foil to lille the d_ip
pans. Misuse could result ill a shock, file
hazard or damag> to the cooktop.
3

IMPORTANTSAFETYINFORMATION.
READALLINSTRUCTIONSBEFOREUSING.
WARNING'!
SAFETYPRECAUTIONS
Only certain types of glass, glass/ceramic,
earthenware or other glazed containers
are suitable fox cooktop cooking; others
may break becanse of the sudden chang>
in temperature.
Nexer clean the cooktop sur/_ace when it
is hot. Some cleaners produce noxious
flmms and wet cloths could cause smam
burns if used on a hot sur/_ace.
Kee I) an eye on foods being fried at high
or medium high heat settings.
Foods fox flTing should be as dIT as
possible. Frost on fiozen foods or moisture
on flesh foods can cause hot f_t to bubble
up and ox>r the sides of the pan.
Use little/_at for effective shallow or deep-
fht flTing. Filling the pan too flfll oftht can
cause spillox>rs when food is added.
If a combination of oils or fi_tswill be used
in flying, stir tog>ther before heating, or as
t:ats meh slowly.
7
Always heat l_atslow N,,and watch as it
heats.
Do not store flammable mamrials near
rixe cooktop.
Kee I) the hood and grease fihers clean
to maintain g_od x_nfing and to ax_id
grease fires.
Do not stoxe or use combustible materials,
gasoline or other flammable vapors and
liquids in rixe vicinity of this or any
appliance.
Clean only parts listed in this Owner's
Manual.
Do not leme paper products, cooking
utensils or food on the cooktop when not
in use.
Kee I) cooktop clean and free of
accumulation of grease or spilloxers which
m W ig_fite.
Nexer heat unopened food containers.
Pressure buildup may make container
burst and cause i*_txIT.
Nexer leaxejars or cans of fi_tdrippings on
or near your cookmp.
Use a deep f:at thermometer whenever
possible to prex_nt ox_rheafing/_t beyond
the smoking point.
Never uT to move a pan of hot fat,
especially a deep/_t fryer _A'aituntil
the £_t is cool.
READANDFOLLOWTHISSAFETYINFORMATIONCAREFULLY.
SAVETHESEINSTRUCTIONS
4

Usingthesurfaceunits.
Throughout this manual, features and appearance may vary from your model.
How to Set
Push the knob in and turn in either
direction to the setting )ou want.
At both OFF and HI the control clicks
into position. Ym may hear slight
clickingsotlnds (hllJng cooking,
indicating the control is keeping the
power level you set.
The control must be pushed in to set
only fl'om the OFFposition. _]_en the
control is in any position other than OFF,,
it may be rotated without i)ushing it in.
If boiling water; fi)r more efficient use,
ttlrn the knob to HI to bring it to a boil
thste_: _Mier the water has come to a boil,
reduce the knob setting to medium-high.
The heat will still be great enough to
maintain a boil, but you will be using less
eiler_'.
An indicator light will glow when any
surtilce unit is on.
Be sure you turn the control knob to OFF
when you finish cooking.
Not over I inch.
Surface Cookware Tips
Use medium- or hea\y-weight cookware.
Muminum cookware conducts heat tipster
than other metals. Cast-iron and coamd
cast-iron cookware are slow to }lbsorb
heat, but generally cook evenly at low to
medium heat settings. Steel pans may
cook unevenly if not combined with
other metals.
For best cooking results, pans should be
fiat on the bottom. Match the size of the
saucei)an to the size of the stu]i_ce unit.
The pan should not extend over the
edge ot the stu_hce unit more than
1 inch.
Use only flat-bottomed woks.
Wok Cooking
Werecommendthat youuseonlya flat-bottomed
wok Theyareavailableat yourlocal retail store.
Do not rise wo]_s that have SUl)port rings.
lJse ot these t)pes ot wok% with or
without the ring in place, can be
d}lngero/is,
Pladng the ring over the stmfi_ce unit will
cause a build-u I) of heat that will damage
the porcelain cooktop. Do not try to use
such woks without the ring. _A)u could be
seriously burned if the wok tipped over.
Deep Fat Frying
Foods tin" ti'ying should be as dry as
possible. Frost on ti'ozen toods or
Illoisttlre on ti'esh toods C}lIl catlse
hot fat to bubble up and over the
sides of the pan.
5

Careand cleaningofthecooktop.
Be sure electrical power is off and aft surfaces are cool before cleaning any part of the cooktop.
How to Remove Packaging Tape
To assure no dmnage is done to the finish
(ff the product, the satest way to remove
the adhesive left fl'om packaging tape on
new appliances is an application of a
household liquid dishwashing detergent,
mineral oil or cooking oil.
Apply with a soft clofl_ and allow to soak.
_._pe dry and then apply an appliance
polish to thoroughly clean and protect
the surti_ce.
NOTE: Theplast/?tapemust be removedfromall
chrometrim.It cannotbe removedif it/s bakedon.
Glass Control Panel
Theglass controlpanel onyourcooktophasbeen
temperadto withstand sudden temperature
changesduringcooking.Giveit the normal care
you wou/dgive anyglassmaterial
_,_]file it is impact-resistant, avoid
scratching it to prevent it fl'om shattering.
If the glass is hot, wipe up spills with a dry
cloth or paper towel. _,\]_en the surfi_ce
has cooled, wash, rinse and (hT it.
Mternately; when the glass is cool, spray it
with glass or window cleane_: Avoid the
use of cleaning powders or hmsh
abrasives that may scratch the stm'i_ce.
Moldedril:
Spring
clip
Clear gmnve
Control Knobs
Thecontrolknobsmayberemovedforeasier
cleaning.
Before removing the knobs fl)r
cleaning, please note that the knobs
are in the OFFposition. When
replacing the knobs, check the OFF
position to insm'e proper placement.
The knob has a groove in each side. The
groove on one side has a spring clip. The
other groove is clea_: Check the inside of
the knob and find the molded rib.
X4ash knobs in soap and water but do not
soak. Avoid getting water down into the
knob stem holes.
Replace the knob by fitting the molded
rib inside the knob into the clear groove
on the stem.

Stainless Steel Cooktop (onsomemodels)
Do not use a steel-wool pad; it will
scratch the surface.
To clean the stainless steel surtace,
use a hot, damp cloth with a mild
detergent suitable tot stainless steel
surtaces. Use a clean, hot, damp
cloth to remove soap. Dry with a
dry, clean cloth.
If fl)od soil remains, t_T a general
kitchen cleane_; such as FantastiF,
Simple Green _,or Formula 409L
For hard-to-clean soil, use a
standard stainless steel cleaner,
such as Bon-Ami or Cameo "_'.
Apply cleaner with a damp sponge.
Use a clean, hot, damp cloth to
remove cleaner. D_w with a dr>
clean cloth. Always scrub lightly
in the direction of the grain.
Afier cleaning, use a stainless steel
polish, such as Stainless Steel Magic '_,
Revere Col)per and Stainless Steel
Cleanei_=; or _'enol All PurI)ose
Metal Polish _, Follow the product
instructions fi)i" cleaning the stainless
steel surtace.
Porcelain Enamel Cooktop(onsomemodels)
Theporce/albenamelfinishlssturdybut
breakableifmisused
This finish is acid-resistant. Howe;'eI; any
acidic fi)ods spilled (such as fl'uitjuices,
tomato or vinegar) should not be
pemfitted to remain on the finish.
If acids spill on the cooktop while it is
hot, use a (hT paper towel or cloth to
wipe it uI) right away: _]_en the surli_ce
has cooled, wash with soap and water:
Rinse well.
got other spills such as tilt spatterings,
wash with soap and water or cleansing
I)ow(le_ alter the sm_i_ce has cooled.
Rinse well. Polish with a dry cloth.
Metal Parts
Do not rise steel wool, abI'asives,
[lIIlIIloni[l oY coilli/lei'cial ()veil cleaneiN.
To safely clean surlhces; wash, rinse and
then dry with a soft cloth.

Careand cleaning ofthecooktop.
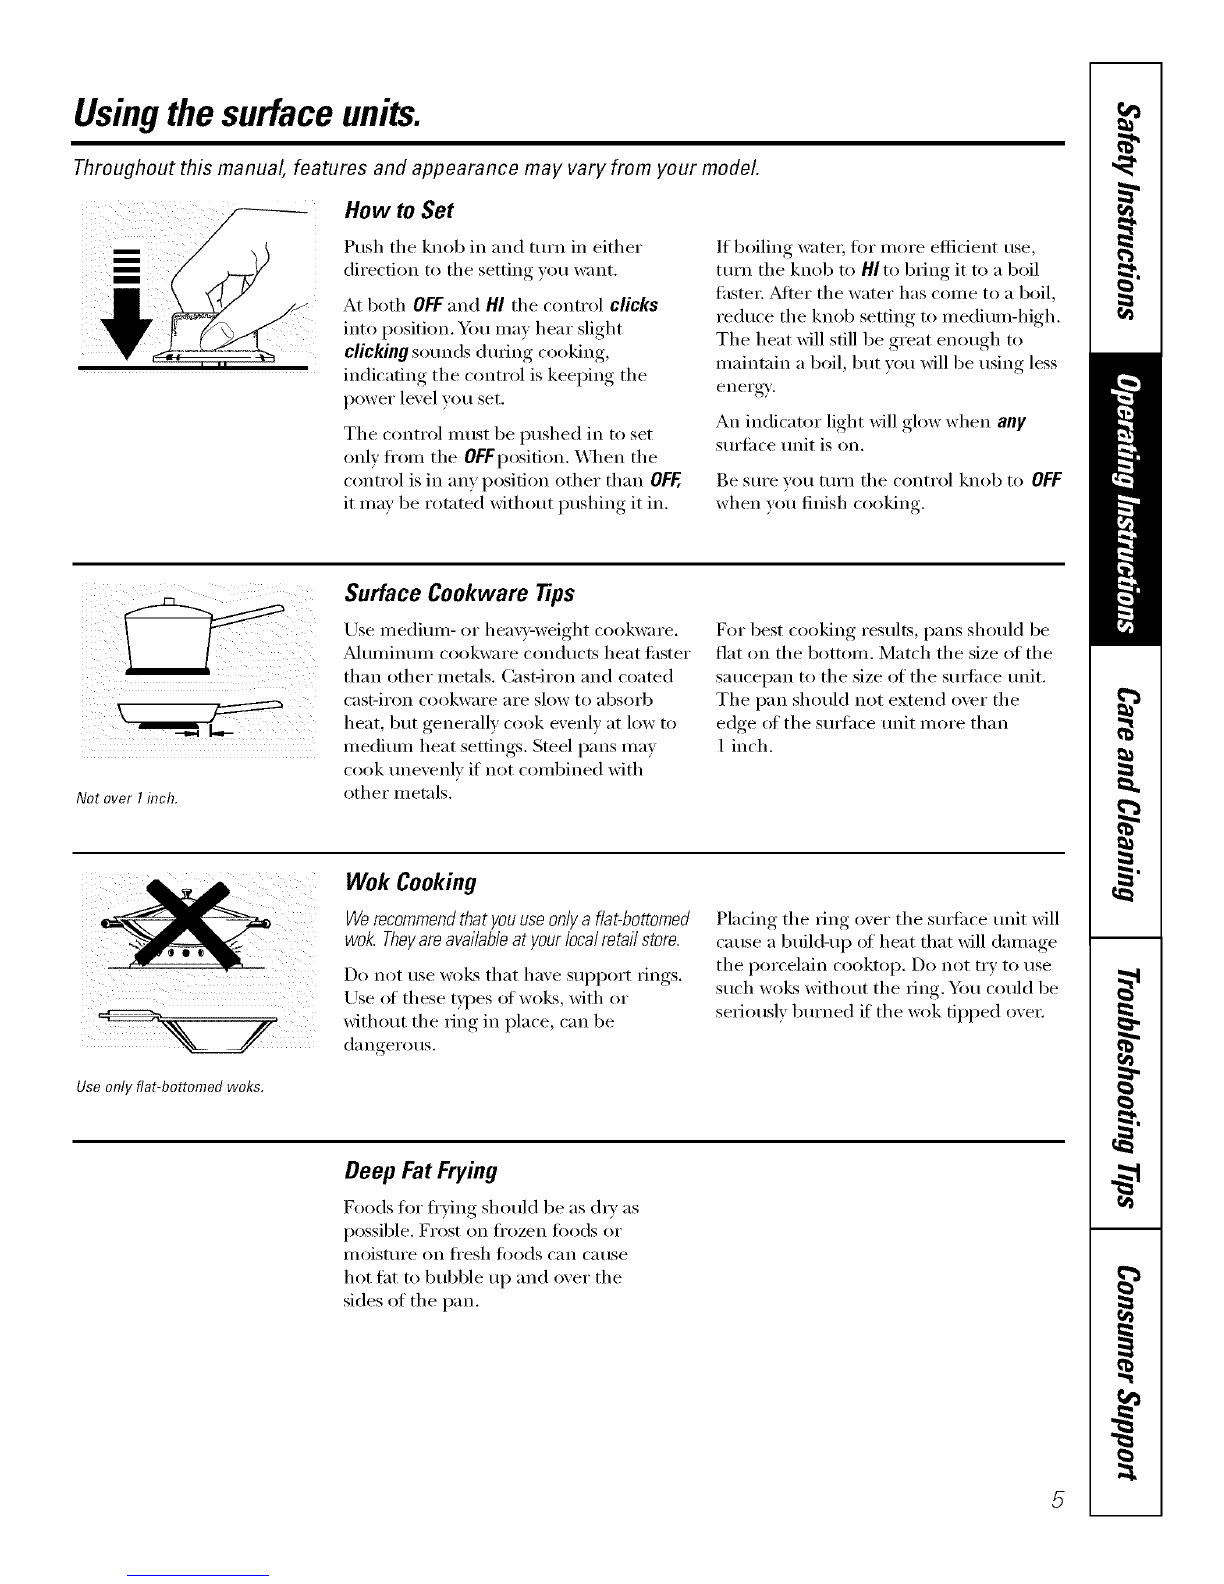
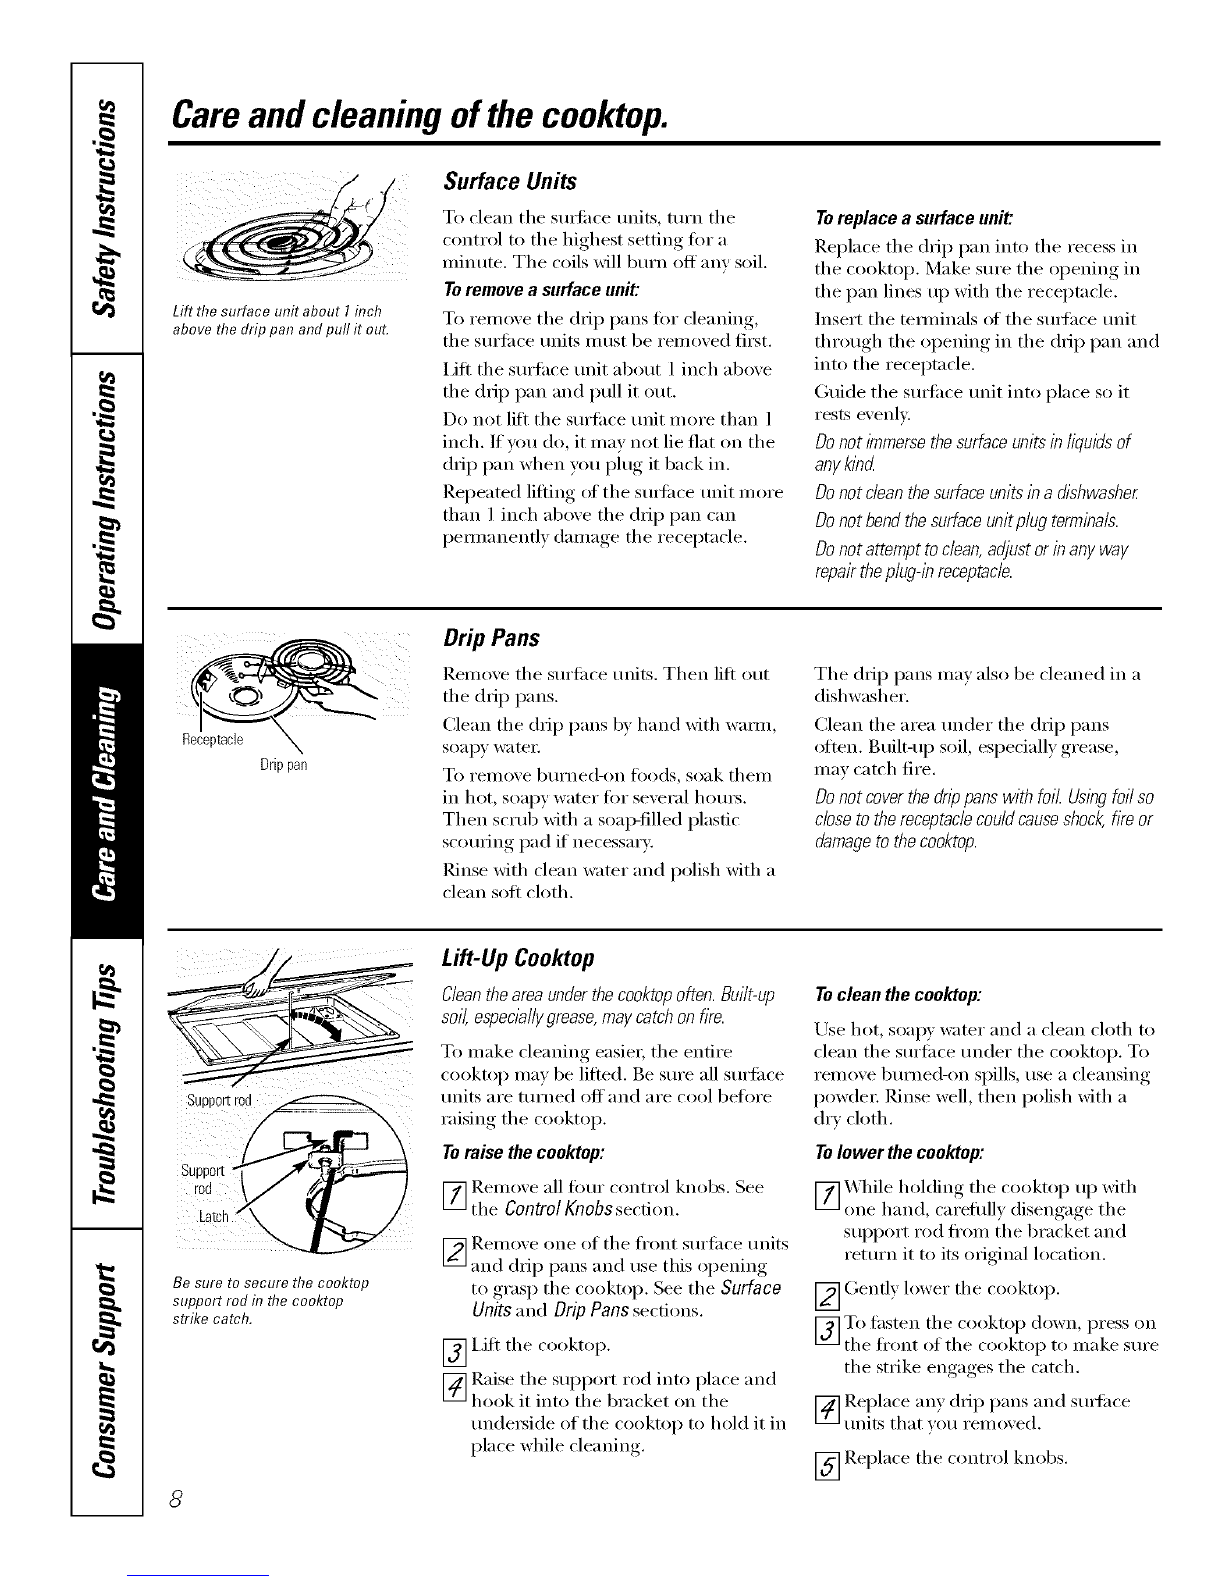
Lift the surface unit about I inch
above the drip pan and pull it out.
Surface Units
To clean tile surfi_ce units, turn tile
control to tile highest setting t0r a
minute. Tile coils will burn off any soil.
Toremove a surface unit:
To remoxe tile (hi I) pans fi,r cleaning,
tile stlrtilce units mtlst be remoxed fit_t.
IJfl tile surfi_ce unit about 1 inch above
tile drip pan and pull it out.
Do not lift tile surtilce unit more than l
inch. If x_m do, it may not lie fiat on the
drip pan when you i)lug it back in.
Repeated lifting ot tile SUltilce unit more
than 1 inch above tile drip pan can
pemmnenfly damage tile receptacle.
Toreplace a surface unit:
Replace tile drip pan into tile recess in
tile cooktop. Make sm'e tile opening in
the pan lines up with the receptacle.
Insert tile temfinals ot tile sm_hce unit
through tile opening in tile dil I) pan and
into tile receptacle.
Guide the s/mfi_ce unit into place so it
rests evenly
Do not immersethe surfaceunits in//qul_s of
anyklbd
Do not dean the surfaceunits in a dishwasher
Do not bendthe surface unitp/ug terminals.
Do not attempt to dean, adjust or in any way
repairthe p/ug4breceptacle.
Drippan
Drip Pans
Remo_e tile surtiwe milts. Then lift out
tile drip pans.
Clean tile drip pans by hand with wmm,
soapy water;
To i'eiilove bttYned-on foods, soak thetll
in hot, soapy water fi)r several hom_.
Then scrub with a soap-tilled plastic
scouring pad if necessary.
Rinse with clean wamr and polish with a
clean soft cloth.
Tile drip pans may also be cleaned in a
dishwasher.
Clean tile area under tile drip pans
often. Built-up soil, especially grease,
tll_lV catch fire,
Donotcoverthe&_opanswithfoil.UsIWfoilso
closetothereceptaclecouldcauseshockfireor
damagetothecooktop.
Be sure to secure the cooktop
support rod in flTecooktop
strike catch.
8
Lift-Up Cooktop
Cleanthe area under thecooktopoften. Built-up
SOl'i,especla//ygrease,may catch on fire.
To make cleaning easier; tile entire
cooktop may be lifted. Be sure all surti_ce
units are turned off and are cool beflwe
raising the cooktop.
Toraise the cooktop:
[Z] Remove all fimr control knobs. See
the Control Knobs section.
_ Remove one of tile fl'ont surface milts
and drip pans and use this opening
to grasp tile cooktop. See tile Surface
Units and Drip Pans sections.
_]I,ifl tile cooktop.
[_ Raise tile support rod into place and
hook it into the bracket on the
tmdet_ide of the cooktop to hold it in
place while cleanin ,
Toclean the cooktop:
Use hot, soalU water and a clean cloth to
clean the surtilce under the cooktop. To
remove burned-on spills, use a cleansing
powder: Rinse well, then polish with a
dry cloth.
Tolower thecooktop:
_] X4qfile holding tile cooktop up xfith
one hand, carefitll) disengage the
support rod fi'om tile bracket and
return it to its original location,
_ (;enfly lower tile cooktop.
_]To fasten tile cooktop down, press on
tile front of tile cooktop to make sure
tile strike engages tile catch.
[_ Replace an) drip pans and stmfi_ce
units that _ou remoxed.
_] Replace tile control knobs.

Installation
Instructions Electric Cooktop
JP328, JP626
Questions?visito_Wehsiteat: GEAppliances.comor Call the GEAnswer Centerat 800.626.2000.
BEFORE YOU BEGIN
Read these instructions completely and carefully.
•IMPORTANT -S_,,e_hese
instructions fi)r local inspector's use.
• IMPORTANT -Obse,,e_,ll
goxerning codes and ordinances.
• Note to Installer -Be sure to leaxe these
instructions with the Consun/er.
• Note to Consumer - KeeI)these instructions
tor flmu'e reference.
WARNING: vo,pe,-_,m_,ls_,fet,thi_
appliance must be properly grounded.See the
GROUNDING INSTRUCTIONS section in these
Installation Instructions.
• Proper installation is the responsibiliD of the installer:
• Product failure due to improper installation is not
coxered trader the _rrantx.
FOR YOUR SAFETY:
• WARNING -Beforebeginnino the
installation, switch power off at the service panel and
lock the service disconnecting meallS to prevent
power fl'om being switched on accidentall)', When the
service disconnecting means cannot be locked,
securely thsten a prominent warning device, such as a
tag, to the service panel.
• To eliminate the risk of burns or fire by reaching over
heated surtace elements, cabinet storage located
above the surti_ce traits should be avoided. If cabinet
storage space is to be provided, the risk can be
reduced by installing a range hood that projects
horizontally a minimum of 5" bewmd the bottom ot
the cabinets. Cabinet installation above the cooktop
may be no deeper than l 3".
• The cooktop should be easy to reach and lighted with
natm'al light dm_ing the day:
TOOLS YOU WILL NEED
• Electric or hand drill and l/8" drill bit
• Flat blade screwdriver
• Phillips scYewdYiver
• Pencil
• Ruler
• Halld or saber saw
FOR TILE COUNTERTOP INSTALLATION
• Electric drill and 5/32" drill bit
•4:_A(;'1x 1¼'1 ii/}lSOili-Vscre_:s
9

Installation Instructions
ELECTRICAL REQUIREMENTS
A'I-FENTION: All electric cooktops must be hard wired
(direct wired) into an approved junction box. A plug
and receptacle is not pemfitted fin" these products.
We recomll_ei_d you have the electrical wiring and
hookup of your cooktop done by a qualified electi_cian.
_Mter installatiolL have the elec0'ician show wm where
w)ur main disconnect is located.
Check Mth your local utilities fin" electrical codes which
apply in your area. Failure to wire your cooktop
according to governing codes could restflt in a
hazardous condition. If there are no local codes,
your cooktop in ust be wired and fused to meet the
requirements of the National Electrical Code,
ANSI/NFPA No. 70 i.atest Edition. _m can get a
copy by writing:
National Fire Protection _ssociation
gatterymalvh Park
Quincy, MA 02269
You should use a single phase, three wire 240/120 Volt,
60 Hertz electrical power s}:smln. If ahmlinum wiring is
used, all connections MUST be listed fin" use with
ahuninuln and copper wiring. It is strongly
recolnn/ended that if alunlinuln wiring is used, the
spedal terlninal grease fin" use with alunlinum wiring,
preti_rably with "grit", is put into the connection to keep
it fl'oln corroding over din e.
At a ininin/11111, the National Electrical Code wire sizing
in Section 310 should be tbllowed. It is fiu'ther
recomnlended that No. 8 AWG copper (or No. 6 AX4'G
ahmlinuln) wire or larger it required, protected with
either a double pole 40 Alnpere circuit breaker or t\_x) 40
Mnpere tuses be used to supply power to the cooktop.
See the section on Electrical Connections tor detailed
insti uctions on hookup of your cooktop.
PRODUCT DIMENSIONS
AND CLEARANCES
Counter space must be provided fi)r installation of
the cooktop. To insure accuraQ/, it is best to make a
template when cutting the opening in the counter.
See illustration below fi_r all necessary dimensions.
When choosing a location, the fl)llowing nlininmln
clearances must be maintained between the cooktop
and a(!jacent combustible surtaces:
• 30" (76.2 cln) n/inilnun/ vertical clearance fl'oln the
cooktop to the nearest overhead surtace.
• 18" (45.7 cm)minimum vertical clearance to
a(!jacent cabinets.
I
Cooktop and cutout dimensions
A
B
C
D
E
F
G
Model
JP328 JP626
30¼" 357z"
76.8 cm 90.2 cm
21¼" 21"
54.0cm 53.3cm
28_J' 3311As"
72.1cm 85.6cm
19%" 1815As"
49.2cm 48.1cm
197z" 191/u"
49.5cm 48.6cm
287/' 337A"
72.4cm 86.0cm
1474" 161%s"
36.2cm 43.0cm
Model
JP328 JP626
H3" rain. 3" rain.
7.6cm 7.6cm
IlY4"rain. 13A"mitt.
4.4cm 4.4cm
d37/' rain. 21/2"rain.
8.9cm 6.4cm
K2" rain. 3SlY"rain.
5.1cm 9.5cm
t57z"rain. 83/4"rain.
14.0cm 9.5cm
M 331/4"rain. 41W' mitt.
84.5cm 105cm
10

Installation Instructions
[] PREPARATION
gefiwe inst;flling the cooktop or movim,_ it to another
location, haxe the electrician ;erif_:
• That)our home is proxided with adequate electrical
selsice.
• That the addition of the cooktop will not oxerload the
household circuit on which it is used.
[] INSTALL THE JUNCTION BOX
Install an
appr(wed
junction box
where it will be
easily accessible
through the
fl'ont of the
cabinet where
cooktop will be
located. See the
illustration at
right for tile
suggested
molmting
location.
BESURETHIS CUT DOES NOT INTERFERE
WITH CABINET STRUCTUREAT FRONT
16"MIN.
m)
[] INSTALL THE COOKTOP
Install tile cooktop in tile cutout oi)enin_*
NOTE: If tile cooktop is_bein,*_ installed in a blind cotmter
(one with no cabinet opening below), wire connections
must be made befin'e l)uttin_*_tile cooktop into tile cutout.
[] SECURE THE COOKTOP
Secure tile tub of tile cooktop to a standard cotmter xfith
tile wood screws shiI)ped with tile cooktop.
Secure tile tub of tile cooktop to a tile cotmter with
4 masom_ screws. These can be pro'chased at any
hardware store.
[] MAKE ELECTRICAL CONNECTIONS
/k WARNING
Tile electrical power to tile cooktop sui)ply line must be
shut off while line connections are being made. Failm'e to
do so could result in serious iqjm T or death.
_,_qlen making tile wire connections, use tile entire length
ot conduit provided (3 teet). Tile conduit must not be cut.
Connect the red and black leads fl'om the cooktop
conduit to the corresponding leads in thejm_cfion box.
Tile power leads SUl)plied with this appliance are UI,
recognized fin" com_ecfion to linger gauge household
wiring. The insulation ot the leads is rated at much higher
temperattH'es than tile temperatm'e rating of household
wiring. The current cari_'ing capaciD' ot the conductor is
governed by tile wire gauge and also tile temperatm'e
rating of the insulation aromad the wire.
GROUNDING INSTRUCTIONS
Tile bare grotmd xfire in tile conduit is connected to tile
cooktop ti'a I/le.
X_qlen connecting to a 3 conductor branch circuit, if local
codes pemfit, connect the bare grolmd connector lead
of the cooktop to the branch drclfit neutral (gray or white
in color).
Effective January 1, 1996, the National Electrical
Code requires that new construction use a (4)
conductor connection and will not permit grounding
through neutral. If used in new construction after
January 1, 1996, in a mobile home or recreational
vehicle, or if local codes do not permit grounding
through the neutral white lead, do the following:
Attach tile appliance ,_,*rotmding, lead (green or bare
copper) to tile residence grounding conductor (green
or bare COl)per ) in accordance with local codes.
11

Before YouCallForService...
Troubleshooting tips
Save time and money! Review the chart on this page
first and you may not need to call for service.
Surfaceunitsnot
functioningproperly
Possible Causes
The surface milts are
not plugged in solidly.
The surface unit
controls improperly set.
The drip pm_s are not set
securely in the cooktop.
A fuse in your home may be
blown or the circuit breaker
tripped.
What ToDo
• _A]th the controls off, check to make sure the surti_ce
unit is plugged completely into the receptacle.
•Check to see the correct control is set ti_r the suil'ilce
unit w)u are using.
•_A]th the controls off, check to make sure the drip
pan is in the recess in the cooktop and that the
opening in the pan lines up with the receptacle.
• Replace the fllse or reset the circuit breaker.
12

GEBuilt-In CooktopWarranty.
Aft warranty service provided by our Factory Service
Centers, or an authorized Customer Care®technician.
Toschedule service, on-line, 24 hours a day, vis# us
at www.GEAppliances.com, or carl 800.GE.CARES
(800.432.2737).
Staple your receipt here.
Proof of the original purchase
date is needed to obtain service
under the warrant_
One Year
Fromthedateefthe
origina!purchase
We Will Replace:
Anypartof the cooktop which tifils due to adefect in materials or workmanship.
Dufino_. this full one-year warranty, GE will also proxide, free of charge, all labor
and in-home sexxice to replace the defectixe part.
Service trips to your home to teach you how to use
the product.
Improper installation.
Failure of the product if it is abused, misused, or used
for other thml the intended purpose or used
commercially.
Replacement of house fuses or resetting of circuit
breakers.
Dmnage to the product caused by accident, f'tre, floods
or acts of God.
IncidentaJ or consequential dmnage caused by possible
defects with this applim_ce.
This warranty is extended to the original purchaser and any succeeding owner for products purchased for
home use within the USA. In Alaska, the warranty excludes the cost of shipping or service calls to your home.
Some states do not allow the exclusion or limitation of incidental or consequential damages. This warranty
gives you specific legal rights, and you may also have other rights which vary from state to state. Toknow
what your legal rights are, consult your local or state consumer affairs office or your state's Attorney General.
Warrantor." GeneralElectric Company.Louisville, KY40225
13

ConsumerSupport.
GEAppliancesWebsite www.GEAppliances.com
Have a question or need assist;race with your appliance? Try the (;E Al)pliances Website 24 hotn_ a (la);
any day of tile year'. For greater convenience and faster se_Mce, you can now download Owner's Manuals,
order parts, catalogs, or even schedule service on4ine. You can also "_&sk Ore" Team of Experts .....
yO/lI" questions, and so iiluch i/loi'e,,,
ScheduleService www.GEAppliances.com
Expert (;E repair se_Mce is one one step awa) from yore" doo_; Get on-line and schedule veto" service at
your comenience 24 hom_ am da_ of the '_ear! Or call 800.GE.(:ARES 800.432.2737) during nomml
business hom_.
RealLifeDesignStudio www.GEAppliances.com
GE SUl_l_orts tile/Jnive_al Design concel)t--prodtu-ts, services and enviromnents that can be used by
people of all ages, sizes and capabilities. We recognize tile need to design fi)r a wide range of physical and
ment;d abilities and impaim_ents. For details of GE's Universal Design applications, including kitchen
design ideas fin" people with disabilities, check out ore" _,Vebsite today. For the hearing impaired, please call
800.TDD.GEAC (800.833.4322).
Extended Warranties www.GEAppliances.com
Pro'chase a (;E extended warrant_, and learn about special disco/mrs that are axailable while veto" warranty
is still in effect. You can pro'chase it on-line anytilne, or call 800.626.2224 dtwing nom_al business hom_.
(;E (_onsulner Heine Serxices will still be there after )our warran D, expires.
PartsandAccessories www.GEAppliances.com
lndividtmls qualified to se_Mce their own appliances can have parts or accessories sent directly to their
homes (VISA, MasterCard and Discover cards are accepted). Order on-line today, 24 hom_ evei'v day or by
phone at 800.626.2002 dtwing nom_al business hom_.
Instructions contained in this manual cover procedures to be performed by any user. Other servicing generally
should be referred to qualified service personnel. Caution must be exercised, since improper servicing may cause
unsafeoperation.
ContactUs www.GEAppliances.com
If' you are not satisfied with tile service you receive from GE, contact us on our _.Vebsite with all tile details
including yore" phone n/llllbei'_ oF write to: General Manager; C/lStOlllei" Relations
GE Appliances, Appliance Park
I,ouisville, K¥ 40225
RegisterYourAppliance www.GEAppliances.com
Register your new applimlce on-line---at your conYenience! Tiinely product registration will allow tot
enhanced COlllllltlnication and prompt service tlndei" tile temps ofxotlr WalTallt}_ should tile need arise.
You may also mail in tile pre-printed registration card included in tile l)ackim*_ material.
_4 Printed in China
Other manuals for JP328
3
This manual suits for next models
1
Table of contents
Other GE Cooktop manuals
Popular Cooktop manuals by other brands

Clatronic
Clatronic EKP 3788 E instruction manual

Kenmore
Kenmore 30" Ceramic installation instructions

Salvis
Salvis Master operating instructions

Electrolux
Electrolux EW36IC60I - 36 in. Induction Cooktop Use and care guide

LG
LG LSCG367ST installation manual

Miele
Miele KM 611 Series Operating and installation instructions

Kenyon International
Kenyon International 120 Use & care guide - installation manual

Electrolux
Electrolux EW36IC60LB Product specifications

Fisher & Paykel
Fisher & Paykel CT560QX user guide

Fisher & Paykel
Fisher & Paykel CG301D installation guide

Signature
Signature SKSGT3054S installation manual

Caloric
Caloric RTP201 Use & care guide