GE 2-9910 User manual

. .
..
.
!.
‘.
~
. .
..
:.-.
-
—.
—.
—-
—-
—-
--
-—
-—
~- —
——
—— ——
. .

.
. .
.
.. .:
.- 2...
..-
-.-
. .
,.
-.- . .
TABLE OF CONTENTS
PAGE SECTION PAGE
SECTION
INTRODUCTION .................3TELEPHONE MEMORY
A. PaRs checklist . . . . ...”..... 3OPERA T!ON . . . . . . . . ..” . . ..”. .”. I7
B. Cordless Telephone A. Storing aNumber into
Characteristics .............4 Memo~ ..................l7
C, Setting the Secutity Code ....4 B. Changing astored
Number . . . . . . . . . . . . . . . . ..l7
CONTROLS and FEATURES . . . . ...5 C. Pause Function . . . . . . . . . . ..l8
A. Cordless Telephone D. Chain Dial from Memoy ....18
FeatureS .................”5 ~RoDu~TcA~~..-......,. .....19
B. Cordless Telephone
Controls ................6-7 A. Batte~ Replacement . . . . ...19
B. General Product Care ......20
INSTALLATION ..”. ”. . ..”8. ”.. ..”8
A. Telephone Outlet
Requirements ..............8
B.
c.
D.
lNCASE OF DIFFICULTY . . . . . ...21
Troubleshooting Chafi. . . . . . . ...21
Installation for Desk or SERVICE ......................22
Table Topuse . . . . . . . . ...8-9
Wail Mounting the ~ARHANTY . . . . . . . . . . . . . . . . . ...23
Base Unit (optional). ....10-11
Charging the Batte~ Pack. ..12 FCC REGISTRATION
INFORMATION ........BACK COVER
TELEPHONE OPERATION ........13
A; Making and Receiving Calls .13
+A
... ... .
.:.,,. .
:.:. ‘.
,.
B.
c.
D.
E.
F.
G.
H.
1.
J.
K.
2
Redial ...................’~
Fast Redial ...............l4
Changing Channels ........14
Handset Volume Control ....14
Tempora~ Tone Feature. ....15
The Flash BuHon ..........15
Distinctive Ring Feature . . ...15
How to Save Battery Power ..16
Tone Signals . . . . . . . . . . . . ..l6
Paging the Handset ........16
-. ,.
.. ,;
,-..... .
.,-.
. ...:
. . .... ...
.- .-,
..
.. .
INTERFERENCE
INFORMATION . . . . . . . . BACK COVER
WARNING: TO PREVENT FIRE
OR ELECTRIC SHOCK HA~RO,
DO NOT EXPOSE THIS PRODUCT
TO RAIN OR MOISTURE.
HEARING AID
COMPATIBILITY . . . . . .BACK COVER
ACCESSORY ORDER
FORM .................FOLD-OUT
.... -. . .
.. ..:
. . -.
.,.
A=A
+
THE LIGHTNING
CAUTION:10 ~EOUCETHE THEEXcLAMATloH
RASH ANOARffoW” RISKOF ELECTRICSHoCK* POIMTWITHl~sTn:
HEADwlTHINTHE00 NOTHEMovEco~ERTRIANGLE
A(OR BACK).No usER
.wAR~’~= SIGN
TRIANGLEIs
WARNING SIGNsERVICEABLEpAnTsIN
.ALERTINGyou of
ALERTINGYOUoF SIDE.REFERSERVICIN
GImportant
“.OANGEROUsTO OUALIFIEOsERvlc
EINSTflUcTlo Ns
VOLTAGE”
lNSlo
EPERSONNEL. AccoM~ANylN G
THE PRoOUCT
THE
PROOWT.
SEEWRKING ON80~OMI 8ACKOF PRODUCT
!

.
..
.
.-
.,
.,.
,.. . .-
.-2. ..
- -- -.
..
:.
.-:.
.-
.
. .
INTRODUCTION
Thank YOU for purchasing the GE 900 Megahertz Cordless Telephone. Your new
telephone is acarefully engineered, high-quality, durable product with natural sound
quality, modern features and elegant styling. It is designed to give you the quality
and convenience you expect in acordless telephone.
To familiarize Vourself with all the features of your telephone, please read the
F~llo;ing- instr~ctions carefully. Retain this Guide for future reference.
FCC NUMBER IS LOCATED ON THE BO~OM OF THE BASE
LOAD NUMBER IS LOCATED ON THE BO~OM OF BASE
OTHER IMPORTANT INFORMATION ON BACK COVER OF THIS GUIDE
‘Carefully remove unit from the package. Check this list tO
be ce~ain all components are included. Remember to
save your sales receipt in case you ever need warranty
sewice.
DSET
.DESK MOUNT
BRACKET
.AC POWER SUPPLY
WITH POWER SUPPLY
CORD
●LONG
TELEPHONE
LINE CORD
●Check List
●
●
●
●
●
.
●BASE UNIT
.SHORT
TELEPHONE
LINE CORD 3

INTRODUCTION
. .
..
.
..4
.-.,
...‘..
.+2..-
...-
-“--
. . .
:.
. .. .:- -.
cThis 900 Megahertz Cordless Telephone utilizes state of
the art technology. It operates on the 902-928 MHz
frequency band. There are three main advantages to this
technology: —More channels
—Clear reception
—Interference free
●Acordless telephone offers convenience, ease and
mobility during telephone communications. Its use,
however, is dependent upon the availability of AC power.
Any interruption of electrical power at your location would
prevent your placing or receiving calls. Therefore, a
cordless telephone should not be installed as
the only phone in your home.
●“Full ~wer” means that your telephone is designed to operate
at the maximum power allowed by the Federal
Communications Commission (FCC).
“The range at which you can use the cordless Handset away
from the Base is dependent upon many factors. The
telephone Base is like aradio transmitter in that it transmits
telephone line signals via radio waves to the Handset.
Therefore, the location of the Base is important in order to
obtain maximum Handset range for the power allowed.
In some areas, installing the Base on the second floor will
provide greater range than aground floor installation.
Reception can be adversely affected by such things as
aluminum siding, appliances (refrigerators, stove, etc.),
insulation foil backing, heating ducts and other metal
construction which acts to shield radio signals.
Atmospheric conditions also play an important role in the
performance of your cordless telephone.
●Always keep the Base antenna raised.
●Above all, keep within the range of the Base.
:B. cor~iess
●
●Telephone
●Characteristics
●
●
●
●
●
●
●
●
●
●
●
●
●
●
●
●
●
●
●
●
9
●
●
●
●
●
●
●
●
●
●
●
●
●
●
●
●
●
●
●
●
●
●
●
●
●
●
●
●
●
●
●
●
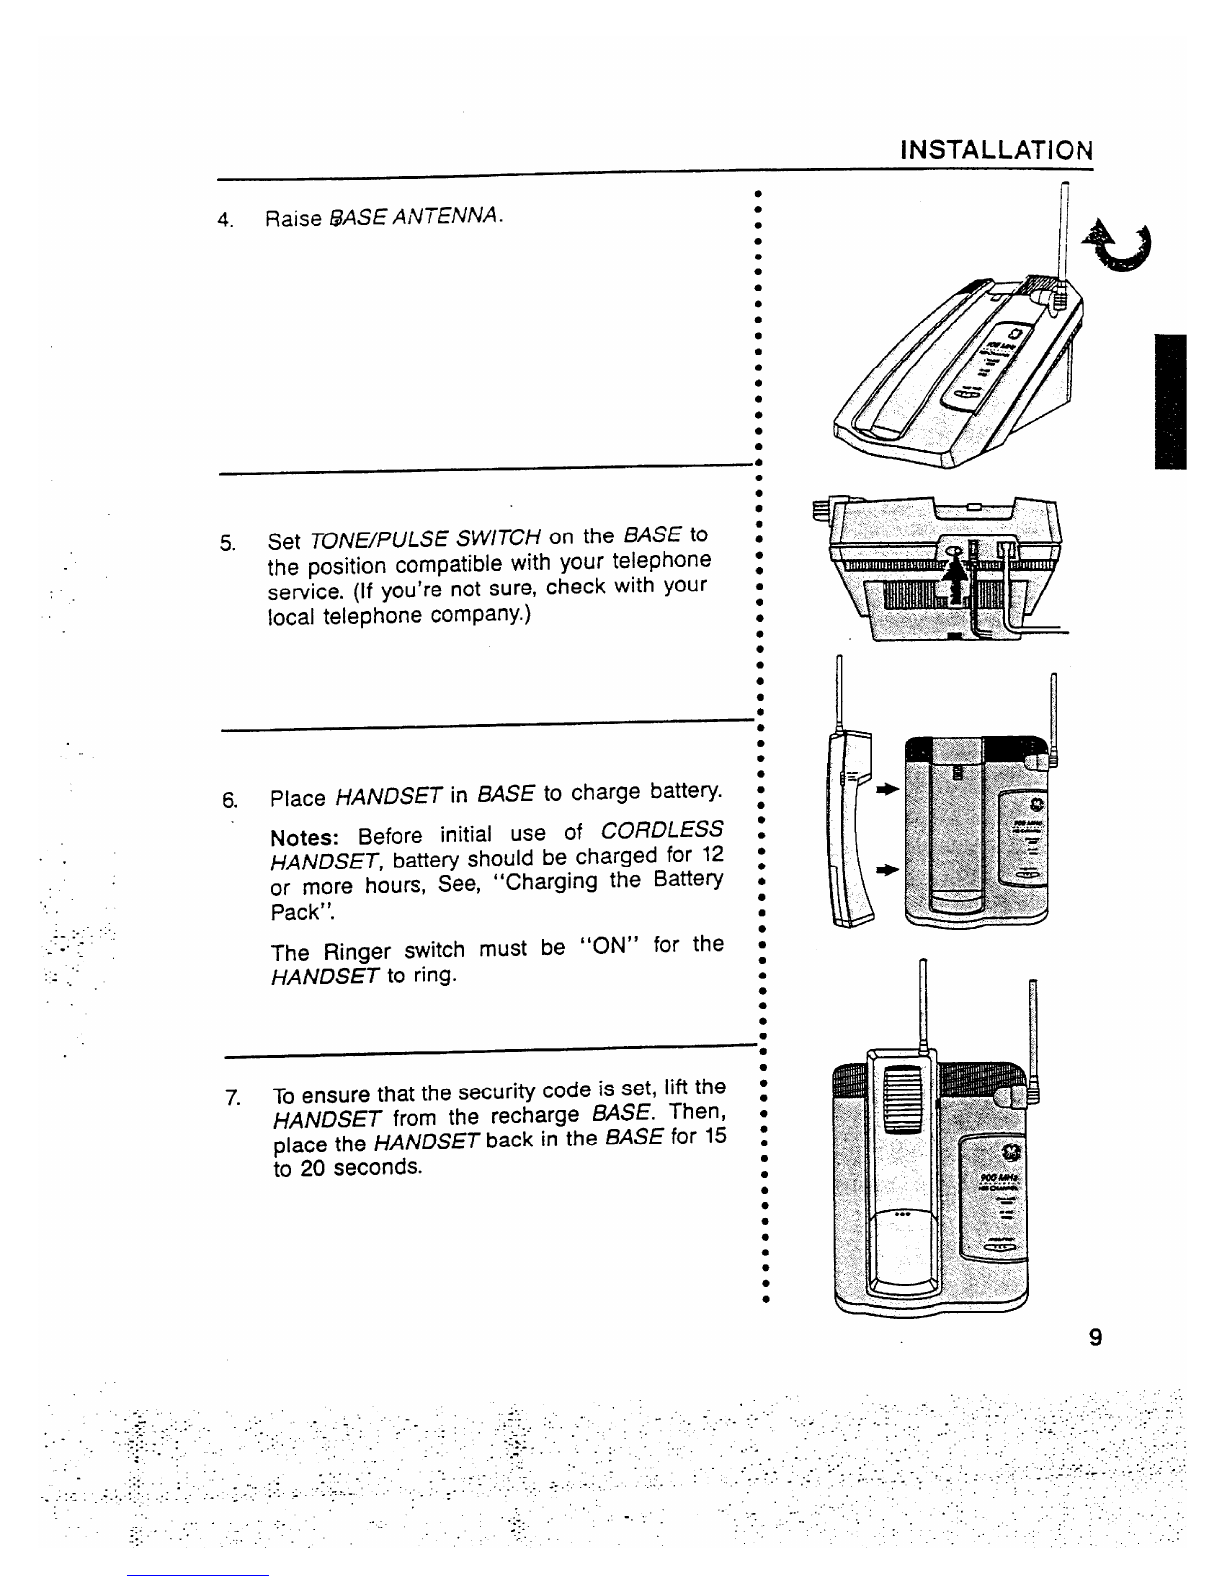
Whenever you place the handset on the base unit, the unit sC. Setting the
automatically verifies its security code. This code helps to ●
●Security
avoid unauthorized use of your telephone line by another ●Code
cordless telephone in your area. ●
●
●
Note: Whenever apower outage occurs, batteries are ●
replaced, or communication is lost between handset and base, 1
the handset may have to be returned to the base for 15-20 ●
seconds to reset the security code. ●
4
. .

CONTROLS and FEATURES
“.
. .
. .
.... .
.- ..
--:--- :
..-
.. - --
..
...
..-,
Full Range Cordless System
●Cmstal Clear sou~d’” with Compandor extends the
●
●
●
●
●
●
●
●
●
●
—
eff~ctive range of your cordless telephone and virtually
eliminates static and interference
Digital Security System prevents false ringing from other
cordless telephones
Page/Find
Charge Light
In Use Light
Tone/Pulse Switchable
Wall or Desk Mountable Base
High Peflormance Base Antenna .
Dual Wave~ Noise Filter: Atwo stage filtering system that
removes unwanted signals
FCC Registered
UL Listed
Remote Handset Features
●
●
●
●
●
100 Channel Scan automatically selects achannel that is
likely to be clear
10 Number MemoW for frequently called numbers
Volume Control
AHigh Petiormance Flexible Antenna
One-Touch Redial of last number dialed
Fast Redial: Just push redial while on-line to redial a
number
Auto Answer capability when handset is in base
Ringer On/Off Switch (Batte~ Saver)
Phone In Use light
Battery Low light
Consumer replaceable rechargeable nickel cadmium
battery
Temporaq Tone allows Pulse/Rota~ users to easily
access tone sewices
Distinctive Ring
Chain Dialing capabili~
One-Year Limited Warranty
:A. Cordless
●
●Telephone
●Features
●
●
●
●
●
●
●
●
●
●
●
●
●
●
●
●
●
●
●
●
●
●
●
●
●
●
●
●
●
●
●
●
●
●
.0
●
●
●
●
●
●
●
●
●
●
●
●
●
●
●
●
●
●
●
●
●
●
●
●
●
●
●
●
●
●
●
5

CONTROLS and FEATURES—
. .
...
.. .
.. . .
.....
... ,.
----- -
-- .-
‘-
.. ,.
. .
....:- ..
HH
6

CONTROLS and FEATURES
“. .-
.
.. .
.... . ,.
..
----- ..
--. -.
.... ..
..- ..
1.
2.
3.
4.
5*
6.
7.
8.
9.
10.
11.
12.
13.
14.
15.
16.
17.
18.
19.
20.
21.
22.
BASE RECHARGE CONTACTS
HANDSET HOOK —Hook holds handset to base unit
when wall mounted.
PAGE/FIND BUTTON
iN USE LiGHT
HANDSET CHARGE LIGHT
HIGH PERFORMANCE BASE ANTENNA
PULSE!TONE SWITCH —Sets the dialing mode for
either Tone or Pulse (Rotary) semice.
AC POWER SUPPLY CONNECTION
TELEPHONE JACK
HIGH PERFORMANCE HANDSET ANTENNA
HANDSET VOLUME CONTROL SWITCH
HANDSET RECHARGE CONTACTS
PHONE BUTTON and IN USE LIGHT
MEMORY BUTTON —Used to store numbers into
memory and dial numbers from memory.
FLASH BUTTON
REDIAL BUTTON —Redials the last number called.
RINGER ON/OFF SWITCH—Convenient ba~ev
saver feature.
BATTERY LOW INDICATOR LIGHT
CHANNEL BUTTON —Allows the user to choose the
clearest channel for best reception.
MEMORY DIRECTORY
Index for numbers stored in the corresponding
MEMORY LOCATION.
BATTERY COMPA~MENT
Contains consumer replaceable Nickel Cadmium
Battery Pack.
DESK MOUNT BRACKET
:B. Cordless
●
●Telephone
●Controls
●
●
●
●
●
●
●
●
●
●
●
●
●
●
●
●
●
●
●
●
●
●
●
●
●
●
●
●
●
●
●
●
●
●
●
●
●
●
●
●
●
●
●
●
●
●
●
●
●
●
●
●
●
●
●
●
●
●
●
●
●
●
●
●
●
●
●
7
..
-.. ,. . . .
... .-

1.
. .
..
.
. .
INSTALLATION
Amodular (Universal Semite Order Code) sA. Telephone outlet
USOC: RJIIC outlet jack (illustrated) is required. 1Requirements
Installation of this telephone in locations with ●
●
4-prong jacks or with hard-wired outlets will ●
require additional Conveflers (not included). The g
dealer from whom you purchased your phone or s
atelephone supply store can advise you ●
●
regarding the proper Converter. ●
●
.. .
...... .
--:-
.-,
-.. ..
,.
-
First, install the desk adapter by snapping it sB. installation for
into place. Then plug TELEPHONE LINE ●‘Table Top use
CORD into jack on the back of BASE UNIT. ~
Plug the other end of the TELEPHONE LINE s
CORD into Modular wall jack. ●
●.R o
●
—— ●
●
●
●
●
●
●
●
2. Plug the small “U’ shaped end of the AC ●
●
POWER SUPPLY into back of unit. ●
●
Note: Use only THOMSON AC power supply z
Model #5-2352 with this Droduct. ●
a●
●
●
●
u
o
w
o
Desk or
3. Plug other end of the AC POWER SUPPLY
into an electrical outlet which cannot be
switched off. Do not use an outlet that
can be turned on and off by awall switch,
Note: Whenever apower outage occurs, or
batteries are replaced, the HANDSET may
have to be returned to the BASE to reset the
security code.
8
.. .,. . . .

INSTALLATION
.
. .
‘.. .
--:-.”- “:
..
-“. ...
..
...
.- -.
●
4. Raise BASE ANTENNA. ●
●
●
●
●
●
b
●
●
●
●
●
●
●
●
●
●
●
5. Set TONE/PULSE SWITCH on the BASE to :
the position compatible with your telephone :
sewice. (If you’re not sure, check with your .
local telephone company.) ●
●
●
●
●
●
●
●
●
●
●
6. Place HANDSET in BASE to charge battery. ~
Notes: Before initial use of CORDLESS :
HANDSET, battery should be charged for 12 :
or more hours, See, “Charging the Batte~ .
Pack”. ●
●
●
The Ringer switch must be “ON” for the :
HANDSET to ring. ●
●
●
●
●
●
7.
●
To ensure that the security code is set, lift the :
HANDSET from the recharge BASE. Then, .
nlace the HANDSET back in the BASE for 15 :
~o 20 seconds. ●
●
●
●
●
●
●
●
n
9

. .
..
“.
..
..
..-
-..
0. . ...+”
. .
. .. .
--: ----
.,
..- ..-
..
-.,. ,-
...
.......- ..
INSTALLATION
1. First, be sure that the desk adapter is NOT
attached to the base. Then plug the SHORT
into jack on the back
TELEPHONE LINE
of the BASE UNIT,
2.
●
●
●
●
●
●
●
●
●
●
●
●
●
●
●
●
●
●
●
●
●
●
●
Connect ADAPTER to the BASE UNIZ ●
●
●
Plug the small “L” shaped end of the AC ~
●
POWER SUPPLY into back of unit. ●
Guide AC POWER SUPPLY CORD through
Channel on top so cord threads down and
hangs out the bottom of the BASE.
●
●
●
●
●
●
●
●
●
●
●
●
●
●
3. Reveme the Handset Hook
“Firmlv slide the HANDSET HOOK out of the s
base.’ Rotate it 1/2 turn and slide it back into the s
BASE.
C. Wall Mou;ting the
Base Unit (optional)
n
II/
●
●
●
●
●
●
●
●
●
●
●
●
●
●
●
●
●
●
●
10

INSTALLATION
.
..
. .
“.
. .
--:- . ..
..
- -- -.
... .’.
.,-.
●
●
4. Connect the shoti Telephone Line Cord ●
modular plug to wail phone outlet ●
●
●
●
●
●
●
●
●
●
●
●
●
●
●
●
●
●
●
●
●
●
●
●
●
●
●
●
5. Mount the BASE UNIT to the wall PLATE ●
●
Slip mounting holes of BASE (on back of ●
●
unit) over wall plate posts and slide BASE ●
down until unit is firmly in place. ●
●
●
●
6. Plug the AC POWER SUPPLY
household outlet. Do NOT use
can be turned on and off by a
into astandard ●
an outlet that s
wall switch. ●
●
●
●
●
●
●
●
●
●
●
●
7. To ensure that the security code is set, lift ●
the HANDSET from the recharge BASE. ●
●
Then, place the HANDSET back in the BASE :
for 15 to 20 seconds. ●
●
●
●
●
●
●
●
●
●
:1
b
I
11
. .
..
.-
-.. +.: .... ... -:.”.”.” .
. . . . . . . . .. .. . . .4. -.. .

. . .
..
.
. .
.
.. .
.. . .
.-.
...0... . .-. .
..-----
--. .-
... ..
.. .-
INSTALLATION
Your GE 900 hlHz Cordless telephone comes
with anickel cadmium rechargeable battery pack
(located in Handset). Charging takes place when
the HANDSET is placed in the BASE. When
fully charged, the battery pack provides suffi-
cient power to enable the HANDSET to be left
out of the BASE for prolonged periods and still
function properly. However, to maintain adequate
power, you will need to recharge the BATTERY
PACK every few days by returning the
HANDSET to the BASE. The HANDSET will
beep and the battery low light will come on
when the battery is low and needs recharging.
10
1.
2.
3.
Recharge the Batteq
Be sure the AC POWER SUPPLY is plugged
into astandard electrical outlet.
Place HANDSET in the BASE.
Before initial use, let charge for 12 hours or
more,
The CHARGE LIGHT will be “ON” when the
batte~ is charging.
IMPORTANT Although you can leave the
HANDSET out of the BASE for extended
periods, you will need to return it to the
BASE Deriodical!v to keen the batte~
pack charged. Periodically clean the charging
contacts on the HANDSET and BASE with asoft
cloth.
NOTE: Leaving the handset charging in the
base will NOT damage the battery pack.
D. Charging the
Battery Pack
A’
●
●
●
●
●
●
●
●
●
●
●
●
●
●
12

TELEPHONE OPERATION
t~~en ~h~ ~AflDsET js ;n the BASE:
To Receive aCall
1,
9
●
8
●
8
●
●
●
●
●
●
●
●
●
●
●
●
●
●
●
●
●
●
●
●
●
4
●
●
●
●
●
●
●
●
9
●
●
●
and
Receiving
Calls
1
When phone r:figs. Iifi the HANDSET. The phcne In
use light wiil turn ‘“o~” and you can talk. (Auto
Answer Feature)
If you press the PHONE button by accident within 2-3
seconds of IiRing the HANDSET out of the base, the
phone will ignore your command. (Afier 2-3 seconds
you will disccflnect the line.)
if the call is first answered on an extension phone and
you wait 10 seconds after the last ring to Iifi the
cordless HAIYOSET, you will have to press the PHONE
button to talk.
When finished with telephone conversation, press
PHONE button to hang up.
Make aCall
Pick up the HANDSET.
Press PHONE button. (phone light will turn “ON”)
Wait for dial tone.
Dial telephone number,
When finished, press PHONE button to hang up.
2.
3.
4.
To
1.
2.
3.
4.
5. ●
●
.4
When the HANDSET is out of the BASE: ●
●
●
●
●
●
●
●
●
☛
●
●
●
●
●
●
●
●
●
●
●
●
●
●
●
●
●
●
●
To
.-. .
.- 1.
2.
Receive aCall
When phone rings, pick-up the HANDSET.
Press PHONE button (phone light will be “ON”).
when finished, press PHONE button to hang up.
Make aCall
Pick up the HAIVDSET.
Press PHONE button. (phone light will turn “ON”)
Wait for dial tone.
Dial telephone number.
3.
1.
2.
3.
4. When finished, press PHONE button to hang up.
5.
.-
. . .
..-
-: . .
..
. . .. .
-----
:..
.. . . . ...
..-
..
.:, , ---
.:.
..
.
/
.:

TELEPHONE OPERATION
Your Cordless Handset has Last Number Redial memory.
The number will remain in the handset’s RED/AL memory ●
un il another number is dialed. ●
●
To REDIAL the last number called ●
●
●
1. Pick-up HANDSET.
2. Press PHONE “ON”.
3. Wait for Dial Tone.
4. Press REDIAL.
●
●
●
●
●
●
If you want to keep dialing abusy number in rapid succes- sC, Fast ~edial
sion you can do so with FAST RED/AL. When you hear the ●
●
busy signal, just press the REDIAL button. The phone will ●
redial the busy number. Press RED/AL to try again. ●
●
●
. . .
..
“. . .
●
●
capable of accessing ●
●
●
●
●
●
cordless phone ●
D. Changing
Channels
Your 900 MHz Cordless Telephone is
up to 100 channels.
Channel Scan
While the ringer switch is “ON”, your
automatically selects achannel that is likely to be clear
everytime you answer or make acall.
●
●
●
●
●
●
●
●
●
.. . To change channels
. .
. .
....... . You can change channels if you experience static and/or
noise.
Press and Release CHANNEL button on Cordless
,.,
,...-2 .:-”
.“. -
- -- ..
.- . . ..
. . . . . :- ..
●
●
●
●
●
●
●
●
●
●
Handset.
●Unit will advance to next Channel.
Notes:
Phone must be “ON” to change the channels.
Phone must be within operating range to change channels.
●
●E. Handset
The handset’s receiver volume control can be adiusted for ●
listening need or preference. Simply slide the VO~UME
CONTROL until you have reached acomfortable listening
●
●Volume
Control
volume. ●
●
●
14
..
. .

. .
..
.
TELEPHONE OPERATION
If you have PULSE (rotary) service, you can still access
those special services (such as electronic banking, calling
cards, telephone answering equipment, etc.) which require
tone signals for aperation.
Dial the local access number in the normal way. Then, press
the “*“ key to activate TEMPOHARY TONE. Your phone
will then generate the required tone signals as you dial the
numbers or symbols needed to complete your call.
When finished, hang up. The phone will automatically return
to PULSE (rotary) service.
Note: The TEMPORARY TONE feature is only for use by
those who have PULSE (rotary) service. If you have Touch-
Tone service, you do not need to use the TEMPORARY
TONE feature.
●
●
●
●
●
●
●
●
●
●
●
●
●
●
●
●
●
●
●
●
●
●
●
●
●
●
●
F. Tempora~
This button is used to activate customer calling services available
through your local phone company, such as Call Transfer and Call
Waiting, etc. These sewices generally require an extra monthly fee.
If you subscribe to any of these sewices, please refer to the phone
company’s instructions on how to use Flash.
Notes: Do not use the PHONE button to try to access calling
services because you will hang-up the phone.
Do not use the FMSH button to hang-up phone.
“o
●
●
●
●
●
●
●
●
●
●
●
●
●
●
●
.
G. Flash
. .
. . ●
.. . . .
...
.-: -.-; .-.
-. ::
.. .
:,. .
.:.!:.
. .
.
,- .
-.
The CORDLESS HANDSET is capable of receiving the distinctive sH. Distinctive
ringing patterns generated through your local telephone company sRing
as aspecial service. This custom calling service is available only :
through your local telephone company. ●
●
●
●
●
●
●
●
●
●
●
●
●
●
●
●
●
●
15
.. .

TELEPHONE OPERATION
The CORDLESS HANDSET has the ability to save battery :1. Howto
power when in or out of the BASE. ●
●Save
To reduce battery usage, slide the R/NGER switch to the ●
4Bat~eq
“OFF” position. However, the Handset will not ring when ●Power
there is an incoming call. This battery saving feature is most :
convenient when another extension phone is within hearing ●
distance. ●
●
●
●
●
●
CORDLESS HANDSET :J. Tone
Ashofl beep when key is —Key tone feedback.
pressed.
. .
..
. . .
.. .
,..,
...... . .
.. . . ..-.
-. .--: “-
-. .-
..- .-
. . . .
.-:.: ..
Ashort beep every 8seconds —The batteries need cha
jn PHONE “ON” (Batte~ low
light will be “ON”)
Along warbling tone with —Signals an incoming ca
RINGER “ON”:
Three beeps when the —Out of range warning.
PHONE button is pressed
“ON”:
●
●
●
●
ging ~
●
●
●
1. :
●
●
●
●
●
●
●
●
●
●
●
Signals
●☛
●0
Your GE CORDLESS PHONE allows you to page your CORD-
LESS HANDSET from the BASE. This comes in handy when
you are trying to get the attention of the person using the
HANDSET, or if you’re just trying to locate the HANDSET,
To Page the HANDSET from the BASE UNIT
Press the PAGE/FIND button on the BASE UNIT.
Each time the PAGE/FiND butto,n is pressed, the HANDSET
will sound the Page signal. ‘
●
●K●
●
●
●
●
●
●
●
●
●
●
●
●
●
●
●
●
●
●
●
●
●
●
●
●
●
●
16
..
.,.
Paging the
Handset

TELEPHONE MEMORY OPERATION
Your Cordless Phone can store up to ten (10) telephone
numbers of up to 16 digits long that can be dialed
automatically.
Memory Storage must be done with the phone “OFF”.
STORING
2.
3.
4.
5.
6.
.
..
Pick up HANDSET.
Press MEMORY.
Enter the number to be stored.
Press MEMORY.
Press anumbered key (0-9 Memory Locqtion).
Write the name or number of party stored in memory
location on Memo~ Directory Card (on back of handset).
WHEN MAKING TEST CALLS TO EMERGENCY NUMBERS:
1. Remain on the line and briefly explain to the
dispatcher the reason for the call before hanging up.
2. Perform such activities in the off-peak hours, such as
early morning hours or late evening.
I
DIALING
. . I. Press PHONE “ON”.
2. Press MEMORY button.
..
. . .:.. 3. Press (0–9 Memory Location).
.- >.-,.
- ---.
●
●
●
●
●
●
●
●
●
●
●
●
●
●
●
●
●
●
●
●
●
●
●
●
●
●
●
●
●
●
●
●
●
●
●
●
●
●
●
●
●
●
●
●
●
●
●
●
●
●
●
●
A. Storing a
Number in
Memo~
n
,. ..
::- . .
. .
1.
2.
3.
4.
5.
6.
Pick up HANDSET.
Be sure that phone is “OFF”.
Press MEMORY button.
Dial new telephone number.
Press MEMORY button again.
Press (0 -9 MEMORY LOCATION) on the handset
keypad.
●
●
●
●
●
●
●
●
●
●
●
●
●
●
●
●
●
●
B. Changing a
Stored
Number
17
..
. . .

. .
“.
.. .
.<.,.< .
.-:. .-~
-----
--- --
. . . ..
. . .
. ..-. ..
TELEPHONE MEMORY OPERAT~ON
Used for storing amomentary delay in the dialing sequence :Cm Pause
of astored telephone number. This is tienerallv used when a~
“PAUSE” is needed to wait for adial ;on[
9for an outside line) or acomputer tone
distance sewices).
At point where pause is required. . .press
Note: You may have to store two or three
of astored number.
L(e.g. afier dialing ~
e.g. for some long :
●
●
●
FLASH. ●
●
Pauses at the end ●
●
This feature allows you to dial in succession achain of
numbers in different memory locations. This is useful when
you must dial more than one number in memory to complete
acall, such as with frequent calls via an independent
service (e.g. MCI or Sprint).
Example: Memo~ Location
Local Access Number of Long
distance company, and 2 or 3
pauses atend, press ..................7
Authorization Code (ID), press ..........8
Long distance phone number,
press ...............................9
To initiate Chain Dialing
1. Press MEMORY
2. Press 7, then wait for the access tone.
3. Press MEMORY
4. Press 8, then wait for the access tone.
5. Press MEMORY
6. Press 9.
Note: When dialing other phone numbers please wait for the
dialing to end. For example, press MEMORY, press 7(wait
for dialing to end) press MEMORY, press 8etc.
●
●
●
●
●
●
●
●
●
●
●
●
●
●
●
●
●
●
●
●
●
●
●
●
●
●
●
●
●
●
●
●
●
●
●
●
●
●
●
●
●
●
●
●
●
●
●
●
●
●
●
●
●
●
D. Chain Dial
from
Memory
n
18

.PRODUCT CARE
.
ARechargeable Nickel Cad@urn battery pack is installed in
each Cordless HANDSET to provide power for operation. If the
battery needs replacing, follow the steps below:
10 Replace 8atte~:
1.
2.
3.
4.
5.
6.
7.
8.
9.
10.
. .
Make sure the PHONE LIGHT on the HANDSET is “OFF”.
Open BATTERY COMPARTMENT on back of HANDSET by
gently sliding down door.
Remove SCREW from battery holder. Remove HOLDER.
Slide BA~ERY PLUG down and out of plug clip. (Do not
pull on the wires.)
Lift BA~ERY PACK out.
Properly dispose of Battery Pack. When discarding
batteries, be sure to dispose of them in the proper manner,
according to your state and local regulations.
Plug in replacement Battery Pack (Cat. #5-2358).
Replace BA~ERY HOLDER and screw to secure.
Replace BATTERY COMPARTMENT Cover.
Charge the HANDSET in the BASE for 12 or more hours
before use. (To ensure that the security code is set, lift the
handset from the recharge base. Then, place the handset
back in the base for 15 to 20 seconds.)
.-. .
-- -
.. Batte~ Safety Precautions
-For your safety, please follow these simple precautions:
cDo not recharge, disassemble, mutilate, puncture, wet or
dispose of Battery in fire. Like other batteries of this type, if
it is burned or punctured, it could release toxic material
.which could cause injury.
●Keep Batte~ out of reach of children.
●Replace only with Cat. #5-2358. Accessory Order Form
included in this guide.
●
●
●
●
●
●
●
●
●
●
●
4
●
●
●
●
●
●
●
●
●
●
●
●
●
●
●
●
●
●
●
●
●
●
●
●
●
●
●
●
●
●
●
●
●
●
●
A. Batte~
Replacement
+
u
9
●
●
●
●
●
●
●
●
●
●
●
●
●
●
●
●
●
●
●
●
●
●
●
●
19
.. ..
. . .. . .. .,.
.. . . .-----
. . . .
... . . ..

. .
“,
PRODUCT CARE *
To keep your telephone working and looking good, follow
these few simple ruies.
●
..
●
..-
.. .
. .
..... . .
...-> ..
- -- ..
,.
.-
.. .;- ..
●
●
...
.. ●
●●
Avoid putting cordiess phone near heating appliances and
devices that generate electrical noise (i.e., motors, fluo-
rescent iamps).
Cordless phone should not be exposed to direct sunlight
or moisture.
Avoid dropping the Handset as well as other rough
treatment to the phone.
Clean phone with asoft cloth
member to first unplug phone dampened with water. (Re-
frorn wall outlet.)
Never use astrong cleaning agent or abrasive powder, as
this wiil damage the finish.
Retain the original packaging, should you need to ship
the phone at alater date.
Periodically clean the charge contacts on Handset and
Base with asoti cloth.
●
●
●
●
●
●
●
●
●
●
●
●
●
●
●
●
●
●
●
●
●
●
●
●
●
●
●
●
●
●
●
●
●
●
●
●
●
●
●
●
●
●
●
●
●
●
●
●
●
●
●
●
●
●
●
●
●
●
●
●
●
●
●
●
●
●
●
●
●
●
●
●
B. Genera!
Product
Care
20
. .
Table of contents
Other GE Cordless Telephone manuals