GE 21887 User manual

21887
Digital Cordless
Telephone and Corded
Speakerphone with Dual
Mode Caller ID User’s Guide
– 0 –

Precautions of Use
The quality of communication depends on the location and
environment of the base and the handset. The 21887 must be kept
away from sources of excessive heat (radiators, direct sunlight, etc.)
and protected against vibrations and dust. Never allow your telephone
to come into contact with water or other liquids or with aerosols. To
reduce the risk of interference and optimize reception, take particular
care to keep it away from the immediate vicinity of windows, large
metal objects, reinforced concrete, televisions, music centre, halogen
lamps or heating devices, fluorescent lighting, burglar alarms,
microwave ovens, computers, etc.
To clean the 21887, use a lightly moistened antistatic cloth
Safety
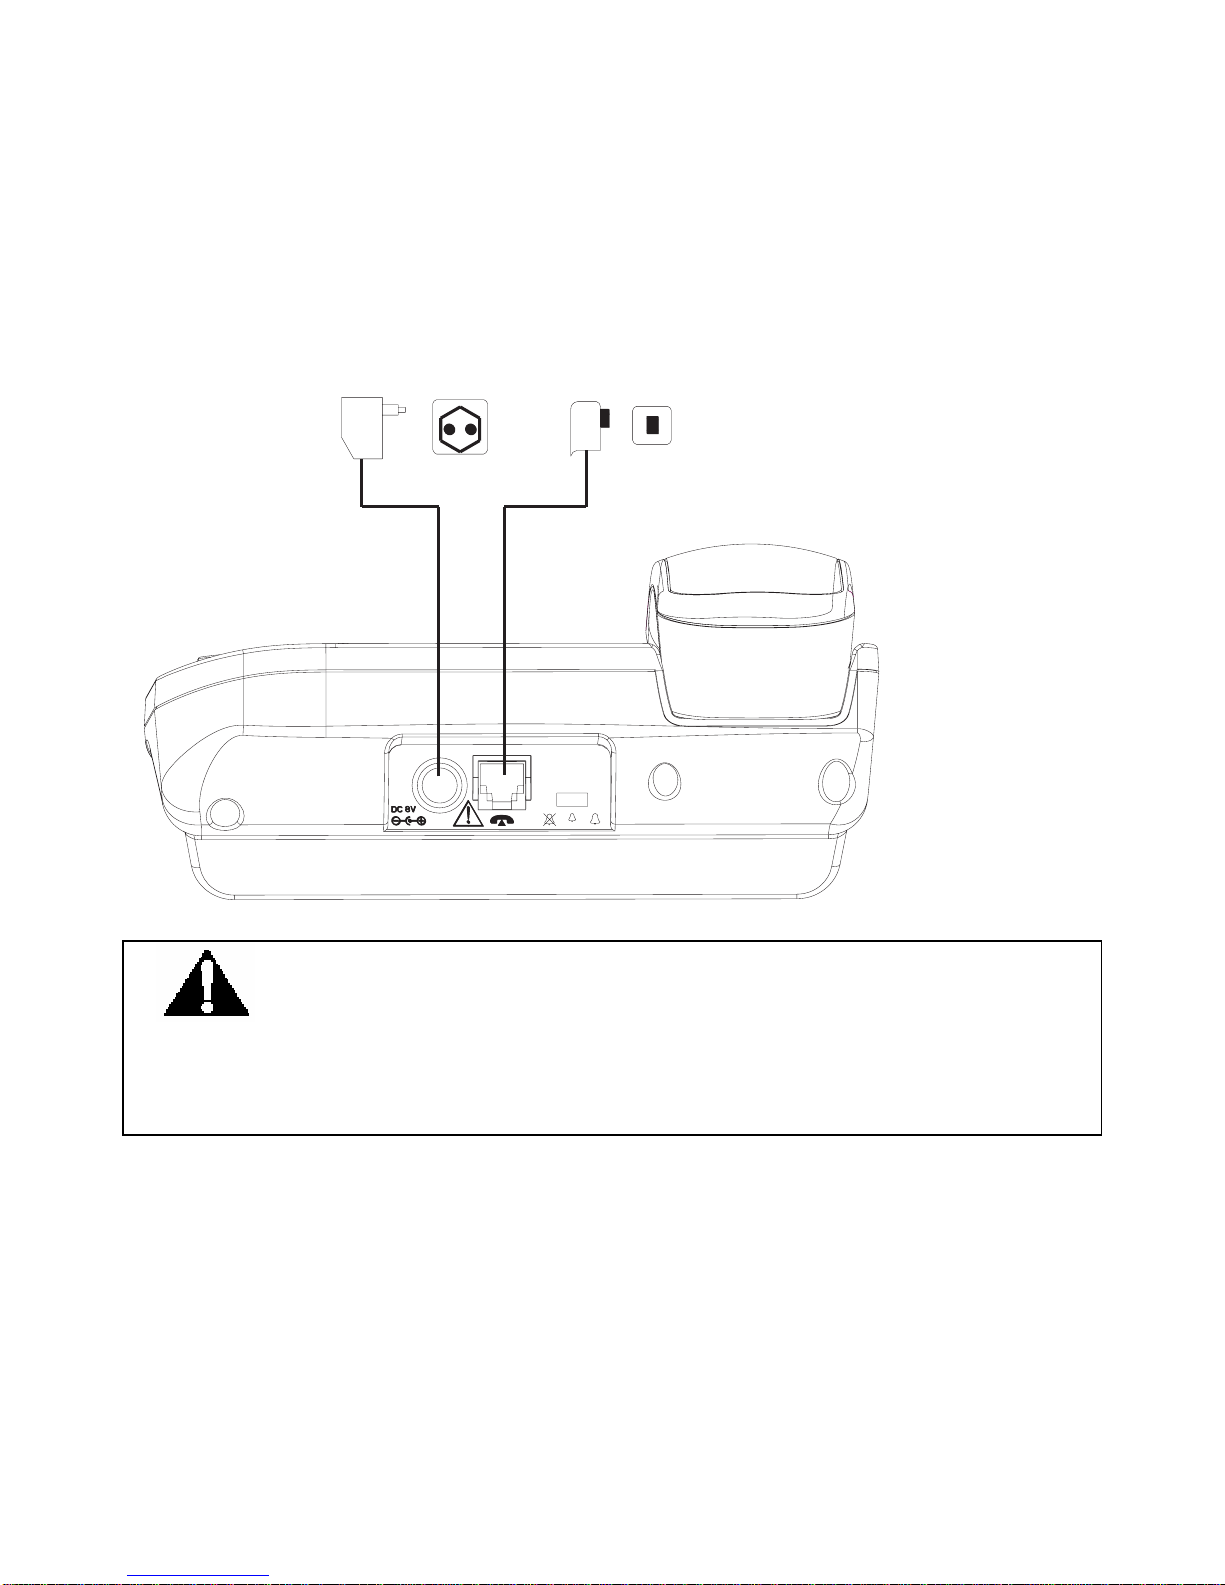
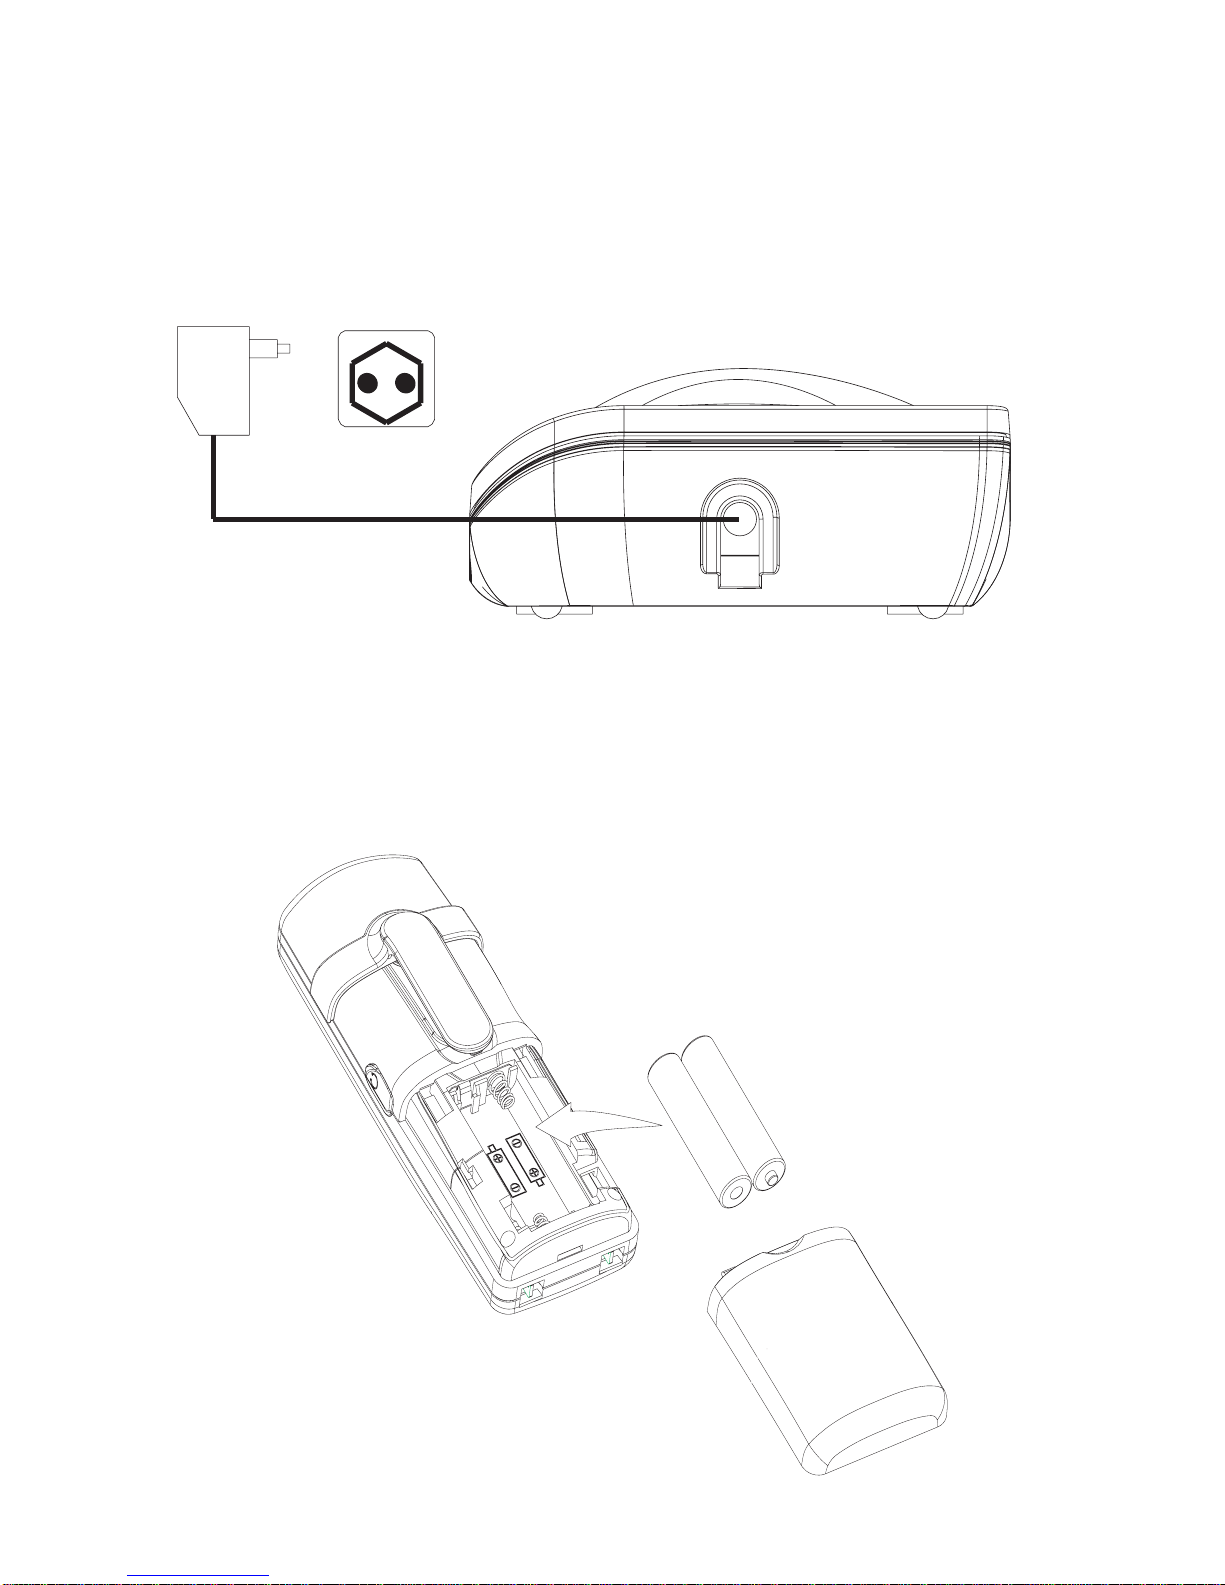
In the event of danger, the mains adapter acts as 220V power
isolating device. It should therefore, as a precaution, be installed
close to the appliance and be easily accessible.
If the mains adapter fails, it must be replaced by an identical model.
If not connected to the mains power or if there is a mains power
failure, installations with cordless handsets will no longer work. You
will then be unable to make or receive calls through the cordless
handset in event of emergency. Fortunately, our Combo phone 21887
consists of one base station and cordless handset. Therefore, you are
still able to make or receive calls through the base station during
p
ower failure (but no digits or icons will be appeared on the display)
The appliance is designed for connection to an analogue telephone
line class TNV3 (telecommunications network voltage).
! Do not use your telephone to notify a gas leak when you are in
the vicinity of the leak.
– 1 –

It is recommended that you avoid using this device during electrical
storms.
Thomson Telecom hereby declares that the 21887 conforms to the
essential requirements and other applicable provisions of European
directive 1999/5/CE.
WARNING:
TO PREVENT FIRE OR ELECTRICAL SHOCK HAZARD, DO NOT
EXPOSE THIS PROCUCT TO RAIN OR MOISTURE.
THE LIGHTING
FLASH AND
ARROW HEAD
WITHIN THE
TRIANGLE IS A
WARNING SIGN
ALERTING YOU OF
“DANGEROUS
VOLTAGE”
INSINDE THE
PRODUCT.
CAUTION: TO
REDUCE THE RISK OF
ELECTRICAL SHOCK,
DO NOT REMOVE
COVER (OR BACK).
NO USER
SERVICEABLE PARTS
INSIDE. REFER
SERVICING TO
QUALIFIED SERVICE
PERSONNEL.
THE
EXCLAMATION
WITHIN THE
TRIANGLE IS
WARNING SIGN
ALERTING YOU OF
IMPORTANT
INSTRUCTIONS
ACCOMPANYING
THE PRODUCT.
SEE MARKING ON BOTTOM / BACK OF PRODUCT
– 2 –

Battery Safety Precautions
zDo not burn, disassemble, mutilate, or puncture. Like other
batteries of this type, toxic materials could be released which
can cause injury.
zTo reduce the risk of fire or personal injury, use only the battery
listed in User’s Guide.
zKeep batteries out of children.
zRemove batteries if storing over 30 days.
zDo Not Use Alkaline or Non Rechargeable Batteries.
CAUTION:
Danger of explosion if battery is incorrectly replaced.
Replace only with GP60AAAHC – Ni-MH 1.2V 600mAh
rechargeable battery or equivalent.
Only use rechargeable batteries with exactly the same specifications
as those supplied with the product. Using non-rechargeable or
non-conforming batteries can damage the product. The batteries
could split or leak if incorrectly inserted, opened or exposed to heat.
Never dispose of batteries in a fire: the cell could explode.
Check with local code for possible special disposal instruction.
Note: To ensure the battery charging properly, clean the charging
contacts on the handset and charger with a soft, dry cloth once a
month. Clean more often if the unit is subject to grease, dust or high
humidity.
– 3 –

Installation
Packaging Contents
Single
pack
Twin
pack
Triple
pack
Packaging
contents
Handset Base
Stations 1 1 1
Cordless
Handset 1 2 3
Mains
Adaptor 2 3 4
Telephone
Line Cord 1 1 1
Batteries,
type AAA,
“1.2V
600mAh”
2 4 6
Charging
station 1 2 3
Operating
instructions 1 1
1
Please check the contents of the package carefully. If anything is
missing or shows signs of transport damage, do NOT put the
telephone into service! In such a case, contact either your sales outlet
with the purchase receipt.
Connecting the Base Station and Power Plug
Connecting the plugs to the corresponding sockets in the base station
(they can not be connected incorrectly because the sockets and plugs
– 4 –

are designed prevent reverse poling). Plug the telephone line in the
telephone connection socket. Insert the power plug at the other end in
the power outlet. The base station in now ready to operate.
Only use the connection cable supplied.
AC power outlet Phone jack
CAUTION:
Plug the adapter to the socket outlet that near the equipment
and shall be easily accessible. Use only the Thomson Telecom power
supply that came with this unit. Using other power supplies may
damage the unit.
– 5 –

Connecting the charging station
Insert the power plug in the socket on the rear side of the charging
station. Insert the power plug at the other end in the power outlet. The
charging station is now ready to operate.
AC power outlet
Getting Started
Install and Charge the Batteries
– 6 –

Insert two pieces AAA batteries in the compartment, ensuring correct
polarity and close the compartment.
Place the handset in the remote charge unit to charge for 14 hours
prior for first use. If you don’t properly charge the phone, battery
performance will be compromised.
Warning: The handset does not work and damaged if the
wrong batteries are inserted.
Use Only Rechargeable batteries supplied (charge at least 14
hours before use).
Do Not use Alkaline or Non Rechargeable batteries.
If batteries are empty, handset LCD will not has any display and the
handset will not response to any key. Handset is then required to put
back on Base Station / Charger cradle to charge. Handset cannot be
used until handset name and aerial icon appear. If handset does not
charged full before use, handset may emit battery low alert tone and
battery level indicator shows empty
Corded Base Station Set Up
Ringer Switch Setting
Ringer volume level (HIGH/LOW/OFF) can be selected by
a switch at the rear side of base station. Default is HI.
Note:
Base intercom ring tone level can’ t be turn OFF.
Handset ringer volume setting is refer to section of Headset Settings
–RingVolume.
– 7 –

Features
This cordless telephone is equipped with the following
features:
Handset Base Station
zDigital sound quality (DECT)
zLarge mono display with backlight
z50 Name and number phone book
zHandsfree
zCaller ID* and Caller ID* with Call Waiting
zIncoming 30 name/number call log
zMulti-language menu.
z8 level LCD contrast, user changeable
z10 Last number redial
zMicrophone mute
zConference call+ (1 external with 2 internal)
zCall forwarding/transfer+
zMessage waiting indicator*
zSeparate base and handset ringers
z4 Level earpiece volume
zReal time clock display
zCall timer
zKey tone on/off
zPage Handset from base station
zFlash/Pause/Hold function
zTone and Pulse dialing
DECT Cordless Handset
zLarge mono display with backlight
z50 Name and number phone book
zHands free
– 8 –

zCaller ID * and Caller ID* with Call Waiting
zIncoming 30 name/number call log
zMulti-language menu.
z8 Ring tone melodies
zRinger on/off
z5 level LCD contrast
z5 level ring volume
zReal time clock display
zHandset naming
zAutomatic call answering
zKey input tone on/off
zBattery status inc low battery warning
zTone and pulse dialing
zUp to 100 hours standby
zUp to 10 hours continuous talk time
zOut of range warning
zRecall/Pause/Hold
zLine in use indication
+ More than one handset required
* Subscription may be required. Please contact your network
provider.
DECT: Digitally Enhanced Cordless Telecommunication -
Standard for Cordless telephones
– 9 –

Handset Layouts
– 10 –

Redial / up key
/▲
CID/▼Caller ID / down key
menu / OK Menu / OK key
Cancel / mute key
R Flash key
Intercom key
Phone book key
Speakerphone key
Off key
Talk key
Asterisk / ring off / temporary tone
dialing key
* / / tone
Hash key/Keypad lock key
Pause key
Handset LCD Display
Speakerphone icon
Phone icon
Key lock icon
Mute icon
Ring off icon
– 11 –

Battery icon
Aerial icon
Internal call
NEW Missed call icon
RPT Repeated call icon
AM AM icon
PM PM icon
Corded Base Layouts
– 12 –

menu / OK Menu / OK key
▲/ ▼Up / down key
C Cancel key
exit Exit key
CID Caller ID key
redial Redial key
Intercom/ page Intercom/ page key
Phone book key
hold Hold key
flash Flash key
Register handset/Mute key
Register/ mute
Speaker key
Vol+/ vol- Volume up / down key
Pause key
*/tone Asterisk / temporary tone dialing key
– 13 –

Base LCD
Phone icon
Speakerphone icon
Mute icon
Internal call icon
Missed call icon
(Voice) Message Waiting icon
RPT Repeated call icon
AM AM icon
PM PM icon
Menu Operation
Base menu
Selecting the Language
Different languages display are available for selection.
zPress MENU/OK key.
z“Language” is displayed and press MENU/OK key.
zPress ▲or ▼key to select the desired language.
zPress MENU/OK key to confirm the setting.
zPress the exit key to return to idle mode.
LCD Contrast
There are 8 levels selection. The default setting is level 4.
– 14 –

zPress MENU/OK key.
zPress ▲or ▼key to select “CONTRAST” and press
MENU/OK key.
zPress ▲or ▼key to select the desired contrast level.
zPress MENU/OK key to confirm the setting.
zPress the exit key to return to idle mode.
Key Tone
You can set the Base key tone to “On” or “Off” when you press the
base keypad. The default setting is “On”.
zPress MENU/OK key.
zPress ▲or ▼key to select “KEY TONE” and press
MENU/OK key.
zPress ▲or ▼key to select “ON” or “OFF”.
zPress MENU/OK key to confirm the setting.
zPress the exit key to return to idle mode.
Dial Mode
You can set the dial mode to “Tone” or “Pulse”. The default setting is
“Tone”.
zPress MENU/OK key.
zPress ▲or ▼key to select “DIAL MODE” and press
MENU/OK key.
zPress ▲or ▼key to select “TONE” or “PULSE”.
zPress MENU/OK key to confirm the setting.
zPress the exit key to return to idle mode.
Flash Time
You can select flash time from 100ms to 800ms. The default setting is
600ms.
zPress MENU/OK key.
zPress ▲or ▼key to select “FLASH TIME” and press
MENU/OK key.
zPress ▲or ▼key to select the desired flash time.
zPress MENU/OK key to confirm the setting.
zPress the exit key to return to idle mode.
– 15 –

Date / Time
You can set the Date/Time displayed in idle mode. The default setting
is “2007, 01/01 12:01 pm”.
zPress MENU/OK key.
zPress ▲or ▼key to select “DATE/TIME” and press
MENU/OK key, the LCD will display “Year 2007”.
zInput the correct last two digits of year (range: 00-99) using
number key, press MENU/OK key to confirm the setting and
enter month and date setting.
zInput the correct date and month by numeric key, the format is:
date/month (date range: 01-30/31, month range: 01-12) using
number key, press MENU/OK key to confirm the setting and
enter time setting.
zInput the correct time, the format is: hour/minute (hour range:
01-12 and 00-23, minute range: 00-59) using number key, and
set the “am” or “pm” using ▲or ▼key.
zPress MENU/OK key to confirm the setting.
zPress the exit key to return to idle mode.
Note: If the value you input is over the range, you can’t enter next
setting by pressing MENU/OK key, please enter the correct setting
again.
Message Waiting
If you have subscribed to a voice messaging service, the icon
will be displayed to alert you if you have a new messages waiting.
You can turn Visual Message Waiting Indication (VMWI) off
zPress the MENU/OK key
zUse the ▲or ▼keys to scroll to ’VMWI’ and press the
‘Menu/OK’ key again
zYou will be prompted ‘VMWI OFF?’
zPress the MENU/OK to confirm the setting.
zPress the exit key to return to idle mode.
Note: This service need subscription to local operator and it supports
the FSK CLI system only.
– 16 –

Reset
You can reset your Telephone Base to its original (default) settings.
Note: After reset the base, all the caller ID records stored in base and
cordless handset, and all the phonebook and redial records stored in
base will be cleared. Please write down the useful information before
reset.
zPress MENU/OK key.
zPress ▲or ▼key to select “RESET” and press MENU/OK
key, the LCD will display “ENTER PIN”. (The default setting
is “0000”)
zInput the correct PIN code using number key, press MENU/OK
key to confirm, and the LCD will display “RESET?”.
zPress MENU/OK key to confirm the setting.
zPress the exit key to return to idle mode.
Handset Menu
Handset Setting
Ring Melody
8 ringer tones are available for selection. The default setting is
“Melody 1”.
zPress MENU/OK key.
zPress ▲or ▼key to select SETUP HS and press MENU/OK
key.
zPress ▲or ▼key to select RING MELODY and press
MENU/OK key.
zPress ▲or ▼key to select the desired ring melody, the
selected melody is sounded.
zPress MENU/OK key to confirm.
zPress the key to return to idle mode.
Ring Volume
5 ring volumes are available for selection. The default setting is
volume 5. Ringer can be disabled by pressing * key for 1.5 seconds in
– 17 –

idle mode, and then icon will then shown on the display. Press
and hold * key again can Enable ringer again.
zPress MENU/OK key.
zPress ▲or ▼key to select SETUP HS and press MENU/OK
key.
zPress ▲or ▼key to select RING VOLUME and press
MENU/OK key.
zPress ▲or ▼key to select the desired ring volume, the
selected volume is sounded.
zPress MENU/OK key to confirm.
zPress the key to return to idle mode.
Note: For the cordless handset, the intercom ring volume can’t be
adjusted, but it can be turned off.
Low Battery
You can set the warning beep to ON when cordless handset battery is
low. It alert you to charge the battery. The default setting is ON.
zPress MENU/OK key.
zPress ▲or ▼key to select “SETUP HS” and press
MENU/OK key.
zPress ▲or ▼key to select TONES and press MENU/OK key.
zPress ▲or ▼key to select LOW BATTERY and press
MENU/OK key.
zPress ▲or ▼key to select ON or OFF.
zPress MENU/OK key to confirm.
zPress the key to return to idle mode.
No Coverage
You can set the warning beep to ON or OFF when the cordless
handset is out of range. The default setting is ON.
zPress MENU/OK key.
zPress ▲or ▼key to select SETUP HS and press MENU/OK
key.
zPress ▲or ▼key to select TONES and press MENU/OK key.
zPress ▲or ▼key to select NO COVERAGE and press
– 18 –

MENU/OK key.
zPress ▲or ▼key to select ON or OFF.
zPress MENU/OK key to confirm.
zPress the key to return to idle mode.
Key Tone
You can set the key tone to ON or OFF.. The default setting is ON.
zPress MENU/OK key.
zPress ▲or ▼key to select SETUP HS and press MENU/OK
key.
zPress ▲or ▼key to select TONES and press MENU/OK key.
zPress ▲or ▼key to select KEY TONE and press MENU/OK
key.
zPress ▲or ▼key to select ON or OFF.
zPress MENU/OK key to confirm.
zPress the key to return to idle mode.
Auto Talk
This option allows user to pick up the cordless handset from charger
to answer the call directly during ringing, and no need to press or
key. The default setting is ON.
zPress MENU/OK key.
zPress ▲or ▼key to select SETUP HS and press MENU/OK
key.
zPress ▲or ▼key to select AUTO TALK and press
MENU/OK key.
zPress ▲or ▼key to select ON or OFF.
zPress MENU/OK key to confirm.
zPress the key to return to idle mode.
(Daily) Alarm
zPress MENU/OK key.
zPress ▲or ▼key to select SETUP HS and press MENU/OK
key.
zPress ▲or ▼key to select ALARM and press MENU/OK key.
– 19 –
Table of contents
Other GE Cordless Telephone manuals