GE 30542EE1 User manual

Model number:
30542
DECT 6.0 CORDED CORDLESS TELEPHONE

Thank you for choosing GE!
Register your product
Please take a moment to register your product online. Just go to
www.gephones.com and click “register here” from the home page. Provide
your email address and receive product updates, special oers, or discounts
on future purchases.
* It will not diminish your warranty rights if you choose not to register.
Assistance and more information
Retain your sales receipt as proof of purchase in the event warranty service is
necessary.
For product assistance or for more information about accessories, visit our
website at www.gephones.com or call our customer service center at
1-877-394-9775.
Attach your sales receipt here.

Table of contents
Getting started
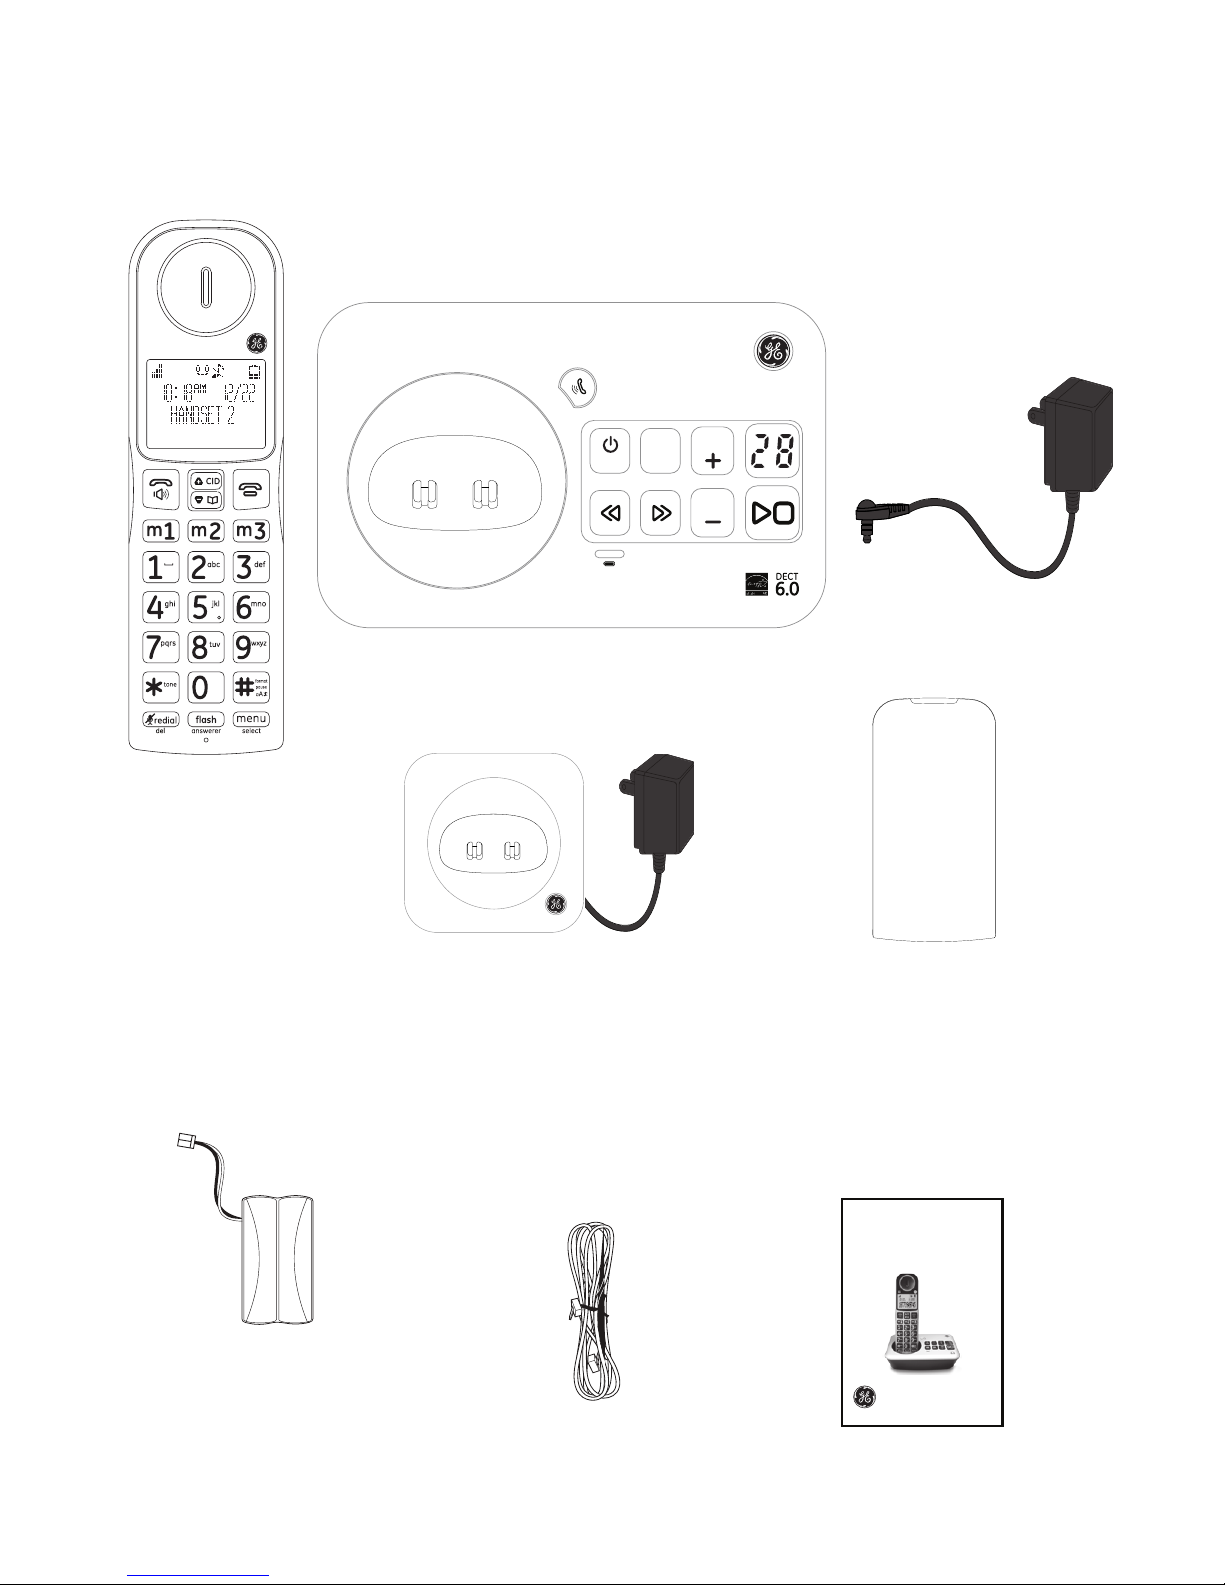
Parts checklist..................................................................1
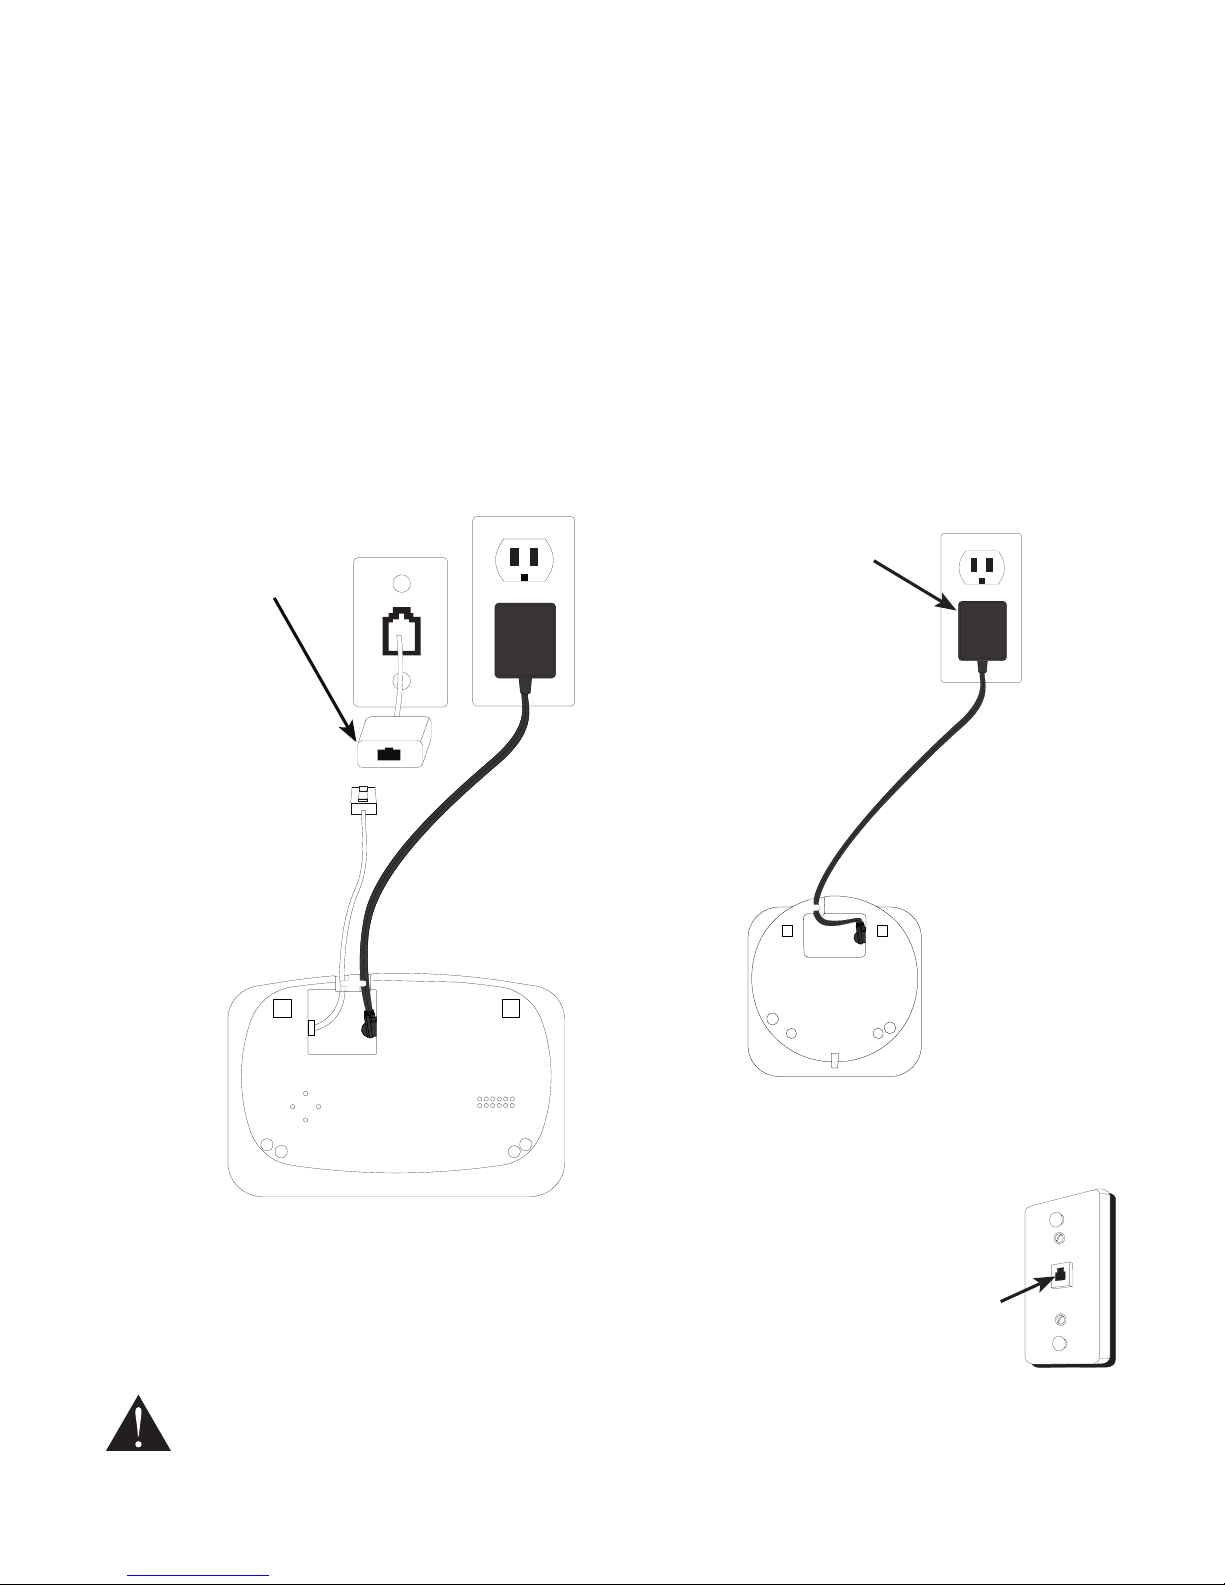
Telephone base and charger installation ...........2
Telephone jack requirements ...................................2
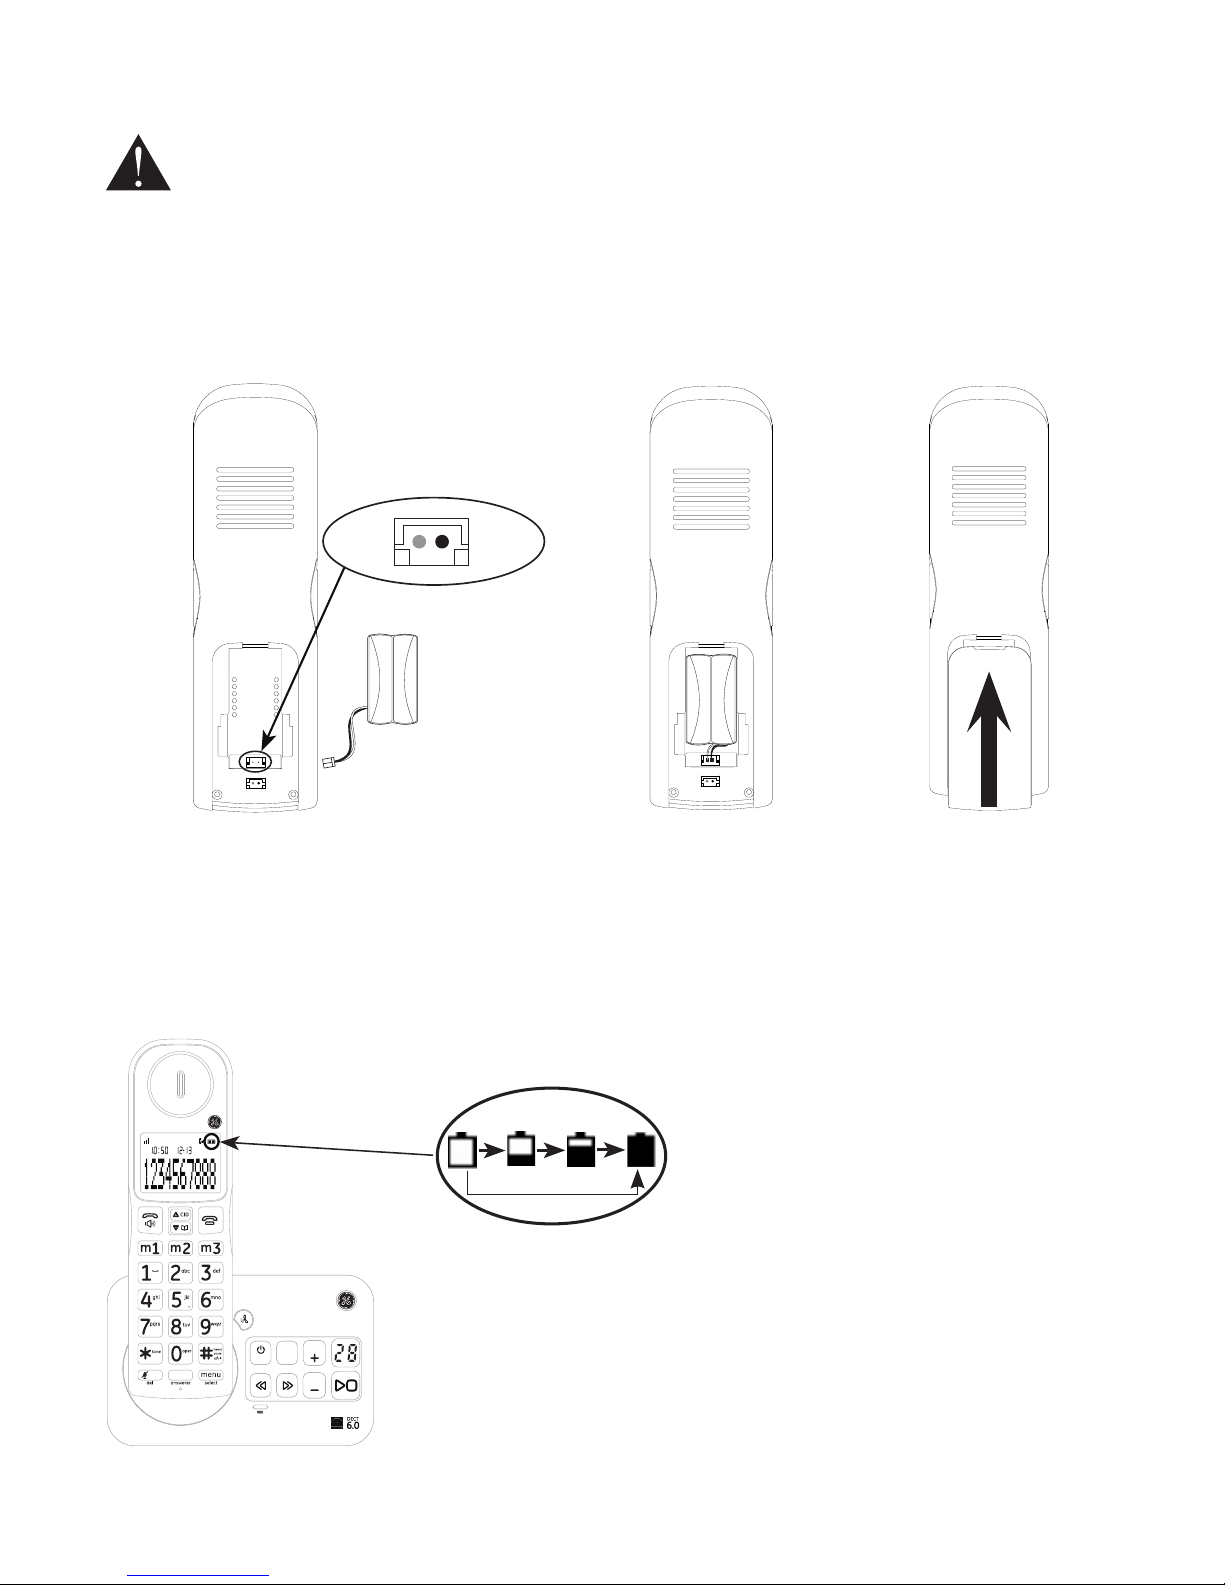
Battery installation.........................................................3
Overview
Telephone base layout.................................................4
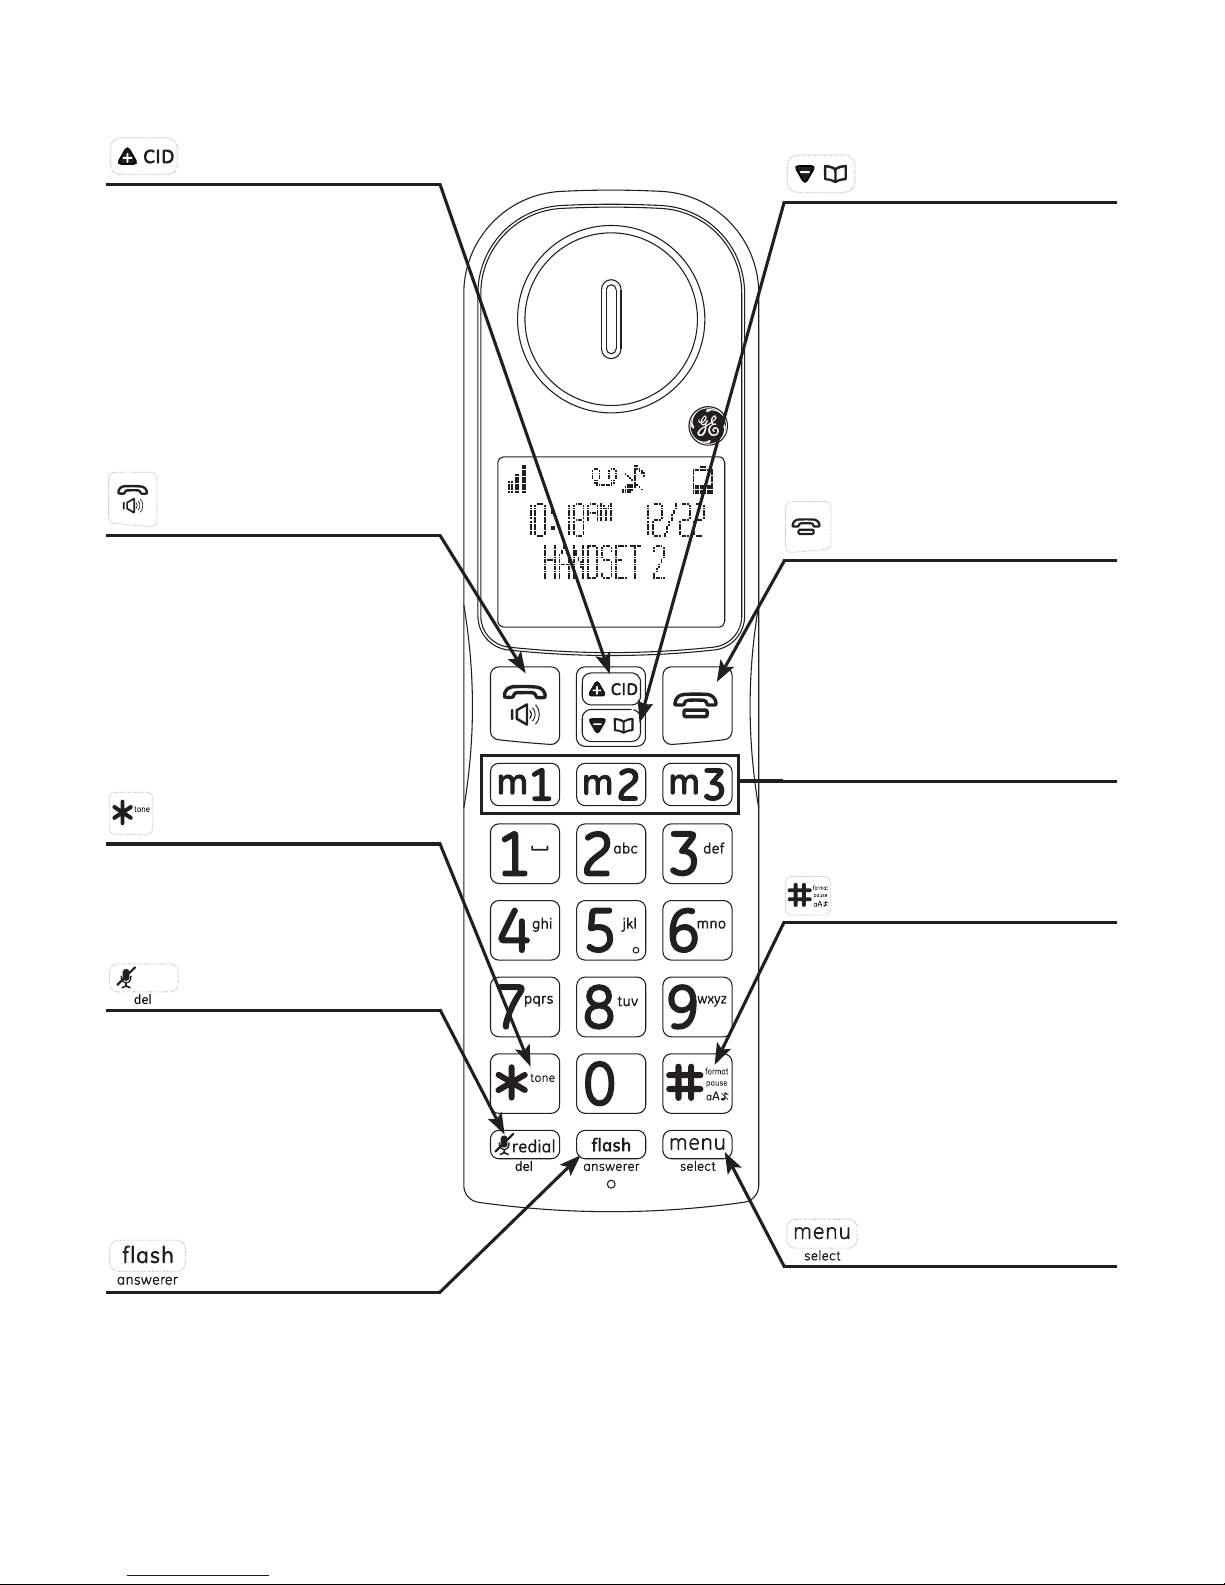
Handset layout ................................................................5
Battery charging.............................................................6
Handset screen display icon.....................................7
Initial setting
Dialing mode.....................................................................8
Programming your area code (optional) .............8
Telephone operation
Make a call.........................................................................9
Predial a call......................................................................9
Answer a call ....................................................................9
Mute......................................................................................9
End a call............................................................................9
Speakerphone..................................................................9
Volume control ................................................................9
Audio boost .......................................................................9
Equalizer ..........................................................................10
Make a call using the redial memory.................10
Save a number from the redial list to the
phonebook..................................................................10
Delete number from the redial list.......................10
Call waiting or call waiting with caller ID
service...........................................................................11
Using multiple handsets...........................................11
Voice mail service........................................................11
Reset VMWI ....................................................................11
Handset locator ...........................................................11
Intercom ..........................................................................12
To answer an incoming call during
intercom.......................................................................12
To transfer a call ..........................................................12
Handset settings
Ringer volume...............................................................13
Ringer Tones ..................................................................13
Low Batt Tone ...............................................................13
Key beeps........................................................................13
Equalizer ..........................................................................14
Handset name..............................................................14
Display language.........................................................14
Auto Talk..........................................................................15
Clock and alarm
Date and time ...............................................................16
Alarm.................................................................................16
Phonebook
Add a phonebook record.........................................17
Memory location..........................................................17
Character table ............................................................18
To view/call a phonebook record.........................18
To search a phonebook entry
alphabetically ............................................................18
Edit a phonebook entry ............................................19
Delete a phonebook entry.......................................19
Delete all phonebook entries.................................19
Phonebook memory...................................................19
Caller ID
Using Caller ID service ..............................................20
Phonebook Caller-ID matching.............................20
Review/call from the call log..................................20
Save a number to the phonebook.......................20
Delete caller ID record...............................................21
Call log display screen messages........................21
Answering system
Turning the answering system on or o...........22
Answering system and voice mail.......................22
Message capacity .......................................................22
New message indicator............................................22
Memo recording...........................................................22
Outgoing Announcement (OGA) ...........................23
Play the current outgoing announcement......23
Record outgoing announcement.........................23
Delete your recorded OGA ......................................23
Number of rings before the system
answers........................................................................24
Message Alert................................................................24
Call screening................................................................24
Call intercept..................................................................25
Message playback using the handset...............25
Message playback using the telephone
base................................................................................25
Options during playback..........................................25
Delete all messages ...................................................25
Remote code for remote access..........................26
Access the answering system remotely...........26
Remote access commands....................................26

Advanced settings
Registering a handset ...............................................27
Deregistering a handset...........................................27
Appendix
Troubleshooting guide..............................................28
General Product Care................................................29
Important Safety Instructions ...............................30
FCC Parts 15, 68 and ACTA......................................33
One Year Limited Warranty ....................................36
Index..................................................................................38
Technical specication .............................................40
Remote access operation card.............................41

1
Getting started
Parts checklist
Your telephone contains the following items. Save your sales receipt and original
packaging in the event warranty service is necessary.
Charger with adapter attached
(1 for 30542XE2
2 for 30542XE3
3 for 30542XE4)
*Available for models with
multiple handsets only
Handset
(1 for 30542XE1
2 for 30542XE2
3 for 30542XE3
4 for 30542XE4)
Battery
compartment cover
(1 for 30542XE1
2 for 30542XE2
3 for 30542XE3
4 for 30542XE4)
Battery
(1 for 30542XE1
2 for 30542XE2
3 for 30542XE3
4 for 30542XE4)
Telephone line cord
Telephone base
User’s guide
Power adapter for
telephone base
del
vol
vol
ans
digital answering system
DECT 6.0 CORDED CORDLESS TELEPHONE
Model number:
30542

Getting started
2
CAUTION:
1. Use only the power adapter that came with this unit. Using other power adapters may damage
the unit.
2. To prevent re or electrical shock hazard, do not expose this product to rain or moisture.
Telephone base and charger installation
1. Plug the smaller end of the power adapter into the power jack at the bottom of the
telephone base, route the cord through the tabbed slot on the right.
2. Plug one end of the telephone line into the jack at the bottom of the telephone
base, route the cord through the tabbed slot on the left.
3. Plug the other end of the telephone line into a telephone wall jack.
4. Plug the larger end of the power adapter into an electrical outlet not controlled by
a wall switch.
If you have DSL high speed Internet service, a DSL lter is required (not included).
Contact your DSL service provider for more information about DSL lter.
DSL lter (not
included) is
required if you
have DSL high
speed Internet
service.
Telephone base installation Charger installation
Plug the power
adapter into an
electrical outlet
not controlled by
a wall switch.
Telephone jack requirements
To use this phone, you need a RJ11C type modular telephone jack,
which might look like the one pictured here, installed in your home.
If you do not have a modular jack, call your telephone service
provider to nd out how to have one installed.
Wall plate
Modular
telephone
line jack

Getting started
3
Battery installation
CAUTION:
1. Use only the supplied rechargeable battery or equivalent replacement battery. See battery
specications on the Technical specication page or visit our website at www.gephones.com to
nd out how to order a replacement battery if necessary.
2. If the handset will not be used for an extended period of time, unplug the battery and remove it
from the handset to prevent possible leakage.
Please fully charge your handset before use!
For optimum battery performance, charge the battery for 16 hours before rst use.
NOTE: Use only the supplied rechargeable battery or replacement battery. Visit our website at
www.gephones.com to order a replacement battery if necessary.
1. Plug the battery connector securely
into the socket inside the handset
battery compartment. Make sure
that red and black wires on the plug
are properly inserted into the socket
as shown.
2. Place the battery
and the wire inside
the battery
compartment.
4. Place the handset onto the telephone base or charger as
shown. An animated battery icon will display after a few
minutes to show that the handset battery is successfully
being charged. For optimum performance, please allow the
battery to charge for 16 hours before rst use.
3. Align the cover
against the battery
compartment and
slide it upwards
until it clicks into
place.
Animated
charging
indicator
del
vol
vol
ans
digital answering system
AM
flashredial
red
wire
black
wire

4
Overview
Telephone base layout
del
vol
vol
ans
digital answering system
ans
Press to turn the
answering system on
or o.
del
Press to delete the
message during
playback.
Press and hold
to delete all old
messages when the
telephone is idle.
Message window
Displays the number
of messages and other
answering system
information.
Press to play
messages or stop
playback.
vol
Press to decrease
the volume during
message playback or
call screening.
Press to skip to the
next message during
message playback.
Press to repeat a
message or press twice
to play the previous
message during message
playback.
Press to page all
system handsets.
vol
Press to increase
the volume during
message playback or
call screening.

Overview
5
Handset layout
• Press to review the
phonebook when the
telephone is not in use.
• During a call, press
to increase the incoming
volume.
• While in menu, press to
scroll up.
• Press to make or answer
a call.
• Press to switch between
speakerphone and
normal handset use
during a call or message
playback.
• During a call, press to
send touch-tone signals
temporarily.
redial
• Press to review redial list.
• Press to mute a call,
press again to resume
conversation.
• Press to delete digit or
character.
• Press to review the call
log when the telephone
is not in use.
• While in menu, press to
scroll down.
• During a call, press
to decrease the incoming
volume.
• During a call, press to
hang up.
• During programming,
press to cancel and exit
without making changes.
• Press and hold to add
a dialing pause when
dialing or entering
numbers into phonebook.
• Press to switch between
upper case and lower
case when entering
names into phonebook.
• Press to show menu.
• Press to select an item,
or to save an entry or
setting.
• During a call, press to answer an incoming call if you
receive a call waiting alert (if you have subscribed
to the call waiting feature from your service provider).
• Press to play answering system message when in
idle mode.
m1-m3
Press to dial programmed
memory numbers.

Overview
6
Battery charging
The following table summarizes the battery charge indicators and what actions need
to be taken.
Battery indicators Battery status Action
Battery icon is scrolling. Battery is charging. Keep the handset in the telephone
base or charger when not in use.
Battery icon is on
steadily.
Battery is completely
charged.
The handset is ready for use.
It will take approximately 2 hours
for the battery icon to indicate a full
charge even if the handset is only
removed from the telephone base or
charger for a short time and replaced.
This is a normal operation and does
not indicate a battery issue.
Battery icon is empty
and the screen shows
LOW BATTERY
CHARGE HANDSET
Battery is low. Place the handset in the telephone
base or charger to charge without
interruption (at least 30 minutes)
before use.
The screen is blank. Battery has no power while
the handset is out of the
telephone base or charger.
Place the handset in the telephone
base or charger for at least 16
hours without interruption. See
troubleshooting on page 28 for
help if the screen remains blank after
charging.

Overview
7
Handset screen display icon
Item Meaning
• Displays when the telephone base is within reception
range.
• Scrolls to indicate battery charging when handset is in the
telephone base or charger.
• Flashes and empty when battery level is low.
• Speakerphone is in use.
• Displays when there are new calls.
• Displays when there is a new voice mail message.
(Available only if you have subscribed to voice mail service
from your telephone service provider.)
• Displays when the alarm is set.
• Flashes during alarm.
• Displays when the ringer is turned o.
• Displays when answering system is on.
• Flashes when there are new messages.

8
Initial setting
Dialing mode
The default dialing mode is TONE for touch tone dialing. If you have pulse or rotary
service, you can change this setting to accommodate your telephone
line service.
1. Press .
2. Press or to select Base Setup and then press .
3. Press again to select Dialing Mode.
4. Press or to select the desired setting and then press
to conrm.
Programming your area code (optional)
If you program your area code, the caller ID history displays only seven
digits of the telephone numbers from your area code.
1. Press .
2. Press or to select Handset Setup and then press .
3. Press or to select Area Code and then press .
4. Enter your area code and then press to conrm.
Dialing Mode
Reset VMWI
10:30PM 11/20
Tone
Pulse
10:30PM 11/20
Area Code
Register HS
10:30PM 11/20
Set Area Code
- - -
10:30PM 11/20

9
Telephone operation
Make a call
1. Press .
2. Dial the phone number.
Predial a call
1. Dial the phone number using the dial pad keys. If you make an error while dialing,
you can press redial to erase the last digit entered.
2. Press .
Answer a call
Press to answer an incoming call.
When there is an incoming call, the screen and dial pad backlight will be on.
Mute
The mute function allows you to turn o the microphone while on a call. You can hear
the other party but the other party cannot hear you.
1. Press redial during a call.
2. Press redial again to resume conversation.
End a call
Press or place the handset in the telephone base or charger to end a call.
Speakerphone
Anytime during a call, press to switch between speakerphone and normal handset
use.
NOTE: Using the speakerphone will drain the battery faster than the normal handset use.
Volume control
You can adjust the volume of the handset or speakerphone anytime during a call.
Press to increase or to decrease the volume.
NOTE: Only the listening volume can be adjusted.
Audio boost
Press the boost button on the left side of the handset to amplify the listening volume
during a call. This feature is designed to assist users who may have diculty hearing
the call at normal sound levels.
To return the handset to the normal volume level, press the boost button again. The
volume will also automatically return to the normal level after you end the call.

Telephone operation
10
Equalizer
This feature allows you to change the balance of the audio of the handset to best suit
your hearing.
Press the EQ button on the right side of the handset to switch between Natural, Bass
or Treble during a call.
Make a call using the redial memory
The last ve telephone numbers previously dialed are stored in the redial list (up to 24
digits each).
1. Press redial .
2. Press or to select the desired phone number and then press to dial.
Save a number from the redial list to the phonebook
1. Press redial .
2. Press or to select the desired phone number and then press .
3. Press or to select Save to Pb and then press .
4. Enter the name by using the dial pad, refer to the character table on page 18 for
more information, and then press .
5. Edit the number by using the dial pad if necessary, and then press .
6. Press or to select the desired ringer tone and then press to conrm.
Delete number from the redial list
1. Press redial .
2. Press or to select the desired phone number and then press .
3. Press or to select DELETE and then press to delete the selected
number.
-OR-
Press or to select DELETE ALL and then press twice to delete all
redial records.

Telephone operation
11
Call waiting or call waiting with caller ID service
To use call waiting, you must subscribe to call waiting service from your telephone
service provider. This feature allows you to receive calls while you are already talking
on the phone. You will hear a call waiting alert tone when there is a second incoming
call. If you subscribe to both caller ID and call waiting with caller ID services, the
second caller’s information is displayed after you hear the call waiting alert tone.
1. Press to answer the second incoming call.
2. Press to switch between calls.
Using multiple handsets
The system allows a maximum of two system handsets to have a conversation with
an outside call at a time. The call will not be ended until all system handsets hang up.
Press on another handset. Press or place the handset in the telephone base or
charger to end the call.
Voice mail service
The icon ashes on the screen of the handset(s) when you have received a new
voice mail message from your service provider.
IMPORTANT: Voice mail service is dierent from the answering system. In order to use the voice mail service,
you must subscribe to it from your telephone service provider.
Reset VMWI
You can reset the VMWI (voice message waiting indicator) when the phone indicates
new messages waiting but there are none (for example, if you have previously
accessed voice mail from a dierent telephone line while away from home). When
new voice mails do exist, your telephone service provider will continue to send the
signal to activate the feature.
1. Press .
2. Press or to select Base Setup and then press .
3. Press or to select Reset VMWI and then press .
4. Press again to select Yes to conrm.
Handset locator
You can locate a misplaced handset by paging it from the telephone base.
1. Press on the telephone base.
2. Press again on the telephone base or press on any handset to stop paging.
Dialing Mode
Reset VMWI
10:30PM 11/20
Yes
No
10:30PM 11/20

Telephone operation
12
Intercom
The system allows an intercom call between two handsets registered to the same
telephone base.
1. Press .
2. Press or to select Intercom and then press .
3. Press or to select the desired handset, and then press .
4. Press to answer the intercom call on the other handset.
5. To end the intercom call, press or place the handset in the telephone base or
charger.
NOTES:
1 The intercom call can be canceled before it is answered by pressing on the originating handset.
2. If the called handset or telephone base does not answer within one minute, or is busy, or is out of range, the
paging will be canceled.
To answer an incoming call during intercom
You will hear an alert tone when you receive an incoming call during intercom.
Press to answer the incoming call and end the intercom.
To transfer a call
You can transfer a call to another system handsets.
1. Press during a call.
2. Press or to select the desired handset and then press .
The call is placed on hold while the intercom is established with the other system
device.
3. Press to answer the intercom on the other handset.
You can choose either option from the followings for this intercom call.
• Press to end the intercom and switch back to the outside call.
• Press or place the handset in the telephone base or charger to transfer the
outside call to the other handset.

13
Handset settings
Ringer volume
You can set the handset ringer volume from level 1 to level 5 or turn the ringer o.
1. Press .
2. Press or to select Handset Tones and then press .
3. Press again to select Ringer Volume.
4. Press or to select the desired volume level and then press
to conrm.
Ringer Tones
You can select from 10 ringer tones.
1. Press .
2. Press or to select Handset Tones and then press .
3. Press or to select Ringer Tones and then press .
4. Press or to select the desired melody (Ringer 1 to 10) and
then press to conrm.
End Range Tone
When this feature is activated, an alert tone sounds when you have moved close to
the end of the reception range during a call.
1. Press .
2. Press or to select Handset Tones and then press .
3. Press or to select End Range Tone and then press .
4. Press or to select On or O and then press to
conrm.
Key beeps
The handset can be programmed to emit a tone with each key press. You can choose
to turn this feature on or o. The default setting is ON. To change the key tone setting:
1. Press .
2. Press or to select Handset Tones and then press .
3. Press or to select Key Beeps and then press .
4. Press or to select On or O and then press to
conrm.
Ringer Volume
Ringer Tones
10:30PM 11/20
Ringer Tones
End Range Tone
10:30PM 11/20
Key Beeps
Ringer Volume
10:30PM 11/20
End Range Tone
Key Beeps
10:30PM 11/20
Volume Level 3
10:30PM 11/20
Ringer 1
Ringer 2
10:30PM 11/20
On
O
10:30PM 11/20
On
O
10:30PM 11/20

Handset settings
14
Equalizer
This feature allows you to change the balance of the audio of the handset to best sit
your hearing.
1. Press .
2. Press or to select Handset Setup and then press .
3. Press or to select Equalizer and then press .
4. Press or to select the Natural, Bass or Treble, and then
press to conrm.
Handset name
Your handsets will be automatically numbered starting from 1 up to the total number
of handsets registered to your base unit. You can rename your handsets for easier
identication (e.g. “Kitchen”, “Bedroom”, “Pams room”, etc). To personalize each
handset with a name:
1. Press .
2. Press or to select Handset Setup and then press .
3. Press or to select Handset Name and then press .
4. Press redial to erase each letter of the current name.
5. Enter your desired handset name (up to 14 characters). Press the
key to the corresponding character to display the correct letter. See
the character table on page 18 for more information.
6. Press to conrm.
Display language
You can select ENGLISH, FRANCIS or ESPAÑOL as the display language. The default
setting is ENGLISH.
To change the display language:
1. Press .
2. Press or to select Handset Setup and then press .
3. Press or to select Language and then press .
4. Press or to select the desired setting and then press
to conrm.
Language
Auto Talk
10:30PM 11/20
Handset Name
Language
10:30PM 11/20
English
Francis
10:30PM 11/20
Handset Name
HANDSET_
10:30PM 11/20
Equalizer
Handset Name
10:30PM 11/20
Natural
Bass
10:30PM 11/20

Handset settings
15
Auto Talk
When this feature is activated, you can answer a call by lifting the handset from the
telephone base or charger without pressing any keys. The default is set to o.
To turn this feature on or o:
1. Press .
2. Press or to select Handset Setup and then press .
3. Press or to select Auto Talk and then press .
4. Press or to select On or O and then press to
conrm.
Auto Talk
Area Code
10:30PM 11/20
On
O
10:30PM 11/20

16
Clock and alarm
Date and time
You can set the date and time of the telephone system as follows.
1. Press .
2. Press or to select Handset Setup and then press .
3. Press or to select Set Date & Time and then press .
4. Enter the current hour and minute. For example, 9:30 should be
entered as [0], [9], [3], [0]. Press or to select AM or PM.
5. Press to conrm.
6. Enter the current month, day and year. For example, May 16, 2010
should be entered as [0], [5], [1], [6], [1], [0], and then press to
conrm.
Alarm
The alarm can be programmed to sound once or daily for one minute. The alarm
setting is independent to each handset.
1. Press .
2. Press or to select Handset Setup and then press .
3. Press again to select Alarm Clock.
4. Press or to select On and then press .
5. Enter the desired hour and minute and then press or to
select AM or PM.
6. Press to conrm.
7. Press or to select the desired alarm melody and then
press .
8. Press or to select Once or Daily and then press to
conrm.
(Once: The alarm sounds once at the set time.
Daily: The alarm sounds daily at the set time.)
Set Date & Time
Equalizer
10:30PM 11/20
Time
09:30PM
10:30PM 11/20
MM/DD/YYYY
05/16/2010
10:30PM 11/20
On
O
10:30PM 11/20
Ringer 1
Ringer 2
10:30PM 11/20
Set Alarm Time
05:30AM
10:30PM 11/20
Once
Daily
10:30PM 11/20
This manual suits for next models
6
Table of contents
Other GE Cordless Telephone manuals
Popular Cordless Telephone manuals by other brands

Panasonic
Panasonic KX-TGP550 T04 user guide

AT&T
AT&T E2717B user manual

Panasonic
Panasonic KX-TG6611PD operating instructions

Radio Shack
Radio Shack 900 MHz Digital Spread Spectrum Dual Keypad Cordless Telephone with Caller ID/Call Waiting... owner's manual

NEC
NEC MDview 232 manual

Sanyo
Sanyo CLT-9839 user guide