GE EDW6000 Series User manual

ge.com
Safety Instruc_tions ....... 2, 3
Operating Instructions
Care and Cleaning ......... 12
Control Panel and Settings . . 4-7
Loading Place Settings ...... 11
Loading tile Racks ......... 10
Optional Accessories ........ 11
Using tile Dishwasher ...... 8, 9
Troubleshooting Tips... l 3, 14
Write the model and serial
numbers here:
Model #
Serial #
Ybu can find them on the tub wall
just inside the dooi:
ED WSO00 Series
PTl)W6000 Series
GHDA 4 50 Series
GHDA 650 Series
GLD4 l O0 Series
GLD4200 Series
GLI) 4 300 Series
GLI) 55 O0 Series
GLI) 5800 Series
GLI) 62 O0 Series
GLI) 6300 Series
GI2) 65 O0 Series
Consumer Support
(Mnsumer Support .... Back Coxer
Warranty ................. 15
165D4700P311 49-5987 05-05JR

IMPORTANT"SAFETY#VFORMATION.
READALLIIVSTRUCTIOIV$BEFOREUSING
WARNING!
Foryoursafety,the informationin this manual mustbe followed tominimize the risk of fire
or explosion,electric shock,or topreventpropertydamage,personalinjury,or death.
WATERHEATERSAFETY
Under certain conditions hydrogen gas may be produced in a water heater that has not been
used for two weeks or more. HYDROGEN GAS IS EXPLOSIVE.
If the hot water has not been used for two weeks or more, prevent tile possibility of damage
or ii_jury by turning on all hot water faucets and allow them to run for several minutes. Do this
before using any electrical appliance which is connected to the hot water svstem. This simple
procedure will allow any built-ui) hydrogen gas to escape. Since the gas is flammable, do not
smoke or use _lll open flame or appliance during this process.
%Use th& appfiance only for its intended purpose as described in th& Owner's Manual
PROPERINSTALLATIONANDMAINTENANCE
This dishwasher must be properly installed and located in accordance with the Installation
Instructions before it is used. If you did not receive an Installation Instructions sheet with your
dishwasher, you can receive one by visiting our Website at GEAppliances.com.
• Connect to a grounded metal, permanent •
wiring system; or run an equil_ment-
grounding conductor with the circuit
conductors and connect to the eqtfipment-
grounding terminal or lead of the appliance.
• hnproper connection of the equii)ment-
grounding conductor can result in a risk
of electric shock. Check with a qualified •
electrician or service representative if you
are in doubt whether the appliance is
properly grounded.
• Use suI)ply conductors rated at least 75°C
(167°F).
Dispose of discarded appliances and shii)ping
or packing material properly.
Do not attempt to repair or replace any part
of your dishwasher unless it is specifically
recommended in this manual, All other
servicing should be reterred to a qualified
technician,
To minimize the possibility of electric shock,
disconnect this appliance fl'om the power
SUl)ply before attempting any maintenance.
NOTE:Turning the dishwasher oH does not
disconnect tile appliance from the power
suI)ply. We recommend having a qualified
technician service your appliance.
WARNING!
DONOT...
• Do not tamper with controls.
• Do not abuse, sit on, or stand on the door
or dish rack of the dishwasher.
• Do not discard a dishwasher without first
rei/lo_,ing the door or i'elllO_,ing the door
latch.
• Do not store or use combustible materials,
gasoline or other flammable vapors and
liquids in the vicinity of this or any other
appliance.
• Do not allow children to play around
dishwasher when opening or closing door
due to the possibility of small fingers being
pinched in door.
• Do not allow children to play with, on
or inside this appliance or any discarded
applia nce.

ge.com
WARNING!RISKOFCHILDENTRAPMENT
PROPERDISPOSALOFTHEDISHWASHER
Junked or abandoned dishwashers are
da ngerous...even if thev will sit for 'iJ ust a
few days." If you are getting rid of wmr old
dishwasher; please follow the inst_ uctions
below to help prevent accidents.
Before You Throw Away Your Old Dishwasher:
• Take off the door of the washing
compartment or remove the door latch
keeper (as shown). Door latch keeper
WHENUSINGYOURDISHWASHER
..g©
a, CAUTION: i.
Anti-Bacteria cycle may be hot to the touch.
Use care befl)re tmloading.
• Use only powder, tabs, liquid detergents
or rinse agents recommended for use in
a dishwasher and kee I) them Otlt of the
reach of children. Cascade ®and ElectrasoP
Automatic Dishwashing Detergents, and
Jet-Dry _and Cascade Crystal CleaW rinse
agents have been approved for use in
all GE dishwashers.
• Using a detergent that is not specifically
designed tot dishwashers will cause the
dishwasher to fill with suds.
• I,ocate sharp items so that they are not likely
to damage the door seal.
• i,oad sharp knives with the handles up to
reduce the risk of cut-type ii_jm'ies.
• Do not wash plastic items tmless marked
dishwasher safe or the equivalent. For
plastic items not so marked, check the
Ilia n t I_;I ctt II'e I"S Fecoi_li/] endations,
• Non-Dishware Items: Do not wash items such
as electronic air cleaner filters, fiu'nace filters
and paint brushes in vom" dishwasher.
Damage to dishwasher and discoloration
or staining of dishwasher may result.
• Do not touch the heating element dm'ing
or ilnlnediatelv after use.
• Do not operate yore" dishwasher unless all
enclosure panels are properly in place.
• Close supervision is necessary if this
appliance is used by or near children.
• I,oad light, plastic items so thev will not
become dislodged and drop to the bottom
of the dishwashe_they might come into
contact with the heating element and be
dalllaoed
• If xour dishwasher is
connected to a wall
switch, insure that the
switch is on prior
to rise.
• If wm choose to turn the switch off
between wash cycles, allow 5-10 seconds after
turning the switch on befi)re touching the
START/RESETpadto allow the control to boot.
READANDFOLLOWTHISSAFETYINFORMATIONCAREFULLY.
SAVETHESEINSTRUCTIONS 3

Aboutthedishwashercontrolpanel. (Formodels with sensor. EDW6000Series,
GHDA650Series, GLD6200Series, GLD6300Series, and GLD6500Series)
Youcan locate your model number on the tub wall just inside the door. Throughout this manual, features and appearance
may vary from your model.
4
Cgcles Options o_tp.....
D n n
ControlSettings
OtatusIndicator Lights
The Stares displa} tells _r_t_ _d_at S happenh Nowhile tile dislmasher is in openJtion and ma_ flash, indicating a
malflmcfion (see page 8). Tile lights will come ON indicating tile sequence of operation the dishwasher is in.
SENSINGDisplayedwhilethe sens0rismeasuringtheam0unt0fs0ilandtemperature0fwater.
(onsomemodels)Thedishwasherwilladjusttheselectedcycletoachieveoptimalperformance.
WASHINGDisplayedduringprewashandmainwashperiods.
(onsomemodels)
RINSINGDisplayedduringrinseperiods.
(onsomemodels)
DRYINGDisplayedduringHEATEDDRY.
(onsomemodels)
SANITIZEDDisplayedwhencyclehasmetsanitizationconditions.LightremainsONuntildoorisopened.
El CLEANDisplayedwhenawashcycleiscomplete.ThelightstaysONasareminderthatthedishesarecleanuntilthedooris
relatchedoruntilanothercycleisselected,
time RemainingDisplay/onsomemodels)
Dining operation, tile (fispla) sho_:s the mimltes remaining until the c) cle is complete. Tile displa_ _r _st
tile remaining time \_hile fl_e sensing light is on. The time displ_tyed at file start of each Qvle _r change ti'om
the fi_ctorysetting as fl_eunit customizes itself to home use. During a (tekffstart, tile displa}willsho_ hom_ of
time remaining until the cyclestarts.
Cycles
ThelightabovetheselectedpadwillbeONtoindicatewhichcyclehasbeenselected,
Thisdishwasherisequippedwithadirtandtemperaturesensor.Cyclelengthandtimewillvarydependingonthesoil
levelandtemperature.
ANTI-BACTERIA
orSANIWASH Heavy8.5gal.,84min.
Medium7.3gal.,78min.
Light6.1gal.,75min.
Thiscycleraisesthewatertemperatureinthefinalrinsetosanitizeyourdishware.Thecyclelengthwillvan/
dependingonthetemperatureofyourinletwater.
NOTE:TheAnti-Bacteriacycleismonitoredforsanitizationrequirements.Ifthecycleisinterruptedduringor
afterthemainwashportionoriftheincomingwatertemperatureissolowthatadequatewaterheatingcannot
beachieved,thesanitizingconditionsmaynotbemet.Inthesecases,thesanitizedlightwillnotilluminateat
theendofthecycle.
NOTE:NSFcertifiedresidentialdishwashersarenotintendedforlicensedfoodestablishments.
POTS
&PANS
NORMALWASH
Heavy10.9gal.,102min.
Medium8.5gal.,78rain.
Light7.3gal.,73min.
Thiscycleismeantforheavilysoileddishesorcookwarewithdried-onorbaked-onsoils.
Even/daydishesaresafetobeusedinthiscycle.
Heavy8.5gal.,65min.
Medium7.3gal.,60min.
Light4.9gal.,49min.
Thiscycleisformedium/heavilysoileddishesandglassware.

ge.com
SPEEDCYCLE
or
SPEEDWASH
(onsomemodels)
7.3gal.,35min.
Thiscycleisforeverydaydishesandglassware.
CHINACRYSTAL 7.3gal.,48rain.
(onsomemodels) Thiscycleisforlightlysoiledchinaandcrystal.
RINSEONLY 2.5gal.,12min.
Forrinsingpartialloadsthatwillbewashedlater.Donotusedetergentwiththiscycle.
NOTE:Only tile ,Mlfi-gactelia cttle has been dedg-ned to meet tile l_qtdrements of Section 6,
NSF184for soil l_mo_aland sanidzafion efficacy.
Op ons
Thelightabove_e selee_dpadw_beON_in_ca_ whichoptionhasbeenselee_
PRESCRUB Forusewithheavilysoiledand/ordried-on,baked-onsoils.ThisoptionMUSTbeselectedPRIORtostartingthe
(onsomemodels) cycle.Thisoptionadds16minutestothecycletime.NOTE:CannotbeselectedwithRINSEONLYcycle.
HEATEDDRY Shutsoffthedryingheatoption.Dishesairdrynaturallyandenergyissaved.Forfasterairdry,youcanprop
LightOFF thedooropenaftertheCLEANlightilluminates.
HEATEDDRY Turnstheheateronforfastdrying.Thiswillextendthetotalruntimeby8minutesfortheSPEED
LightON CYCLE,38minutesforNORMALandPOTS/PANS,and30minutesforallothercycles.NOTE:Cannotbe
selectedwithRINSEONLYcycle.
LOCK Youcanlockthecontrolstopreventanyselectionsfrombeingmade.Oryoucanlockthecontrolsafteryouhave
startedacycle.
Childrencannotaccidentallystartdishwasherbytouchingpadswiththisoptionselected.
ToLOCKthedishwashercontrol,touchandholdtheHEATEDDRYpadfor3seconds.Thelightbelowthe
HEA_DDRYpadwillturnon.ToUNLOCKthedishwashercontrol,touchandholdtheHEATEDDRYpadfor
3seconds.TheLOCKlightwillturnoff.
ADDED Whenselected,thecyclewillrunlongerwiththeheatingelementontoimprovebothwashanddryperformance.
HEAT NOTE:CannotbeselectedwithRINSEDNLYcycle.
DELAYHOURS Y_ucande_aythestart_fa_ashcyc_ef_rupt_9h_urs.T_uchtheDELAYHOURSpadt_ch__sethenumber_f
hoursyouwanttodelaythestartofthecycle:thentouchSTART/RESETonetime.Thedishwasherwillcount
downandstartautomaticallyatthecorrecttime.TouchingSTART/RESETasecondtimewillcancelthe
DELAYSTARTselection.
RESET Tochangeacycleafterwashingstarts,touchtheSTART/RESETpadtocancelthecycle.TheSTART/RESETlight
willflashwhilethewaterispumpedoutifneeded.Thistakesapproximately90seconds.Whenthelightstops
flashing,thedishwashercanbereprogrammedandrestarted.
DStart
Close and latch the dish_asher door and select the cycle and desired enhancements. Touch the START/RESETpad
once to beg_n the cycle. Water beg-ins to fill fl_e disln_'ashel, and approximately 60 seconds later tile wash action
begins. Touching tile START/RESETpada second time will cancel the c\cle ail(] cause tim water to dndn ()tat. This
will take approximately 2 minutes.
NOTE:T]_e dish'_asher remembers your last cycle, so you, don't hme to reprognun each time. When the dish'_ asher
door is fully closed, the control panel lights _ill displaytile last settings you selected.
If you don't x_ant to chan_,'e am', of tile setting,s, simi,)lv touch tile START/RESETpad once to begin the Qcle.
If tile door is closed, tile indicator lights will turn off if"the STAR'r/RESETpadis not pressed within two minutes.
To actix_Jtethe displa:_,open and close tile door or toud_ all) pad.
_Mso,if a power fidlure ocous, NORMALand HEATEDDRYxdll automatically be prognunmed.

Aboutthedishwashercontrolpanel. (Formodels without a sensor. EDW5000Series,
GHDA450Series, GLD4100Series, GLD4200Series, GLD4300Series, GLD5500Series, and GLD5800Series)
Youcan locate your model number on the tub wall just inside the door. Throughout this manual, features and appearance
may vary from your model
_//) Options
ControlSettings
_r_ status IndicatorLights
The Status displa) tells you what's hai)pening while the dishwasher is in operation and ma)
flash, indicating a malflmction (see page 8), The lights will come ON indicating the sequence
of operation the dishwasher is in,
SANITIZED Displayedwhencyclehasmetsanitizationconditions.LightremainsONuntil dooris opened.
CLEAN Displayedwhenawashcycleis complete.ThelightstaysONasa reminderthatthe dishesare
cleanuntilthe doorisopenedor untilanothercycleisselected.
Cycles
ThelightabovetheselectedpadwillbeONtoindicatewhichcyclehasbeenselected
SANIWASH 7.3gal.,97min.
Thiscycleraisesthewatertemperaturein thefinal rinseto sanitizeyourdishware.Thecycle
lengthwill varydependingonthetemperatureof yourinletwater.
NOTE:TheSANI-WASHcycleismonitoredfor sanitizationrequirements.Ifthe cycleis
interruptedduringor afterthe mainwash portionor ifthe incomingwatertemperatureisso
lowthat adequatewater heatingcannotbeachieved,the sanitizingconditionsmaynotbemet.
Inthesecases,thesanitizedlightwill notilluminateatthe endof thecycle.
NOTE:NSFcertifiedresidentialdishwashersarenotintendedfor licensedfoodestablishments.
POTS 8.5gal.,89rain.
& PANS Thiscycleis meantfor heavilysoileddishesorcookwarewith dried-onor baked-onsoils.
Everydaydishesaresafeto beusedinthis cycle.
NORMALWASH 5.9gal.,56min.
Thiscycleisfor medium/heavilysoileddishesandglassware.
LIGHTWASH 6.1gal.,36min.
(onsomemodels) Thiscycleisfor everydaydishesandglassware.
CHINACRYSTAL6.1gal.,39min.
(onsomemodels) Thiscycleisfor lightlysoiledchinaandcrystal.
RINSEONLY 1.2gal.,6 min.
Forrinsingpartialloadsthat will bewashedlater.Donot usedetergentwith this cycle.
NOTE: Only the SANI-WASH cycle has been designed to meet the requirements of Section 6,
NSF 184 fin" soil remowfl and sanitization eliicacv.

ge.com
BOptions
Thelight above the selected pad will be ONto indicate which OPTIONhas been selected.
HOTSTART Forusewith heavilysoiledand/ordried-on,baked-onsoils.ThisoptionMUSTbe selected
(onsomemodels) PRIORtostartingthecycle. Thisoption will improve both wash and dry performance. This
option adds 20minutes to the cycle time.
NOTE:Cannotbe selectedwith RINSEONLYcycle.
HEATEDDRY Shutsoff the dryingheatoption.Dishesair drynaturallyandenergyissaved.Forfasterair dry,
Light OFF youcanpropthedooropenafter the CLEANlight illuminates.
HEATEDDRY Turnstheheateronfor fastdrying.Thiswill extendthetotal runtime by38minutes.
Light ON NOTE:Cannotbeselectedwith RINSEONLYcycle.
LOCK Youcanlockthecontrolstopreventanyselectionsfrombeingmade.Oryoucanlockthe
controlsafter youhavestarteda cycle.
Children cannot accidentally start dishwasher by touching pads with this option
selected.
ToLOCI{thedishwashercentrel,touchandholdtheHEATEDORYpadfor3seconds.Thelightbelowthe
HEATEDDRYpadwillturnon.ToUNLOCKthedishwashercontrel,touchandholdtheHEATEDDRYpadfor
3seconds.TheLOCKlightwillturnoff.
HOTWASH Whenselected,the cyclewill runlongerwith the heatingelementonto improvebothwashand
dryperformance.NOTE:Cannotbeselectedwith RINSEONLYcycle.
DELAYHOURS Youcandelaythestart ofa washcyclefor upto 8 hours.Touchthe DELAYHOURS
padto choosethe numberofhoursyouwant to delaythestartof thecycle;thentouch
START/RESETonetime.Thedishwasherwill countdownandstartautomaticallyat thecorrect
time.TouchingSTART/RESETasecondtimewill cancel the DELAYSTARTselecIion
RESET Tochangea cycleafterwashingstarts,touchthe START/RESETpadto cancelthe cycle.
The$TART/RESETlightwill flashwhile thewater ispumpedout if needed.Thistakes
approximately90seconds.Whenthe lightstopsflashing,the dishwashercanbe
reprogrammedandrestarted.
DStart
Close and latch the dishwasher door and select the cycle and desired enhancements. T(mch the
START/RESETpadonce to begin the c'_cle. _\'ater beoins_ ,to fill the dishwasher, and approximately
60 seconds later the wash action begins. Touching the START/RESETpad asecond time will cancel
the cycle and cause the water to drain out. This will take approximately 2 minutes.
NOTE:The dishwasher remelnbers your last cycle so you don't have to reprogram each tilne.
When the dishwasher door is fidlv closed, the control panel lights will display the last settings you
selected.
If wm don't want to change any of the settings, simply touch the START/RESETpadonce to begin
the cycle.
If the door is closed, the indicator lights will tm'n off if the START/RESETpadis not pressed
within two minutes, To activate the display, open and close the door or touch any pad,
Also, if a power t_film'e occm's, NORMALand HEATEDORYwill automatically be programmed.

Usingthedishwasher.
ChecktheWaterTemperature
Tile entering water should be at least 120°F and not
mol_ than 150°E fbr effective cleaning and to pl_\'ent
dish damage. Check tile water temperature with a
can& or meat fllem/ometec Turn on tile hot water
faucet nearest the dishwashen place the them/ometer
ill a glass and let tile water run contilmouslx into the
glass until the temperature stops rising.
UseJet-Dry®or CascadeCrystalClear®RinseAgent
Jet-Dry _ or Cascade Crystal Clear ®rinse agents remove spots and prevent new fihn buildup on
_our dishes, glasses, flatware, cookware and plastic.
Filling the Dispenser
The rinse agent dispenser holds 3.5 oz. of rinse agent. Lrnder normal
conditions, this will last ai>proximately one month. Refill when rinse
agent is not ",isible ill the indicator. Do not o,,erfill.
[Z] Make sm'e the dishwasher door is flfll) open.
_-]Turn the dispenser cap to the lefi and lift it out.
_]Add rinse agent tmtil the indicator window looks flfll. Do not
oxerfill.
[_ Clean up any spilled rinse agent with a damp cloth to prevent
foa Ill.
N Replace the dispenser cap.
indicator
Dispensercap
Rinse Aid Setting
The amtmnt of rinse agent released into the final wash can be
ac!justed. The factory setting is at the midpoint. If there are rings of
calcium (hard water) spots on dishes, try a higher setting. If wm
obselwe ti)aln ill the final rinse, try a lower setting.
To adjust the setting
Remove the dispenser cap, then tm'n the ac!iustable setting dial
counterclockwise to increase the amotmt of rinse agent or clockwise
to reduce the anmmlt of rinse agent dispensed.
DishPreparationPriorto Loading
•No pre-rinsing of normal fi)od soil is
required.
• Scrape off hard soils, including bones,
toothpicks, skills and seeds.
• Renmve large quantities of any relnaining
food.
• Remove leat}' vegetables, meat trimmings,
and excessive amotmts of grease or oil.
• Remove acidic tbod soils that can discolor
stainless steel.
8

Using the dishwasher, ge.em
ProperUseof Detergent
[]se o]_P,• detergent, ,}s)ecH]c'_lh'_ • mqde, {or I_se
ira/ dishwashers. Cascade _ "and ElectrasoP
Alltomatic Dish_ashim/g Deterge_]ts have beem/
approved %1" i_se ira/ a]] (;E dishwashers_ Keep
vom" detergem/t {}'esh and drL Dom]'t }:mr
i)owder detergem/t ira/t/) the (]ispem/ser m/ti]
vim're ready to wash dishes.
The amom/t of detergent to use depends on
whether your water is hard or soft. With hard
water; yoll m/eed extra dete_Nent. With soft
water; yoll m/eed less deterge)it.
Protect vtmr dishes amid dishwasher by
c]mtacti'm/g yollr water departmem/t mid askim]g
how hard yam" water is. T_e]ve or more graim/s
is extremeiy hard writer. A water softe]/er is
recommended. Withollt it, lime cnm/ b_ui]d ill/
h/ the water yah'e, which col_]d stick while
open/and cause floo(tim/g. Too milch detergem/t
with soft water cm/ cm_se a permam]ent
c]olldim/ess of glassware, ca)led etching.
llse die h#brmado]/ ira/ die table below as
a gLdde]im/e to determim/e the amom]t of
a_ltomatic dishwasher detergent to place ira/
the dispen/ser.
Number
ofGrains DetergentCupstoFill
Lessthan4 15cuporfill cuptofirst line
4to 8 25cupor fill cupto secondline
8to 12 15and25cupsorfill mainwashcup
Greaterthan12 15,25cupsandtheopencuporfill both
MainWashandPreWashcup
Open f/
cup ___
(onsomemodels)
For heavi/psoi/ed loads, use the Pots and Pans or Heavy Wash
cycle and add a little extra dete&qent
DONOTUSE_AND DISHDETERGENT
m
m
NOYK:{Isi[_g a detergem that is not specific!lly
designed tbr dishwashers wi]l cruise the dishwasher
to fill with s_/ds. Dmi[]g operation, these snds wi]l
spill out of the dishwasher veins, coveri_/g the
kitchen floor a[/d makhlg the floor wet.
Because so marly detergent comai/_ers look alike,
store the dishwasher detergem i[] a separate space
flora all oilier c]eatlers. Show mlvone who []1:_} !lse
the dishwasher the correct detergent ;rod where it
is st)wed.
W]]i]e there wi]l be no lasting damage to the
disl]washe[; yam" dishes wi]] _]ot get c]ea[/ using a
dishwashi[_g detergem that is not forrm/]ated to
work with dishwashers.
(onsomemodels}
Medium Medium Extremely
Sok Soft Hard Hard
(onsomemodels)
ForgettoAdd a Dish?
A forgotten dish can be added am time before
the main wash.
[2] Squeeze the door latch to release the door.
[_---_D{t not open the door m]til the water spray
action stops. Steam ma_ rise out {If the
dishwasher.
F_Add forgotten dishes.
F_] C}ose the door.

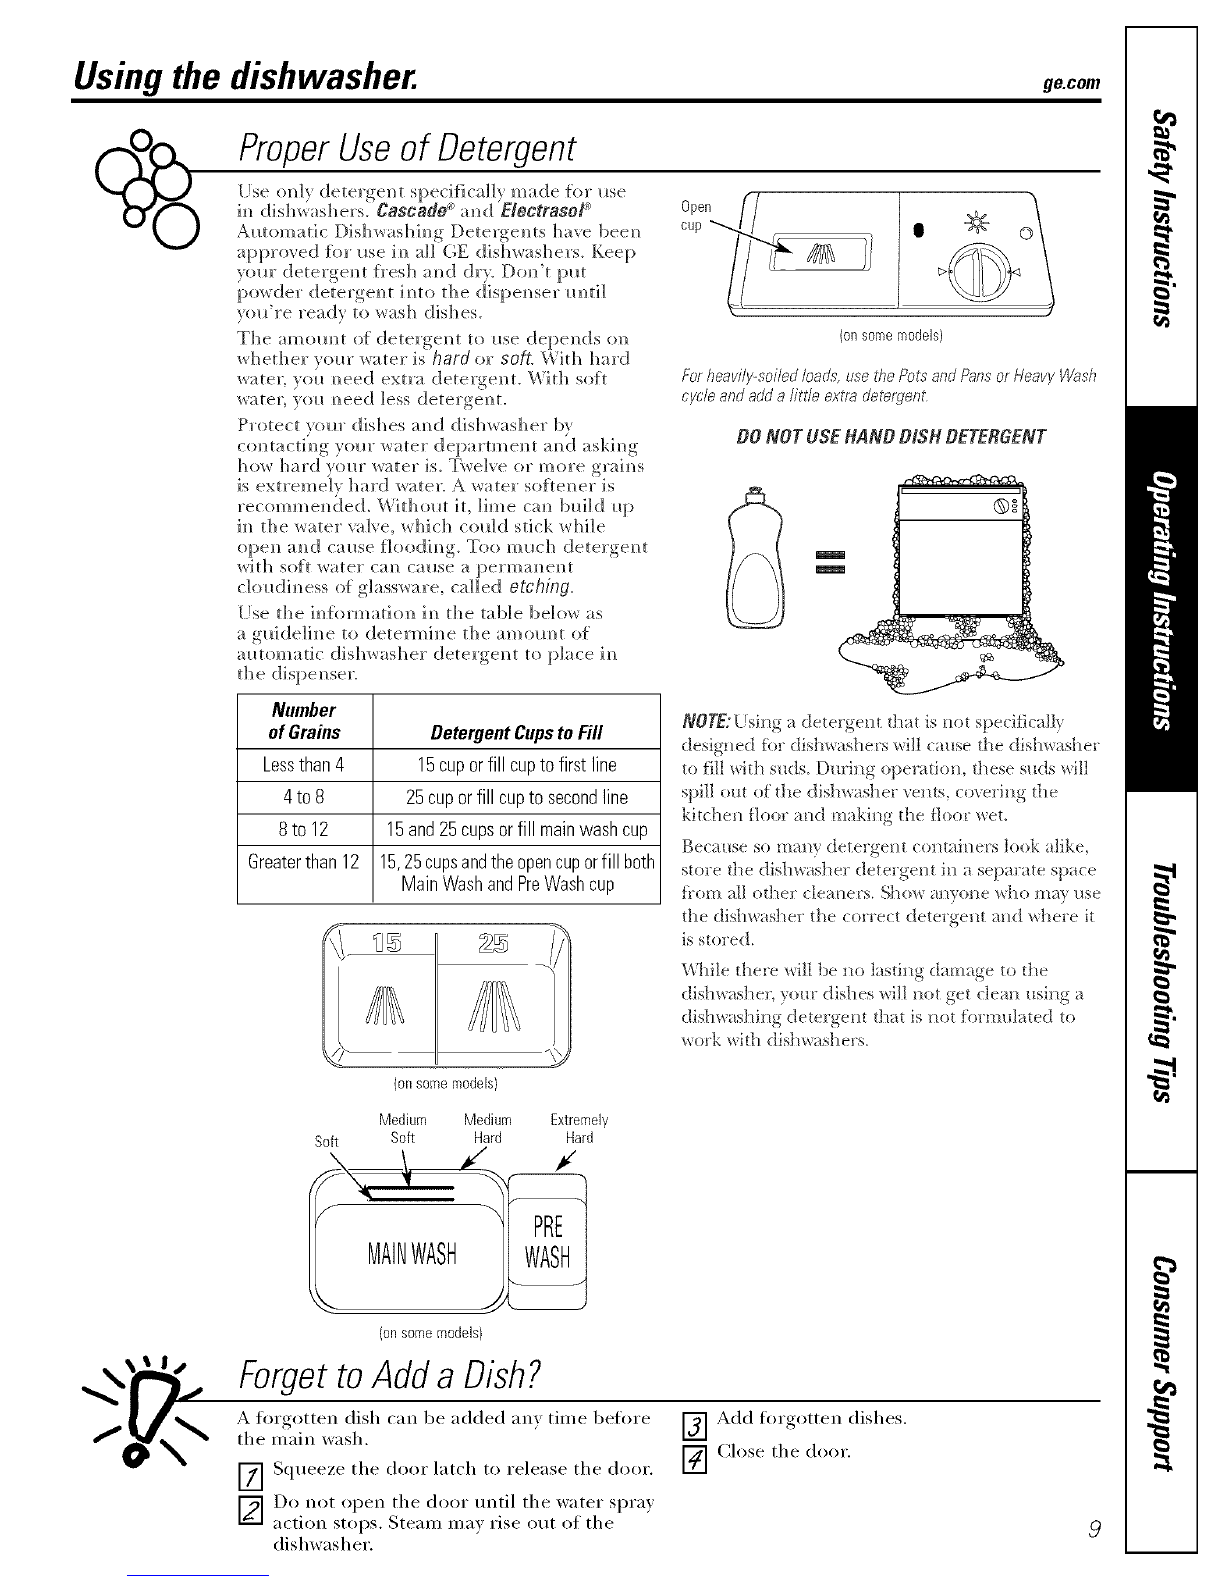
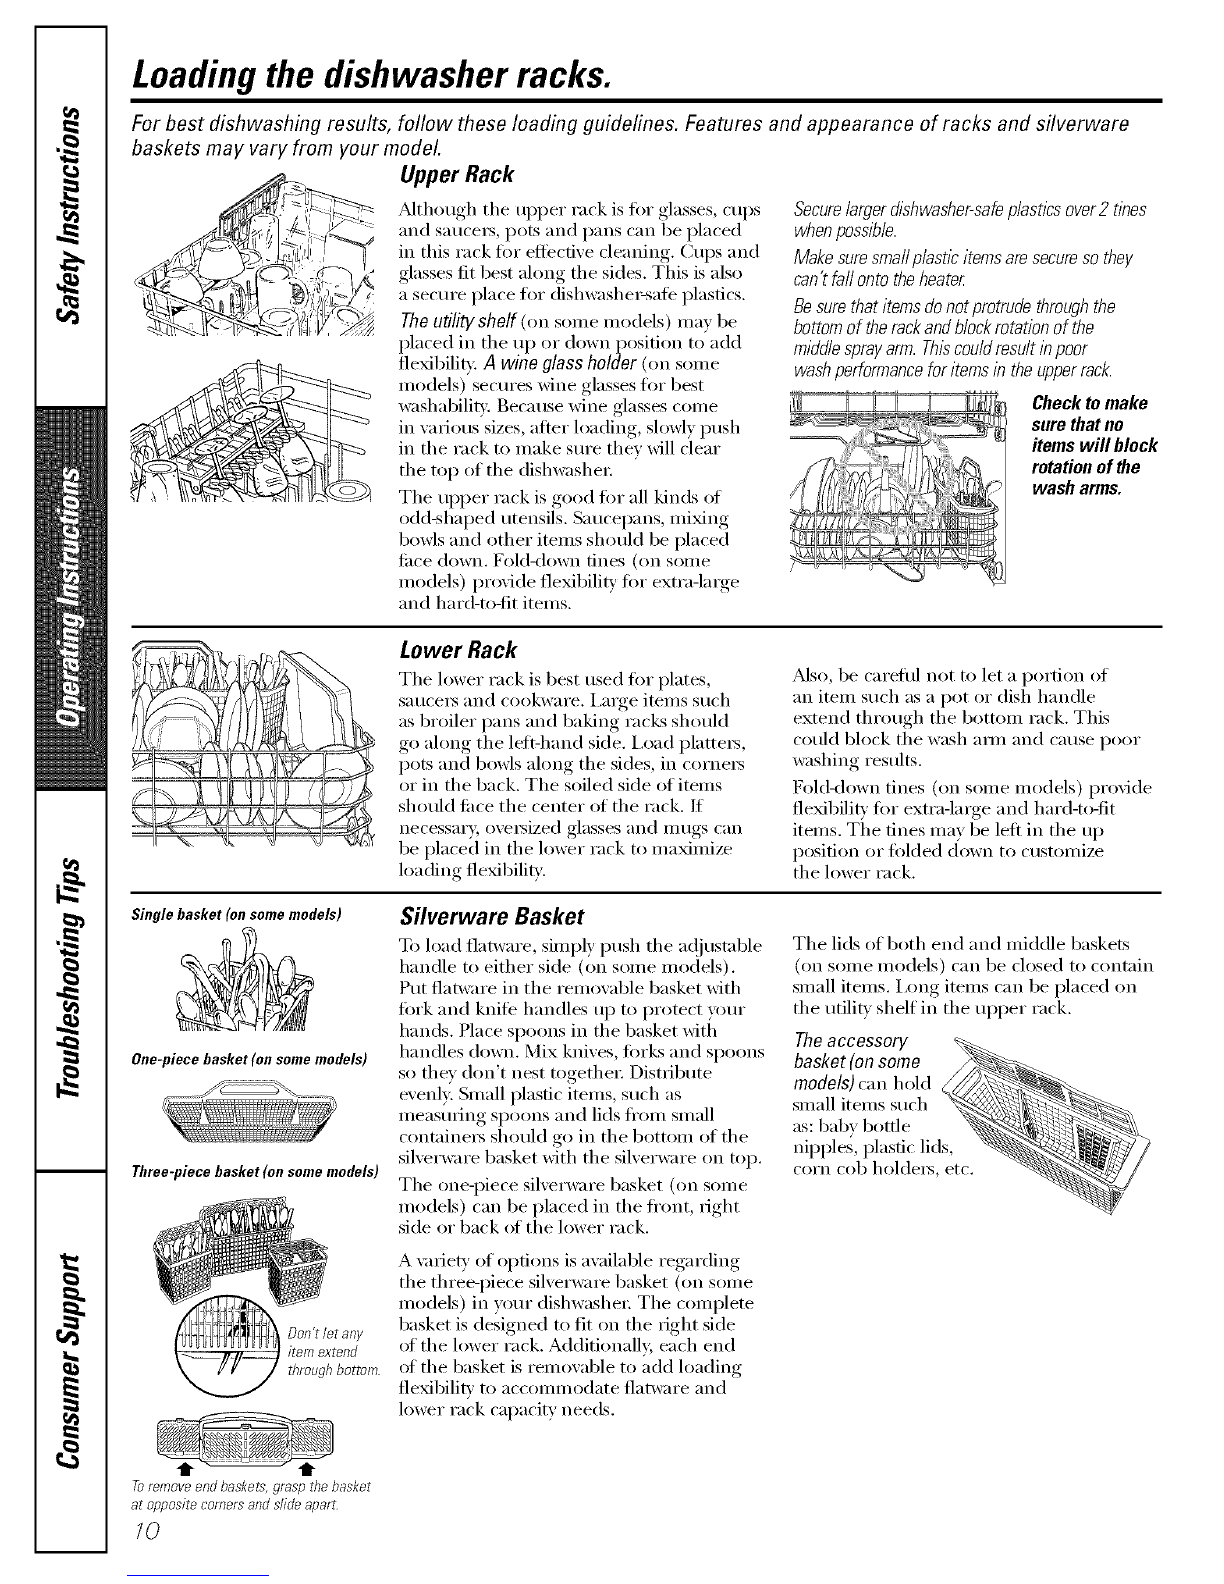
Loading the dishwasher racks.
For best dishwashing results, follow these loading guidelines. Features and appearance of racks and silverware
baskets may vary from your model
Upper Rack
Mthough tile upper rack is fin" glasses, cups
and Satlcers, pots and pans can be placed
in this rack for effective cleaning. Cups aim
glasses fit best along the sides. This is also
a secure place fin" dishwashe>safb plastics.
The utility shelf (on some models) may be
placed in the up or down position to' add
flexibilib': A wine glass holder (on some
models) secures wine glasses fin" best
washability. Because wine glasses come
in wuJous sizes, after loading, slowly push
in tile rack to make sure they will clear
the top of the dishwasher:
Tile uI)per rack is good fin" all kinds of
odd-shaped utensils. Saucepans, miMng
bowls and other items should be placed
filce down. Fold<lown fines (on some
models) provide flexibility tot extra-large
and hard-to-fit items.
Securelargerdishwasher-safeplastics over2 tines
whenpossible.
Make suresmaflp/astlc items aresecureso they
can't fafl onto theheater.
Besure thatitems do not protrude throughthe
bottom of the rackand blockrotation of the
middlesprayarm. Thiscouldrasu/t lb poor
washperformancefor items in the upperrack.
Check tomake
sure that no
items will block
rotation of the
wash arms.
Lower Rack
Tile lower rack is best used for plates,
Satlcers and cookware, i,a_ge items Stlch
as broiler pans and baking racks should
go ahmg the lef*-hand side. i,oad platte_5,
pots and bowls along tile sides, in corners
or in the back. The soiled side of items
should fi_ce tile center of tile rack. If
necessar}; oversized glasses and mugs can
be placed in the lower rack to maximize
loading flexibility.
Mso, be carefid not to let a portion of
an item such as a pot or dish handle
extend through the bottom rack. This
could block tile wash am_ and cause poor
washing results.
Fold<lown tines (on some models) provide
flexibility for extra-large and hard-to-tit
items. Tile fines may be left in tile up
position or ridded down to customize
the lower rack.
Single basket (onsome models)
One-piece basket (on some models)
Three-piece basket (on same models)
Don't/et any
item extend
through bottom
Toremoveendbaskets,graspthebasket
atopposite comers andslideaparL
10
Silverware Basket
To load flatware, simply push tile a(!justable
handle to either side (on some models).
Put flatware in tile remowd)le basket with
fork and knife handles up to protect your
hands. Place spoons in the basket with
handles down. Mix knives, forks and spoons
so they don't nest together Distribute
evenly. Small plastic items, such as
measming spoons and lids fi'om small
containers should go in the bottom of the
silverware basket with the silverware on top.
The one-piece silverware basket (on some
models) can be placed in tile fi'ont, _ight
side or back _ff tile lower rack.
A \mie U of opdons is awfilable regarding
the three-piece silverware basket (on some
models) in w_ur dishwasher: The complete
basket is designed to fit on the right side
of the lower rack. Additionall> each end
of the basket is remowd)le to add loading
flexibility to accommodate flatware and
lower rack capacity needs.
The lids of both end and middle baskets
(on some models) can be closed to contain
small items. I,ong items can be placed on
tile utility shelf in tile ui)per rack.
The accessory
basket (on some /_"_._
models)can heM _J_
small itemsb,,tdeSUCh_" ___.__._,_._
as: baby _
nipples, plastic lids, "_
corn cob holde_, etc.

Loadingplace settings.., gecom
Follow these guidelines for loading 10place settings. Features and appearance of racks and silverware baskets
may vary from your model.
Upper Rack--lO place settings Lower Rack--lO place settings Lower Rack--lO place settings
Foflow these guidelines for loading 12place settings. Features and appearance of racks and silverware baskets
may vary from your model.
Upper Rack-- 12place settings Lower Rack-- 12place settings
Optional accessories.
You can change the appearance of w)ur
dishwasher by adding a custom panel trim kit.
Weed panel trim kit--This accessory contains
trim and instructions fi,r you to supply and install
a1/4" thick decorative wood door:
•GPF525B(Black)
• GPF525W(White)
• GPF525C(Bisque)
Trimlesswoodpanelkit--This accessory contains
parts and instructions for you to suppl} and install
zt ,
a./4 tlnck decorative wood door:
Non-wood countertop bracket kit--This is fin.
installations which have non-wood countertops
and includes side-motmting brackets and
instructions fin" secm-ing the dishwasher:
• GPF65
Theseaccessories are available at extra cost from
GE.Carl800.626.2002to order. Visa,Mastercard, or
Discover cards are accepted.
Specify accessory number when ordering.
• GPF575
//

Caring for the dishwashe
Cleaning the Door Panel
Bdore cleaMm_gd_e _'(t_t p;mel, make
sl*re wlu k_ ow what b])e ot pa m_el yol*
have. Rdbr to die last two ]etters o} vol*r
modd mm_ber. \'{}11 cam_ locate vom"
mode] m,tuber (m the ]e}t-ham_d mb wall
,Ji_st im]si de the door ]f v ol* r m ode]
mm]ber e_]ds wit]] BB, _,_,*or CC, the_]
vol* I/ave a Pai m/ted Door pam]e]. If vom"
mode] ram/bet ends _dth SS, them/ v(m
I/ave a Staim/]ess Steel Door pare/eL If vom"
modd m/mberei/ds _it]] (_S, theN/y(m
I/ave a C]e;mStee] Door pro/el.
Fo]hm the h/strllctio]/s be]o_ for c]eam/im/g
the door [>am/el for yore" spedfic m ode].
Painted Door Panel (mode/numbers endingin
BB-b/ack,b'l/b¢&whiteor O0-bis'que)
llse a c]eam soft, lightly dampem/ed dot]l,
the]/ dr) thorollgh])_ Yoll may also I_se a
good app]im/ce _ax or polish.
Stainless Steel Boor Panel (triode/numbers
endingbSS)
The st din/less steel pm/e]s can be c]em/ed
Hth Stainless Steel Magic" ore similar
product _ls]_/g a c]ea_/, soil clod]. Do _/ot
_lse app]hmce wax, polish, bleach or
products ctmtai_/]_/g c]/]orh/e (m Stab/less
Steel doors.
You can order Stainless Steel Magic
/@XIOX15through (;E Pare by ca]]i_ig
800.626.2002.
CleanSteel Door Panel (mode/numbers
endingb CS)
[]se a c]ea_/, soft, ]ig]]t]y dampe_/ed cloth,
thei/ dry thoro_lgh]y. Do _/ot me app]i;mce
x_r{[x, [)(}]_S]] {)1" a_Y C]]e]]_]C;_] age]it o_/
C]ea_/Stee] doors.
Donotwipethedis'hwasherwithasoileddish
cloth orwet towel. Thesemayhave a resi&e.
Donotusescouringpadsorpowderedcleaners"
becausetheseproducts"canscratchthefinLd_.
Cleaning the Control Panel
To clean the control panel, use a lightly
dampened cloth. Then dry thoroughly.
Protect Against Freezing
1} holt]" (]]S]]_,_li]ls]le]{" iS ]eit i_/ all mlheated
place dmi_/g tile w]_/tey, _]sk _ seYv]ce
tec]/_/]da _/ tit:
_ (12{_toff electrical ]_)()_A'e]" tO the
dishwash er. P,em (B'e t_ses or tri p
circ{_it breaker.
[_Tum olK" the water supp] T a_/d
d[sco_/_/ect the water h/let ][_/e from
the water _':_]_'e.
['_ ]-)Ya]_/ wateF fYo_l/ the water [_/]et ][_/e
mid water vah'e. ([!sea pa_/ to catch
E_--_];iec(m_/ect the water i_/]et ]i_/e to the
w{_teY V_i]ve.
Airgap ,"T__ ',1_
Checktheair gap any time your
dishwasher isn't draining well.
Does YourDishwasher Have an Air Gap?
An air gap protects your dishwasher
against water backing up into it if a drain
clogs. The air gap is not a part of the
dishwasher. It is not covered by your
warranty: Not all phm/bing codes require
air gaps, SO VOll Ill,IV I]Ot have ()lie.
The air gap is easy to clean.
r-_ Turn {}It the dishwasher and lift (>it
tile C 0_, eI'.
_-_ Remoxe the plastic cap and clean
with a t(}othpick.
/2

Beforeyoucall forservice.., gecom
__ roubleshooting tips
Save time and money! Review the charts on the following pages,
or visit ge.eom. You may not need to call for service.
Error Messages Possible Causes What To Be
START/_ESET status Yon have pressed the *Press die SEART/RESETp'ad onl) whe_ you want _o restart the
indicator light flashing START/RESETpadwhile the dishv_ashe_:
dishwasher is rmming. Tlfis will
cancel the cycle. The light will stop
flashing after the dishwasher drains
(about 90 seconds).
This is a reminder that your *Close and latch _he door after opening it mid<}cle.
dishwasher door has been left
open during operation, h Mll
continue beeph_g m_tiJ yon close
the door.
DishwasherDEEPS
onceeve€30seconds
Problem Possible Causes What ToOo
Dishes and flatware Low-i_et water temperatnre o M_ke sure i_l[et _ter tempe_m_re is _orre_t (see p:_ge 8). Turn ou
not clean the hot wamr timcet *_earest the dishwasher, let rml tmtil the wlter
temperature stops dsing. Then start the dishw isher and turn off
the t u_cet, This insures the enmdng water is hot.
Water pressure is tempuraJJ]y low * Turn on a t_mcet. Is ware!"confi_g out more slowI_ d_an usual?
If'so, wlit m_ti! pressure is _ormaI beline _sing )our dishwashec
gap or disposer is clogged * Clea_ the air gap or th*sh the dispose_:
Improper rack loading * Make sure lure dishwme does not block the demrge_*t dispe_lser
or the wash arms. See/he Load,;ogNe dishwasher racks section.
No air gap or high drai_ loop * Verifi 0_at _<a*hae an ah"g_tp or a high drain loop. Refer to
Spots and f#ming
onglassesand
flatware
Exlremely hard water o
Low inlet water temperature
Overloadi_ the dishwasher
Improper loading t
Old or damp powder detergent 2
Rinse agent dispenser empty 3
Too little detergent 4
Use Jet-Dry_ur CascadeCrystalClear__'inseagex_tsto remo_e spots and
p*'ew_t _ew tihn buildup,
To remoxe stubborn spots and pre-existing film ti'om g[ass*_Ire:
Remo_>all metal utensils from d_edishwasher
Do [_otadd (temt'g>[_t,
Select die POTS&PANSqcle,
Start the dishwasher and allowto mn hw 18 m 22 mhmtes. Dishwisher
wiI1_ov_be i_ the main _r:_s}_*
5Open the door a_d pour 2 c_ps (500 ml) of white vinegar into d_e
bottom of the dislmasher.
8Close the door aurt allow to complete d_e qde, lfvineg'ar dnse doesn't
work: Repeat as above, except use //4 cup (60 ml) of citdc acid c_)_tals
instead of _ineg;ic
Cloudiness on Combinadon of soft water and * This is called etching and is peuna_le_/t To prex ent this hum bappeni_/g,
glassware too much deterg'ent use less detergent if you ha_e soft watec Wash gh_ssware i_ the shortest
qcle that will get them clea_L
Water temperature entering * This co_dd be etching. [xa'_er d_e water heater mmperatm>,
the dishwasher exceeds 150°F
Suds in the Rth Correct detergent * Use only automatic dislm isher detergents u) avoid sudsiug,
wasn't used Cascade _ "a_dE]eetrasoff Amomadc Dishwashing Detergents
=_ haxe bee0 approxed to!" use ir_all GE dMm'ashers.
• To remove suds kern the tub, ope_ the dishwasher and let
suds dissipate. Close and latch t}_edishwasher: Pump out m_ter
b} touching the START/RESETpadonce; d_en 3(}secouds later,
u_urh the _AR_'RES_Tpad agzd_LRepeat if'necessat)
Rir_seagent * Alwl}swipe_p rinse agent spillsimmediate h, /
was spilled

Beforeyoucall forservice...
Problem PossibleCauses What ToDo
Detergentleftin
dispensercups
Blackorgray
marksondishes
Dishesdon'tdry
Dishes are blocking the
detergent cup
Alunmmm utensils have
rubbed aga_lst dishes
Low inlet water temperature
•Repositi(m the dishes, so tile water fl'(mi tile lower spray arm call
flush tile detergent cup. See tile Loadingthe dishwasher section.
•Remo_e marks with a mild, abrasive cleanel:
• Make sure inlet water temperatm_ is at least 120°E
•Select HEATEDDRY.
•Use HOTSTARTHOTWASHorADDEDHEATopfions.
• Select a higher c>cle, such asANTI-BACTERIA,SAM WASHor POTS&
PANS.
Rhlse agent dispenser is empty
Controlpanelresponded Door latch maynot be properly
to inputshutdishwasher seated
neverfilledwith water
Stainedtubinterior
Dishwasherwon'trun
• Check tile rinse agent dispenser and fill as required.
•Make sure the door is finnlv cl((sed.
Water valve may be turned off •
Some tomato-based foods can •
cause reddish stains
Tea or coffee stahls
An overall yellow or brown film can •
be caused by iron deposits hi water
_qfite film on hlside surface - •
hard water n_mrals
Fuse is blown or circuit breaker is •
nipped
Make sure water val_e (nsuall_ located under the sink) is (timed on.
Use of file RINSEONLYcycle after adding the (fish to the load
can decrease tile level ()f staining. GE recommends Cascade®
Plastic Booster to help rein(we these t_pes of stains.
Remo_e tile st_dn by hand, using a solution of 1/2 cup bleach
ai/(] 3 C't(ps W_iFiii watel:
AWARNING
Beibre cleaning interior, _dt at least 20 minutes after actcle for the
beating elements to cool do_n. Failure to do so call resuh ill burns,
A special filter ill tile _ater supply lille is tile (rely w,t_ t() con'ect
this problem. Contact t ware _soflene _comp m_
GE recoriuTiends Jet-Dry ®or Cascade Crystal CleaP to help
pre\ent bald _x_tter minenll deposits t]FO(Titblming.
Run (fish_lsher with citric acid to remove mineral deposits. Citric acid
(Part number: WD35XlS1) call be ordel_d through (;E Parts. See back
co_er for ordering inibrmafion.
Replace filse or reset circuit breakel; Remoxe ally other appliances fi'om
tile circuit.
Power is turned off • Ill some installations, fl_e po_r to fl_e dishwasher is pr(wided fl_roug_l a
w_fllwitch, often located next to tile disposer switch. Make sure it is on.
Control panel is locked •Unlock control panel. See page 5 or 7.
Controlpanel lights
gooff when you're
setting controls
Water standingin
the bottomofthe tub
Waterwon?pump
outofthetub
Steam
Sanitizedlightdoes
notilluminateatthe
endofthecycle
(Anti-Bacteria
cycleonly)
Noise
/4
Reboot your control
Time too long between
touching of selected pads
• Turn off power to tile dishwasher (circuit breaker or wall _vitch) for
30 seconds; then turn back on.
• Each pad most be touched within 30 seconds of the others.
To relight, touch any pad again, or unlock and relatch d(((n:
This is normal
Drain is dogged
This is normal
The door was opened mid the
cycle was interrupted durhlg
or after the main wash portion
The incoming water
temperature was too low
Normal operating sounds •
Rattling dishes when the spray •
arm rotates
• A small amount of clean water around the outlet on tile tub
bottom at tile back of the tub keeps tile water seal lubricated.
•If you brae an air g_q),clean it. See page 12.
• If the dish_;lsher drains into a (fisposel, run (fisposer cleal:
• Check t(( see if your kitchen sink is &;fining _>11.If n((t, ?_m
('i'i_i_ need a phmqbel;
• _Ahml, moist air comes through tim vent lJr the door latch during duing
and when water is being pumped ()/it. This is necessafv for drying.
• Do not inmrrupt the cycle aivtime during or after main wash.
Raise tile _tter heater tempen,ture to bet\_een 120°F and 140°E
Detergent cup opening.
_A_lterentering dishwasher.
The motor stops and starts at various times during the cycle.
Drain pump sounds during tile pump out,
Make sure dishes are properly loaded. See the Loadingthe
dishwasher racks section.

GEDishwasher Warranty.
All warranty service provided by our Factory Service Centers,
or an authorized Customer Care®technician. Toschedule service,
on-line, 24hours a day, visit us at ge.com, or call 800.GE.CARES
(800.432.2737).
Staple your receipt here.
Proofof the original purchase
date is needed to obtain service
under the warrant_
For The Period Of." GEWill Replace:
One Year Anypart of the dishwasher which fifils due to a defect in materials or workmanship. During this
Fromthedate ofthe fullone-yearwarranty,GE will alsoprovkle, freeofcharge,all labor and in-home service to replace
originalpurchase the defective part.
SecondYear Anypartof the dishwasher WaterDistributionSystemwhich fifils due to a defect in materials or
Fromthedate ofthe workmanship. During this second-yearlimitedwarranty,youwill be responsible fin" anylabor or
originalpurchase in-home service costs,
FiveYears TheOuron'Mdishwasherracks,if they fifil due to a defect in materials or worlunanship. During
(forEDW60#Series, this five-yearlimitedwarranty,youwill be responsible fin" anylabor or in-home service costs.
GLB6200Series,
GLB6300Series,
GLD6500Series,and
GHDA650Series
modelsonly)
Fromthedate ofthe
originalpurchase
TenYears
Fromthedate ofthe
originalpurchase
Tile PetmaTuf ®tub or door liner, if it fifils to contain water due to a defect in materials or
workmanship. During this full ten-year warranty, GE will also provide, free of charge,all labor
and in-home service to replace the defecti\'e part,
What GE Will Not Cover:
• Service trips to your home to teach you how to use
the product.
• Improper installation, delivery or maintenance.
• Failure of the product if it is abused, misttsed, or used for
other than the intended purpose or used commercially.
• Replacement of house fuses or resetth_g of circuit
breakers.
• Dmnage to the product caused by accident, f'we, floods
or acts of God.
• Incidental or consequentiaJ dmnage caused by possible
defects with this applim_ce.
•Clemlh_g or servicing of the air gap device in the
drain line.
• Dmnage caused after delivery.
This warranty is extended to the original purchaser and any succeeding owner for products purchased for home
use within the USA. Proof of original purchase date is needed to obtain service under the warranty. In Alaska, the
warranty excludes the cost of shipping or service calls to your home.
Some states do not allow the exclusion or limitation of incidental or consequential damages. This warranty gives
you specific legal rights, and you may also have other rights which vary from state to state. Toknow what your
legal rights are, consult your local or state consumer affairs office or your state's Attorney General
Warrantor: General Electric Company.Louisville, KY 40225
15

ConsumerSupport.
6EAppllancesWebsite go.corn
Ha_e a question or m_eed _ssistam_ce _rd_]_ y(}_" _pp]iance? Tr_ d_e (;E App]iam_ces Webske 24 hems a day.
am_yd_Lv o{ the year! For greater c<mvei_]emlce amid Iri_ster service, yol_ cm_ m_owdo_]]oad ()_ner's Mam_a]s,
order parts, catalogs, or even sc]]edll]e service om_-]h_e. \i_1_ cm_ also "Ask Our Team of Experts ......
yore" qllestioi/s, amid so m]/HCh more...
ScheduleSerwce
Expert (;E repair service is on]} one step ;_wa} Item }ore" doe]: Get <m-liN_e and sc]]edl_]e "_om" service _t
"_oHr co]P,'em_ie]_ce 24 horn:4 am_ c[a', oJ_ the "_ear! ()r call 800.(_E.(_ARES S00.432.2737) duriw?4 _urmal
bHsim_ess hoHrs.
geoco_
flea/LifeOes,'gnStudio go.corn
GE s_q:>ports the [T_ive_sa] Design co_cept--prod_cts, services a_d em'irom]]e]]ts that ca_ be _sed by
people of a]] :_ges, sizes and capabilities. We recognize the _eed to design R)ra _rd(le _:mge o{ physical m_d
m e]_ ta] abi]i ti es a]] d im pai rm e_ ts. For details of (;E's [I_ive_sa] Design app]i catio]_ s, i_ c] _ldi_ g ]dtch eli
desig_ ideas for peop]e _ith disabilities, check o_t o_r _'_'ed)site today. For the heari_/g impaired, please ca]]
S00.TDD.GEAC. (800.833.4322).
ExtendedWarranties go.corn
Pin'chase a (;E exte]lded wa]'l_mtv mid ]ea]'_l oboist special discolmts t]l_t are ax'ai]ab]e _:rhi]e )'OH]" _r_]'_]_ b'
is still i_ effect. _b_ can purchase it o_-]i_e m_ytime or c_d] S00.626.2224 duri_g nc, m_a] b_si_ess hem's.
(;E C(m sum er Hem e Servi ces wi]] still be th ere atte]" }o_ n" win're _ t} expi res.
PartsandAccessories _eoCO_
]]_divid_a]s (p_a]ified to service t]]e]r own app]im_ces ca_ ha_e parts or accessories sent direcdv to their
homes (V_SA, M _ster(_ard m_d Discover c_n'ds are accepted). ()rder o_-dh_e toda}, 24 ho_rs ever; din,' or
b} phoebe at S00.626.2002 duri_g _om_a] b_si_ess hours.
]ustructions cantoned NthN mauue/ cover procedures to be performed by a.g user. Other servicing generally
should be referred to qualified service personnel Caetion must be exercised, since improper servicing may cause
u_safe operatiou.
ContactUs
ff _)_ are not satisfied wit]] the se_ice vo_ receive [}'om (;E, c(mtact _s o_ our Webs]re with a]] the details
iurh_di_g }our phol_e mm_be_; or _rite to: C,el_e_d Mintages; (5_stomer Relatio_s
(;E App]iaures, App]iaure Park
l,o_is_i]]e, KY 40225
RegisterYourAppliance
Register your new app_anee o]]=_e--at your convemenee! Timely prod_ct regist_;_tio_ _rd]] _]]()W {k)_"
e]]hm?ced commlm]cat]o_? a_?(] prompt service imder the terms of }_)m" warl_mty; sholl]d the _?eed raise.
}i)_ may also m_i] i_ the pre-p_J_]ted regist_ti(m card i_ch_ded i_ the i:)ac]d_g material, or detach a_d
_se the form i_ this ()_er's Mam_a].
corn
Other manuals for EDW6000 Series
1
This manual suits for next models
11
Table of contents
Other GE Dishwasher manuals