GE HDA3600RWW User manual

GEAppliances.com
Safety Instructions ........ 2-s
Operating Instructions
Care and Cleaning .............. 14
Control Panels .................... 8
Control Settings ............... 6-7
Dial Cgcles ....................... 9
Flashing Display Lights .......... 10
Loading the
Dishwasher Racks ............... 12
Loading Place Settings .......... 1B
Optional Accessories ............ 14
Using the Dishwasher ........ 10, 11
Troubleshooting Tips ... 15,16
Consumer Support
Consumer Support .............. 18
Warrantg ...................... 17
Write the model and serial
numbers here:
Model #
Serial #
Youcan find them on a labelon the
tub walljust insidethe door.
Standard Tub
Dishwashers
49-55076(3-1 11/29/10 GE
All manuals and user guides at all-guides.com
all-guides.com

IMPORTANT SAFETY INFORMATION
READ ALL INSTRUCTIONS BEFOREUSING--
SAVE THESE INSTRUCTIONS
WARNING!
For your safety, the information in this manual must be followed to minimize the risk of fire,
explosion, electric shock, and to prevent property damage, personal injury, or death.
WARNING! WATER HEATER SAFETY
Undercertain conditions, hydrogengas may beproduced in a water heater that hasnot beenusedfor two
or more weeks. HYDROGENGASISEXPLOSIVE.
Ifthe hotwater has not been usedfor two or more weeks,prevent the possibility of damage or injury
by turning on all hot water faucets and allow them to run for several minutes. Dothis before usingany
electrical appliance connected to the hot water system. Thissimple procedure will allow any built-up
hydrogen gas to escape.Sincethe gas isflammable, do not smoke,usean open flame, or usethe appliance
during this process.
PROPER INSTALLATION AND MAINTENANCE
This dishwasher must be properly installed and located in accordance with the Installation Instructions
before it is used. If you did not receive an Installation Instructions sheet with your dishwasher, you can
receive one by visiting our website at GEAppliances.com.
• Connect the dishwasher/appliance to a grounded
metal, permanent wiring system; or run an
equipment-grounding conductor with the circuit
conductors and connect to the equipment-
grounding terminal or lead of the appliance.
• Improper connection of the equipment-grounding
conductor can result in a risk of electric shock.
Check with a qualified electrician or service
representative if you are in doubt whether the
appliance is properly grounded.
• Dispose of discarded appliances and shipping
or packing material properly.
• Donot attempt to repair or replaceany part
of your dishwasherunlessit isspecifically
recommended inthis manual. Allother servicing
should be referredto a qualified technician.
• Tominimizethe possibility of electricshock,
disconnect this appliance from the power supply
before attempting any maintenance.
NOTE:Turning the dishwasher off does not
disconnect the appliance from the power supply.
We recommend having a qualified technician
serviceyour appliance.
CAUTION: To prevent minor injury and property damage
• Contents washed in Anti-bacterial mode, if
available,may be hot to the touch. Usecare
before handling.
• Usinga detergent that isnot
specifically designedfor
dishwashers will cause the
dishwasher to fill with suds.
• If your dishwasher isconnected to a wall _1
switch,ensure that the switch ison prior k?
to use.
• On dishwasherswith electronic controls,
if you choose to turn the wall switch
off between wash cycles,allow 5-10 seconds after
turning the switch on beforetouching START/RESET
to allow the control to initialize.
• Non-Dishware Items:Do not wash items such
aselectronic air cleanerfilters, furnace filters
and paint brushes in your dishwasher. Damage
to the dishwasher and discoloration or staining
of the dishwasher may result.
• Closesupervisionisnecessary ifthis appliance
isused by or near children.
• Load light, plastic items sothey do not become
dislodged and drop to the bottom of the
dishwasher-they might come into contact with
the heating element and be damaged.
2
All manuals and user guides at all-guides.com

INFORMACION IMPORTANTE DE SEGURIDAD
LEA TODAS LAS INSTRUCCIONES ANTES DE USAR--
GUARDE ESTASINSTRUCCIONES GEAppliances.com
%
iADVERTENCIA!
Paru su seguridad, debe cumplirse con la informaci6n de este manual a fin de minimizur
el riesgo de incendio o explosi6n, descarga el_ctrica o para prevenir dafios a la propiedad,
lesiones personales o la muerte.
iADVERTENCIA! SEGURIDAD DEL CALENTADOR DE AGUA
Bojo ciertascondiciones,puede producirse gasde hidr6geno en un calentador de agua que no seha usado
durante dossemanasorods. ELGASDEHIDROGENOESEXPLOSIVO.
Siel agua caliente no seha utilizado par dossemanas o m6s,evite la posibilidadde da_os o lesiones
abriendo todos losgrifos de agua caliente g dej6ndolas correr durante varios minutos. Haga esto antes
de utilizar cualquier aparato el6ctrico que seencuentre conectado al sistema de agua caliente. Estesimple
procedimiento permitir6 que se libere cualquier clase de acumulaci6n de gas de hidr6geno.Vaque el gas
es inflamable, no fume o utilice una llama abierta o un aparato durante este proceso.
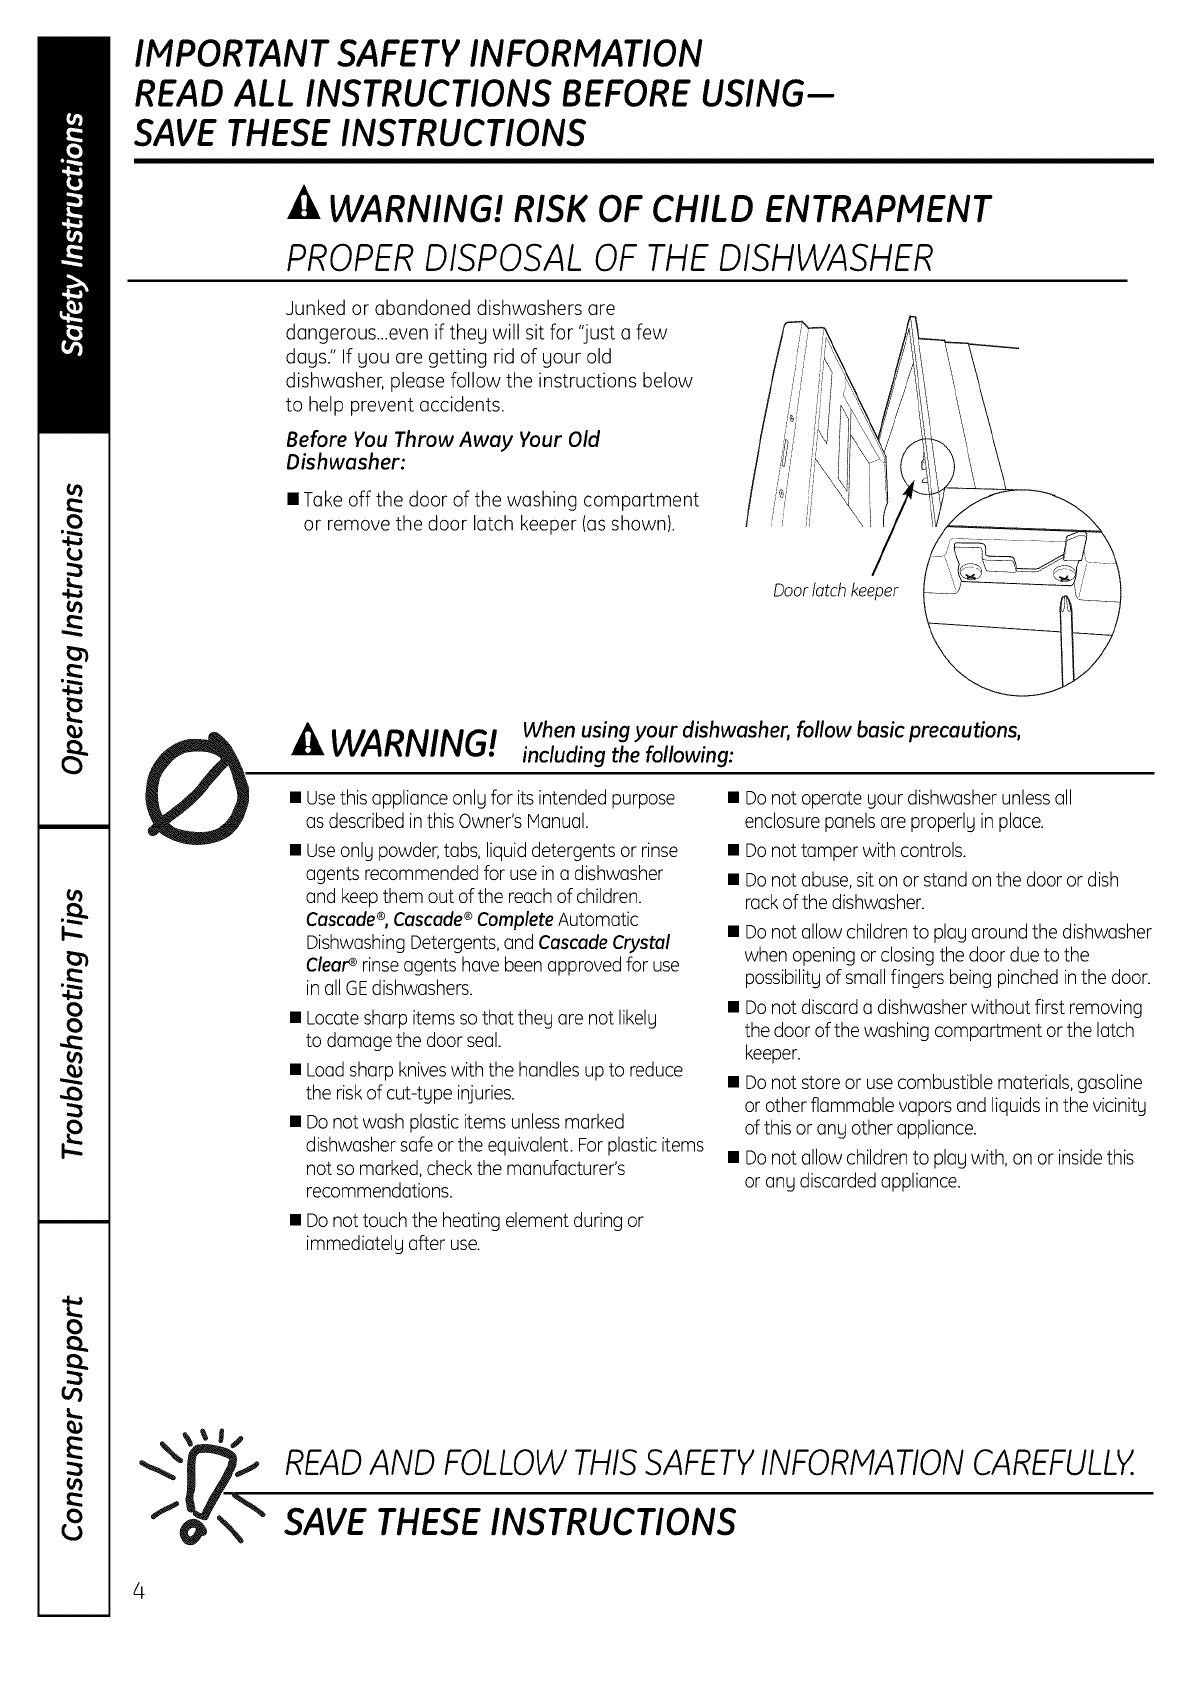
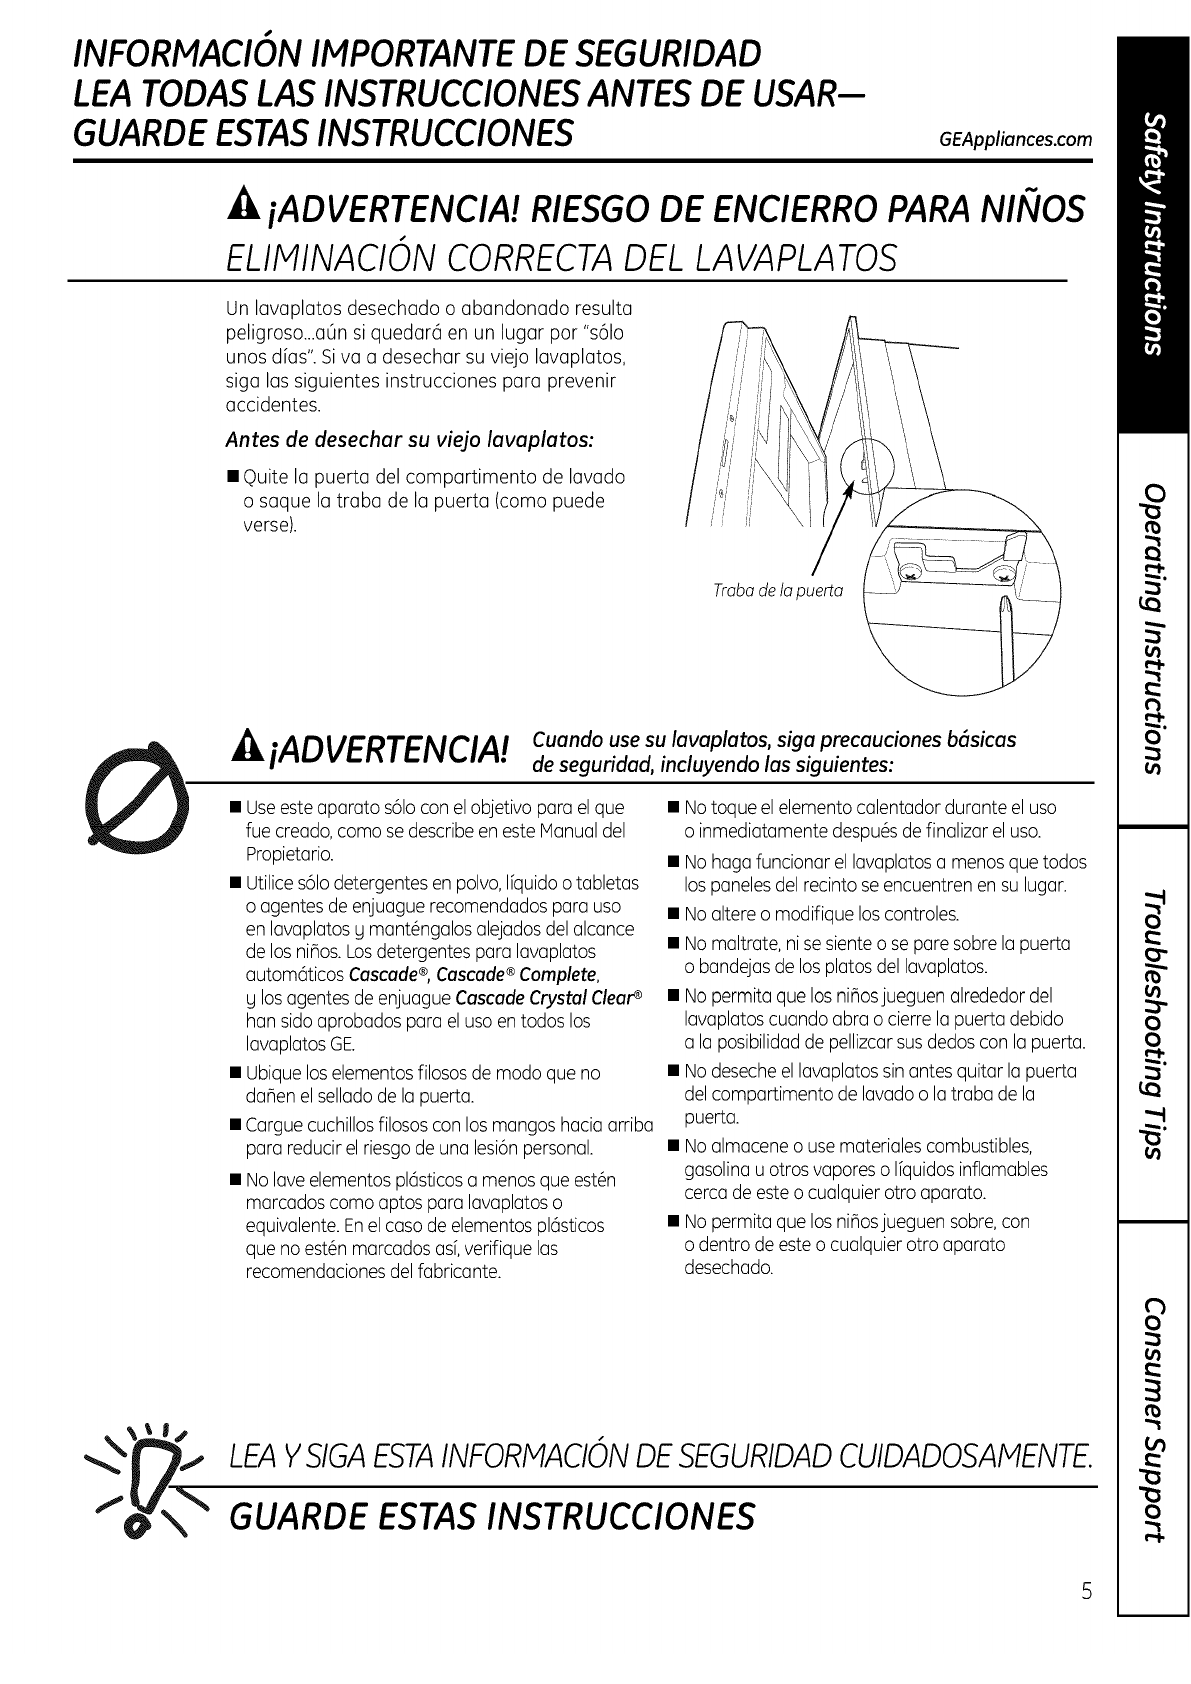
INSTALACld N YMANTENIMIENTO ADECUADOS
Este lavaplatos debe instalarse de manera adecuada y ubicarse de acuerdo con las Instrucciones de
Instalaci6n antes de comenzar el usa. Siusted no ha recibido una pdgina de Instrucciones de instalaci6n
con su lavaplatos, puede obtener una visitando nuestro sitio Web en GEAppliances.com.
• Conecteel lavaplatos/aparato a un sistema
de cableado permanente conconexi6n a tierra
o debe utilizarseun conductor de conexi6n a tierra
del equipamiento con losconductores de circuito,
g debe conectarse a la terminal de conexi6n
a tierra o conductor del aparato.
• Unaconexi6n inadecuada del conductor de
conexi6n a tierra de equipo puede provocar
un riesgode descarga el6ctrica.Consultea un
electricistacalificado o representante de servicio
t6cnico sitiene dudassobre la correcta conexi6n
a tierra delaparato.
• Eliminelosaparatos que no va a utilizarm6s g el
material de empaque o env[ocomo corresponde.
Nointente reparar o cambiar ninguna piezade
su lavaplatosa menos que est6 especfficamente
recomendado en este manual.Cualquierotro
serviciodebe realizarloun t6cnico calificado.
Paraminimizar la posibilidadde una descarga
el6ctrica,desconecte este aparato de la fuente
de energia antes de realizarcualquier clasede
mantenimiento.
NOTA:Apagar el lavaplatos no desconecta el
aparato del suministro de energia. Recomendamos
que un tdcnico calificado realice elservicio tdcnico
de su aparato.
PRECAUCION: Para evitar lesiones menores y dafios a la propiedad
Loselementos lavados en el modo anti-bacterial,
siseencuentra disponible,pueden quedar
calientes al tacto. Tenga cuidado antes de
tocarlos.
Utilizar un detergente no
diseBadoespecificamente
para lavaplatos provocar6
que el aparato seIlene
de espuma.
Sisu lavaplatos seencuentra conectado
a un interruptor de pared,verifique que
el interruptor seencuentre encendido
antes del usa.
Enlavaplatos con controleselectr6nicos, siusted
elije apagar el interruptor de pared entre ciclos
de lavado, deje pasar 5-10 segundos despu6sde
encender el interruptor antes de presionar
START/RESETpara permitir que el control seinicie.
• Elementosno aptos para lavaplatos: Nolave
elementos coma filtros de limpiadores de aire
electr6nicos,filtros de hornos g pincelesde pintura
en su lavaplatos. Pueden producirse daBosen el
lavaplatos g decoloraci6n o manchas en el
aparato.
• Serequiere una supervisi6nestricta cuando
cualquier aparato esutilizado par niBoso en
su cercan[a.
Cargueelementos livianos g plSsticosde modo
que no sedesplacen g caigan al fondo del
lavaplatos, ga que pueden entrar en contacto con
el elemento calentador g daBarse.
All manuals and user guides at all-guides.com

IMPORTANT SAFETY INFORMATION
READ ALL INSTRUCTIONS BEFORE USING--
SAVE THESE INSTRUCTIONS
_t_WARNING! RISK OF CHILD ENTRAPMENT
PROPERDISPOSAL OF THE DISHWASHER
Junked or abandoned dishwashers are
dangerous...even if they will sit for "just a few
days." If you are getting rid of your old
dishwasher, please follow the instructions below
to help prevent accidents.
Before You Throw Away Your Old
Dishwasher:
• Take off the door of the washing compartment
or remove the door latch keeper (asshown).
Doorlatch keeper
When using your dishwasher, follow basic precautions,
WARNING! including the following:
• Usethis applianceonly for its intended purpose
asdescribedin this Owner'sManual.
• Useonly powder,tabs, liquiddetergents or rinse
agents recommendedfor usein a dishwasher
and keepthem out ofthe reachof children.
Cascade®,Cascade®CompleteAutomatic
DishwashingDetergents,and CoscedeCrystal
Clear_ rinseagents have beenapprovedfor use
in all GEdishwashers.
• Locatesharp itemssothat they are not likely
to damage the door seal.
• Loadsharp kniveswith the handlesup to reduce
the riskof cut-type injuries.
• Donot wash plastic itemsunlessmarked
dishwashersafe or the equivalent. Forplasticitems
not somarked,checkthe manufacturer's
recommendations.
• Donot touch the heatingelement during or
immediately after use.
• Donot operate your dishwasherunlessall
enclosurepanelsare properly in place.
• Donot tamper with controls.
• Donot abuse,siton or stand on the door or dish
rack ofthe dishwasher.
• Donot allow childrento play around the dishwasher
when opening or closingthe door due to the
possibilityof smallfingers being pinchedin the door.
• Donot discard a dishwasherwithout first removing
thedoor ofthe washing compartment or the latch
keeper.
• Donot store or usecombustible materials,gasoline
or other flammable vapors and liquidsin the vicinity
ofthis or any other appliance.
• Donot allow childrento play with, on or insidethis
or any discarded appliance.
READAND FOLLOWTHISSAFETYINFORMATIONCAREFULLY
SAVE THESE INSTRUCTIONS
4
All manuals and user guides at all-guides.com

INFORMACION IMPORTANTE DE SEGURIDAD
LEA TODAS LAS INSTRUCCIONES ANTES DE USAR--
GUARDE ESTASINSTRUCCIONES GEAppliances.com
_tliADVERTENCIA! RIESGODE ENCIERROPARA NI_IOS
ELIMINACION CORRECTADEL LAVAPLATOS
Un lavaplatos desechado o abandonado resulta
peligroso...aOn si quedar6 en un lugar por "s61o
unos dias". Siva a desechar su viejo lavaplatos,
siga las siguientes instrucciones para prevenir
accidentes.
Antes de desechar su viejo lavaplatos:
• Quite la puerta del compartimento de lavado
o saque la traba de la puerta (como puede
verse).
Traba de la puerta
iADVERTENCIA! cuondou_e_uIovoploto_,_igoprecauciones basicas
de seguridad, incluyendo las siguientes:
• Useesteaparato s61oconel objetivo para el que
rue creado,como sedescribeen este Manualdel
Propietario.
• Utilices61odetergentesen polvo,liquido o tabletas
o agentes de enjuague recomendadospara uso
en lavaplatosg mant@ngalosalejadosdel alcance
de losminos.Losdetergentespara lavaplatos
automOticosCascade% Cascade ®Complete,
g los agentes de enjuague Cascade Crystal Clear_
hamsido aprobados para el uso en todos los
lavaplatosGE.
• Ubiqueloselementosfilososde modo que no
dahen el selladode la puerta.
• Carguecuchillosfilososcon losmangos haciaarriba
para reducir elriesgode una lesi6npersonal.
• Nolaveelementos pl6sticosa memosque est_n
marcadoscomo aptos para lavaplatoso
equivalente.Enelcaso de elementospl6sticos
que no est@nmarcadosasf,verifique las
recomendacionesdelfabricante.
• Notoque el elemento calentador durante el uso
o inmediatamente despu@sde finalizar eluso.
• Nohaga funcionar el lavaplatosa memosque todos
lospanelesdel recinto seencuentren en sulugar.
• Noaltere o modifique loscontroles.
• Nomaltrate, nisesiente o separe sobrela puerta
o bandejasde losplatos del lavaplatos.
• Nopermita que losniBosjueguenalrededor del
lavaplatoscuando abra o cierre la puertadebido
a la posibilidadde pellizcarsusdedoscon la puerta.
• Nodesecheel lavaplatossinantes quitar la puerta
delcompartimento de lavadoo la traba de la
puerta.
• Noalmacene o usematerialescombustibles,
gasolinau otros vaporeso Ifquidosinflamables
cerca de esteo cualquier otro aparato.
• Nopermita que losniBosjueguensobre,con
o dentro de esteo cualquier otro aparato
desechado.
LEAYSIGAESTAINFORMACIONDESEGURIDADCUIDADOSAMENTE.
GUARDE ESTAS INSTRUCCIONES
All manuals and user guides at all-guides.com

About the dishwasher control panel
Control Settings
OCycles
An indicator light above the selectedpad will be ON to indicate which CYCLEhas been selected,on some models.
POTS& PANS/ For heavily soiled dishes or cookware with dried-on or baked-on soils.Everyday dishes may be included.
HEAVYWASH This cycle will not remove burned-on foods.
(onsomemodels/
NORMAL/ For loads of everyday dishes, glasses and cookware with medium soils. NOTE:Hang dishes have lighter
NORMAL WASH soil than normal. Choosing a cycle other than NORMAL WASH will save energy and water.
SHORT WASH For quickly washing loads of everyday dishes with medium soils that hove not dried on,such as loads
onsomemodels/ consisting mostly of glosses.
WATER SAVER For dishes with light soils.
LIGHT WASH
onsomemodels/
RINSE ONLY For rinsing partial loads that will be washed later. Do not use detergent.
DRYING For worming cleon dishes and serving plates. This cycle will take approximately 30 minutes.
PLATEWARMER
HOT PREWASH Preheats wash water to the correct temperature.
HOT START
CHINA CRYSTAL For lightly soiled china and crystal.
(onsomemodels)
Options
An indicator light above theselectedpad will be ONto indicate which OPTIONhas been selected,on some models.
HI TEMP Turns on the heater in oil final rinse cycles to help prevent spotting on dishwore. This option may be
RINSE turned ON or OFFduring the wash cycle.
(onsomemodels)
HI TEMP Energizes the heater to boost water temperature in prewosh and main wash fill cycles. Recommended
WASH for use with heavily soiled dishes. Option may be turned ON or OFFduring the wash cycle.
HEATED DRY Shuts off the drying heat option. Dishes air dry naturally and energy is saved. Open the dishwasher door
OFF to speed drying.
HEATED DRY Turns the heater on for fast drying. This cycle will extend the time to your wash cycle by 30 minutes.
ON DO NOTuse with RINSE ONLYcycle.
LOCK
(electronic models
only)
When the LOCKpadis touched twice within 5seconds,all pads become inoperative. Youcan lackthe controls to
prevent any selectionsfrom being made. Oryou can lock the controls afteryou havestarted a cycleor selected
DELAYSTARTso thecycleor DELAYSTARTis notinterrupted.
Children cannot accidentally start dishwasher by touching pads with this option selected.
To unlock the dishwasher after it has been locked, touch the LOCKpad twice within 3 seconds.The light above
the LOCKpadwill turn off.
DELAY HOURS Delays the start of a wash cycle for up to 8 hours.
(on some models)
RESET Touch RESET to cancel options.
(timer models)
START/RESET Touch START/RESETone time to start dishwasher cycle. Touch START/RESETo second time to pump
out (electronicmodels) and then turn off the dishwasher. Do not touch START/RESETmore than one time unless you intend
to end the cycle.
6
All manuals and user guides at all-guides.com
all-guides.com

GEAppliances.com
Control Settings
Cycle Chart
Models Cycle Water Usage (gal.) (min.)
Timer Models
Electronic Models
Hot St(]rt Option 1
He(]vg W(]sh
Pots & P(]ns
Norm(]l W(]sh*
Light W(]sh/W(]ter S(]ver
RinseOnlg
Pl(]te W(]rmer/Drging
Pots & P(]ns
He(]vg W(]sh
Norm(]l W(]sh
Chin(]/Crgst(]l
RinseOnlg
2.5
6.0 - 7.0
6.0 - 7.0
4.8 - 5.6
3.9 - 4.5
2.2
0.0
8.8
7.5
4.8
6,3
1.3
Cycle Time
i0
120
118
110
114
58
45
112
108
95
8O
5
1Hot St(]rt Option (]dds w(]ter (]mount (]nd cgcle time shown when selected.
*Norm(]l W(]sh button should be pushed to run this cgcle.
NOTE:Not (]11models h(]ve everg cgcle listed.
7
All manuals and user guides at all-guides.com

About the dishwasher control panel
You can locate your model number on the left tub walljust inside the door. Throughout this manual,
Features and appearance may vary From your model.
Please match the control panel for your unit to a similar control panel below.
Heovg
Hot Prewosh or Hot Start
Option @
Off 0
f
Plate Warmer (Heated Dr
Normal Wash
F Light Wash or Water Saver
Heated DrU
Off
Pots Normal
& Pans Wash
I IU
Cycle
Selector
HI Temp Wash Heated Dry
On Off On Off
EnergySaver
Option
START WATER SAVER
o ®
HOT PREWASH OPTION •
OFF•
PLATE WARMER
(HEATED DRY ON) @ • RINSEONW
(HEATEDDRYOFF)
Cgcles Options
lID ID lm lID
gOt_ grm_ £Te_ r_Heate_d r_Reset_
LWos ZJ
Hot Start
Option 0
Off 0
Plate Warmer
(Heated Drg On)
Stort
@o Light Wash
_inse Onlg
(Heoted Dry Off)
Cgcles Options CLEA.
I
II II II II II II II ..__11_...._11_.. 2 4 8II
LON_jI2'"sjC'_dLptj LW,_dLW,sdLt_'£j WEsELJ
8
All manuals and user guides at all-guides.com

Operation ofmodels with cycledial GEApplio.ces.com
Hot Stor_
Optbn ster_
e
StartOela__-_*
off oLgmwo_
Rinse Onig
(Heated QIg Offi
Rinse Only
Forrinsing partial loadsthat will be washed later Do not usedetergent
_i! Hake sureHEATEDDRYisnot selected, _:: Slowly turn the Dialto RINSEONLY.
Besurethedoorisunlatched. _,iLatchthedoortostartthecycle.
Hot Star_
Option Sturt
Plate Warmer "_
! o,,_
{Heated Dry off)
Plate Wormer or Drying
Forworming cleon dishes and serving plates.Thiscycle will take approximately 39 minutes.
Loadcleon dishware to bewormed. Slowly turn the Dialto PLATEWARMERor
SelectHEATEDDRYON DRYING.
i
Besurethedoorisunlatched. Latchthedoortostartthecycle.
HDt Start
Option Start
PlateWormer _
R_nSe0_1_
(Heated L_I Off}
Hot Start or Hot Prestart Option
Preheatswash water.
SelecttheHOTSTARTorHOTPRESTART
......cycle and any other option on the push
button pad.
Besurethedoorisunlatched.
Slowly turn the Dialto HOTSTARTor
HOTPRESTART.
_,i Latch the door to start the cycle.
Short Wash or Light Wash or Water Saver
Hot Start
Option Start
_i&!! "" Forquickly washing loadsof everyday disheswith light to medium soilsthat have not dried on.
Li_,,!,,a!_ Besurethe door is unlatched.
............,\ /...... Latch the door to start the cycle.
(H oted O 9Orl) ..........................
Slowly turn the Dialto SHORTWASH,
d g LIGHTWASHor WATERSAVER.
Start (Models with a Dial)
Slowly turn the Dialto the STARTor ONposition,or the selected cycle. Don'tturn it past the START,
ON or cycle position;you could accidentally missa prewash.
Thereisa time delay between start-up and water fill so you will not hear any wash action right
away.
Latch the door to begin the cycle.
All manuals and user guides at all-guides.com

Operation of electronic models (model GSD4000 Only)
Using the Dishwasher Door
door must be closed and locked into placeto selecta LOADSELECTIONor an OPTION.
Ifthe door is opened during a cgcle and left open, the dishwasher willbeep once every 30 seconds untilthe
.... door is cosed and atched into p ace.
Start
Close and latch the door. Touch the START/RESETpod to begin the cgcle. Water fill begins and
opproximatelg 60 seconds later the wash action begins.
NOTE:The dishwasher remembers gour last cgcle so gou don't hove to reprogram each time. When
the dishwasher is loaded and the door latch is in the locked position, the control panel lights will be ON
and displag the last settings gou selected.
If gou don't wont to change ang of the settings, simplg touch the START/RESETpad to begin
the cgcle.
Also, if a power failure occurs, NORMALand HEATEDDRYwill automatically be programmed.
Hake ang new selections and touch the START/RESETpad to begin the cgcle.
Cleon
This light is illuminated when o wash cgcle is complete. The light willstag ON until the door is opened.
Flashing Display Lights
Lights What It Means
This isnormal.
TheSTART/RESETpad
hasbeen pressed.
What To Do
Allow the dishwasher to drain and reset before gou start a new
wash cgcle.
CLEAN
PLUS A
BEEPING
SOUND
Control Error Pressthe START/RESETpad to turn off the beeper.If the CLEAN
light continues to flash,coil for service.
Control Error Pressthe START/RESETpad to turn off the beeper and the
dishwasher will attempt to reset.Restartthe wash cgcle.
Ifthis error continues,turn off the power to the dishwasher at
the circuit breaker for 30 seconds.Trgthe dishwasher again.
Ifthe error isstill present,coil for service.
PLUS A
BEEPING
SOUND
10
All manuals and user guides at all-guides.com

Using the dishwasher GEAppliances.com
Check the WaterTemperature
The entering water must be at least 120°F and
not more than 150°F, for effective cleaning and to
prevent dish damage. Check the water temperature
with a candy or meat thermometer. Turn on the
hot water faucet nearest the dishwasher, place
the thermometer in a glass and let the water
run continuously into the glass until the temperature
stops rising.
Adjust the maximum/minimum temperature of the
water heater if necessary to deliver water at the
proper temperature.
UseCascadeCrystalClear®RinseAgent
Cascade Crystal Clear¢rinseagents remove spotsand prevent new film buildup on dishes,glasses,flatware,
cookware and plastic.
Filling the Dispenser
Fillthe rinseagent dispenseruntil it reachesthe bottom of
lip insidethe opening.Replacecap.
Tocheck if rinseagent isneeded,remove the cap and look
into the dispenser.
A full dispensershould lost about one month.
If the rinseagent spills,wipe up the excess.
Proper Use of Detergent
Useonly detergent specifically made for usein
dishwashers.Cascade®Automatic Dishwashing
Detergents have been approved for usein all GE
dishwashers. Keepyour detergent fresh and dry.
Don't put powder detergent into the dispenser until
you're ready to wash dishes.
Theamount of detergent to usedepends on whether
your water ishard or soft.With hard water, you need
extra detergent. With soft water,you need less
detergent.
Protectyour dishes and dishwasher by contacting
your water department and asking how hard your
water is.Twelveor more grains isextremely hard
water. A water softener isrecommended. Without it,
lime can build up in the water valve,which could
stick while open and causeflooding. Toomuch
detergent with soft water can cause a permanent
cloudiness of glassware,called etching.
Usethe information inthe table below as a guideline
to determine the amount of automatic dishwasher
detergent to place in the dispenser.
Number
of Grains Detergent Cups to Fill
Lessthan 4 Fillto 1/3 of main cup
4 to 8 Fillto 2/3 ofmain cup
8 to 12 Fillmain cup
Greater than 12 Fillmain cup and open cup
You'llfind two detergent dispenserson the insidedoor
of your dishwasher.Allwash cycles requiredetergent
in the main cup. Whenusingautomatic dishwashing
detergent tabs,simply placeone tab in the main cup
and close.
Besurethe DialisOFF before adding detergent.
Otherwise,the detergent cup will not closeand latch
properly. Add detergent then close the main cup.
opoocup
Moi_
NOTE:To open detergent cup after it has been
closed,simply turn the detergent cup handle
counterclockwise until it releases.Asnapping
sound may be heard.
DO NOT USE HAND DISH DETERGENT
NOTE:Usinga detergent that isnot specifically
designedfor dishwasherswill causethe dishwasher
to fill with suds.Duringoperation, thesesudswill spill
out of the dishwashervents,covering thekitchen floor
and making the floor wet.
Becauseso many detergent containers lookalike,
store the dishwasher detergent in o separate space
from all other cleaners.Show anyone who may use
the dishwasher the correct detergent and where it
is stored.
Whilethere will be no lasting damage to the
dishwasher,your disheswill not get clean using
o dishwoshing detergent that is not formulated
to work with dishwashers. 22
All manuals and user guides at all-guides.com
all-guides.com

Loading the dishwasher racks
For best dishwashing results, follow these loading guidelines. Features and appearance of racks and silverware
baskets may vary from your model
Upper Rack
Theupper rack isfor glasses,cups and
saucers.Cupsand glassesfit best along
the sides.Thisisalso a secure place for
dishwasher-safe plastics.Theupper rack is
good for all kindsof odd-shaped utensils.
Saucepans,mixing bowls and other items
should be placed face down.
Securelarger dishwasher-safeplastics over
two fingers when possible.
Makesuresmall plastic itemsare secureso
they can't fall onto the heating element.
Lower Rack
Whenloading thelower rock, do not load
largeplatters or trays in the front right
comer.Theymay prevent detergent from
circulatingduring the wash cycle.
Thelower rack isbest usedfor plates,
saucers and cookware. Large items such as
broiler pans and racksshould go along the
sides.Load platters, pots and bowls along
the sides,in corners or in the back.The
soiledside of items should face the center
of the rack.
i I Wash Tower
Keepthe centerarea clearin the lower
rack.
Thewash tower risesthrough the
center of the lower rack during the
wash and rinseportions of the cycle.
Tower
Do not cover upper rack tower
(not present on all modelsl
Don't block the upper rack
wash tower.
Don't blockthe wash
tower or load tall things
next to it.
Be sureitems don't fall
through rack and block
rotation of the spray arm.
Also,be careful not to
let a portion of an item
such as a pot or dish
handle extend through
the bottom rack.This
could block the wash
arm and causepoor
washing results.
Silverware Basket
Putflatware in the removable basketwith
fork and knife handlesup to protect your
hands. Placespoons inthe basketwith
handlesdown. Mixknives,forks and spoons
sothey don't nest together. Distribute
evenly.Smallplastic items, such as
measuring spoons and lidsfrom small
containers, shouldgo in the bottom of the
silverware basketwith silverware on top.
DON'T LETANY ITEM EXTENDTHROUGH
BOTTOM OF SILVERWAREBASKETAND
RACK,TO ENSUREPROPERFUNCTION
OF SPRAYARM.
12
All manuals and user guides at all-guides.com

Loading place settings... GEAppliances.com
Follow these guidelines for loading 10 place settings. Features and appearance of racks and silverware baskets
may vary from your model.
Upper Rack--lO place settings Upper Rack--lO place settings Lower Rack--lO place settings
Upper Rack--12 place settings Upper Rack--12 place settings Lower Rack--12 place settings
Forget to Add a Dish?
A forgotten dishcan be added any time beforethe main wash.
_Push the door latch to the left.
_Once the water calms, open the door.Steam may riseout of the dishwasher.
Add forgotten dish.
Closethe door and push the latch to the far right.
Tips for Loading and Good Wash Performance
Don't block the lower rack wash tower.
Don't let items fall through rack and
block spray arms.
13
All manuals and user guides at all-guides.com

Caring for the dishwasher
Tocleon the control panel, use alightly dampened cloth, then dry thoroughly. Tocleon the exterior, useagood appliance
polish. Never use sharp objects, scouring pods or harsh cleaners on any port of the dishwasher.
Sump cover screws
Protect Against Freezing
If your dishwasher isleft in an unheated place
during the winter, ask a servicetechnician to:
Cut off electrical power to the dishwasher.
Removefusesor trip circuit breaker.
Turn off the water supply and disconnect the
........water inlet line from the water valve.
Drain water from the inlet line and water
vave. Usea pan to catch the water.
Reconnectthe water inletline to the
water va ve.
Removethe plastic sump cover in the tub
bottom and usea sponge to soak up water
in the rubber boot.
Check the air gap any time your
dishwasher isn't draining well.
Does Your Dishwasher Have an Air Gap?
An air gap protects your dishwasher against
water backing up into it if a drain clogs.
Theair gap isnot a part of the dishwasher.
It is not covered by your warranty. Not all
plumbing codes require air gaps, so you may
not have one.
The air gap is easy to clean.
Turn off the dishwasher and lift offthe
chrome cover.
Unscrew the plasticcap and clean with
..........a toothpick.
Stainless Steel Panels
Thestainless steel panelscan be cleaned
with StainlessSteelMagic or a similar
product using a clean, soft cloth.
Youcan order StainlessSteelMagic
#WXlOX15 through GEPartsby calling
800.626.2002.
Optional accessories
You can change the appearance of your
dishwasher by adding a custom panel trim kit.
1/4" Wood panel trim kit--This accessory
contains trim and instructions for you to supply
and install a1/4''thick decorative wood door:
_,,,;GPF25B(Black)GPF325B/GPF425B
GPF25W (White)GPF325W/GPF425W
GPF25C(Bisque)GPF325C/GPF425C
3/4" Trimless wood panel kit--Thisaccessory
contains parts and instructions for you to supply
and install a3/4" thick decorative wood door:
GPF375/GPF475
NOTE:TheGPFIO0dishwasher door spring kit
must also be ordered and installed when the
door panel weighs four Ibs.or more. Thiskit is
includedwith the 3/4" trim kits.
Non-wood countertop bracket kit--This isfor
installations which have non-wood countertops
and includesside-mounting brackets and
instructions for securing the dishawasher:
GPF65
Consult your GEAppliance dealer to get the correct
kit foryour model.
These accessories are available at extra cost
from GE.Call800.626.2002 to order, or see your
authorized GEAppliance dealer. Visa, MasterCard or
Discover cards are accepted. Specify accessory
number when ordering.
34
All manuals and user guides at all-guides.com

Beforeyou call for service... GEAppliancescam
Troubleshooting Tips Save time and money! Review the charts on the following
pages, or visit GEAppliances.com. You may not need to call for service.
Problem Possible Causes What To Do
Dishwasher won_ run Fuseis blown, or the • Replacefuse or reset circuit breaker. Removeang other appliances
circuit breaker tripped from the circuit.
• Trg pressingthe START/RESETpad(Electronicmodels)two times.
Power isturned off • Insome installations,power to the dishwasher isprovided through a wall
switch, often located next to the disposer switch. Hake sure it ison.
Noise Some ofthe sounds • Soft food disposalshredding action.
you'll hear are normal • Drainvalve opening to pump water out.
• Timer control as cgcle progresses.
• Detergent cup opening.
• Themotor stopping during the drging period.
• Waterdrainingoutoftub immediatelyo%r touchingtheSTART/RESETpad.
Utensils are not secure • Hake sure everything issecured in dishwasher.
in rack or something small
has dropped into reck
Rattling dishes when • Hake sure dishes are properlg loaded.Seethe Loading the
the spray arm rotates dishwasher rockssection.
Motor hums • Dishwasherhas not been usedon a regular basis.Ifgou do not use
gour dishwasher often, set it to fill and pump out once evergweek.
Thiswill help keepthe seal moist.
Water standing in This isnormal • A small amount of clean water around the outlet on the tub bottom
the bottom of the tub at the back ofthe tub keepsthe water seallubricated.
Water won't pump Drain isclogged • If gou have an air gap, clean it.
out of the tub • Checkto seeif gour kitchensink isdraining well. If not, gou mag need
a plumber.
• Ifthe dishwasher drains into a disposer,run disposer clear.
Suds in the tub Wrong detergent • Useonlg automatic dishwasher detergents to avoid sudsing.
was used Coscadd%Cascade®Complete and Electrasol®Automatic Dishwashing
Detergents have been approved for usein all GEdishwashers.
• Toremove suds from the tub, open the dishwasher and let suds
dissipate. Add i gallon of cold water to the tub. On Hodels with a Dial:
Closeand latch the dishwasher. Pump out water bg slowIgturning the
Dialuntil a drain period isreached. Repeatif necessar#.On Hodels with
ElectronicControl: Pumpout water bg pressingthe START/RESETpad,
then 10 seconds later,pressSTART/RESETpadagain. Repeatif necessarg.
• AIwagswipe up rinseagent spillsimmediatelg.
• Useof the RINSEONLYcgcle after adding the dish to the load
can decreasethe levelof staining.GErecommends Cascade®
Plastic Booster to help remove these tgpes of stains.
• Removethe stain bg hand,using asolution of 1/2 cup bleach
and 3 cups warm water.
Rinseagent was spilled
Stained tub interior Some tomato-based
foods can cause reddish
stains
Tea or coffee stains
An overall yellow or
brown film can be
caused by iron deposits
in water
-& WARNING
Beforecleaning interior,wait atleast 20 minutes after acgcle for the
heating elements to cool down. Failureto do so can result in burns.
_&ADVERTENCIA
Antesdelimpiarel interior,espereparIomenos20minutosdespuesde unciclo
paraqualoselementoscolentodoresseenfrfen.Nohocerlopuedeprovocor
quemoduros.
• A special filter in the water supplg lineisthe onlg wag to correct
this problem. Contact a water softener compang.
White film on inside
surface-hard water
minerals
•GErecommends Cascade Crystal Clear_ to help prevent hard water
mineral depositsfrom forming.
• Rundishwasher with citric acid to remove mineral deposits. Citric
acid (Partnumber: WD:35X151)can be ordered through GEParts.
Seeback cover for ordering information. 15
All manuals and user guides at all-guides.com

Beforeyou call for service...
Problem
Dishes don't dry
Possible Causes What To Do
•Hake sure inletwater temperature isatleast 120°R
• SelectHEATEDDRY
• UseHOTSTARTand ADDEDHEAToptions.
• Selecto higher cycle, such as POTS&PANSor HEAVYWASH.
Rinseagent dispenser • Checkthe rinseagent dispenser and fill as required.
is empty
Dishes and flatware Inlet water temperature • Raisethe water heater temperature to 120°R
not clean is below 120°R • UseHOTSTART,POTS&PANSor HEAVYWASHand HI TEMPWASH.
Too little detergent • SeeUsingthe dishwashersection, referto Proper UseofDetergentfor
detergent recommendations.
Old or damp powdered • SeeUsingthe dishwashersection, referto Proper UseofDetergentfor
detergent detergent recommendations.
Water pressure is • Turnon a faucet. Iswater coming out more slowly than usual?If so,
temporarily low wait until pressureis normal before usingyour dishwasher.
Air gap is clogged • Cleanthe air gap.
Improper rack lauding • Hake surelargedishware doesnot block detergent dispenseror wash arm.
Noair gap or high • Verify that gou have an air gap or a high drain loop.Referto
drain loop the Installation Instructions.
Spots and filming
onglasses and
flatware
Low inlet water
temperature
Extremely hard water
Low inlet water
temperature
Overloading the
dishwasher
Improper loading
Old or damp powder
detergent
Rinseagent dispenser
empty
Too little detergent
• UseCascade Crystal Cleare rinse agents to remove spots and prevent
new film buildup.
• Toremove stubborn spots and pre-existingfilm from glassware:
IRemoveall metal utensilsfrom the dishwasher.
2Donot add detergent.
3 Selectthe longest cgcle.
4 Startthe dishwasher and allow to run for 18 to 22 minutes.
Dishwasherwill now be inthe main wash.
5Open the door and pour 2 cups (500ml)of white vinegar into the
bottom of the dishwasher.
6Closethe door and allow to complete the cgcle.If vinegar rinse
doesn't work: Repeatasabove,except use 1/4 cup (60 ml)of citric
acid crystals instead of vinegar.
Cloudiness on Combination of soft • Thisiscoiled etching and ispermanent. Toprevent this from
glassware water and too much happening, use lessdetergent if gou hovesoft water. Wash glassware in
detergent the shortest cgcle that will get it cleon.
Water temperature • Lower the water heater temperature.
entering the dishwasher
exceeds150°R
Detergent cup lid Dial isnot in the OFF • Turnthe Timer Dialto OFF.
won_latch position
Detergent left in Dishesare blocking the • Repositionthe dishes.
dispenser cups detergent cups
Steam This is normal • Steam comes through the vent bg the door latch during drging and
when water is being pumped out.
Black orgray Aluminum utensils have • Removemarks with o mild, abrasive cleaner.
marks on dishes rubbed against dishes
Control panel lights Time too long between • Eachpad must betouched within 30 secondsof the others.To relight,
go offwhen you are touching or selecting touch any pad again or unlatch and relatch the door.
setting controls pads
Control panel Door latch may not • Callfor service.
responded to inputs be properly seated
but dishwasher never
filled with water
16
All manuals and user guides at all-guides.com
all-guides.com

GEDishwasher Warranty.
All warranty serviceprovided byour FactoryServiceCenters,
or an authorizedCustomerCare®technician.Toscheduleservice
on-line,visitusat GEAppliances.com,or call800.GE.CARES(800.432.2737)
in the UnitedStates.In Canada,call2_.800.561.3344.Pleasehaveserial
number and model numberavailablewhen callingforservice.
Stapleyour receipt here.
Proof of the original purchase
date is needed to obtain service
under the warranty.
For The Period Of:
One Year
From the date of the
original purchase
Five Years
(onlyfor model numbers
beginningwith PDW
or CDW)From the date
of the original purchase
Lifetime of Product
(onlyfor model numbers
beginning with PDW
or COW)
GE Will Replace:
Any part of the dishwasher which fails due to a defect in materials or workmanship. During
this limited one-year warranty, GEwill alsoprovide, free of charge, all labor and in-home service
to replacethe defective part.
Thedishwasher racks and the electronic control module iftheg shouldfail due to a defect
in materials or workmanship. Duringthis five-year limited warranty, you will be responsible
for ang labor or in-home servicecosts.
TheStainlesstub or door liner,if it fails to contain water due to a defect in materials or
workmanship. Duringthis limited warranty, GEwill alsoprovide, free of charge, all labor and
in-home serviceto replacethe defective part.
What GE Will Not Cover (for customers in the United States):
• Service trips to your home to teach you how to use
the product.
• Improper installation, delivery or maintenance.
• Failureof the product if it isabused, misused, or usedfor
other than the intended purpose or usedcommercially.
• Replacementof housefusesor resetting of circuit breakers.
• Product not accessible to provide required service.
• Damage to the product causedby accident, fire, floods
or acts of God.
• Incidental or consequential damage causedby possible
defects with this appliance.
• Cleaningor servicingofthe air gap devicein the drain line.
• Damage caused after delivery, including damage from
items dropped on the door.
EXCLUSION OF IMPLIED WARRANTIES--Your sole and exclusive remedy is product repair as provided in this Limited
Warranty. Any implied warranties, including the impfied warranties of merchantability or fitness for a particular
purpose, are limited to one year or the shortest period allowed by law.
Thiswarranty isextendedto theoriginal purchaserand anysucceedingowner forproducts purchasedfor home usewithin the USA.
If theproduct islocated in an area whereservicebya GEAuthorizedServicerisnot available,you may be responsiblefor a trip
chargeor you may be requiredto bring theproduct to anAuthorized GEServicelocation forservice.Proofoforiginal purchasedate
isneededto obtain serviceunder thewarranty. InAlaska,thewarranty excludesthecostof shippingor servicecallstoyour home.
Somestates do not allow theexclusionor limitation of incidental or consequentialdamages. Thiswarranty givesyou specific legal
rights, andyou may alsohaveother rights which vary from state to state. Toknow what your legal rights are,consultyour local or
state consumeraffairs office oryour state'sAttorney General.
Warrantor: General Electric Company. Louisville, KY 40225
What Is Not Covered (for customers in Canada):
•Service trips to your home to teach you how to use
the product.
• Improper installation.
If gou have an installation problem, contact gour dealer
or installer. You are responsible for providing adequate
electrical, exhausting and other connecting facilities.
• Failure of the product if it is abused, misused, or used for
other than the intended purpose or used commercially.
• Replacement of house fuses or resetting of circuit breakers.
• Damage to the product caused by accident, fire, floods
or acts of God.
• Damage caused after delivery.
II EXCLUSION OF IMPLIED WARRANTIES--Your sole and exclusive remedy is product repair as provided in this Limited
Warranty. Any implied warranties, including the implied warranties of merchantability or fitness for aparticular
purpose, are limited to one year or the shortest period allowed by law.
This warranty is extended to the original purchaser and any succeeding owner for products purchased in Canada for home use
within Canada. In home warranty service will be provided in areas where it is available and deemed reasonable by Mabe to provide.
WARRANTOR IS NOT RESPONSIBLE FOR CONSEQUENTIAL DAMAGES.
Warrantor: MABE CANADA INC. 17
All manuals and user guides at all-guides.com

Consumer Support.
GEAppliances Website In the U.S.:GEAppliances.com
Have a question or need assistancewith your appliance?Try the GEAppliances Website 24 hours a day, any day
of the gear! Forgreater convenience and faster service,you can now download Owner's Manuals,order parts or even
schedule serviceon-line. In Canada: www.GEAppliances.ca
Schedule Service Inthe U.S.:GEAppliances.com
Expert GErepair service is only one step away from your door. Get on-line and schedule your service at your
convenience any day of the gear! Or call 800.GE.CARES(800.432.2737)during normal business hours.
In Canada, call 1.800.561.3344
Real LifeDesign Studio Inthe o.s.:GEAppliances.com
GEsupports the UniversalDesignconcept-products, servicesand environments that can be usedby people of all
ages,sizesand capabilities. We recognizethe need to design for a wide range of physical and mental abilities and
impairments. Fordetails of GE'sUniversalDesignapplications, including kitchen design ideasfor peoplewith disabilities,
check out our Websitetoday. Forthe hearing impaired, pleasecall 800.TDD.GEAC(800.833.4322).
In Canada, contact: Manager,Consumer Relations,IVlabeCanada Inc.
Suite310, 1 Factory Lane
Moncton, N.B.E1C9M3
Extended Warranties In the U.S.:GEAppliances.com
Purchasea GEextended warranty and learn about specialdiscounts that are availablewhile your warranty isstill
in effect. You can purchase iton-line anytime, or call800.626.2224 during normal businesshours. GEConsumer Home
Serviceswill still be there after your warranty expires.In Canada, please visit our Website or contact your local
extended warm nty provider.
Partsand Accessories In the U.S.:GEAppliances.com
Individuals qualified to servicetheir own appliances can haveparts or accessoriessent directly to their homes (VISA
and MasterCard cards are accepted).Order on-line today, 24 hours every day or by phone at 800.626.2002during
normal businesshours.
Instructions contained in this manual cover procedures to be performed by any user. Other servicing generally
should be referred to qualified service personnel. Caution must be exercised, since improper servicing may cause
unsafe operation.
Customers in Canada should consult the yellow pages for the nearest lvlabe service center, or call 1.800.661.1616.
Contact Us In the U.S.:GEAppliances.com
If you are not satisfied with the service you receive from GE,contact us on our Website with all the details including your
phone number, or write to: General Manager, Customer Relations
GEAppliances, Appliance Park
Louisville, KY40225
In Canada: www.GEAppliances.ca, or write to: Director, Consumer Relations, IVlabeCanada Inc.
Suite 310, 1 Factory Lane
Moncton, N.B. E1C91v13
Register YourAppliance In the U.S.:GEAppliances.com
Register your new appliance on-line--at your convenience! Timely product registration will allow for enhanced
communication and prompt serviceunder the terms of your warranty, should the need arise.You may also
mail in the pre-printed registration card included in the packing material. InCanada: www.GEAppliances.ca
28
All manuals and user guides at all-guides.com

Notes.
O"
0
O"
v
0
0
0
.._
.._
0
19
All manuals and user guides at all-guides.com

_J
0
_J
0
0
J:::
-0
w
0
O.
O.
V)
0
_J
Notes.
20
All manuals and user guides at all-guides.com
Table of contents
Languages:
Other GE Dishwasher manuals

GE
GE Built-In Dishwasher User manual

GE
GE GDWF100R Manual

GE
GE GDT550HGD0BB User manual

GE
GE Monogram ZBD0700NII User guide

GE
GE Appliances EDW3000 Series User manual

GE
GE Profile PDWT200VWW User manual

GE
GE Monogram ZBD4600 User manual

GE
GE Triton XL PDW7300 series User manual

GE
GE Dishwasher User manual

GE
GE GSM603G User manual