GE Monogram ZBD0710 User manual

Owner’s
Manual
Dishwasher
ZBD6800
ZBD6880
ZBD6890
ZBD0700
ZBD0710

2
Consumer Information
Dishwasher
Your new Monogram dishwasher makes an e oquent statement of sty e, convenience and kitchen
p anning f exibi ity. Whether you chose it for its purity of design, practica features or assiduous
attention to detai —or for a of these reasons—you’ find that your Monogram dishwasher’s superior
b end of form and function wi de ight you for years to come.
The information on the fo owing pages wi he p you operate and maintain your dishwasher proper y.
If you have any other questions, visit our Website at: monogram.com
Introduction
Contents
App iance Registration . . . . . . . . . . . . . . . .3, 23, 24
Care and C eaning . . . . . . . . . . . . . . . . . . . . . . . . .15
Consumer Services . . . . . . . . . . . . . . . . . . . . . .3, 20
Mode and Seria Number Location . . . . . . . . . . .3
Operating Instructions . . . . . . . . . . . . . . . . . . .6–14
Contro Pane and Operation . . . . . . . . . . . .6–8
Lighting Features . . . . . . . . . . . . . . . . . . . . . . . . .9
Water Temperature . . . . . . . . . . . . . . . . . . . . . .9
Rinse Agent . . . . . . . . . . . . . . . . . . . . . . . . . . . . . .9
Dish Preparation Prior to Loading . . . . . . . . .10
Detergents . . . . . . . . . . . . . . . . . . . . . . . . . . . . .10
Dishwasher Racks . . . . . . . . . . . . . . . . . . .11–14
Prob em So ver . . . . . . . . . . . . . . . . . . . . . . . . .16–19
Safety Instructions . . . . . . . . . . . . . . . . . . . . . . . .4, 5
U.S.A. Warranty . . . . . . . . . . . . . . . . . . . . . . . . . . .21
Canada Warranty . . . . . . . . . . . . . . . . . . . . . . . . .22

3
Consumer Information
Dishwasher
Before
using
your
dishwasher
Read this manua carefu y. It is intended to he p
you operate and maintain your new dishwasher
proper y.
Keep it handy for answers to your questions.
If you don’t understand something or need more
he p, there is a ist of to -free consumer service
numbers inc uded on the Consumer Services
page in the back section of this manua .
OR
Visit our Website at: monogram.com
Write
down the
model &
serial
numbers
You can ocate your mode and seria numbers
on the tub wa just inside the door.
Before sending in the card, please write these
numbers here:
Mode Number
Seria Number
Use these numbers in any correspondence or
service ca s concerning your dishwasher.
If you received
a damaged
dishwasher
Immediate y contact the dea er (or bui der) that
so d you the dishwasher.
Save time
& money
Before you request service, check the Prob em
So ver in the back of this manua .
It ists causes of minor operating prob ems that
you can correct yourse f.
If you
need service
To obtain service, see the Consumer Services
page in the back of this manua .
We’re proud of our service and want you to be
p eased. If for some reason you are not happy
with the service you receive, here are steps to
fo ow for further he p.
For customers in the USA:
FIRST, contact the peop e who serviced your
app iance. Exp ain why you are not p eased.
In most cases, this wi so ve the prob em.
NEXT, if you are sti not p eased, contact us on
our website, write a the detai s—inc uding your
phone number—or write to:
Manager, Customer Re ations
GE App iances
App iance Park
Louisvi e, KY 40225
For customers in Canada:
FIRST, contact the peop e who serviced your
app iance. Exp ain why you are not p eased.
In most cases, this wi so ve the prob em.
NEXT, if you are sti not p eased, write a the
detai s—inc uding your phone number—to:
Manager, Consumer Re ations
Mabe Canada Inc.
1 Factory Lane, Suite 310
Moncton, N.B. E1C 9M3

CAUTION: To prevent minor injury or property damage
•Contents washed in Anti-bacteria mode, if
avai ab e, may be hot to the touch. Use care
before hand ing.
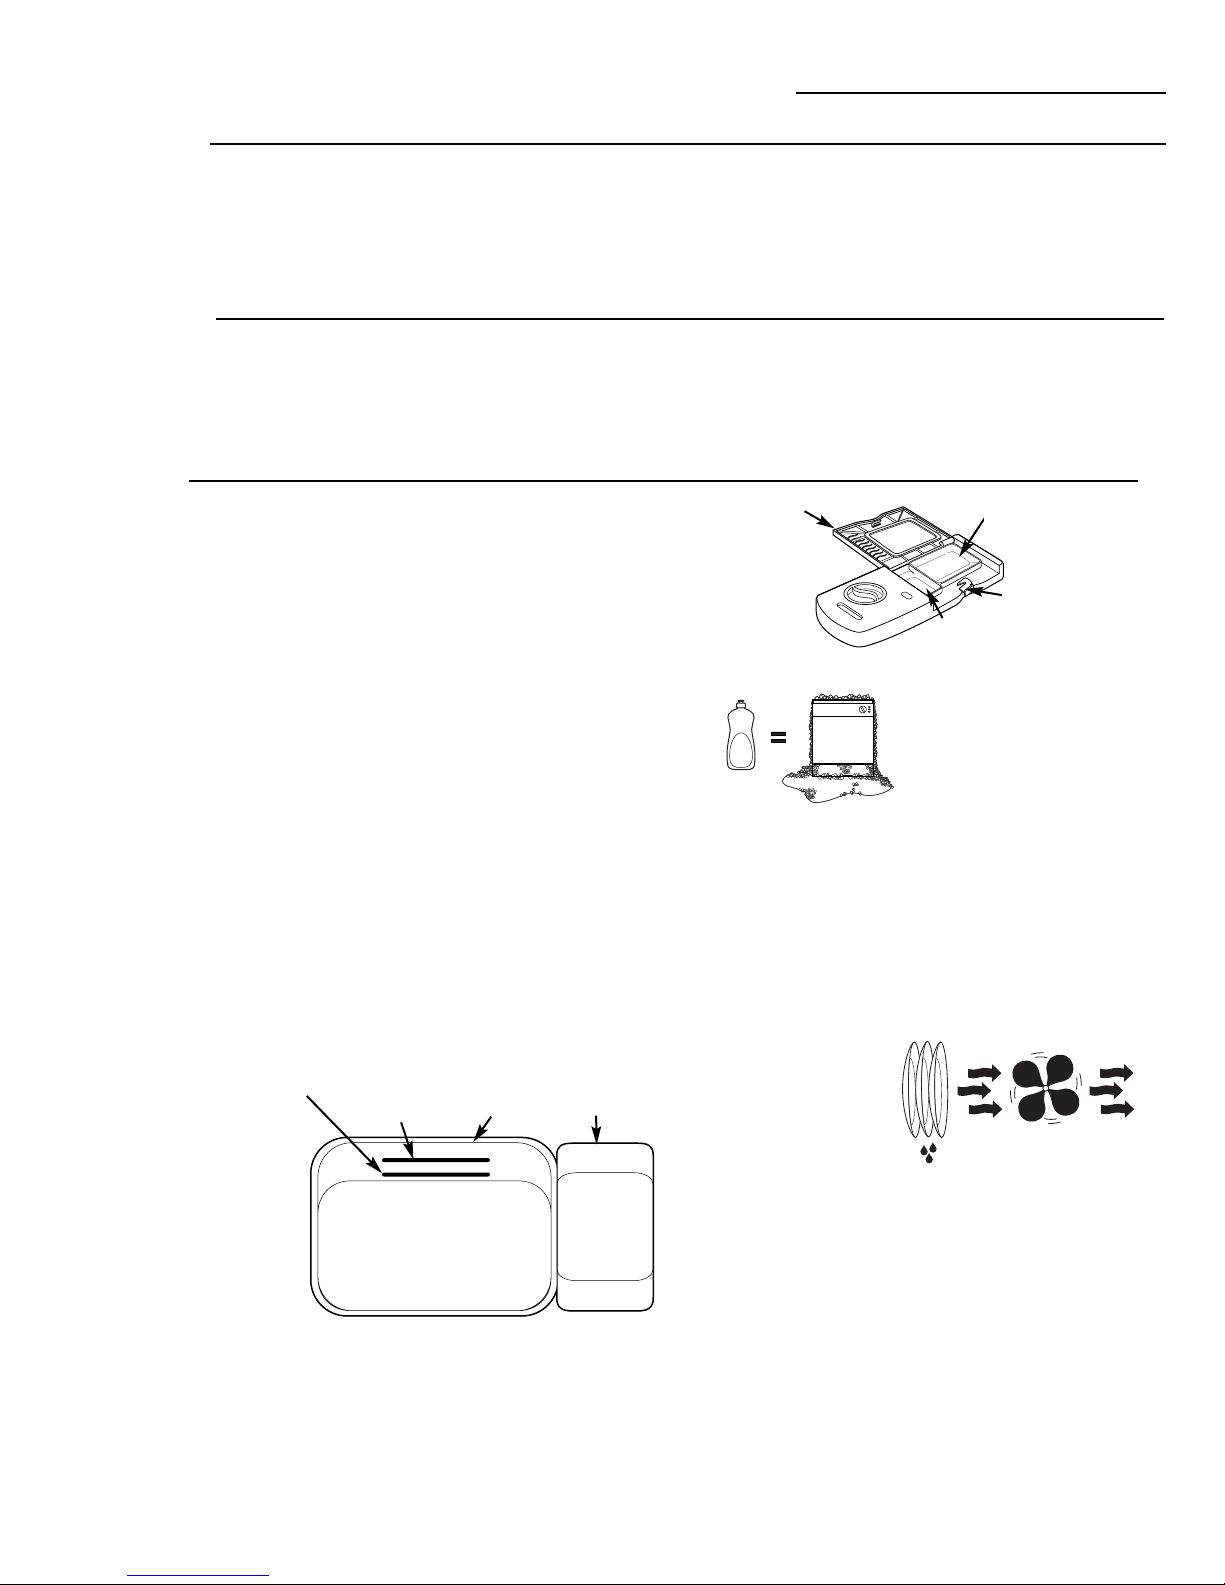
•Using a detergent that is
not specifica y designed
for dishwashers wi
cause the dishwasher
to fi with suds.
•If your dishwasher is connected to a
wa switch, ensure that the switch is
on prior to use.
•On dishwashers with e ectronic contro s,
if you choose to turn the wa switch off
between wash cyc es, a ow 5–10
seconds after turning the switch on
before touching START/RESET to a ow
the contro to initia ize.
•Non-Dishware Items: Do not wash items such
as e ectronic air c eaner fi ters, furnace fi ters and
paint brushes in your dishwasher. Damage to
dishwasher and disco oration or staining of
dishwasher may resu t.
•C ose supervision is necessary if this app iance
is used by or near chi dren.
•Load ight, p astic items so they wi not
become dis odged and drop to the bottom
of the dishwasher—they might come into
contact with the heating e ement and be
damaged.
4
IMPOR AN SAFE Y INS RUC IONS
READ ALL INS RUC IONS BEFORE USE
SAVE HESE INS RUC IONS
WARNIN ! WATER HEATER SAFETY
Under certain conditions, hydrogen gas may be
roduced in a water heater that has not been
used for two weeks or more. HYDRO EN AS
IS EXPLOSIVE.
If the hot water has not been used for two weeks or
more, prevent the possibi ity of damage or injury by
turning on a hot water faucets and a ow them to
run for severa minutes. Do this before using any
e ectrica app iance which is connected to the hot
water system. This simp e procedure wi a ow any
bui t-up hydrogen gas to escape. Since the gas is
f ammab e, do not smoke or use an open f ame or
app iance during this process.
WARNIN !
For your safety, the information in this manual must be followed to minimize the risk of fire
or explosion, electric shock, and to prevent property damage, personal injury, or death.
This dishwasher must be ro erly installed and located in accordance with the Installation
Instructions before it is used. If you did not receive an Installation Instructions sheet with
your dishwasher, you can receive one by visiting our website at monogram.com.
•Connect to a grounded meta , permanent wiring
system; or run an equipment-grounding conductor
with the circuit conductors and connect to the
equipment-grounding termina or ead of the
app iance.
•Improper connection of the equipment-grounding
conductor can resu t in a risk of e ectric shock.
Check with a qua ified e ectrician or service
representative if you are in doubt whether the
app iance is proper y grounded.
•Dispose of discarded app iances and shipping
or packing materia proper y.
•Do not attempt to repair or rep ace any part
of your dishwasher un ess it is specifica y
recommended in this manua . A other servicing
shou d be referred to a qua ified technician.
•To minimize the possibi ity of e ectric shock,
disconnect this app iance from the power supp y
before attempting any maintenance.
NOTE: Turning the dishwasher off does not
disconnect the a liance from the ower su ly.
We recommend having a qualified technician
service your a liance.
PROPER INSTALLATION AND MAINTENANCE

Junked or abandoned dishwashers are
dangerous…even if they wi sit for “just a
few days.” If you are getting rid of your o d
dishwasher, p ease fo ow the instructions be ow
to he p prevent accidents.
Before You Throw Away Your Old Dishwasher:
•Take off the door of the washing compartment
or remove the door atch keeper (as shown).
5
PROPER DISPOSAL OF THE DISHWASHER
WARNIN ! RISK OF CHILD ENTRAPMENT
Door
atch
keeper
READ AND FOLLOW THIS SAFETY INFORMATION CAREFULLY.
SAVE THESE INSTRUCTIONS
•Use this app iance on y for its intended purpose
as described in this Owner's Manua .
•Use on y powder, tabs, iquid detergents or rinse
agents recommended for use in a dishwasher and
keep them out of the reach of chi dren. Cascade®,
Cascade®Complete and Electrasol®Automatic
Dishwashing Detergents, and Jet-Dry®and
Cascade Crystal Clear®rinse agents have been
approved for use in a GE dishwashers.
•Locate sharp items so that they are not ike y
to damage the door sea .
•Load sharp knives with the hand es up to reduce
the risk of cut-type injuries.
•Do not wash p astic items un ess marked
dishwasher safe or the equiva ent. For p astic
items not so marked, check the manufacturer's
recommendations.
•Do not touch the heating e ement during or
immediate y after use.
•Do not operate your dishwasher un ess a
enc osure pane s are proper y in p ace.
•Do not tamper with contro s.
•Do not abuse, sit on or stand on the door or dish
rack of the dishwasher.
•Do not a ow chi dren to p ay around dishwasher
when opening or c osing door due to the possibi ity
of sma fingers being pinched in door.
•Do not discard a dishwasher without first removing
the door or the door atch keeper of the washing
compartment.
•Do not store or use combustib e materia s, gaso ine
or other f ammab e vapors and iquids in the vicinity
of this or any other app iance.
•Do not a ow chi dren to p ay with, on or inside this
app iance or any discarded app iance.
WARNIN ! When using your dishwasher, follow basic precautions,
including the following:
IMPOR AN SAFE Y INS RUC IONS
READ ALL INS RUC IONS BEFORE USE
SAVE HESE INS RUC IONS

6
Dishwasher
Control
Settings
Wash Cycles Use the arrow pads to scro through the wash cyc es. The ight above or next to the
se ected pad wi be ON to indicate which WASH CYCLE has been se ected.
NO E: This dishwasher is equipped with an ExtraC ean™Sensor with automatic temperature
contro ; therefore, cyc e time and tota water consumption may vary depending on soi (heavy,
medium, ight) and temperature conditions.
AN I Heavy 9.1 ga ons, 95 minutes
BAC ERIAL Medium 7.8 ga ons, 95 minutes
Light 6.5 ga ons, 90 minutes
This cyc e raises the water temperature in the fina rinse to sanitize your dishware.
The cyc e ength wi vary depending on the temperature of your in et water.
NO E: The Anti-Bacteria cyc e is monitored for sanitization requirements. If the cyc e is interrupted
during or after the main wash portion or if the incoming water temperature is so ow that adequate
water heating cannot be achieved, the sanitizing conditions may not be met. In these cases, the
sanitized ight wi not i uminate at the end of the cyc e.
NO E: NSF certified residentia dishwashers are not intended for icensed food estab ishments.
COOKWARE Heavy 10.4 ga ons, 80 minutes
Medium 9.1 ga ons, 90 minutes
Light 7.8 ga ons, 100 minutes
This cyc e is meant for heavi y soi ed dishes or cookware with dried-on or baked-on soi s. This cyc e
may not remove burned-on foods. Everyday dishes are safe to be used in this cyc e.
NORMAL Heavy 8.75 ga ons, 70 minutes
Medium 6.25 ga ons, 60 minutes
Light 5 ga ons, 55 minutes
This cyc e is for medium/heavi y soi ed dishes and g assware.
SPEED CYCLE 7.8 ga ons, 37 minutes
(on some mode s) This cyc e is for everyday dishes and g assware.
You can locate
your model
number on the
tub wall just
inside the door.
Throughout this
manual,
features and
a earance
may vary from
your model.
81 43
25 6
7
910
1 3
25 6
7
910
NSF IN ERNA IONAL
Meets NSF Standard 184 Sanitization and C eaning
performance of househo d spray-type dishwashers.
R
E
S
I
D
E
N
T
I
A
L
Contro Pane
ZBD6890 and ZBD0700
ZBD6800 and ZBD6880
8
ZBD0710
1 43
25 6
7
910
1

7
CHINA 7.8 ga ons, 50 minutes
CRYS AL This cyc e is for ight y soi ed china and crysta .
GLASSES Heavy 7.8 ga ons, 50 minutes
(on some mode s) This cyc e is specifica y designed for g asses.
PLAS ICS Heavy 7.8 ga ons, 70 minutes
CYCLE Medium 6.5 ga ons, 60 minutes
(on some mode s) Light 5.2 ga ons, 55 minutes
This cyc e is specifica y designed to reduce the risk of me ting p astic items and
improve p astic drying for dishwasher safe p astic items.
RINSE ONLY Heavy 2.6 ga ons, 10 minutes
Light 1.3 ga ons, 5 minutes
For rinsing partia oads that wi be washed ater. Do not use detergent with
this cyc e.
DELAY S AR — This option wi a ow you to de ay the start time of any wash cyc e for up to 8
or 24 hours (depending on mode ).
• Se ect the de ay start time you want by pressing the DELAY START pad.
Mu tip e or continuous pressing wi increment the de ay hours. Se ect the
number of hours you want to de ay the start of the cyc e. Then press
START/RESET.
• After c osing the door, the machine wi count down and automatica y start
at the correct time.
NO E: To cance the DELAY START se ection before the cyc e begins, press the
DELAY START pad unti the disp ay is b ank. Pressing START/RESET wi not cance
de ay hours.
ADDED HEA — When se ected, the cyc e wi run onger with the heating e ement on to improve
both wash and dry performance.
NO E: Cannot be se ected with RINSE ONLY cyc e.
PRE WASH— For use with heavi y soi ed and/or dried-on, baked-on soi s. This option
(on some mode s) MUST be se ected PRIOR to starting the cyc e. This option adds 16 minutes
to the cyc e time.
NO E: Cannot be se ected with RINSE ONLY cyc e.
HEA ED— When se ected, turns the drying heater and fan on for fast drying. This option
DRY wi extend the cyc e time by 30 minutes for the ANTI-BACTERIAL cyc e,
38 minutes for the NORMAL cyc e and COOKWARE cyc e, 8 minutes for the
SPEED cyc e, 15 minutes for the PLASTICS cyc e and 30 minutes for a other
cyc es. When this is NOT se ected, the fan wi turn on for 4 hours to dry your
dishes without added heat—and energy is saved.
NO E: Cannot be se ected with RINSE ONLY cyc e.
LOCK — You can ock the contro s to prevent any se ections from being made. Or you
can ock the contro s after you have started a cyc e.
Children cannot accidentally start the dishwasher by touching pads with
this option selected.
To ock the dishwasher contro s, press and ho d the HEATED DRY pad for
3 seconds. The LOCK ight wi turn on. To un ock the dishwasher contro s, press
and ho d the HEATED DRY pad for 3 seconds. The LOCK ight wi turn off.
Dishwasher
Contro Pane /Operation
2
3
4
5
6

8
Status Indicator Lights
(indicators vary by mode )
The Status disp ay te s you what is happening whi e the dishwasher is in operation.
The ights wi come ON, indicating the sequence of the dishwasher operation.
SENSING Disp ayed whi e the ExtraC ean™Sensor is measuring the amount of soi and
temperature of water. The dishwasher wi adjust the se ected cyc e to achieve
optima performance.
ADD-A-DISH Disp ayed during prewash, indicating that dishes added now wi sti be c eaned.
WASHING Disp ayed during prewash, main wash and rinse periods.
DRYING Disp ayed during HEATED DRY.
SANI IZED Disp ayed when cyc e has met sanitization conditions.
CLEAN Disp ayed when a wash cyc e and enhancements are comp ete.
ime Remaining Display (on some mode s)
During operation, the disp ay shows the minutes remaining unti the cyc e is comp ete. The disp ay
may adjust the remaining time whi e the Sensing ight is on. The time disp ayed at the start of
each cyc e may change from the factory setting as the unit customizes itse f to actua home
usage. During a de ay start, the disp ay wi show hours of time remaining unti the cyc e starts.
S AR /RESE
S AR — After se ecting the cyc e and desired enhancements, press the START/RESET pad
one time to ready the dishwasher to begin the cyc e. C ose the door to start the
cyc e or begin the DELAY START countdown. When the cyc e starts, the water fi
begins and approximate y 60 seconds ater the wash action begins.
The dishwasher wi a ways disp ay your ast se ection and enhancements. If you
don’t want to change the settings, simp y press the START/RESET pad one time
to ready the dishwasher and c ose the door to begin the cyc e.
NO E: If the START/RESET ight is f ashing, the cyc e has been interrupted.
Light wi stop f ashing after the dishwasher automatica y pumps out the water.
C ose the door to a ow the water to pump out (this takes approximate y
70 seconds). When the ight stops f ashing, the dishwasher can be
reprogrammed and restarted.
A so, if a power fai ure occurs, NORMAL and HEATED DRY wi automatica y be
programmed. Make any new se ections and press the START/RESET pad to begin
the new cyc e.
RESE — Open the door s ow y to prevent sp ash-out. Press the START/RESET pad
to cance the cyc e. C ose the door. The dishwasher wi pump out and turn off
after 70 seconds.
Clean— The CLEAN ight is i uminated and a doub e beep wi sound when the se ected
cyc e and enhancements are comp ete. You may remove the dishes at any
time. Note the high-efficiency fan wi run quiet y for 30 minutes to 4 hours
(depending on se ected cyc e) after the CLEAN ight is i uminated to continue
drying the dishes. This can be stopped by opening the door and pressing
any keypad.
NO E: To turn off the doub e beep indicator (or re-activate it if it was previous y
disengaged), press the HEATED DRY pad 5 times within 3 seconds. A trip e beep
wi sound to indicate the end-of-cyc e beep option has been togg ed.
Dishwasher
Contro Pane /Operation
7
8
9
10

9
Using the dishwasher
Dishwasher
Water
Tem erature
The entering water must be at east 120°F (49°C)
and
not more than 150°F (66°C), for effective
c eaning and to prevent dish damage.
Check the water temperature with a candy or
meat thermometer. Turn on the hot water faucet
nearest the dishwasher, p ace the thermometer in
a g ass and et the water run continuous y into the
g ass unti the temperature stops rising.
Use a
Rinse
Agent
A rinse agent improves dry performance,
reduces spots and prevents new fi m bui dup
on your dishes, g asses, f atware, cookware
and p astic. Jet-Dry®and Cascade Crystal
Clear®are recommended rinse agents for
Monogram Dishwashers.
The rinse agent dispenser ho ds 3.5 oz. of rinse
agent. Under norma conditions, this wi ast
approximate y one month. Try to keep it fu ,
but do not overfi .
To fi the rinse agent dispenser, make sure the
dishwasher door is fu y open.
Rotate the dispenser cap counterc ockwise and
ift it out. Add rinse agent unti the indicator
window shows fu .
C ean up any spi ed rinse agent with a damp
c oth. Rep ace the dispenser cap.
The amount of rinse agent re eased into the fina
wash can be adjusted. The factory setting is at
the midpoint. If there are rings of ca cium (hard
water) spots on dishes, try a higher setting. If
there is foaming, use a ower setting.
To adjust the setting, remove the dispenser cap;
then turn the adjuster counterc ockwise to
increase the amount of rinse agent or c ockwise
to decrease the amount of rinse agent dispensed.
Rinse agent
adjuster
Indicator
window Dispenser
cap
Lighting
Features
(on some
models)
Interior Lights (on some models)
The interior Xenon ights provide better visibi ity
for oading and un oading. They turn on when the
door is opened and turn off when the door is
atched. The ights wi turn off after 15 minutes
if the door remains un atched. To turn the ights
back on, atch and open the door.
Do not attempt to rep ace the bu bs. If ight bu b
rep acement is necessary, p ease contact the
GE Answer Center for service by ca ing
1.800.626.2000.
End-of-Cycle Indicator Light (on some models)
The end-of-cyc e indicator ight is ocated on the
right side of the dishwasher, above the hand e.
This ight comes on when the se ected cyc e is
comp ete. The ight wi stay on unti the door is
opened. The dishes may be removed at any time.
Note that the high-efficiency fan wi run quiet y
for 30 minutes to 4 hours (depending on the
se ected cyc e) after the end-of-cyc e indicator
ight is i uminated to continue drying the dishes.
Opening the door and pressing any keypad wi
stop the fan.

Use on y detergent specifica y made for use in
dishwashers. Cascade®, Cascade Complete®and
Electrasol®Automatic Dishwashing Detergents have
been approved for use in a Monogram Dishwashers.
Keep your powdered detergent fresh and dry. Don’t put
detergent into the dispenser unti you’re ready to wash
dishes.
A wash cyc es except RINSE ONLY require detergent.
The amount of detergent to use depends on whether
your water is hard or soft.
Protect your dishes and dishwasher by contacting your
water department and asking how hard your water is.
Twe ve or more grains is extreme y hard water. A water
softener is recommended. Without it, ime can bui d
up in the water va ve, which cou d stick whi e open and
cause f ooding. Too much detergent with soft water
can cause a permanent c oudiness of g assware,
ca ed etching.
The detergent cup has indicator ines to he p you.
Use the right amount of detergent. As a guide:
For Soft water (water hardness ess than 4 Grains Per
Ga on [GPG]), fi cup to the first ine.
For Medium soft water (4–8 GPG), fi cup to the second ine.
For Medium hard water (8–12 GPG), fi cup.
For Extreme y hard water (more than 12 GPG), fi both cups.
If the amount of food soi is high, use a bit more detergent.
If water temperature is greater than 140°F, use a bit ess
detergent.
C ose cover and be sure it is atched after fi ing dispenser
with detergent.
Do not use hand dish detergent.
NO E: Using a detergent
that is not specifica y designed
for dishwashers wi cause the
dishwasher to fi with suds.
During operation, these suds wi
spi out of the dishwasher vents,
covering the kitchen f oor and making the f oor wet.
Because so many detergent containers ook a ike,
store the dishwasher detergent in a separate space
from a other c eaners. Show anyone who may use the
dishwasher the correct detergent and where it is stored.
Whi e there wi be no asting damage to the dishwasher,
your dishes wi not get c ean using a dishwashing
detergent that is not formu ated to work with dishwashers.
Drying Fan
If the Heated Dry
option is se ected,
the drying fan wi run
during the drying
portion of the cyc e
and up to 2 hours
after the CLEAN ight
turns on, depending on the se ected wash cyc e. If the
Heated Dry option is not used, the CLEAN ight wi come
on at the end of the fina rinse and the fan wi run up to
4 hours, depending on the se ected wash cyc e.
If the Rinse On y wash cyc e is se ected, the Heated Dry
option is automatica y turned off and the drying fan wi
run for 4 hours.
If the drying fan is running and the CLEAN ight is on, the
drying fan can be turned off by opening the door and
pressing any key on the keypad.
10
Detergents
Pre-wash
section
Cover
Cover
atch
Main wash
section
Using the dishwasher
Dishwasher
Dish
Pre aration
Prior to
Loading
•No prerinsing of norma food soi is required.
•Scrape off hard soi s, bones, toothpicks, skins and seeds.
•Remove arge quantities of any remaining food.
•Remove eafy vegetab es, meat trimmings and
excessive amounts of grease or oi .
Forget
to Add
a Dish?
A forgotten dish can be added any time before the
main wash.
1. Open the door s ight y.
2. Wait unti the water spray action stops. Steam may
rise out of the dishwasher.
3. Add forgotten dishes.
4. C ose the door.
MAIN WASH
PRE
WASH
Extreme y
hard
Soft Medium
hard
Medium
soft

Loading the Racks
Dishwasher
U er Rack
Features and appearance of racks and
si verware basket may vary from your mode .
A though the upper rack is for g asses, cups and
saucers, pots and pans can be p aced in this
rack for effective c eaning. Cups and g asses fit
best a ong the sides and shou d be p aced open-
end down. This is a so a secure p ace for
dishwasher p astics.
The uti ity she f (on some mode s) may be p aced
in the up or down position to add f exibi ity.
A wine g ass ho der (on some mode s) secures
wine g asses for best washabi ity. Because wine
g asses come in various sizes, after oading,
s ow y push in the rack to make sure they wi
c ear the top of the dishwasher.
The upper rack is good for a kinds of
odd-shaped utensi s. Saucepans, mixing bow s
and other items shou d be p aced face down.
Fo d-down tines (on some mode s) provide
f exibi ity for extra- arge and hard-to-fit items.
Secure arger dishwasher-safe p astics over
2 tines when possib e.
Make sure sma p astic items are secure so they
can’t fa onto the heater.
Be sure that items do not protrude through the
bottom of the rack and b ock rotation of the
midd e spray arm. This wi resu t in poor wash
performance for items in the upper rack.
Check to make sure that no items in the ower
rack wi b ock rotation of the wash arm mounted
under the upper rack.
11

ype A
To oad f atware, simp y push the adjustab e
hand e to either side (on some mode s).
Put f atware in the removab e basket with fork
and knife hand es up to protect your hands.
P ace spoons in the basket with hand es down.
Mix knives, forks and spoons so they don’t nest
together. Distribute even y. Sma p astic items,
such as measuring spoons and ids from sma
containers shou d go in the bottom of the
si verware basket with the si verware on top.
This cou d b ock the wash arm and cause poor
washing resu ts.
The one-piece si verware basket can be p aced
in the front, right side or back of the ower rack.
ype B
A variety of options are avai ab e regarding the
three-piece si verware basket (on some mode s)
in your dishwasher. The comp ete basket is
designed to fit on the right side of the ower rack.
Additiona y, each end of the basket is removab e
to add oading f exibi ity to accommodate
f atware and ower rack capacity needs.
The ids of both end and midd e baskets can be
opened and c osed to contain sma items. Long
items can be p aced on the uti ity she f in the
upper rack.
The standard position of your adjustab e rack
is “up”, which a ows for maximum c earance for
your ta er items in the ower rack. If you have
ta er wine g asses, tumb ers or other items to
p ace in the upper rack, you may want to adjust
the rack to the ower position.
o lower the rack, support the weight of the rack
with your hands as shown, and press both finger
pads about 1/4″toward the inside of the rack
as indicated, guiding the rack down to its ower
position.
o raise the rack to the “up” position, pu up on
the center of the rack side frame unti the rack
ocks into p ace.
Loading the Racks
Dishwasher
12
Adjustable
U er Rack
(on some
models)
Silverware
Basket
Don’t et any
item extend
through bottom.
To remove end baskets, grasp the basket
at opposite corners and s ide apart.
One-piece basket (on some mode s)
Three-piece basket (on some mode s)

Cutlery ray
The cut ery tray ho ds up to 4 arge knives such as
a carver, chef’s knives, bread knife, etc., that are too
ta to fit in the si verware basket.
Hook the tray onto the rear of the upper rack.
Lay the knives between the guides (as shown).
Bowl ines
The specia arge-bow tines in the ower rack add
f exibi ity to your oading pattern. They are usefu
for serving bow s or other arge bow s.
To use the bow tines, fo d down the 2 rows of f ex
tines in front of the bow tines and oad bow s just
as you wou d in the upper rack.
You can remove the upper rack to a ow space for
arge items in the ower rack.
To remove the upper rack, push thumb tab out and
remove the front end caps on each side of the rai .
Pu the rack straight out and off the rai s.
Rep ace the end caps, then push the rai s a the
way back into the dishwasher. S ide the shower
nozz e attachment over the spout.
Then fi the ower rack and begin your cyc e.
NO E: Nozz e must be in p ace with upper rack
removed. If not insta ed proper y, poor wash
performance and noise wi resu t.
NO E: Don’t forget to remove the shower nozz e
attachment before you rep ace the upper rack.
13
Lower Rack
The ower rack is best used for p ates, saucers and
cookware. Large items such as broi er pans and
baking racks shou d go a ong the eft-hand side.
Load p atters, pots and bow s a ong the sides, in
corners or in the back. The soi ed side of items
shou d face the center of the rack, or they can be
p aced soi side down. If necessary, oversized
g asses and mugs can be p aced in the ower rack
to maximize oading f exibi ity.
A so, be carefu not to et a portion of an item such
as a pot or dish hand e extend through the bottom
rack. This cou d b ock the wash arm and cause poor
washing resu ts.
Fo d-down tines (on some mode s) provide f exibi ity
for extra- arge and hard-to-fit items. The tines may
be eft in the up position or fo ded down to customize
the ower rack.
Be sure ta tines in the ower rack do not b ock the
spray arm above them. Check for this by spinning
the arm when both racks are pushed a the way in.
Shower nozz e
attachment
These tines fo d down Large-bow tines
Remove the
U er Rack
Extra Rack
Features
(on some
models)
Loading the Racks
Dishwasher
Remove end cap
Push thumb tab

14
Follow
these
guidelines
for loading
10 and
12 lace
settings
Loading the Racks
Dishwasher
Features and appearance of racks and si verware baskets may vary from your mode .
Upper Rack—10 place settings Lower Rack—10 place settings
Upper Rack—12 place settings Lower Rack—12 place settings

15
Care and C eaning
Dishwasher
Exterior
To c ean the contro pane , use a ight y dampened c oth, then dry thorough y. To c ean the exterior
painted pane s, use a good app iance po ish wax. See the note be ow about wax on stain ess stee
pane s.
Never use sharp objects, scouring pads or harsh c eaners on any part of the dishwasher.
The stain ess stee pane s can be c eaned with CERAMA BRYTE®Stain ess Stee App iance C eaner
or a simi ar product using a c ean, soft c oth. You can order CERAMA BRYTE®Stain ess Stee App iance
C eaner
through GE Parts by ca ing 800.626.2002 (for U.S. on y). In Canada, ca 1.888.880.3030.
NO E: Avoid streaks on stain ess stee pane s. Do not use wax on stain ess stee pane s.
Protect
Against
Freezing
If your dishwasher is eft in an unheated p ace during the winter, ask a service technician to:
1. Turn off e ectrica power to the dishwasher. Remove fuses or trip circuit breaker.
2. Turn off the water supp y and disconnect the water in et ine from the water va ve.
3. Drain water from the water in et ine and water va ve (use a pan to catch the water).
4. Reconnect the water in et ine to the water va ve.
The Air
Ga
An air gap protects your dishwasher against water
backing up into it if a drain c ogs. The air gap is not
a part of the dishwasher. It is not covered by your
warranty. Not a p umbing codes require air gaps,
so you may not have one.
A p ugged or dirty air gap wi prevent the
dishwasher from draining proper y. C ean it out
if the dishwasher is not draining proper y.
The air gap is easy to c ean.
1. Turn off the dishwasher and ift off the chrome
cover.
2. Unscrew or unsnap the p astic cap (depending
on mode ) and c ean with a toothpick.
Interior
The stain ess stee used to make the dishwasher tub and inner door provides the highest re iabi ity
avai ab e in a GE dishwasher. If the dishwasher tub or inner door shou d be scratched or dented
during norma use, they wi not rust or corrode. These surface b emishes wi not affect their function
or durabi ity.
Check the air gap any time your
dishwasher isn’t draining we .

16
PROBLEM POSSIBLE CAUSE WHA O DO
Control panel lights go Time too ong between •Each pad must be touched within 30
off when you’re setting touching of se ected pads seconds of the others. To re ight, touch any
controls pad again, or un atch and re atch door.
Noise Detergent cup opening •This is norma .
The motor stopping during
the drying period
Water draining out of the
tub immediate y after you
touch the START/RESET pad
Drying fan running for 2–4
hours after CLEAN ight is
i uminated (Top Contro
Pane mode s on y)
Utensi s are not secure •Make sure everything is secured in
in the rack or something dishwasher.
sma has dropped into
the rack
Motor hums •Dishwasher has not been used on a regu ar
basis. If you do not use your dishwasher
often, run a RINSE ONLY cyc e once every
week. This wi he p keep the sea moist.
Detergent left in Dishes are b ocking the •Reposition the dishes.
dispenser cups detergent cups
Water standing in the This is norma •A sma amount of c ean water around the
bottom of the tub out et on the tub bottom at the back of the
tub keeps the water sea ubricated.
Water won’t pump out Drain is c ogged •If you have an air gap, c ean it.
of the tub •Check to see if your kitchen sink is
draining we . If not, you may need a p umber.
•If the dishwasher drains into a disposer,
run disposer c ear.
Suds Correct detergent •Use on y automatic dishwasher detergents
wasn’t used to avoid sudsing. Cascade®, Cascade
Complete®and Electrasol®dishwasher
detergents have been approved for use
in a Monogram dishwashers.
•To remove suds from the tub, open the
dishwasher and et suds dissipate. Touch START.
Let run for 30 seconds. Touch START again.
Dishwasher wi pump out in 70 seconds.
Repeat if necessary.
Rinse agent was spi ed •A ways wipe up rinse agent spi s
immediate y.
Stained dishwasher Some tomato-based foods •Use of the RINSE ONLY cyc e after adding
parts can cause pink or orange the dish to the oad can decrease the eve
stains of staining.
•GE a so recommends Cascade®Plastic
Booster™to he p remove these types of stains.
Before You Ca For Service
Dishwasher
Questions?
Use this
roblem
solver

17
Questions?
Use this
roblem
solver
PROBLEM POSSIBLE CAUSE WHA O DO
Dishes and flatware Low in et water •Make sure in et water temperature is at east
not clean temperature 120°F (49°C) (see Using the Dishwasher section).
•Run water at the nearest faucet prior to
starting the dishwasher to insure optima water
temperature.
Water pressure is •Turn on a faucet. Is water coming out
temporari y ow more s ow y than usua ? If so, wait unti
pressure is norma before using your
dishwasher.
Air gap is c ogged • C ean air gap.
Improper rack oading •Make sure arge dishware does not b ock the
detergent dispenser or the wash arms.
•G asses and dishes must face the spray arms.
Spots and filming on • Use Jet Dry®or Cascade Crystal Clear®rinse
glasses and flatware agents to remove spots and prevent new fi m
bui dup.
•Make sure water temperature is at east 120°F.
•Load dishwasher as shown in the Loading
P ace Settings section.
•Make sure detergent is fresh.
•If water is extreme y hard, a softener may
be required.
Cloudiness on glassware Combination of soft water •This is ca ed etching and is permanent.
and too much detergent To prevent this from happening, use ess
detergent if you have soft water. Wash
g assware in the shortest cyc e that wi get
it c ean. See page 10.
Water temperature •Lower the water heater temperature.
entering the dishwasher
exceeds 150°F (66°C)
Black or gray marks on A uminum utensi s have •Remove marks with a mi d, abrasive
dishes rubbed against dishes c eaner.
Extreme y hard water
Low in et water temperature
Over oading the dishwasher
Improper oading
O d or damp powder
detergent
Rinse agent dispenser empty
Too itt e detergent
Before You Ca For Service
Dishwasher

18
Questions?
Use this
roblem
solver
PROBLEM POSSIBLE CAUSE WHA O DO
Yellow or brown film Tea or coffee stains •Remove the stain by hand, using a so ution
on inside surfaces of 1/2 cup b each and 3 cups warm water.
CAU ION: Before c eaning
interior, wait at east 20 minutes after a
cyc e for the heating e ement to coo
down. Fai ure to do so can resu t in burns.
An overa ye ow or brown •A specia fi ter in the water supp y ine is
fi m can be caused by iron the on y way to correct this prob em.
deposits in water Contact your GE dea er or a water softener
company
White film on inside Hard water minera s •GE recommends Jet-Dry®or Cascade
surfaces Crysta C ear®to he p prevent hard water
minera deposits from forming.
•Run dishwasher with citric acid to remove
minera deposits. Citric acid (Part number:
WD35X151) can be ordered through GE
Parts. See the Consumer Services page
for ordering information.
CAU ION: Before c eaning
interior, wait at east 20 minutes after a cyc e
for the heating e ement to coo down. Fai ure
to do so can resu t in burns.
Dishes don’t dry Low in et water •Se ect HEATED DRY.
temperature •Make sure in et water temperature is at east
120°F (49°C) (see Using the Dishwasher section).
•Se ect ADDED HEAT.
•Use a onger cyc e, such as Antibacteria .
Rinse agent dispenser is •Check and refi the rinse agent dispenser.
empty
Dishwasher won’t run Door not atched •Make sure door is fu y c osed and atched.
Wa switch •Check for a wa switch that the dishwasher
(some insta ations) is in might be connected to. A wa switch is
the “off” position required by e ectrica codes in some
oca ities. Turn the switch “on” if it is “off.”
Fuse is b own, or the •Rep ace fuse or reset circuit breaker. Remove
circuit breaker tripped any other app iances from the circuit.
Dishwasher contro •Turn off power at the circuit breaker
is inoperative for 30 seconds, then reset power.
Steam This is norma •Warm moisture comes through the vent
on the bottom of the door during drying
and when water is being pumped out.
Before You Ca For Service
Dishwasher

19
Before You Ca For Service
Dishwasher
Questions?
Use this
roblem
solver
PROBLEM POSSIBLE CAUSE WHA O DO
Sanitized light does not The door was opened and •Do not interrupt the cyc e any time during
illuminate at the end of the cyc e was interrupted or after main wash.
the cycle (Anti-Bacteria during or after the main
cycle only) wash portion
Low in et water •Raise the water heater temperature to
temperature at east 120°F (49°C).
Interior lights not Door was open for more •Latch the door and reopen.
working than 15 minutes
Bu bs are burned out •Ca for service to rep ace bu bs.
End-of-cycle indicator Dishwasher has not •Open the door and check the status
light does not illuminate comp eted cyc e indicator ights on contro pane to
determine if cyc e is comp ete.
Beeps every 30 seconds Door was opened •C ose the door to comp ete the cyc e.
during the cyc e
S AR /RESE light blinks START/RESET pad was •Dishwasher wi pump out for approximate y
pressed during the cyc e 70 seconds and b inking ight wi turn off.
Power fai ure during •Dishwasher wi pump out for approximate y
the cyc e 70 seconds and b inking ight wi turn off.
Dishwasher wi automatica y restart using
NORMAL WASH and HEATED DRY.

20
Consumer Services
Dishwasher
With the purchase of your new Monogram appliance, receive
the assurance that if you ever need information or assistance
from E, we’ll be there. All you have to do is call—toll- free!
E Answer
Center
®
In the USA:
800.626.2000
Whatever your question about any Monogram major app iance, GE Answer Center®information
service is avai ab e to he p. Your ca —and your question—wi be answered prompt y and
courteous y. And you can ca any time.
OR
Visit our Website at: monogram.com
In Canada, call 1.888.880.3030.
Monogram
Preferred Service
In the USA:
800.444.1845
In Canada:
1.888.880.3030
A GE consumer service professiona wi provide expert repair service, schedu ed at a time that’s
convenient for you. Many GE Consumer Service company-operated ocations offer you service
today or tomorrow, or at your convenience (8:00 a.m. to 8:00 p.m. weekdays, 9:00 a.m. to 4:00
p.m. Saturdays). Our factory-trained technicians know your app iance inside and out—so most
repairs can be hand ed in just one visit.
Service Contracts
In the USA:
800.626.2224
In Canada:
1.888.880.3030
You can have the secure fee ing that GE Consumer Service wi sti be there after your warranty
expires. Purchase a GE contract whi e your warranty is sti in effect and you’ receive a substantia
discount. With a mu tip e-year contract, you’re assured of future service at today’s prices.
Parts and
Accessories
In the USA:
800.626.2002
In Canada:
1.888.880.3030
Individuals qualified to service their own appliances can have parts or accessories sent direct y
to their home. The GE parts system provides access to over 47,000 parts…and a GE Genuine
Renewa Parts are fu y warranted.
User maintenance instructions contained in this manual cover procedures intended to be
performed by any user. Other servicing generally should be referred to qualified service
personnel. Caution must be exercised, since improper servicing may cause unsafe operation.
For Customers
With Special
Needs…
In the USA:
800.626.2000
GE offers Brai e contro s for a variety of GE app iances, and a brochure
to assist in p anning a barrier-free kitchen for persons with imited mobi ity.
Consumers with impaired hearing or speech who have access to a
TDD or a conventiona te etypewriter may ca 800.TDD.GEAC
(800.833.4322) to request information or service.
monogram.com
This manual suits for next models
15
Table of contents
Languages:
Other GE Dishwasher manuals

GE
GE Profile PDW8900 Series User manual

GE
GE Triton XL PDW7300 series User manual

GE
GE GLD5604V Manual

GE
GE PDWF600RBB - Full Console Dishwasher Manual

GE
GE Nautilus GSD4000J User manual

GE
GE PROFILE GLD6900 User manual

GE
GE GLC4400R User manual

GE
GE GDF510PxJ Series How to use

GE
GE GSM1800FBB Manual

GE
GE Profile PDW8200 Series How to use