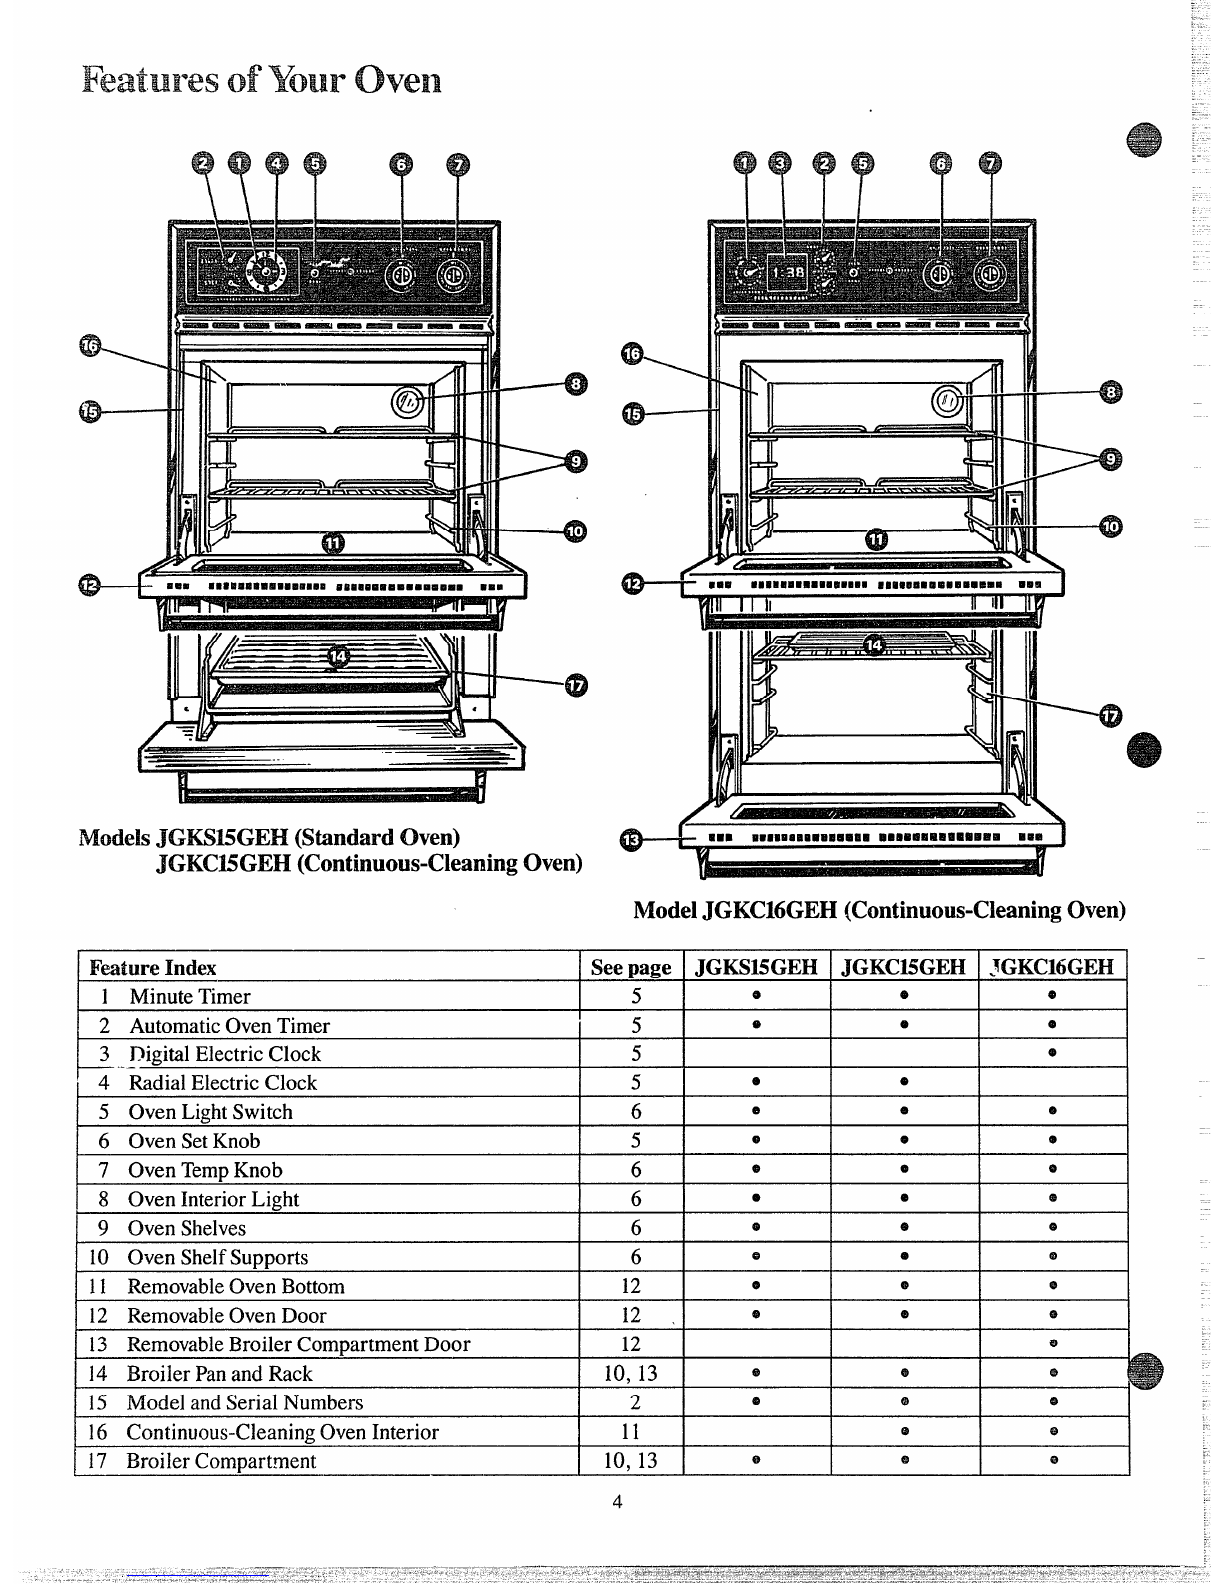
GE JGKC15GEH Installation instructions

I
UseandCareof
gasmodels
Features p4
Usingtheoven p6
Specialcareof
continuous-cleaningoven pll
Questions?
UsetheProblemSolver p15
YourDirectLimetoG(7< ($+’C:~ &~L’ . .
“.- . . .. .
;
‘--,,“
TheGEAmwverG-W-I-77 L/’T:L-2-,,2--/’

S+dy Insmlctims ..........2-3
Featuresof!bur CNen .........4
AutomaticC&en-mm,
C2Gckml. MinuteT’hm2r.. ...5
using Jbw chum , . . . ., ... , ..,6
Baking .....“. . . . . . . ........7
Baking‘chart . . ●. . +. . ........8
R(mthlg, c%art ..............9
Eln-ding,CYM3rt. . . . . . . . . . . . =.m
special Gu%d
Cmthmws-(%aring Oven. . .H
~M=emdcleaning , , . . . . . . .II-13
CleaningChart . . . . . . . . . . .. ..14
ProblemSolver..............15
Iflbu NeedService..........15
“V&irrmty. . .. ... ... .13ackCover
TiiJmOF%all range
CCmtr’ck
Nycmsmellgas:
1.open
2. touch+dectrical
switches’
3. anyopen
fhm?
4. call your
gas
*non$tWmelectricswitches
onorCM
because sparks may
ignite the gas.
FOR
Keep the
area dew’ and freemm-%1
and (mK?r
and
It isintendedtohelpyouoperate
andmaintainyournewoven
properly.
Keepithandyforanswerstoyour
questions.
Ifyoudon’tunderstandsomething
or needmorehelp.write(include
yourphonenumber):
ConsumerAffairs
GeneralElectricCompany
AppliancePark
Louisville,KY40225
downthe modd
andserialnumbers.
You’llfindthemonalabellocated
insidetheovenontheleftside.See
page4.
Thesenumbersarealsoonthe
ConsumerProductOwnership
RegistrationCardthatcamewith
youroven.
&@
-9
=&*.
13cfbresendinginthiscard.
pleasewritethesenumbershere:
Model Number
Serial Number
Usethesenumbersinany
correspondenceor service
callsconcerningyouroven.
Hyoureceived
adamagedCW2n...
Immediatelycontactthedealer(or
builder)thatsoldyoutheoven.
Sawtime
Beforeyourequest
service;..
ChecktheProblemSolveron
page15.It listsminorcausesof
operatingproblemsthatyoucan
correctyourself.
all this
epit getyourmm have
the showyouthe
oftheovengascut-off
valveandhowtoshutit offif
necessary.
~Haveyourwen and
bya
installer,inaccordancewiththe
InstallationInstructions.Any
adjustmentandserviceshouldbe
performedonlybyqualifiedgas
rangeinstallersorservice
technicians.
~Plugyourovenintoa120-vW
wtkt only.Donot
removetheroundgroundingprong
fromthepkg. Ifi aoubtaboutthe
groundingofthehomeelectrical
system,itisyourpersonal
2
responsibilityandobligationto
haveanungroundedoutletreplaced
withaproperly-groundedthree-
prongoutletinaccordancewith
theNationalElectricalCode.Do
notuseanextensioncordwith
thisappliance.
@Besureallpacking
areremovedhm theovenbefore
operatingit, topreventfireor
smokedamageshouldthepacking
materialignite.
@~~~~~~
your own iscorrectly
adjustedbyaservice
or forthe
typeofgas or ill) on .%+
@
=—w=
~hid it ktobe~$d. &is (%n “-
beconvertedfromonetypetothe
other.SeekstdlationInstructions.

~DWt leavechiklrenaloneor
unattendedwherean ovenis
hotor in operation.Theycould
beseriouslyburned.
~Donftallo~t’anyonetoclimb,
standor hangonthedooror
broihwcompartment.They
coulddamagetheovenandeven
[ipitovercausing severepersonal
injury.
QCAUTION: DO NOT STORE
ITEMSOF INTERESTTO
CHILDRENINCABINETS
ABOVEANOVEN-CHILDREN
CLIMBINGONTHEOVENTO
REACHITEMSCOULDBE
SERIOUSLYINJURED.
~Neverwearloosefittingor
hanginggarmentswhileusing
theappliance.Flammable
materialcouldbeimitedif
u
roughtincontactwithflameor
hotovensurfacesandmaycause
severeburns.
~Neveruseyourappliancefor
warmingor heatingthe room.
Prolongeduseoftheovenwithout
adequateventilationcanbe
hazardous.
~Donotusewaterongrease
fires.Neverpickupaflaming
pan.Turnoffburner,thensmother
flamingpanbycoveringpan
completelywithwellfittinglid,
cookiesheetorflattray.Flaming
greaseoutsideapancanbeput
outbycoveringwithbakingsoda
or,ifavailable,amulti-pu~ose
drychemicalorfoam.
e~nots~o~fl~~na~~e matefi~
inanoven.
~Donotletcookinggreaseor
otherflammablematerials
accumulateinor neartheoven.
@Donotuseovenforastorage
area.
@Standawayfromtheoven
whenopeningovendoor.The
hotair or steamwhichescapes
cancauseburnstohands,face
and/oreyes.
@Keepovenfreefromgrease
buildup.
@Placeovenshelvesindesired
positionwhileoveniscool.
~Pullingoutshelftotheshelf
stopisaconveniencein lifting
heavyfinds.Itisalsoaprecaution
againstburns fromtouching
hotsurfacesofthedooror oven
walls.
@Don’tusealuminumfoil
anywhereintheovenexceptas
describedinthisbook.Misuse
couldresultinafirehazardor
damagetotherange.
~Don’theatunopenedfood
containersintheoven.Pressure
couldbuildupandthecontainer
couldburst causingan injury.
@Useonlyglasscookwarethat
isrecommendedforuseingas
oven.
~Whenusing cookingor
roastingbagsinoven,follow
themanufacturer’sdirections.
~Whencookingpork?follow
ourdirectionsexactlyandalways
cookthemeattoatleast170°F,-
Thisassuresthat,intheremote
possibilitythattrichinamaybe
presentinthemeat,itwillbe
killedandmeatwillbesafetoeat.
3
(continued)
@Ahvaysremovebroilerpan
frombroilercompartmentas
soonasyoufinishbroiling.
Greaseleftinthepancancatch
fireifovenisusedwithout
removingthegreasefromthe
broilerpan.
~Whenbroiling9ifmeatistoo
ciosetothe flame,thefat may
ignite.Trimexcessfattoprevent
excessiveflare-ups.
@Makesurebroilerpanisin
placecorrectlytoreducethe ‘.---
possibilityofgreasefires. —
@If youshouldfiaveagrease
fireinthebroilerpan, turnoff
oven,andkeepdrawerclosedto
containfireuntilitburnsout.
@Cleanonlypartslistedinthis
UseandCareBook.
@Keepovencleanand freeof
accumulationsofgreaseor
spilloverswhichmayignite.
If YouNeedService
eReacl
66TheProblemSolver>5
onpage15ofthisbook.
@Don’tattempttorepair or
replaceanypart ofyouroven
unlessit isspecifically
recommendedinthisbook.All
otherservicingshouldbereferred
toaqualifiedtechnician.
SAVE
!s!%--
i%sa%c:.

—
.@
I
-\
Models JGKM5GEH (Standard Oven)
JGKC15GEH(Continuous-CleaningOven)
ModelJGKC16GEH(Continuom+CleaningOven)
JGKC15GEH
IJGKC16GEHIFeatureIndex
1MinuteTimer
2AutomaticOvenTimer
3DigitalElectricClock
Seepage JGKS15GEH
5eII
5IoI I
5III
~4RadialElectricClock 5Ie e
1
I5ovenblhts~itch 6Ie e IeI
I6OvenSetKnob 5IeI I
I7OvenTemPKnob 6IeI I
e e
1 8 OvenInteriorLight I6Ie
9OvenShelves 6e
10 OvenShelfSupports 6e
11 RemovableOvenBottom ——
12 e
12 RemovableOvenDoor 12 ,@
I13 RemovableBroilerCompartmentDoor I12 I
I14 BroilerPanandRack I10,13 I
15 ModelandSerialNumbers 2e
16 Continuous-CleaningOvenInterior 11
117 BroilerCom~artrnent 10.13 e
4

7%6
clock
JGK!315GEH&JGKC15GEH
TheMinuteTimerhasbeen
combinedwiththeovenclock.Use
ittotimeallyourprecisecooking
operations.You’llrecognizeitas
thepointerwhichisdifferentin
colorthantheclockhands.
Minutesaremarkedupto60onthe
centerringoftheclock.
Toset the Minute Timer, turnthe
knobtotheleft,withoutpushingin,
untilthepointerreachesthenumber
fminutesyouwanttotime.
ModelJGKC16GEH
~lleMinute
Timeristhelargedial
totheleftofthedigitalclock.Use
ittotimeallyourprecisecooking
operations.Thisdialalsochanges
thedigitalclock.
Toset the Minute Timer, turn
thecenterknobclockwise,without
pushingin, untilthepointerreaches
thenumberofminutesyouwantto
time(upto60).
Atthe end ofthe time set on
,ither Minute Minder. abuzzer
unds to tell youtime is up. Turn
thekmob,withoutpushingin,until
thepointerreachesOFF andthe
buzzerstops.
JGKS15GEH&JGKC15GEH
TosettheClock,pushtheknobin
andturntheclockhandstothe
righttothecorrecttime.Thenlet
theknoboutandcontinueturning
toOFF.
Model JGKC16GEH
Toset the CIock,pushinthecenter
knoboftheMinuteTimerandturn
theknobineitherdirectiontoset
thedigitalclocknumeralstothe
correcttime.(Aftersettingthe
clock,lettheknoboutandturnthe
MinuteTimerpointertoOFF.)
AutomaticOwenTimer
ThisTimerwillautomaticallystart
andstopyourovenforyou.Here’s
whatyoudo:
LMakesurebothyourovenclock
andtheSTARTdialshowthecorrect
timeofday.WhentheSTARTknob
ispushedinandturned,itwill“pop”
intoplacewhenthetimeshownon
theovenclockisreached.
2. SettheSTARTcontrol.Pushin
andturntheSTARTknobtothe
timeyouwanttheoventoturnitself
on. (Ifyouwantitto startcooking
immediately,donotsettheStart
time.)
3. SettheSl_OPcontrol.Pushin
andturntheSTOPknobtothetime
youwanttheoventoturnitselfoff.
Note:Theremustbeat leastahalf
hourdifferencebetweentheSTART
andSTOPdialsfortheautomatic
controlto work.
4. SettheOVENSETknobto
AUTOOVEN.
5. SettheOVENTEMPknobto
thedesiredcookingtemperature.
Nowtheovenwillturnitselfon
immediatelyor atalaterStarttime
thatyouset,cookatthetemperature
youselectedandturnitselfoffat
theStoptimeyouselected.
Aftertakingfoodoutoftheoven,
be suretoturntheOVENTEMP
controltooffandtheOVENSET
knobtotheMAN.OVENsetting
whereitshouldbekeptfornormal
ovenuse.
5

TheOWII and broilerburners on
)“ourovenare lightedby electric
ignitioneliminating the need for
scmdingpilotlightswithconwmtly
burningflame.
C,4LJTION:DON~ MAKEANY
ATTEMPT’TOOPERATETHE
ELECTRICIGNITIONOVEN
DURINGANELECTRICAL
POWERFAILURE.Resumption
ofelectricalpowerwhenOVEN
TEMPcontrolisinanyposition
otherthanOFFwiHresultin
automaticignitionoftheoven
burnerandcouldcausesevere
burnsif, atthetime,youwere
attemptingtolighttheburnerwith
amatch.
lb LighttheOvenBurner
TurntheOVENTEMPknobtothe
desiredtemperature.Theburner
shouldignitewithin60seconds.
MAdjustment
Anairadjustmentshutterforthe
ovenburnerregulatestheflowofair
totheflame.
screwandrotatetheshut~ertoallow
moreorlessairintotheburnertube
asneeded.
Whenthe right amountofair
flowsintotheburner,theflame
shouldbesteady,withapproximately
l-inchblueconesandshouldnot
extendoutoverthebaffleedges.
&%O~~UsingYourOwn
1. Lookatthecontrol.Besureyou
understandhowtosetitproperly.
2. Checktheinsideoftheoven.
Lookattheshelves.Practice
removingandreplacingthem
whiletheoveniscool.
3. Readtheinformationandtips
onthefollowingpages.
4. Keepthisbookhandywhereyou
canrefertoit—especiallyduring
thefirstfewweeksofgetting
acquaintedwithyouroven.
(hen ‘lkmperatureControl
TheOVENTEMPc&trol is
locatedontheupperovencontrol
panel.
Removethebroilerpanandrack,
pullthebroilercompartmentdrawer
outtothe“stop”positionorremove
thebroilercompartmentshelfand
you’llfindtheshutteragainstthe
backwallofthecompartment.
Simplyturntheknobtothedesired
cookingtemperatures,whichare
markedin25°F.incrementsonthe
dial.Itwillnormallytake30to60
secondsbeforetheflamecomeson.
Aftertheovenreachestheselected
temperature,theovenburnercycles
offcompletely,thenon withafull
flametokeeptheoventemperature
controlled.
‘h adjust the f’low.ofair to the
burner,loosenthePhillipshead
6
oval shelves
Theshelvesaredesignedwith
stop-lockssowhenplacedcorrectly
on_theshelfsupports,theywillst~p
beforecomingcompletelyoutof
theovenandwillnottiltwhenyou
areremovingfoodor placingfood
onthem.
Whenplacingcookwareonashelf,
pulltheshelfouttothe “stop”
position.Placethecookwareon
theshelf,thenslidetheshelfback
intotheoven.Thiswilleliminate
reachingintothehotoven.
Toremovetheshelvesfromtheove
forcleaning,pullouttostop
position,liftupon frontandpull
themout.
ShelfPositions
Theovenhasfourshelfsupports—
A(bottom),B,CandD(top).Shelf
positionsforcookingaresuggested
onBakingandRoastingpages.
Ove~ Light
Useswitchoncontrolpaneltoturn
lightonandoff.

Eikm’tosetMm”Range
h“
1. Positiontheshelfor shelvesin
theoven.
2. Close ovendoor,turnOVEN
I“EMPknobtodesiredtemperature
andpreheatovenforabout10
minutesif preheatingis necessary.
3. Place foodinovenon centerof
shelf.Allowatleastan inchbetween
edgeofbakewareandovenwallor
adjacentutensils.
If cooking on two shelvesatthe
sametime,placeshelvesabout4
inchesapartandstaggerfoodon
them.
4.Checkfoodfordonenessat
minimumtimeonrecipe.Cook
longerifnecessary.Switchoff
heatandremovefood.
reheating is important when using
temperaturesbelow225”F.and
whenbakingfoodssuchasbiscuits,
cookies,cakesandotherpastries.
Preheatingis notnecessarywhen
roastingor forlong-timecooking
ofwholemeals.
Mostbakingisdoneonthesecond
shelfposition(B)fromthebottom.
Whenbakingthreeor fouritems,
,l~c~Wushelvespositionedonthe
secondandfourthsetsofsupports
(B& D)frombottomofoven.
Bakeangelfoodcakesonfirstshelf
position(A)frombottomofoven.
BakingTips
@Followatestedrecipeand
measuretheingredientscarefully.
Ifyouareusingapackagemix,
followlabeldirections.
~If moistureisnoticeableonthe
frontoftheovenorontheoven
windowwhenfirstturningonthe
oven,leavetheovendoorajarfora
fewminutesor untiltheovenis
warm.
eDonotopentheovendoorduring
abakingoperation—heatwillbe
lostandthebakingtimemightneed
tobeextended.Thiscouldcause
poorbakingresults.
~Donotdisturbtheheatcirculation
intheovenwiththeuseofaluminum
foil.If foilisused,placeasmall
sheetofit, about10by 12inchesat
themost,onalowershelfseveral
inchesbelowthefood.Do not
placefoilontheovenbottom.
CommonBaking Problems
andPossibleSolutions
Pm
Burning around edges
~Oventoofill; avoidovercrowding.
@Edgesofcrusttoothin.
@Incorrectbakingtemperature.
Bottom crust soggy and unbaked
@
Allowcrustand/orfillingtocool
sufficientlybeforefillingpieshell.
~Fillingmaybetoothinorjuicy.
~Fillingallowedtostandinpie
shellbeforebaking.(Fillpieshells
andbakeimmediately.)
~Ingredientsandpropermeasuring
affectthequalityofthecrust.Usea
testedrecipeandgoodtechnique.
Makesuretherearenotinyholes
ortearsinabottomcrust.“Patching”
apiecrustcouldcausesoaking.
Pie filling runs over
~Topandbottomcrustnotwell
sealedtogether.
@Edgesofpiecrustnotbuiltup
highenough.
@Toomuchfilling.
~Checksizeofpieplate.
Pastry is tough; crust not flaky
@TOO
muchhandling.
@Fattoosoftor cutintoofine.
Rolldoughlightlyandhandleas
littleaspossible.”
7
CAKES
Cakerises higheron one side
@
Batterspreadunevenlyinpan.
@Ovenshelvesnotlevel.
@Usingwarpedpans.
@Incorrectpansize.
Cakescracking on top
~Checkoventemperature.
~Battertoothick,followrecipe
orexactpackagedirections.
~Checkforpropershelfposition.
~Checkpansizecalledforinwipe.
~Impropermixingofcake.
Cakefalls
~Toomuchshortening,sugaror
liquid.
eCheckleaveningagent,baking
powderor bakingsodatoassure
freshness.Makeahabittonote
expirationdatesofpackaged
ingredients.
eCakenotbakedlongenoughor at
correcttemperature.
~Ifaddingoiltoacakemix,make
certaintheoilisthetypeand
amountspecified.
Crustis hard
eChecktemperature.
gCheckshelfposition.
Cake has soggy layeror streaks
at bottom
UI
Underminingingredients.
gShorteningtoosoftforproper
creaming.
gToomuchliquid.
Cooms &Imxmm
Doughy center; heavycrust on
surface
~Checktemperature.
@Checkshelfposition.
eFollowbakinginstructions
carefi.dlyasgiveninreliablerecipe
or onconveniencefoodpackage.
~Flatcookiesheetswillgivemore
evenbakingresults.Don’tovercrowd
foodson abakingsheet.
8Conveniencefoodsusedbeyond
theirexpirationdate.
Browning more noticeable on
one side
~Ovendoornotclosedproperly,
checkgasketsea!.
gCheckshelfposition.

LAluminumpansconductheatquickly.Formost 2. D.trkor non-shinyfinishes,alsoglassandpyroceram,
conventionalbaking,light,shinyfinishesgivebestresults gcwrallyabsorbheatwhichmayresultindry,crisp
becausetheyhelppreventover-browninginthetimeit crusts.Reduceovenheat25°F.iflightercrustsare
takesforheattocookthecenterareas.Werecommend desired.Preheatcastironforbakingsomefoodsforrapid
dull(satin-finish)bottomsurfacesofpansforcakepans browningwhenfoodisadded.
-and pie plates tobesurethoseareasbrowncompletely.
Shelf Oven Time,
Food Cookware Positions Temperatures Minutes Comments
Bread
Biscuits(Win. thick) Shiny CookieSheet B, C400°-4750 15.20 Canned, refrigeratedbiscuitstake 2to4
minuteslesstime.
Coffeecake Shiny Metal Pan with B, A350°-4000 20-30
satin-finish bottom
Corn bread or muffins Cast Iron or Glass Pan B400°-4500 20-40 Preheat cast iron pan forcrisp crust.
Gingerbread Shiny Metal Panwith B350° 45-55
satin-finish bottom
Muffins Shiny Metal Muffin Pans A, B400°-4250 ~()-3(3 Decreaseabout 5minutesfor muffin mix.
Popovers Deep Glass or Cast Iron Cups B375° 45-60 Or bake at450”F.for 25 minutes, then at
350”F.for 10to 15minutes.
Quick loafbread Metal or Glass Loaf Pans B350°-3750 45-60 Dark metal or glassgivesdeepest
Yeastbread (2 loaves) Metal or Glass Loaf Pans A, B375°-4250 45-60 browning.
Plain rolls Shiny Oblongor Muffin Pans A, B375°-4250 10-25 For thin rolls, ShelfBmaybe used.
Sweet rolls Shiny Oblongor Muffin Pans B, A350°-3750 20-30 For thin rolls, ShelfBmaybe used.
Cakes
(withoutshortening)
Angelfood Aluminum“llbe Pan A325°-3750 30-55 Twopiece pan is convenient.
Jelly roll Metal Jelly Roll Pan B375°-4000 10-15 Line pan with waxedpaper.
Sponge Metal or Ceramic Pan A325°-3500 45-60
Cakes
Bundtcakes Metal or Ceramic Pan A, B325°-3500 45-65
Cupcakes Shiny Metal Muffin Pans B350°-3750 20-25 Paper liners produce more moist crusts.
Fruit cakes Metal or Glass Loaf or A, B275°-3000 2-4 hrs. Use 300”F.and Shelf Bfor small or
Tube Pan individualcakes.
Layer Shiny Metal Panwith B350°-3750 20-35
satin-finish bottom
Layer,chocolate Shiny Metal Pan with B350°-3750 25-30
satin-finish bottom
Loaf Metal or Glass Loaf Pans B350° 40-60
cookies
%ownies Metal or Glass Pans B,C325°-3500 25-35 Bar cookies from mix use same time.
3rop Cookie Sheet B,C350°-4000 10-20 Use Shelf Candincrease temperature
25 to 50”F.for more browning.
refrigerator Cookie Sheet B, C400”-425° 6-12
lolled or sliced Cookie Sheet B, C375°-4000 7-12
Fruits,
OtherDesserts
3akedapples Glass or Metal Pans A, B, C350°-4000 30-60
hstard Glass Custard Cups or B300°-3500 30-60 Reducetemperatureto 300”F.for large
Casserole (set inpan of hot water) custard.
Puddings, rice Glass Custard Cups or B325° 50-90 Cook bread or rice puddingwith custard
andcustard Casserole base 80 to 90 minutes.
Pies
Frozen Foil Pan on Cookie Sheet A400°-4250 45-70 Large pies use400”F.and increase time.
Meringue Spread tocrust edges B, A325°-3500 15-25 Toquickly brownmeringue use 400°F. for
8to 10minutes.
One crust Glass or Satin-finish Metal A, B400°-4250 45-60 Custard fillingsrequire lowertemperature,
Twocrust Glass or Satin-finish Metal B400°-4250 40-60 longer time.
Pastry shell Glass or Satin-finish Metal B450° 12-15
Miscellaneous
Bakedpotatoes Set on OvenShelf A, B, C325°-4000 60-90 Increase time for largeamount or size.
Scallopeddishes Glass or Metal A, B, C325°-3750 30-60
Souffles Glass B300°-3500 30-75
8

oastins is ~~~~in~ by dry heat.
~endmmeat or poultry can be
roasteduncoveredinyour oven.
Roastingtemperatures, which
shouldbe lowand steady,keep
spatteringto aminimum. When
roasting,it is notnecessary to sear,
baste,cover, or add water to your
Step2:Checkweightofroast.
Placemeatfat-side-uporpoultry
breast-side-uponroastingrackina
shallowpan. Themeltingfatwill
bastethemeat. Selectapanas
closetothesizeofmeataspossible.
(Broilerpanwithrackisagood
panforthis.)
Step ~: Most meatscontinue to
cook slightlywhile standingafter
being removed fromthe oven. For
rare or medium internal doneness,
if meat is to stand 10to 20 minutes
while making gravy or foreasier
carving, you maywish to remove
meat from ovenjust beforeit is
meat. Roastingis easy,just f~llow -
Step3:TurnOVENTEMPcontrol done.If nostandingisplanned,
thesesteps: todesiredtemperature.Checkthe cookmeattosuggested
StepLPositionovenshelfat RoastingChafifortemperatures
secondfrombottomposition(B)for andapproximatecookingtimes.
smallsize roast (3to-5lbs.)andat
bottomposition(A)forlarger
roasts.
Roastingchart
temperature.
FrozenRoasts
Frozenroastsofbeef,pork,
lamb,etc., canbestartedwithout
thawing,butallow10to25minutes
perpoundadditionaltime(10
minutesperpoundforroastsunder
5pounds,moretimeforlarger
roasts).
Thawmostfrozenpoultrybefore
roastingto ensureevendoneness.
Somecommercialfrozenpoultry
canbecookedsuccessfullywithout
thawing.Followdirectionsgiven
onpacker’slabel.
Oven ApproximateRoastingTime Internal
Type Temperature Doneness inMinutesperPound Temperature‘F
hfeat 3to5-lbs. 6to8-lbs.
Tendercuts; rib, highquality 325° Rare: 24-30 18-22 130°-1400
sirlointip, rump or topround* Medium: 30-35 22-25 150°-1600
WellDone: 35-45 28-33 17~0-1850
Lamblegor bone-in shoulder* 325° Rare: 21-25 20-23 130°-1400
Medium: 25-30 24-28 150°-1600
WellDone: 30-35 28-33 170°-1850
\’ealshnulcler,leg or loin* 325° WellDone: 35-45 30-40 170°-1800
PctK1oin,rib or shoulder* 325° WellDone: 35-45 30-40 170°-180”
Ham, pre-cooked 325° ToWarm: 10minutes per lb. (any weight) 125°-1300
Under10lbs. 10to15-lbs.
Ham, raw 325° Well Done: 20-30 17-20 160°
*Forboneless rolled roasts over6-inches
thick, add5to 10minutesper lb. totimes
gi~enabove.
Poultry 3to5-lbs. Over5Ibs.
Chickenor Duck 325° WellDone: 35-40 30-35 185°-1900
Chickenpieces 375” Well Done: 35-40 185°-1900
10to15-lbs. Over15lbs. Inthigh:
Turkey 325° WellDone: 20-25 15-20 185°-1900
—
9
——-.

Tips
~Broilingisusuallydonewithoven @Use tongs toturn meat over-
Elroilingiscookingibodbydirect
h~:~tf~~i~~ ab~v~thef~(>d.Your
rangehasaconvenientcompartment
belowthe ovenforbroiling. Italso
hasaspeciallydesigned broiler pan
and rack that allowdripping fatto
drain awayfrom the foodsand be
keptawayfrom the high heatof
thegas tlame.
Distancefrom the heat source may
bechangedbypositioningthebroiler
pan and rack on one of three shelf
positionsinthebroilercompartment—
.4 (bottomofbroiler compartment),
B(middle)and C(top).
piercing n~eatlosesjuices.
~Steaksand chops shouldbeat
andbroilerdoorsclosed. I-lowcvm.
ifyoulikeyour steaksvery rare
insideand charred on the outside,
leavethe ovendoor slightlyajar. least 1inch thick-forbest broiling
results. Pan broilthinner ones.
IstSide
Time,
Uinutes
!ndSide
Time,
Uinutes
Quantity
imdlor
Thickness Broil
Position Comments
Food
Bacon c
c
31/2 Arrange in single layer.
%-lb. (aboutS
thin slices)
l-lb. (4patties)
!4to %-in. ~hick Space evenly.Up to 8patties
take about same time.
GroundBeef
WellDorm
BeefSteaks
Rare
Medium
WellDone
Rare
Medium
WellDone
HowtoBroil
LIf meat has fator gristle near the
edge, cut vertical slashes throughit
about2inchesapart,butdon’tcut
intomeat.Werecommendthatyou
trimMtopreventexcessivesmoking,
leavingalayeraboutl/8-inchthick.
2. Removebroilerpanandrack
frombroilercompartmentand
placefoodonrack.
3. Pulloutbroilerdrawerorbroiler
shelfandpositionbroilerpanin
compartment.Placingfoodcloserto
flameincreasesexteriorbrowningof
food,butalsoincreasesspattering
andthepossibilityoffatsandmeat
juicesigniting.
4. Closebroilerdoorand,formost
foods,turnOVENTEMPknobto
BROIL.Exceptionsare chicken
andhamwhicharebroiledata
~ol.vel”
settingin order to cook food
throughbefore overbrowningit.
5. Turn most foodsonce during
cooking;(theexceptionisthinfillets
of fish; oil one side, place that side
downonbroilerrackandcookwithout
turning until done). Time foodsfor
aboutone-half thetotal cooking
time, turn food, then continueto
cookto preferred doneness.
6. TurnOVENTEMPknobto
OFF.Removebroilerpanfrom
compartmentandservefood
immediately.Leavepan outside
compartmenttocool.
9-1o 7-8
7
5-6
8-9
6-7
12-14
16-18
p5-30
SteaksIcssthan 1inchcook
throughbeforebrowning.
Pan frying is rccommcndcd.
slush fat.
l-in, thick
(1-1VZIbs.)
]~z-in.thick
(2-Zi/jIbso)
A
A
A
A
A
A
9
12
13
10
15
25
A
c
c
30-35 Reducetimes about5to 10
minutesper side for cut-up
chicken. Brusheach side with
meltedbutter. Broil with skin
sidedown first and broil with
door closed.
Chicken(450°) 1whole
(2 [()2\fi-lbs.),
split lengthwise
BakeryProducts
Bread(Toast)or
Toasterpastries
English Muffins
Space evenly.Place English
muffins cut-side-upand brush
with butter ifdesired.
2-4 slices
1pkg. (2)
2-split
2-3
3-4
13-16
‘/2-1
BDo not
turn
over.
5
Cut throughbackof shell,spread
open. Brush with melted butter
beforeand after half time.
Lobstertails
(6to 8-oz. each) 2-4
l-lb. fillets %to
1~-in.thick
l-in. thick
c5Handle and turn very carefully.
Brush with lemon butter before
andduring cooking if desired.
Preheat broiler to increase
browning.
Incteasetimes5to 10minutes
per side for Ifi-in. thick or
homecured.
Fish
Hamslices(450°
Precooked 8B8
4-5
10-12 Slash fat.
Porkchops
WellDone
Lambchops
Medium
WellDone
Medium
WellDone
Wieners,
similar precooked
sausages,
bratwurst
2(%in.)
2(1-in,thick),
about 1lb.
A
A10
13
Slash fat.2(1 inch)
about 10-12oz.
2(1%inch),
about 1lb.
B
B
B
B
8
10
10
17
4-7
10
4-6
12-14
If desired, split sausages inhalf
lengthwiseinto5to 6-inchpieces.
1-2l-lb. pkg. (10) c6
10

eProper cm and cleaning are
imp-ortantso youroven ~%’illgive
}Youefficient and satisfactory
service. Followthese directions
carefully in caring for itto help
assuresafeandproper maintenance.
BE SURE ELECTRIC POWER
IS OFF BEFORE CLEANING
ANY PARTOF WI-R OVEN.
SpecialCareof
cwlthNmus-ckmling
(hen Interior
ModelsJGKCk5,JGKC16
Ymr ovenhasaContinuous-
Cleaning oventhat cleans itself
while cooking. Theinsideofthe
oven—top,sides,andback—is
finishedwithaspecialcoating
which cannot be cleaned in the
usualmanner withsoap, detergents,
commercial ovencleaners, coarse
abrasivepads or coarse brushes.
eir use and/or the use ofoven
prayswill cause permanent
damage.
The special coating is aporous
ceramic material whichisdarkin
colorandfeels slightlyroughtothe
touch.Ifmagnified,thesurface
wouldappearaspeaks,valleys,and
sub-surface“tunnels:’Thisrough
finishtendstopreventgrease
spattersfromforminglittlebeads
ordropletswhichrundownthe
sidewallsofahard-surfaceoven
linerleavingunsightlystreaksthat
requirehandcleaning.Instead,
whenspatterhitstheporoustinish
itisdispersedandispartially
absorbed.Thisspreadingaction
increasestheexposureofoven
soiltoheatedair,andmakesit
somewhatlessnoticeable.
Soilmaynot disappearcompletely
andatsome timeafterextended
usage,stains may appearwhich
cannotberemoved.
@p i
%:es ecia coatingworksbeston
%+mallamountsofspatter.Itdoes
notwork well with larger spills,
especially sugars, eggor dairy
mixtures.
Thespecialcoatingisnotused
onovenshelves.
Shelvesshouldbe
cleanedoufsidefheoven,toavoid
damagetothespecialcoating.
mclew] the
Continuous-CleaningOven:
1. Letovenpartscoolbefore
handling. It is recommendedthat
rubber glovesbeworn when
cleaningovenparts manually.
2. Removeshelvesandcookware.
3. Soilvisibilitymaybe reducedby
operatingtheovenat450”F.Close
thedoorandturnOVENTEMP
knobto450°F.Timeforatleast4
hours.Repeatedcyclesmaybe
necessarybeforeimprovementin
appearanceisapparent.
REMEMBER:DURINGTHE
OPERATIONOFTHEOVEN,THE
DOOR,WINDOWANDOTHER
SURFACESWILLGETHOTENOUGH
‘IOCAUSEBURNS.DONCYI’
TOUCH.
LETTHEOVENCOOLBEFORE
REPLACINGSHELVES.
4. Ifaspilloverorheavysoiling
occursontheporoussurface,as
soonaspracticalaftertheovenhas
cooled,removeasmuchofthesoil
aspossibleusingasmallamountof
waterandastiffbristlenylon
brush.Whenusingwater,useit
sparinglyandchangeitfrequently,
keepingitascleanaspossible,and
besuretoblotitupwithpaper
towels,cloths,or sponges.Donot
ruborscrubwithpapertowels,
clothsor sponges,sincetheywill
leaveunsightlylintontheoven
finish.Ifwaterleavesawhitering
onthefinishasitdries,applywater
againandblotitwithacleansponge,
startingattheedgeoftheringand
workingtowardthecenter,
Donot use soap, detergent,
commercialovencleaner,silicone
ovensprays7coarsesteelpadsor
coarsebrushesontheporous
surface.Theseproductswillspot,
clog,andmartheporoussurface
andreduceitsabilitytowork.
Do notscrape the poroussurface
withaknifeorspatula—theycould
permanentlydamagethefinish,
PorcelainOvenInterior
Withpropercare,theporcelain
enamelwallswillretaintheirgood-
-lookingfinishformanyyears.
Soapandwaterwillnormally
dothejob.Heavyspatteringor
spilloversmayrequirecleaning
withamildabrasivecleanser.Soapy,
wetpadsmayalsobeused.Donot
allowfd spillswithahighsugaror
acidcontent(suchasmilk,tomatoes,
sauerkraut,ffuitjuicesorpiefilling’)
toremainonthesurface.Theymay
causeadullspotevenaftercleaning.
Householdammoniamaymakethe
cleaningjobeasier.Place1/2cupina
shallowglassorpotterycontainerin
acoldovenovernight.Theammonia
timeswillhelploosentheburned-on
greaseandfood.
Ifnecessary,youmayuseacaustic
cleaner.Followthepackage
directions.
Cautionsaboutusing
spray-onovencleaners:
Becarefilwheretheovencleaner
issprayed.
eD. notsprayontheelectrical
controlsandswitches(onmodelsso
equipped)becauseitcouldcausea
shortcircuitandresultinsparking
orfire.
~Donot~lowafilmfromthe
cleanertobuilduponthetemperature
sensingbulb—itcouldcausethe
oventoheatimproperly.(Thebulb
islocatedatthetopoftheoven.)
Carefullywipethebulbcleanafter
eachovencleaning,beingcareful
nottomovethebulbasachangein
itspositioncouldaffecthowthe
ovenbakes.
~DO not sprayanyovencleaner
ontheovendoor,handlesorany
exteriorsurfaceoftheoven,wood
orpaintedsurfaces.Thecleanercan
damagethesesurfaces.
(contittuedne.vtpage)
Fi3sz ”–
-–A-
S#mi&
-=
___
~11
-
—
11

Door
Theovendoorisremovableto
makecleaningtheoveneasier.
Toremovethedoor,openitafew
inchestothespecialstopposition
thatwillholdthedooropen.Grasp
firmlyoneachsideandliftthedoor
straightupandoffthehinges.(Due
tothelargeamountofinsulation
andtheconstructionof thedoor,it
isheavy.)
Note:Becarefulnotto placehands
betweenthe springhingeandthe
ovendoorframe.Thehingecould
snapbackandpinchfingers.
Washwithhot, soapywater.For
stubbornspots,useasolutionof
ammoniaandwater.Do not
immersethedoorin water.
lb replace the door,positionslots
inbottomofdooroverthehinges
thatarein the “out”position.Then
lowerthedoorslowlyandevenly
overbothhingesatthesametime.
Ifhingessnapbackagainsttheoven
frame,pullthembackout.
ModelJGKC16GEHalsohasa
removablebroilercompartment
doorwhichmayberemovedfor
cleaning.
0“431
Theraisedsectionoftneoven
bottomisremovableforcleaning.
Takeitoutoftheovenandyoucar
ap@~ effectivecleanerstoclean
upexcessivespilloversor remove
baked-onsoil—cleanersthatshou
neverbeusednearthespecial
porousceramicoveninterior.
Toremovethe ovenbottom:
LRemovetheovenshelves.
d
2. Liftupwardonshelfsupports.
Swingbottomofsupportstoward
centerofovenandremove.
3. Removethetwoknurledhold-
downscrewsateachfrontcorner.
If screwsaretootighttoremoveby
hand,useascrewdriver.
4. Placeyourfingersintheslotsin
5. Pullthebottomforwardandout
oftheoven,keepingtherearofthe
ovenbottomglidingonthebottom
ofthelowestshelfglide.Thiskeeps
itfromcatchingontheburnerigniter
shield.Toreplacethebottom,just
reversethisprocedure,makingsure
theIWOtabsontherearoftheoven
bottomgointotheslotsattherear.
Theovenbottomhasaporcelain
enamelfinish.Tomakecleaning
easier,protecttheovenbottom
fromexcessivespillovers.Thisis
particularlyimportantwhenbaking
afruitpieor otherfoodswithhigh
acidcontent.Hotfruitfillingsor
foodsthatareacidincontentsuch
asmilk,tomatoor sauerkraut,and
sauceswithvinegaror lemon
juice,maycausepittinganddamage
totheporcelainenamelsurface.
Toprotecttheovenbottomsurface,
placeapieceofaluminumfoil
slightlylargerthanthebakingdish
or smallcookiesheetonalower
rackor underthebakingdishto
catchanyboilovers.It shouldnot
completelycovertherackasthis
wouldcauseunevenheatinthe
oven.Aluminumfoilshouldnot
beplacedon theovenbottom.
If aspilloverdoesoccuronthe
ovenbottom,allowtheoventocool
first.Youcancleanthebottomwith
soapandwater,amildabrasive
cleanser,soap-filledabrasivepads,
orcausticovencleanerfollowing
manufacturer’sdirections.
Whenapplyingovencleaner,
becarefulnottogetitonthe
countertop,floor,continuous-
cleaningovenpartsor anyother
surface.
Note:Porcelainovendoorlinerand
ovenbottommaybecleanedwitha
commercialovencleaner.They
mustberemovedandcleanedaway
fromtheoventopreventdamageto
thecontinuous-cleaningovenliner.
thebottomandli~tupthefront
edgeoftheov~i~ bottomuntilitis @
clearoftheovenfrontframe. .-
12 .
.

O\Tenshelvesmaybecleanedwith
iimildabrasive cleanser following
manufacturer’sdirections. After
cleaning.rinsethesheiveswithclean
waterand dry with adry cloth. To
removeheavy,burned-onsoil, soapy
metalpads maybeusedfollowing
manufacturer’sdirections.After
scrubbing,washwithsoapywater,
rinseanddry.
Bmik Pall 6%Rack
Afterbroiling,removethebroiler
rackandcarefullypouroffthe
grease.Washandrinsethepan
andrackin hot,soapywater.
Iffoodhasburnedon, sprinkle
thebroilerrackwhilehotwith
detergentandcoverwithwetpaper
towelsor adishcloth.Thatway,
burned-onfoodswillsoakloose
whilethemealisbeingserved.
notstoreasoiledbroilerpan
rackintheovenor broiler
compartment.
Beforereplacing any light bulb,
disconnectelectric power to the
rangeat the main fuse or circuit
breakerpaneL Letthebulbcool
completelybeforeremovingit. Do
nottouchahotbulb with adamp
cloth—thebulb will break.
Thelightbulbinyourmm is
locatedinthe upperrightcorner.
Reachinandunscrewitaftertaking
precautionsmentionedabove.
Replaceitwithahigh-temperature
appliancebulbofthesamewattage.
the
oven
Thetemperaturecontrolinyour
newovenhasbeencarefullyadjusted
toprovideaccuratetemperatures.
However,ifthisovenhasreplaced
oneyouhaveusedforseveralyears,
youmaynoticeadifferenceinthe
degreeofbrowningor thelength
oftimerequiredwhenusingyour
favoriterecipes.Oventemperature
controlshaveatendencyto “drift”
overaperiodofyearsandsince
thisdriftisverygradual,itisnot
readilynoticed.Therefore,you
mayhavebecomeaccustomedto
yourpreviousovenwhichmay
haveprovidedahigherorlower
temperaturethanyouselected.
Beforeattemptingtohavethe
temperatureofyournewoven
changed,besureyouhavefollowed
thebakingtimeandtemperatureof
therecipecarefully.Then,after
youhaveusedtheovenafewtimes
andyoufeeltheovenis toohot
or toocool,thereisasimple
adjustmentyoucanmakeyourself
ontheOVENTEMPknob.
Pull the knob offthe control shaft
and look at the back side. There is
adisc in the center of the knob skirt
withaseriesof notcheson the inner
edgenextto the knob shafi. One of
these notches ispositioned overa
pointeron the sideofthe knobshall.
Note position of
pointer to notches
before adjustment
,#@-~ ~
(
a
@
w! ,’
,4$0h
‘\,‘~R?&
\. -. Loosen onlv the
Notewhichno[chthepointeris
locatedin. Tomakeanadjustment,
carefullyloosen(approximately
oneturn),butdonotcompletely
removethetwoscrewsthatholdthe
skirttotheknob.Holdtheknobin
onehandandwiththeotherhand
carefullytilttheskirtuntilthenotch
inthediscclearsthepointeronthe
knobshaft. .
Toraisetheoventemperature,turn
thedial inthedirectionof the
arrowfor“Raise~’Tolowerthe
temperature,turnthedial inthe
directionofarrowfor“Lower~’
Eachnotchwillchangetheoven
temperatureapproximately25”F.
Wesuggestthatyoumakethe
adjustmentonenotchfromthe
originalsettingandcheckoven
performancebeforemakingany
additionaladjustments.
Aftertheadjustmentismade,make
surethepointerontheknobshaft
isalignedwiththenotchinthedisc.
Pressskirtandknobtogetherand
retightenscrewssotheyaresnug,
butbecarefulnottoovertighten.
Re-installknobonrangeand
checkperformance.Note:After
anadjustmenthasbeenmadethe
“Off” and“Broil”positionswill
notlineupwiththeindicatormark
onthecontrolpanelasthey
previouslydid.Thiscondition
isnormalandwillnotcreate
aproblem.
.locking scr~ws
(continuednetipage)
13

.—.——-... ..
PART
outsideGlassFinish
I&let@,including
SideTrimsand
TrimStrips
porcelainEnamel
Finish
I%intedSurfaces
InsideOvenDoor*
OvenInterioF–
Top,SidesandBack
(ModelsJGKC15and
JGKC16)
(CAUTION: When in
USC,light bulbs can
becomewarm enoughto
break if touched with
moistcloth or towel.
Whencleaning, avoid
warmlamps with cleaning
cloths.)
OvenLiner*
OlodelJGKS15)
(CAUTION: When in
use, light bulbs can
becomewarm enoughto
break if touched with
moistcloth or towel.
Whencleaning, avoid
warmlamps with cleaning
c!othsif lamp coverk
removed.
RemovableOven
Bottom
Shelves
ifiATERL$L!!TOUSE
eSoapand W’atcr
oPaperTowel
@Dry Cicth
*Soapand Water
*Soapand Water
@Soapand Water
oSoap-Filled Scouring Pdd
~Commercial Oven Cleane
*Stiff Bristle Nylon Brush
~Soapand Water
●Soap-Filled Scouring Pad
~Commercial Oven Cleane
eSoapand Water
aSoap-Filled Scouring Pad
(Non-metallic)
●Soapand Water
0Soap-Filled Scouring Pad
@Commercial Oven Cleane
GENERAL DNUX.T1ONS
Dmin fat, cool pan irndrick sligh[ly.(Do not let soiledpm iid rack sIandinhroik?r
compartment to cool.) Sprinldcon dcwrgent. Fill [hcpxnwith warm wmcrand Sprtid
cloth or paper toweloverthe reck. Let pan and rack stand ft>rafewminutes. Wash;scour
if necessary.Rinse and dry. OPTION: The broiler punand rack mayalso be ciwtncdina
dishwasher.
Pull off knobs. Washgently but do not soak. Dry and return controls mrange makingsure
to match flat w-caon the knoband shaft.
Clean outside ofcooicd black $Iassdoor with ii glasscleaner thatdoes not contain
ammonia. Washother glass withcloth dampened insoapywater,Rinse and polish with a
dry cloth. If knobswe rcrnoved,do not allow Wa[erto run down insidethe surfaceof gloss
whilc c!eaning.
Wmh, rinse, andthen polish withadry cloth. DO NCY’fUSE steel wool, abrasives,
ammonia, acids, or commercial ovencleaners which maydamagethe finish.
Avoidcleaning powdersor harsh abrasiveswhich mayscratchthe enamel. Ifacids should
spill on the rangewhile it is hot, usc adry paper towelor cloth to wiw up right away.
When the surface has cooled, washand rinse. fir other spills, such as fatsmatterings.etc.,
washwith soap and water when cooledand then rinse. Polish with dry cloth.
Usc amild solutionof soap and water. Do not usc anyharsh abrasivesor cleaningpowders
which may scratchor mar surface,
Toclean ovcrrdoor; removebyopening afewinchesand graspingdoor at sides. Lift door
upand awayfromhinges. Clean with any and all mentioned materials. Replaceby
gmsping door atsides and liningupdoor with hinges. Push door firmly intoplace.
Cool beforecleaning.
If heavysoiling hasoccurred on theporous suryuce,removeas much ofthe soil as possible
usingasmall amountof waterand astiff bristle nylonbrush. Use water sparingly and (
changeit frequently,keepingit as c!eanas possible, and be sure to blot it up with paper
towels,cloths, or sponges.Do notruborscrubwith paper towels, cloths or sponges, since
they will leaveunsightly lint on the ovenfinish. If waterleavesawhite ring on the finishas
itdries, apply water againand blotitwith aclean sponge,starling at the edgeof the ring
and workingtowardthe center.
Forspeeialcleaninginstructions,seepageU.
Cool beforecleaning.
FOR LIGHT SOIL: Frequent wiping with mild soapand water (especiallyafter cooking
meat) will prolong the time between major cleaning. Rinse thoroughly.NOI’E: Soap left
on liner causes additional stains whenovenis reheated.
FOR HEAVYSOIL: Choose anonabrasivecleaner and followlabel instructions, using
thin layerofcleaner. Use of rubber glovesis recommended. Wipe or rub lightly on
stubborn spots. Rinse well. Wipe offany ovencleaner that gets on thermostat bulb. When
rinsing ovenafter cleaning also wipe thermostat bulb.
The ovenbottompanel can be removedfor easy cleaning (see page 12).Use the same
directions for cleaningas explainedabovefor Porcelain Enamel Finish,
Removeshelvesand clean them outsideof the ovento avoiddamagingthe specially coated
oventop, sides andback. Use anyand all mentioned materials. Rinsethoroughly to
removeall materialsafter cleaning. N~E: Some commercial ovencleaners cause
darkening and discoloration, When using for first time, test cleaner on small part of
shelf and check for discoloration beforecompletely cleaning.
*spillage of marinades, fmit juices, and basting materials containing acids may causediscoloration. Spilloversshould be blotted up immediately,with care
beingtaken not to touchany hot portion of the oven, When the surface is cool, clean and rinse.
14
-...... -....—-—.—.mm....-.—-.m--———

~f’~~ LIGHT’ EM--JES
NO-rWORK
F(3ODDOESNOT
BROIL PI?C)I?ERLY
FOODDOESNOTROAST
ORBAKEPROPERLY
IMoEmJRE H“JSIDEAND
OUTSIDEOVEN
CAUSEAND
@Plugonrangeknotcompletelyinsertedintotheoutletreceptacle.
@
Circuitbreakerinhousehasbeen~ripped~or fusehasbeimbkwvn,
=oven controlsarenotproperlyset.
@Bulbisdefective.Replace.
@Switchwhichoperatesovenlightisbroken.Cal!forservice.
@OVENTEMPknobnotsetatBROIL.BroilerwillnotoperateifCWEN
TEMPknobisturnedpastBROIL.
*Foodisbeingcookedonhotpan.
~Utensilsarenotsuitedforbroiling.
~OVENSETknobnotsetonMJ7X).(MM whenusingAutomaticOven
Timer.
~OW3NTEMPknobnotsetcorrectly.
@Shelfpositionis incorrect.CheckRoastingandBakingpages.
~Ovenshelfisnotlevel.
@Wrongcookwareisbeingused.Whenroasting,panistoosmall.
@Foiltentnotusedwhenneededto slowdownbrowningduringroasting.
=Besureovenventductis notblockedorcovered.
HJ“(IU‘needmore help...Cw, toll free:
The GE AnswerCenter”
consumer service
Toob[ainservice,seeyourwarranty
onthebackpageofthisbook.
1~~-re proudofour service and
wiint you to bepleased, If for some
reasonyou are nothappy with the
service you receive, here are three
stepsto followfor further help.
FIRST’,contact the people who
servicedyour appliance. Explain
whyyouarenot pleased. In most FIIVALLY,if yourproblemisstill
cases,thiswillsolvetheproblem. notresolved,write:
NEXT,ifyouarestillnotpleased, MajorAppliance
writeallthedetails—including ConsumerActionPanel
yourphonenumber—to: 20 NorthWackerDrive
Manager,ConsumerRelations Chicago,Illinois60606
GeneralElectric
AppliancePark
Louisville,Kentucky40225
15

-%8AI+ g---- ~-”
t-.’ ,,“ .“
>L—
b.==
~-~::- I&
,,~<.
Save proof of original purchase date such asyour sales slip or cancelied check to establish warranty period. 4~~l~.-..-
=—.
-==$?Ji!:- —
1s FULL ONE-YEAR WARRANTY This warranty is extended to the
For one year from date of original original purchaser and anysucceed-
purchase, we will provide, free of ing owner for products purchased
charge, partsand service labor in for ordinary home use in the 48
your home to repair or replace any mainland states, Hawaii and
part ofthe range that fails because Washington, D.C.In Alaska the
of amanufacturing defect. warranty is the same except that it
is LIMITED because you must pay
to ship the product to the service
shop or for the service technician’s
travel costs to your home.
All warranty.service will be provided
by our Factory Service Centers or
by our authorized Customer Care~
servicers during normal working
hours.
Look in the White or Yellow Pages
of your telephone directory for
GENERAL ELECTRIC COMPANY,
GENERAL ELECTRIC FACTORY
SERVICE, GENERAL ELECTRIC-
HOTPOINT FACTORYSERVICE or
GENERAL ELECTRIC CUSTOMER
CARE@SERVICE,
Is N(YTCOVEFED @Service trips to your home to
teach you how to use the product.
ReadyourUse andCarematerial.
If you then have any questions
about operating the product,
please contact your dealer or our
Consumer Affairs office at the
address below or call, toll-free:
The GE Answer Center@
800.626.2000
consumer information service
~Improper installation.
If you havean installation problem,
contact your dealer or installer.
Youare responsible for providing
adequate electrical, gas,exhaust-
ing and other connecting facilities.
~Replacement of house fuses
or resetting of circuit breakers.
@Failure of the product if it is
used for other than its intended
purpose or used commercially,
@Damage to product caused
by accident, fire, floods or acts
of God.
WARRANTOR IS NOT RESPON-
SIBLE FOR CONSEQUENTIAL
DAMAGES.
ilk
Some states do not allow the exclusion or limitation of incidental or consequential damages, so the above limitation or exclusion IIx-s
II~=
may not apply to you. This warranty gives you specific legal rights, and you may also have other rights which vary from state to state. ~~@
To know what your legal rights are in your state, consult your local or state consumer affairs office or your state’s Attorney General. ll&:-
,,’=——
1,,=
V#arrantOr: (N3neral El~ctric Company Ilxs=
~;
~;---
Hfurther help is needed C0nc3ernirq t~is warranty,contact: 1!:=
~!~-:
Manager-Consumer Affairs, General Electric Company, Appliance Park, Louisville, W40225 IIG—.
a;;~-<
This manual suits for next models
3
Table of contents
Other GE Oven manuals
Popular Oven manuals by other brands

APW Wyott
APW Wyott X*WAV 1422 Specifications

Hotpoint Ariston
Hotpoint Ariston FH 532 /HA operating instructions

Blanco
Blanco BOSE 617X Guide to installation

Hotpoint Ariston
Hotpoint Ariston FK 1032E C 0 X/HA operating instructions

Bosch
Bosch HBC34D553B instruction manual

Binder
Binder VDL Series Mounting instructions