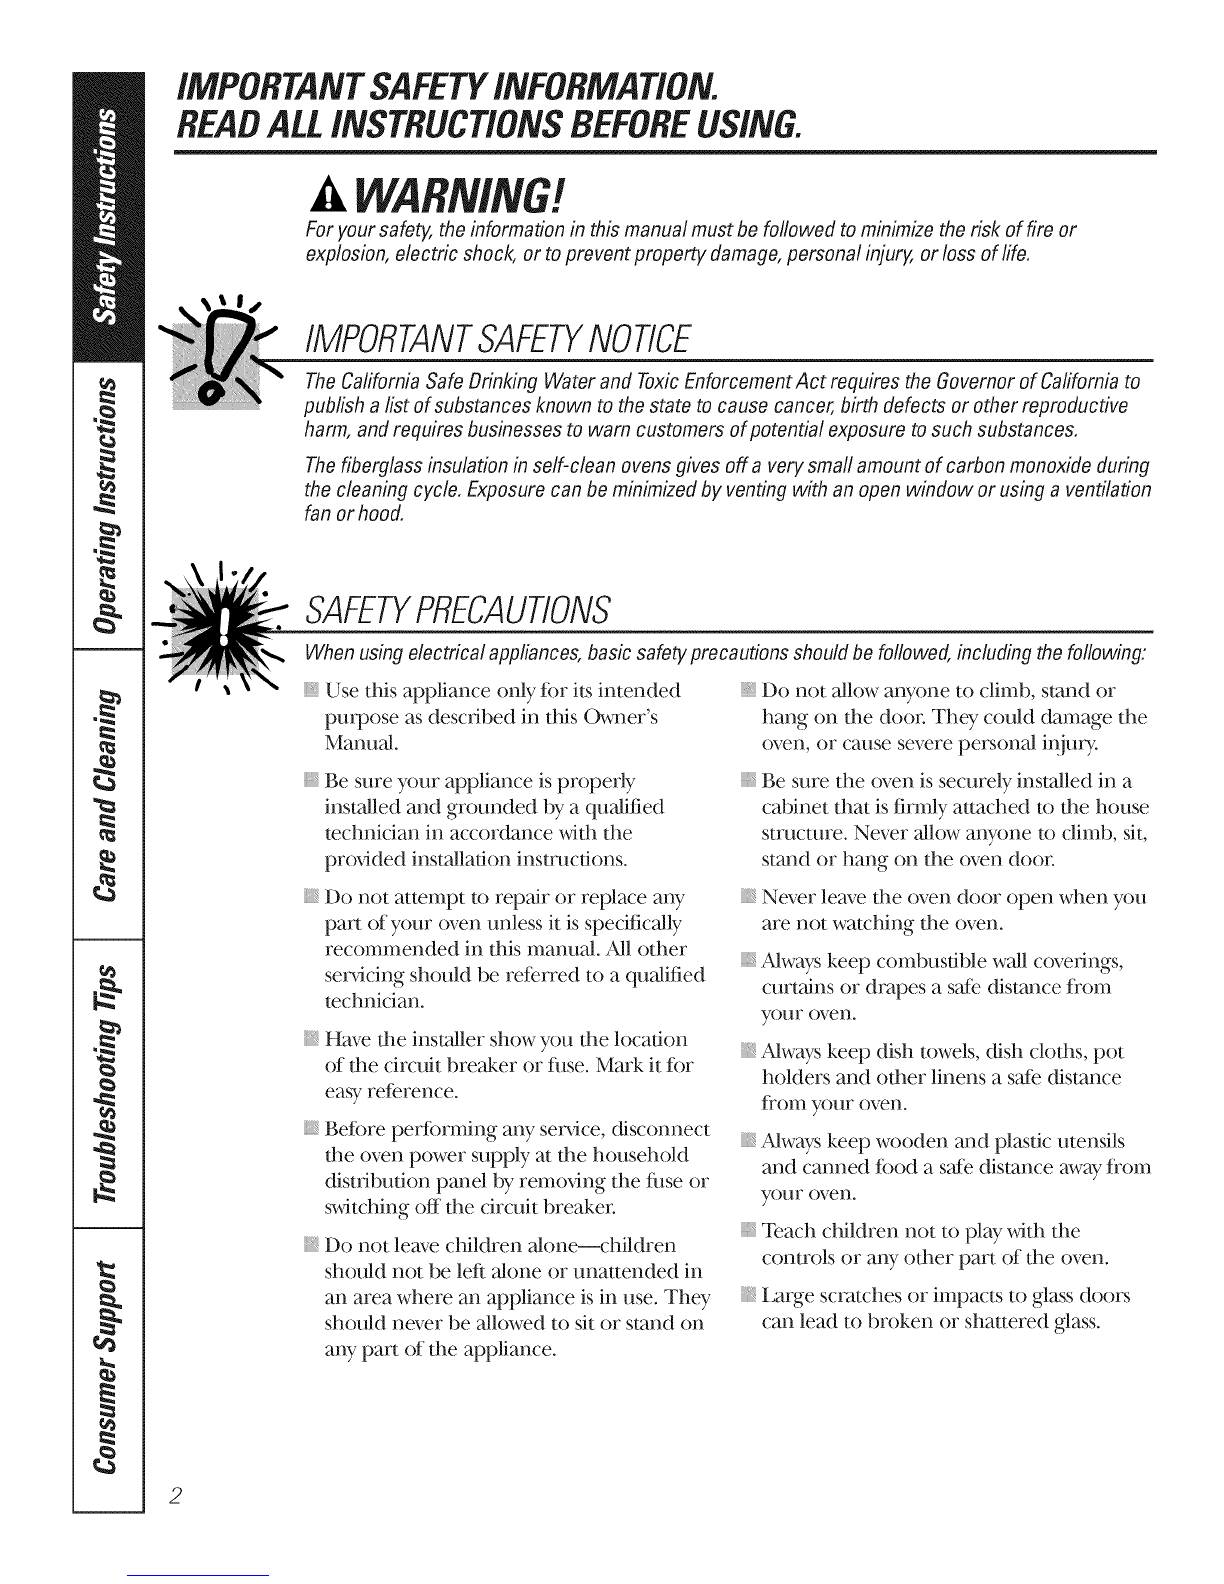
Usingthe timedbakingand mastingfeatures, somemode/sJ
Onmodelswithpress pad controlsfor bothovens,youcanusetimedbakingin oneovenwhileusingself-cleanin the other;
you canalsousetimed bakingin bothovensat thesametime.
NOTE:Foodsthatspoil easily--such asmill<,eggs,fish,stuffings,poultry andpork--should not beallowedto sit formorethan
I hourbeforeor after cooking.Roomtemperaturepromotesthegrowth of harmfulbacteria.Be surethat theovenlightis off
becauseheatfrom thebulbwill speedharmfulbacteriagrowth.
ii( :;! ; 7¸¸¸¸)
i _ [ i
ii6 ¸¸¸7¸¸¸¸¸¸¸¸8 C9/_)
Temp
(depend!wOnmodel)
2 3 4- 5
zor
®
our Nin
(dependingonmodel)
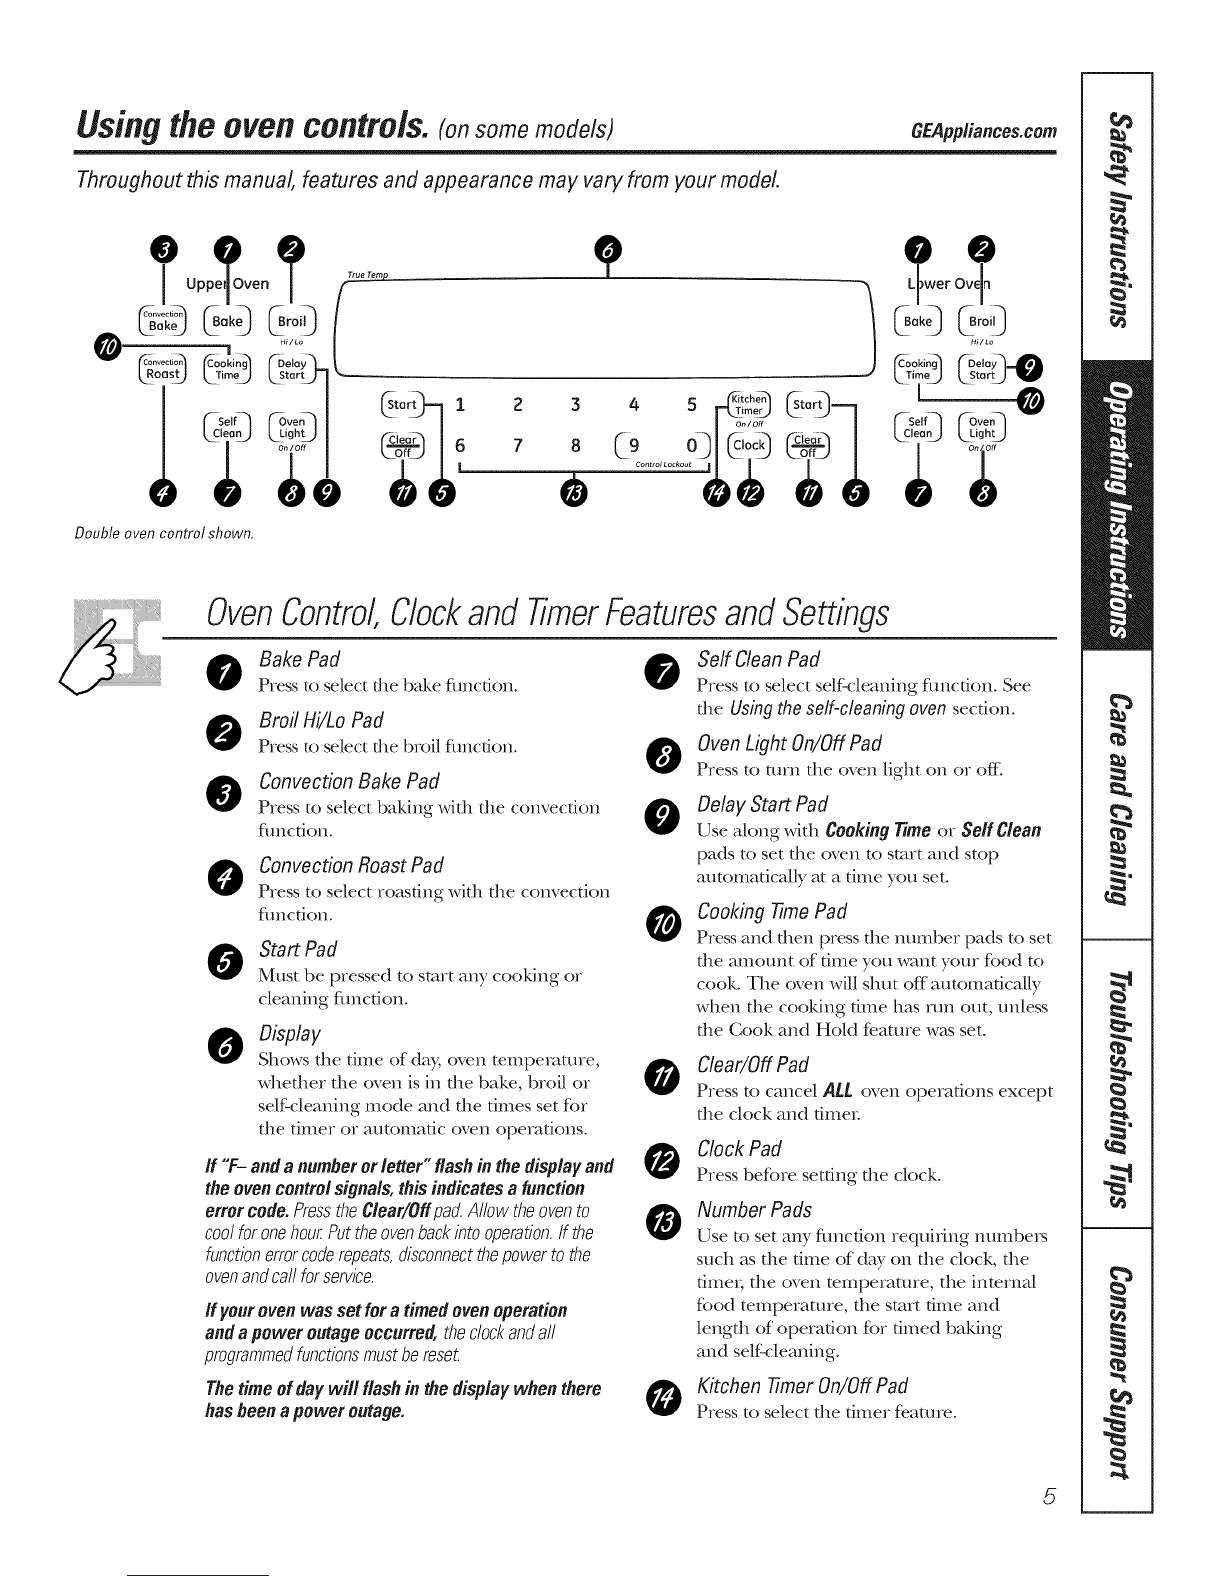
How to Set an Immediate Start and Automatic Stop
Theovenwillturnof?immediatelyandcookforaselected
lengthoftime.Attheendofthecookingtimetheover?will
turnoffautomatically
Makesure the clockshowsthe correct time
ofday.
[-_ Pressthe Bake pad.
[] On modelswith number pads, pressthem
in order to setthe desired temperature.
On medalswith Tamp+and - pads,press
them to increase or decrease the set
desiredtemperature.
_] Pressthe CookingTimepad.
NOTE:Ifyourreciperequirespreheatingyoumayneedto
addadditionaltimetothelengthofthecookingtime.
On models_ith number pads, pressthem
until the amount oftime)ou wantshowsin
the display.For example,to set 2hours and
45minutes,press2, 4and 5 in that ordeL
On modelswith Hourand Min÷and -
pads, pressthem to enter the desired
baking time.The maximumtime you
can enter in minutes is 59. Cooking dines
more than 59 minutes should be changed
to hems and ndnutes. For example, enter
90 minutes as I hem; 30 minutes.
The oven temperature and the cooking
time that you entered will be displayed.
[_ Press the Staffpad.
The displ Wshows the oven temperature that
you set and the cooking time countdown. The
diN)laystarts changing once the temperature
reaches 100°E
NOTE:Whenusbgbothovensatthesametime,the
timesshowingin thedisplaywillbeforthelastovenset
Todisplaythetimesetforthefirstovenset,pressthe
CookingTimepadforthatoven.
The oven will continue to cook for the
progqammed amount of time, then shut off
m/tomatically, unless the Cook and Hold ligature
wasset. See the Specialfeaturesofyouroven
controlsecdon.
Press the Clear/Offpad to clear the display.
i23/4- 5
or
(9
tdependingonmodel)
i234 5
6 z 8 (_9 o]
or
(depending onmodel)
Delay
i23/4- 5
or
@(9
.©Q
(dependingonmodel)
10
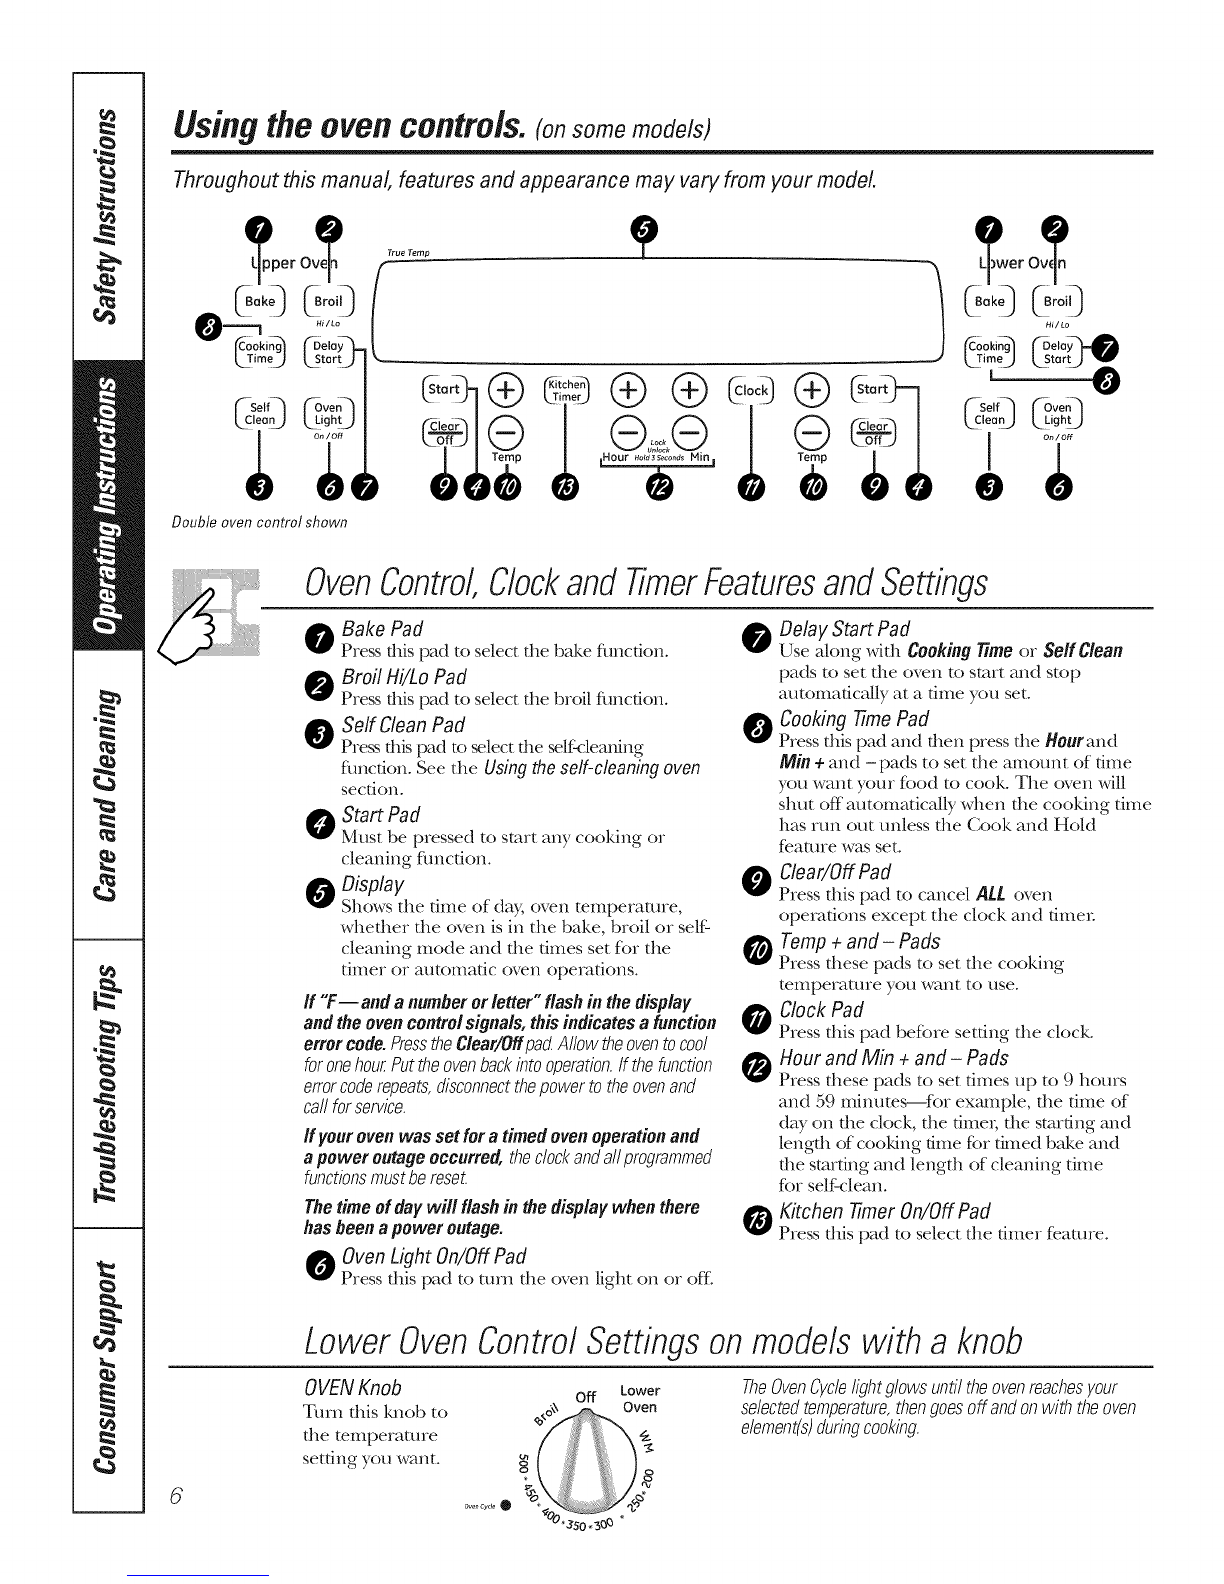
How to Set a Delayed Start and Automatic Stop
Youcansettheovencontroltodelay-starttheoven,
cookforaspecificlengthoftimeandthenturf?off
automatically
Make sure the clock shows the correct dine
ofday.
[77 Press the Bake pad.
On models with number pads, press them
in order to set the desired temperature.
On models with Temp+and - pads, press
them to increase or decrease the set
desired temperature.
[_ Press the Cooking Timepad.
NOTE:Ifyourreciperequirespreheatingyoumayneedto
addadditionaltimetothelengthofthecookingtime.
On models _ith number pads, press them
until the amount of time )ou want shows in
the display. For example, to set 2 hours and
45 minutes, press 2, 4 and 5 in that ordeL
On models with Hour and Min ÷and -
pads, press them to enter the desired
baking time. The ma_nmm time you can
enter in minutes is 59. Cooking times more
than 59 minutes should be changed to
hom_ and minutes. For example, enter
90 minutes as l hem; 30 minutes.
The oven temperature and the cooking
time that you entered will be displayed.
[_ Press the DelayStaffpad.
[_ Using the number pads (on some models)
orthe Hourand Min+or -pads (on some
medals), enter the time ofdayyouwant
the oven to turn on and stat_cooking.
[7] Pressthe Startpad.
NOTE:Anattentiontonewillsoundifyouareusingtimed
bakinganddonotpresstheStartpadafterenteringthe
bakingtemperature.
If youwouldliketo checkthe timesyou haveset,
pressthe DelayStaffpad to check the starttime
you havesetor pressthe Cooking77mepad to
checkthe length ofcookingtime youhaveset.
_'_l_enthe oventurns on at the time ofday
you haveset,the displaywillshowthe changdng
temperature (stintingat 100°F)and the cooking
time countdown.The displaystartschanging
once the temperature reaches 100°E
NOTE:Whenusingbothovensatthesametime,the
timesshowinginthedisplaywillbeforthelastovenset.
Todisplaythetimesetforthefirstovenset,pressthe
CookingTimepadforthatoven.
The oven willcontinue to cook forthe
progqammed amount of time, then shut off
m/tomatically,unlessthe Cook and Hold ligature
wasset.See the Specialfeaturesofyouroven
controlsecdon.
Pressthe Clear/Offpad to clearthe display.