GE 28203 User manual

Model 28223 Series
DECT 6.0
Multi-Handset
Speakerphone
Answering System
User’s Guide
Your new GE telephone system is EXPANDABLE
up to a total of 6 handsets (by purchase of optional
Model 28203 handset with charge cradle)

Important Information
NOTICE: This product meets the applicable Industry Canada technical
specications.
Operation is subject to the following two conditions: (1) This device may
not cause interference, and () This device must accept any interference,
including interference that may cause undesired operation of the device.
The equipment must be installed using an acceptable method of connection.
The customer should be aware that compliance with the above conditions
may not prevent degradation of service in some situations.
Repairs to certied equipment should be made by an authorized Canadian
maintenance facility designated by the supplier. Any repairs or alterations
made by the user to this equipment, or equipment malfunctions, may give
the telecommunications company cause to request the user to disconnect
the equipment.
Users should ensure for their own protection that the electrical ground
connections of the power utility, telephone lines and internal metallic water
pipe systems, if present, are connected together. This precaution may be
particularly important in rural areas.
CAUTION: Users should not attempt to make such connections themselves,
but should contact the appropriate electric inspection authority, or
electrician, as appropriate.
NOTES: This equipment may not be used on coin service provided by the
telephone company.
Interference Information
This equipment generates and uses radio frequency energy which may
interfere with residential radio and television reception if not properly
installed and used in accordance with instructions contained in this manual.
Reasonable protection against such interference is ensured, although there
is no guarantee this will not occur in a given installation. If interference is
suspected and veried by switching this equipment on and off, the user is
encouraged to try to correct the interference by one or more of the following

measures: Reorient the radio/television receiver’s antenna, relocate the
equipment with respect to the receiver, plug the equipment and receiver
into separate circuit outlets. The user may also wish to consult a qualied
radio/television technician for additional suggestions. This equipment has
been fully tested and complies with all limits for Class B computing devices
pursuant to part 15 FCC Rules and Regulations.
Telephone Network Information
Should your equipment cause trouble on your line which may harm the
telephone network, the telephone company, where practicable, may notify
you that temporary discontinuance of service may be required. Where prior
notice is not practicable and the circumstances warrant such action, the
telephone company may temporarily discontinue service immediately.
The telephone company may make changes in its communications facilities,
equipment, operations or procedures where such action is required in the
operation of its business. If these changes are expected to affect the use or
performance of your telephone equipment, the telephone company will likely
give you adequate notice to allow you to maintain uninterrupted service.
Notice must be given to the telephone company upon termination of your
telephone from your line.
REN Number
On the bottom of this equipment is a label indicating, among other
information, the Ringer Equivalence Number (REN) for the equipment.
The REN is useful in determining the number of devices you may connect
to your telephone line and still have all of these devices ring when your
telephone number is called. In most (but not all) areas, the sum of the RENs
of all devices connected to one line should not exceed 5. To be certain of the
number of devices you may connect to your line as determined by the REN,
you should contact your local telephone company.
REN Number is located on the cabinet bottom.

Hearing Aid Compatibility (HAC)
This telephone system meets FCC standards for Hearing Aid Compatibility.
Licensing
Licensed under US Patent 6,7,009.
FCC RF Radiation Exposure Statement
This equipment complies with FCC RF radiation exposure limits set forth
for an uncontrolled environment. This equipment should be installed and
operated with a minimum distance of 0 centimeters between the radiator
and your body. This transmitter must not be co-located or operated in
conjunction with any other antenna or transmitter.
For body worn operation, this phone has been tested and meets the FCC RF
exposure guidelines when used with the belt clip supplied with this product.
Use of other accessories may not ensure compliance with FCC RF exposure
guidelines.
Information for DECT Product
This telephone is compliant with the DECT 6.0 standard
which operates in the 1.9GHz to 1.9GHz frequency range.
Installation of this equipment is subject to notication and
coordination with UTAM. Any relocation of this equipment
must be coordinated through and approved by UTAM. UTAM
may be contacted at 1-800-9-886.

5
Important Information ......................2
Interference Information ..................2
Telephone Network Information ......3
REN Number ........................................3
Hearing Aid Compatibility (HAC) ......4
Licensing ..............................................4
FCC RF Radiation Exposure
Statement ......................................... 4
Information for DECT Product ..........4
Introduction .........................................7
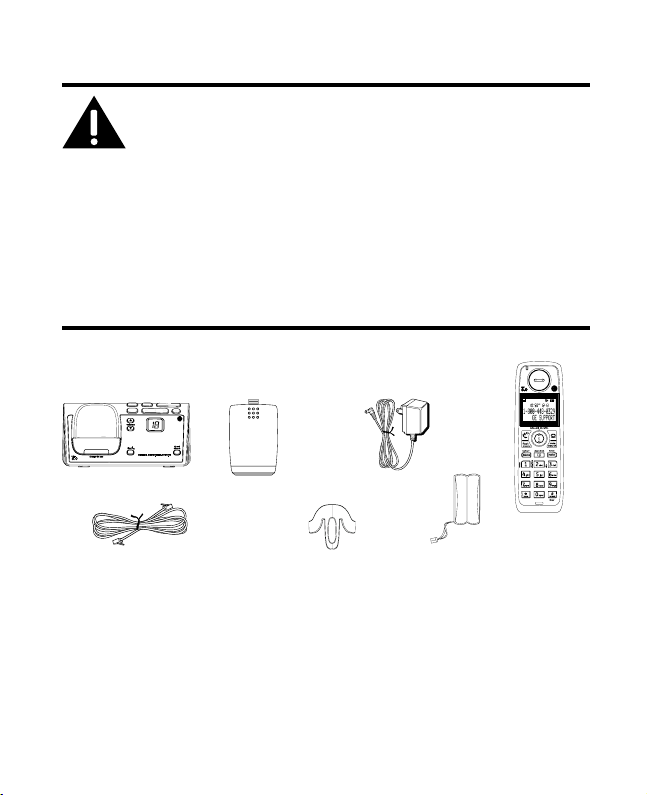
Before You Begin ................................7
Parts Checklist ..................................7
Telephone Jack Requirements ..........8
Installation ..........................................8
Digital Security System .........................8
Important Installation Guidelines.....9
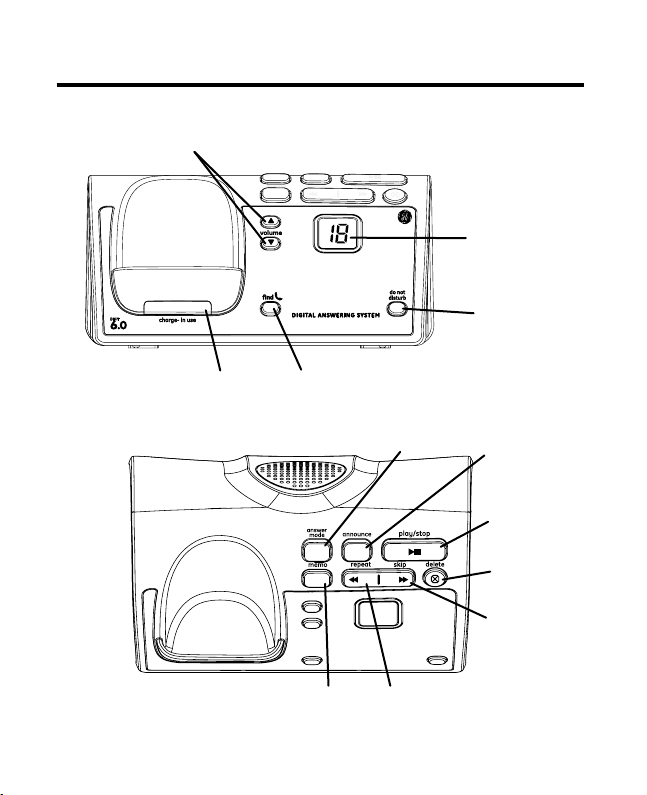
Base Layout ......................................10
Front View ................................................ 10
Top View .................................................... 10
Handset Layout .................................11
Display Icons ...........................................11
Installing the Phone .........................12
Installing the Handset Battery ........ 1
Base Station ............................................ 1
Answering System Setup .................14
Answerer ................................................... 1
Handset Access ..................................... 15
Message Alert ......................................... 16
Security Code ........................................16
Speaker Volume .................................... 17
Voice Instruction ................................... 17
Table of Contents
Recording the Outgoing
Announcement............................... 17
Reviewing and Choosing the
Announcement............................... 18
Programming the Telephone ..........19
Standby Screen ...................................... 19
Programming Functions .................... 19
Room Monitor ..................................19
Alarm Clock.............................................. 1
Initial Setup .............................................. 1
Handset Name .....................................
Date and Time ......................................
Area Code ...............................................
Tone/Pulse .............................................
Language ...............................................
Auto Talk .................................................
Registration ........................................... 5
De-Registration ................................... 6
Global De-registration ...................... 7
Sound Setup ............................................ 7
Ringer Tone ........................................... 8
Ringer Volume ...................................... 8
Key Tone ................................................. 9
Reset Setting ........................................... 9
Voicemail ................................................ 9
All Settings ............................................. 0
Telephone Operation .......................30
Visual Indicators .................................... 0
VMWI / Visual Ringer Indicator on
Handset ............................................. 1
Call Timer ..................................................
Auto Standby ..........................................

6
Ringer Volume ........................................
Flash/Call Waiting ................................
Last Number Redial .............................
Exit ...............................................................
Page ............................................................
Paging from the Base/Group
Page.....................................................
Mute ............................................................
Receiver Volume Control ...................
Do Not Disturb (D-N-D) ....................... 5
Intercom Operation
.........................35
Making an Auto Intercom Call ........ 5
Advanced Intercom Features.......... 6
Transferring External Calls to Other
Handsets .........................................38
Caller ID (CID) .....................................39
Call Waiting Caller ID .......................... 9
Receiving CID Records ........................ 9
Storing CID Records ............................. 0
Reviewing CID Records ...................... 0
Dialing a CID Number ......................... 0
Storing CID Records in Internal
Memory .............................................. 1
Deleting All CID Records ....................
Phonebook .........................................43
Review Records .....................................
Add Records ............................................
Inserting a Pause in the Dialing
Sequence ..........................................
Edit Records ............................................. 5
Delete Records ....................................... 5
Dialing a Number from Internal
Memory .............................................. 6
Answering System Operation .........46
Message Counter Indicator.............. 6
Leaving a Message/Memo ............... 7
Screening Calls from the Base ........ 7
Messages Playback ............................. 8
Memory Full ............................................. 8
Erasing Messages ................................. 8
Remote Access ..................................49
Cordless Handset .................................. 9
Screening Calls from the Handset 50
Accessing the Answering System from
Another Location ........................... 51
Memory Full ............................................. 5
Changing the Battery.......................52
Battery Safety Precautions .............. 5
Display Messages .............................53
Answering System Display
Messages ........................................55
Troubleshooting Guide ....................56
Caller ID Solutions .............................. 56
Cordless Phone Solutions ............... 56
Battery Solutions ................................ 58
Answering System Solutions ..........58
Causes of Poor Reception................59
General Product Care .......................59
Warranty ............................................60
Accessory Information.....................61
Index ....................................................62
Table of Contents

7
Handset
Telephone line cord
AC power
adaptor
Handset
battery pack
Battery
compartment
cover
Base
Belt Clip
Introduction
CAUTION: When using telephone equipment,
there are basic safety instructions that should
always be followed. Refer to the IMPORTANT
SAFETY INSTRUCTIONS provided with this product
and save them for future reference.
IMPORTANT: Because cordless phones operate on
electricity, you should have at least one phone in your
home that isn’t cordless, in case the power in your home
goes out.
Before You Begin
Parts Checklist (for 28223xx1 model)
Make sure your package includes the items shown here.
Note: If a speaker box is included in your package, it
replaces one set of a handset, belt clip, battery pack and
cover.
For Model 28223xx2 there will be ONE additional handset, charge
cradle, belt clip, battery pack and cover than shown above.

8
For Model 28223xx3 there will be TWO additional handsets, charge
cradles, belt clips, battery packs and covers than shown above.
For Model 28223xx4 there will be THREE additional handsets, charge
cradles, belt clips, battery packs and covers than shown above.
For Model 28223xx5 there will be FOUR additional handsets, charge
cradles, belt clips, battery packs and covers than shown above.
For Model 28223xx6 there will be FIVE additional handsets, charge
cradles, belt clips, battery packs and covers than shown above.
Telephone Jack Requirements
To use this phone, you need an RJ11C type
modular telephone jack, which might look like
the one pictured here, installed in your home.
If you don’t have a modular jack, call your
local phone company to nd out how to get
one installed.
Installation
Digital Security System
Your cordless phone uses a digital security system to protect against
false ringing, unauthorized access, and charges to your phone line.
INSTALLATION NOTE: Some cordless telephones operate
at frequencies that may cause or receive interference
with nearby TVs, microwave ovens, and VCRs. To minimize
or prevent such interference, the base of the cordless
telephone should not be placed near or on top of a TV,
microwave ovens, or VCR. If such interference continues,
move the cordless telephone farther away from these
appliances.
Modular
telephone line
jack
Wall plate

9
Certain other communications devices may also use the
1.9GHz DECT frequency for communication, and, if not
properly set, these devices may interfere with each
other and/or your new telephone. If you are concerned
with interference, please refer to the owner’s manual for
these devices on how to properly set channels to avoid
interference. Typical devices that may use the 1.9GHz DECT
frequency for communication include wireless audio/video
senders, wireless computer networks, multi-handset
cordless telephone systems, and some long-range cordless
telephone systems.
Important Installation Guidelines
• Avoid sources of noise and heat, such as motors, uorescent
lighting, microwave ovens, heating appliances and direct
sunlight.
• Avoid areas of excessive dust, moisture and low temperature.
• Avoid other cordless telephones or personal computers.
• Never install telephone wiring during a lightning storm.
• Never install telephone jacks in wet locations unless the jack is
specically designed for wet locations.
• Never touch non-insulated telephone wires or terminals, unless
the telephone line has been disconnected at the network
interface.
• Use caution when installing or modifying telephone lines.

10
nd
(button)
charge- in use
(indicator)
volume
5/6
(buttons)
message counter
(indicator)
do not disturb
(button)
memo
(button)
play/stop
(button)
skip
(button)
repeat
(button)
announce
(button)
delete
(button)
answer mode
(button)
Base Layout
Front View
Top View

11
Handset Layout
display
ash/
answerer
(button)
CALLER ID-VOL 5 or 6
(caller id/volume up or
down button)
TALK/SPEAKER
(button)
*tone
(button)
#pause/ringer
(button)
END
(button)
mute/menu OK
(button)
delete/int/conf
(delete/intercom/
conference)
play/stop
(button)
skip
(button)
Voice Mail Waiting
Indicator (VMWI)/
Visual Ringer
review
(button)
microphone
format/redial
(button)
Headphone jack
Display Icons
Signal strength Alarm ON
Speakerphone New Call
Message Battery
Voicemail
AM
AM
SMS
PM
PM
Ringer OFF/DND ON
phonebook
(button)

1
Installing the Phone
Installing the Handset Battery
NOTE: You must connect the handset battery before use.
CAUTION: To reduce the risk of re or personal
injury, use only the Thomson Inc. approved Nickel-
metal Hydride battery (Ni-MH) battery model
5-2840, that is compatible with this unit.
1. Locate battery and battery door which are packaged together
inside a plastic bag and are separate from the handset.
. Locate the battery compartment on the back of the handset.
. Plug the battery pack cord into the jack inside the compartment.
NOTE: To ensure proper battery installation, the connector
is keyed and can be inserted only one way.
. Insert the battery pack.
5. Close the battery compartment by pushing the door up until it
snaps into place.

1
. Plug one end of the telephone line cord into the TEL LINE jack on
the back of the base and the other end into a modular jack.
. Plug the AC power converter into the electrical outlet and the DC
connector into the jack on the back of the base.
. Place the handset in the base cradle. The charge/in use indicator
turns on, verifying the battery is charging.
5. Allow the phone to charge for 16 hours prior to rst use. If
you don’t properly charge the phone, battery performance is
compromised.
CAUTION: To reduce risk of personal injury, re, or
damage use only the 5-2812 power adaptor listed
in the user’s guide. This power adaptor is intended
to be correctly orientated in a vertical or oor
mount position.
Base Station
1. Choose an area near an electrical outlet and a telephone wall
jack (RJ11C), and place your cordless telephone on a level surface,
such as a desktop or tabletop, or you may mount it on the wall.

1
Answering System Setup
This section shows you how to set up your answering system to
receive incoming calls. Before you begin the set up process, you must
turn on the answering system.
1. Answering system has modes RECORDS MSGS MODE,
ANNOUNCE ONLY MODE and OFF.
. Press the answer mode button to switch to RECORDS MSGS
MODE, ANNOUNCE MODE and OFF.
NOTE: The answering system displays “- -” when it is off.
Answerer
On the Handset:
In the Answerer Menu, there are four programmable submenus:
Answerer mode, Rings to Answer, Message Alert and Security Code.
1. Make sure your phone is OFF (not in TALK mode).
. Press the mute/menu OK button to go to the main menu.
. Press caller ID-volume (5 or 6) button to scroll to ANSWERER.
. Press mute/menu OK button to enter the submenu.
Answer Mode
From the Answerer Menu:
1. Press the caller ID-volume (5 or 6) button to scroll to the
answerer mode sub-menu.
. Press mute/menu OK button to enter the menu. The screen
displays RECORD MSGS.
. Use the caller ID-volume (5 or 6) button to scroll to your
selection. The default setting is RECORD MSGS.
. Press the mute/menu OK button to conrm. You will hear a
conrmation tone and the screen displays the new setting.

15
Handset Access
From the Answerer Menu:
1. Press the caller ID-volume (5 or 6) button to scroll to the
Answerer Mode sub-menu.
. Press mute/menu OK button to enter the menu. The screen
displays ANSWER MODE RECORD MSGS.
. Use the caller ID-volume (5 or 6) button to scroll to your
selection. The default setting is RECORD MSGS.
. Press the mute/menu OK button to conrm. You will hear a
conrmation tone and the new setting shows in the display.
Rings to Answer
This feature lets you select the number of times you want the phone
to ring before the answering system answers a call.
From the Answerer Menu:
1. Press the caller ID-volume (5 or 6) button to scroll to the RING
TO ANSWER sub-menu.
. Press mute/menu OK button to enter the menu. The screen
displays RING TO ANSWER 3 4 5 6 TS.
. Use the caller ID-volume (5 or 6) button to scroll to your
selection. The default setting is 5.
. Press the mute/menu OK button to conrm. You will hear a
conrmation tone and the screen displays the new setting.
NOTE: If you select Toll Saver (TS) the unit answers after the
3rd ring if there are NEW messages, OR the unit answers
after the 5th ring if there are NO new messages. This allows
user to access their answerer from another location and
then hang up after 4 rings to save long distance charges.

16
Message Alert
This feature sets your answering system to give an alert tone every
10 seconds when there are new messages.
From the Answerer Menu:
1. Press the caller ID-volume (5 or 6) button to scroll to the
MESSAGE ALERT sub-menu.
. Press mute/menu OK button to enter the menu. The screen
displays ON OFF.
. Use the caller ID-volume (5 or 6) button to scroll to ON or OFF.
The default setting is OFF.
. Press the mute/menu OK button to conrm. You will hear a
conrmation tone and the screen displays the new setting.
Security Code
You can access the answering system from a tone dialing telephone
in another (remote) location. The security code is required for remote
access, and it prevents unauthorized access to your answering
system.
From the Answerer Menu:
1. Press the caller ID-volume (5 or 6) button to scroll to the
SECURITY CODE sub-menu.
. Press mute/menu OK button to enter the menu. The screen
displays SECURITY CODE 1 2 3.
. Use the touch-tone pad to enter your new -digit security code.
The default setting is 123.
. Press the mute/menu OK button to conrm. You will hear a
conrmation tone and the screen displays the new security code.
NOTE: If you make a mistake, use the delete/int/conf button
to delete the security code and begin again.

17
Speaker Volume
Use the volume (5 or 6) buttons to adjust speaker volume on the
base to a comfortable level. L1 is the minimum speaker volume and
L8 is the maximum.
Voice Instruction
If you need additional assistance, press the
repeat
button in standby
mode and follow the voice instructions.
Recording the Outgoing Announcement
For best results when recording, you should be about nine inches
from the microphone, and eliminate as much background noise as
possible.
You may record an outgoing announcement for the current
answerer mode or choose the default for your current outgoing
announcement.
1. Make sure the answering system is ON.
. Press and hold the announce button until the speaker announces
“RECORD ANNOUNCEMENT FOR RECORD MESSAGES MODE
AFTER THE TONE “.
. Begin speaking after you hear the beep.
. Release the button when you nish your announcement.
NOTE: If you choose not to record an outgoing
announcement, a default announcement plays instead.
To return to the default announcement after you have
recorded your own outgoing announcement, press and
hold the announce button and release it when you hear the
beep. Or, press the delete button while the announcement
is reviewing.

18
Sample Outgoing Announcement
Hi, this is (use your name here), I can’t answer the phone right now,
so please leave your name, number and a brief message after the
tone, and I’ll get back to you. Thanks.
NOTE: The maximum recording time for the outgoing
announcement is 2 minutes.
NOTE: While recording message for ANNOUNCE ONLY
mode, remember to advise your caller that they will not be
able to leave a message as the ANNOUNCE ONLY mode will
not record incoming messages.
Reviewing and Choosing the Announcement
Press and release the announce button to review and select this one
as your outgoing announcement.
NOTE: Press the play/stop button at any time to stop
playing the announcement.

19
Programming the Telephone
Standby Screen
The handset displays the handset number and user name.
Programming Functions
The system uses a menu structure to give you access to all of the
built-in features. You may program the following items in main menu:
Phone book, Room monitor, Alarm clock, Answerer, Initial Setup,
Sound Setup, Reset Settings.
Room Monitor (applicable only with additional handsets)
1. Make sure your phone is OFF (not in TALK mode).
. Press the mute/menu OK button to go to the main menu.
. Press caller ID-volume (6 or 5) button to scroll to ROOM
MONITOR.
. Press the mute/menu OK button to enter ROOM MONITOR menu,
the screen displays ROOM MONITOR EXTENSION?.

0
5. Use the touch tone pad to enter the handset name/number to be
monitored.
NOTE: When this phone system is expanded (up to 6
handsets by purchase of optional Model 28203 handset
with recharge cradle), handsets are named HANDSET 1,
HANDSET 2, HANDSET 3 and so on respectively.
6. The receiving handset will turn on the microphone and the
originating handset will turn on the speakerphone to monitor
sound from the receiving handset.
NOTE: For room monitoring mode to work, the originating
handset must NOT be on the cradle.
NOTE: While in room monitoring mode, the handsets will
emit an alert tone approximately every 5 seconds if there is
an incoming call. You may press the TALK/SPEAKER button
to quit room monitor and answer the call.
NOTE: While in room monitoring mode, the originating
handset can be switched to monitor by handset earpiece
by pressing the TALK/SPEAKER button once. Switch back to
speakerphone by pressing the TALK/SPEAKER button once.
NOTE: Press the END button on the handset to exit room
monitor mode.
Other manuals for 28203
1
This manual suits for next models
1
Table of contents
Other GE Telephone manuals