GE 28527 Series User manual

Model 28517/28527 Series
DECT 6.0 Cordless
Handset Speakerphone
Answering System
User’s Guide
Your new GE telephone system is EXPANDABLE up to a total of 4 handsets (by purchase of
optional Model 28507 handset with charge cradle)
Introduction
CAUTION: When using telephone equipment, there are basic safety instructions that should always
be followed. Refer to the IMPORTANT SAFETY INSTRUCTIONS provided with this product and save
them for future reference.
IMPORTANT: Because cordless phones operate on electricity, you should have at least one phone in your
home that isn’t cordless, in case the power in your home goes out.
Beforeyoubegin
Parts Checklist (for model 285x2xx1)
Make sure your package includes the items shown here.
Model 28512xx1 Model 28527xx1
Accessory

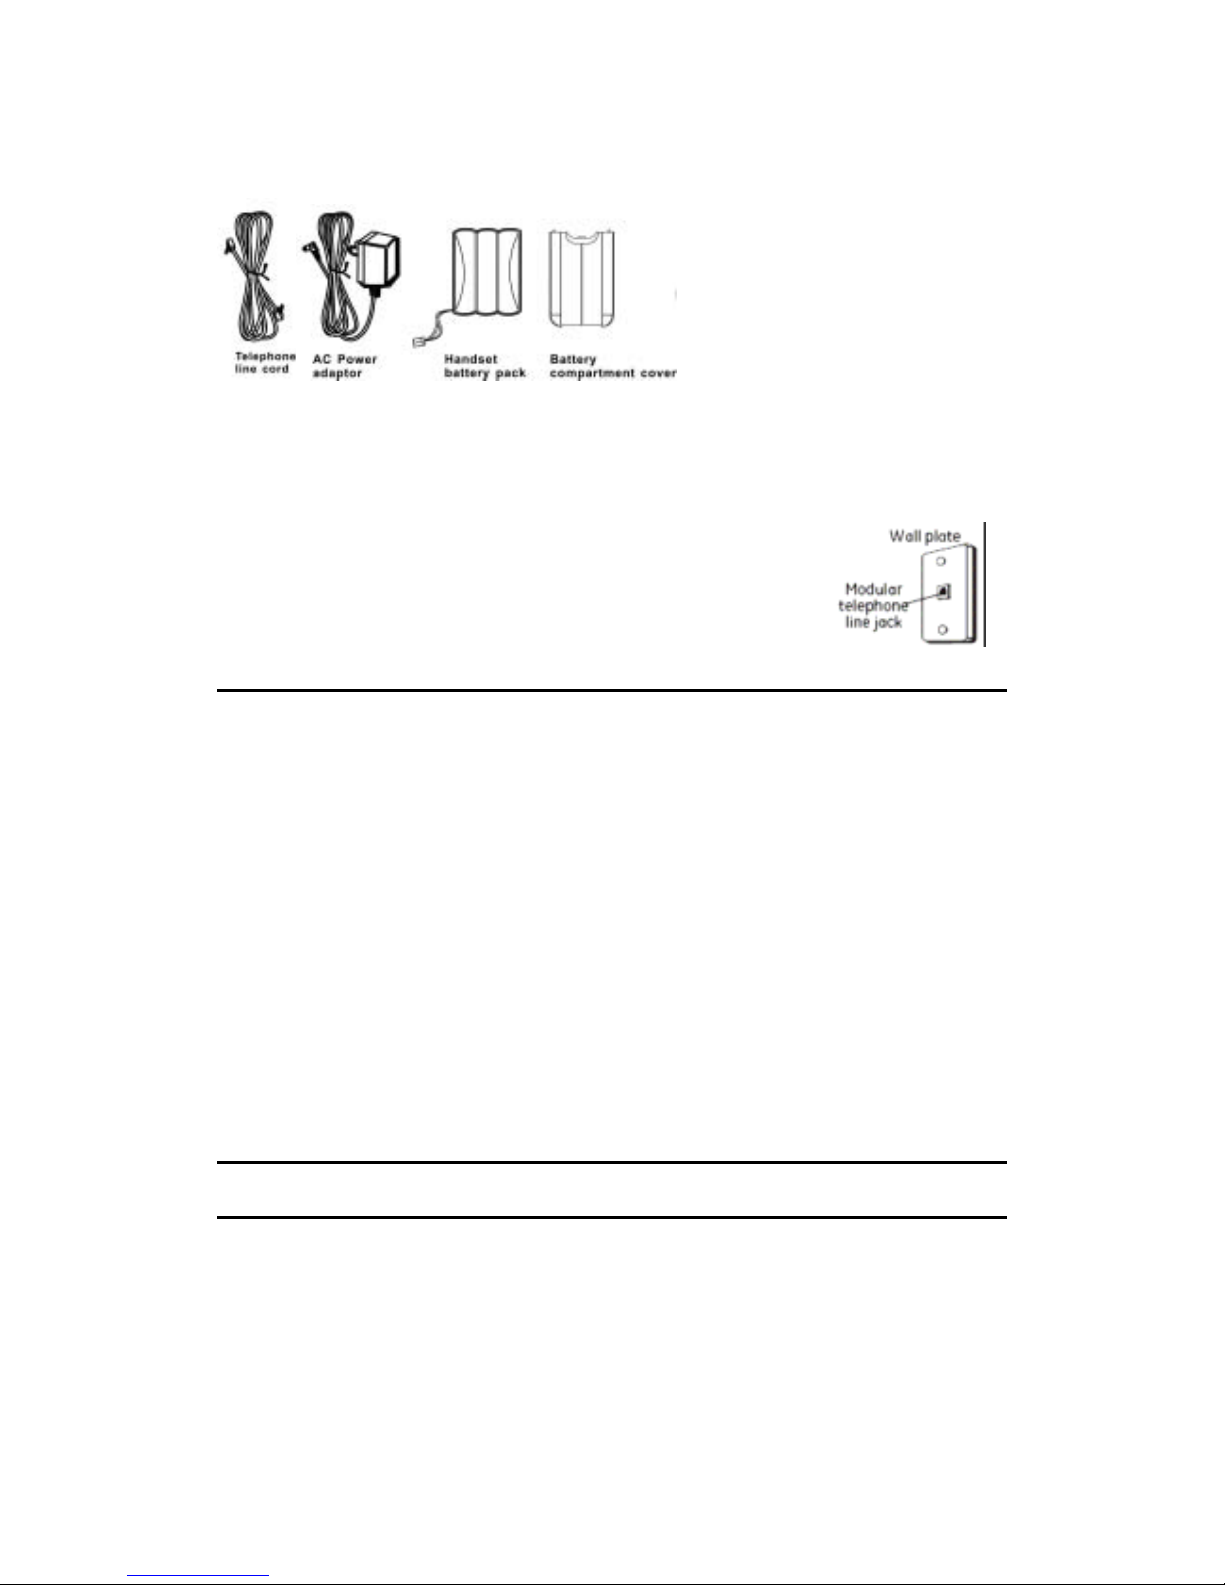
For Model 285x2xx2-A there will be ONE additional handset, charge cradle,
battery pack and cover than shown above.
For Model 285x2xx3-A there will be TWO additional handsets, charge cradles,
battery packs and covers than shown above.
For Model 285x2xx4-A there will be THREE additional handsets, charge cradles,
battery packs and covers than shown above.
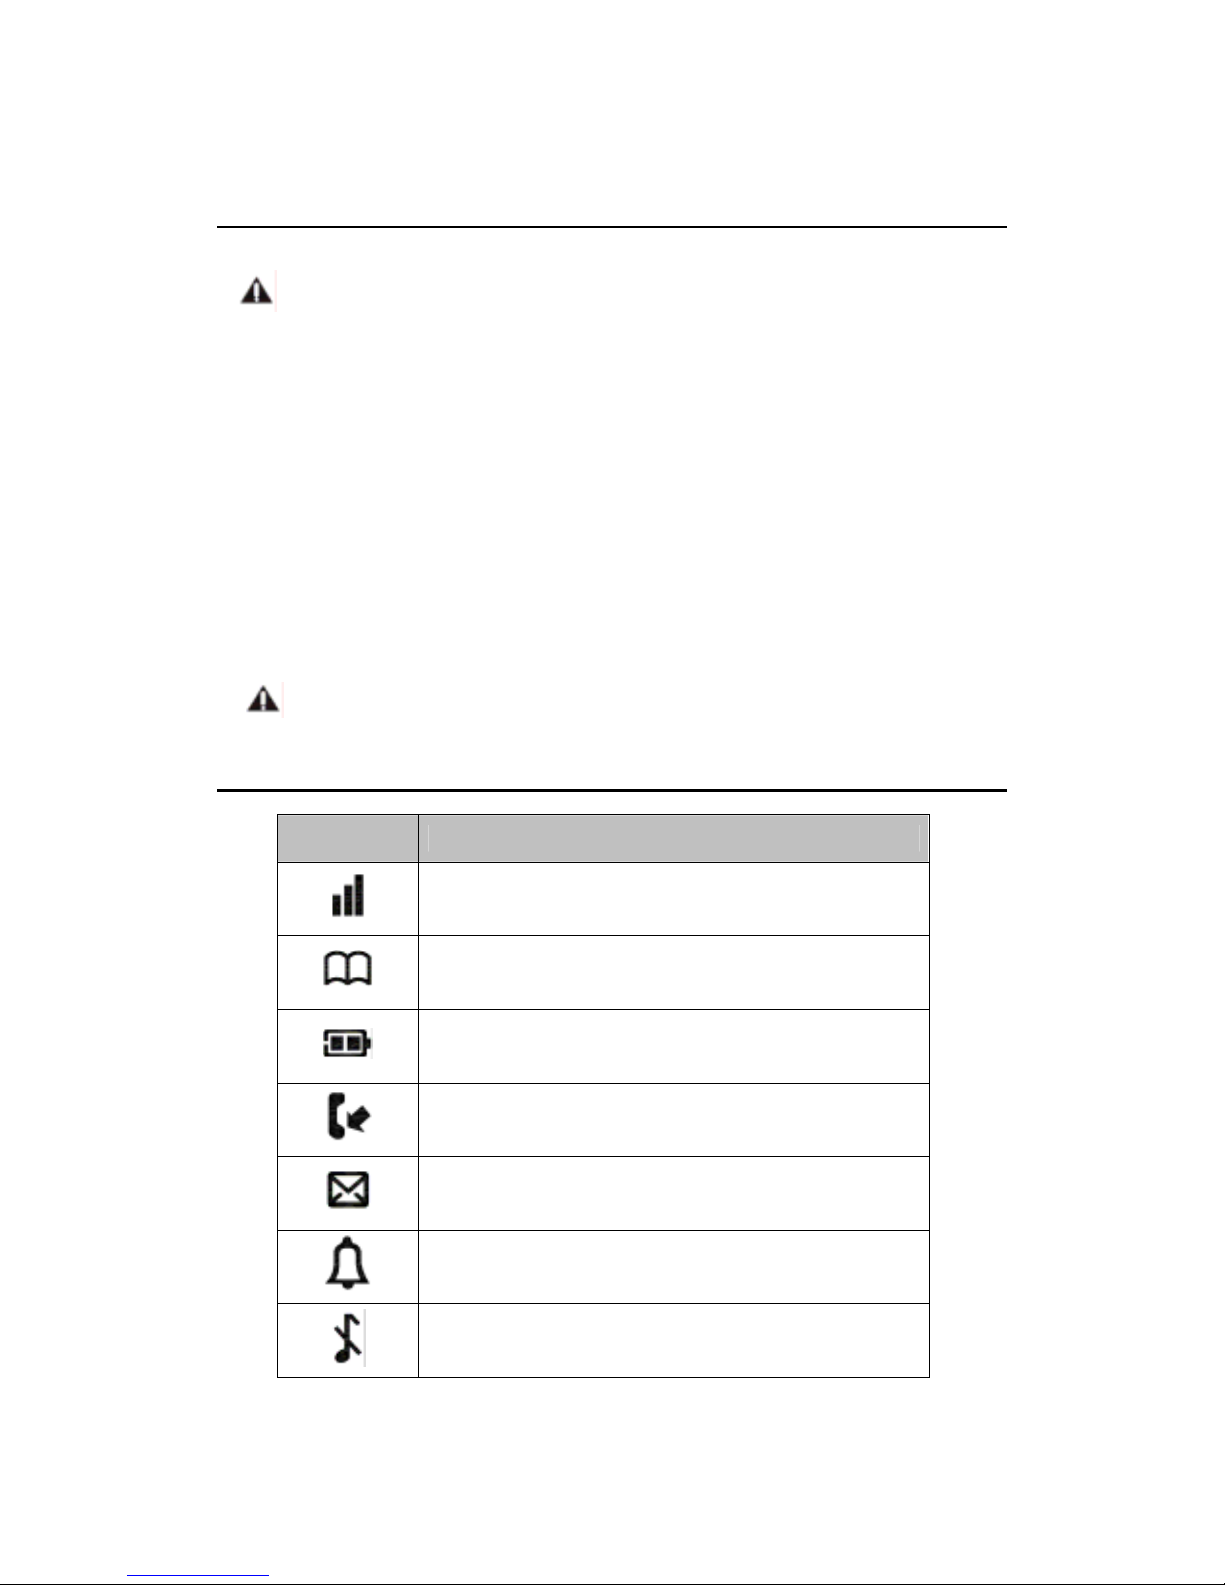
Telephone Jack Requirements
To use this phone, you need an RJ11C type modular telephone jack, which might look
like the one pictured here, installed in your home. If you don’t have a modular jack, call
your local phone company to find out how to get one installed.
Installation
Digital Security System
Your cordless phone uses a digital security system to protect against false ringing, unauthorized access, and charges to
your phone line.
INSTALLATION NOTE: Some cordless telephones operate at frequencies that may cause or receive
interference with nearby TVs, microwave ovens, and VCRs. To minimize or prevent such interference, the
base of the cordless telephone should not be placed near or on top of a TV, microwave ovens, or VCR. If
such interference continues, move the cordless telephone farther away from these appliances.
Certain other communications devices may also use the 1.9 GHz frequency for communication, and, if not
properly set, these devices may interfere with each other and/or your new telephone. If you are concerned
with interference, please refer to the owner’s manual for these devices on how to properly set channels to
avoid interference. Typical devices that may use the 1.9 GHz frequency for communication include
wireless audio/video senders, wireless computer networks, multi-handset cordless telephone systems,
and some long-range cordless telephone systems.
Important Installation Guidelines
• Avoid sources of noise and heat, such as motors, fluorescent lighting, microwave ovens, heating appliances and direct
sunlight.
• Avoid areas of excessive dust, moisture and low temperature.
• Avoid other cordless telephones or personal computers.
• Never install telephone wiring during a lightning storm.
• Never install telephone jacks in wet locations unless the jack is specifically designed for wet locations.
• Never touch non-insulated telephone wires or terminals, unless the telephone line has been disconnected at the
network interface.
• Use caution when installing or modifying telephone lines.
Handsetlayout
Baselayout
Model: 28512
Model: 28527

Installing the phone
Installing the Handset Battery
NOTE: You must connect the handset battery before use.
CAUTION: To reduce the risk of fire or personal injury, use only the CCT Tech USA Inc. approved
model SL-422943 Li-polymer, which is compatible with this unit.
1. Locate battery and battery door which are packaged together inside a plastic bag and are separate from the handset.
2. Locate the battery compartment on the back of the handset.
3. Plug the battery pack cord into the jack inside the compartment.
NOTE: To ensure proper battery installation, the connector is keyed and can be inserted only
one way.
4. Insert the battery pack.
5. Close the battery compartment by pushing the door up until it snaps into place.
Base Station
1. Choose an area near an electrical outlet and a telephone wall jack (RJ11C), and place your cordless telephone on a
level surface, such as a desktop or tabletop, or you may mount it on the wall.
2. Plug one end of the telephone line cord into the TEL LINE jack on the bottom of the base and the other end into a
modular jack.
3. Plug the AC power converter into the electrical outlet and the DC connector into the jack on the bottom of the base.
4. Place the handset in the base cradle. The charge/in use indicator turns on, verifying the battery is charging.
5. Allow the phone to charge for 16 hours prior to first use. If you don’t properly charge the phone, battery performance is
compromised.
CAUTION: Use only the power adaptor that came with this unit. Using other power adaptors may
damage the unit.
Display
Handset Display Items
Item Meaning
Turn on when base unit range
Blinking when base out of range
Turn on during review the phone book
Battery Level
Blinking when there is incoming call
Steady on during a call
Blinking when there is VMWI
Turn on when Alarm set
Turn on when ringer off set

Turn on when answering machine on
Blinking when there is new message
Blinking when there is a missing call
Turn on during review the call log and when is old record in call log
Initialsettings
Display language
You can select either “ENGLISH” or “ESPAÑOL” or “FRANCIS” as the display language. The default setting is “ENGLISH”
1. Press [ ], then
2. Press [ ]/[ ] to select “SETTINGS” and press [OK], then
3. Press [ ]/[ ] to select “LANGUAGE” and press [OK], then
4. Press [ ]/[ ] to select the desired setting, then
5. Press [ ] and [ ] to return idle
Dialing mode
If you cannot make calls, change this setting according to your telephone line service. The default setting is “TONE”
1. [ ]
2. [ ]/[ ]: “ADVANCED SET”→[OK]
3. [ ]/[ ]: “DIAL MODE”→[OK]
4. [ ]/[ ]: Select the desired setting
5. [ ] → [ ]
Date and time
1. [ ]
2. [ ]/[ ]: “CLOCK&ALARM”→[OK]
3. [ ]/[ ]: “DATE & TIME”→[OK]
4. Enter the current year, month and date by selecting 2 digits.
Example: May 16, 2010
[1][0][0][5][1][6]
5. Enter the current hour and minutes by selecting 2 digits.
Example: 9:30 am
[0][9][3][0]

[]/[ ]: Select am or pm
6. [ ] → [ ]
Note:
You can change date and time display format
Date format
1. [ ]
2. [ ]/[ ]: “CLOCK&ALARM”→[OK]
3. [ ]/[ ]: “SET FORMAT”→[OK]
4. [ ]/[ ]: “DATE FORMAT”→[OK]
5. [ ]/[ ]: Select the desired setting (MM/DD OR DD/MM)
6. [ ] → [ ]
Time format
1. [ ]
2. [ ]/[ ]: “CLOCK&ALARM”→[OK]
3. [ ]/[ ]: “SET FORMAT”→[OK]
4. [ ]/[ ]: “TIME FORMAT”→[OK]
5. [ ]/[ ]: Select the desired setting (12 HOURS OR 24 HOURS)
6. [ ] → [ ]
Ringer Volume
1. [ ]
2. [ ]/[ ]: “SETTTINGS”→[OK]
3. [ ]/[ ]: “HANDSET TONE”→[OK]
4. [ ]/[ ]: “RINGER VOLUME”→[OK]
5. [ ]/[ ]: Select the desired setting (VOLUME 1 to 4 and OFF)
6. [ ] → [ ]

Note:
You can set ringer off when handset in standby
1. Long press [ ] to activate
2. To deactivate ringer off, long press [ ] again
LCD will show “RINGER OFF” when ringer off feature activated
Ringer Tone
1. [ ]
2. [ ]/[ ]: “SETTTINGS”→[OK]
3. [ ]/[ ]: “HANDSET TONE”→[OK]
4. [ ]/[ ]: “RINGER TONE”→[OK]
5. [ ]/[ ]: Select the desired setting (MELODY 1 to 10)
6. [ ] → [ ]
Answering System Setup (Availiablefor28527)
This section shows you how to set up your answering system to receive incoming calls. Before you begin the set up
process, you must turn on the answering system.
• Press the ans on/off button to turn the answering system on and off. The MESSAGES indicator lights when the answering
system is on. The indicator blinks when you have new messages.
Setting the Voice Prompt Language
You can select either “ENGLISH” or “ESPAÑOL” or “FRANCIS” as the voice prompt language of the answering system.
The default setting is “ENGLISH”
To change the answering system’s voice prompt language,
1. [ ]
2. [ ]/[ ]: “ANSWERER”→[OK]
3. [ ]/[ ]: “SETTINGS”→[OK]
4. [ ]/[ ]: “LANGUAGE”→[OK]
5. [ ]/[ ]: Select the desired setting
6. [ ] → [ ]
Speaker Volume
Use the [ ] buttons to adjust speaker volume on the base to a comfortable level. L1 is the minimum

speaker volume and L8 is the maximum.
Outgoing Announcement
When the unit answers a call, an outgoing message is played to callers
You can use either:
- your own outgoing message
- a pre-recorded outgoing message
Recording Outgoing Announcement
You can record the outgoing message through the base microphone or handset microphone
Base:
1. Press and hold [ ]
2. After a beep sounds, you should move 9 inches from the base microphone and speak clearly into the base
microphone. (2 minutes max)
3. Release [ ] to stop recording
Handset:
1. [ ]
2. [ ]/[ ]: “ANSWERER”→[OK]
3. [ ]/[ ]: “RECORD OGM”→[OK]
4. [ ]/[ ]: “RECORD MSGS” OR ‘ANSWER ONLY”→[OK]
5. [ ]/[ ]: “RECORD OGM”→[OK]
6. After a beep sounds, hold the handset about 8 inches away and speak clearly into the microphone (2
minutes max.)
7. Press [ ] to stop recording
8. [ ]
Using a pre-recorded Outgoing Announcement
If you erase or do not record your own outgoing message, the unit plays a pre-recorded message asking callers to leave a
message.
Resetting to a pre-recorded Outgoing Announcement
If you want to use a pre-recorded outgoing message once you record your own greeting message, you need to erase your
own outgoing message.
1. [ ]
2. [ ]/[ ]: “ANSWERER”→[OK]
3. [ ]/[ ]: “RECORD OGM”→[OK]
4. [ ]/[ ]: “RECORD MSGS” OR ‘ANSWER ONLY”→[OK]
5. [ ]/[ ]: “DELETE”→[OK]
6. The handset shall play back the pre-recorded outgoing message
7. [ ]

Makingcalls
1. Lift the handset and dial the phone number
To correct a digit, press [ ]
2. Press [ ]
3. When you finish talking, press [ ] or place the handset on the base unit or charger.
Using handset speakerphone
1. Dial the phone number and press [ ]
2. When you finish talking, press [ ]
Note:
To switch back to receiver mode, press [ ]
Adjusting the receiver or speaker volume
Press [ ] or [ ] repeatedly while talking
Making a call using the redial list
The last 5 number dialed are stored in the redial list (each 24 digits max)
1. Press [ ]
2. press [ ] / [ ]: Select the desired phone number
3. Press [ ] or [ ]
Erasing a number in redial list
1. Press [ ]
2. Press [ ] / [ ]: Select the desired phone number→[ ]
3. [ ]/[▼]: “DELETE” or “DELETE ALL→[ ]
4. Press [ ] to confirm
Answeringcalls
When a call is being received, the LCD and keypad backlight flash rapidly
1. Lift the handset and press [ ] or [ ] when the unit rings
2. When you finish talking, press [ ] or place the handset on the base unit or charger
OtherFeatureduringacall
Mute
While mute is turned on, you can hear the other party, but the other party cannot hear you.
3. Press [ ] during the call

4. To return the call, Press [ ] again
Note:
LCD will show “MUTE ON” when mute feature activated
For Call waiting or Call Waiting Caller ID service subscriber
To use call waiting, you must subscribe to call waiting from your service provider. This feature allows you to receive calls
while you are already talking on the phone, you will hear a call waiting tone. If you subscribe to both Caller ID and Call
Waiting with Caller ID services, the 2nd caller’s information is displayed after you hear the call waiting tone on the handset.
1. Press [ ] to answer the 2nd call
2. To switch between calls, press [ ]
Conference
To join the conversation, press [ ] or [ ] when other handset is on an outside call.
Note:
A maximum of 3 parties (including 1 outside party) can join a conversation using 2 extensions.
Ringer Off
To activate ringer off.
5. Long press [ ] in standby
6. To deactivate ringer off, long press [ ] again
Note:
LCD will show “RINGER OFF” when ringer off feature activated
Phonebook
Adding record
1. [ ]
2. [ ] / [ ]: “PHONEBOOK”→[ ]
3. [ ] / [ ]: “ADD RECORDS”→[ ]
4. Enter the name (max. 12 character) →[ ]
5. Enter the number (max. 24 digits) →[ ]
6. [ ]
Character Table for the entering names
Key Character
[1] Space 1 < > *
[2] A B C 2
[3] D E F 3
[4] G H I 4

[5] J L K 5
[6] M N O 6
[7] P Q R S 7
[8] T U V 8
[9] W X Y Z 9
[0] 0 - / ||| # +
Correct the mistake
Press [ ] to delete the characters or numbers
View record
1. [ ]
2. [ ] / [ ] : “PHONEBOOK”→[ ]
3. [ ] / [ ] : “VIEW RECORDS”→[ ]
4. Press [ ] to view the name and number
5. Press [ ] or [ ] to dial out if necessary
6. [ ]
OR
Press [ ] at idle and repeat step 3
Make a call from phonebook
1. [ ]
2. [ ] / [ ] : Select the desired record
3. [ ] or [ ]
Searching by first character
1. [ ]
2. Press [1] – [9] which contains the character you are searching for (Page ?)
3. [ ] / [ ] : Select the desired record if necessary
4. [ ] or [ ]
Editing entries
1. Find the desired record → [ ]
2. [ ] / [ ] : “EDIT RECORDS

3. Edit the name if necessary → [ ]
4. Edit the number if necessary → [ ]
5. [ ]
Erasing entries
1. Find the desired record → [ ]
2. [ ] / [ ] : “DELETE
3. Press [ ] to confirm
4. [ ]
Chain dial
This feature allows you to dial phone numbers in the phonebook while you are on a call.
1. During an outside call, press [ ]
2. [ ] / [ ]: Select the desired record
3. Press [ ] to dial the number
Programming the Telephone
Standby Screen
The handset displays the handset number, date and time.
Programmable settings
You can customize the unit by programming the following features using the handset.
Programming by scrolling through the display menus
1. [ ]
2. Press [ ] or [ ] to select the desired main menu.→ [ ]
3. Press [ ] or [ ] to select the desired item in sub-menu 1.→ [ ]
In some cases, you may need to select from sub-menu 2. → [ ]
4. Press [ ] or [ ] to select the desired setting.→ [ ]
This step may vary depending on the feature being programmed
To exit the operation, press [ ]
Note:
In the following table, <> indicates the default setting
Main Menu Sub-menu 1 Sub-menu 2 Page

ADD RECORDS
VIEW RECORDS
EDIT RECORDS
DELETE
PHONEBOOK
DELETE ALL
DATE & TIME *1
TIME FOMRAT
SET FORMAT
DATE FORMAT
ALARM
<OFF>
CLOCK&ALARM
ALARM MELODY
<MELODY 1>
HANDSET NAME
RING VOLUME
<VOLUME 1> *2
RINGER TONE
<MELODY 1>
HANDSET TONES
KEY TONE
<ON> *3
SETTINGS
LANGUAGE
<ENGLISH>
CHANGE PIN
<123> *4
REGISTRATION
UNREGISTER
RESET
AREA CODE
ADVANCED SET
DIAL MODE
<TONE>
PLAY
DELETE ALL
ANSWERER
(28527xxx-A)
ANSW. ON/OFF
<ON> *1

RECORD MSGS
RECORD OGM
ANSWER ONLY
ANSWER MODE
<RECORD MSGS> *1
RING DELAY
<5 RINGS> *1
REMOTE ACC.
<DEACTIVATE> *1
SETTINGS
LANGUAGE
<ENGLISH> *1
* 1 If you program these settings using one of the handsets, you do not need to program the same item using another
handset
* 2 When the ringer volume is turned off, “RINGER OFF” is displayed and the handset does not ring outside calls. However
even when the ringer volume is set to off, the handset still rings for paging and intercom calls.
* 3 Turn this feature off if you prefer not to hear key tons while you are dialing or pressing any keys.
* 4 This menu will only available on the answering machine model (28527xxx).
Registeringahandset
Additional handset
Up to 4 handsets can be registered to the base.
Important:
The unit shall able to register with 28502xxx-A only
Registering a handset to the base unit
The supplied handset and base unit are pre-registered. If for some reason the handset is not registered to the base unit,
re-register the handset.
Handset:
1. [ ]
2. [ ] / [ ] : “ADVANCED SET”→ [ ]
3. [ ] / [ ] : “REGISTRATION”→ [ ]
4. Handset will show “PRESS FIND KEY FOR 5S”
.
Base:
5. Press and hold the [ ]for 5 seconds. For 28527, the base LED will blinking rapidly.
Handset:
6. Handset will have a long beep when success register
Note:
An error tone will emit when the registration not success

Deregistering a handset
1. [ ]
2. [] / [ ]: “ADVANCED SET”→ [ ]
3. [] / [ ]: “UNGISTRATER”→ [ ]
4. [] / [ ]: Select the desired handset → [ ]
5. [ ]
UsingCallerIDservice
IMPORTANT: In order to use this unit’s Caller ID features, you must subscribe to either the standard
Name/Number Caller ID Service or Call Waiting Caller ID Service. To know who is calling while you are on
the phone, you must subscribe to Call Waiting Caller ID Service.
This unit receives and displays information transmitted by your local phone company. This information can include the
phone number, date, and time; or the name, phone number, date, and time.
Receiving CID Records
When you receive a call, the Caller ID information is transmitted between the first and second ring. The Caller ID
information appears on the display while the phone rings, giving you a chance to monitor the information and decide
whether or not to answer the call.
Storing CID Records (In CID Memory)
If you are not at home or cannot answer, your telephone’s Caller ID memory stores the data for the 10 most recent calls
you received so you can see who called while you were unavailable. When the 11th call is received, the oldest Caller ID
record (1st call) is automatically deleted.
Reviewing CID Records and call back
As calls are received and stored, the display is updated to let you know how many calls have been received. To scroll CID
records:
1. []
2. Press
[]to search from the most recent call, or [] to search from the oldest call.
3. To Call back, press [ ]or [ ]
To Exit, press [ ]
Editing a caller’s phone number calling back
You can edit a phone number in the caller list by removing its area code and/or the long distance code “1”
1. []
2. [] / [ ]: Select the desired record → [ ]
3. If the desired record is a name, Press [ ]to show the number

4. Press [ ] repeatedly until the phone number is shown in the desired format
Local phone number
Example: 123-4567
Area code – Local phone number
Example: 317-123-4567
1 – Area code – Local phone number
Example: 1-317-123-4567
5. [ ]or [ ]
OR
You can edit the number you want
1. [ ]
2. [ ] / [ ]: Select the desired record →[ ]
3. [ ] / [ ]: “EDIT RECORDS” → [ ]
4. Enter the number if necessary
5. Press [ ] to save the new number in the record or Press [ ] or [ ] dial out the number
Delete a CID record
1. [ ]
2. [] / [ ]: Select the desired record→[MENU]
3. [] / [ ]: “DELETE” or “DELETE ALL” →[OK]
4. Press
[ ]
to confirm
5. [ ]
Store a CID record
1. [ ]
2. [] / [ ]: Select the desired record → [ ]
3. [] / [ ]: “SAVE NUMBER” →[ ]
4. Enter the name and number → [ ]
5. [ ]
Answering system (Availablefor28527)
The answering system can answer and record calls for you when you are unavailable to answer the phone

Important:
Only 1 person can access the answering system at a time.
When callers leave messages, the unit records the day and time of each message. Make sure the date and
time have been set correctly
Recording capacity (including the outgoing message)
The total recording capacity is about 12 minutes. A maximum of 59 messages can be record
Answer mode
There are two answering mode. “RECORD MSGS” mode means the answering system will record message when no one
pick up the call. “ANSWER ONLY” mode means the answer system will play the outgoing message only but not record the
message.
To select the answering mode
1. [ ]
2. [] / [ ]: “ANSWERER”→ [ ]
3. [] / [ ]: “ANSWER MODE”→ [ ]
4. [] / [ ]: Select the desired setting
5. [ ]
→ [ ]
Turning the answering machine on/off
Base unit:
Press [ ] to turn on/off the answering system
Handset:
1. [ ]
2. [] / [ ]: “ANSWERER”→[ ]
3. [] / [ ]: “ANSW. ON/OFF”→[ ]
4. [] / [ ]: Select the desired setting
5. [ ]→[ ]
Note:
Turn on and off will not change answer mode of the answering system
When the answering system is turned on, the LED on the base light up
Call screening
1. When the answering system answers the call, listen while the caller leaves a message (to determine who is calling).
2. To speak to the caller, press the [ ]or [ ].

The answering system automatically stops recording when you activate the handset or pick up an extension phone.
Note:
To turn off the call screening, Press [ ] to set the volume off
Playback the messages using the base unit
When the new message have been recorded, the message indicator on the base unit flashes
Press [ ]
If new messages have been recorded, the base plays new messages
If there are no new messages, the base unit plays all messages
Operating the answering system during playback
Key Operation
Adjust the speaker volume
Play or Stop message
Repeat message
Skip message
Erase currently playing message
Erasing all messages
Long Press [ ] while the unit is not in use
Playback the messages using the handset
When the new messages have been recorded
1. [ ]
2. [] / [ ]: “ANSWERER”→ [ ]
3. [] / [ ]: “PLAY”→ [ ]
4. [ ]: Select the operation during playback
Note:
To switch to the receiver, press [ ]
Erasing all messages
1. [ ]
2. [] / [ ]: “ANSWERER”→[OK]
3. [] / [ ]: “DELETE ALL”→[OK]

4. Press [ ]to confirm
5. [ ]
Memo Recording
Using the [Memo] button on the base, you can record the memo as a new message.
1. Press and hold [ ]
2. After a beep sounds, you should move 9 inches from the base microphone and speak clearly into the base
microphone. (2 minutes max)
3. Release [ ] to stop recording
Remote operation
Using a touch-tone phone, you can call your phone number from outside and access the unit to listen to messages or
change answering system setting.
Remote access code
A 3 to 8 digits remote access code must be entered when operating the answering system remotely. This code prevents
unauthorized parties from listening to your messages remotely. The default setting is “123”
To set the remote access code:
1. [ ]
2. [] / [ ]: “ADVANCED SET”→ [ ]
3. [] / [ ]: “CHANGE PIN” →[ ]
4. Input the old remote access code →[ ]
5. Input the new remote access code →[ ]
6. A beep sound emit
Using the answering system remotely
1. Dial your phone number from a touch-tome phone.
If the answering system is on:
2. After the outgoing message finish, Press [ ] and the answering system will ask you input the remote access
code. Please input the remote access code after the message played.
If the answering system is off:
3. The answering system will ask you input the remote access code. Please input the remote access code after the
message played.
Remote commands
You can press dial keys to access certain answering system functions.
Keys Description
[1] Skip to the previous message
[2] Play the message
[3] Skip to the next message
[6] Delete the playing message
[7] Turn on the answering machine
[8] Stop message playback
[9] Turn on/off the answering machine

Answering system settings
Number if rings before the unit answers a call
You can select the number of rings you want the phone to ring before the answering system answers a call.
1. [ ]
2. [] / [ ]: “ANSWERER”→ [OK]
3. [] / [ ]: “SETTINGS” →[OK]
4. [] / [ ]: “RING DELAY” →[OK]
5. [] / [ ]: Select the desired setting →[OK]
6. [ ]
NOTE:
If you select Toll Saver (TS) the unit answers after the 3rd ring if there are NEW messages, OR the unit answers after
the 5th ring if there are NO new messages. This allows user to access their answerer from another location and then
hang up after 4 rings to save long distance charges.
Voice mail service
The [ ] on LCD flash when you receive a new message from your service provider.
IMPORTANT:
In order to use this unit’s Visual Message Waiting Indicator (VMWI) feature, you must subscribe to this service from
your phone company.
Intercom
Intercom calls can be made between handsets
Note:
If you receive an outside call while talking on the intercom, you hear beep. To answer the call with the handset, long press
[*] to switch the outside call and intercom
While paging a handset, the paged handset beeps for 1 minute.
Making an intercom call
1. [ ]
2. Select the handset you want to page by pressing the desired handset number ([1] –[4]) or you can page all handset
by pressing [ ]
3. When you finish talking, press [ ]
Answering an intercom call
1. Press [ ]or [ ]to answer the page
2. When you finish talking, press [ ]
Handset locator

You can locate a misplaced handset by paging it.
1. Base unit: [ ]
All register handsets beep for 1 minute.
2. To stop paging:
Base Unit: Press [ ]
Handset: Press [ ]
Transferring calls
Outside calls can be transferred or a conference call with an outside party can be made between 2 handsets.
1. During outside call, press [ ]
2. Select the handset you want to page by pressing the desired handset number ([1] –[4]) or you can page all handset by
pressing [ ]
3. Press [ ]
4. The call will transfer to the paged handset
Changing the Battery___________________________________
Changing the Battery
CAUTION: To reduce the risk of fire or personal injury, use only the CCT Tech USA Inc.
approved model SL-422943 Li-polymer battery (Ni-MH), which is compatible with this unit.
1. Make sure the telephone is OFF (not in TALK mode) before you replace the battery.
2. Remove the battery compartment door.
3. Disconnect the cord attached to the battery pack and remove the battery pack from the handset.
4. Insert the new battery pack and connect the cord to the jack inside the battery compartment.
5. Put the battery compartment door back on.
6. Place handset in the base or handset charge cradle to charge. Allow the handset battery to properly charge (for 16
hours) prior to first use or when you install a new battery pack. If you do not properly charge the phone, battery
performance will be compromised.
NOTE: The RBRC seal on the battery used in your CCT Tech USA Inc. product indicates that we are participating
in a program to collect and recycle the rechargeable battery (or batteries). For more information go to the RBRC
web site at www.rbrc.org or call 1-800-8-BATTERY or contact a local recycling center.
Battery Safety Precautions_______________________________
• Do not burn, disassemble, mutilate, or puncture. Like other batteries of this type, toxic materials could be released which
can cause injury.
• To reduce the risk of fire or personal injury, use only the Li-ploymer battery listed in the User’s Guide.
• Keep batteries out of the reach of children.
• Remove batteries if storing over 30 days.
Troubleshooting Guide__________________________________
Telephone General Use
Problem Cause/solution
The handset does not turn on even after installing
battery pack.
- Place the handset on the base unit or charger to
turn on the handset
The unit does not work. - Make sure the battery pack is installed correctly.
- Fully charge the battery.
Check the connections. (for 16 hours)
- Unplug the base unit's AC adaptor to reset the unit.
Reconnect the adaptor and try again.
- The handset has not been registered to the base
unit. Register the handset.
This manual suits for next models
6
Table of contents
Other GE Telephone manuals