GE VISION Line ES44AC User manual

72-8306-250
11/09
Featuring
Lionel VISION™Line
GE®ES44AC
EVOLUTION HYBRID
Owner’s Manual
Lionel VISION™Line
GE®ES44AC
EVOLUTION HYBRID
Owner’s Manual
6-28306 Hybrid.indd 1 12/16/09 2:56 PM

Congratulations!
As a VISION Line™ locomotive, the ES44AC HYBRID is the most technically advanced and
realistic O Gauge diesel locomotive ever made. On the outside, this gold standard engine
features more realistic interior detail, exterior detail and decoration than ever before. Inside
the body you'll find the highest caliber electronics and sounds to give you unprecedented
operational realism. In addition to all the great features found on Lionel Standard O
locomotives, your ES44AC HYBRID is equipped with an array of other realistic and dramatic
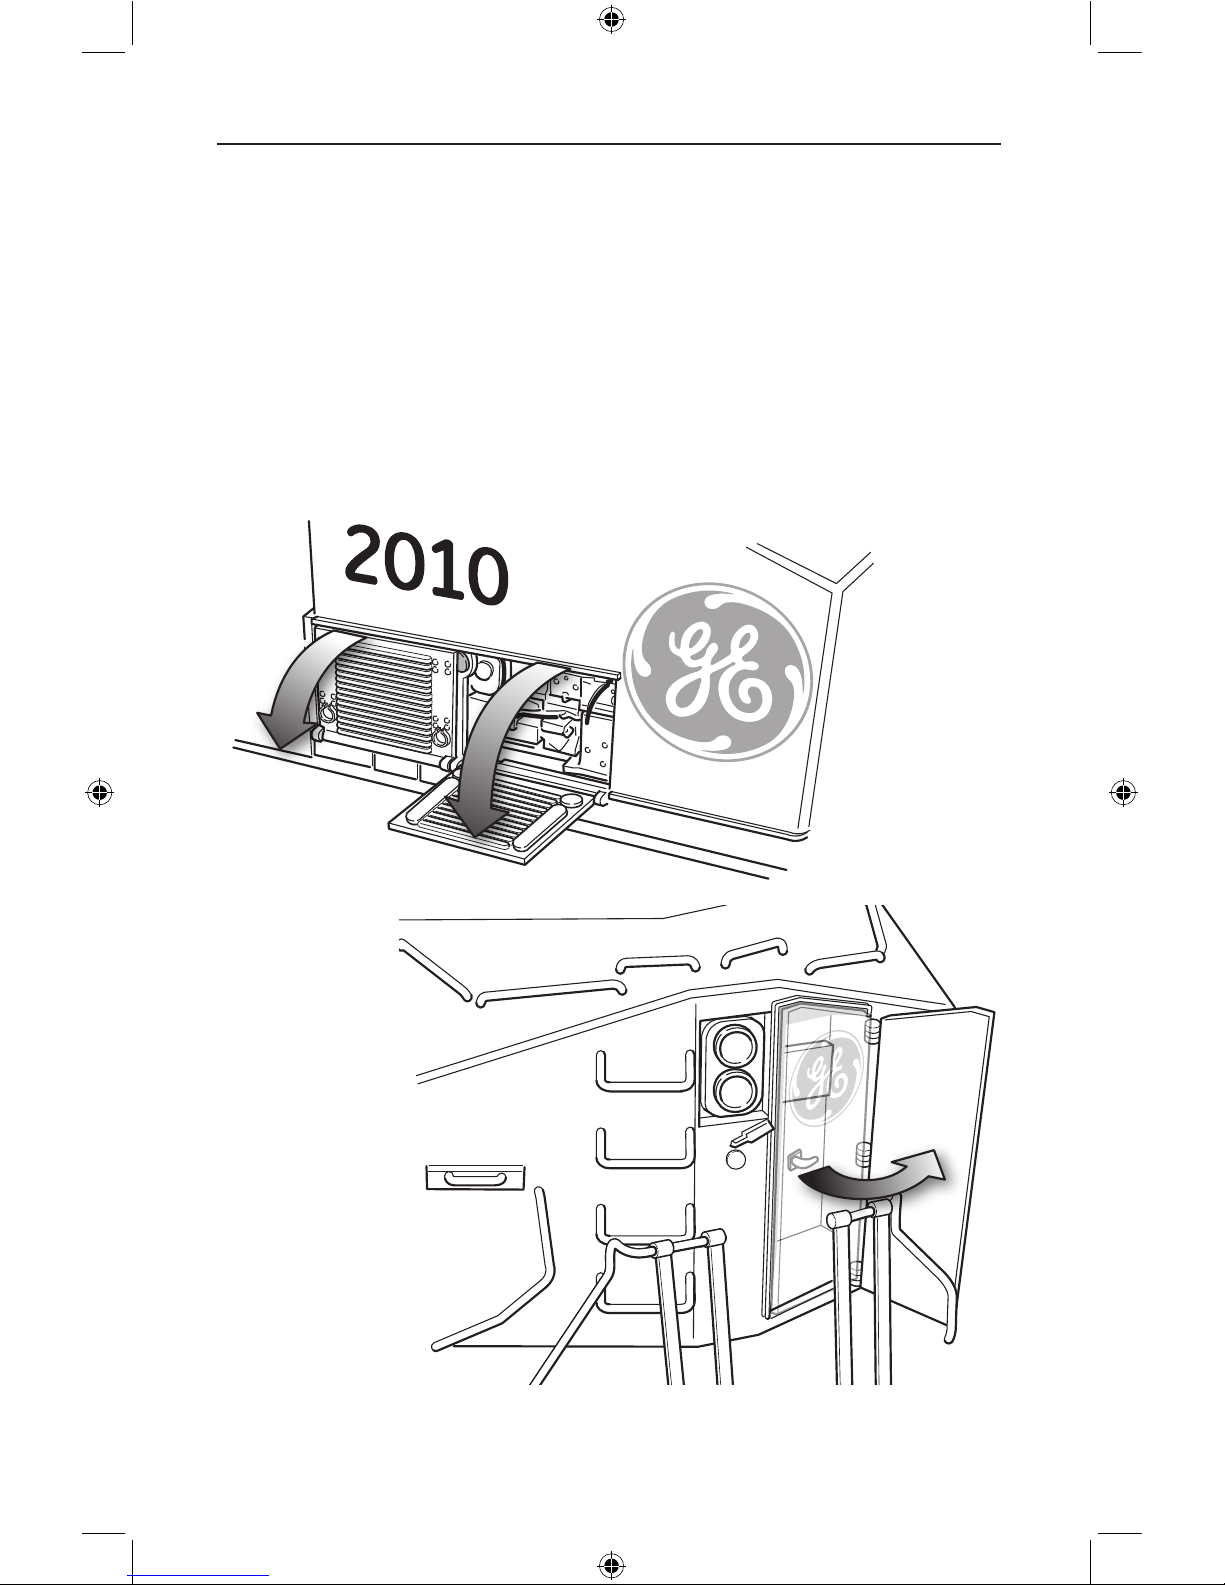
effects including a removable cab roof for viewing a highly detailed interior with illuminated
gauges, opening door with interior details on the locomotives front cab, opening doors below
the engineer's window showing scale details underneath, operating turbo-intercooler fans,
and smoke output synchronized to the diesel RPM of the Legacy RailSounds sound system.
More than ever, you are in control of the realistic effects and operation of your locomotive.
The VISION Line ES44AC HYBRID locomotive is ready for duty on your layout.
Unpacking Your VISION Line locomotive
Because of all the fine details and special features on your VISION Line locomotive, we
thought it best to really pack it tight, even better than our normal sturdy packing. This
VISION Line locomotive is the first ever packaged with ECO-friendly material including
a baseplate used to secure the locomotive while in transit. Both the container and the
baseplate are held together with velcro straps. Carefully remove the container and baseplate
from the box, and set it on a flat surface. Remove the velcro straps and carefully remove the
shell and wrapping. Look at the bottom of the baseplate to locate the screws that fasten the
baseplate to the locomotive. With a Phillips screwdriver, remove the screws while keeping
the locomotive level. CAUTION: The handrails of your locomotive are the antennas for the
LEGACY system. The stanchions are plastic to insulate the handrails from the die-cast body.
The stanchions are very fragile, so do not squeeze them or the handrails when unpacking
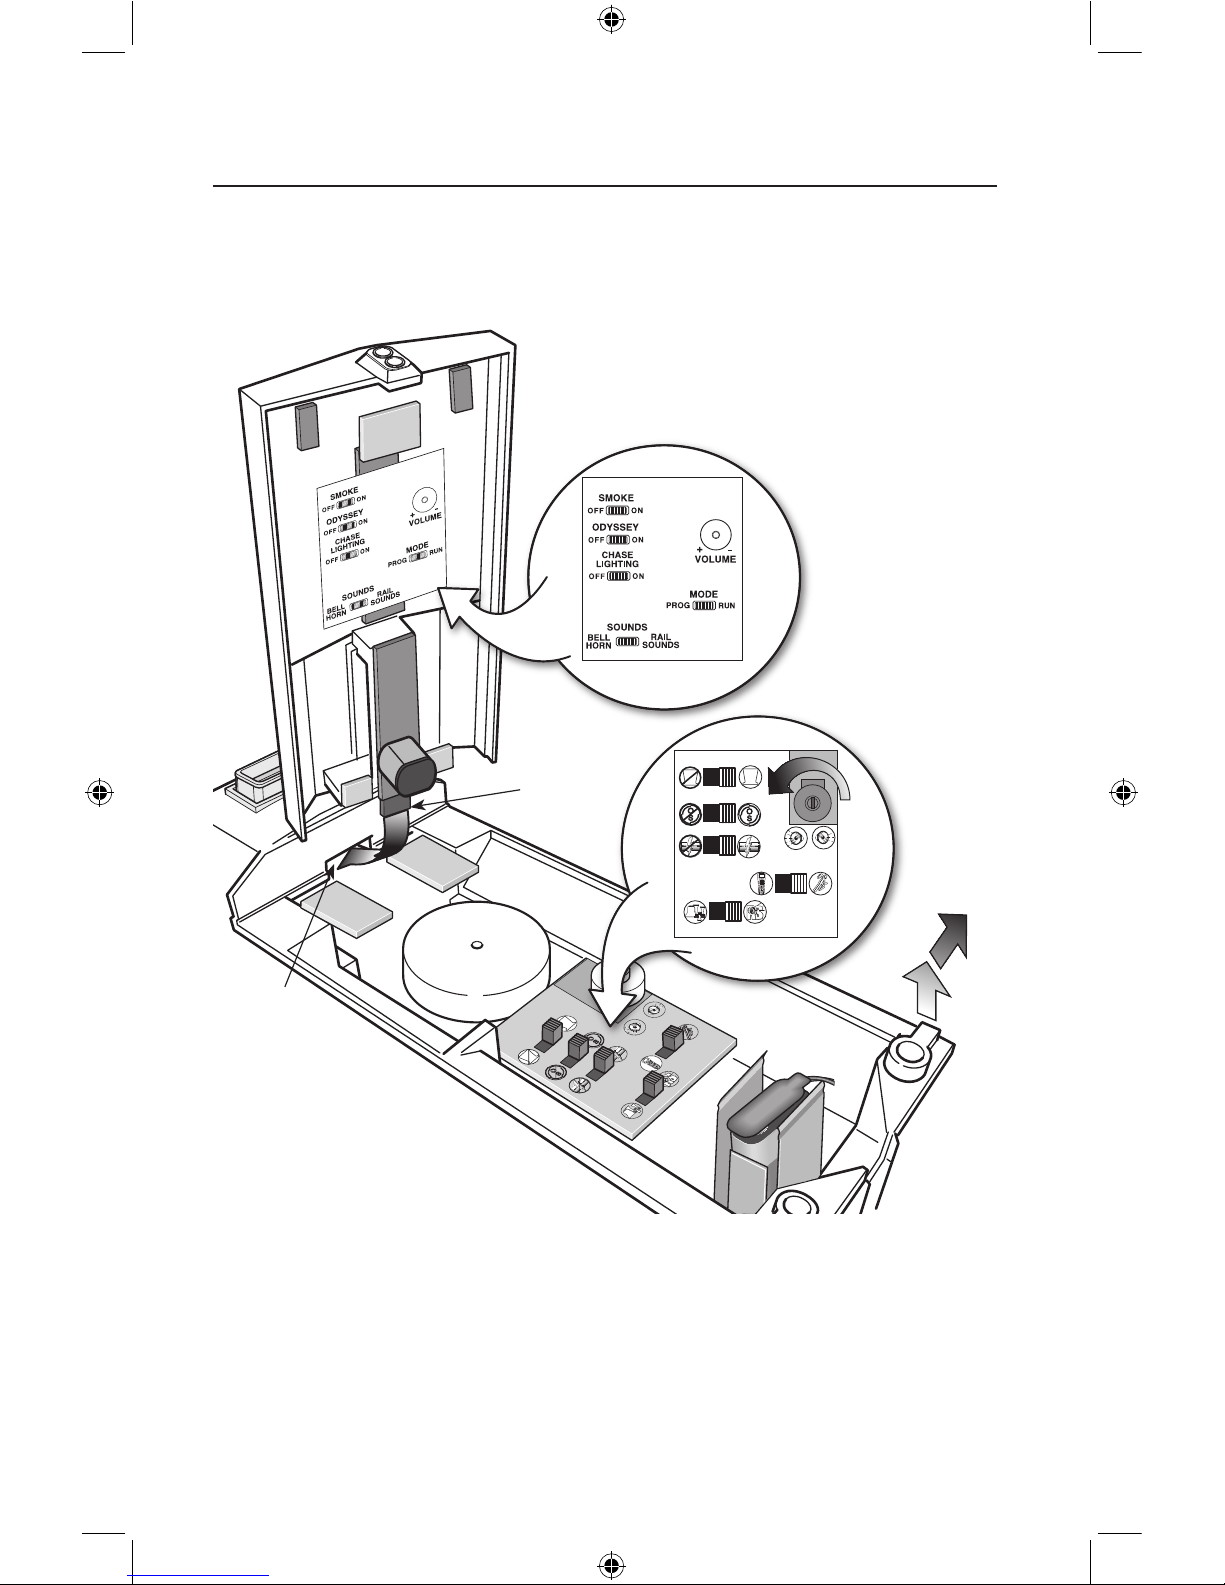
the locomotive. Your VISION locomotive is now ready to place on the track. PLEASE see the
smoke fluid section Fig. 8, page 35 before you run your locomotive.
2
The following Lionel marks are used throughout this catalog and are protected
under law. All rights reserved.
Lionel®, LEGACY™, TrainMaster®, Odyssey®, RailSounds®, CrewTalk™, TowerCom™, DynaChuff™,
StationSounds™, Pullmor®, ElectroCoupler™, Magne-Traction®, CAB-1® Remote Controller,
American Flyer®, Lionel ZW®, ZW®, MagniVision®, TMCC®, Lionelville®, Wireless Tether™,
Powerhouse™, LionMaster®, Conventional Classics™, Postwar Celebration Series™, TruRail™, PH-1
Powerhouse®, Powermaster®, Powerstation-Powerhouse®, Accessory Motor Controller™, AMC™,
Accessory Switch Controller™, ASC™, Action Recorder Controller™, ARC™, Track Power Controller
300™, TPC 300™, Track Power Controller 400™, TPC 400™, Block Power Controller™, BPC™,
Operating Track Controller™, OTC™, FatBoy™, Lionel Lines®, Joshua Lionel Cowen Series™, Lockon®,
TrainSounds™, MultiHorn™, Choo-Choo™
6-28306 Hybrid.indd 2 12/16/09 2:56 PM

3
VISION Line™ features of this locomotive
Front of Locomotive
New Lighting Features
• Prototypical battery “charging lights” ash in motion along sides
• Rule 17 lighting for both headlight and rear light
• Enhanced realistic lighting in cab interior with illuminated panel details
Unparalleled Detailing
• Movable cab details
• Dual powered turbo-intercooler fans
• Opening doors on the engineer’s side of cab and the front door of cab reveal realistic
details
Opening side doors
with interior detail
Opening front door
with interior detail
6-28306 Hybrid.indd 3 12/16/09 2:56 PM

4
VISION Line™ features of this locomotive
New Prototypical Idle Mode Features
Prototypical to energy-saving procedures on the actual engine, your VISION Hybrid is equipped with
new Idle Mode features. When your engine is left idling for a period, it will automatically “step-down”
its operations and enter a realistic and prototypical sequence of idle modes
• If the locomotive rests at idle for 30 seconds, it will enter a step-down mode in which operation
on some of the diesel cylinders are shut down. You will hear this change through your RailSounds
sound system. Lighting is not affected
• If the engine remains in idle another 30 seconds, the sounds of the diesel engine will shut off.
Note you will continue to hear the occasional release of air from the cylinders, and every 15 seconds a
warning bell will sound off. Cab lights and the charging lights turn off, all other lights are unaffected
• At maximum energy saving mode, your Hybrid will randomly start up the diesel to charge the air tanks.
After the brief startup, locomotive cycles back through the steps above. Lights and sounds are reactivated
• If any command other than a speed-related command is entered, a long warning bell will sound
off, and the engine will proceed to full startup
Unparalleled Detailing
• Removable cab roof reveals the decorated cab interior
NOTE: Slide in tabs and place
pipe in hole as you replace
the roof on the locomotive
To remove roof, lift up front
a little, then pull away
Illuminated cab interior
with back-lit gauges
Front of Locomotive
Pipe
Hole
Tabs
6-28306 Hybrid.indd 4 12/16/09 2:56 PM

5
VISION Line™ features of this locomotive continued
New Smoke Features
• TruRail Exhaust, a new cab-controlled, variable-intensity smoke effect
• Fan-driven smoke unit with adjustable smoke output delivers varying intensities of smoke
to exhaust stack
• All smoke effects are synchronized to the RailSounds sound system and are completely
user controllable
Note: TruRail Exhaust models the prototypical behavior of GE's Evolution Hybrid locomotive.
Like the actual Hybrid, this locomotive is capable of producing large volumes of smoke when
it transitions through the 8 ascending RPM levels. Once a transition is made, the smoke level
tailors off to a continuous wisp. Slight adjustments in speed steps using the Velocity Throttle will
not produce a large volume of smoke unless an ascending transition in RPM level is detected.
Descending levels of RPM levels will not produce large volumes of smoke.
Upgraded Sound Features
• The LEGACY RailSounds sound system synchronized realistic sounds to nearly all aspects
of locomotive operation
• The independently adjustable volume control allows you to use the Remote Controller to
lower the level of background effects (such as RPM levels) while keeping operator
controlled effects (such as the horn) at full volume
• TruRail Dialog – Activate our upgraded dialog features which boast the most
authentic railroad terminology possible. Also, dialog scenarios can change with engine
operation and user control
• TruRail Signals – Activate the “quilling” horn and user-playable bell featuring
continuous or single strike sounds with variable intensity. There is a dedicated CAB-2
slide lever control for both horn and bell functions
Have fun experimenting with the prototypical behavior of GE's Evolution Hybrid locomotive.
Standard Features for this locomotive:
• LEGACY Control System – You can run the engine in LEGACY Control mode, in TrainMaster
Command Control mode, or in Conventional mode with a standard transformer
• Odyssey II Speed Control with ON/OFF switch
• Two high-torque motors with momentum ywheels
• Front and rear ElectroCouplers
• Die-cast metal locomotive body, frame, and trucksides
• Traction tires
• Accurate separately-applied builder’s plates
• Engineer and brakeman gures
• Opening roof on cab
• Sliding cab window glass
• Enhanced realistic lighting in cab interior with backlit gauges
• Directional lighting including operating headlight and back-up light
• Illuminated number boards
• Ground lights
• Oscillating ditch lights
• Fan-driven smoke unit with ON/OFF switch
• User-adjustable smoke output
6-28306 Hybrid.indd 5 12/16/09 2:56 PM

6
Table of contents
Quick Start
LEGACY Control operations 8
TrainMaster Command Control operations 8
Transformer operations 8
Locomotive switch function overview
Locomotive switch location 9-10
LEGACY RailSounds sound system operations
Installing the battery 11
LEGACY Control System operations
Get ready to run 12
Start ‘Er Up 12
The LEGACY CAB-2 Remote Controller 13
The Velocity Throttle 14
The Multi-Controller 14-15
The Train Brake Slider 15
The Warning Sound Controller 16
The Speed Bar 17
Ground Light Control 18
Rule 17 Lighting Control 18
LEGACY RailSounds 19
Activating the CrewTalk dialog and TowerCom announcements 20
Assigning your locomotive a new ID# 21
Reprogramming your locomotive to restore features 21
TrainMaster Command Control operations
Operating your locomotive in the Command Control environment 22
Using LEGACY RailSounds in the TMCC environment 23
CAB-1 Remote Controller commands 24
CAB-1 Remote Controller numeric keypad commands 25
Activating CrewTalk and TowerCom announcements 26
Assigning your locomotive a new ID# 27
Reprogramming your locomotive to restore features 27
Conventional transformer operations
Operating your locomotive in the conventional environment 28-29
Using the LEGACY Railsounds sound system in the conventional environment 30
Activating CrewTalk and TowerCom announcements 31
Locking your locomotive into a single direction 31
Uncoupling your locomotive in the conventional environment 32
6-28306 Hybrid.indd 6 12/16/09 2:56 PM

7
Contents of your locomotive box
1 Locomotive
1 Smoke fluid bottle
4 Replacement traction tires
1 Owner's manual
1 Engine memory module
1 VISION Line Locomotive Warranty Card
VISION Line Enhancements
VISION Line features will be described in each section where it is relevant to the
operation of your locomotive and the system you use. Some LEGACY and VISION Line
features may not be available in the conventional or TMCC environment.
Odyssey II Speed Control system operations
Odyssey II Speed Control system performance 33
Odyssey II Speed Control system LEGACY Control operation 33
Odyssey II Speed Control system TrainMaster Command Control operation 33
Odyssey II Speed Control system conventional transformer operation 33
Conventional RailSounds operations
Installing a Lionel Sound Activation Button for conventional operation 34
Maintaining and servicing your locomotive
Adding fluid to your locomotive’s smoke generator 35
Lubricating your locomotive 36
Maintaining your locomotive’s handrail antenna 37
Servicing your locomotive’s lamps 37
Tire-Traction 38
Notes 39
Lionel VISION Line Locomotive Warranty 40
6-28306 Hybrid.indd 7 12/16/09 2:56 PM

Quick Start
Power your locomotive with an alternating-current (50-60Hz AC) transformer only.
Powering your locomotive with a direct-current (DC) transformer, or in excess of 19
volts AC, may result in damage to sensitive electronic components.
LEGACY Control operations
For the finest operating experience, your locomotive is fully compatible with the new
LEGACY Control System.
To operate in LEGACY mode, you need a LEGACY Command Base and LEGACY CAB-2
Remote Controller. Both products are offered together in the LEGACY Command Set,
6-14295.
1. Turn off track power and plug in the LEGACY Base.
2. Place your locomotive on Lionel or Lionel-compatible O-54 or larger track.
3. Increase track power voltage to full power (no more than 19 volts AC).
4. Press ENG and 1 to address your locomotive with your LEGACY CAB-2 Remote Controller.
5. Throttle up and move ‘em out.
TrainMaster Command Control operations
To operate your locomotive in the Command Control environment, you need a Command
Base (available separately, 6-12911) and a CAB-1 Remote Controller (available separately,
6-12868).
1. Turn off track power and plug in the Command Base.
2. Place your locomotive on Lionel or Lionel-compatible O-54 or larger track.
3. Increase track voltage to full power (no more than 19 volts AC).
4. Press ENG and 1 to address your locomotive with your CAB-1 Remote Controller.
5. Throttle up and move ‘em out.
Transformer operations
1. Turn off track power.
2. Place your locomotive on Lionel or Lionel-compatible O-54 or larger track.
3. Power your locomotive at 12-18 volts with your alternating current (AC)
transformer.
4. Wait three to eight seconds until the locomotive’s headlight illuminates and the
LEGACY RailSounds sound system starts up.
5. Move ‘em out! Press the DIRECTION button on your controller, then throttle up.
For conventional operation, there must not be a Command Base powered up
anywhere in the area. The locomotive receives its signals through the airwaves. If
a base is detected your locomotive will default to command mode.
8
Note!
Note!
6-28306 Hybrid.indd 8 12/16/09 2:56 PM

9
The switches that control the features and programing of your locomotive are located under the
radiator roof hatch on the top rear of the locomotive Figure 2, page 10. When you lift up the hatch
these switches are visible with their icons. Icons on the left hand side show the ON or RUN positions.
Icons on the right hand side show the OFF or PROGRAM positions. On the inside of the lift off hatch,
there is also a legend with words that help describe the function of each switch.
Looking down at the back of the locomotive with the front facing away from you the switches are as
follows:
Smoke Unit Switch
Used to turn the main smoke stack unit function “ON” and “OFF”.
This switch is "read" by your engine at start-up. Switching it after start-up will
have no effect.
Odyssey II Speed Control System Switch
Used to turn the Odyssey II Speed Control System “ON” and “OFF”.
Battery charging chase lights
Used to turn the chase light effect “ON” and “OFF”. This switch is "read" by your
engine at start-up. Switching it after start-up will have no effect.
Program Run Switch
Used to assign an ID# and reprogram the locomotive in LEGACY and Command
operation when the switch is in the “PROG” position. Also used to “lock” your
locomotive in a single direction, or neutral, in conventional operation when the
switch is placed in the “PROG” position. See pages 21, 27, and 31.
Figure 1. Locomotive switch functions
PROGRAM
ON
-
ON
RUN
SWITCH
OFF
+
OFF
Sound controls
Volume UP/DOWN Control
Used to turn the maximum volume up or down.
RailSounds ON/OFF Switch
Used to turn off all sounds except horn and bell. Switch is read when
the locomotive is powered up after it has been powered down for at
least 10 seconds.
Locomotive switch function overview
Locomotive switch location
SWITCH
SWITCH
SWITCH
SWITCH
SWITCH
SWITCH
SWITCH
SWITCH
SWITCH
SWITCH
SWITCH
SWITCH
SWITCH
SWITCH
SWITCH
SWITCH
SWITCH
SWITCH
SWITCH
SWITCH
SWITCH
SWITCH
SWITCH
SWITCH
SWITCH
6-28306 Hybrid.indd 9 12/16/09 2:56 PM

+ -
10
Insert tab into
slot in body
Front of Locomotive
Slot
Lift hatch up,
then pull back
Rear of Locomotive
Figure 2. Locomotive switch locations
Locomotive switch function overview
Locomotive switch location continued
6-28306 Hybrid.indd 10 12/16/09 2:56 PM

11
Figure 3. Installing the battery in the locomotive
LEGACY RailSounds sound system operations
Installing the battery
Although the LEGACY RailSounds sound system is powered through the track, we
recommend that you install a nine-volt alkaline battery in the locomotive to prevent
the sound system from shutting down during track power interruptions (for example,
at a switch or a dirty section of track). Follow these steps and see below as you install
the battery.
If the RailSounds sound system turns off during interruptions in track power,
you may need to replace the battery.
1. Lift the radiator roof hatch off the rear of the locomotive body by lifting up at the rear
and pulling back. See Figure 2 page 10.
2. Remove the protective cover from the battery harness.
3. Snap the battery harness onto the nine-volt alkaline battery’s terminals.
4. Slide the battery into the battery holder.
5. Replace the radiator roof hatch on the body by inserting the tab at the front of the
radiator fan housing and placing the rear on the magnets. See Figure 2 page 10.
Note!
6-28306 Hybrid.indd 11 12/16/09 2:56 PM

12
Get your engine running now by following the instructions in this guide. We'll power up
the track, "address the engine" so it can be controlled by your CAB-2 remote, and learn
to use the Velocity Throttle, Horn, Bell, Brake and Direction commands.
Power Up The Track
If using a PowerMaster, TPC or ZW, refer to the proper manual for the correct method
to power up. With your locomotive on the track and ready to roll, power up your track to a
constant 18 volts. If a circuit breaker trips when you turn on the Lionel power supply, check
the wheels of your locomotive to make sure they are all securely on the track. Check to
make sure the track is free of all metals that may cause a short circuit.
Address Your Engine
First, you must address the engine. This "tells" your CAB-2 which locomotive you want
to control. This is important when you have more than one engine on your layout.
To address an engine:
1. Press ENG
2. Press 1
LEGACY Control System operations
This section is a brief overview of the LEGACY Control System. For a more in-depth
explanation of the LEGACY Control System features, please see your LEGACY Control
System Operations Manual.
GET READY TO RUN
See reference numbers 1, 2, and 3
Start 'Er Up
Now it is time to start up your engine's sound system.
3. Press Startup
Your engine sound system will start up and the Touch-screen Control Panel will appear.
Startup dialog. Pressing and holding the startup key while the engine is off triggers a
conversation between the dispatcher and locomotive crew, prior to the prime mover sounds
coming on. Tapping the same button while the engine is shutdown starts the prime mover
sounds without dialog.
Note!
6-28306 Hybrid.indd 12 12/16/09 2:56 PM

LEGACY Control System operations
The LEGACY CAB-2 Remote Controller
13
Main Display
Displays real-time information about your railroad system.
Displays real-time feedback of operation.
Scroll Button
Navigates through the entire list of
Engines, Trains, Switches, etc.
Select Button
Performs addressing by 3-4
digit road number.
Touch Screen Key Pad
A group of touch sensitive keys with
icons for each function. These keys
serve many purposes and their icons
change accordingly.
Train Brake Slider
This slider is used to increase or
decrease the amount of Train Brake
affecting the engine or train.
Train Link Button
For future use.
AUX-2/Out Button
Controls switch direction.
Turns Headlight ON/OFF
Emergency Halt Button
Stops everything on layout;
also stops recording
playback.
Record Button
Used to record and play back
events.
Velocity Throttle
Throttle control over
engines, also used to
navigate thru info/options.
Set Button
Used to set Engine address and for
programming.
Info Button
Used to enter/view the info/options of selected
components.
CTC Button
Press and hold to turn your remote on
and off. Tap this button to
enter the remote and base options. Tap
it again to return to the main screen.
Soft Keys
These keys directly correlate to the 5
selection boxes located at the bottom
of the main display. These are also
used in the info/option menus to select
options.
Warning Sound Controller
Warning Bell and Variable Whistle/Horn
control. Pull down to sound Whistle/
Horn. Push up and release to trigger
Warning Bell.
Official R.R. Speed Control Bar
Toggles the touchscreen display of R.R.
preset speeds and control panel.
Multi Controller
Boost, Brake, and Direction control.
Rock forward for Boost, rock backward
for engine brake, and press down for
direction change. Click-hold-and rock
for absolute direction selection.
Front & Rear Coupler Buttons
Fire couplers.
Low, Medium, High Momentum Buttons
Used to select the desired momentum of your
addressed engine/train/accessory.
AUX-1/Thru Button
Press to view the Control Panel
while operating. Controls switch
direction.
Feedback Button
Toggle ON/OFF the vibration feedback
feature in the CAB-2 Remote.
6-28306 Hybrid.indd 13 12/16/09 2:56 PM

14
LEGACY Control System operations
THE VELOCITY THROTTLE
The Velocity Throttle (that big red rotary knob on the bottom of your Lionel remote)
is used to start your engine moving, slow it down or speed it up. Use it simply by
turning it clockwise (speed up) or counter-clockwise (slow down).
4. Turn the Velocity Throttle clockwise a small amount. Your engine will begin to move.
5. Experiment with the engine’s response to the Velocity Throttle. Turn the Velocity
Throttle clockwise and counter-clockwise.
6. Slow and stop your engine by turning the Velocity Throttle counter-clockwise.
See reference numbers 4, 5, and 6
See reference numbers 7, and 8
THE MULTI-CONTROLLER
Direction
The direction of your engine toggles between forward and reverse at the touch of
the Multi-Controller.
7. Press the Multi-Controller once. Your engine will come to a stop and the lights will
change directions.
8. Turn the Velocity Throttle clockwise a small amount. Your Engine will reverse
directions and travel in the opposite direction.
6-28306 Hybrid.indd 14 12/16/09 2:56 PM

15
LEGACY Control System operations
THE MULTI-CONTROLLER (continued)
Boost & Brake
Boost and Brake give you another way to
control the speed of your train. Boost gives
your loco a temporary increase in tractive
power, and returns to the previous speed when
you release the control. The brake command
slows you down more quickly than the Velocity
Throttle alone.
9. Experiment with Boost and Brake. Notice
how your engine responds to the Multi-
Controller. See reference number 9
THE TRAIN BRAKE SLIDER
ATrain Brake is used to slow down and limit the top speed of your train by adding
a load. The more the Train Brake is applied by pulling the Train Brake Slider down, the
more laboring is heard from the engine. Eventually Train Brake application will slow
down the train and it is even possible to stop a train by pulling the Train Brake Slider
all the way down. A tremendous amount of laboring can be heard whenever you apply
the Train Brake in a large amount.
10. Experiment with the Train Brake. Try a small amount of the Train Brake when your
engine is moving down the rails at a medium speed. Notice the effect the Train
Brake has on sound and speed. Try adding even more Train Brake and notice that
the engine sounds like it is working harder and harder.
See reference number 10
6-28306 Hybrid.indd 15 12/16/09 2:56 PM

16
LEGACY Control System operations
THE WARNING SOUND CONTROLLER
Warning sounds are an important part of Lionel Railroading. Your Lionel Legacy
Control System equipped engines have a real-time variable "quilling" Horn while
Lionel TMCC engines do not have this feature.
11. Blow the Horn by pulling down on the Warning Sound Controller.
12. Try pulling down the Warning Sound Controller various amounts and listen. Notice
the difference in intensity of the Horn sound.
13. Push the Warning Sound Controller up once and quickly release. Notice that the
bell rings.
14. Push the Warning Sound Controller up and hold it for 1.5 seconds. Notice that the
bell is sounding continuously.
15. Push the warning sound controller up and hold for 1.5 seconds. Notice that the
continuous bell stops.
16. Experiment with ringing the bell in your own rhythm or continuously, depending on
how you push the Warning Sound Controller
See reference numbers 11, and 12 See reference numbers 13, 14, 15, and 16
6-28306 Hybrid.indd 16 12/16/09 2:56 PM

17
LEGACY Control System operations
THE SPEED BAR
Selection of Preset Speeds
The Speed Bar is used to select a new touch-screen Icon Control set. This set of touch-
screen keys is used to select preset speeds. Pressing AUX-1 returns you to the standard
control panel.
17. Press, hold and release the Preset Speed icons one by one. Experiment.
18. The speed of the engine
changes with each press
and release of a different
Preset Speed key.
19. You can also use the Velocity
Throttle and other action
controls in this mode and
continue to use Preset
speeds at the same time.
20. Repeat step 17.
21. Press AUX-1 to leave the
Preset speed mode and
return to the Standard
Control Panel.
Note: Pressing and holding a
preset speed button triggers
corresponding dialog between
the dispatcher and locomotive
crew. Tapping a preset speed
button changes the locomotive
speed without dialog.
22. Press the speed bar to toggle between the Speed Control Panel and the Standard Control
Panel.
At this point you know the basics of how to operate your LEGACY Control system. There is
a lot of fun waiting as you experience the interaction of the controls and the touch-screen.
Be sure to read the entire Lionel Legacy Control System Manual to get the most from your
Lionel products.
See reference numbers 17, 18, 19, 20, 21, and 22
6-28306 Hybrid.indd 17 12/16/09 2:56 PM

18
Rule 17 lighting features – In Auto mode, when the locomotive stops the headlights dim.
Press Rule 17 OFF Button
Standard Lionel diesel behavior, headlamp at full intensity in motion and stop conditions.
TAP Rule 17 ON button:
Toggles headlamp between dim and full settings. Does not engage Rule 17 Auto mode.
PRESS and HOLD Rule 17 ON Button:
Engages Rule 17 Auto mode, which causes the headlights to dim when the locomotive stops.
When operating the locomotive under low-light or dark
conditions, Ground Lights provide the engineer and
brakeman with a visual reference to the ground and allow
them to more accurately judge the motion of the locomotive.
AUTO MODE is the default operation of the Ground Lights.
In AUTO MODE, the Ground Lights are ON when the locomotive
is stopped and they remain ON when the locomotive is in motion through speed step 24. At speed step
25 and above, the Ground Lights are OFF. When the locomotive slows to speed step 24, the Ground Lights
will turn ON. In the Legacy environment, you may activate the Ground Lights when the locomotive is in
motion at speed step 25 and above using the icon shown below to turn the Ground Lights ON. When the
locomotive comes to a stop by either throttling down or by pressing the DIRECTION button, the Ground
Lights will default to AUTO MODE. You may also set the Ground Lights so that they will remain OFF when
the locomotive is stopped or in motion by using the icon shown below to turn the Ground Lights OFF. When
the Ground lights are set to OFF, The AUTO MODE is de-activated.
For optimal effect of the functional Ground Lights, operate your locomotive in low light conditions.
LEGACY Control System operations
Rule 17 Lighting ON Rule 17 Lighting OF
Ground Light ON Ground Light OFF
Note!
Ground light
RULE 17 LIGHTING CONTROL
GROUND LIGHT CONTROL
6-28306 Hybrid.indd 18 12/16/09 2:56 PM

19
LEGACY Control System operations
LEGACY RailSounds
Figure 5. Legacy RailSounds and RESET icons
Engine RPM up
Increases RPM levels.
Engine RPM down
Decreases RPM levels.
Crew Talk
Engineer begins radio dialog and dispatcher
replies.
Volume UP
Raises the volume of the LEGACY RailSounds
sound system background sounds, such as
diesel RPM and air release sounds. The horn,
bell and dialog are unaffected. The default
is full volume. The volume setting is retained
when track power is turned off.
Volume DOWN
Lowers the volume of the LEGACY RailSounds
sound system background sounds, such as
diesel RPM and air release sounds. The horn,
bell, and dialog are unaffected. The volume
setting is retained when track power is turned
off. Sound volume decreases.
RailSounds Shutdown
Activates the LEGACY
RailSounds sound system
shutdown sequence when
stopped.
Shutdown sounds.
Emergency Key
Activates the emergency
stop feature while in motion.
(Icon will change as the
state of the locomotive
changes).
Stops and resets the locomotive
Resets the locomotives direction
to forward and restores standard
lighting defaults.
Tower Com
Dispatcher begins radio dialog and
engineer replies.
6-28306 Hybrid.indd 19 12/16/09 2:56 PM

20
Activating while the locomotive is in motion enables an arrival conversation
for 30 seconds. If the train stops within this time, pressing will play this special
conversation.
(recently in motion)
*
*
Activating the CrewTalk dialog and TowerCom announcements
With the LEGACY RailSounds sound system, CrewTalk dialog and TowerCom
announcements feature a variety of brief radio conversations between the engineer
and the dispatcher. All dialog is intelligible, and each comment is followed by at least one
automatic response.
CrewTalk dialog is an engineer initiated radio conversation with the dispatcher. TowerCom
announcements are a dispatcher initiated radio conversation with the engineer. Be sure to
listen for the different combinations of words and phrases that comprise these exchanges.
See below for the dialog commands. The dialog in the table provides examples of the
conversations you can trigger. The actual phrasing will vary.
Locomotive Commands Example dialog
AUX1, Crew: Can we go?
Tower: No, please standby
AUX1, Tower: Stand by for clearance
Crew: Roger
Crew: Can we go?
Stopped Tower: Roger, you are clear
Tower: You are clear for departure
Crew: Roger, we are clear
Crew: Signing off!
Shutdown sequence
Crew: Train is moving
Tower: Roger
Crew: Are we clear ahead?
Tower: Roger, clear ahead
Moving Tower: You are clear inbound
Crew: Roger
Tower: Emergency stop!
Crew: Emergency stop, braking now
LEGACY Control System operations
6-28306 Hybrid.indd 20 12/16/09 2:56 PM
This manual suits for next models
1
Table of contents
Popular Toy manuals by other brands

GREAT PLANES
GREAT PLANES Piper j-3 cub instruction manual

Mega Construx
Mega Construx Call of Duty Dragonfire Drone Strike manual

LEGO
LEGO Technic 9397 Assembly guide

Fisher-Price
Fisher-Price G4415 manual

Hasbro
Hasbro GI Joe B.A.T Attack 61975/61874 instructions

Peg-Perego
Peg-Perego Deere CONSTRUCTION TRAILER Use and care

Mattel
Mattel Barbie VIDEO GAME HERO instructions

Horizon Hobby
Horizon Hobby E-FLITE Turbo Timber Evolution instruction manual

Faller
Faller SET OF SIDEWALK TILES instructions

Seagull Models
Seagull Models YAK 54 Assembly manual

marklin
marklin 29710 instruction manual

E-FLITE
E-FLITE Carbon-Z Cub instruction manual