GE 09GP110 User manual

We bring good things to life.

Important Infor na an
IlllI
WARNING
Toreduce the risk of fire or shock
hazard, do not expose this TV to rain
or moisture. A
TO REDUCE THE RISK OF _C SHOCK, DO
NOT REMOVE COVER (OR BACK). NO USER
SERVICEABLE PARTS INSIDE. REFER SERVI(3NG
TO QUAt,IFIED SERVICE PERSONNEL
Thissymbolindic_
"dangerousvoltage"inside
theproductthatpresentsa
riskofelectricshockor
personalinjury.
I I
Thissymbolindicates
importantinsm_ons
accompanyingthe
product.
Cautions CAUTION:
Toreduce the risk of electric shock, match wide blade of plug to
wide slot, fully insert.
Note To Cable TV Installer
Refer tothe identfficadon/rati_ng label on the backof this productfor its proper
operating voltage.
FCC Regulations state thatunauthorized changes ormodifications to this equipment
may void the user's authorityto operate it.
CAUTION: If fixed (non-moving) images are left on the screen for long periods,
they may be permanently imprinted on the screen. Such images include network
logos, phone numbers, and video games. Extended viewing of channels displaying
these images should be avoided.
This reminder is providedto call your attention to Article 820-40 of the National
Electrical Code (Section 54 of the Canadian Electrical Code, Part 1) which provides
guidelines for propergrounding and, in particular,specifies thatthe cable ground shall
be connected to the grounding system of the building as close to the point of cable entry
as practical.
Product
Registration
Hease fill out the productragistrafion card andreturn it immediately. Returning this
cardallows us to contact you ff needed.
Keep your sales receipt to obtain warranty parts and service and for proof of
purchase. Attach it here and record the serial and model numbers in case you ever
need them. The numbers are located on the back of the TV.
ModelNo
SerialNo
PurchaseDate:
DealedAddress/Phone

Introduction .....
Thank you for choosing GE Table of Contents
Your television is designed for long
life and superior operation. Despite its
sophistication, your new "IV is
amazingly simple to operate because it
has so many automatic features.
Important Information .............................................................i
Getting Started
First-Tm_e Operation .................................................................. 2-3
Controlling Your TV
Front Panel .................................................... ................................. 4
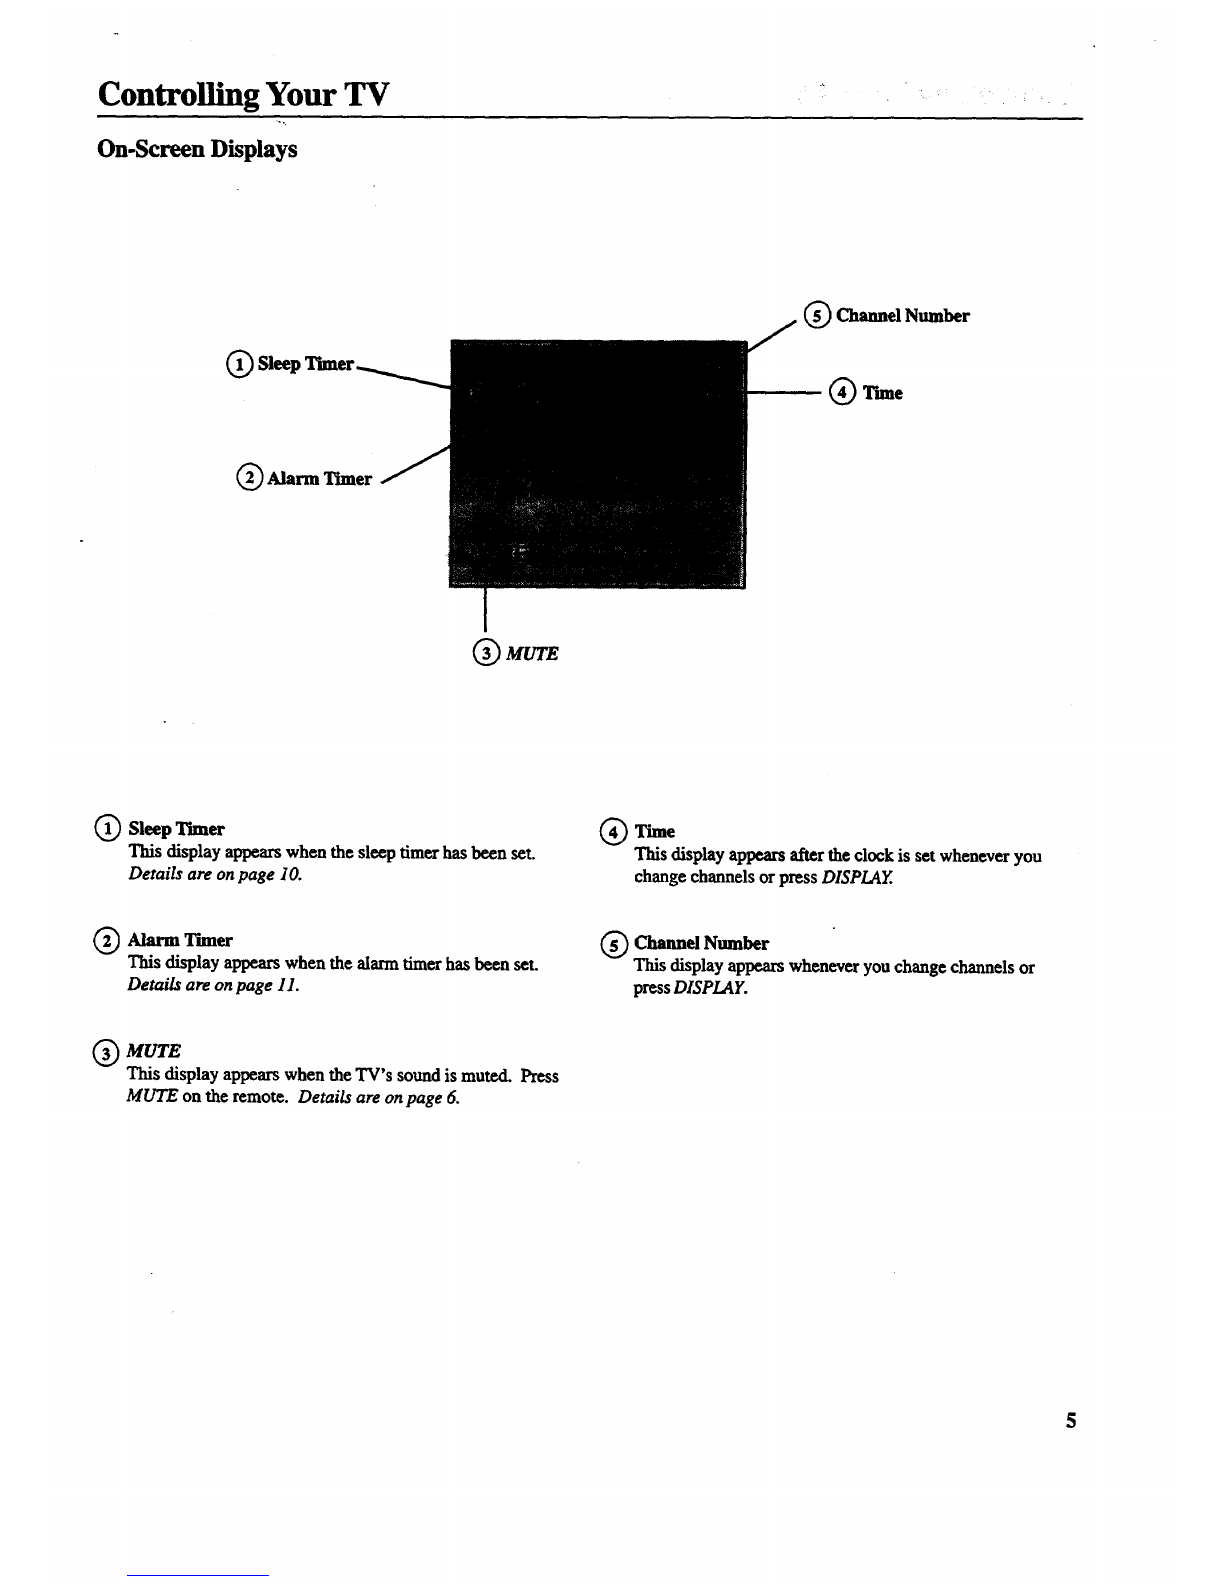
On-Screen Displays ....................................................................... 5
Remote Operation ....................................................................... 6-7
Operating Features
VIDEO Menu ................................................................................. 8
SETUP Menu ................................................................................. 9
Languages (English, French, Spanish) .......................................... 9
Sleep Timer Operation ................................................................. 10
Alarm Timer Operation ............................................................... 11
Autoprogramming Channel Memory .......................................... 12
Editing Channel Memory ............................................................. 12
Connecting Your TV
Antenna/Cable Information ......................................................... 13
Dipole Antenna Connection ........................................................ 13
Home Antenna Connections ........................................................ 14
Cable-TV Connections ................................................................ 15
Mounting Your Television ....................................................... 16.18
Getting Started
Cable-TV Operation .................................................................... 19
Limited Warranty .................................................................... 20
Accessories
Accessories .................................................................................. 21
Order Form ............................................................................. 21-22
Caring for Your TV
Cleaning & Care .......................................................................... 23
Trouble Checks ......................................................................... 24

Getti'ng Started
First-Time Operation
The steps below will help you get your TV connected and working quickly.
Page numbers are also listed for more details.
1. Unpack TV and accessories.
Shown below arethe accessories that
came packed with your TV.
6
DipoleAntenna
AC PowerCord
RemoteControland
Two Batteries
(Under Counter Mounting Hardware)
I =l"
One Mounting Bracket /t_';
(Two Pieces) OneMountingGukle(TemOate)
Five Washers Five Hex Nuts
FifteenSpacers:
Fifteen Phillips Screws: FNe 1"Spacers
Fwe 1"Screws Five 1/2" Space_
Rye2"Screws Rve1/4"Spacers
Rye 3"Screws
Two Power Cord Hooks
2. Place batteries in remote.
1. Turnthe remotecontrol facedown.
2. Remove the battery cover.
3. Place two "AAA" batteries as shown
matching the + and- end of each
battery in the compartment.
4. Replace the cover.
3. Connect antenna or
cable-TV system.
Most antenna or cable-TV systems can
be connected as shown here.
IncomingCablefrom Antenna or
Cable-W System
Ba_of
"IV
• Details forconnecting a home antenna
to your'IV axe onpage 14.
• Details forconnecting a cable-TV
system to your TV are onpage 15.
4. Attach power cord.
First attachthe flat end of the power cord
completely into the connector on the back
of your TV, andthen plug the otherend
into awall outlet.
Do This Not This
2

Getting Started
First-Time Operation
5, Turn on TV and place channels
in memory.
YourTV is designed to place active
channels into your TV's memory the first
time you turn it on.
I -- I l,,,l_ I
I:_11, _ llse.,
0@0
•Press POWER on the "IVor remote to
turnon the TV.
• The TV automatically cycles through all
channel numbers andplaces active
channels into the channel memory.
When your TV is finished, it tunes to
the lowest channel number in its
channel memory.
6. Edit the channel memory,
Youcan add and erase channels from
memory as desired.
•Press MENU repeatedly to highlight
SETUP. Then press + to select the
SETUP menu.
•PressMENU repeatedly to highlight
EDIT CHANNELS.
Press MKVU
repeatedlyto
see 2nd setup
m_lU.
•Press + to select EDIT CHANNELS.
•Select the desired channel number by
pressing the CHANup or down button
or by pressing two number buttons.
7. Set the dock.
•Press MENU repeatedly until SETUP is
highlighted. Then press + to select the
SETUP menu.
• Repeatedly press MENU to select
CLOCK.
• Press and hold- to set the correct hour.
Then press and hold + toset the correct
minutes.
• Press CLEARto removethe menu from
the screen.
• Then press + to add a channel, or
press- to erase achannel. Details
are onpage 12.
•Press CLEAR to remove the menu from
the screen.
3

Controlling Your TV
Front Panel
Shown here are the front-panel buttons.
r
€'-
J
Remote Sensor
Remote Sensor
• When using the remote control, point it toward this sensor.
MENU Button
•Press repeatedly until the item you want is highlighted, then
press + or- to enter the menu.
•Press repeatedly to move down each menu screen and then
press + or - to adjusteach setting.
CH Buttons (Channel Up and Down)
(Also 1 and 2 Buttons)
•Press Channel up to see the next higher channel in memory.
•Press Channel down to see the next lower channel in memory.
• You can add orerase channels in memory as desired. Details
are on page 12.
VOL Buttons (Volume Up and Down)
(Also + and- Buttons)
• Press VOL +to increase volume, orpress VOL- to
decrease volume.
• Press + or- to adjustthe setting of an item thatis
highlighted in the menu.
•The volume display will automatically appearon the
screen when you press the VOL buttons if there are no menus
on the screen.
POWER Button
•Press to turnthe TV on or off.
4

Controlling Your TV
On-Screen Displays
QSlee
(_) Alarm Timer
QChannel Number
QMUTE
QSleep Timer
This display appearswhen the sleep timer has been set
Details are on page 10.
(_ Time
This display a_wars after the clock is set whenever you
change channels or press DISPLAY
(_ Alarm Timer
This display appears when the alarm timer has been set.
Details are onpage 11.
Channel Number
Qhis display appears whenever you change channels or
pressDISPLAY.
QMUTE
This display appears when the TV's sound is muted. Press
MUTE on the remote. Details are onpage 6.

Controlling YourTV •
Remote Operation
When operating the remote, point it
directly at the front of the TV.
Objects between the remote and the
remote sensor can block the signal to
the 'IV.
fPOWER
©
MUTE PREV CH
CHAN
CLEAR MENU RESET
0
POWER Button
• Press to turn the TV on oroff.
PREV CH Button (Previous Channel)
• Pressing this button switches the TV
back to the last tuned channeL This is
useful if you want to watch two
channels.
• Select the first channel you wish to
watch. Then select the other channel by
pressing two number buttons.
• The TV changes back and forth between
the two channels each time you press
this button.
DISPLAY Button
•Press to display the time and channel
numberon the screen.
•Press to see ff the Sleep Tuner and/or
Alarm Tuner is set
• Press to quickly remove menus from
the screen.
MUTE Button
•Press to quickly reduce sound to
minimum level.
•Torestore sound and normal picture,
press MUTE again orpress VOLup.
CHAN Buttons (Channel Up and Down)
(Also 1and 2 Buttons)
• Pressto select the next higher or lower
channel in memory.
• You can add or erase channels in
memory as desired.
Details are on page 12.
VOL Buttons (Volume Up and Down)
(Also- and + Buttons)
• Press VOL+to increase volume, or
press VOL- to decrease volume.
• Press + or- to adjust the setting of an
item that is highlighted in a menu.
•The volume display appearson the
screen when you press the VOLbuttons.
t
6

Controlling Your TV
POWER
©
MUTE PREV CH
VOL
®
CHAN
CLEAR MENU RESET
bbb
bbb
b
INPUT
©b
SKIP
©
MENU Button
• Press repeatedly until the item you want
is highlighted, then press + or- to enter
the menu.
• Press repeatedly to move down each
menu screen and then press + or- to
adjusteach setting.
RESET Button
•Press toreturn all video settings (color,
tint, contrast, brightness, and sharpness)
back to the original settings.
CLEAR Button
•Press to clear the screen of all on-screen
displays except MUTE.
Number Buttons (0-9)
•Press to access any channel number.
• To select a channel, press two number
buttons. For example, press 0 then 6for
channel 6.
• To select a3-digit number,press and
hold numberbutton 1until 1-- appears
on the screen. Then press the other
two numbers.
INPUT Button
• Switches the TV to channel 03. This is
useful ff you have a VCR connected to
your'IV.
SKIP Button (Commercial Skip)
• Allows you to look at other channels
during commercials using the
CHAN buttons.
• Each press adds 30 seconds. The timer
can be set to nm for up to four minutes.
The TV switches back to original
channel when time runsout.
7

Operating Features
VIDEO Menu
Press MENU until VIDEO is highlighted. Then press + to select the
VIDEO menu. Press MENU to move down the menu and + and - to
adjust each function.
Press
MENU to
select
VIDEO
Press÷
for 1st
VIDEO
Menu
Screen
The VIDEO RESET function changes all the video functions (color, tint,
contrast, brightness, sharpness) back to the factory settings. Press + or-to
reset the video functions. RESET appearson the TV screen momentarily
while the functions arebeing adjusted.
The COLOR futiction adjusts the amount of color in the picture. Press + or
to select COLOR, then press + to increase or press -to decrease color.
Press
MENU
until the
second
VIDEO
Menu
appears
The TINT function adjusts the color of flesh tones. Press + or- to select
TINZ. Press + to addmore green tint orpress - to addmore red tint.
!The CONTRAST function adjusts the overall brightness and contrastof
the picture. Press + or- to select CONTRAST. Press + to increase or
press -to decrease contrast.
The BRIGHTNESS function adjusts the brightness of the darkportions
of the picture. Press + or- to select BRIGHTNESS. Press + to increase
or press - to decrease brightness.
The SHARPNESS function adjusts picture sharpness. Press + or- to
select SHARPNESS. Press + to increase orpress -to decrease.
t
8
Adjustment
Displays These functions are displayed individually at the bottom of the screen
once they have been selected. The setting can be adjusted at that time by
pressing either the +or- button.

Operating Features
SETUP Menu
Press MENU until SETUP is highlighted. Then press + to select the
SETUP menu. Press MENU to move down the menu and + and -to
adjust each function.
1st
SETUP
Meau
Screen
By setting the Sleep function, you program your TV to turn itself off after a
of time. This is useful whenever you want to watch "IV for an
houror so before going to sleep. Press the + or- button to select the length
of time you want the "IVto stay on. Details are onpage 10.
!Youcan program your TV to turnitself on ata specific time by setting the
ALARM time function and turning the ALARM: ON/OFF function ON.
page 11.
iThe ALARM: ON/OFF function lets you turnthe alarm on or off by pressing
or- button. Details are onpage 11.
After setting the CLOCK function, the time is displayed on the TV screen
whenever you change channels or press DISPLAY. Press and hold- to set
•the correct hours and + to set the correct minutes. Details are on page 3.
Press
MENU
until the
second
SETUP
Menu
appears
When you press + or- to startthe AUTOPROGRAM function, the TV cycles
through all channels and places only the active channels for your area in its
channel memory. The channel memory is the list of channels the TV stops on
when you press CHAN up or down. Details are on page 12.
The EDIT CHANNELS function allows you to edit the channel memory by
adding or erasing channels. Details are onpage I2.
!The ANTENNA: CABLFJAIRfunction tells your "IV whether you have cable
or a home antenna connected to it. The "IV adjusts this function for you
when you start the AUTOPROGRAM function. If you wish to adjust it
manually, press + or- to switch between the CABLE and AIR setting.
Languages
The on-screen displays in this TV can
be displayed in one of three languages:
English, French, or Spanish. When
you select a language, most of the
displays will be shown on the screen
in your preferred language.
Selecting a Language
1. Press MENU once to bring up the
main menu and highlight ENGLISH. 2. Press + or- to select FRANCAIS
(French), ESPANOL (Spanish),
or ENGLISH.
9

Operating Features
Sleep Timer Operation
By setting the Sleep Timer, you can
program your TV to turn itself off
aftera certainperiod of time (upto
four hours). This is useful whenever
you want to watch TV for an hour or
so before going to sleep.
Setting the Sleep Timer
1. Press MENU until SETUP is high-
lighted. Then press + to select the
SETUP menu.
4. When the Sleep Tarter is turned on, the
letters SLP appearon the screen
whenever you change channels or
stations orpress DISPLAY.
2. Press + to select the length of time you
want the TV to stay on. Each press of
the + buttonadds 30 minutes. The
timer can be set to runfor up to four
hours. Each press of the- button
subtracts30 minutes.
5. Repeat step 1 to see the amount of time
remaining before theTV shuts itself off.
32 minutes
remaining
3. When finished, the display disappears
from the screen in a few seconds. To
make itdisappear more quickly, press
CLDgR on the remote.
6. When the Sleep Timer counts down to
one minute, the Sleep Thner display
appears on the screen. When this
display appears, press CLEAR to cancel
the Sleep Tuner if you want the TV to
remain on.
Cancelling Sleep Timer
PressMENU until SETUP is high_ghted.
Then press + to select the SETUP menu.
Pressthe - button until the screen
shows "-:- -".
10

Operating Features
Alarm Timer Operation
The "IV can be programmed to turn
itself on at a specific time within a24-
hour period by setting the Alarm
Tuner. This is useful for using the TV
as an alarm clock. Instead of waking
up to a buzz, wake up to a favorite "IV
program. You may also set the timer
for a special program that you might
otherwise forget.
Once you set the Alarm Tuner, the TV
turns on at die preset time, stays on for
one hour, and then shuts off. You may
need to adjust the channel and volume
.level before activating the Alarm
Tmaer. The Alarm Ttmer turns on the
"IV to the "IV channel station and the
volume level that was selected the last
time the TV was on.
Setting the Alarm Timer
1. Press MENU until SETUP is high-
lighted. Then press +to select the
SETUP menu.
2. Press MENU until ALARM is high-
lighted. Press - to select the correct
hour andpress + to select the correct
minutes.
4. When the Alarm "Vtmeris turned on,
the letters ALM appearon the screen
whenever you change channels or press
DISP£AY.
.
6.
The "IVturns on at the preset time and
automatically sets the Sleep T'maer to 1
hour (60 minutes). It operates for 60
minutes then shuts off.
Toturn the "IV off before the 60
minutes is up, just press POWER on
the TV or the remote. If you wish to
watch TV longer than 60 minutes, then
cancel the Sleep TLmerby setting it
to "-:--". Details are on page 10.
3. After you set the ALARM time, press
MENU to select AL4RM: ON/OFF.
Press + or- to switch this setting to the
ON position.
Turning the Alarm On and Off
1. Press MENU until the ALARM:
ON/OFF function is selected. 2. Press + or- to switch between ON
and OFF.
11

Operating Features
Autoprogramming Channel Memory
The Channel Memory is the list of TV
channel numbers your TV will stop on
when you press the CHAN up or down
button. You can program any list of
channels into the channel memory
although your TV is so automatic that
you wiU probably never need to
manually operate this feature. If you
do, follow the instructions at the fight.
1. Connect home antenna(s) or cable to
yourset.
2. Press MENU until SETUP is high-
lighted. Press + to select the SETUP
menu.
The first time you turn on the TV, it
cycles through all channels and places
active channels into the channel
memory. You can then add or erase
channels as desired by following the
•instructions in the "Editing Channel
Memory" section at the right.
3. Repeatedly press MENU until
A UTOPROGRAM is highlighted.
Editing Channel Memory
Follow these instructions to erase and add
channels.
1. Press MENU until SETUP is high-
lighted. Press+ to select the SETUP
menu.
oRepeatedly press MENU until EDIT
CHANNELS is highlighted. Press + to
select EDIT CHANNELS.
1" EDIT CHANNELS
Notes:
• Signals from scrambled cable channels and
some cable channels having unusual signal
conditions may not be autoprogrammed.
•To prevent the TV from losing its channel
memory, make sure the outlet you plug your
TV into is "on" all the time. Do not plug
the TV into an outlet thatcan be turned on
and off by a wall switch. Also do not plug
the TV into an outlet on the back of another
device (such as a cable-TV converter box)
that is turned off when the device is turned
off.
• If there is an extended power failure, your
TV will automatically reprogram active
channels the first time you turn it on after
the power failure.
2rid
SETUP
Menu
4. Press + to begin Autoprogramming.
The TV cycles through all channels
and places only active channels into
memory.
5. When the TV finishes cycling, you can
check the channels in memory by
pressing CHAN up or down.
2rid
SETUP
Menu
.Select the channel number by pressing
CHAN up ordown ortwo number
buttons on the remote.
When "+" appears next to the channel
number,the channel is in the channel
list. Press - to erase the channel.
When "--" appears next to the channel
number, the channel iSnot in the
channel list. Press + to add the
channel.
4. Press _- to erase or press the +to add.
12

Connecting Your TV
Antenna/Cable Information
Most modern TV antennasreceive both
VHF (Very High Frequency) and UHF
(Ultra High Frequency) channels.
Channels 2-13 areVI-IFchannels, and
channels 14-69 are UHF channels.
Typical
Indoor
Antenna
'_ Typical
Outdoo_
Antenna
In most situations you will get better
picture quality if you use an outdoor
antenna orconnect your TV to acable-IT
system. If this is not possible, connect the
indoor antenna supplied with your TV.
Cable-TV delivers both VHF and UHF
channels and other channels not available
from your antenna.
Shown below aretwo basic types of
antenna cables. Signals from a home
antenna may be conducted through either
type. Cable-TV signals, however, are
always conducted through round, 75-ohm
coaxialcable.
Types of Antenna Cables
Flat 300-ohm
twin-lead cable
Round 75-ohm
coaxial cable
Slip-on End
Screw-on End
Use the connectorshownbelow to connect
your antenna or cable-TV system to the
back of the TV. _Wa_er
Antenna _
Connector _Nut
IMPORTANT NOTE: Antenna
connector, nut, and washer must be
in place when TV is in use.
• Follow the instructions below if you
intendto connect the indoor antenna
supplied with your TV.
-or-
•Follow the instructions onpage 14 if
you intend to connect an indoor or
outdoorantenna to your'IV.
-or-
•Follow the instructions onpage 15 if
you intend toconnect a cable- "IV
system to your TV.
Dipole Antenna Connection
Follow the steps to connect the indoor antenna supplied with
your TV (only if you do not connectanoutdoor antenna or a
cable-TV system).
OInsert the antenna base into the pocketed slot on the back
of your set. Stand at the back of your set with the antenna
twin-lead facing you, and press the base of the antenna
into the slot until it locks in place.
QConnect the ends of the twin-lead the Antenna
to Adapter
supplied with your TV.
QConnect the Antenna to the ANTENNA connector
Adapter
on the back of the TV.
®Later, after you've turned on the IT, adjust the length and
position of the antenna rods for best reception.
• For viewing VHF channels, extend the rods fully.
•For viewing UHF channels, shorten the rods for best
reception.
Dipole Antenna (Supplied)
Base
Slot
Antenna Adapter
(Supplied) _ Q Twin Lead
13

Connecting Your TV
Home Antenna Connections
Follow one of the steps below to connect an indoor or outdoor antenna to your TV (not a cable-TV system).
AIfthe antenna cable coming from your home antenna is a 75-ohm round coaxial cable that carries only VHF (channels 2-13),
only UHF (channels 14-69), or VHF and UHF channels, connect itto your set like this:
Cable _rve_
Home _I TV
Antenna • VHF or UHF Only
or
VHF/UHF Combination
-OR-
B If the antennacable from home is 300-ohm flat twin lead that carries VHF
coming your antenna aonly (channels 2-13),
only UHF (channels 14-69), orVHF and UHF channels, connect itto your set like this:
From Push on Back
Home _of
Antenna "IV
VHF or UHF Only
or Adapter
VIIF/UHF Combination (supplied)
C
D
-OR-
Ifthe antenna cables coming from your home antenna(s) are a 75-ohm round coaxial cable thatcarries VHF (channels 2-13)
and a 300-ohm flat twin-lead cable for UHF (channels 14-69), connect them to your set like this:
UHF
Cables
From and
Home
Antenna(s) VHF I
Note: Be sumto connecttheUHF antennacabletothe
UHF screwsontheAntennaMixer andtheVHF antenna
cabletothescrewsmarked VHF.
PushOh
Antenna Mixer*
Transformer* (use only #193984)
(such as #AH011)
-OR-
If the antenna wires coming from your home antenna(s) are two 300-ohm fiat twin-lead cables as shown here, connect them
to your set like this:
Push on
Cables UHF , _ _ .... •....... _na_A
Home and ......
Antenna(s) VHF "'AntennaMixer*
(useonly #193984)
Note: Be sumto connecttheUHFantennacableto theUHFscrewsontheAntenna
Mixer andtheVHF antenna cableto thescrewsmarkedVHF.
Back
of
TV
14
Optional accessory available from your dealer. Only use Antenna Mixer (Stock #193984).

Connecting Your TV
Cable-TV Connections
Follow one of these steps to connect a cable-TV system to your TV instead of a home antenna. Since cable-TV systems
vary, you may Wish to consult your local cable-TV company for additional information.
A Follow this diagram ff your cable company does not require acable box (no scrambled channels):
m
_ble _ I of
TV
BFollow this diagram if your cable company requires acable box thatcan be controlled by remote control:
A_fl'i[tlmA
,m,n0 .-- W
Cable r"iV
RemembertotuneyourTVto the
outputchannelof thecablebox (usually
2, 3, or4) whenselectingchannelsvia
the cablebox.
CFollow this diagram if your cable company requires acable box that cannot be controlled by remote control:
Incoming (_)
Cable
® © ©
Note: Theseoptionalaccessories(2-way
,puu=__JBs_Q_ anda_ _al
cables(_)) areavailableas akitunder
#AHO41BL.*
The "A" position on the A/B switch lets you select all
non-scrambled channels by the TV's remote. The "B" position allows you to select scrambled channels
via the cable box. Remember to tune your TV to the
outputchannel of the cable box (usually 2, 3, or 4)
when selecting channels via the cable box.
*optional accessories are available from most dealers orelectronics supply stores.
15

Connecting Your TV
Mounting Your Television
Follow these insm_ons if you wantto mountyo_ TV.undera cabinet:
Tools Required:
• Rule ortape measure
• Phillips screwdriver
•Pencil
• Blade screwdriver
• Drill and 1/4" drill bit
•DrillCountersinkAttachment (Optional)
Mounting Considerations:
•Make sure the bottom of the cabinet you select is strong enough to support aTV.
• Allow adequate room for ventilation, room to swivel, access to control knobs and
space for the antenna.
•Mount TV near an AC outlet.
•Do not use area directly beneath TV for cooking.
• Before mounting, turn the set on to check reception in the area you have selected (if
reception is poor try another location).
Mounting Instructions:
1. Prepare cabinet by removing items from counter and cabinet. Clean underside of
cabinet where TV is to be mounted.
2. Cut out the mounting guide and screw guide
•Cut out the guides on the lines indicated.
•The size of the mounting guide and the screw hole positions areidentical to the top
of the mounting bracket.
3. Position mounting guide
•Position the mounting guide on the underside of cabinet 314 inch back from the
cabinet's front edge.
• Position the mounting guide in the desired location and tape it to the bottom of the
cabinet. Be sure the location is a flat surface
Notes: Some kitchen cabinets have front overhangs as shown here. If the thickness of the
overhang exceeds 3/4 inch, tapethe mounting guide as close to the cabinet's front edge as
possible. The farther back you mount the TV, the less you will he able to swivel itto the left
and right (if cabinet is near wall).
The TV will protrudeabout 3" from the cabinet when the mounting guide is positioned 3/4"
back from the cabinet's front edge.
Cabinet Overhang
Mounting Bracket
16

Connecting Your TV
4. Drill holes in cabinet
• Drill l/4-inch diameter holes through the underside of the cabinet bottom using the
five circles on the mounting guide as a guide.
5. Remove mounting guide and drill shavings
Remove the mounting guide and clean the drill shavings from inside and under the
cabinet.
6. Select spacers if required
• The spacers slip over the ends of the screws and allow you to mount the TV below
the edge of the cabinet's overhang.
• Ifyour cabinet does not have an overhang, you probably will not need to use any
spacers.
• Ifyour cabinet has anoverhang, select the proper length spacer(s) so the TV will
clear the overhang when swiveled.
•Two or three spacers can be used together to make lengths of 1/4" to 1-3/4" at 1/4"
increments. Refer to the chartbelow to select the properspacers:
7. Select proper length of screws
• Only five screws are ne_ied. The size you need depends upon your type of cabinet.
• Holding the selected spacers for one of the screw holes under the cabinet, install a
washer and screw inside the cabinet using one of the three lengths of screws
provided.
Note: A visual description of these parts is on page 2.
8. Position mounth_g bracket under cabinet
•Position the mounting bracket under the cabinet as shown and match the screw
holes.
9. Attach mounting bracket to cabinet
• First mount one comer of the bracket. Hold the bracket and spacer(s) in place and
insert the screw from the inside of the cabinet down through washer and drilled
hole or down through countersink and drilled hole.
Note: The washers must be used on metal cabinets and on wood cabinets if you do not
countersink the drilled holes.
* Position the washer flat-side down and place screw into screw bole, through the
spacer(s) and through the screw hole in the mounting bracket.
•Place a nut into the cylinder at the bottom of the mounting bracket screw hole.
Hold nut in place (if necessary, use the top of apencil). While maintaining upward
pressure on the mounting bracket, finger tighten the screw. Do not tighten firmly
until all five screws have been started.
• Align each of the remaining mounting bracket screw holes with the drilled holes
and properly position the selected spacers. Install washers, screws, and nuts as
previously described. Now, finish tightening the five screws but do not overtighten
them.
LessthanI"
1"to 1-1/4"
1-1/4" to 1/2"
1-1/2" to 1-3/4"
1-3/4" to 2"
1/4" Spacers
I/2" Spacers
3/4" Spacers
I" Spacers
3/4"
Spacer
1/4"to3/4"for
ProperMounting
17

Connecting Your TV
10. (Optional)Attach Supplied Antenna to Bottom of TV
Ifyou have attached the supplied dipole antenna to the top of your TV,you will need
to attach it to the bottom of your TV before mounting it. If you have connected
another type of antenna, skip to step I 1
If the dipole antenna is attached to the top of the TV, you can remove it by
grasping the base and lifting it up andoff.
Insert the antenna base into the pocketed slot on the bottom of your TV. Press
the base of the antenna into the slot until it locks in place.
Connect the ends of the twin-lead to the antenna adapter(supplied).
Connect the antenna adapterto the round antenna connector on the back of the
TV.
Later, afteryou have turned on the TV, adjust the length and position of the
antenna for best reception.
•For viewing VHF channels 2-13, extend the rods fully.
• For viewing UHF channels 14-69, shorten the rods for best reception.
• For listening to the radio, ff necessary, adjust the antenna rods for best
reception.
®
11. SHde TV onto Bracket
•Slide the TV onto the mounting hook of the bracket and push it all the way back
until the hook on the bracketlocks into the back of the TV.
• Secure the TV in the bracketby sliding the locking tabon the back of the bracket
into the bracketassembly. You should hear a click sound when the sliding tab is
locked into position.
Warning: make sure the locking slide is pushed fully into the locked position.
Failure to lock the sliding tab into position may allow the TV to fall off the bracket
causing personal injury or damage to the TV. Push the sliding tab into the bracket
Iassembly until you hear a click.
•To remove the TV, slide the locking tab out of the bracket assembly.
• Lift the TV up and gently pull forward.
Note: The TV must be slightly below the cabinet overhang when installed in the bracket.
Some clearance is necessary so the TV can be easily rotated to the desired viewing angle or
removed for portable use.
12. Attach AC Power Cord
•Firstattach the AC power cord to the 4-prong conn_tor on the back of the TV.
•Then extend the cord and plug it into an electrical outlet.
13. Attach Cord Hooks
• You can use the cord hooks to hold the cord out of the way.
• For the most attractive appearance, place the cord hooks atthe back edge of the
cabinet (on or next to the wall) directly above the outlet tobe used.
• To attach the cord hooks, peel off the adhesive back and attach the hooks to a
clean, dry surface on underside of cabinet or back wall.
• Use the cord tie that is attachedto the power cord to wrap andtie excess cord out
, of sight.
18
Table of contents
Other GE TV manuals