GE 27GT619 User manual


ri
RISKOF ELECTRICSHOCK
DO NOT OPEN
Ii
To reduce the risk of electric shock, do
not remove cover (or back). No user
serviceable parts inside. Refer servicing
to qualified service personnel.
I_ his symbol indicates
"dangerous voltage"
inside the product that
presents a risk of electric
shock or personal injury.
_ik his symbol indicates
important instructions
accompanying the product.
WARNING
To reduce the risk
of fire or shock
hazard, do not
expose this TVto
rain or moisture.
Caution: To reduce the risk of electric shock, match wide blade of plug
to wide slot, fully insert.
Attention: Pour _viter les chocs _lectriques, introduire la lame la plus
large de la fiche dans la borne correspondante de la prise et pousser
jusq0 au fond.
Refer to the identification/rating label located on the back panel of your product
for its proper operating voltage.
FCC Regulations state that unauthorized changes or modifications to this
equipment may void the user's authority to operate it.
II II I I I I
_Cable TV Installer: This reminder is provided to call your attention to Article 820-40 of the National _I
IElectrical Code (Section 54 of the Canadian Electrical Code, Part 1) which provides guidelines for J
Iproper grounding and, in particular, specifies that the cable ground shall be connected to the
Lgrounding system of the building as close to the point of cable entry as practical.
F_ THOMSON CONSUMER ELECTRONICS
10330 North Meridian Street
Indianapolis, IN 46290
©1996 Thomson Consumer Electronics, Inc.
Trademark(s)® Registered
Marca(s) Registrada(s)
Printed in U.S.A.
TOCOM 15127130
The following materials were used in printing
this publication:
m,, c0,s,. SOY INK

Step 1
Unpack the TV and accessories. The accessories packed with the IV include a
remote, four AAA batteries, and an antenna adapter.
rIMPORTANT INFORMATION: OPTIONAL STAND
A matching stand has been designed to be used with this television. This
stand is provided with hardware to secure the TV to the stand so that it
cannot be pulled off easily or tipped over. This stand is available from your
dealer, and is not available by mail order.
Caution: if you choose not to use the stand recommended for your TV, take
precautions that the stand or other furniture the TV is placed on is properly
located and of adequate size and strength to prevent the TV from accidentally
being tipped over or pulled off. This could cause damage to the TV and/or
_personal injury.
Step 2:
Connect your TV. This is a basic
connection from an antenna, cable
box, or VCR to your TV. Connect the
cable from your cable system or off-air
antenna to the cable-in jack on the
back of the TV, as shown.
ANTENNA,CABLE,CABLEBOXORVCR
"IV

Step 3:
Plug in the "IV. Plug the end of the power cord into the wall
outlet, matching the wide blade of the plug with the wide
slot in the outlet. Be sure to insert the plug completely.
Step 4
Put batteries in the remote.
• Remove the battery compartment cover from
the back of the remote.
• Insert the four AAA batteries as shown,
matching the + and - ends of each battery in
the compartment.
• Replace the cover.
Step 5
Turn on the TV.
•Press mv on the remote.
Read the next section, Using the Menu System, which is a brief overview of
the basic rules for getting around in the menus using the remote or TV's front
control panel.
THE MENU RULE: POINT AND SELECT
You only need to know one rule to use the on-screen menus and control
panels: point and select.

_qHAT-tSPOINT AND SELECT?
The point and select method has two steps.
1. Point to a menu item using the MOVE arrows on the
remote.
2. Select a menu item by pressing MENU.
Selecting an item tells the TV's menu system to go ahead
and make the change or go to a place you have indicated.
(You can also select an item by pressing the corresponding
number button on the remote.)
r •
Once you know how to point and select your way through the menus, you
can apply this rule in the menu control panels, which do the real work in the
menu system.

Main Menu
The Main menu is your gateway to controlling the TV. It lets you adjust the
TV's audio, picture quality, screen, time functions and channel settings.
TV MAIN MENU
To select any other menu item:
1. Press MENU to bring up the "l'V's Main menu.
2. Point to any menu item by pressing the up and down arrows until the
item is highlighted in green.
3. Press MENU to select the item and a new menu comes up.
To exit any menu screen, point to Exit and press MENU, or press CLEAR.
The Audio menu
The Audio menu lets you adjust the way the TV sounds.
Audio
Mute Turns off the TV's sound. Press MENU to toggle the Mute feature
between ON and OFF.
XS Stereo -An innovative method for providing stereo sound effect_ m
The sound delivered by your television is XS Stereo. This patented process |
suppresses noise, restores the dynamic range and electronically expands the]
stereo signal to create a more spacious sound effect. J
Stereo Press MENU to toggle the Stereo feature between ON and OFF.
On Sound is reproduced in stereo or mono, whichever is being broadcast.
Off Sound is reproduced in mono.
The Picture Quality Menu"
The Picture Quality menu contains the controls that adjust the TV's picture.
Picture Quali

There are five slider controls for adjusting the way the picture looks. Use the
left and right arrow buttons to adjust the controls.
Contrast Adjusts the difference between light and dark areas of the picture.
Color Adjusts the richness of the color.
Tint Adjusts the balance between the red and green levels.
Black Level Adjusts the brightness of the picture.
Sharpness Adjusts the crispness of edges in the picture.
Auto Color Displays the current setting (ON or OFF). This feature
automatically corrects the color of the picture. Select Off if you prefer to
adjust the picture with the Picture Controls. Use the MENU button to toggle
between the choices.
Reset Picture Controls Resets the picture controls to their original settings.
The Screen Menu
The Screen menu contains the controls that let you adjust the Closed-Caption
mode, Closed-Caption display and menu language.
Screen
Closed-Caption Display Displays a choice list that lets you choose the way
closed captioning information is shown on the screen. Use the MENU button
to toggle between the choices.
Off No captioning information displayed.
On Captioning information shown always, when available.
On When Sound is Muted Displays captioning information, when
available, whenever you press the MUTE button. The captioning
information is not displayed when the sound is not muted.
Closed-Caption Mode Displays a choice list that lets you choose which
captioning mode is used for displaying captioning information. Use the
MENU button to toggle between the choices: CC1 and CC2.
Menu Language Lets you select the language of your choice: English,
French or Spanish. Use the MENU button to toggle between the choices.

The Channel Menu
The Channel menu contains all the commands used to control your channels,
including custom-building your channel list and setting parental controls.
Channel
Signal Type Displays a choice list that lets you select the current antenna
type.
Antenna Choose this if you are currently using an off-air antenna for
UHF/VHF TV signals.
Cable TV Choose this if you are currently using cable or a cable box for
"IV signals.
Auto Channel Search Displays acontrol panel that lets you tell the TV to
search automatically for" all the channels available through the antenna input.
When the "IV finds an active channel, it places it in the channel list; inactive
channels (weak stations or channels with no signal at all) will be removed
from the channel list.
Lists and Labels Displays a control panel that lets you custom-build your
channel scan list, choose a four-character label for each channel, and decide
whether each channel is "parent-approved." Use the up, down, left and right
arrows to enter settings and create labels. Press MENU to exit.

There are several indicators that come up when you change channels or
press the DISPLAY button. This display is called the Channel Marker. The
Channel Marker shown below is just an example of what your screen may
look like.
08:59 Displays the current time.
WRI"V Displays the label assigned to the current channel.
06 Displays the current channel.
Sleep Displayed when the Sleep Timer has been set.
Stereo Displayed when the current channel is broadcasting in Stereo.
CC Displayed when Closed Captioning is available on the current channel.
Mute Displayed when you mute the audio.
Schedule Displayed when the TV is scheduled to turn on.
01-30 Displayed to count down time left on the commercial skip (SKIP) timer.

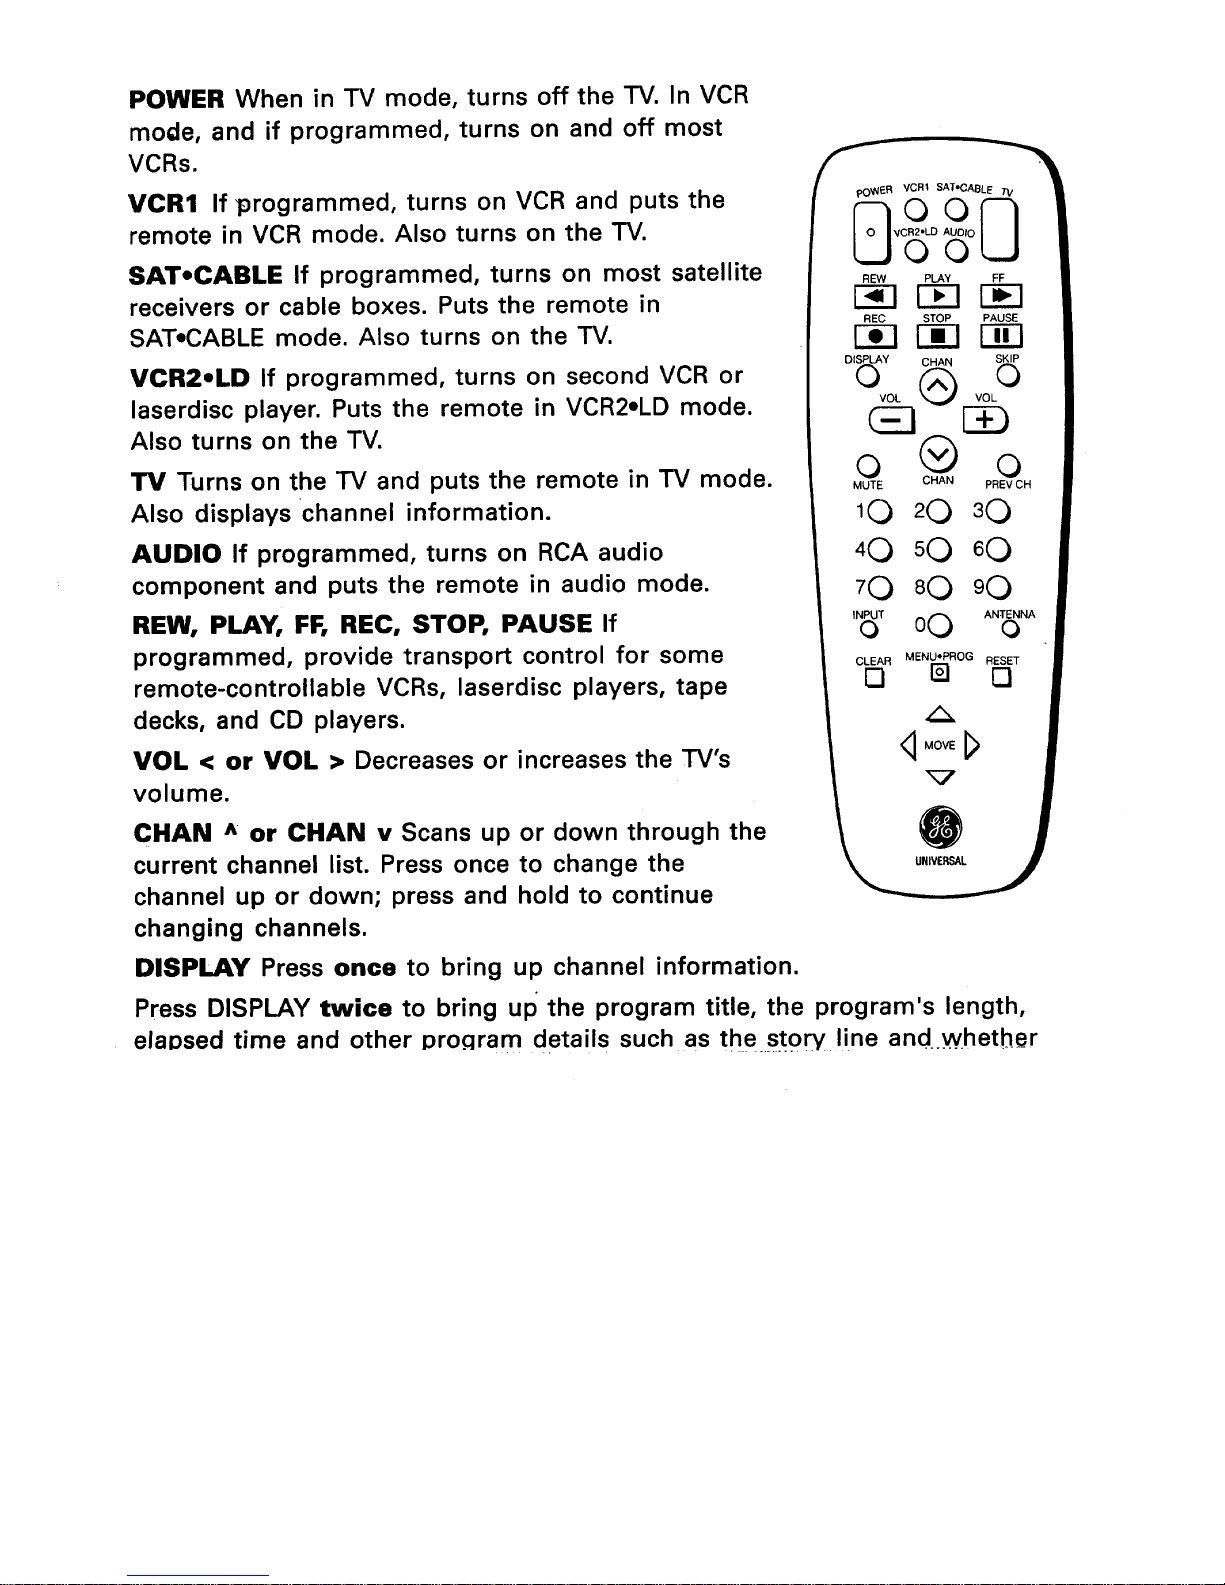
POWER When in TV mode, turns off the TV. In VCR
mode, and if programmed, turns on and off most
VCRs.
VCR1 If programmed, turns on VCR and puts the
remote in VCR mode. Also turns on the TV.
SAT,CABLE If programmed, turns on most satellite
receivers or cable boxes. Puts the remote in
SAT, CABLE mode. Also turns on the TV.
VCR2,LD If programmed, turns on second VCR or
laserdisc player. Puts the remote in VCR2,LD mode.
Also turns on the TV.
TV Turns on the TV and puts the remote in TV mode.
Also displays channel information.
AUDIO If programmed, turns on RCA audio
component and puts the remote in audio mode.
REW, PLAY, FF, REC, STOP, PAUSE If
programmed, provide transport control for some
remote-controllable VCRs, laserdisc players, tape
decks, and CD players.
VOL < or VOL > Decreases or increases the TV's
volume.
CHAN ^or CHAN v Scans up or down through the
current channel list. Press once to change the
channel up or down; press and hold to continue
changing channels.
REW PLAY FF
F_l r-F1 _E]
REC STOP PAUSE
r-_-i r-ffl r-m
DISPLAY CHAN SKIP
o @ o
VOL VOL
E£)
o @ o
MUTE CHAN PREV CH
10 20 30
40 sO 60
70 80 90
INPUTo 00 ANTENNAo
CLEAR MENU*PROG RESET
[] [] []
<1MOVE_
_7
UNIVERSAL
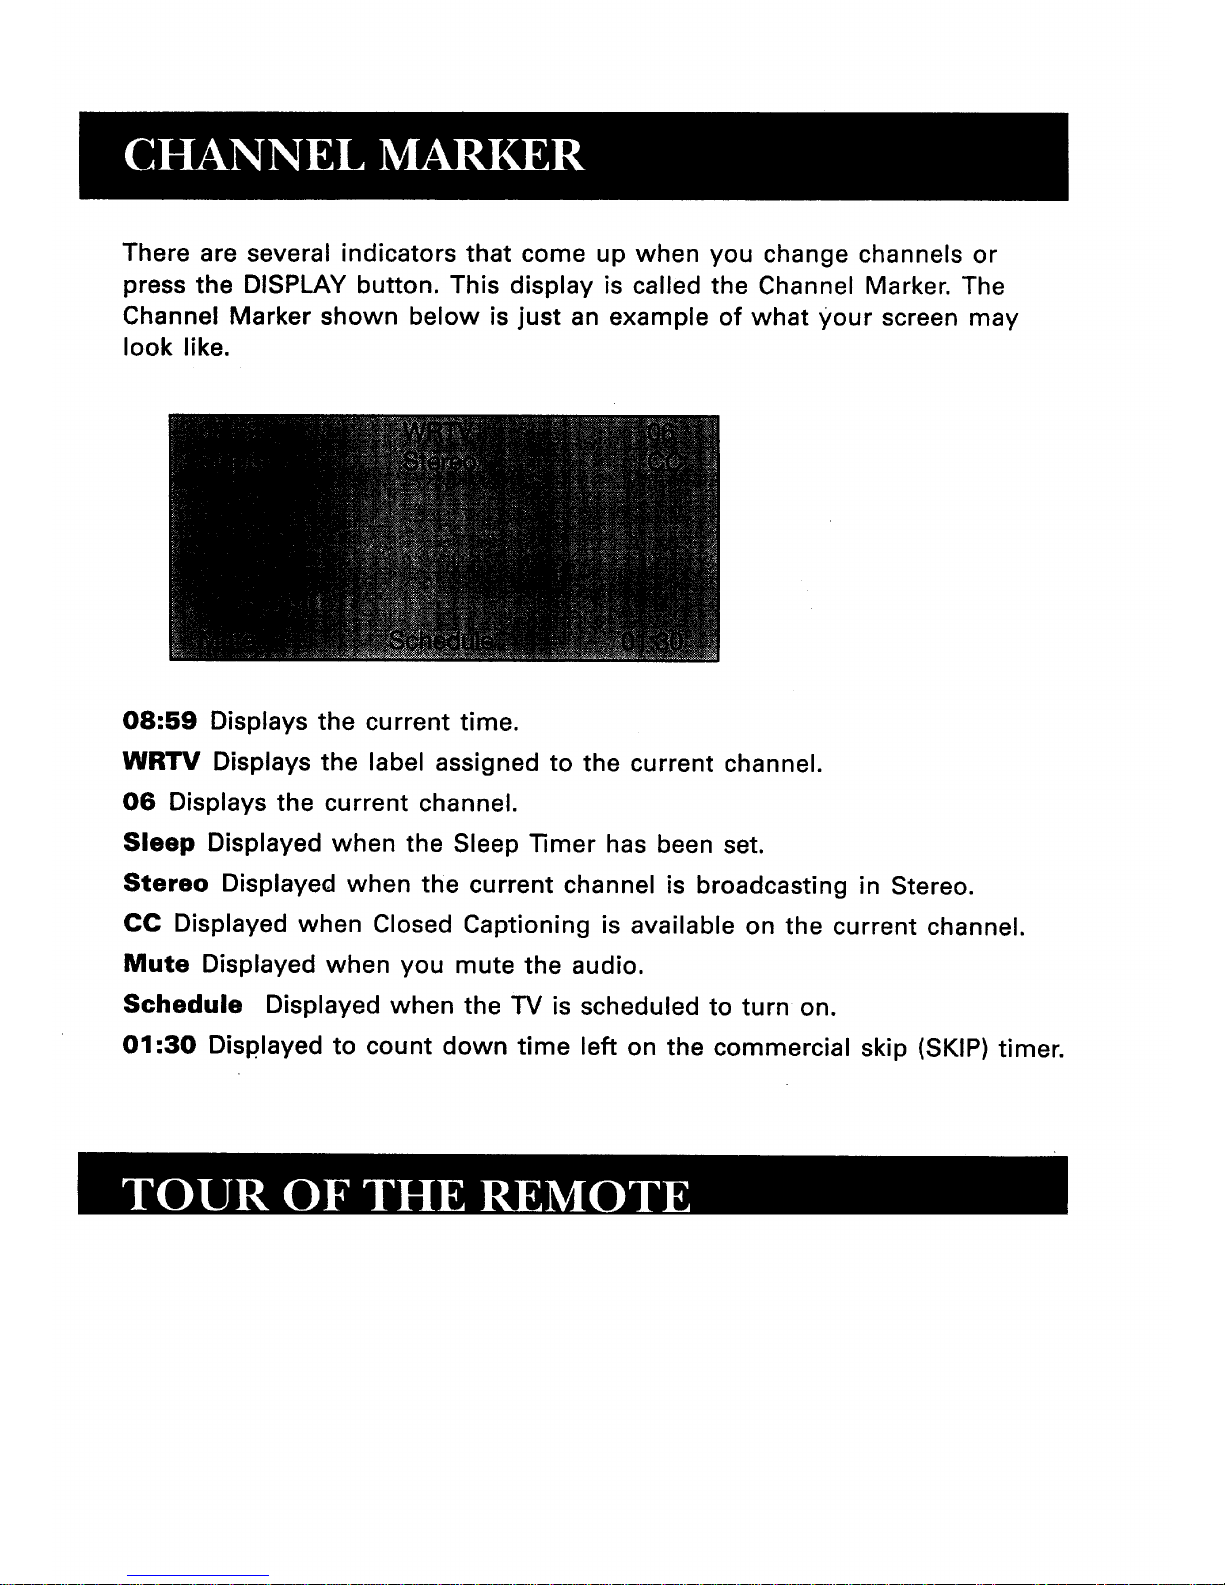
DISPLAY Press once to bring up channel information.
Press DISPLAY twice to bring up the program title, the program's length,
elapsed time and other pro.qram details suchas the StOp/line and..whether

Closed-Captioning is available, l_ress UI:51_LAY again to clear the screen.
Whether all (or any) of the program details are displayed depends on whether
the program provider has sent the information along with the program.
SKIP Press once before changing channels and the TV will wait 30 seconds
before returning you to the original channel. Press repeatedly to add more
time. Press CLEAR to cancel the SKIP timer and remain on the current
channel.
MUTE Turns off the TV's sound. Press again to restore the sound.
PREV CH Returns you to the previous channel.
(0-9) Number Buttons Enters channel numbers and time settings directly
though the remote control. To enter a two-digit channel, press the two digits.
To enter a three-digit channel, press and hold the first digit, then add the
second two. Example: to tune to channel 123, press and hold 1, press 2, then
press 3.
INPUT Press to toggle through the available input sources (CH3, CH4, etc.).
ANTENNA Functions as TV.VCR button in VCR mode and "IV=SAT button in
SAT=CABLE mode.
CLEAR Removes any menu or display from the screen and returns you to TV
viewing. Also cancels the SKIP timer.
MENU=PROG Brings up the Main menu. When in the menu system, selects
highlighted items or returns you to the previous menu. When in VCR mode, it
functions as a Program button.
RESET Returns all picture quality controls to their original settings.
MOVE (ArroWS) Used to point to different items in the menu system. Also
used to adjust the menu controls.

..........."Chart #Use the up and down arrows to scroll Up and down through the
channel scan list. You can enter the channel number directly using the
number buttons.
"Chan Labels Use the up and down arrows to enter a four-character label
for each channel.
Scan List Only the channels included in the Scan list are available when
you scan up and down using the CHAN buttons. Use the up and down
arrows to indicate whether the channel number indicated is included
(YES) or is not included (NO) in the channel scan list.
Parent Approved Use the up and down arrows to choose whether the
channel indicated should be shown when the Parental Control feature is
turned on. Select YES to indicate that the channel can be shown at any
time, regardless of whether Parental Control is turned on. Select NO to
indicate that the front panel cannot tune to that channel when Parental
Control is turned on. Important: You must turn the Parental Control
feature ON in the Parental Control control panel.
Parental Control Displays a choice list that lets you adjust the Parental
Control feature,
On The front panel CHAN buttons will tune only to channels that you
have marked as "Parent Approved" in the Lists and Labels control panel.
Important: When Parental Control is on, the TV's front panel no longer
provides access to the menus. Parents may prefer to hide the remote and
let children use the front .panel to change channels.
Off The TV shows all channels, whether they are marked as "Parent
Approved" or not.
Auto Tuning Lets you set the channel the TV will tune to when you press a
device button (VCR1, VCR2 or SAT=CABLE). For example, you may want the
"IV to tune to channel 3 when you press the VCR1 button. Point to VCR1 on
the Auto Tuning control panel. Use the MENU button to toggle through the
choice list: Not Connected, CH2, CH3 or CH4. Choose CH3 from the list.
Select other auto tuning channels or exit the control panel.

The Time menu contains the controls that let you set the time and schedule
the TV to turn off and on at specific times.
Time
Sleep Timer Displays a control panel that |ets you select the amount of time
you want to give the TV before it shuts itself off. Use the up and down arrows
to increase or decrease the sleep timer by 15 minute increments. Press
MENU to exit.
Schedule Displays a control panel that lets you set up aschedule for turning
the "IV on and off automatically. Make sure to turn the schedule On in
the control panel. Use the up and down arrows and number buttons to
change the settings. Use the left and right arrows to move across the control
panel. You must first set the clock to use the scheduling feature.
Set Time Displays a control panel that lets you enter the current time. Use
the up and down arrows and number buttons to Set the time. Press MENU to
exit.

Programming the Remote to Control other Components
The universal remote can be programmed to control most brands of remote
controllable VCRs, and cable boxes. If you own an RCA, GE, or ProScan VCR,
you probably don't need to program it at all. Other manufacturers' brands
need to be programmed.
To determine whether the universal remote needs to be programmed, turn on
the component (VCR, cable box, satellite receiver, or laserdisc player), point
the remote at the component, and press the appropriate button (VCR1, VCR2,
SATeCABLE, or AUDIO). Then press POWER or CHAN UP or DOWN to see if
the component responds to the remote commands. If not, the remote needs
to be programmed.
Follow these steps to program your universal remote to control your
component:
1. Turn on the component to be programmed.
2. Find the appropriate brand and code number(s) on the code list shown
below.
3. Press and hold the component button on the remote.
4. Enter the two-digit code from the code list.
5. Release component button then press POWER to see if the component
responds to the remote commands. If it doesn't, try pressing the
component button and POWER to see if the component responds.
Once the remote has been programmed with the correct codes, you are ready
to use it to control your devices. To operate the device:
1. Press the device button ('I'V, VCR1, VCR2oLD, SATeCABLE, or AUDIO) to set
the remote to control the device.
2. Press OFF/ON to turn the device off or on.
3. Use the remote buttons that apply to that device.
This remote may not operate all models of the brands that are shown. Use
the codes shown or on the sheet packed with your remote.
Aiwa .................................. 15
Akai .......................... 03,22,23
Audio Dynamics .......... 14,16
Broksonic .......................... 10
Canon ................................ 08
Capehart ............................ 01
Citizen ................................ 09
Craig ............................. 07,12
Curtis Mathes ......... 00,08,15
Daewoo ............................. 13
dbx ................................ 14,16
Dimensia ........................... 00
Dynatech ........................... 15
Emerson ............ 09,10,13,15,
........................ 20,23,24,34,41
Fisher ............. 02,12,18,19,43
Funai .................................. 15
GE .................. 00,07,08,32,37
Goldstar ....................... 09,14
Harman Kardon ................ 14
Hitachi ................ 05,15,35,36
Instant Replay ................... 08
JCL ..................................... 08
JCPenney .......... 02,05,07,08,
............................. 14,16,30,35
JVC ..................... 02,14,16,30
VCR CODES
Kenwood ............ 02,14,16,30
Lloyd's ............................... 15
Magnavox .................... 08,29
Marantz .... 02,08,14,16,29,30
Marta ................................. 09
MEI .................................... 08
Memorex ........... 08,09,12,15
MGA ............................. 04,27
Minolta ......................... 05,35
Mitsubishi ..... 04,05,27,35,40
Montgomery Ward .......... 06
MTC .............................. 07,15
Multitech ............ 07,15,31,32
NEC ..................... 02,14,16,30
Panasonic ......................... 08
Pentax .......................... 05,35
Philco ............................ 08,29
Philips ........................... 08,29
Pioneer .................... 05,16,33
ProScan ............................. 00
Quartz ..... ........................... 02
Quasar ............................... 08
Sansui ............................... 16
Sanyo ........................... 02,12
Scott ........................ 04,13,41
Sears02,05,09,12,18,19,35,43
Sharp ....................... 06,24,39
Shintom .................. 17,26,31
Sony ........................ 17,26,38
Sylvania .................. 08,15,29
Symphonic .................. 02,15
Tashiko .............................. 09
Tatung ............................... 30
Teac .............................. 15,30
Technics ............................ 08
Teknika ............... 08,09,15,21
Toshiba .................... 05,13,19
Totevision .................... 07,09
Unitech .............................. 07
Vector Research .......... 14,16
Victor ................................. 16
Video Concepts ........... 14,16
Videosonic ........................ 07
Wards ........... 05,06,07,08,12,
RCA ...... 00,05,07,08,28,35,37 ........................ 13,15,25,31,35
Realistic ........ 02,06,08,09,12, Yamaha .............. 02,14,16,30
.................................. 15,19,43 Zenith ........................... 11,17
Samsung ....... 07,13,22,32,42

F I
ABC_.............................. 22,46
Anvision ....................... 07,08
Cablestar ...................... 07,08
Eagle .................................. 08
Eastern International ....... 02
General Instrument... 04,05,
.............. 15,23,24,25,30,36,46
Hamlin ................ 12,13,34,48
Hitachi ..................... 37,43,46
Jerrold ............... 04,05,15,23,
.............. 24,25,30,36,45,46,47
Macom ......................... 37,43
Magnavox ......... 07,08,19,21,
.............. 26,28,29,32,33,40,41
NSC ................................... 09
Oak .......................... 01,16,38
Oak Sigma ........................ 16
Panasonic ............... 03,27,39
Philips ...... 07,08,19,21,26,28;
........................ 29,32,33,40,41
II II
SATELLITE/CABLE
IIL | I|
ii
BOX CODES
| Ill
Pioneer .................... 18,20,44
Randtek ........................ 07,08
RCA ............................... 00,27
Regal ............................ 12,13
Regency ....................... 02,33
Samsung ........................... 44
Scientific Atlanta .... 03,22,35
Signature .......................... 46
Sprucer .............................. 27
Starcom ............................. 46
Sylvania ............................ 11
Teknika .............................. 06
Texscan ........................ 10,11
Tocom ................. 17,21,49,50
Unika ....................... 31,32,41
Viewstar ....... 07,08,19,21,26,
................... 28,29,32,33,40,41
Warner Amex ................... 44
Zenith ........................... 14,42
,, m
AUDIO CODES
RCA/'Dimonsia
AM/FM Receiver ............... 03
CD ...................................... 07
Tape ................................... 06
Phone ................................ 05
Aux .................................... 04
I I
ASERDISC CODES 1
Pioneer .................... .'.,...33,37 /
ProScan ........................ 33,37 |
RCA ............................... 33,37 J

If you experience any difficulty with your TV, check afew basic remedies
before calling your service technician.
TV WILL NOT TURN ON OR CONTROLS DON'T WORK
Check to make sure it is plugged in.
Check the wall receptacle (or extension cord) to make sure it is "live" by
plugging in something else.
Try unplugging set for two minutes and then plug it back in and turn it on
again.
PROBLEMS WITH REMOTE
• Maybe something is between the remote and the remote sensor.
•Maybe the remote is not aimed directly at the TV's remote sensor.
•Maybe remote batteries are weak, dead or installed incorrectly. Try
replacing batteries correctly.
•Remove batteries and hold down one or more buttons for several
seconds. Install the batteries and try remote.
TURNS ON OR OFF WHILE PLAYING
Schedule function may have been activated.
Electronic protection circuit may have been activated because of a power
surge. Wait 30 seconds and then turn on again. If this happens
frequently, the voltage in your house may be abnormally high.
SCHEDULE DOES NOT TURN OFF THE TV AT THE SET TIME
•Check schedule on/off function (it must be set to On).
• Check to make sure clock is set to the correct time.

BLANK SCREEN OR BLACK BOX APPEARS ON THE SCREEN
•Try, another channel.
• Press RESET, in case the picture controls are set too low.
• Captioning may be turned on. Check the Closed-Caption Display control
panel in the Channel menu.
NO SOUND, PICTURE OKAY
• Maybe sound is muted. Try pressing volume up button to restore sound.
NO PICTURE, NO SOUND BUT POWER LIGHT IS ON
Maybe cable/air function is in wrong position.
Maybe a vacant channel is tuned.
If watching VCR, make sure TV is tuned to channel 3 or 4 - same as CH3/4
switch on VCR. Also check to make sure TVNCR switch on VCR is in
correct position.
SOUND OKAY, PICTURE POOR
•Check antenna connections.
• Try adjusting sharpness function to improve weak signals.

VOL < Decreases the volume. When in the
menu system, VOL < is used to point left to
items and adjust menu controls.
VOL • Increases the volume. When in the
menu system, VOL > is used to point right to
items and adjust menu controls.
r _,q
MENU V Cl-iANA <VOL>power
CHAN ^Scans up through the channel list. In the menu system, it points up
to items and adjusts menu controls.
CHAN v Scans down through the current channel list. In the menu system, it
points down to items and adjusts menu controls.
MENU Brings up the Main menu. When in the menu system, it selects
highlighted items. Also returns you to the previous menu.
If you turn Parental Control on, the front panel no longer provides access to
the menus. For more information, see Parental Control in the Channel menu
on the back side of these instructions.
POWER Turns the TV on and off.
The front panel shown is a typical button layout. The exact look of the
buttons may be different from those on the front of your TV.

You can clean the TV as required, using a soft cloth or the dusting attachment
for your vacuum cleaner. Be sure to occasionally vacuum the ventilation slots
in the cabinet to help assure adequate ventilation.
To'clean the TV screen, use a diluted soap and water mixture and a soft cloth.
Do not use furniture polish on the TV cabinet or screen.
While cleaning do not spray liquid directly on the screen, or allow
liquid to run down the screen and inside the TV. Also, avoid placing
drinks or vases with water on top of the TV. This could cause
damage to the TV.
jr _1 •
Caution: If fixed (non-moving) imagesare left on the screen for long
periods, they may be permanently imprinted on the screen. Such images
include network loges, phone numbers, and video games. This damage is
not covered by your warranty. Extended viewing of channels displaying
these images should be avoided.
_= , , ,J
WHAT YOUR WARRANTY COVERS:
• Any defect in materials or workmanship.
FOR HOW LONG AFTER YOUR PURCHASE:
•90 days for labor charges.
•One year for parts.
•Two years for picture tube.
(The warranty period for rental units begins with the first rental.)
WHAT WE WILL DO:
• Pay any Authorized GE Television Servicenter the labor charges to repair
your television.
Pay any Authorized GE Television Servicenter for the new or, at our
option, refurbished replacement parts and picture tube required to repair
your television.

HOW YOU GET SERVICE:
* For screen sizes of 20" and smaller: Take your GE television to any
* Authorized GE Television Servicenter.
For screen sizes larger than 20": Request home service from any
Authorized GE Television Servicenter.
To identify your nearest Authorized GE Television Servicenter, ask your
dealer, look in the Yellow Pages, or call 1-800-447-1700.
Show the service technician your evidence of purchase date or first rental.
WHAT YOUR WARRANTY DOES NOT COVER:
•Customer instruction. (Your Owner's Manual clearly describes how to
install, adjust, and operate your television. Any additional information
should be obtained from your dealer.)
•Installation and related adjustments.
•Signal reception problems not caused by your television.
•Damage from misuse or neglect.
•Batteries.
•Images burnt onto the screen.
•A television that has been modified or incorporated into other products or
is used for institutional or other commercial purposes.
• A television purchased or serviced outside the USA.
•Acts of God, such as but not limited to lightning damage.
PRODUCT REGISTRATION:
• Please complete and mail the Product Registration Card packed with your
television. It will make it easier to contact you should it ever be
necessary. The return of the card is not required for warranty coverage.
HOW STATE LAW RELATES TO THIS WARRANTY:
• This warranty gives you specific legal rights, and you may have other
rights that vary from state to state.
IF YOU PURCHASED YOUR PRODUCT OUTSIDE THE USA:
* This warranty does not apply. Contact your dealer for warranty information.
Table of contents
Other GE TV manuals