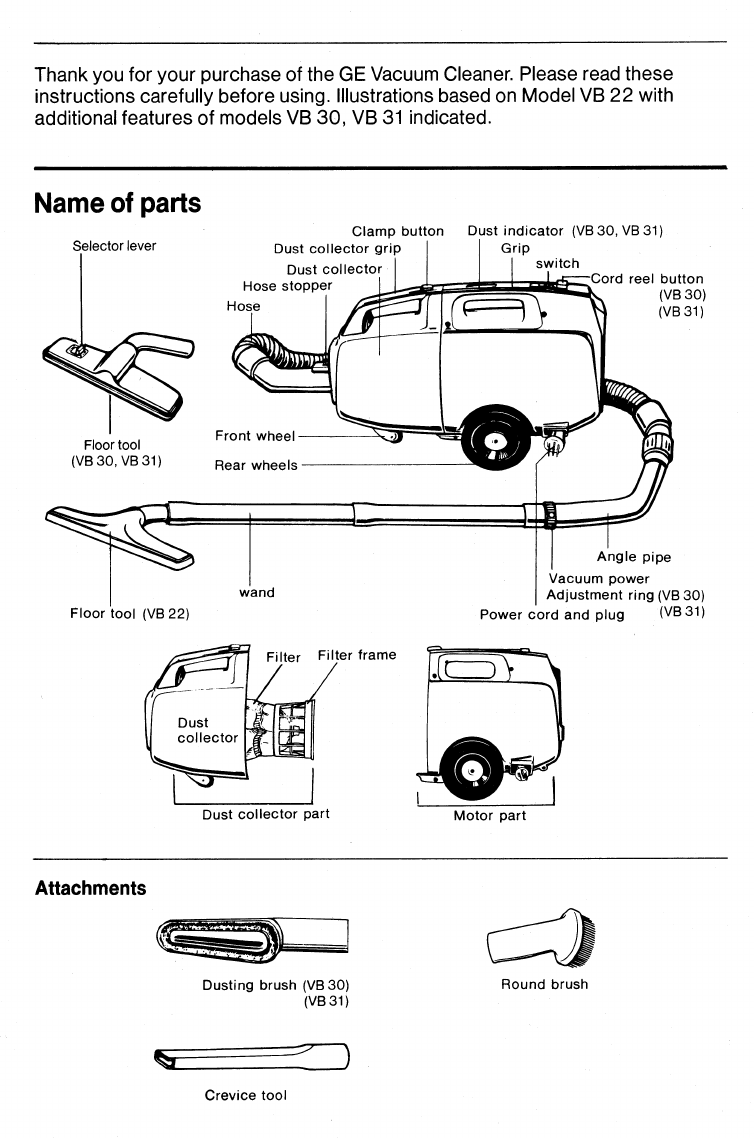
GE VB 22 Owner's manual

Use & Care
Barrel
Vacuum
Cleaners
GENERAL
ELECTRIC

Angle pipe
Vacuum power
Adjustment ring (VB 30)
Power cord and plug
(VB 31)
Floor tool (VB 22)
Clamp button
Dust collector grip
Dust collecto
r
Hose stopper
Hose
Dust indicator (VB 30, VB 31)
Grip
switch
Cord reel button
(VB 30)
(VB 31)
Floor tool
(VB 30, VB 31)
Front wheel
Filter Filter frame
Dust collector part
Motor part
Selector lever
Thank you for your purchase of the GE Vacuum Cleaner. Please read these
instructions carefully before using. Illustrations based on Model VB 22 with
additional features of models VB 30, VB 31 indicated.
Name of parts
Attachments
Dusting brush (VB 30)
(VB 31)
Crevice tool
Round brush

Important safeguards
1.
Make sure that the filter is securely attached in its place before vacuuming.
Forgetting the filter will allow dust to enter the motor section and could damage
the vacuum cleaner.
2.
Do not block the flow of air. Blocking suction or allowing the dust to clog the
hose will decrease the efficiency of the motor.
3.
Never vacuum burning objects, volatile material or any matter that might damage
the hose or filter. Also avoid vacuuming wet objects.
4.
Keep the vacuum cleaner away from stoves and other heat-emitting appliances.
Heat can deform and discolour the plastic parts of the unit.
5.
Keep the vacuum cleaner free of insecticides. Do not wipe it with benzine,
thinner, petrol or other oils which might cause discolouration or cracking. To
clean the body and hose, dampen a cloth with a mild detergent and wipe clean.
6.
Be sure not to push the clamp button while carrying the vacuum cleaner.
Reminder
1.
Pull out the plug from the power point after use. Grasp the plug—not the cord—
when pulling out the plug. Also do not extend the cord from the unit beyond
the red marker line.
2.
If the dust indicator still points to red after having emptied the dust collector
this probably indicates that the hose is clogged. Dust can be easily removed
from the hose by attaching it to the exhaust port (See USING THE BLOWER),
or by pushing through a thin rubber hose (used for gas or water) after
disconnecting the angle pipe. (VB 30, VB 31).
3.
Long and continuous use (especially in the summer) causes the exhaust air
and the body of the vacuum cleaner to become warm. This, however, does not
denote a malfunction.

4.
The vacuum power adjustment ring (VB 30, VB 31)
The full vacuum power of the cleaner
may be too strong in certain cases,
for instance when vacuuming curtains
and draperies. In these cases, turn
the vacuum power adjustment ring
(on the hose) to control the vacuum
power. Match the hole in the ring with
the hose hole to reduce the power.
Vacuum power
adjustment ring
How to use
1.
Empty the dust collector before it
becomes completely filled. Frequent
emptying lengthens the life of the
motor and maintains strong suction
power.
2.
Before using the blower, make sure
that the hose and wands are free of
dust. (VB 30, VB 31)
3.
When cleaning rough and uneven
surfaces, pull the floor tool toward
you while vacuuming.
4.
If the cord should stop during
rewinding, pull it out a little and twist
the cord reel button again. (VB 30,
VB 31)
5.
Large pieces of waste and long
objects block the hose. Remove
them before vacuuming.
6.
Use the crevice tool to suction off
dust collected on the bristles of the
floor tool. A coarse comb can also
be used.
Functions of each part
1.
The Switch
Press the ON side of the switch to
start the motor.
To stop the motor, press the OFF
side of the switch.
2.
The Dust Indicator (VB 30, VB 31)
The dust indicator shows the amount of dust that has collected in the dust
collector. Hold the floor tool away from the floor, while operating, to check.
VB 31
ORANGE
BROWN
VB 31
Suction power
decreases. Dust
collector should
be emptied.
11111111111S1
Vacuuming can
continue
VB 30
RED
BLUE
VB 30

Cord reel button
Removal ring
o•
►
4. The Cord (VB 30, VB 31)
To rewind the cord, simply push the
cord reel button. Push it in the
direction indicated by the arrow and
the cord will automatically rewind.
5. Unclogging the hose
When the hose is clogged with dust,
remove it in the following manner:
1)
Pull out the angle pipe by turning the
removal ring in either direction.
2)
Use a vinyl garden hose to push out
the dust clogging the hose.
3)
Insert the angle pipe in place and
return the ring to its original position.
*Do not use the hose without the angled
pipe in place. If the hose is used with-
out the angled pipe, the hose will bend
excessively, causing it to break.
Angled pipe
6. The Attachments
Different attachments serve different purposes.
1)
The dusting brush (VB 30, VB 31)
Very convenient for all kinds of
upholstered furniture, beds,
tapestries, curtains, and also for
dusting clothes.
2)
The angle pipe
Usually fitted between the wand and
hose.
For cleaning not easily accessible or
high places, use the wand together
with the angle pipe and the round
brush.
3)
The round brush
Its soft bristles make it ideal for
dusting high-polish surfaces,
furniture, lamps, shelves, picture
frames and other fragile objects.
4)
The crevice tool
For cleaning out crevices in sofas,
chairs, for vacuuming corners and
other not easily accessible places.

Assembly
1. Insert the hose all the way up to the
hose stopper. To detach it, depress
Body
the hose stopper and pull.
Floor nozzle
Wands
Hose
1.10
(-1
2. Insert securely by turning.
l
eVir
aNkfift(0
1110
3. Pull out the cord and
connect it to a 240 volt
A.C. power point.
Blower outlet
Crevice tool
Switch
Hose stopper
Clamp button
Using the blower (VB 30, VB 31)
Use the blower to blow out dust from
behind furniture, on bric-a-brac, on
ventilator grilles and to clean out hoses.
1.
Attach the hose to the blower outlet.
2.
Attach the crevice tool to the end of
the hose.
Plug the power cord into an A.C.
wall socket.
3.
Press the ON side of the switch to
blow air out from the end of the hose.
Emptying the Dust collector
After making sure that motor has
stopped turning, empty dust by
observing the following procedure.
1) Detach the hose from the cleaner
body.
Press the hose stopper and pull the
hose toward you.
2) Then hold the dust collector by its grip
and depress the clamp button.

3) The cleaner body will come apart, into 4) Hold the dust collector with left hand,
the dust collector and the motor
grip knob on filter frame firmly with
case.
right hand.
Dust collector
Motor case
Rubber gasket
5) Pull filter up and twist filter frame back
and forth (approx 20 times). Fine dust
particles will be loosened from the
filter dropping into the dust collector.
7) Dispose of the dust accumulated in
the dust collector as shown.
9) To re-assemble the cleaner body, fit
the protrusion on the edge of the dust
collector into the slit on the lower edge
of the motor case. Push the two parts
together until the clamp button clicks
into place. The two parts will then be
locked together.
6) Lift the filter assembly from the dust
collector as shown.
8) Put the filter back into the dust
collector. Make sure that the rubber
gasket around the filter does not
protrude over the edge of the dust
collector.
Dust collector
Motor case

Australia wide service
Should you require additional information please contact the nearest State
Service Centre:
RANK ELECTRIC HOUSEWARES PTY. LIMITED
296 FERNTREE GULLY RD. NOTTINGHILL
VICTORIA 3168 AUSTRALIA .
0 and GENERAL
ELECTRIC are Registered Trademarks of
General Electric Company,U.S.A.
322-6-411K-21500
SI Printed in Japan 9
This manual suits for next models
2
Table of contents
Other GE Vacuum Cleaner manuals