GE Appliances GMAN1200 User manual

“L” WASHER
IMPORTANT
Electric Discharge (ESD)
Sensitive Electronics
ESD problems are present everywhere. ESD may damage or weaken the
electronic control assembly. The new control assembly may appear to work
well after repair is finished, but failure may occur at a later date due to ESD
stress.
• Use an anti-static wrist strap. Connect wrist strap to ground connection
point or unpainted metal in the appliance.
–OR–
Touch your finger repeatedly to ground connection point or unpainted
metal in the appliance.
• Before removing the part from its package, touch the anti-static bag to a
green ground connection point or unpainted metal in the appliance.
• Avoid touching electronic parts or terminal contact; handle electronic
control assembly by edges only.
• When repackaging failed electronic control assembly in anti-static bag,
observe above-mentioned precautions.
DIAGNOSTIC GUIDE
Before testing washer operation, check the following:
• Is the power cord firmly plugged into a live circuit?
• Has a household fuse blown or circuit breaker tripped? Time delay fuse?
• Are both hot and cold water faucets open and water supply hoses
unobstructed?
Before opening the unit make sure the washer is unplugged from power
outlet.
• Check all connections before replacing components. Look for broken or
loose wires, failed terminals, or wires not pressed into connections far
enough.
• The most common cause for control failure is corrosion on connectors.
Therefore, disconnecting and reconnecting wires will be necessary
throughout test procedures.
• Connectors: Look at top of connector. Check for broken or loose wires.
Check for wires not pressed into connector far enough to engage metal
barbs.
• Resistance check must be made with power cord unplugged from outlet,
and with wiring harness or connectors disconnected.
FOR SERVICE TECHNICIAN ONLY—DO NOT REMOVE OR DESTROY
175D6149P002
WARNING
Disconnect power before servicing.
Replace all parts and panels before operating.
Failure to do so can result in injury or death.
Electrical Shock Hazard
Programming the Control Board
• The replacement control board will always enter into test mode t01 on
initial power-up.
• If replacing the control board, the washer will not function until the
replacement control board has been programmed.
To program the replacement control board:
1. Reconnect power to the washer. (The display will now show “---”, which
means no model has been selected.)
2. Rotate the cycle knob until the correct model number is displayed:
Display “1” = GFWN1100, GFWN1200, GMAN1200
Display “2” = GFWH1200
Display “3” = GFWN1300
Display “4” = GFWH1300
Display “5” = GFWH1400, GFWH1405
Display “6” = GFWS1500, GFWS1505
3. Press and hold the Start key for 3 seconds (or until a second beep is
sounded).
4. Press the Power key to reset the control.
Note: If an error is made in programming the control, enter test mode and
select t01. Then repeat steps 2 through 4.

2
FOR SERVICE TECHNICIAN ONLY—DO NOT REMOVE OR DESTROY
175D6149P002
WIRE DRAWING
for models GFWN1100, GFWN 1200, GFWN1300 and GMAN1200
WIRE DRAWING
for models GFWH1400 and GFWH1405

3
FOR SERVICE TECHNICIAN ONLY—DO NOT REMOVE OR DESTROY
175D6149P002
WIRE DRAWING
for models GFWH1200 and GFWH1300
WIRE DRAWING
for models GFWS1500 and GFWS1505

4
FOR SERVICE TECHNICIAN ONLY—DO NOT REMOVE OR DESTROY
175D6149P002
SYSTEM DRAWING

SERVICE MODE
To Enter: Press Temp-e Wash-Temp-e Wash (within 30 seconds of plugging
in washer).
To Exit: Repeat press Temp-e Wash-Temp-e Wash.
TEST LIST
“t01” Model ID
Verifies (or sets on new board) the proper Model id
“t02” Error Codes
Lists up to 10 control-detected problems
“t03” Software ID
Verifies using latest UL code - Control - eePROM - Inverter software
“t04” Exercise LCD/LEDs
Verifies that all the displays and buttons work
“t05” Pump Test
Test drain-out pump
“t06” Pressure Switch Test
Fills to all 3 levels, then pumps out water
“t07” Thermistor/Heater Test
Verifies that both the Thermistor and Heater work
“t08” Steam Test
Verifies that Steam generator work
“t10” Tumble Test
Verifies Washer Tumbles (i.e. Wash cycle)
“t11” Spin Test
Verifies Washer spins
“t12” Dispenser Test
Verifies Dispenser fill works—for all four fill modes
“t13” EOL Test
Performs End-of-Line test sequence
5
FOR SERVICE TECHNICIAN ONLY—DO NOT REMOVE OR DESTROY
CONTROL BOARD CONNECTOR LOCATIONS
175D6149P002

FOR SERVICE TECHNICIAN ONLY—DO NOT REMOVE OR DESTROY
175D6149P002
DETAILS FUNCTION
Requirement Sequence
t01 none Start Displays defined Model id (1-6); displays “---” if new board (to set Model id, rotate knob until desired id (1-6)
displayed, press and hold “START” key to program this model)
Power Returns to “t01”
t02 none Start Displays most recent error code (E00=none)
Start Displays previous error code (up to previous 10)
Hold start Clear all error codes (and then displays E00)
Power Returns to “t02”
t03 none Start Alternate “UL” and UL software version
Start Alternate “cod” and Control Software version
Start Alternate “EE” and eePROM version
Start Alternate “Inv” and Inverter Software version
Power Returns to “t03”
t04 none Start Loops on lighting LED’s, LCD, and cycle ids
Any button Beeps when depressed
Power Returns to “t04”
t05 none Start Displays “P” and pump for 60 seconds
Power Returns to “t05”
t06 none Start Displays “E” (for Empty) and starts filling when reaches Foam level—displays “F”
Start Fill, when reaches Main level—displays “nl”
Start Fill, when reaches overflow level—briefly displays “OF,” pumps out, displays “E” when tub empty
Power Returns to “t06”
t07 Main level
pressure
switch must
work
Start For GFWH1100, GFWN1200, GFWN1300, GMAN1200 models:
Displays temperature in °F, turns on cold water (CV1) for 10 seconds, turns off CV1 and turns on HV for a maximum
pressure time-out of 5 minutes
For GFWH1200, GFWH1300, GFWH1400, GFWH1405, GFWS1500, GFWS1505 models:
Displays temperature in °F, turns on the CV and fills the tub until the Main level switch closes. Turn on the heater for a
maximum of 5 minutes
Power Pumps out water and returns to “t07”
t08 none Start Displays “SEA” and rotates the basket at 43 revolutions per minute (only for GFWS1500 and GFWS1505 models
Power Stops rotating the basket, turns off the steam and returns to “t08”
t10 none Start Displays “tt” and tumbles tub alternating the direction every 5 seconds
Power Stops tumbling and returns to “t10”
t11 none Start Spins to 400 RPM displaying increasing RPM
Start For GFWH1100, GFWN1200, GFWN1300, GMAN1200, GFWH1200, GFWH1300 models:
Spins to 1000 RPM (displays A00)
For GFWH1400, GFWH1405, GFWS1500, GFWS1505 models:
Spins to 1100 RPM (displays B00)
Power Stops spinning and returns to “t11” when stops
t12 none Start Displays “ddt” and turns on HV to fill detergent compartment (for GFWH1100, GFWN1200, GFWN1300, GMAN1200,
GFWH1200, GFWH1300 models)
Displays “pdt” and turns on HV to fill Pre Wash compartment (for GFWH1400, GFWH1405, GFWS1500, GFWS1505 models)
Start Displays “bdt” and turns on CV2 to fill bleach compartment (for GFWH1100, GFWN1200, GFWN1300, GMAN1200, GFWH1200,
GFWH1300 models)
Displays “ddt” and turns on HV to fill main dispensing compartment (for GFWH1400, GFWH1405, GFWS1500, GFWS1505
models)
Start Displays “Fdt” and turns on CV1 and CV2 to fill softener compartment (for GFWH1100, GFWN1200, GFWN1300, GMAN1200,
GFWH1200, GFWH1300 models)
Displays “bdt” and turns on CV to fill bleach compartment (for GFWH1400, GFWH1405, GFWS1500, GFWS1505 models)
Start Displays “HCt” and turns on CV1 and HV to fill detergent compartment (for GFWH1100, GFWN1200, GFWN1300, GMAN1200
GFWH1200, GFWH1300 models)
Displays “Fdt” and turns on CV to fill softener compartment (for GFWH1400, GFWH1405, GFWS1500, GFWS1505 models)
Power Pumps out water and returns to “t12”
t13 none Start Starts EOL test sequence (NOT used in Repair)
Power Returns to “t13”
6

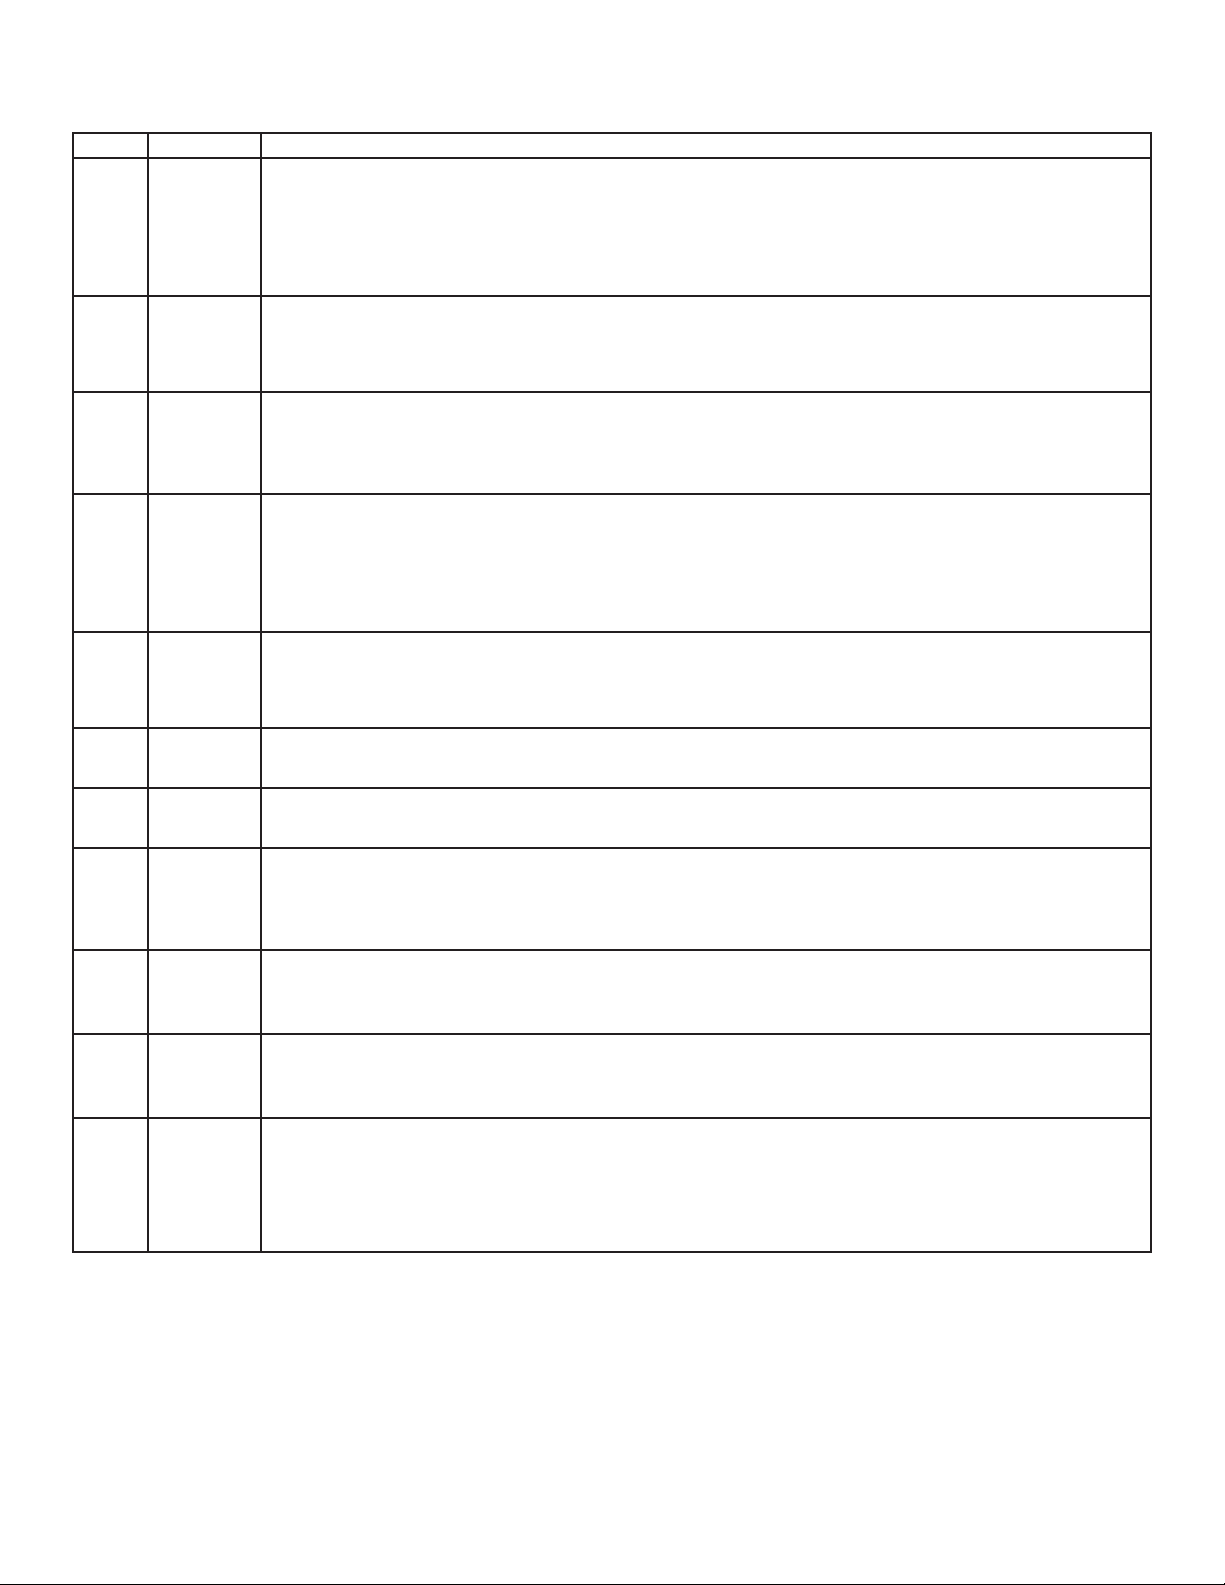
TROUBLESHOOTING CHART
Code(s) Description Action
22, 23 Fill problems • Ensure manual water valves are fully open.
• Check if water strainers on solenoid valve assembly are clogged.
• Check for obstructions inside inlet water hoses.
• Ensure solenoid valves do not leak when the valves are de-energized and the washer is powered down.
• Measure coil resistance for both valves; if outside range (1000–1250 ohms at room temp.), replace solenoid valve assembly.
IF ABOVE STEPS DO NOT CLEAR THE PROBLEM, OR FOR ERROR CODE 23:
• Replace solenoid valve assembly.
31 Drain • Ensure pump strainer is clean and free of debris.
problems • Check for obstruction inside the drain hose.
• Check pump impeller blades and bearing; if evidence of blade damage or seized bearings are present, replace the pump.
• Check electrical connections at the pump motor and harness.
• Measure pump motor resistance; if outside range (9–14 ohms at room temp.) replace the pump.
38, 39 Dispenser • Check for obstruction in dispenser mechanism and linkages.
problems • Check electrical connections at dispenser motor feedback switch and in the harness.
• Check electrical connections of water valves in the harness.
IF ABOVE STEPS DO NOT CLEAR THE PROBLEM:
• Replace dispenser motor assembly.
42, 44, 46 Motor Drive • Ensure all 4 shipping bolts have been properly removed.
47, 48, 49 operation • Remove all foreign objects that may be lodged between inner and outer basket.
above design • Look for signs of seized bearing(s) on basket and drum motor, replace components as necessary.
limits • Inspect condition and mounting of door gasket, replace and re-mount as necessary.
• Ensure inner basket (drum) can rotate freely.
IF ABOVE STEPS DO NOT CLEAR THE PROBLEM:
• Replace motor drive or drum motor.
43, 4A, Motor Drive • Measure AC outlet voltage, ensure correct range (102V to 132V AC).
4B, 4C, internal • Check electrical connections at the drum motor, motor drive.
50, 52, problems • Check harness integrity between main control and motor drive.
53, 54 • Unplug the unit, wait 30 seconds, restart the unit.
• If the fault persists and re-appears – replace the motor drive.
55, 56 Main Control • Replace the main control.
internal
problems
57, 58, Main Control • Unplug the unit, wait 30 seconds, re-start the unit.
71 internal • If the fault persists and re-appears – replace the main control.
problems
60, 61 DOOR LOCK • Check integrity of wiring and connections between main control and DOOR LOCK mechanism.
63, 64, assembly • Investigate DOOR LOCK mechanism, check door microswitch operation, lock and unlock solenoid continuity, contact integrity;
problems replace DOOR LOCK mechanism if necessary.
IF ABOVE STEPS DO NOT CLEAR THE PROBLEM:
• Replace the main control.
65, 80, Water Level • Check integrity of wiring and connections between main control and Water Level Sensor.
81, 82 Sensor • Check integrity of Water Level Sensor, replace if necessary.
problems IF ABOVE STEPS DO NOT CLEAR THE PROBLEM:
• Replace the main control.
66, 67 Water • Check integrity of wiring and connections between main control and Thermistor Assembly.
Temperature • Using ohmmeter, measure Thermistor resistance; if outside expected range, replace Thermistor Assembly.
Sensor IF ABOVE STEPS DO NOT CLEAR THE PROBLEM:
problems • Replace the main control.
62 System • Check integrity of wiring and connections, look for insulation breakdown and short circuit conditions on the harness, replace
Contact harness if necessary.
Failure • Check integrity and electrical connections of all loads (heater, pump, pressure switch, door lock, solenoid valves,
dispenser motor), replace respective components if necessary.
IF ABOVE STEPS DO NOT CLEAR THE PROBLEM:
• Replace the main control.
7
FOR SERVICE TECHNICIAN ONLY—DO NOT REMOVE OR DESTROY
175D6149P002

8
FOR SERVICE TECHNICIAN ONLY—DO NOT REMOVE OR DESTROY
MODEL NUMBERS
GFWN1100
GFWN1200
GFWH1200
GMAN1200
GFWN1300
GFWH1300
GFWH1400
GFWH1405
GFWS1500
GFWS1505
31-16849
04-12GE
Printed in China
175D6149P002
This manual suits for next models
9
Table of contents
Other GE Washer manuals

GE
GE G1579 User manual

GE
GE WBB5500 User manual

GE
GE GTW680 series Original instructions

GE
GE GTWN8250DWS Assembly instructions

GE
GE Profile WPRB9250 User manual

GE
GE WWA5600R User manual

GE
GE WWA7010G User manual

GE
GE WCSR4170G4WW User manual

GE
GE GE Energy Star WBVH5300KWW Manual

GE
GE Profile PTWN6050M Manual