POWER BUTTON
USB CHARGING PORT
MOUNTING LOCK
MOUNT
QUICK DISMOUNT BUTTON
MOUNTING SCREW
RUBBER STRIP
WARNING:The lights are not a replacement or substitute for your bicycle’s
original reflectors. Please check your local regulations before operating the
lights.
On/O
To turn the taillight on, press and hold the power button for two seconds.
To turn the taillight o, press and hold the power button for two seconds.
Switching Modes
There are four dierent lighting modes. (High, Low, Strobe, and Fast Strobe)
To switch through the dierent lighting modes, press down on the power
button to alternate through the four modes.
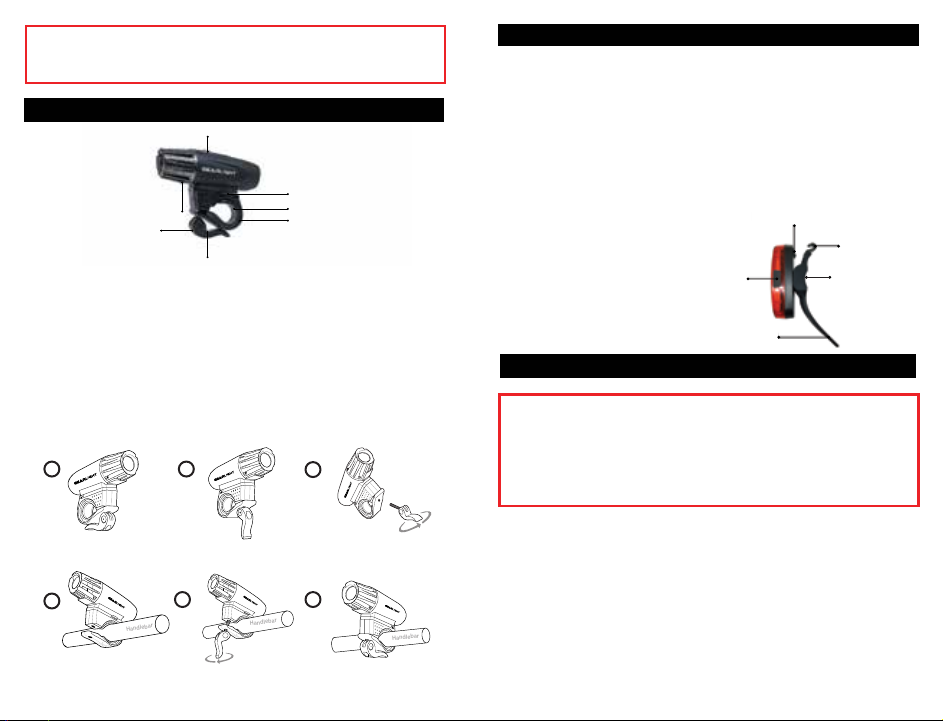
TAILLIGHT OPERATION
HEADLIGHT OPERATION
On/O
To turn the headlight on, press down on the power button located on the top
of the headlight.
To turn the headlight o, press down on the power button to cycle through all
the lighting modes until the light is o.
Switching Modes
There are four dierent lighting modes. (High, Medium, Low, and Strobe)
To switch through the dierent lighting modes, press down on the power
button to alternate through the four modes.
How to Mount the Headlight
How to Mount the Taillight
HOW TO CHARGE THE HEADLIGHT AND TAILLIGHT
Note: Fully charge the lights before their first use
1. Lift the rubber cover to locate the USB charging port.
2. Connect the light to the USB charging cable.
3. Connect the USB charging cable to a device with a USB charging port,
such as a computer or cellular phone charger. See warning.
4. The headlight is fully charged in approximately 3 hours and the indicator
light will turn solid blue. The taillight is fully charged in approximately 2
hours and the indicator light will turn o.
5. Unplug the USB charging cable when the battery is fully charged.
Wrap the silicone strap around the bike frame and attach it to the strap hook.
Note: Make sure the rubber cover is secured over the USB charging port when the
lights are in use. Do not use the lights in heavy rain.
WARNING:Lights contain lithium batteries that can present a fire hazard. Do
not charge or store the lights near flammable materials. Do not overcharge
the lights; unplug the lights once they are fully charged or if left unattended.
Use only UL-Listed charging adapters rated at 5V 1A max. Do not use or
charge the lights if they are wet or damaged. Do not disassemble or modify
the lights. Failure to follow safety instructions may result in fire, personal
injury and damage to property.
START PULL OUT THE
MOUNTING LOCK.
ROTATE THE MOUNTING
LOCK UNTIL IT DETACHES
FROM THE MOUNT.
ATTACH THE MOUNT
OPTIONAL: To accommodate for
larger size handlebars, remove
one or two rubber strips. CAUTION: Do not over-tighten
INSERT THE MOUNTING
LOCK BACK
PUSH BACK IN THE
MOUNTING LOCK.
1
4
2
5
3
6
USB CHARGING PORT
POWER BUTTON
(PRESS & HOLD)
STRAP HOOK
SILICONE STRAP
Note: To prevent the
taillight from falling o
during your ride, always
tighten the screw holding
the light to the silicone
strap after adjusting the
light’s orientation.
SCREW


