Gear4music FUSION DRUM KIT User manual

FUSION DRUM KIT
SETUPGUIDE

FUSION
DRUM KIT

3
DRUMS AND CYMBALS:
1x Snare Drum (14” x 5.5”)
1x Tom Tom Drum (10” x 8”)
1x Tom Tom Drum (12” x 9”)
1x Floor Tom Drum (14” x 14”)
1x Bass Drum (20” x 16”)
1x Hi Hat Cymbals (pair, 14” – top and bottom)
1x Crash/Ride Cymbal (16”)
HOOPS AND TENSION RODS:
32x Tom Tension Rods and Washers
(2x rods already attached to each tom)
16x Bass Drum Tension Rods,
Claws and Washers
2x Bass Drum Hoops
2x Tom Tom Hoops
(12”, attached to drum)
2x Tom Tom Hoops
(13”, attached to drum)
2x Floor Tom Hoops
(14”, attached to drum)
Note – The hoops for the drums are packaged
with the drums and will need removing to fit the
drum heads.
DRUM HEADS:
1x Batter Head for 10” Tom Tom Drum
(with Gear4music logo)
1x Resonant Head for 10” Tom Tom Drum
(no logo)
1x Batter Head for 12” Tom Tom Drum
(with Gear4music logo)
1x Resonant Head for 12” Tom Tom Drum
(no logo)
1x Batter Head for 14” Floor Tom Drum
(with Gear4music logo)
1x Resonant Head for 14” Floor Tom Drum
(no logo)
1x Batter Head for 20” Bass Drum
(no logo)
1x Resonant Head for 20” Bass Drum
(with Gear4music logo)
Note – The snare drum already has drum heads
attached and only requires tuning.
HARDWARE:
1x Bass Drum Pedal
1x Hi-Hat Stand (three parts)
1x Crash Cymbal Stand
1x Snare Drum Stand (two parts)
3x Floor Tom Legs
2x Tom Tom Drum Arms
2x Bass Drum Legs
2x Bass Drum Hoops
1x Drum Stool (three parts)
1x Drum Key
1x Rubber Bass Drum Hoop Protector
Your kit will arrive in one box and should take
around 30 minutes to fully assemble. Please
check that all the items below are present before
assembly and follow the instructions carefully.
CONTENTS CHECKLIST

4
Bass Drum Leg
Bass Drum
Tension Rods,
Claws and Washers
12” Tom Tom
14” Floor Tom
10” Tom Tom
Snare Drum
Hi-Hat
Hi-Hat Stand
Bass Drum Pedal
Snare Drum Stand
Bass Drum
Crash Cymbal
Crash Cymbal Arm
Drum Stool
YOUR DRUM KIT

5
1. Lay the bass drum on the floor, with the front of
the bass drum at the bottom (the bass drum leg
mounts should be closest to the floor).
2. Place the batter head (without the Gear4music
logo) onto the drum and place 1x bass drum
hoop on top.
3. Using 6x bass drum tension rods, claws and
washers, line the tension rods up with the 6x
screw threads (these are called drum lugs) that
are already mounted to the bass drum.
4. Using the drum key, screw the 6x tension rods
into the drum lugs to an even tension. Ensure
that all the creases have been taken out of the
skin, but do not over-tighten.
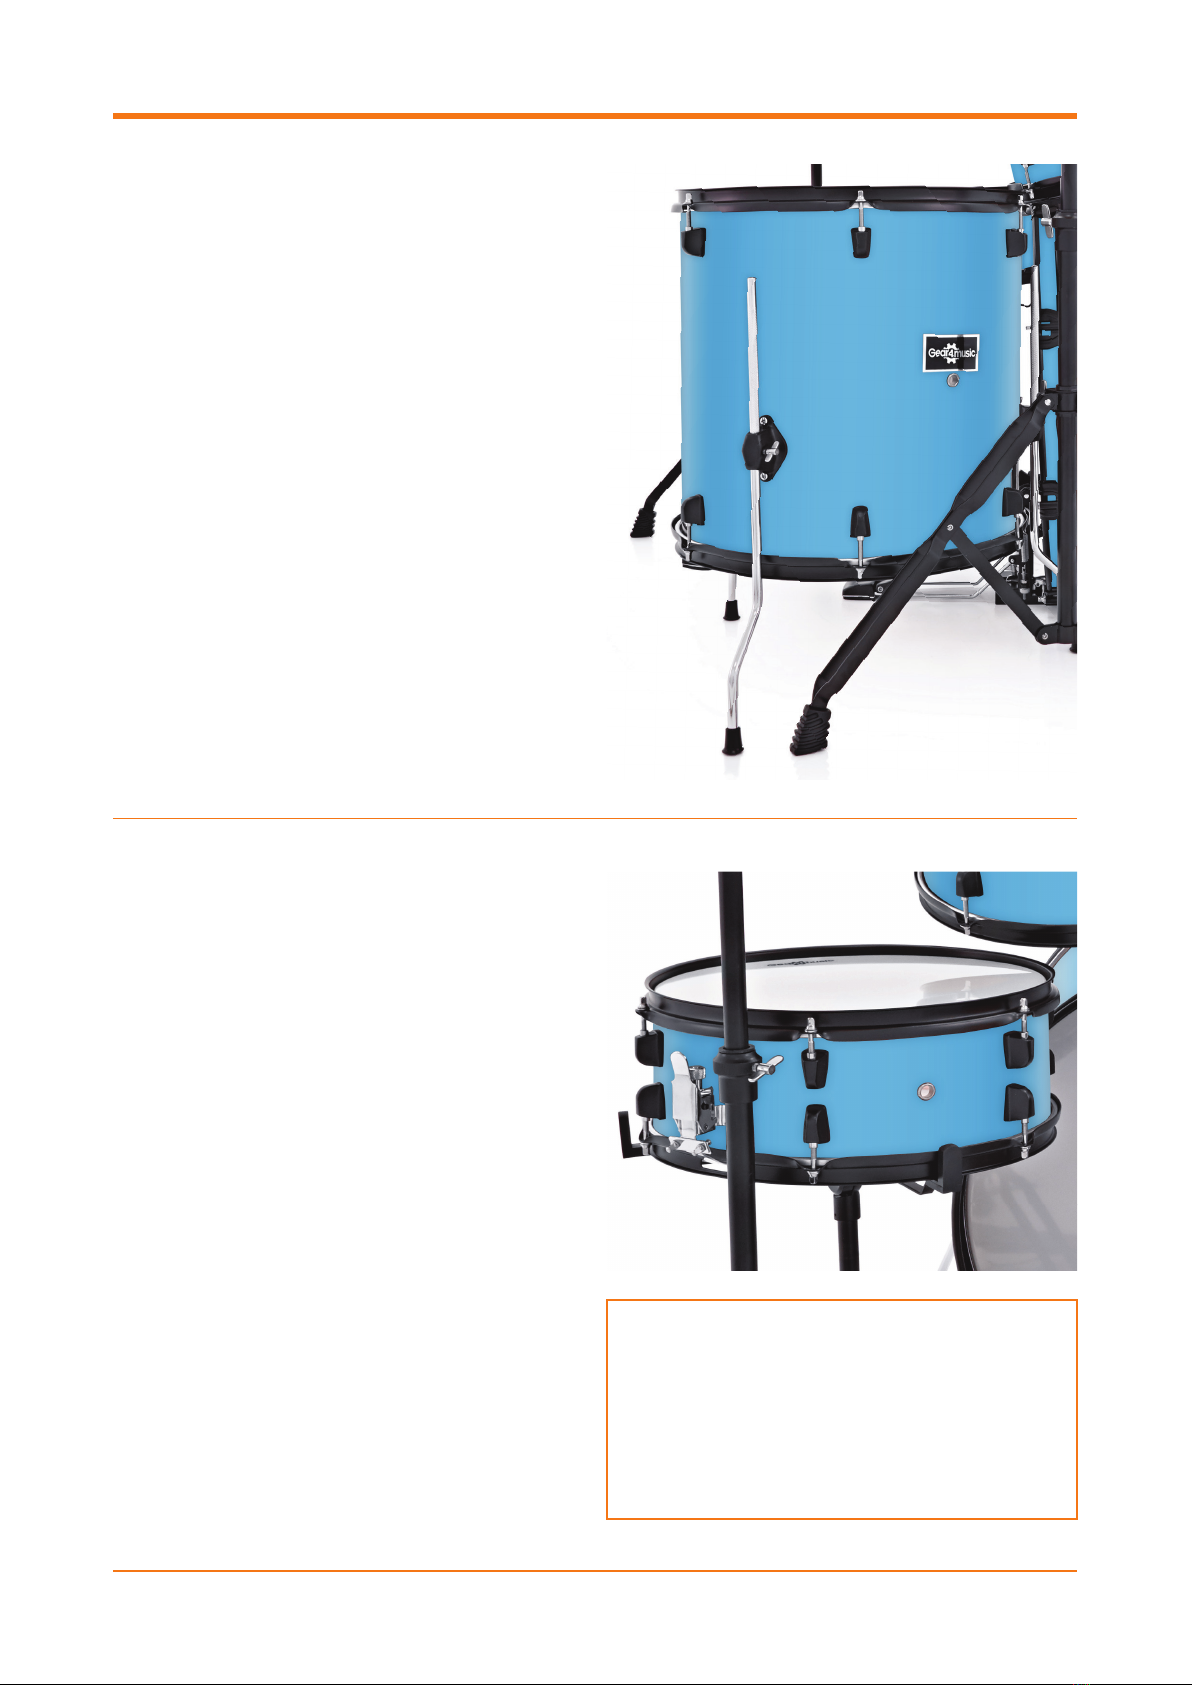
5. Place the 2x bass drum legs into the holes on
each side of the bass drum and tighten the wing
nuts to hold them in place.
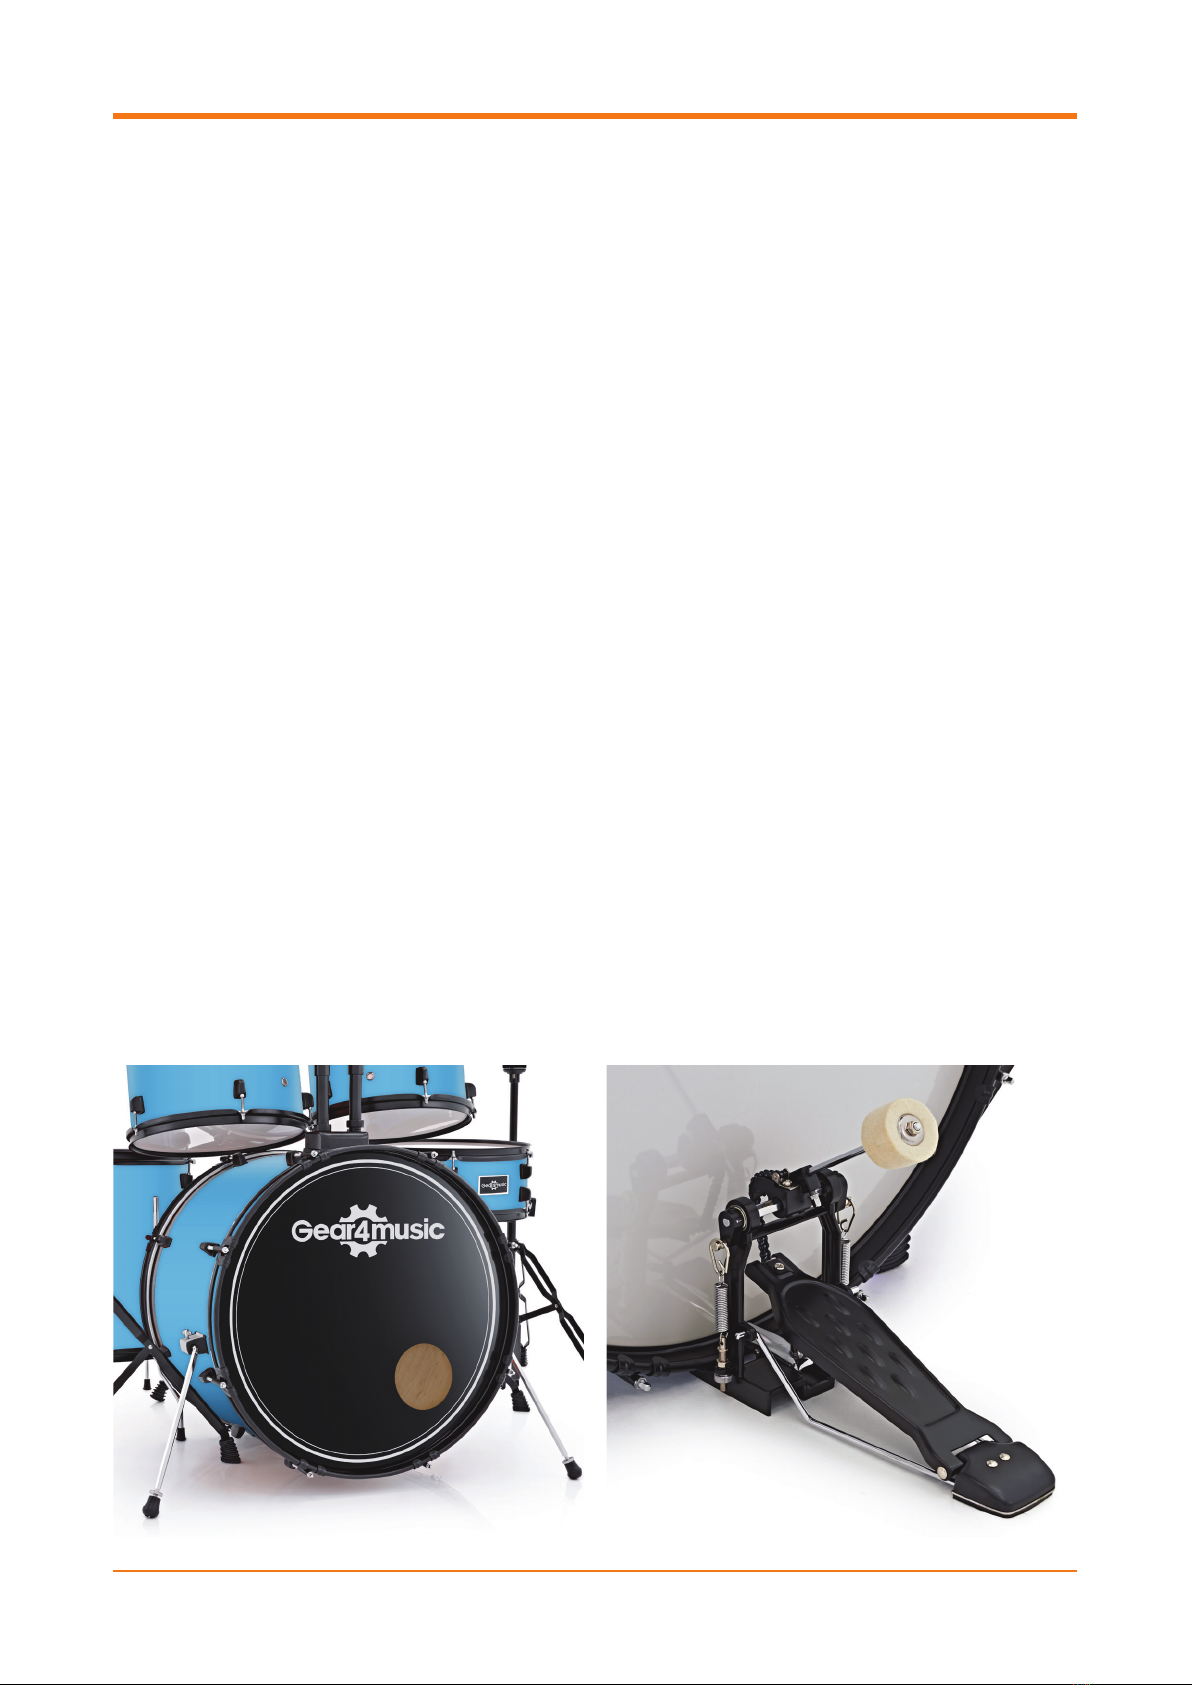
BASS DRUM ASSEMBLY
ITEMS REQUIRED:
1x Bass Drum (20” x 16”)
1x Batter Head for 20” Bass Drum (no logo)
1x Resonant Head for 20” Bass Drum
(with Gear4music logo)
12x Bass Drum Tension Rods, Claws and Washers
2x Bass Drum Legs
1x Drum Key
1x Rubber Bass Drum Hoop Protector
6. Turn the bass drum over and repeat steps 2 – 4
on the opposite side. When placing the skin on
the front of the drum we advise lining the logo
up with the tom brackets so it will be straight
when viewed by an audience.
7. Turn the bass drum upright, so it is now resting
on the bass drum legs.
8. Take the rubber bass drum hoop protector.
Place it on the bottom of the bass drum hoop
on the side that the kick drum pedal will hit (the
side without the logo).
9. Take the 1x bass drum pedal. There is a clamp at
the bottom of the pedal which can be adjusted
using the wing nut. First, unscrew the wing nut,
then slide the clamp between the bottom of the
bass drum hoop and the top of the rubber bass
drum hoop protector. Once it’s in place, screw
the wing nut so it’s firmly secured.
ASSEMBLY INSTRUCTIONS

6
1. Take 1x Tom Tom Drum (10”x 8”) and place on
the floor with the Gear4music logo on the side
of the drum facing upright.
2. Using the drum key, undo the 2 tension rods
from the drum lugs. This will release the metal
drum hoop. Put the tension rods and drum hoop
to one side temporarily.
3. Place 1x 10” Batter Head (with Gear4music logo)
on top of the drum and place the metal hoop
over the head, noting that the tension rod holes
need to line up with the drum lugs located on
the side of the drum.
4. Using the drum key, screw 5x tension rods into
the drum lugs to an even tension, ensuring any
creases have been removed from the skin. Do
not over tighten.
5. Turn the drum over and repeat steps 2 – 4 using
the corresponding resonant head (without the
Gear4music logo).
10” TOM TOM DRUM ASSEMBLY
ITEMS REQUIRED:
1x Batter Head for 10” Tom Tom Drum
(with Gear4music logo)
1x Resonant Head for 10” Tom Tom Drum (no logo)
2x Tom Tom Hoops (10”, attached to drum)
10x Tom Tension Rods and Washers
(note – 2x already attached to the drum)
1x Drum Key
13” TOM TOM DRUM ASSEMBLY
ITEMS REQUIRED:
1x Batter Head for 12” Tom Tom Drum
(with Gear4music logo)
1x Resonant Head for 12” Tom Tom Drum
(no logo)
2x Tom Tom Hoops (12”, attached to drum)
10x Tom Tension Rods and Washers
(note – 2x already attached to the drum)
1x Drum Key
1. Repeat steps for 10” tom tom drum assembly.

7
14” FLOOR TOM DRUM ASSEMBLY
ITEMS REQUIRED:
1x Batter Head for 14” Floor Tom Drum
(with Gear4music logo)
1x Resonant Head for 14” Floor Tom Drum
(no logo)
2x Floor Tom Hoops (14”, attached to drum)
10x Tom Tension Rods and Washers
(note – 2x already attached to the drum)
1x Drum Key
1. Repeat the steps for the 10” tom tom
drum assembly.
2. Take the 3x floor tom legs and insert them into
the 3x holes on the side of the floor tom drum.
Tighten the wing nuts to secure the legs in
place. When you put the drum upright on to the
legs, the Gear4music badge on the side of the
drum should be straight.
SNARE DRUM ASSEMBLY
ITEMS REQUIRED:
1x Snare Drum (14” x 5.5”)
1x Snare Drum Stand (two parts)
1. The snare drum is already assembled but needs
to be installed on its stand. Take the tripod base
of the snare drum stand, then unscrew the wing
nut slightly to release the three arms. Tighten the
wing nut once the arms are splayed.
2. Take the second part of the stand and place the
pole into the top of the tripod base. Tighten the
wing nut between both parts to secure in place.
At the top of the snare drum stand are three
arms with rubber stops. Evenly space these arms
and simply set the snare drum on top, with the
Gear4music logo pointing upwards.
3. Push the arms inwards then secure them around
the drum. Tighten the wing nut on the stand
(now below the snare drum stand) to secure
everything into place.
NOTE – There is a lever on the side of the
snare drum. Before beginning to play this
drum, make sure to push the lever to its
tensioned position, as this activates the snare
wire underneath. If you press this lever and
get no snare sound, you adjust this using the
knob next to the lever when the tension lever
is released.

HI-HAT ASSEMBLY
ITEMS REQUIRED:
1x Hi-Hat Stand (three parts)
1x Hi-Hat Cymbals (Pair, 14” – top and bottom)
1x Drum Key
1. Take the tripod base of the hi-hat stand and
spread the legs out by unscrewing the wingnut.
The pedal attachment is connected to two rods.
Place the two rods into the base of the tripod
stand to secure it into place.
2. The second part of the hi-hat stand comprises
of three parts: a black metal pole, a silver thin
rod and the hi-hat clutch located at the top. First,
using the drum key, undo the bolt fixing the hi-
hat clutch and place to one side. This will allow
the silver rod to be completely removed as well.
3. Taking the silver metal rod, screw the threaded
end into the top of the tripod base and then
place the black metal pole over the rod. Secure
into the base, adjusting to the height you want
the cymbals to be at.
4. Take one of the hi-hat cymbals and place it
upside down on top of the hi-hat stand.
5. Take the hi-hat clutch and unscrew the nut at
the bottom. Separate into two parts so that
there is one black felt on each end. Thread the
screw part through the top of the cymbal and
then reattach the felt and nut to the underside
of the cymbal.
6. Insert the cymbal and clutch onto the silver
metal rod and let both cymbals rest on top of
each other without tightening the clutch wing
nut to the silver metal rod.
7. Slightly pressing the hi-hat pedal, tighten the
wing nut. When you release the pedal, the top
cymbal should raise away from the bottom
cymbal, so that they do no touch each other.
8. Final adjustments to the angle of the bottom
cymbal can be made using the turn bolt
underneath the bottom hi-hat cymbal,
should it be required.
8

9
CRASH CYMBAL ASSEMBLY
ITEMS REQUIRED:
1x Crash Cymbal (16”)
1x Crash Cymbal Stand
1. The cymbal stand is already assembled and only
requires height and leg adjustments. These can
be made by undoing the wing nuts, splaying the
legs, and then undoing both telescopic poles to
set to the desired height.
2. At the top of the cymbal stand, there is an
adjustable bar. Loosen this to adjust the angle
the cymbal will sit, tighten this bar when you are
happy with the position.
3. Remove the wingnut that holds the washer
and two felt pads. Remove these items leaving
behind a single felt pad on the stand. Place
the cymbal on this felt pad, then place the
remaining felt pad directly on top of it, followed
by the washer and wingnut. Do not overtighten,
this will reduce the resonance of the cymbal.

FITTING TOM TOM DRUMS
TO THE BASS DRUM
ITEMS REQUIRED:
1x Tom Tom Drum (10” x 8”)
1x Tom Tom Drum (12” x 9”)
1x Bass Drum (20” x 16”)
2x Tom Tom Drum Arms
1. Take the two tom drum arms and place them
into the holes on top of the bass drum. Have
them so the arms face away from each other.
Tighten the wing nuts on the bass drum to
secure them in place.
2. Loosen both wingnuts on both tom arms,
and place the tom drums on to each arm. The
smaller tom (12”) goes on the left (if you are
looking at the kick skin without a logo) and the
larger tom (13”) on the right.
3. Adjust the angle of each tom arm to your
desired position then tighten the wing nuts to
secure the drums and tom arms.
Note – Memory locks have been put in place
on the tom arms, which makes setup easier.
These can be adjusted if required using the
drum key.
10

11
DRUM STOOL ASSEMBLY
ITEMS REQUIRED:
1x Drum Stool (three parts)
1. Take the base of the stand, undo the wing
nuts and splay the legs. Set this on the
ground upright.
2. Take the height adjustment pole (which has
5 holes). Use the bolt, washer and wing nut to
secure it into the base. To do this, enter the pole
into the base and place the bolt through the
desired hole, then use the washer and wing nut
to secure. It may take a few attempts to get the
desired height for the user.
3. Place the saddle on top of the height-adjustment
pole and tighten using the wing nut under the
seat. Make sure this is fastened securely.
NOTE – Your drum kit is now set up and will
simply need tuning before playing.
Drum and cymbal positioning is a personal
preference and the layout of a drum kit can
vary. However, please feel free to refer to the
images on our website for some suggestions.
For more information and guidance on tuning
your drum kit, please visit our website
at www.gear4music.com

If you have any more questions about this product, please do not hesitate to contact the
This manual suits for next models
1
Table of contents
Other Gear4music Drum manuals

Gear4music
Gear4music JUNIOR 3 PIECE DRUM KIT User manual

Gear4music
Gear4music CHILDREN’S DRUM KIT User manual

Gear4music
Gear4music BDK STARTER KIT User manual

Gear4music
Gear4music DD70 User manual

Gear4music
Gear4music DD40 User manual

Gear4music
Gear4music DD400+ User manual

Gear4music
Gear4music DD400X User manual

Gear4music
Gear4music VISIONPAD-6 User manual

Gear4music
Gear4music JDD200 User manual

Gear4music
Gear4music JUNIOR 5 PIECE DRUM KIT User manual