GeChic 1102I User manual

ユーザーガイド
On-Lap 1102I

Noces, Cauons & Warranty Exclusions
LCD Pixel Statement
Federal Communicaons Commission (FCC) Class B Statement
CE Declaraon of Conformity
WEEE Symbol Informaon
I
II
II
III
III
Chapter 1 Parts of On Lap Monitor & Accessories 1
Secon 1 Parts Descripon 1
Secon 2 Accessories Descripon 2
Chapter 2 Installaon Instrucons 3
Secon 1 Installaon of Horizontal Display 3
Secon 2 Store the Monitor in the Protecve Cover 4
Secon 3 Install 1102I Monitor to T1S2 Stand(Oponal) 4
Secon 4 Lay Touch Monitor Flat with 1102 Mul-Mount Kit(Oponal) 5
Secon 5 Mount On-Lap 1102 to VESA 75 Monitor Arm or Wall Mount
(with 1102 Mul-Mount Kit)(Oponal) 6
Secon 6 Install On-Lap Proprietary HDMI-A & USB-A to Dock Port
Cable(Oponal) 6
Chapter 3 Hot Keys, LED and OSD Instrucons 6
Secon 1 Hot Keys& LED Indicaons 6
Secon 2 OSD Descripon 7
Chapter 4 Sengs of Extended Display 9
Secon 1 Sengs of Extended Display on Windows 10 9
Chapter 5 Using of Touch Monitor 10
Secon 1 Noces 10
Secon 2 Touch Screen Sengs on Windows 10/7 10
Chapter 6 Product Specicaon 11
Secon 1 General Specicaon 11
Secon 2 Supported Operang Modes 12
Secon 3 Supported Video Modes 12
Chapter 7 Troubleshoong 12
CONTENTS
English

WEEE
IV
V
V
13
1. 13
214
15
115
216
3 1102I T1S2 16
41102 17
51102 On-Lap 1102 VESA75
18
6 HDMI-A + USB-A -Dock 18
LED OSD 18
1 LED OSD 18
22. OSD 19
21
1 - Windows 10 21
21
121
2 Windows 10/7 21
22
122
223
323
23

Noces, Cauons & Warranty Exclusions
Warning: The sign alerts you to potenal hazards that can hurt
you or damage the product.
1. When carrying On-Lap Monitor, please put it into the protecve cover with
glass side inward and avoid pressing the monitor violently and rubbing the
glass surface by any sharp objects.
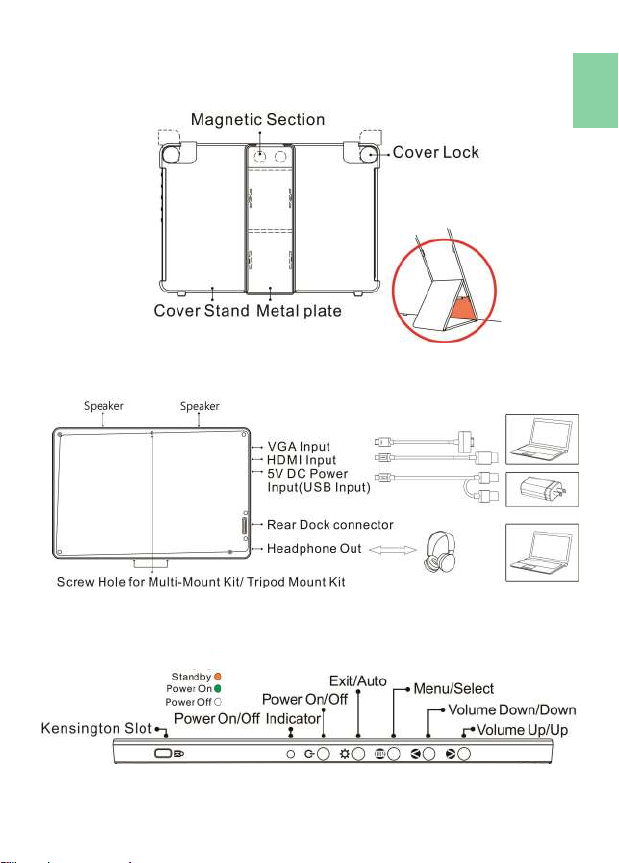
2. When plugging in/out the cables, do make sure the force exerts in horizon-
tal direcon - do not shake the port or plug it in vercal direcon. Any dam-
age caused by wrong plug urging is not included in the warranty coverage.
3. The power input specicaon for On-Lap monitor is 5V 2A DC current.
Inpung On-Lap Monitor more than 5V can cause shortages, and this will
void the GeChic Manufacturer's Warranty. We suggest you to connect both
connectors of the USB power cable to your desktop΄s USB ports or use
GeChic 5V-2A charger.
4. Part of On-Lap Monitor or its protecve Cover contains magnets, please
put On-Lap Monitor away from hard drive or any device that may be eect-
ed or damaged by magnets. Please put the magnec buckle of protecve
cover away from your desktop when the PC is in sleep mode or boosng.
5. Cleaning On-Lap Monitor : Unplug the power input before cleaning. Please
use so cloth to clean touch screen. For stubborn stains, please use lightly-
dampened cloth to wipe again. Do not use benzene, alcohol, thinner, am-
monia, abrasive cleaners, compressed air or other corrosive solvents. These
solvents may cause permanent damage on the screen or leave unremova-
ble stain.
6. Please do not place the monitor on a shaky or unstable table, cupboard or
trolley and do not use the On-Lap Monitor on a moving vehicle.The Product
may be severely damaged from overturning or falling.
7. The product is not waterproof. Do not use this product in or near water.
8. Do not insert any object into the Product΄s slots or gaps. Do not disassem-
ble the monitor in any way.
9. High Volume Warning: High volume can lead to lasng damage to your
hearing. Please check the volume sengs before reproducing any sound.
10.Overuse of the monitor may result in vision damage. For every 30 minutes
with the monitor, give your eyes 10 minutes break. Avoid children under
age 2 to watch with the monitor; prevent children over age 2 from watch-
ing with the monitor over 1 hour per day.
11.Exclusions from Warranty Service
Please read the warranty terms below carefully, and follow the usage guide
and precauonary notes. Please keep this manual for future reference.
GeChic does not warrant uninterrupted or error-free operaon of this Prod-
uct. The warranty only covers failure /malfuncon under normal use condi-
ons during warranty period. The warranty does not apply to the following
condions:
(1)The bar code has been removed or worn down, and cannot be idened.
(2)This product has been modied, disassembled, or reed.
I

(3)Display and touch funcon working normally; only variaon in appear-
ance (i.e., ageing, arion, scratch, color changing and etc.).
(4)Any breakdown caused by power supply. (i.e., inpung power over 5V or
unsteady current)
(5)Any damage caused by disoperaon or failure to follow this manual. (i.e.,
Plug or unplug the cable in wrong direcon and causing damage on cable
or monitor.)
(6)Any damage caused by hing or cracking monitor accidentally or
purposely, or collapsing or overturning monitor.
LCD Pixel Statement
There is slightly uneven brightness on the screen when displaying dierent
screen paern. The LCD screen has 99.99% or more eecve pixels. 0.01% of
pixels or less may not light or may light incorrectly. The On-Lap monitor uses a
high quality LCD panel. Nevertheless, pixels on the LCD screen may not light or
appear as red or black dots. All the above are normal with the LCD monitor
and will not aect the normal usage of the product.
Avoid placing the monitor against sun-light, or it may damage the monitor.
An aerimage of the previous screen may remain, when the same image is
displayed for hours. In this case, the screen is recovered slowly by turning o
the power for a few hours.
Federal Communicaons Commission (FCC)
Class B Statement
Noce: This equipment has been tested and found to comply with the limits
for a class B digital device, pursuant to part 15B of the FCC Rules. These limits
are designed to provide reasonable protecon against harmful interference in
a residenal installaon.
If this equipment does cause harmful interference to radio or television recep-
on, which can be determined by turning the equipment o and on, the user
is encouraged to try to correct the interference by one or more of the follow-
ing measures:
●Reorient or relocate the receiving antenna.
●Increase the separaon between the equipment and receiver.
●Connect the equipment into an outlet on a circuit dierent from that to
which the receiver is connected.
●Consult the dealer or an experienced radio/TV technician for help.
Cauon:
1. Changes or modicaons not expressly approved by GeChic Corp. could
void the user's authority to operate the equipment.
2. Shielded interface cables and AC power cord, if any, must be used in
order to comply with the emission limits.
3. The manufacturer is not responsible for any radio or TV interference
caused by unauthorized modicaon to this equipment. It is the respon-
sibilies of the user to correct such interference.
II

CE Declaraon of Conformity
This product complies with the following standards:
●EN60950-1:2006 and A11+A1 (Safety requirement of Informaon Tech-
nology Equipment).
●EN 55032:2006+A1: 2007 (Radio Disturbance requirement of Infor-
maon Technology Equipment).
●EN55024:1998+A1:2001+A2:2003 (Immunity requirement of Infor-
maon Technology Equipment).
●N 61000-3-2:2006+A1: 2009+A2: 2009 (Harmonic current emissions).
●EN 61000-3-3:2008 (Voltage uctuaons & icker) following provisions
of direcves applicable.
●2006/95/EC (Low Voltage Direcve).
●2004/108/EC (EMC Direcve).
●2005/32/EC (EuP Direcve, EC No. 1275/2008 implemenng Direcve
for Standby and O mode power consumpon) and is produced by a
manufacturing organizaon on ISO9000 level.
WEEE Symbol Informaon
This symbol on the product, accessories or literature indicates that this prod-
uct and its electronic accessories (e.g., adapter, cables, and Rear Dock) must
not be disposed of with your other household waste. Instead, it is your re-
sponsibility to dispose of these items by handing it over to a designated
collecon point for the recycling of waste electrical and electronic equip-
ment.
For more informaon about where you can drop o your waste
equipment for recycling, please contact your local city oce, your
household waste disposal service or the shop where you purchased
the product.
For Disposal in Countries Outside of the European Union
If you wish to discard this product and its accessories in other area and coun-
tries, please contact your local government for applicable laws and regula-
ons governing the disposal of this product.
III

Chapter 1 Parts of On Lap Product & Accessories
Secon 1 Parts Descripon
1

2
Secon 2 Accessories Descripon
1. Accessories in Package
Standard Accessory
USB-A to Micro USB power & touch cable(1.2m) 1 pcs
HDMI-A to Micro-HDMI video cable(1.2m) 1 pcs
5V,Max.2A Adapter 1 pcs
Protecve Cover Stand 1 pcs
Manual 1 pcs
2. Oponal Accessories
Product Name Descripon
USB-A to Micro USB power &
touch cable(2.1m) 1 pcs
One plug is USB-A(male) for adapter/computer USB
port; the other is Micro USB(male) for On-Lap moni-
tor.
On-Lap Proprietary VGA
video cable (2.1m)
Proprietary cable for On-Lap products.
One plug is D-sub(male) for computer΄s VGA port;
the other plug is Micro-HDMI (male) for On-Lap
monitor.
HDMI-A to Micro-HDMI
Video Cable (2.1m)
One plug is HDMI-A (male) for connecng to com-
puter΄s HDMI-A port ; the other plug is Micro-HDMI
(male) for connecng to On-Lap monitor.
Mini-HDMI to Micro-HDMI
Video Cable (2.1m)
One plug is mini-HDMI (male) for camera΄s mini-
HDMI port ; the other plug is Micro-HDM (male)
connecng to On-Lap monitor.
Micro-HDMI to Micro-HDMI
Video Cable (1.2m)
One plug is Micro-HDMI (male) for camera’s Micro-
HDMI port; the other plug is Micro-HDMI (male) for
connecng to On-Lap monitor.
On-Lap proprietary HDMI-
A&USB-A to dock port cable
(2m)
Proprietary cable for On Lap 1503/1102. One plug is
Gechic proprietary connector for plugging into the
port on Rear Dock; the other two plugs are HDMI-A
(male) and USB-A (male).
Please refer to Chapter 2> Secon 6.
1102 Mul Mount Kit
Proprietary for On-Lap1102. Can be used as a stand
of touch monitor for varies viewing angles; can be
installed on wall mount or arm of VESA 75. Please
refer to Chapter 2.
T1S2 Stand
Proprietary for On-Lap1102/M505/T1 series monitor.
T1S2 supports the monitor for both horizontal and
vercal displays with exible viewing angle adjust-
ment. Please refer to Chapter 2> Secon 3.

Chapter 2 Installaon Instrucons
Secon 1 Installaon of Horizontal Display
Refer to the Fig., ① take
the magnec buckle o
rstly, ②fold and aach
the rubber side of the
magnec buckle on the
mental plate. Adjust the
posion of the magnet
buckle to change the
viewing angles.
The min. viewing angle of horizontal
display is 40 degrees. Do not aach the
magnec buckle higher than the blue line ,
otherwise it may cause the monitor over-
turning.
As the g. below, rotate aside the Cover Locks rstly, and take the monitor out.
Then turn the monitor's backside to the Protecve Cover:①Put the boom
half of the monitor into the Protecve Cover, and ②Put the top half of the
monitor into the Protecve Cover. Rotate down the Cover Locks to prevent the
monitor from sliding out.
①②
As the g. , connect On-Lap 1102 to
a laptop. On-Lap 1102 can be pow-
ered on through two USB ports or a
5V-2A adapter. The video input
source is "HDMI1".
P.S. If the monitor does not get enough power from a single USB port, it
may cause splash screen or display interrupon. Please connect to two
USB ports on your PC or the 5V-2A adapter.
3

It is recommended to install 1102I
touch monitor on VESA75 arm or
wall mount for its Vercal Display.
Secon 2 Store the Monitor in the Protecve Cover
Warning: When not in use, please put the monitor back in the Protec-
ve Cover with its backside outward. Please also rotate down the Cover
Lock to prevent the monitor from sliding out.
Warning: Please keep the " Rear Dock Port" downward in the Protecve
Cover. If the monitor is put upside down in the Protecve Cover, it may
cause the scratches and the Cover Locks cannot be locked on.
Secon 3 Install 1102I Monitor on T1S2 Stand (Oponal)
As shown in the Fig, screw the monitor to the VESA bracket and then screw
the bracket to T1S2 stand.
4

Secon 4 Lay Touch Monitor Flat with 1102 Mul Mount Kit
(Oponal)
In the Fig. shown, use three
M2x5mm screws to x the
monitor to the monitor bracket
rst. Aer selecng the viewing
angle of 75°,62°,42° or 25°, use
two M4x5mm screws to x
Bracing Plate to the Monitor
Bracket.
Noce! When M505/1503/1102 monitor is
displayed vercally, the center line of the
monitor isn't on the pivot of T1S2 stand.
When rotang 1102I to portrait mode, please lt the monitor to 180 de-
gree, rotate it to vercal mode, and lt back to the viewing angle.
5

Secon 6 Install On-Lap Proprietary HDMI-A & USB-A to
Dock Port Cable(Oponal)
In the Fig. shown, remove the rubber bung at the rear of the monitor rstly.
Insert "On-Lap Proprietary HDMI-A & USB
-A to Dock Port Cable" to the rear port of
1102, and then screw it up. Plug in USB-A
connector to computer's USB port; HDMI-
A connector to computer's HDMI port.
Please press the menu buon of the mon-
itor to enter OSD menu and choose
"HDMI 2" as "Input Source."
Chapter 3 Hot Keys, LED and OSD Instrucons
Secon 1 Hot Keys & LED Indicaons
Noce: If need to adjust “Increase/up ” or “Decrease/down ”
connuously , press the buon and don't release. Do not press two
buons at the same me, or it may cause no response or fault response.
LED Light Descripon:
LED Light: It shows green light when turning on On-Lap Monitor and shows
Orange light when stand by. There is no light when the monitor is o.
6
Secon 5 Mount On-Lap 1102I to VESA 75 Monitor Arm or
Wall Mount (With 1102 Mul Mount Kit)(Oponal)
As the g., rstly use three M2x5mm screws to x the monitor to the Moni-
tor Bracket. Then use four M4x5mm screws to x the Monitor Bracket to the
arm.

Increase
Volume/ Next
Press this buon to show "Volume bar". Press and
hold this buon to increase the volume connuously.
In the OSD menu, press this buon to move down or
to the right.
Decrease
Volume/
Previous
Press this buon to show "Volume bar". Press and
hold this buon to decrease the volume connuous-
ly. In the OSD menu, press this buon to move up or
to the le.
Menu/Select Press this buon to launch OSD panel. When using
OSD menu, press this buon to select and enter the
next page.
Exit In the OSD menu, press this buon to return to previ-
ous page or exit.
+ Reset Press both "Exit" and "Decrease Volume/Down" at
the same me and OSD will be reset as the factory
sengs.
Secon 2 OSD Descripon
When turning on On-Lap monitor at the rst me, the "Language Select" menu
appears on the le top. Please press " Menu/Select" buon to choose the
language you like, then the "Language Select"
menu won't appear next me. If press "Exit"
buon to disable the "Language Select"
menu, it will appear again when powering on
the monitor next me.
1. Display Sengs
In the Fig. shown, enter "Display Sengs" to
adjust "Brightness", "Contrast", "Sharpness",
etc.
1) ECO Mode: The maximum brightness is
at 50 in Eco Mode.
2) Auto Adjust: Launch "Auto Contrast
Adjust" and "Auto Brightness Adjust" to
adjust brightness and contrast automa-
cally to ensure the highest quality when
displaying moving images.
2. Color Sengs
1) Color Eect: In Color Eect, there are 4
modes: "Standard", "Photo", "Game",
and "Movie" oered to be selected.
7

82) Blue Light Reducon: Select "On" to reduces the blue light automacal-
ly.
3) Color Temperature: Select "Cool" to increase the blue color of the im-
age; Select "Warm" to increase the red color of the image. Select "User"
to adjust the RGB color sengs manually.
3. Aspect Rao
1) Aspect rao: When select "16:9 Full
Screen", the monitor displays a 16:9
image in full screen. When select 4:3,
the monitor displays a 4:3 image with
le-right side black borders to ll the
16:9 screen. When select "Original",
the monitor displays the image in its
original size.
2) Overscan: only available when in-
pung HDMI video signal
(e.g.,1080P/720P). Enabling this func-
on allows you to calibrate the display area.
4. Manual Image Adjust
1) Auto Adjust: Adjust image sengs
automacally. Only available when
inpung VGA video signal.
2) H. Posion: Move screen image to le/
right.
3) V. Posion: Move up/down screen
image.
4) Clock: Adjust the pixel clock for hori-
zontal sweep. If the frequency is not
correct, the screen shows vercal
stripes and the image is not proporonal.
5) Phase: Adjust the phase of the pixel clock signal. With a wrong phase
adjustment, the screen shows horizontal disturbances.
5. OSD Menu
1) Language Select: Change to the other language.
2) H. Posion: Move the OSD menu to
le/right.
3) V. Posion: Move up/down the OSD
menu.
4) OSD Timer(sec): Adjust idle me before
OSD menu disappears.
5) OSD Transparency: Make the OSD
menu transparent to show the back-
ground.
6) Auto Power O: Select "On" to launch
this funcon, when no image displayed
on the screen, the monitor will enter
Stand -by mode, and power o itself aer 15 minutes. Select "O" to
disable this funcon. The monitor will stay in Stand-by mode and will
not power o.

7) Power Buon Lock: Select "On" to lock the Power Buon.
6. Audio Sengs
Adjust audio volume or select silent mode.
7. Input Source
1) Select Analog VGA source, HDMI1 digital video signal (from the le
HDMI port) or HDMI 2 digital video signal (from the HDMI port on
Rear Dock).
2) Auto Search: When "On" is selected, the monitor will detect three
video input sources in sequence, and
the monitor will display the rst one
read. When "O" is selected, only the
video source selected in Input Source
will be displayed. If no such selected
video signal inputs, the monitor will
show "no signal" warning message,
and won’t check other video sources.
3) CEC Mode: When "On" is selected,
users can turn on or o the monitor
by connecng to the device with
HDMI CEC funcon such as DVD
player, camera, or PlayStaon game console.
8. Informaon
Show the frequency of the input image, On-Lap model, rmware version,
etc.
1) Reset: Select "Yes" to reset to defaults.
Chapter 4 Sengs of Extended Display
Secon 1 Sengs of Extended Display on Windows 10
Click , select [Sengs]→ [System] → [Display]→ and choose "Extend
these displays" at Mulple displays.
Select "1920x1080" at Resoluon; select "Landscape" at Orientaon for
horizontal display or select "Portrait" for vercal display, and then click
“apply” to save the sengs.
9

10
Chapter 5 Using of Touch Monitor
Secon 1 Noces
1. Windows 10/7 computer supports On-Lap 1102I touch funcon. If the
computer doesn’t adopt Windows 10/7, it may not be able to use
touchscreen funcon on 1102I monitor.
2. USB power and touch cable① transmits both pow-
er and touch signals at the same me; ② can only
transmit power. If ①connector does not connect
to a USB port on the computer, the touch funcon
will be no longer available.
Secon 2 Touch Screen Sengs on Windows 10/7
If the computer doesn’t enable touchscreen funcon automacally or the
monitor doesn’t sense touch posion accurately, please use Windows 10/7
[Tablet PC Sengs] in [Control Panel] to start touch screen seng.
In Windows 10, search “Calibrate” and select “Calibrate the screen for pen
or touch input”.
In Windows 7, click [Tablet PC Sengs] in [Control Panel] to start touch
screen sengs.
In the Fig. shown, please select “Setup”. When the display shows on-screen
instrucons on On-Lap 1102I, touch On-Lap 1102I to complete touch screen
seng.

Specicaon On-Lap1102I
Panel Wide screen 11.6 inch(16:9)
True Resoluon 1920x1080
Color Depth 16.7M colors
Brightness 250 (cd/m²) (Typ.)
Contrast Rao 1000:1(Typ.)
Viewing Angle 178°(H)/178°(V)(CR>10)
Response Time 12.5(ms)(Typ.)
Type of Touchscreen
Operang System
Projecve capacive touch screen
10 points mul-touch
Support Windows10/7
Connecvity HDMI*2,VGA*1
Audio output Earphone jack
Speaker 1.0W(Max.)*2
HDCP Support Yes
HDMI CEC Support Yes
Plug and Play VESA DDC2B/C1
●Power Consumpon
●Standby Mode
●O Mode
≦8.5W
<0.5W
<0.5W
Rang Power 5V 1.7A
Environment Condion Operaon: 0~50℃; Storage: -20~60℃
Dimensions (W*H*D) 294mm*194mm*12mm (monitor)
299mm*209mm*21mm (monitor& cover)
Weight (Typical) 670g(monitor); 920g(monitor& cover)
Cercaon
Chapter 6 Product Specicaon
Secon 1 General Specicaon
R53848
RoHS
11

Secon 2 Supported Operang Modes
Secon 3 Supported Video Modes
Resoluon Refresh Rate Horizontal
Frequency(kHz)
Vercal
Frequency(Hz)
640x480 60Hz 31.469 59.940
720x480 60Hz 29.855 59.710
800x600 60Hz 37.879 60.317
848x480 60Hz 31.02 60.000
960x600 60Hz 37.212 59.635
1024x768 60Hz 48.363 60.004
1152x864 60Hz 53.783 59.959
1280x600 60Hz 37.377 59.900
1280x720 60Hz 45.000 60.000
1280x768 60Hz 47.776 59.870
1280x800 60Hz 49.702 59.810
1280x960 60Hz 60.000 60.000
1280x1024 60Hz 63.981 60.020
1360x768 60Hz 47.712 60.015
1366x768 60Hz 47.712 59.790
1360x1024 60Hz 63.606 59.836
1400x1050 60Hz 65.317 59.978
1440x900 60Hz 55.935 59.887
1600x900 60Hz 55.990 59.946
1600x1024 60Hz 63.675 59.901
1680x1050 60Hz 65.290 59.954
1920x1080 60Hz 67.500 60.000
Supported Operang Modes
1920x1080P (50Hz/59.94Hz/60Hz) 1280x720P(50Hz/59.94Hz/60Hz)
720x480P(59.94Hz/60Hz) 640x480P(59.94Hz/60Hz)
Problem Soluons
Touch On-Lap 1102I in the
extended display, but the
cursor appears only on the
main display, not 1102I.
Please refer to Chapter 5> Secon 2 Touch Screen
Sengs on Windows 10/7 to start touch sengs.
No response on the touch
screen?
Please refer to Chapter 5> Secon 1 to check whether
the USB cable is connected correctly to the comput-
er , and whether the operang system supports
external touch screen or not. (Most of smartphones,
Apple®'s computers do not support external touch
screen.
Chapter 7 Troubleshoong
12

IV

V
Table of contents
Other GeChic Tablet manuals