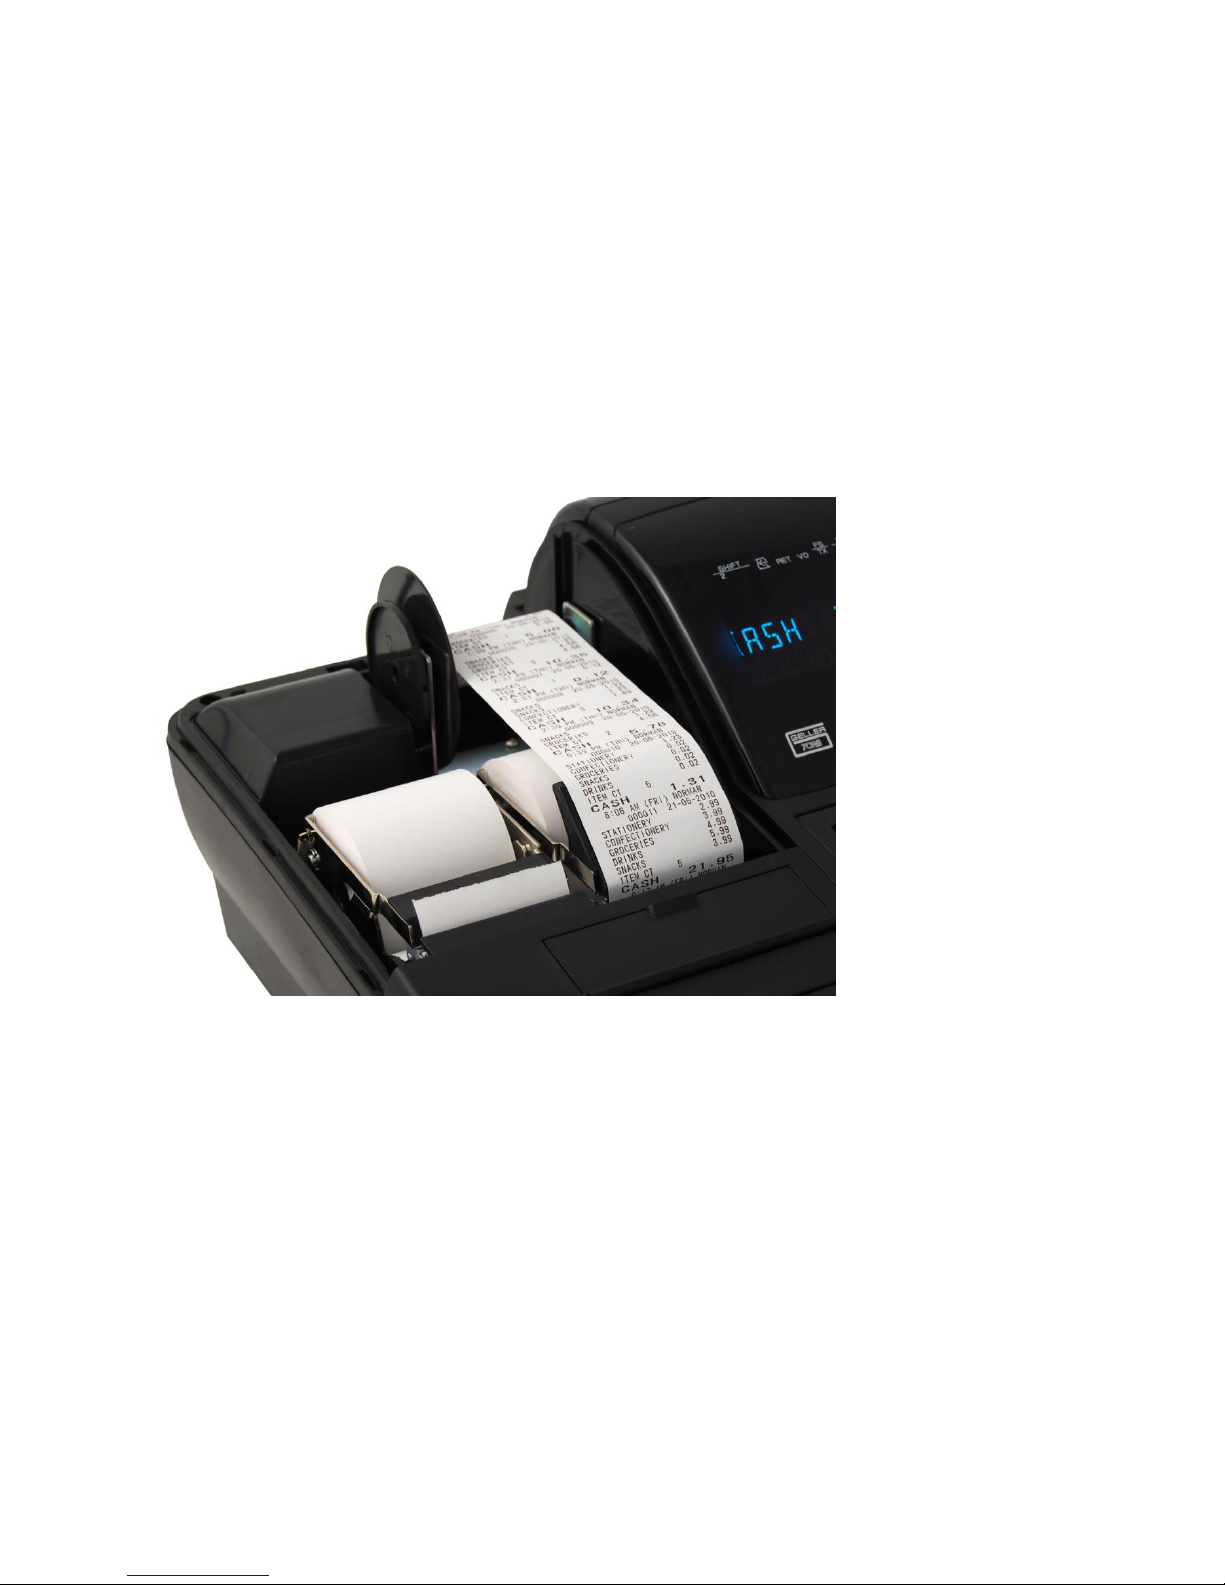
Geller SX-695 User manual

1
SX-695
End User Guide
Retail

2
SX-695
Feature Guide
299 departments
18500 PLU‟s (standard) 35600 PLU‟s (extra memory)
58mm thermal receipt & journal printers
99 clerk interrupt holds with auto store after pre set time limit
PC link for easy programming and advanced sales reporting
Scanning with easy programming, price check, PLU delete and
re-ordering features
Optional Pre-loaded Retail File
Shelf Edge Labels
Mix and Match
Stock Control & Advanced Reports –Best Sellers / Non Movers
Programmable keyboard layout
Drawer alarm with programmable timer
Advanced Training mode
Management control
Age Verification
Supports Newspapers and Magazines
IRC Networking
Dallas Key
Kitchen & Wide Receipt Printer Link

3
Please Note: By amending program details using this user guide you automatically accept full responsibility
for any changes you make to your system as a result of using the information contained in the guide. Please
ensure that any changes made to your system are carried out by a suitably qualified person who
understands the implications of those changes. It is always preferable that you talk to the reseller who
supplied you as your terminal may have been configured specially for your needs. Changes made by you
may conflict with settings originally made by your supplier. Specifications are subject to change without
notice and whilst all efforts have been made to ensure the validity of these documents, we accept no
responsibility for any omissions or errors contained in them.

4
INDEX
Power Switch 5
Rear Display 6
Cash Drawer 7
Control Lock 8
Paper Rolls 9 –10
Scanner 11
Programming Layout 12
Date & Time 13
Retail Preloaded/Newspapers 14 - 15
Basic Sale/Split Payment 16 –17
Multiple Sale/Quick Tender Keys/Price Check 18
Receipt On-Off/Cancel 19
Return/Void 20
Last Item Void/No Sale 21
Discount 22 –24
Clerk Hold 25
Easy Price & Name Change 26 –27
PLU Delete 28
Stock 29 –30
Re-Ordering 31
Age Verification 32 –33
Shelf Edge Labels 34
Mix & Match/Cashback 35
X/Z Report/Housekeeping 36 - 38
Error Messages 39 –40
F.A.Q 41
Glossary 42 –45

5
GETTING STARTED
The Main Power Switch
The main power switch is located on the right-hand side of the SX-695.
The switch must be in the ON position before the ECR is operational.

6
GETTING STARTED
The Display
The customer display screen can be lifted and rotated for the best viewing angle.
By programmable option, the control lock position can be temporarily displayed and
a warning tone sounded each time the key position is changed.

7
GETTING STARTED
The Cash Drawer
Adelay can be set so that if the drawer is left open for more than a
designated number of seconds, an alarm will sound.
It is possible to program the ECR so that it cannot be used for transactions
when the drawer is open.
Whenever the ECR is not in use (i.e. at night), the control lock should be
turned to the „L‟ position and the cash drawer emptied & left open to avoid
damage in the event of a break in.

8
CONTROL LOCK
The control lock allows you to change between the various functions on the till. The
till is equipped with nine positions. To change the position use the owner‟s key
(marked with [OW]), manager‟s key (marked with [MA]) and the operator‟s key
(marked with [OP])
OP : Key for Operator can access "L" and "R" positions
MA: Key for Manager can access "P1", "L", "R", " X1", "V" and "Z1" positions.
OW: Key for Owner can access all key positions
The following table shows the modes the cash register is equipped with.
Mode
Functions
P1 - Program 1
mode
Used to program "Date", Department, PLU, Tax etc.
L - Lock mode
Used to lock the cash register. This position disables all
operations.
R - Register mode
Used to process sales transaction
Read mode X1
(T)
Used to read and print the Sales Reports.
Used for training the operator.
V - Void mode
Used to void the registration.
Z1 - Reset mode
Used to reset and print the Sales Reports
X2 - Periodical read
mode
Used to print periodicals information report.
Z2 - Periodical reset
mode
Used to read and reset the periodical sales information.
P2 - Program 2
mode
Used to program "SYSTEM FLAG", "KEY LAYOUT",
"TRANSACTION NAME" etc. System mode is
accessible from the P2 mode.

9
PAPER ROLLS
Installing the Paper Rolls into your SX-695
Your cash register comes fitted with 2 thermal printers which use 58mm
paper rolls.
Receipt Roll
1. Lift up the printer cover from the back
2. Press the Receipt Release Button located under the protective flap above the
keyboard
3. Remove the old till roll & drop the new till roll into the holder with the paper
feeding from underneath
4. Push the set plate down securing the paper in place
5. To feed the paper press the RF button on the keyboard

10
Journal Roll
1. Press the Journal Release Button located under the protective flap above the
keyboard
2. After removing the previous Journal drop the new till roll into the holder with
the paper feeding from underneath
3. Feed enough paper in order to connect to the printer spool
4. Insert the end of the roll into the slit and wind the paper around the spool a
couple of times
5. Push the set plate down securing the paper in place
6. Place the audit spool back into the cradle
7. To tighten the slack on the paper press the JF Key on the keyboard
8. Replace the printer cover
Note
As thermal paper is used you can only print on one side. If you install it the
wrong way round (the heat sensitive side away from the print head) it will not
print.
Once the till is installed whenever the paper rolls require changing, please
press the Release Key to enable the till.
RLS

11
GETTING STARTED
Scanner
The SX-695 has a connection for a handheld scanner to be attached in a retail
environment. The connection port for the scanner is located on the rear of the
till (Com 1). Once the scanner is connected and till powered on the scanner
will beep to acknowledge connection. You will then need to reboot the till in
the 'P2' position with the RF Key held down.

12
PROGRAMMING LAYOUT
This is the default programming layout which is always activated when the key is
turned to the „P‟ position.
New BkSpace
Feature

13
DATE & TIME SETTINGS
Insert the manager program key (MA) in the control lock and turn to the P1
program position
Press the down arrow once to DATE and press enter
To set the date, enter as year-month-day format.
Example: For 16th June 2010
DATE: 20100616 Enter Key
To set the current time, use 24 hour format.
Example: To set 10:15 AM
TIME: 1015 Enter Key
ENTER
0
2
6
0
1
1
ENTER
1
0
1
5
6
0
ENTER

14
RETAIL PRELOADED
Your system may have been preloaded with a stock file containing popular products
etc. This section will describe the operation of getting the most out of this
preloaded system.
There is no need to program an item from scratch. Simply add the price at the point
of sale and the product name will be automatically stored for future sales. If the item
is not in the retail file, the department name will be used instead.
With the key in the 'R' Position scan your product.
The till will prompt PRICE+DEPT?
Enter the price followed by the relevant department this product applies to.
The example below shows if a customer brings a can of drink to the till that has
price of £1.20:
If this item is in the database, the next time it is scanned through the till it will
display the name of the product and the price that was set (in this case £1.20)
If the product is not in the database it will still sell at the desired price and use the
department name. Note If the incorrect dept/category was selected, you can use
the Dept Link button in the P1 position to rectify.
NEWSPAPERS
Newspapers have barcodes which change every day.
The SX-695 will allow the user to scan a Monday Newspaper and enter the price.
This will now work automatically for each weekday as the SX-695 has an intelligent
Newspaper system. The Newspaper names are already pre-loaded for convenience
On the Saturday the till will recognise it is as a Saturday barcode & request the
price.
1
2
0
DRINKS

15
Magazines and Local Newspapers are also pre-loaded and also adopt this simple
function.
To add a newspaper to the system, scan the newspaper in the R position. Enter a
price (e.g 40p) and press the Newspaper Dept on the keyboard.
NOTE: The following can be actioned when the till is live in shop or
before installation. If this is setup prior to use, you will need to take a 'Z2' report in
order to reset the sales before live transactions begin. Please see Reports section.
4
0
NEWSPAPERS

16
BASIC SALE
To sign on the the till either enter your user number followed by the Clerk No. key or
press your direct user button.
OR
Scanned Items
To complete a basic sale scan the product, this will display the price of the item.
Then use the Sub-Total Key to display the amount of the transaction. You can then
enter the amount of money tendered & the relevant tender type to complete the
sale. The example below shows an item scanned (bottle of drink, £1.20) and being
tendered using the cash key for an amount of £5.
SCAN ITEM
The till will then issue a receipt and indicate the change due. In this case it would
be £3.80
NOTE: If your scanner is not being used you are still able to sell barcode listed
products.
Enter the barcode number of the product followed by the PLU Key
This will sell the relevant product. Now you can continue the sale as normal by
entering more items or sub-totaling and tendering the sale.
CASH
TEND
SUB
TOTAL
5
0
0
PLU
SUB
TOTAL
1
0
00
CASH
TEND
CLERK
1
CLERK
No.
BARCODE NUMBER

17
Non Scanned/Open Items
To complete a basic sale enter the desired amount and press the relevant
Department/PLU Key, then use the Sub-Total Key to display the amount of the
transaction. You can then enter the amount of money tendered & the relevant
tender type to complete the sale. The example below shows an amount of £5.00
being entered into Department 9, Sub-Totaled & Cash of £10.00 being paid.
The till will then issue a receipt and indicate the change due. In this case it would
be £5.00
SPLIT PAYMENT
Split payment can be used if required. Once you have entered your sale and sub
totaled then enter the cash amount that is being tendered first and complete the
sale with the card amount tendered. The below example
0
00
DPT
2
2
SUB
TOTAL
1
0
00
CASH
TEND
1
0
00
CARD
5
0
0
DPT
9
CASH
TEND
SUB
TOTAL
1
0
0
0

18
MULTIPLE SALE
Enter the Quantity, press the multiply button, enter the amount followed by the
relevant Department/PLU button. The example below shows 2 items of £2 being
sold into Department 7.
QUICK TENDER KEYS
You can use the quick tender keys to complete a sale instead of just pressing cash
or manually entering your amount. These buttons are marked £50, £20, £10 & £5.
The example below shows a sale of £7.99 in Department 4 and tendered using the
£10 quick tender button.
PRICE CHECK
To check a price of a product, press the PRICE CHECK button before pressing
an item. This will display the price of the product without selling it. To sell the item
press the item again.
Q/F
2
00
CASH
TEND
2
DPT
7
7
99
£10
DPT
4
Q/F
£10
PRICE
CHECK

19
RECEIPT ON/OFF
It is possible to switch the receipt print off and on by pressing the Receipt On/Off
button. If you require a receipt after the sale has completed. Press the 2nd Receipt
button. When the receipt is off an LED indicator will be on the Display.
CANCEL
To cancel a transaction whilst in process press the Cancel Key at any point
during the Sale. The below example details a sale being canceled after three
entries:
2nd
RECEIPT
1
5
00
DPT
1
3
9
9
DPT
2
7
9
5
DPT
3
CANCEL
RECEIPT
ON/OFF
RECEIPT
ON/OFF
CANCEL
Please note, If using Clerk Interrupt then sign on
firstly before pressing the receipt button

20
RETURN
You can return an item sold outside of the original transaction by pressing
the Return key, entering the amount, selecting the relevant Department/PLU and
using the Tender key. The example below shows a Return a sale of £5.99 into
Department 3.
VOID
You can void an item outside of the original sale by turning the key to the 'V'
Position, pressing the Void Key and entering the transaction as was sold.
The below example shows a Void on a transaction of £20.00 into Department
2.
VOID
2
0
00
DPT
2
CASH
TEND
RET
5
9
9
DPT
3
CASH
TEND
RET
VOID
Table of contents
Other Geller Cash Register manuals