INTRODUCTION:
Congratulations on your purchase of the GEMINI RENEGADE DJ package. Each
piece of equipment included in this kit comes with instructions packed in the unit box. Please read
the individual instructions included with each unit prior to use.
DJ KIT FEATURES:
• Two XL-200 Belt Drive Manual Turntable With CN-25 Cartridges
• One PMX-350 Stereo DJ Mixer With Removable Crossfader
• Two Gemini PM-100 Two-Way, Self-Powered Monitor Speakers With Cables
• One pair of Gemini EM-50 Stereo Lightweight, Back-of-Neck Headphones with 12’ Cable
• One Gemini GM-26 Microphone with 15’ Cable and Case
• RCA Cables
CAUTIONS:
1. Read all operating instructions before using this equipment.
2. To reduce the risk of electrical shock, do not open unit(s). THERE ARE NO USER
REPLACEABLE PARTS INSIDE. Please refer servicing to an authorized technician.
3. Do not expose unit(s) to sunlight or a heat source such as a radiator or stove.
4. These unit(s) should be cleaned with a damp cloth ONLY. Avoid solvents or other cleaning
detergents. Do not use spray cleaners or lubricants on controls or switches.
5. When moving this equipment, it should be placed in its original packaging to reduce the risk of
damage during transit.
6. Do not expose these units to rain or moisture.
NOTE: EXCESSIVE VOLUME CAN CAUSE DAMAGE TO YOUR STEREO SYSTEM AND SPEAKERS. KEEP VOLUME AT A
REASONABLE LEVEL.
CONNECTIONS:
Before making any connection, ensure that power switches on all units are in the OFF position. Check that
the VOLTAGE SELECTORS on BOTH turntables are set correctly before plugging in power cords.
TURNTABLES TO MIXER:
1. Using the hard-wired RCA stereo cable attached to the rear of the LEFT XL-200 turntable,
connect the turntable to the PH1 inputs on the rear of the mixer.
2. Connect the RIGHT turntable to the PH3/LN2 inputs on the rear of the mixer and then move
the switch below the inputs to the PH3 position. Additional line inputs (such as a CD player) will
require the proper switch setting.
3. Attach the GROUND LUG on either end of the RCA cables to the GROUND THUMB SCREW on
each turntable and the THUMB SCREW (GRD) on the mixer.
NOTE: NOT ATTACHING GROUND(S) WILL CAUSE TURNTABLE(S) TO “HUM.”
4. Set the PH-1— PH-2/LN1 switch below the gain knob on the face of the mixer to PH-1. Set the
PH-3/LN2—LN3 switch to PH-3/LN2.
MIXER TO SPEAKERS:
1. On the rear of the PMX-350 mixer are RCA output jacks. Using the RCA stereo cables provided, connect
the mixer’s MASTER outputs to the PM-100 speaker INPUTS on the rear of the RIGHT CHANNEL
speaker.
2. Using the cable hard-wired into the LEFT CHANNEL speaker, connect it to the L-SPK jack on
the right speaker.
MIXER TO RECEIVER OR AMP:
1. The PMX-350 MASTER output jacks are unbalanced and are used to connect the mixer to the
main amplifier or the stereo receiver LINE or AUX inputs utilizing the provided RCA stereo cables.
HEADPHONES & MICROPHONE:
1. Plug the GEMINI EM-50 headphones into the PHONE input located on the front panel of the
GEMINI PMX-350 mixer.
2. Plug the included GM-26 MIC into the input located on the front of the GEMINI PMX-350.
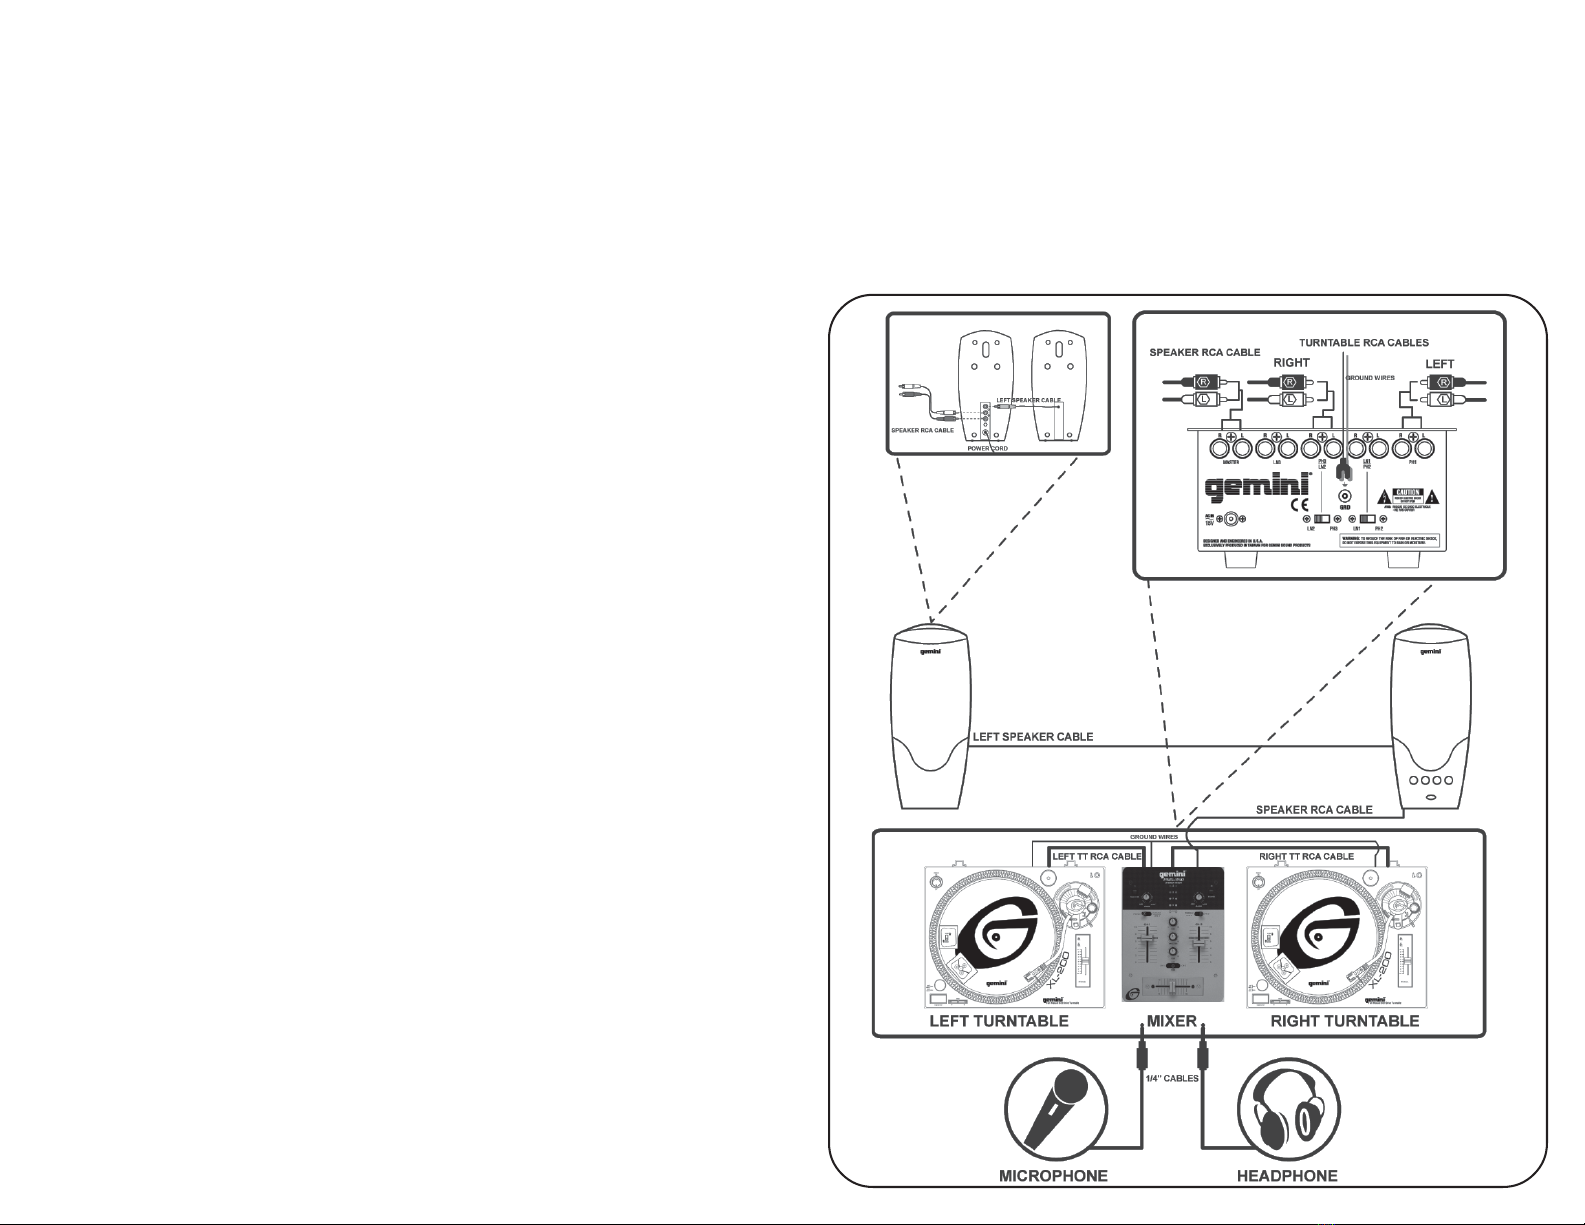
SETUP DIAGRAM:
BACK OF SPEAKERS
BACK OF MIXER
IDEAL SETUP


