Genelec SE User manual
SE™ Small Environment System Operating Manual
AutoCalTM


3
GENELEC SE™ SMALL ENVIRONMENT DSP SYSTEM
OPERATING MANUAL
Do not attempt to operate the system without first becoming acquainted with this manual.
This document refers to software version 1.2.x. The third digit “x” denotes small
corrective updates and may vary.
Genelec Document D0082R001a. Copyright Genelec Oy 5.2009. All data subject to change.

4

5
Contents
INTRODUCTION .................................................................................................................. 8
SOFTWARE REGISTRATION ............................................................................................. 8
GLOSSARY.......................................................................................................................... 9
SYSTEM PARTS .................................................................................................................. 13
8130A Loudspeaker Delivery Content 13
SE7261A Subwoofer Delivery Content 13
GLM.SE™ DSP Loudspeaker Manager Package Delivery Content 13
GLM.SE™ DSP Multiroom Expansion Package Delivery Content 14
LOUDSPEAKERS................................................................................................................ 15
Two-way Loudspeakers (8130A) 15
Subwoofer (SE7261A) 16
PLACING LOUDSPEAKERS IN THE MONITORING ROOM.............................................. 18
Full-Bandwidth Loudspeaker Placement 18
Subwoofer Placement 19
Multi-Channel System Layout 20
GETTING STARTED............................................................................................................ 23
Quick Course to System Basics 23
Step-By-Step System Setup for GLM.SE™ Control Network Use 25
Step-By-Step System Setup for Stand-Alone Use 25
GENELEC LOUDSPEAKER MANAGER GLM.SE™.......................................................... 26
Overview 26
GLM.SE™ Control Network 27
Installing the GLM.SE™ Software 29
Running the System Setup Wizard 29
AUDIO CABLING................................................................................................................. 30
GLM.SE™ Rapid Cabling Presets 33

6
SYSTEM SETUP WIZARD................................................................................................... 40
Wizard Introduction 40
Rapid Cabling Wizard 41
Manual Cabling Wizard 44
Saving the Setup 50
ACOUSTICAL SETUP WIZARD .......................................................................................... 51
AutoCal™ - Theory of Operation 52
Setting up for AutoCal™ 52
Running AutoCal™ 56
Symmetrical Placement EQ™ 58
Subwoofer Phase Alignment Using the AutoPhase 60
Editing AutoCal™ Settings Manually 61
Storing Settings Permanently Into the SE7261A 62
BASIC USE OF THE GLM.SE™.......................................................................................... 63
GLM.SE™ Main Page 63
Mute All and Bypass BM 64
Volume Control 64
Level Presets 66
Access to the GLM.SE™ System Setup Editors 66
Information Data Banner 67
Audio Channel Group Functions 67
Menu Items 68
MANAGING SYSTEM SETUPS........................................................................................... 70
Saving and Recalling Setups 70
Editing Audio Cabling Definitions 71
Editing Group Definitions 72
Replacing and Removing Loudspeakers in a System Setup File 74
EDITING ACOUSTIC CALIBRATIONS ............................................................................... 76
Opening the Acoustical Settings Editor 76
8130A Loudspeakers 77
Interactive Response Editor 79
SE7261A Subwoofer 82
7
Using the Interactive Response Editor 89
STAND-ALONE OPERATION.............................................................................................. 90
8130A Connectors and Controls 90
SE7261A Connectors and Controls 92
Stand Alone Controls (Manual) 93
FUNCTION REFERENCE.................................................................................................... 98
Genelec AutoCal™ 98
SE7261A Online 98
Load Setup 99
Wizard Introduction 100
Rapid Cabling Preset Selection 101
Loudspeaker Marking 102
Storing the Acoustic Settings in GLM.SE™ 103
Recalling the Acoustic Settings in GLM.SE™ 104
System Audio Connections 105
Manual Cabling 105
Rapid Cabling 106
Signal Format 107
Audio Cable Definition 107
Audio Cabling Summary 109
Loudspeaker Connection 110
Floating Level Fader 112
Reference Level Calibration 113
Uninstalling GLM.SE™ 114
Configurable settings for Powermate knob 115
GLM.SE™ AutoLink Application 115
FREQUENTLY ASKED QUESTIONS.................................................................................. 119
Product 119
Connectivity 120
Software 122
Problems and Support 123
Index .................................................................................................................................... 125

8
INTRODUCTION
Congratulations and thank-you for the purchase of this Genelec SE™ DSP Loudspeaker System. This
system is designed to integrate easily into the digital production environment. There are several ways to
configure and operate the SE™ systems for a wide variety of high quality audio applications.
This manual addresses the Genelec Loudspeaker Manager GLM.SE™ and the proprietary Genelec
loudspeaker control network, guiding step-by-step through the setup process. The SE7261A subwoofer
can also be used in stand-alone mode just like any other subwoofer, but without enjoying the benefits of
additional flexibility and versatility of the GLM.SE™.
SOFTWARE REGISTRATION
Please register your software at Genelec’s website www.genelec.com. The registration form is in the
Professional Monitoring/Products/DSP Monitoring Systems section. The user registration is essential to
Genelec as it allows keeping track of software versions as well as customer hardware revisions, allowing
us to serve you better.
This registration process requires the GLM software “Box Nr.” code. This code is physically printed on the
software package. Software updates cannot be obtained without complete, prior system registration.
Genelec Loudspeaker Manager Small Environment (GLM.SE™), Genelec AutoCal™, AccuSmooth,
SinglePoint, Symmetrical Placement EQ, AutoPhase and MultiPoint are trademarks of Genelec Oy.
Parts of the Genelec Loudspeaker Manager are written using MATLAB®. © 1984 -2005 The MathWorks,
Inc.

9
GLOSSARY
.gse file GLM.SE™ System Setup File
.gtd file Genelec Time Data file containing the computed impulse responses of a
loudspeaker or subwoofer.
3.5 mm Measurement
Signal Cable
A 3.5 mm stereo jack-to-jack interconnection cable used to connect the
MIC OUT socket on the Network Interface to a computer’s soundcard
input.
AccuSmooth A proprietary smoothing algorithm that has a higher resolution (narrower
smoothing bandwidth) at low frequencies than a standard 1/3 octave
smoothing, and a similar resolution at high frequencies. This is used by
AutoCal™ to ensure accurate placement of notch filters at critical bass
frequencies.
Acoustical Settings Editor A page in the GLM.SE™ that provides access to the Acoustical Settings
in the loudspeaker or subwoofer. The Interactive Response Editor can
also be accessed here.
Acoustical Setup Wizard A self-guided Wizard that allows for manual or automated (AutoCal™)
calibration of the Loudspeaker Acoustic parameters.
Audio channel Although the definition of an audio channel is rather straightforward and
clear, it should not be confused with loudspeakers or audio cables in
the loudspeaker system. The AES/EBU digital audio cables may carry
one or two audio channels. There may be one or more loudspeakers
reproducing one audio channel.
Bass Management Bass Management is used to reproduce the low frequency content of
audio channels over one or more subwoofers instead of loudspeakers.
This can be the low frequency content from the full-bandwidth audio
channels. Parts or the entire LFE audio channel can also be bass
managed.
Digital Signal Cable The digital signal cable carries an AES/EBU audio signal.The GLM.SE™
supports AES/EBU digital audio cables typically carrying two channels
of audio.
Digital Thru The connector on the back of a loudspeaker used to pass the AES/EBU
digital audio signal presented to the digital input connector onto another
loudspeaker.
10
Genelec 8200A
Calibration Microphone
A factory calibrated acoustic measurement microphone used for
AutoCal™ system alignment.
Genelec AutoCal™ Genelec AutoCal™ is a property of the GLM.SE™ software that utilizes
built-in test signal generators inside the Genelec SE7261A Subwoofer to
acoustically measure and align the loudspeaker system.
Genelec AutoPhase Genelec AutoPhase is a part of Genelec AutoCal™. It aligns the phase of
the subwoofer in the system to the designated loudspeaker(s).
Genelec Sound Card Genelec Sound Card is a high quality sound card integrated in the
Network Interface device. It provides a precise frequency response
measurement with Genelec 8200A Calibration Microphone and Genelec
AutoCal™ function. The Sound Card is only active when AutoCal™
function is used.
GLM.SE™ Control
Network
The GLM.SE™ loudspeaker control network is a proprietary network
allowing the setting, reading and monitoring of loudspeakers and
subwoofers on the GLM.SE™ network. System setup can be achieved
very rapidly by simply opening a System Setup file, which causes all
system and loudspeaker settings to be automatically communicated to
all loudspeakers.
GLM.SE™ DSP
Loudspeaker Manager
Package
The GLM.SE™ control network delivery package containing all hardware
and software to build a GLM.SE™ Loudspeaker Manager environment.
8130As and SE7261As are purchased separately.
GLM.SE™ DSP Multiroom
Expansion Package
An expansion package providing a license and hardware to install the
GLM.SE™ in multiple rooms within a single facility.
GLM.SE™ Main Page The face of the GLM.SE™.This page is used to access all other functions
of Loudspeaker Manager.
Network Interface / Sound
card
The Network Interface is a USB device that connects the computer to
the GLM.SE™ loudspeaker control network. The Genelec Sound Card
is integrated in the Network Interface. The Network Interface translates
communication between the computer and the control network,
enabling a very large and physically long control network with multiple
loudspeakers. The Network Interface isolates the private and confidential
messaging with loudspeakers from any public data networks and from
the functioning of the computer running the GLM.SE™ software.
GLM.SE™ System Setup
Editor
This page is used to access more detailed sections of the GLM.SE™
including the Acoustical Settings Editor.
11
GLM.SE™ Software GLM.SE™ is an abbreviation for the Genelec Loudspeaker Manager.
This software enables setup and control of loudspeakers on the GLM.
SE™ control network through the use of system setup files, and supports
fully automated loudspeaker system setup.
Group Loudspeakers or audio channels designated to play simultaneously.
ID Tone A built-in tone in the SE7261A used to identify which loudspeaker is
being communicated to.
IEC Mains Cable A standard detachable mains cable used to apply mains electrical power
to the loudspeaker or subwoofer.
Interactive Response
Editor
Located in the Acoustical Settings Editor, this Editor allows for the
interactive adjustment of a measured response using the Room Response
Controls.
Loudspeaker This term is used for loudspeakers that are not subwoofers. An 8130A
Digital Input loudspeaker.
Manual Cabling Wizard A self-guided Wizard that allows for more complicated and versatile
System Setups not found in the Rapid Cabling Wizard.
Manual Controls The user interface settings on a loudspeaker or subwoofer used when in
stand-alone mode.
Microphone Holder The rubber mounting hardware to attach the Genelec 8200A Calibration
Microphone to a standard microphone stand.
MultiPoint A method of spatial averaging used in AutoCal™ measurements, used
when optimizing the Acoustical Settings.
Network Cable A CAT5 cable with RJ45 connectors (type PC-to-HUB, straight not crossed
wiring). This cable is also used as an Ethernet network cable. Network
cables connects the Network Interface to the SE7261A subwoofer to
form a network of devices that may be controlled using the GLM.SE™
software
Network Control Mode The use of Genelec DSP loudspeakers with the GLM.SE™ software and
the control network.
Rapid Cabling Wizard The GLM.SE™ contains pre-made system setups of the most typical
loudspeaker arrangements. Rapid Cabling makes system setup simple
and fast by allows the selection of one of these presets.
Room Response Controls A collection of controls used to modify the loudspeaker or subwoofer
response in order to improve the in-room sound quality at the listening
position.
12
SinglePoint A measurement taken in the main monitoring position used by AutoCal™
when optimizing the Acoustical Settings.
Software CD The CD-ROM containing the install files for Genelec Loudspeaker
Manager and AutoCal™.
Stand-Alone Mode The use of Genelec SE7261A subwoofer as an individual subwoofer,
without the GLM.SE™ software and the control network.
Stored Settings The settings stored inside a SE7261A subwoofer. These settings are
used when the loudspeaker is operated in the stand alone mode
Subwoofer An SE7261A subwoofer with 8 channel bass management.
System Setup File (.gse) Files stored on the hard drive of a computer running the GLM.SE™.
Loading a System Setup File in GLM.SE™ automatically sets up all
loudspeakers in the system with stored monitoring Group definitions,
audio cable definitions, defaults for monitoring levels and all acoustical
alignment settings.
System Setup Wizard System Setup Wizard guides the user through the process of setting up
the GLM.SE™.
Third-party Volume
Controller
A peripheral device (e.g. Griffin PowerMate) used to control the system
volume.
USB Cable A type A-B USB cable used to connect the Network Interface to a
computer.

13
SYSTEM PARTS
The Genelec SE7261A/8130A loudspeaker system consists of
• Two-way8130ADigitalInputloudspeakers
• SE7261ASubwoofer
• GLM.SE™ DSP Loudspeaker Manager Package containing the user interface software
with the Control Network Interface including the Genelec Sound Card and a factory calibrated
acoustic measurement microphone for controlling the SE7261A subwoofer.
• GLM.SE™DSPMultiroomExpansionPackage
A basic working system requires only loudspeaker(s). See Getting Started.
8130A Loudspeaker Delivery Content
Contents of the Delivery Box
• Loudspeaker
• IECMainsCable
• 8130ALoudspeakerOperatingManual
SE7261A Subwoofer Delivery Content
Contents of the Delivery Box
• SubwooferLoudspeaker
• IECMainsCable
• NetworkCable
• SE7261ASubwooferOperatingManual
GLM.SE™ DSP Loudspeaker Manager Package Delivery Content
The GLM.SE™ Genelec Loudspeaker Manager is a loudspeaker control networking system that offers
capability to control all system parameters as well as the possibility for detailed acoustical alignment
of every loudspeaker in the system. The use of the GLM.SE™ is warmly recommended. Genelec
AutoCal™ provides the GLM.SE™ with a fully automated multi-loudspeaker system acoustical calibration
capability and comes with a factory-calibrated measurement grade microphone, microphone amplifier
and microphone holder.
14
Contents of the GLM.SE™ delivery box
• SoftwareCD
• GenelecGLM.SE™SystemOperatingManual
• QuickConnectionGuide
• NetworkInterfacewithabuilt-incalibrationmicrophoneamplierandGenelecSoundCard
• USBCable
• Genelec8200AMeasurementMicrophone
• MicrophoneHolder
• MeasurementSignalCablewith3.5mmstereoplugs
GLM.SE™ DSP Multiroom Expansion Package Delivery Content
The GLM.SE™ software is sold with a site-license permitting installation into multiple rooms. The GLM.
SE™ DSP Multiroom Expansion Package delivers a Network Interface and cables for installation into one
additional room. Each additional room needs a multiroom expansion pack.
• NetworkInterface
• USBCable

15
LOUDSPEAKERS
This section provides a rapid overview of Genelec GLM.SE™ loudspeakers. In-depth information about
the loudspeakers is available at www.genelec.com and in the Operating Manuals supplied with the
loudspeakers.
Two-way Loudspeakers (8130A)
The two-way 8130A loudspeakers accept both AES/EBU digital audio and analog audio through the same
connector, however in this system only a digital signal is passed from the SE7261A.
Digital Audio Input
The digital input has a fixed sensitivity. Digital signals are represented relative to their maximum value, or
Full Scale (FS) value. For example, -10 dBFS means that the digital audio signal level is 10 dB below the
full scale or the maximum representable digital signal.
In the SE7261A/8130A System, the maximum theoretical audio level for a 0 dBFS digital audio input
signal translates to 115 dB SPL at 1 m sound pressure level. For example, a signal having -36 dBFS level
produces a sound level of 79 dB SPL at 1 m. This is a technical specification of the loudspeaker, and the
Genelec Loudspeaker Manager GLM.SE™ can adjust the monitoring volume down from this level.
Digital audio sample rate can vary from 32 kHz to 192 kHz and word length from 16 to 24 bits. Only single
wire-dual channel is supported.

16
Two-Way Loudspeaker Functional Blocks
All audio enters audio input stage where all crossover and filtering takes place. The audio outputs go
via digital-to-analog conversion to built-in power amplifiers and on to the tweeter and woofer drivers.
The loudspeakers have built-in user interfaces with switches and a rotary level control on the front of the
loudspeaker.
Subwoofer (SE7261A)
Digital Audio Input
The digital input has a fixed sensitivity. Digital signals are represented relative to their maximum or Full
Scale value. For example, -10 dBFS means that the signal level is 10 dB below the full scale or the
maximum representable digital signal.
In Genelec SE7261A subwoofers, the maximum audio level of 0 dBFS translates to the theoretical 115 dB
SPL at 1 m sound pressure level. For example, a -36 dBFS signal produces a sound level of 79 dB SPL at
1 m. Genelec Loudspeaker Manager GLM.SE™ adjusts the monitoring volume down from this level.
Digital audio sample rates can vary from 32 kHz to 192 kHz and word length from 16 to 24 bits. Single-
Wire formats are only supported. Note that there may be a valid AES/EBU signal although the signal is
silent.
17
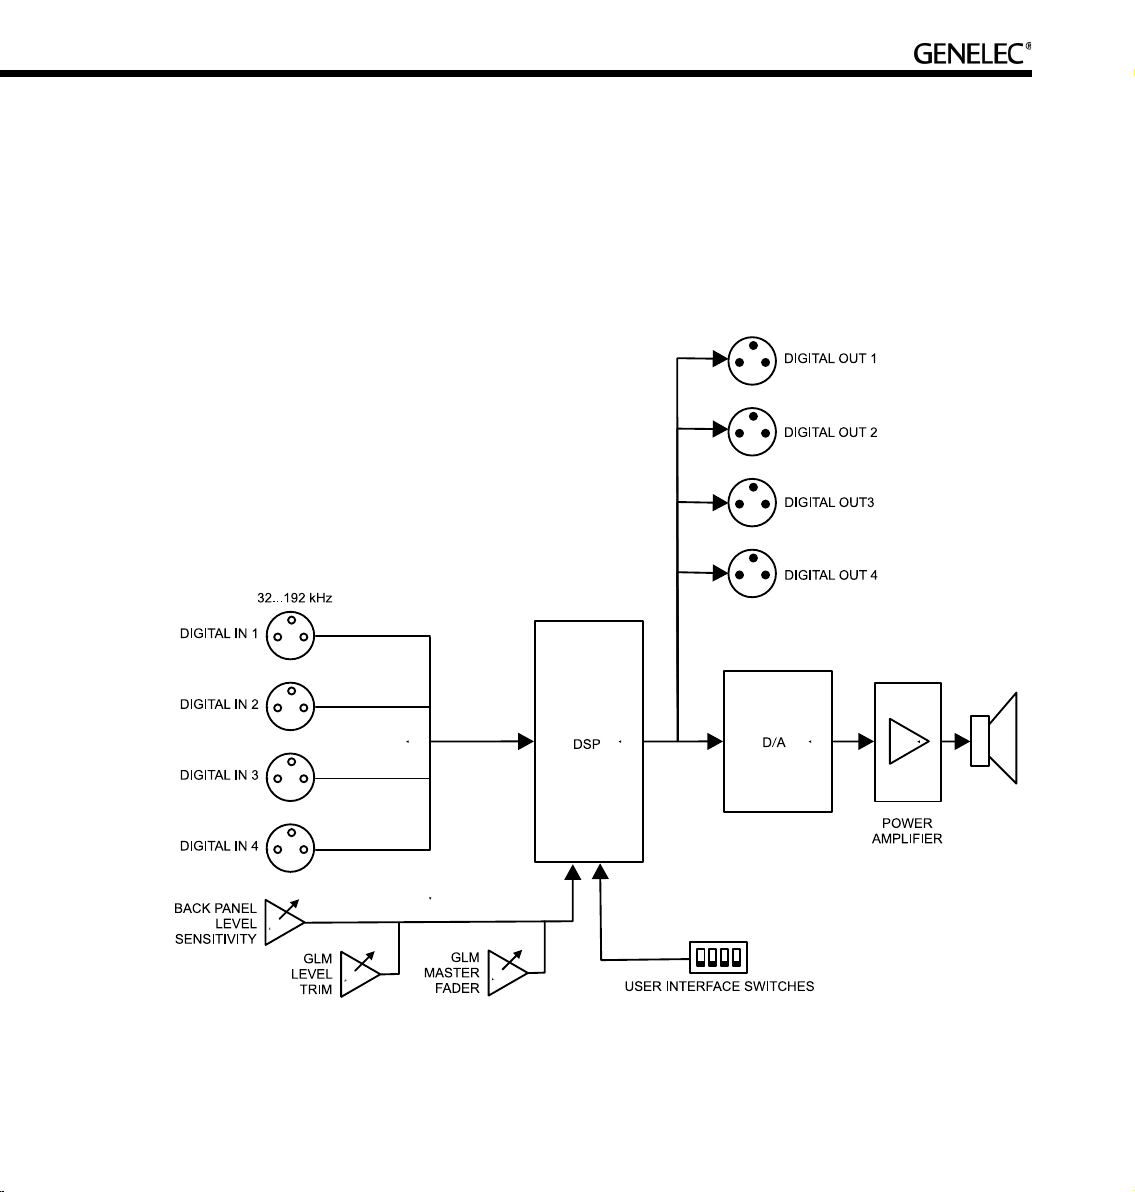
Subwoofer Functional Blocks
The subwoofers have AES/EBU digital audio inputs only. There are no analog audio inputs. All audio
enters the DSP processor, where all signal processing takes place. The output goes via digital-to-analog
conversion to the built-in power amplifier and driver. High pass outputs are delivered via AES audio to the
8130As. The subwoofer has a built-in user interface with switches and rotary controls and a connection to
the Genelec Loudspeaker Manager network enabling centralized management of up to 8 loudspeakers
and 1 subwoofer in one installation.

18
PLACING LOUDSPEAKERS IN THE MONITORING ROOM
Here is a quick introduction to monitoring loudspeaker placement.
• Placetheloudspeakersintheirexpectedpositionsbeforecablinganything.
• Formostapplications,thetwo-way8130Aloudspeakersshouldbelocatedwithin1.7-2.5meters
(5-8 ft.) of the primary listening position.
• Attempttoplaceallloudspeakersatearheightforthepersonintheprimarylisteningposition.
If a loudspeaker is higher than ear height, tilt and turn the loudspeaker toward the listening
position. Genelec two-way loudspeakers feature a vibration-isolating monitor stand, the IsoPod™,
which enables the positioning of the loudspeaker towards to the primary listening position.
• Aimtheacousticaxisofallloudspeakers towards the main listening position both horizontally
(turn towards the listening position) and vertically (tilt towards the listening position).
• Positionsubwooferclosetothewall(s).
• Rememberthatallaudiocablesmustgotothesubwooferrstandthentotheloudspeakers.
Make sure that enough cable length is available to move the subwoofer around the room to find
a location of optimal performance.
The following sections provide more detailed information about placing loudspeakers in a monitoring
environment.
Full-Bandwidth Loudspeaker Placement
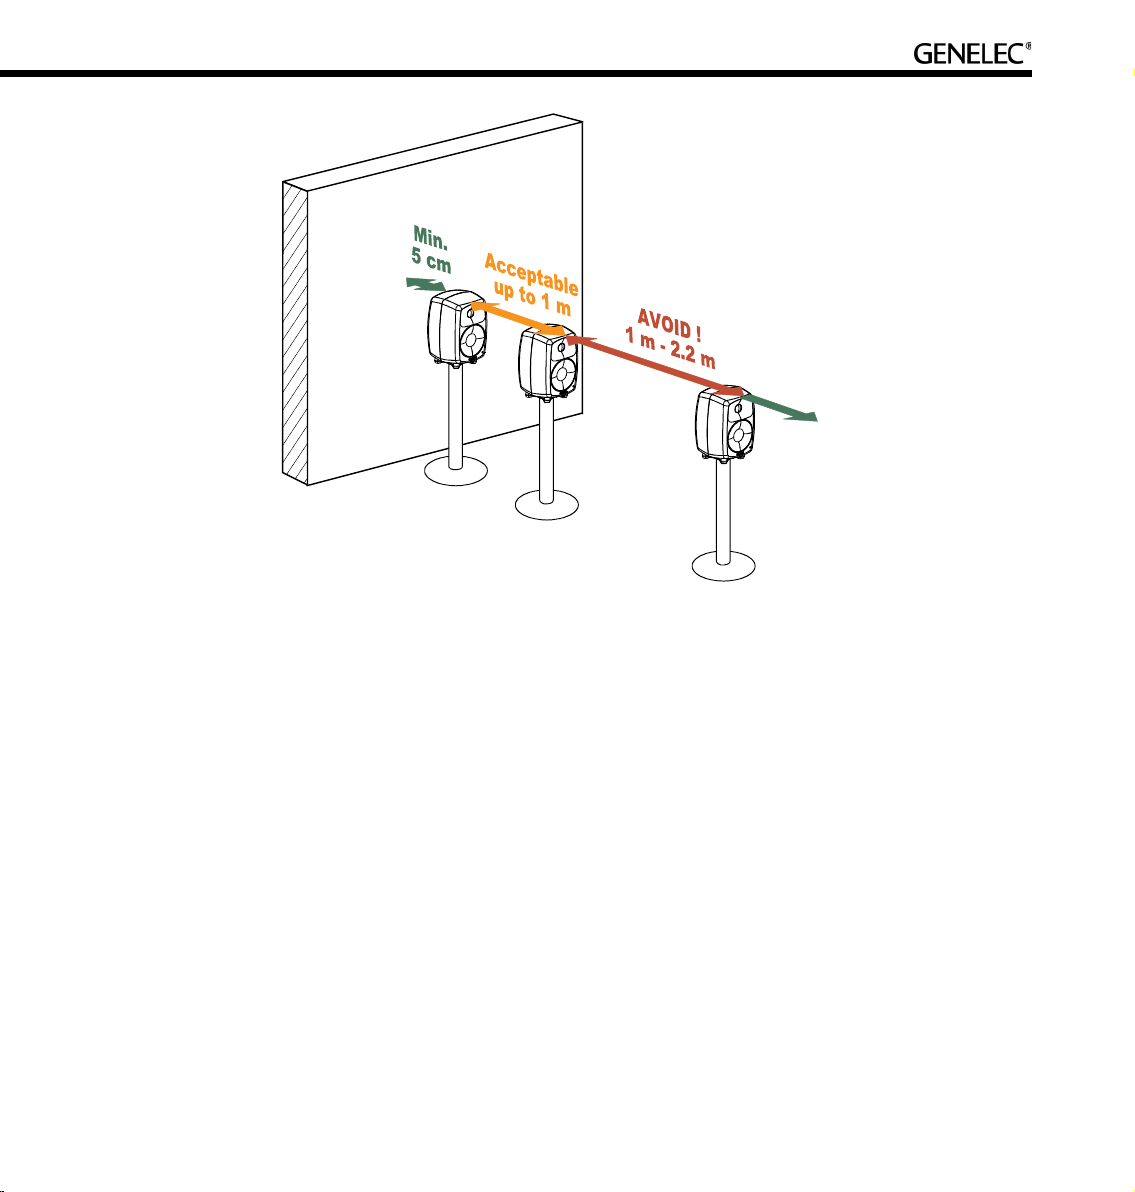
Minimum Distance From a Wall Behind a Loudspeaker
Genelec two-way 8130A loudspeakers should be placed so that a minimum distance of 5 cm (2”) is left
behind the loudspeaker for amplifier cooling and rear opening reflex port sound radiation.
Low Frequency Cancellations
In general, when a loudspeaker’s front baffle is more than 0,3 meters (1 foot) away from the wall behind the
loudspeaker, a reflection from this wall can cause a cancellation of low frequencies and hence reduction
of bass output. For two-way loudspeakers, low frequency cancellations in the 40 – 80 Hz frequency range
should be avoided. Cancellations in the 80 - 200 Hz range should also be avoided if possible.
Recommended Distances
Translating this into distance recommendations shows that loudspeakers can be placed close to a wall at
a distance less than 1 meter (3 ft.). Distances between 1 and 2.2 meters (3-7 ft.) should be avoided.
Loudspeakers placed more than 2.2 meters (7 ft.) away from walls may suffer from cancellations around
the low frequency cut-off of the loudspeaker limiting low frequency bandwidth. As a rule of thumb, the
19
lower the low frequency cut-off the further away the loudspeaker must be placed from the wall in order to
avoid this phenomenon.
Distances to the ceiling and other walls may be shorter than the distance to the wall behind a loudspeaker.
Reflections from these surfaces may be important and should also be considered.
Subwoofer Placement
Subwoofers can make life much easier in producing high quality low frequency energy. When a subwoofer
is used, the loudspeakers can be placed more freely, thereby allowing more flexibility in finding a good
location in the room for the reproduction of low frequencies.
A subwoofer should be placed close to a wall, preferably closer than 0.6 meters (2 ft.) from a wall. This
placement eliminates most possible cancellation sources and the subwoofer response remains flat and
well loaded.
Recommended distances from a single wall to the front baffle of free-standing loudspeakers.
Correct (green), acceptable (orange) and not recommended (red).

20
Recommended distances from a single wall to the front baffle of loudspeakers combined with subwoofer(s).
Correct (green), acceptable (orange) and not recommended (red).
Using a subwoofer provides an additional crossover frequency (typically at 85 Hz). This makes placing
loudspeakers much easier. Acceptable distances extend to 1.1 m because of the low frequency cut-off of
loudspeakers. Loudspeakers may be placed between 1.1…2 m without serious compromises due to the
wall behind the loudspeaker causing serious cancellation effects.
Although Genelec subwoofers provide accurate phase control at the crossover point, loudspeakers
should not be placed further than 2 m (7 ft.) from a supporting subwoofer. Larger distance differences may
cause tonal balance differences around the crossover frequencies due to loudspeakers and subwoofer(s)
exciting different room modes.
Multi-Channel System Layout
The positioning of tables, screens, racks, etc, is critical in order to maintain accurate imaging. Early
reflections can smear the sound image and compromise localization. To avoid this, reflecting surfaces
between loudspeakers and the listening position should be minimized. Symmetrical positioning of
equipment is essential. Even with symmetry, reflecting surfaces should be removed from the vicinity of
acoustic paths.
This manual suits for next models
2
Table of contents
Other Genelec Speakers System manuals

Genelec
Genelec 1238AC User manual

Genelec
Genelec AIW25 User manual

Genelec
Genelec AIW26 User manual

Genelec
Genelec AIC25 User manual

Genelec
Genelec 1032A User manual

Genelec
Genelec 8030C User manual

Genelec
Genelec GLM 4 User manual

Genelec
Genelec DSP 8260A User manual

Genelec
Genelec 1029A User manual

Genelec
Genelec PowerPak 8030A User manual

Genelec
Genelec S30-1038 User manual

Genelec
Genelec 8030 CP User manual

Genelec
Genelec aiw26b User manual

Genelec
Genelec 6010A User manual

Genelec
Genelec 8010 User manual

Genelec
Genelec S30D User manual

Genelec
Genelec 8320A User manual

Genelec
Genelec 1032A User manual

Genelec
Genelec GLM 4 User manual

Genelec
Genelec AIW26 User manual


