General Filters General Aire 400 Series User manual

Installation Manual
HEPA Air Cleaners 400 Series HEPA Air Cleaners
GFI #4640 (400D)
& GFI #4641 (400R)
®
General Filters, Inc.
43800 Grand River Avenue
Novi, Michigan 48375
Toll Free: (866) 476-5101
www.generalaire.com
17” W
24” H
12.75” D
Please Read And Save These Instructions
GENERALAIRE® HEPA AIR CLEANERS
Model 400D (Duct Mount) 400R (Room/Portable)
GFI # 4640 4641
Weight (Pounds) 35
Dimensions (Inches) 24 H x 12.75 D x 17 W
Rated Air Flow (CFM) 400
Min. Ave. % Eff. 1.0-3.0 Microns HEPA 99.97%
Operation Air Flow From Furnace Through Air Cleaner/Fan Coil Room / Portable
Replacement Filters 1. HEPA (GFI #4645) - Replace Every 2 Years / 2. Pre-Filter (GFI #4646) With Carbon - Replace Every Year
Power Consumption (Watts) 300
Amperage 115V / 1 / 60Hz; 2.75 Amp
Certication CCSAUS
Collar / Intake / Exhaust
Openings (Inches)
Collar: 8 (203mm)
Intake: 3.75 (95mm) x 14.375 (365mm)
Exhaust: 3.75 (95mm) x 14.375 (365mm)
Pallet Quantity 18
Mounting Return Air Duct Mount / Collar Room / Portable
Warranty (Years) 5
In the Box
HEPA Air Cleaner, 9’ Power Cord, Installation Manual,
Duct Collars, Pre-Filter, HEPA Filter, 3 Mounting
Brackets, Screws, Mounting Template
HEPA Air Cleaner, 9’ Power Cord, Installation Manual,
Pre-Filter, HEPA Filter, Screws, Caster Wheels
70081850

®
INSTALLATION
1. Before Installing Your New Surface or Duct Mount HEPA Air Cleaner, Determine:
• Location on the return side of the duct for installation of your HEPA 200D or 400D.
• Determine if you will be installing via surface mount or duct mount.
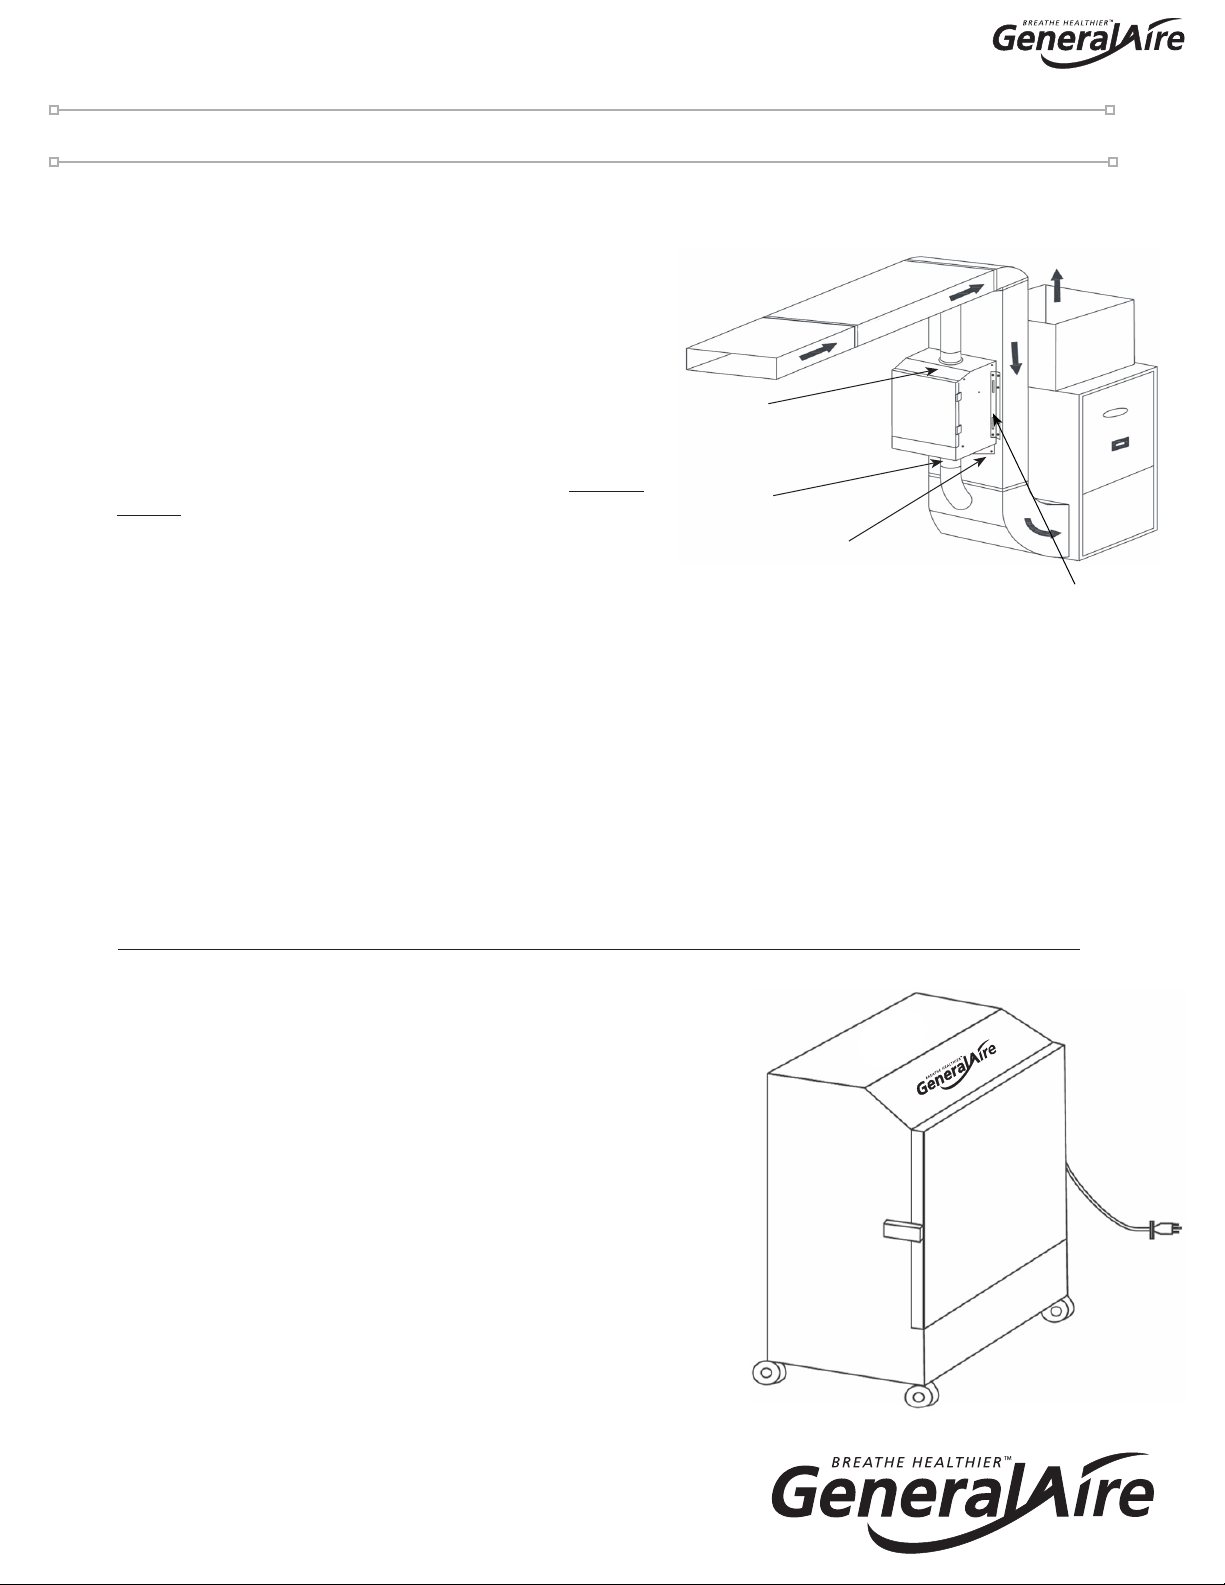
Surface Mount HEPA (Models 400D)
Surface Mount
Duct Mount Collars Are Included!
Intake
Exhaust
Bottom
Support
Bracket Side
Mounting
Bracket
*Side Mounting Brackets Add 1” on Either
Side of HEPA Unit; Requiring a Minimum
Duct Width of 20” for Installation
• WARNING: Disconnect electrical power before beginning installation.
!
Duct Mount
1. Install mounting support bracket on return air duct for
bottom support using the provided #8 x 1/2” screws.
2. Install the side mounting brackets on both sides of the unit
by removing and remounting the screws located on the
unit*
3. Using the provided template, cut rectangular intake and
exhaust holes in the duct work. Each will measure 3.75”
high by 14.375” wide.
4. Cut out the intake and exhaust holes from the back of the
HEPA unit.
5. Hang the HEPA Air Cleaner onto the duct, rst resting on
the bottom support bracket. Screw side brackets into the
duct using the provided #8 x 1/2” screws.*
6. Remove lters from plastic bags. Insert the pre-lter with
carbon in the top slot; the HEPA lter in the bottom slot.
7. Plug unit into a 120V outlet. Turn fan on using the dial
control to the preferred speed.
See maintenance on the back page.
Return Air
Return Air
Return Air
®
INSTALLATION CONT.
®
1. Install mounting support bracket on return air duct for
bottom support using the provided #8 x 1/2” screws. (Unit
can also be installed on the wall, with ducting connecting to
return, using 8” provided collars.) Install the side mounting
brackets on both sides of the unit by removing and
remounting the screws located on the unit.*
2. Cut round intake and exhaust holes in the duct work; each
8” in diameter.
3. Cut out the round intake and exhaust holes on the top and
bottom of the HEPA unit.
4. Hang the HEPA Air Cleaner onto the duct using the
provided #8 x 1/2” screws. Attach duct to intake and
exhaust holes. Screw side brackets into the duct using the
provided #8 x 1/2” screws.*
5. Install 8” collars using the provided #8 x 1/2” screws (12
included).
6. Remove lters from plastic bags. Insert the pre-lter with
carbon in the top slot; the HEPA lter in the bottom slot.
7. Plug unit into a 120V outlet. Turn fan on using the dial
control to the preferred speed.
See maintenance on the back page.
Duct Mount HEPA (Models 400D)
Room / Portable Units (Models 400P)
Duct Mount Collars Are Included!
Intake
Exhaust
Bottom
Support
Bracket Side
Mounting
Bracket
1. Remove lters from plastic bags. Insert the prelter with carbon
in the top slot and the HEPA lter in the bottom slot.
2. Install caster wheels.
3. Place in room of choice and pug the unit into a 120V outlet.
4. Turn variable speed dial control to increase airow (CFM).
See maintenance on the back page.
*Side Mounting Brackets Add 1” on Either
Side of HEPA Unit; Requiring a Minimum
Duct Width of 20” for Installation
Return Air
®

®
WARRANTY
43800 Grand River Avenue
Novi, Michigan 48375
Toll Free: (866) 476-5101
www.generalaire.com
Your new HEPA Air Cleaner carries a 5-year limited warranty. For our complete
warranty policy visit www.generallters.com.
MAINTENANCE
1. Replace your pre-lter with carbon (GFI #4646) every 3 to 6 months.
2. Replace your HEPA lter (GFI #4645) every 2 years.
IMPORTANT:To ensure your safety and the longevity of your unit, we recommend:
• Contacting a licensed contractor to perform maintenance or repairs.
!
1.
2.
3.
4.
6.
6.
1. Pleated Pre-Filter With Carbon (GFI #4646)
2. HEPA Filter (GFI #4645)
3. Child Safety Switch
4. PSC Motor
5. Variable Motor Control (Not Shown)
6. Door Latch
7. Casters (R Model; Not Shown)
• WARNING: Disconnect electrical power before beginning maintenance.
!
Last Updated: 12-2020
This manual suits for next models
4
Other General Filters Air Cleaner manuals


