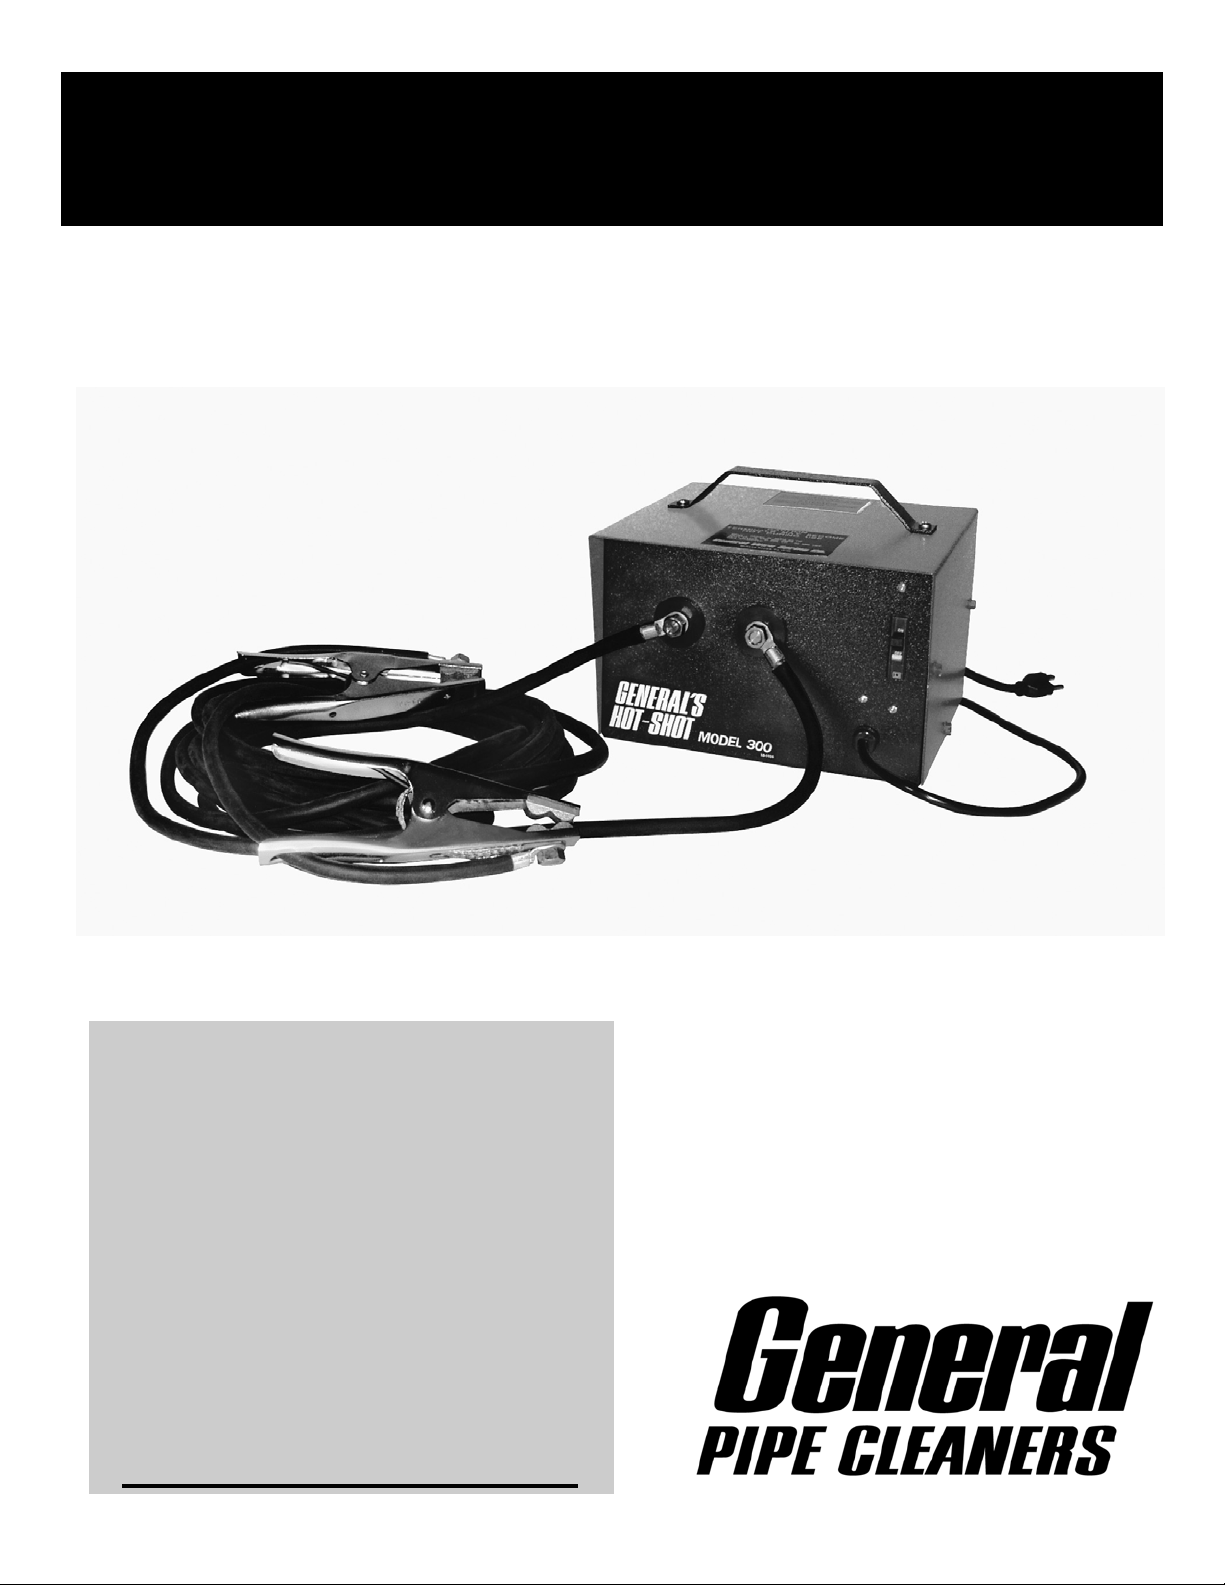
General Pipe Cleaners General Hot-Shot CHS-300 User manual

General Hot-Shot™
Operating Instructions
Model CHS-300
(For use with Copper and Iron Pipe
1/2" to 1-1/2" size, up to 100' long)
Your Hot-Shot is designed to give you
years of trouble-free, profitable service.
However, no machine is better than its
operator. We therefore suggest you read
these instructions through carefully before
using your machine on the job. This will
enable you to operate the Hot-Shot more
efficiently and more profitably. Failure to
follow these instructions may cause
personal injury to operator or damage to
equipment.
SAVE THESE INSTRUCTIONS!

Hot-Shot™
Safety Instructions
WARNING
Machine must be plugged
into properly grounded
outlet. Failure to follow
instructions may result in
serious injury or death.
Do not operate power tools
in explosive atmospheres,
such as in the presence of
flammable liquids, gases, or
dust.
Use safety equipment.
Always wear safety glasses
and rubber soled, non-slip
shoes.
READ AND UNDERSTAND
ALL INSTRUCTIONS!
Failure to follow all instructions listed below
may result in electric shock, fire and/or serious
personal injury.
Call General’s customer service department at
412-771-6300 if you have any questions.
SAVE THESE INSTRUCTIONS!
Work Area Safety
1. Keep your work area clean and well lit.
Cluttered benches and dark areas invite
accidents.
2. Do not operate power tools in explosive
atmospheres, such as in the presence of
flammable liquids, gases, or dust. Power
tools create sparks which may ignite the dust or
fumes.
3. Keep bystanders, children, and visitors
away while operating a power tool.
Distractions can cause you to lose control.
Electrical Safety
1. Grounded tools must be plugged into an
outlet, properly installed and grounded in
accordance with all codes and ordinances.
Never remove the grounding prong or
modify the plug in any way. Do not use any
adapter plugs. Check with UL approved
tester or a qualified electrician if you are in
doubt as to whether the outlet is properly
grounded. If the tool should electrically
malfunction or break down, grounding provides
a low resistance path to carry electricity away
from the user.
!
2. Avoid body contact with grounded surfaces
such as pipes, radiators, ranges and
refrigerators. There is an increased risk of
electric shock if your body is grounded.
3. Don’t expose power tools to rain or wet
conditions. Water entering a power tool will
increase the risk of electric shock.
4. Do not abuse the cord. Never use the cord
to carry the tools or pull the plug from an
outlet. Keep cord away from heat, oil, sharp
edges or moving parts. Replace damaged
cords immediately. Damaged cords increase
the risk of electric shock.
5. When operating a power tool outside, use
an outdoor extension cord marked “W-A” or
“W”. These cords are rated for outdoor use
and reduce the risk of electric shock.
6. Use only three-wire extension cords which
have three-prong grounding plugs and
three-pole receptacles which accept the
tool’s plug. Use of other extension cords will
not ground the tool and increase the risk of
electric shock.
7. Use proper extension cords. Insufficient
conductor size will cause excessive voltage
drop and loss of power.
8. Extension cords are not recommended
unless they are plugged into a Ground Fault
Circuit Interrupter (GFCI) found in circuit
boxes or outlet receptacles. The GFCI on the
machine power cord will not prevent electric
shock from the extension cords.
9. Keep all electric connections dry and off the
ground. Do not touch plugs or tools with
wet hands. Reduces the risk of electric shock.
Personal Safety
1. Stay alert, watch what you are doing and
use common sense when operating a power
tool. Do not use tool while tired or under
the influence of drugs, alcohol, or
medication. A moment of inattention while
operating power tools may result in serious
personal injury.
2

Hot-Shot™
2. Dress properly. Do not wear loose clothing
or jewelry. Contain long hair. Keep your
hair, clothing, and gloves away from moving
parts. Loose clothes, jewelry, or long hair can
be caught in moving parts.
3. Avoid accidental starting. Be sure switch is
off before plugging in. Plugging in tools that
have the switch on invites accidents.
4. Do not overreach. Keep proper footing and
balance at all times. Proper footing and
balance enables better control of the tool in
unexpected situations.
5. Use safety equipment. Always wear eye
protection. Dust mask, non-skid safety shoes,
hard hat, or hearing protection must be used for
appropriate conditions.
Tool Use and Care
1. Use clamp or other practical way to secure
and support the workpiece to a stable
platform. Holding the work by hand or against
your body is unstable and may lead to loss of
control.
2. Do not use tool if switch does not turn it on
or off. Any tool that cannot be controlled with
the switch is dangerous and must be repaired.
3. Disconnect the plug from the power source
before making any adjustments, changing
accessories, or storing the tool. Such
preventative safety measures reduce the risk of
starting the tool accidentally.
4. Store idle tools out of reach of children and
other untrained persons. Tools are
dangerous in the hands of untrained users.
5. Use only accessories that are recommended
by the manufacturer for your model.
Accessories that may be suitable for one tool
may become hazardous when used on another
tool.
Tool Service
1. Tool service must be performed only by
qualified repair personnel. Service or
maintenance performed by unqualified repair
personnel could result in injury.
2. When servicing a tool, use only identical
replacement parts. Follow instructions in
the Maintenance section of this manual.
Use of unauthorized parts or failure to follow
Maintenance Instructions may create a risk of
electric shock or injury.
Introduction
A frozen water pipe can be thawed very quickly by
passing low voltage high current electricity through
the frozen pipe. Plastic pipe will not conduct
electricity so this method will not work on
plastic pipe. There must be unfrozen water under
standard water pressure on one side of the frozen
part of the pipe and an open faucet on the other
side.
When thawing a frozen section of water pipe, heat
the pipe only enough to melt a thin film of ice in the
inside of the pipe. A faucet must be opened in
the unfrozen part of the line down stream from the
frozen section. The warmer water above the ice
will seep through the melted film and very quickly
melt the rest of the ice. The water will start to flow
in about 10 minutes if the connections are properly
made. Since copper pipe will not heat as fast as
steel pipe, allow about a 30 percent longer thawing
time. (See Chart)
Features
• The Hot-Shot CHS-300 puts out 325 amps, yet
pulls only 17 amps. It can clear 1/2" to 1-1/2"
pipes up to 100 ft. long.
• The unit has a built-in thermal protector. If the
internal temperature reaches a critical level, the
Hot-Shot will automatically shut down.
Warnings
• The Hot-Shot CHS-300 requires a 115 volt AC
grounded 20 amp circuit.
• Be sure the unit is plugged into a properly
grounded receptacle. If in doubt, check
receptacle before plugging in unit.
• If the power cord supplied with the unit is not
long enough, be sure to use a grounded heavy
duty extension cord that is in good condition.
Using lighter cords can result in severe power
loss and overheating.
• There is a possibility that the output current of
the unit may be transferred into the electrical
service, either at the house being thawed, or at
a remote location. Therefore, all grounds (i.e.
electric service, telephone, and cable TV
grounds) must be disconnected, both at the
house being thawed and all houses on the
same distribution transformer.
• Do not leave unit unattended while thawing. Do
not leave unit operating overnight.
Operating Instructions
1. Isolate the frozen section of pipe. Inside a
house, this is done by opening faucets and
back tracking the pipes. The frozen section will
3

Hot-Shot™
usually be in the outside walls, near doors,
windows and in crawl spaces under floors. If all
the water outlets in the house fail to operate,
the line from the curb valve to the house is
frozen.
2. House service pipes usually have to be thawed
by connecting one cable to the exposed pipe in
the kitchen or basement and other cable to the
curb service. At the curb, make the connection
to the valve at the bottom of the service riser,
using the curb key. Do not connect the cable to
the adjustable ground level cover as it is a poor
connection to the valve.
3. Connect the cables on either side of the frozen
section so that they complete an electric circuit.
The cable clamps must be at least 10 ft. apart.
Caution: The cables get hot! Keep them
clear of rugs and finished floors that can be
damaged by heat.
4. Good connections are required. Clean all pipes
before connecting the cables. Make both pipe
connections before plugging unit into
receptacle. Make sure all connections are tight
to prevent arcing at the clamps. Loose
connections also get hot and reduce current
flow. Caution: Uncoil the cables. Do not
leave any cable coiled up or placed on steel
objects as the heating in the pipe will be
reduced.
5. If a good connection is made, the pipe and
cables will vibrate with a 60 cycle hum that you
can feel with your hand. After all connections
are made and the unit is plugged in, switch the
circuit breaker on.
Some Common Problems
1. Cables stay cold. Pipe does not thaw.
• Do you have power? Check fuses.
• Is the circuit breaker switched on?
• Do you have a good connection?
• Are the pipes clean at the connection?
• Are both clamps on the same pipe?
• Has the thermal protector tripped?
• Is there a rubber coupling in the line?
• Is there plastic pipe in the line?
• Has the ice pushed the joints apart?
2. Cables get warm. Pipe does not thaw.
• Are clamps on pipe, not on curb cover?
• Are the pipes clean under the clamps?
• Are cables sized properly? (Larger cables
must use larger wire size.)
3. Cables get hot. Pipe does not thaw.
• Is there water pressure in pipe?
• Is the source of water pressure frozen?
• Is source water pump operating?
• Do the clamps cover all of frozen area?
• Can the current go more than one way from
clamp to clamp?
Thawing Times
The times in the below chart are approximate and
under ideal conditions. Actual times will vary
depending upon type of pipe, diameter, gauge, and
length of cable, etc.
Note: Since copper pipe will not heat up as fast as
iron pipe, allow about a 30 percent longer thawing
time.
Note: Longer cables must also be a larger gauge.
If smaller diameter cables are used, current will be
reduced.
325 AMP Output
Thawing Time
Pipe Length Iron Pipe Copper Pipe
20 ft. 9 minutes 12 minutes
40 ft. 12 minutes 16 minutes
50 ft. 14 minutes 19 minutes
60 ft. 17 minutes 23 minutes
80 ft. 24 minutes 32 minutes
100 ft. 30 minutes 40 minutes
General Wire Spring Co.
1101 Thompson Avenue
McKees Rocks, PA 15136
© General Wire Spring Co. 2005 C-CHS-300 OI-04/05
Other General Pipe Cleaners Tools manuals