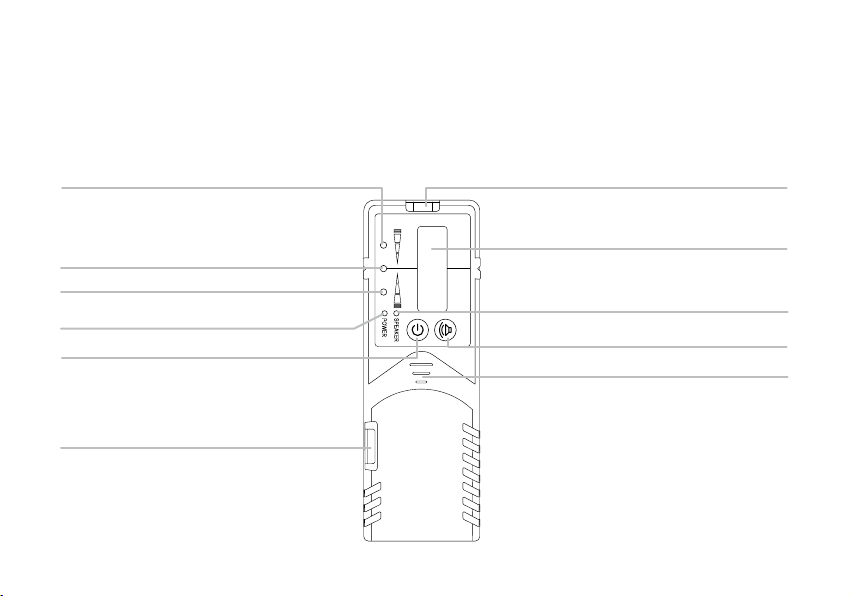
General X3G User manual

X3G
MULTI-LINE LASER
INSTRUCTION MANUAL

2
SAFETY
Read the following safety instructions before
attempting to operate this product.
Keep these instructions in a safe place or store
in the carry case for future reference.
SAVE ALL WARNINGS AND INSTRUCTIONS
FOR FUTURE REFERENCE.
WARNING: Read and understand all
instructions.
▪Use the laser only with the specically
designated batteries.
▪Store the laser out of reach of children and
other untrained persons. Lasers are dangerous
in the hands of untrained users.
▪Use only accessories that are recommended
for your model.
!
▪Tool service must be performed only by
qualied repair personnel. Repairs, service
or maintenance performed by unqualied
personnel will void the warranty. Only
approved and authorised service technicians
can carry out warranty repairs.
▪Do not use optical tools such as a telescope
or transit to view the laser beam. Serious eye
injury could result.
▪Do not place the laser in a position which
may cause anyone to intentionally or
unintentionally stare into the laser beam.
Serious eye injury could result.
▪ Do not position the laser near a reective
surface which may reect the laser beam
toward anyone’s eyes. Serious eye injury
could result.
▪Do not use optical tools to view the laser
beam.

3
!
!
▪Do not set up the tool at a position where
the laser beam can cross any person at head
height.
▪Do not let children come in contact with the
laser.
▪ Turn the laser o when it is not in use. Leaving
the laser on increases the risk of staring into
the laser beam.
▪Do not operate the laser around children or
allow children to operate the laser. Serious eye
injury may result.
▪Do not remove or deface warning labels.
▪Position the laser securely on a level surface.
Damage to the laser or serious injury could
result if the laser falls.
WARNING: DO NOT DISASSEMBLE
THE LASER. There are no user serviceable
parts inside. Disassembling the laser will
void all warranties on the product. Do not
modify the product in any way. Modifying
the tool may result in hazardous laser
radiation exposure.
CAUTION: Class 3 Laser Product
▪Never look into the laser beam directly and
intentionally.
▪Do not use optical tools to view the laser
beam.
▪Do not set up the tool at a position where
the laser beam can cross any person at
head height.
▪Do not let children come in contact with
the laser.

4
ITEM CHECKLIST
Please ensure the following items are included with your laser level.
If anything is missing please contact your retailer.
Carry case
AA alkaline batteries
Multi-purpose mount
(two piece)
General X3G Laser targets (x2)
INCHES CM
1
1
2
3
4
5
6
7
2
3
INCHES CM
1
1
2
3
4
5
6
7
2
3

5
LASER OVERVIEW
Laser port
Laser port
1/4” tripod thread
Control panel
Power / locking switch
Battery door cover

6
LASER CONTROL PANEL
Line mode
Battery indicator
Pulse mode
Pulse mode indicator

7
DETECTOR OVERVIEW
Line mode
NOTE: The detector is an optional accessory which can be purchased from your retailer.
Speaker
Sound on / off
LED speaker indicator
Laser sensor
Power
Bubble vial
LED power indicator
LED direction indicator
LED centre indicator
Bubble vial

8
SET UP
POWER SUPPLY
BATTERY REPLACEMENT
OPERATION
▪Select a place as close as practical to
the work site. Ensure the location is clear
of traffic.
▪Place the laser on a level surface such
as a bench or mount.
▪The instrument is powered by four AA
alkaline batteries.
▪Remove the battery cover door and the
batteries.
▪Insert the batteries according to polarity
and replace the battery door.
▪ To turn the instrument on, slide the
locking switch to the “on” position. Self
levelling will commence and the horizontal
beam will activate.
▪If the instrument is outside the self
levelling range the instrument will not level
causing the laser beam to switch off and
emit a beeping sound repeatedly. If this
occurs, reposition the instrument onto a
level surface until the instrument can level
off.
▪Press the line mode button on the control
panel to cycle through the active beams.
▪ To lock the beams in place, slide the
power / locking switch to the ‘lock’
position. The instrument can now be tilted
to the desired angle.
USING YOUR LASER

9
▪Press the pulse mode button on the top of
the instrument to enter into pulse mode.
▪Switch the detector on by pressing the
power button. The speaker will beep
indicating the instrument is operating.
▪Move the detector into the path of the laser
beam.
▪Hold the detector upright for horizontal
beams. Rotate the detector 90° for vertical
beams.
▪The LED direction indicators will indicate
the position of the laser beam. The centre
LED will indicate alignment with the beam.
USING YOUR DETECTOR
NOTE: When in the locked position the
instrument will not self level and correct for
vibrations and/or disturbances.

10
MULTI-PURPOSE MOUNT OVERVIEW
Screw fixing point
1/4” thread
Height adjustment lock knob
1/4” thread thumb screw
Magnets
Height adjustment knob
5/8” thread
1/4” thread
Screw fixing point
Clamp

11
USING THE MULTI-PURPOSE MOUNT
Mounting onto a magnetic surface
▪Attach the instrument to the mount
using the thumb screw.
▪ Attach the mount to a metal surface,
ensuring that the mount has a strong hold
before releasing your hands.
▪ To adjust the height of the instrument,
unlock the height adjustment knob.
Rotate the height adjustment knob to
raise or lower the instrument to the
desired height. Retighten the height
adjustment lock knob to secure in place.
▪ To rotate the instrument on the mount,
loosen the mini thumb screw, position
the instrument, and then re-tighten the
thumb screw.
Screw fixing point

12
USING THE MULTI-PURPOSE MOUNT
Mounting via the clamp
▪Attach the two mount pieces together via
the magnetic backing.
▪Attach the instrument to the mount using
the thumb screw.
▪Use the clamp to mount to a suspended
ceiling track, ensuring that the mount has
a strong hold before releasing your hands.
▪ To adjust the height of the instrument,
unlock the height adjustment knob. Rotate
the height adjustment knob to raise or
lower the instrument to the desired height.
Retighten the height adjustment lock knob
to secure in place. Alternatively, slide the
mount on the magnetic backing.
▪ To rotate the instrument on the mount,
loosen the mini thumb screw, position the
instrument, and then re-tighten the thumb
screw.

13
Mounting via screw fixing points
▪Attach the instrument to the mount using
the thumb screw.
▪Fix a screw into a secure surface and
hook the mount over the screw. Ensuring
that the mount has a strong hold before
releasing your hands.
▪ To adjust the height of the instrument,
unlock the height adjustment knob. Rotate
the height adjustment knob to raise or
lower the instrument to the desired height.
Retighten the height adjustment lock knob
to secure in place.
▪ To rotate the instrument on the mount,
loosen the mini thumb screw, position the
instrument, and then re-tighten the thumb
screw.
Mounting onto a tripod
▪Attach the mount onto the tripod via the
5/8” x 11 or 1/4” thread.
▪Attach the instrument to the mount
using the thumb screw.
▪ To adjust the height of the instrument,
unlock the height adjustment knob.
Rotate the height adjustment knob to
raise or lower the instrument to the
desired height. Retighten the height
adjustment lock knob to secure in place.
▪ To rotate the instrument on the mount,
loosen the mini thumb screw, position
the instrument, and then re-tighten the
thumb screw.

14
Error Cause & Solution
Laser does not turn on
▪Check the batteries. They may be in the wrong way or need
replacing.
▪Check the battery compartment for signs of damage.
Ensure they are clean and not bent.
Laser does not remain on
for long periods of use.
▪Check the batteries.
▪Check the battery compartment for signs of damage.
Ensure they are clean and not bent.
Laser does not level off
▪Instrument may be outside its self levelling range.
Adjust the instrument or tripod so it is level.
▪Instrument may have low power.
▪Instrument may have impact damage.
TROUBLE SHOOTING

15
CARE AND MAINTENANCE
▪This is a precision measuring instrument
and should always be handled with care and
transported within the carry case provided.
▪Always slide the locking switch to the “off”
position when transporting the instrument
or moving around the job site.
▪ Whenever possible, store the instrument
in a dry, shady location.
▪Calibration of the instrument is
recommended: every six months, if ongoing
accurate levelling is required, or an impact
has occurred.
▪The operator should check the accuracy
of the instrument before precision levelling
is attempted. Failure to do so may result
in inaccurate measurements.
▪ Clean the instrument with a dry, soft
cloth after use in dusty, damp or wet
conditions before storing.
▪Smudges and fingerprints may be
removed with a damp tissue or a soft, lint-
free cloth.

16
WARRANTY
AUSTRALIA
“Our goods come with guarantees that
cannot be excluded under the Australian
Consumer Law. You are entitled to a
replacement or refund for a major failure
and for compensation for any other
reasonably foreseeable loss or damage.
You are also entitled to have the goods
repaired or replaced if the goods fail to be
of acceptable quality and the failure does
not amount to a major failure.”
For more information please visit
consumerlaw.gov.au
The General X3G comes with a 3 (three) year manufacturers warranty.
NEW ZEALAND
For more information please visit
consumerprotection.govt.nz

17
To assist you with any queries or technical
questions please contact customer support
Australia: 1300 658 338
New Zealand: 0800 367 527
CUSTOMER SUPPORT

18
SPECIFICATIONS
Specications General X3G
Product code 70091
Warranty 3 Years
Accuracy ±2mm at 10m
Operating range 50m (with optional detector)
Levelling range ±4°
Laser class 3 Green
Battery life 10 hours
Battery type 4x 1.5v AA
Vertical lines 2
Horizontal lines 1
IP rating 54
Weight (kg) 0.59
Dimensions (mm) 110 x 65 x 115

19

www.spoton.com.au
This manual suits for next models
1
Table of contents
Other General Laser Level manuals

General
General GML3DGSTDKT User manual

General
General XL1 User manual

General
General 3DG User manual

General
General X5 User manual

General
General ML-3DG User manual

General
General RL-20R User manual

General
General Titanium Series User manual

General
General ML-3DR User manual

General
General Titanium Series User manual

General
General RL-20G User manual