Genie Z-135/70 User manual

Installation Instructions
S
oftware Update
Z
-
135/70
ZX
-
135/70
Part No. 1258800
Rev A

Instructions Rev A
Introduction
2 Software Update Part No. 1258800
Introducti on
Introducti on
Observe and Obey:
This procedure shall be completed by a person
trained and qualified on the repair of this
machine.
Immediately tag and remove from service a
damaged or malfunctioning machine.
Repair any machine damage or malfunction
before operating the machine.
Before Starting Installation:
Read, understand and obey the safety rules
and operating instructions in the appropriate
operator's manual.
Be sure that all necessary tools and parts are
available and ready for use.
Read this procedure completely and adhere to
the instructions. Attempting shortcuts may
produce hazardous conditions.
Indicates that a specific result is expected after
performing a series of steps.
Indicates than an incorrect result has occurred
after performing a series of steps.
Note: These installation instructions only apply
to the Genie models listed on the front cover,
as required by Service Advisory 140007.
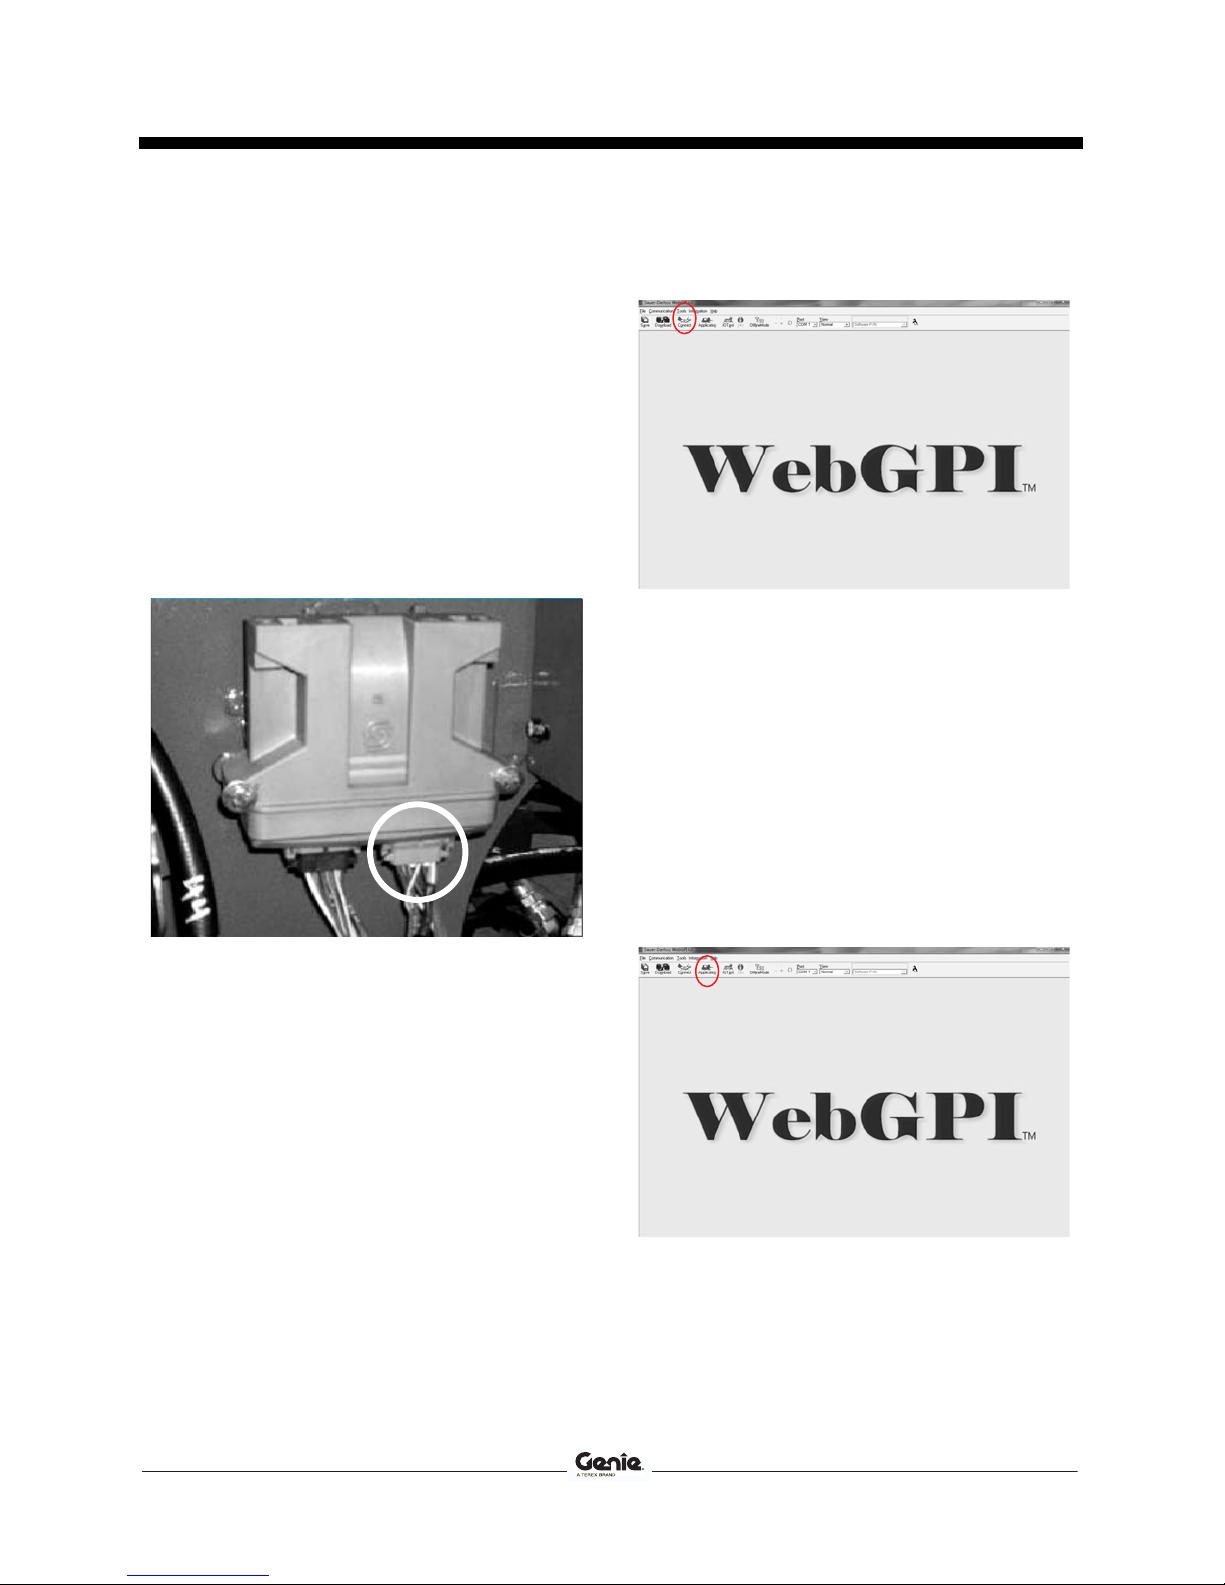
Tools Required:
Computer or Laptop with Microsoft operating
system XP or newer
DB9 cable, female to male of suitable length
(DB9F to DB9M)
7/16 inch wrench
7/16 inch socket
Ratchet
Small flathead screwdriver
Service Manual:
Z-135/70, GPN-106783
ZX-135/70, GPN-218700
USB to DB9 adapter cable (if required)
SCON Tee harness (if required)
(107647, ordered seperately)
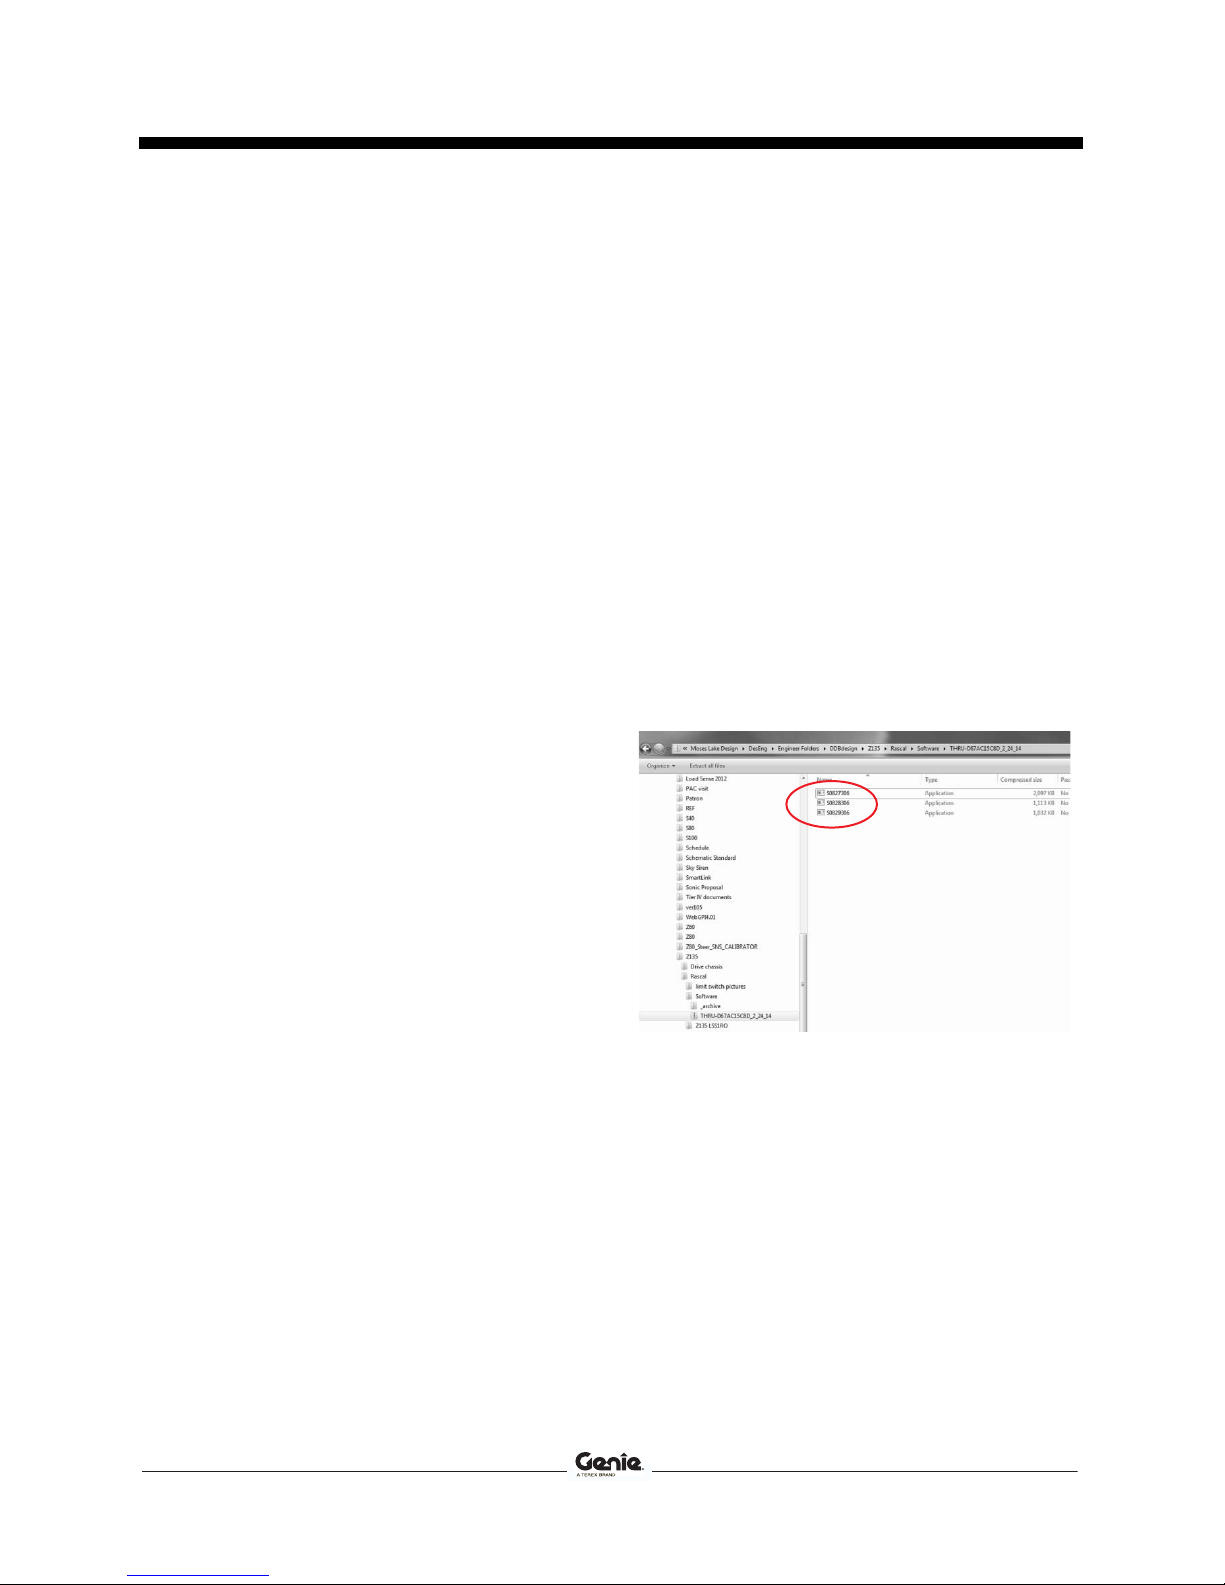
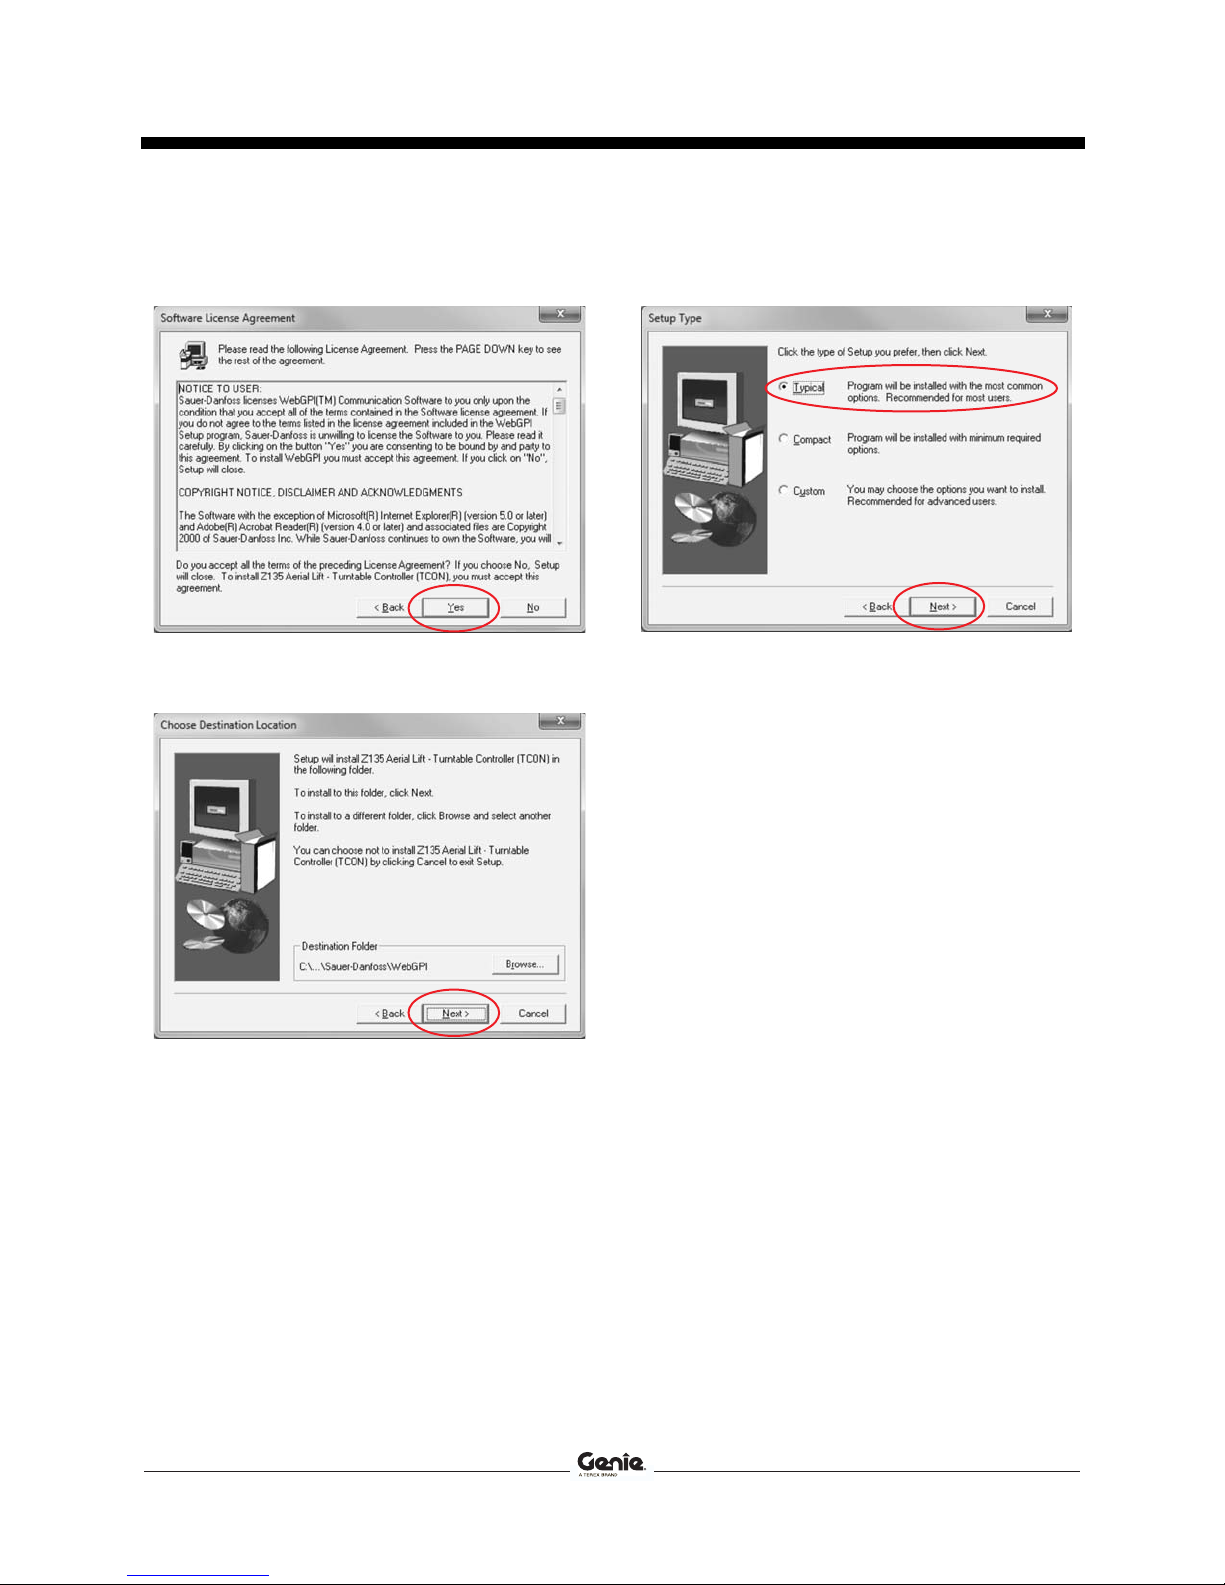
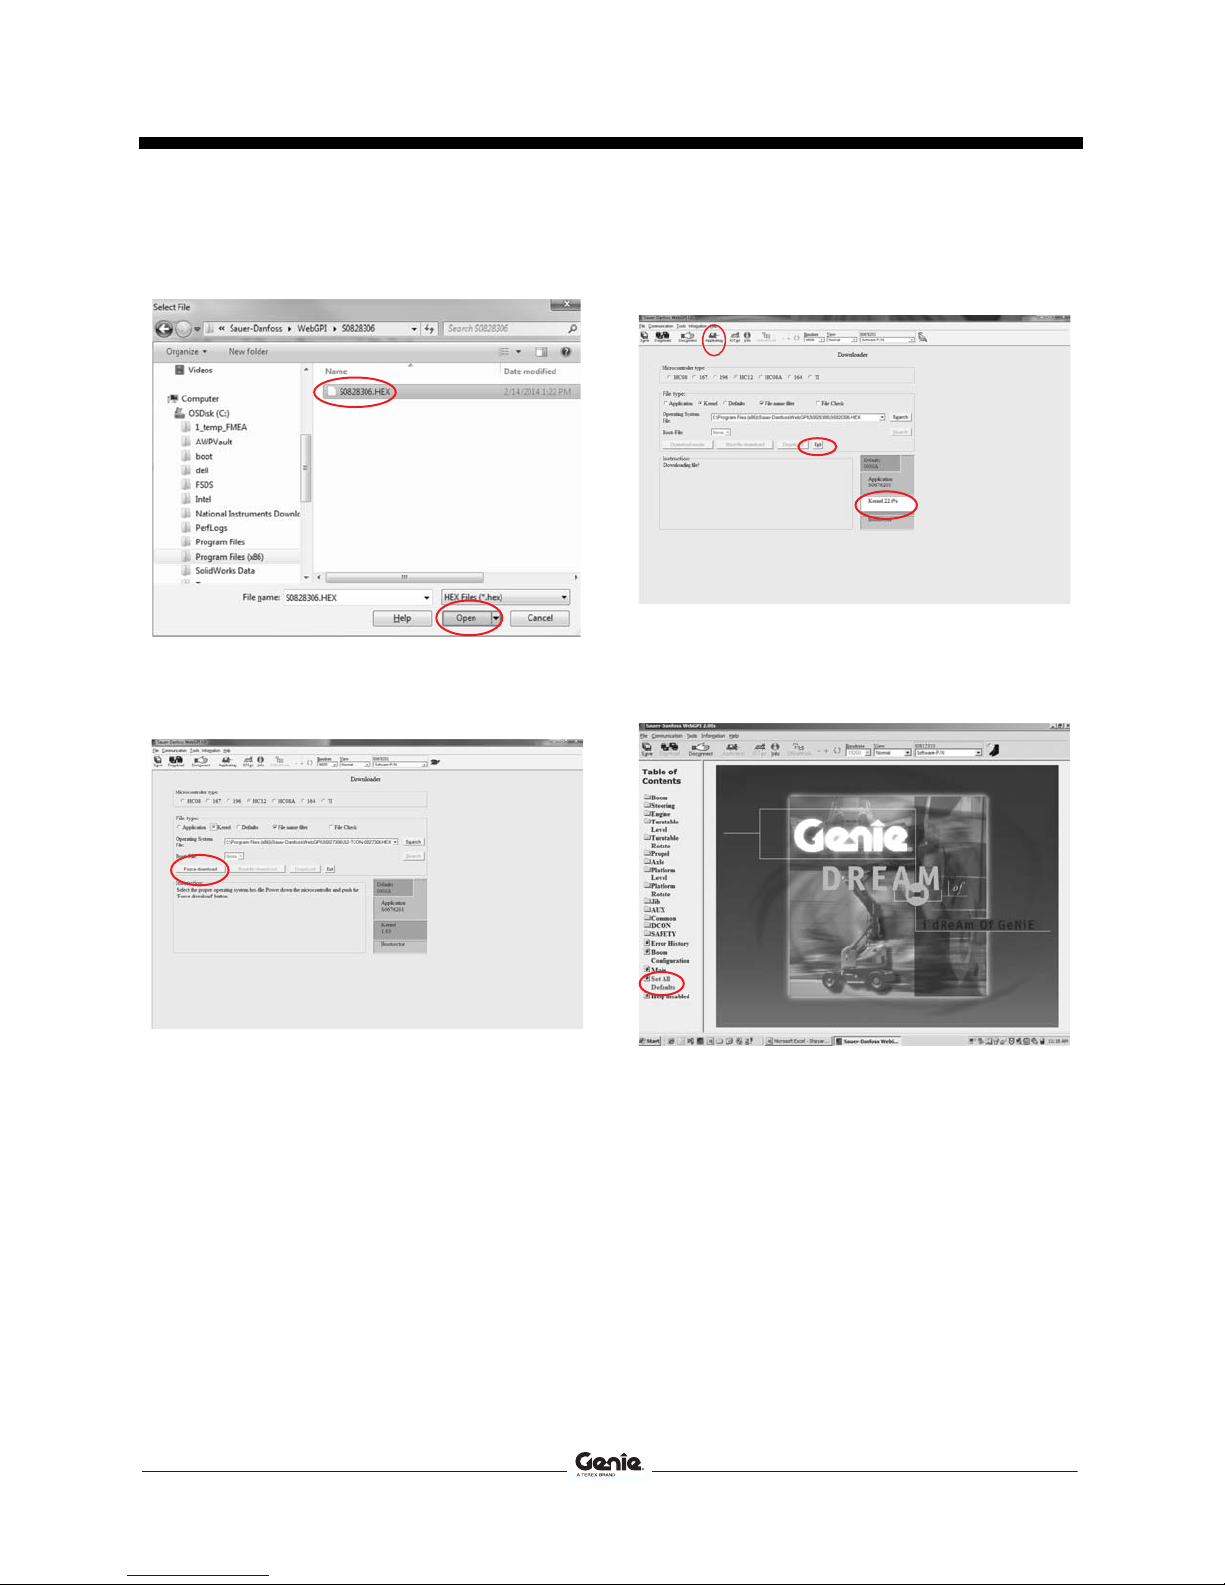
WebGPI™ software
(215336, ordered separately)
Note: The WebGPI™ software kit must be
purchased if it is not already installed on your
computer, and is not warrantable under this
Service Advisory.
Glossary of Terms
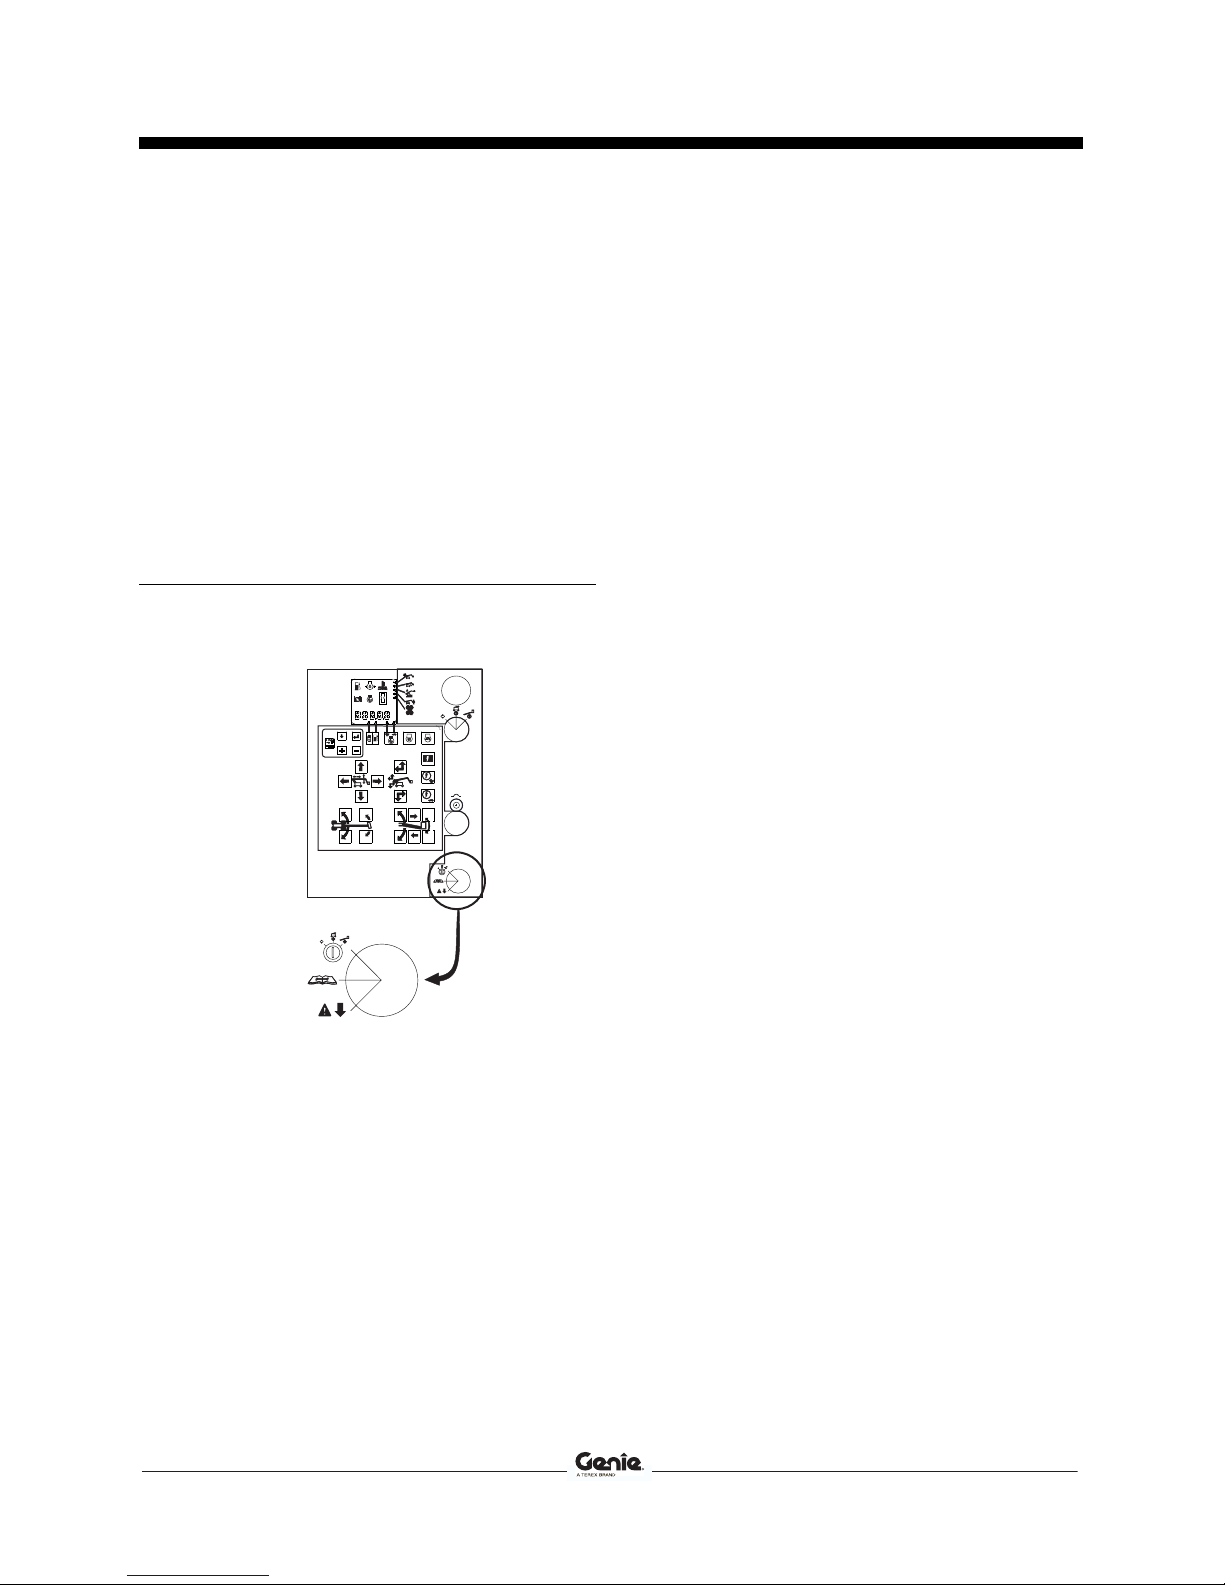
SCON - Safety controller
TCON - Turntable controls (Ground controls)
PCON - Platform controls

Rev A Instructions
Introduction
Part No. 1258800 Software Update 3
Machine Software Version
Update Requirements
Machines equipped with platform overload
protection and an operating system with a
software version less than 3.00 must install
load sense upgrade kit 1258801.
Machines equipped with platform overload
protection and an operating system with a
software version 3.00 or higher continue to the
Application Software Installation.
Machines not equipped with platform overload
protection continue to the Application Software
Installation.
Before proceeding, verify the Service
Bypass key switch is in Run mode.
Components of Kit 1258799
Flash drive, Z135/ZX135, V3.06
Genie part number 1258799
Qty. 1
Includes:
TCON software, V3.06
Genie part number 237074
PCON software, V3.06
Genie part number 237075
SCON software, V3.06
Genie part number 237076
Installation instructions
Genie part number 1258800
STOP
00000
Run
Service
Bypass
Recovery

Instructions Rev A
Introduction
4 Software Update Part No. 1258800
If you have any further questions regarding these
instructions or need assistance, please contact
Genie Product Support at one of the following
telephone numbers:
United States: 800-536-1800
Canada: 425-881-1800
Europe: UK 0044 1476 584 333
France 0033 237 260 986
Germany 0049 4221 491 821
Iberica 0034 935 725 090
Italy 0039 075 941 8132
Scandinavia 0046 3157 5154
Other locations 0031 653 221 908
Middle East: 0097 143 391 800 or
0097 150 459 7937
Australia: 61 7 3456 4444
All other locations 001-425-881-1800

Rev A Instructions
Procedure
Part No. 1258800 Software Update 5
Procedure
Note: Perform this procedure on a flat level surface,
with the boom and jib in the stowed position.
Software Version
Note: Before proceeding, verify the version of
software installed on your machine.
1At the TCON, turn the key switch to ground
controls and pull out the red Emergency Stop
button.
2Read and record the scroll message on the
display (example: VER 2_10 is version 2.10).
3Push in the red Emergency Stop button.
Limit Switch Rework
For machines equipped with platform overload
protection and software version less than 3.00
The platform overload limit switch LSP1OLS must
be replaced before proceeding with the software
upgrade.
Calibration Information
After the installation of the Application Software is
complete, the machine will have to go through a
complete calibration process. Refer to the
appropriate Service Manual for your machine.
Loading the Software onto a
Computer or Laptop
Note: Loading software onto your computer
requires that you must have administrative
rights to download executable files.
1Turn on the computer or laptop.
Note: If the WebGPI Software Update Zip files
have been downloaded from the Firmware site,
continue to the Application Software Installation.
2Insert the thumb drive (Genie part
number 1258799) into the computer or laptop.
Note: If the WebGPI Update files are not displayed
on your computer, go to My Computer and locate
the Removable Disk.
3Select each of the three application files one at
a time.

Instructions Rev A
Procedure
6 Software Update Part No. 1258800
4Select Yes on the License Agreement
screen.
5On the Choose Destination screen record the
default destination folder and select Next.
6On the Setup Type screen select Typical,
then select Next.
Note: After pressing Next you will see a series of
file names flash across the screen. When the
status bar displays 100%, installation is complete.
7Remove the thumb drive.

Rev A Instructions
Procedure
Part No. 1258800 Software Update 7
Application Software Installation
SCON Software Update
Note: The key switch must be in the off
position, and the red Emergency Stop Button
pushed in before disconnecting the the
harness from the SCON.
1Locate the SCON mounted on the frame
behind and to the right of the function manifold
on the ground controls side of the machine.
2Disconnect the gray J121 connector from the
SCON.
3Connect the SCON Tee-Harness (Genie part
number 107647) between the gray connector
and the SCON.
4Connect the laptop DB9 cable to the
Tee-Harness.
5At the TCON, turn the key switch to ground
controls and pull out the red Emergency Stop
button.
6Open WebGPI™ and click on the Connect
icon.
Note: The current application software file will be
shown at the top of the screen. (example:
S0677100 for older software)
Note: If Check power and serial connection is
displayed, confirm power is on at the TCON and
check the connection between the computer and
SCON.
Note: If Attempting to establish connection is
displayed, check your serial port COM settings.
The COM port settings can vary between
computers.
7Click on the Application icon.

Instructions Rev A
Procedure
8 Software Update Part No. 1258800
8Select Check Parameters.
9Select Tilt Sensors Params. Read and record
the Tilt Angle Matrix Gains parameters.
10 Click on the Disconnect icon.
11 Click on the Connect icon.
12 Click on the Download icon.
13 Select File type: Kernel.
14 Click on the Search button and locate
application software S0829306.HEX.

Rev A Instructions
Procedure
Part No. 1258800 Software Update 9
15 Select S0829306.HEX, and then click on
Open.
16 Click on the Force download button. Cycle
the power off, then back on at the red
Emergency Stop Button at the TCON.
17 Click on the Download button.
18 When the Kernel file is at 100%, cycle the
power off, then back on at the red Emergency
Stop Button at the TCON.
19 Click on the Exit button, then the Application
icon.
20 Select Set All Defaults. Select Ok.

Instructions Rev A
Procedure
10 Software Update Part No. 1258800
21 When prompted, select Level 2, enter
SG81355 for the password and select
Accept.Select Check Parameters.
22 Select Tilt Sensors Params. Enter the
parameters that were recorded in step 9.
Note: The numbers must be entered
accurately. The SCON can not be calibrated in
the field. If the numbers are not accurate, the
machine will not operate or level properly.
23 When prompted, select Level 3 and enter
BSNW for the password.
24 Push in the red Emergency Stop button at the
TCON and disconnect the Tee-Harness from
the SCON.
25 Securely connect the gray J121 connector to
the SCON.

Rev A Instructions
Procedure
Part No. 1258800 Software Update 11
TCON Software Update
Note: Before installation, go to your computers
Control Panel and increase your computers time
out period to more than 30 minutes.
1Open the ground control box and set the
fasteners aside.
2Connect the computer DB9 cable to the TCON
PCB.
3At the TCON, turn the key switch to ground
controls and pull out the red Emergency Stop
button.
4Open WebGPI™ and click on the Connect
icon.
Note: The current application software file will be
shown at the top of the screen. (example:
S0675100 for older software)
Note: If Check power and serial connection is
displayed, confirm power is on at the TCON and
check the connection between the computer and
TCON.
Note: If Attempting to establish connection is
displayed, check your serial port COM settings.
The COM port settings can vary between
computers.
5Click on the Download icon.

Instructions Rev A
Procedure
12 Software Update Part No. 1258800
6Click on the Search button and locate
application software S0827306. HEX.
7Select S0827306.HEX, and then click on
Open.
8Click on the Download button.
Note: This download can take 10 to 30 minutes
depending on the speed of your serial connection.
If your computer times out you will have to repeat
the TCON Software Update.
9When the Application file is at downloaded,
click on the Exit button.

Rev A Instructions
Procedure
Part No. 1258800 Software Update 13
10 Cycle the power off, then back on at the red
Emergency Stop Button at the TCON.
11 Click on the Application icon.
12 Select Set All Defaults. Select Ok.
13 When prompted, select Level 2, enter
SG81355 for the password and select Accept.
14 Push in the red Emergency Stop Button and
disconnect the DB9 cable from the TCON
PCB.
15 Close the ground control box and securely
tighten the retaining fasteners.

Instructions Rev A
Procedure
14 Software Update Part No. 1258800
PCON Software Update
1Open the platform control box and set the
fasteners aside.
2Connect the computer DB9 cable to the PCON
PCB.
3At the TCON, turn the key switch to platform
controls and pull out the red Emergency Stop
buttons at both control boxes.
4Open WebGPI™ and click on the Connect
icon.
Note: The current application software file will be
shown at the top of the screen. (example:
S0676201 for older software)
Note: If Check power and serial connection is
displayed, confirm power is on at the TCON and
check the connection between the computer and
PCON.
Note: If Attempting to establish connection is
displayed, check your serial port COM settings.
The COM port settings can vary between
computers.
5Click on the Download icon.

Rev A Instructions
Procedure
Part No. 1258800 Software Update 15
6Select File Type: Kernel.
7Click on the Search button and locate
application software S0828306.HEX.
8Select S0828306.HEX, and then click on
Open.
9Click on the Force download button. Cycle
the power off, then back on at the red
Emergency Stop Button at the TCON.

Instructions Rev A
Procedure
16 Software Update Part No. 1258800
10 Click on the Download button.
11 When the Kernel file is at 100%, cycle the
power off, then back on at the red Emergency
Stop Button at the PCON.
12 Click on the Exit button, then the Application
icon.
13 Select Set All Defaults. Select Ok.
14 When prompted, select Level 2, enter
SG81355 for the password and select Accept.
15 Cycle the power off, then back on at the red
Emergency Stop Button at the TCON.
16 Select RSJ1AO Function Check.
17 Enter the following settings: Sensor voltage
range %, 60. Timeout, 10. Lower Deadband,
75. Min Movement Value, 22.
18 When prompted, select Level 2, enter
SG81355 for the password and select Accept.
19 Push in the red Emergency Stop Button and
disconnect the DB9 cable from the PCON
PCB.
20 Close the platform control box and securely
tighten the retaining fasteners.
21 Calibrate the machine. Refer to the
appropriate Service Manual for you
machine.
Instructions Part No. 1258800
Rev A
Software Update
Other manuals for Z-135/70
2
This manual suits for next models
1
Table of contents
Other Genie Boom Lift manuals

Genie
Genie Super-Straddle User manual

Genie
Genie Z Series User manual

Genie
Genie S-40 TRAX User manual

Genie
Genie GS-2669 RT User manual

Genie
Genie S-105 User manual

Genie
Genie Z-30/20N User manual

Genie
Genie S-60 HC User manual

Genie
Genie 43650 User manual

Genie
Genie Super Tower User manual

Genie
Genie Z-45/22 User manual
Popular Boom Lift manuals by other brands

CMC
CMC S15 manual

Oshkosh Corporation
Oshkosh Corporation JLG 450AJ Service and maintenance manual

Oshkosh Corporation
Oshkosh Corporation JLG M400Anarrow Service and maintenance manual

JLG
JLG 1230ES Operation and safety manual

Terex
Terex GRJL-2298 Operator's manual

Terex
Terex Genie GTH-5519 Service manual