Gentec-EO Pronto Series User manual


PRONTO-HIGH-POWER series user manual - revision 1.8 2
WARRANTY
All Gentec-EO products carry a one-year warranty from the date of shipment on material or workmanship
defects when used under normal operating conditions.
Gentec-EO will repair or replace, at its sole discretion, any product that proves to be defective during the
warranty period.
The warranty does not cover damages caused by product misuse, product modifications, accidents,
abnormal operating or handling conditions, or third-party battery leakage. Any attempt by an unauthorized
person to alter or repair the product voids the warranty. Gentec-EO is not liable for consequential damages
of any kind.
CLAIMS
For warranty service, please contact your Gentec-EO representative or fill out an RMA request:
https://www.gentec-eo.com/contact-us/support-rma-request
To help us answer your request more efficiently, please have your product serial number ready before
contacting customer support.
Upon receipt of return authorization, ship the product according to the RMA instructions. Do not ship items
without a return authorization. Transport is at the customer’s expense, in both directions, unless the product
has been received damaged or non-functional. Gentec-EO assumes no responsibility for the damage
caused in transit.

PRONTO-HIGH-POWER series user manual - revision 1.8 3
SAFETY INFORMATION
Do not use a Gentec-EO device if the monitor or the detector looks damaged or if you suspect that the
device is not operating properly.
Appropriate installation must be done for water-cooled and fan-cooled detectors. Refer to the specific
instructions for more information. Wait a few minutes before handling the detectors after they are powered
up. The surfaces of the detectors get very hot, and there is a risk of injury if they have not cooled.
Note: This equipment has been tested and found to comply with the limits for a Class A digital
device, pursuant to part 15 of the FCC Rules. These limits are designed to provide
reasonable protection against harmful interference in a residential installation. This
equipment generates, uses and can radiate radio frequency energy. If not installed and
used in accordance with the instructions, it may cause harmful interference to radio
communications. However, there is no guarantee that interference will not occur in a
particular installation. If this equipment does cause harmful interference to radio or
television reception, which can be determined by turning the equipment off and on, try to
correct the interference by taking one or more of the following steps:
Reorient or relocate the receiving antenna.
Increase the distance between the equipment and receiver.
Connect the equipment to an outlet that is on a different circuit than the receiver.
Consult the dealer or an experienced radio/TV technician for help.
Caution: Changes or modifications not expressly approved in writing by Gentec-EO Inc. may void
the user’s authority to operate this equipment.
SYMBOLS
The following international symbols are used in this manual:
Refer to the manual for specific warning or caution information to avoid any
damage to the product.

PRONTO-HIGH-POWER series user manual - revision 1.8 4
Table of contents
1. PRONTO-HIGH-POWER series handled laser probe ............................................................................................ 6
1.1. Included with your PRONTO-HP...................................................................................................................... 6
1.2. Introduction ......................................................................................................................................................... 6
1.3. Warnings and disclaimer .................................................................................................................................. 7
1.4. Basics operating instructions (PRONTO-500/3K/6K/10K) ........................................................................ 8
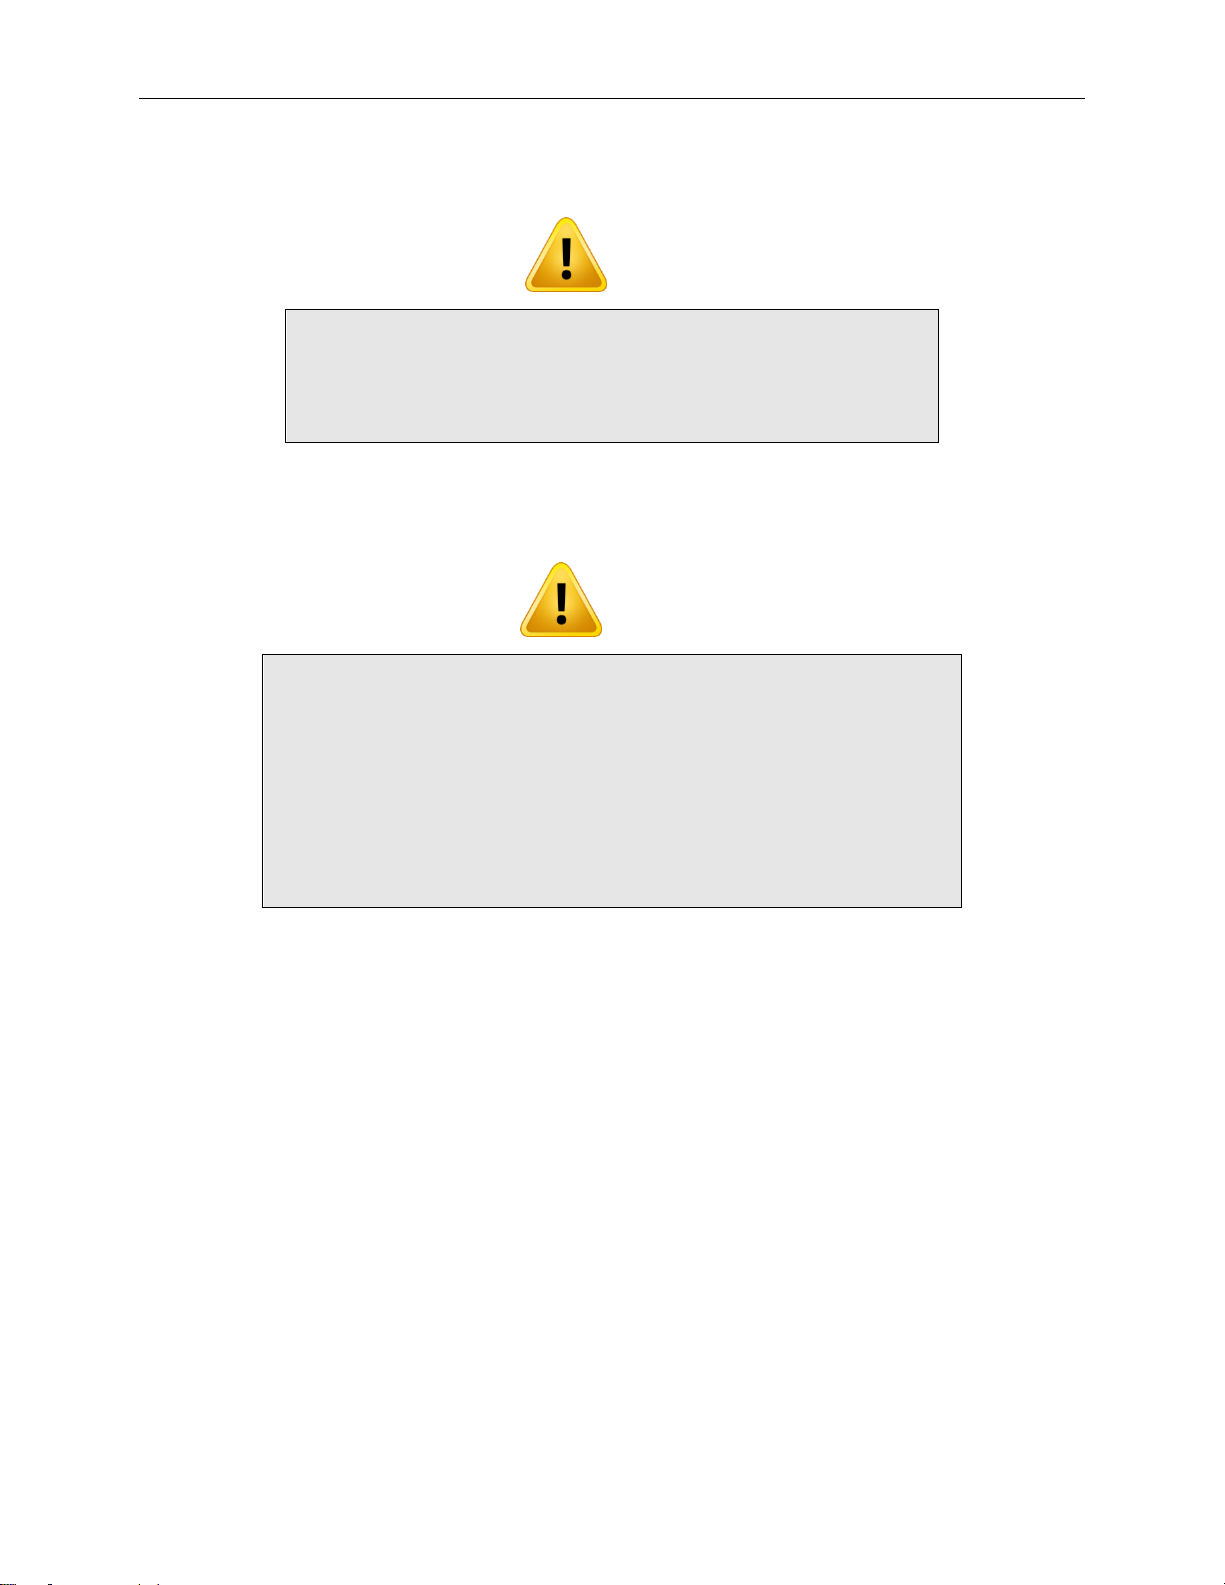
1.4.1. Basics operating instructions for the single-shot power mode (SSP)............................................. 8
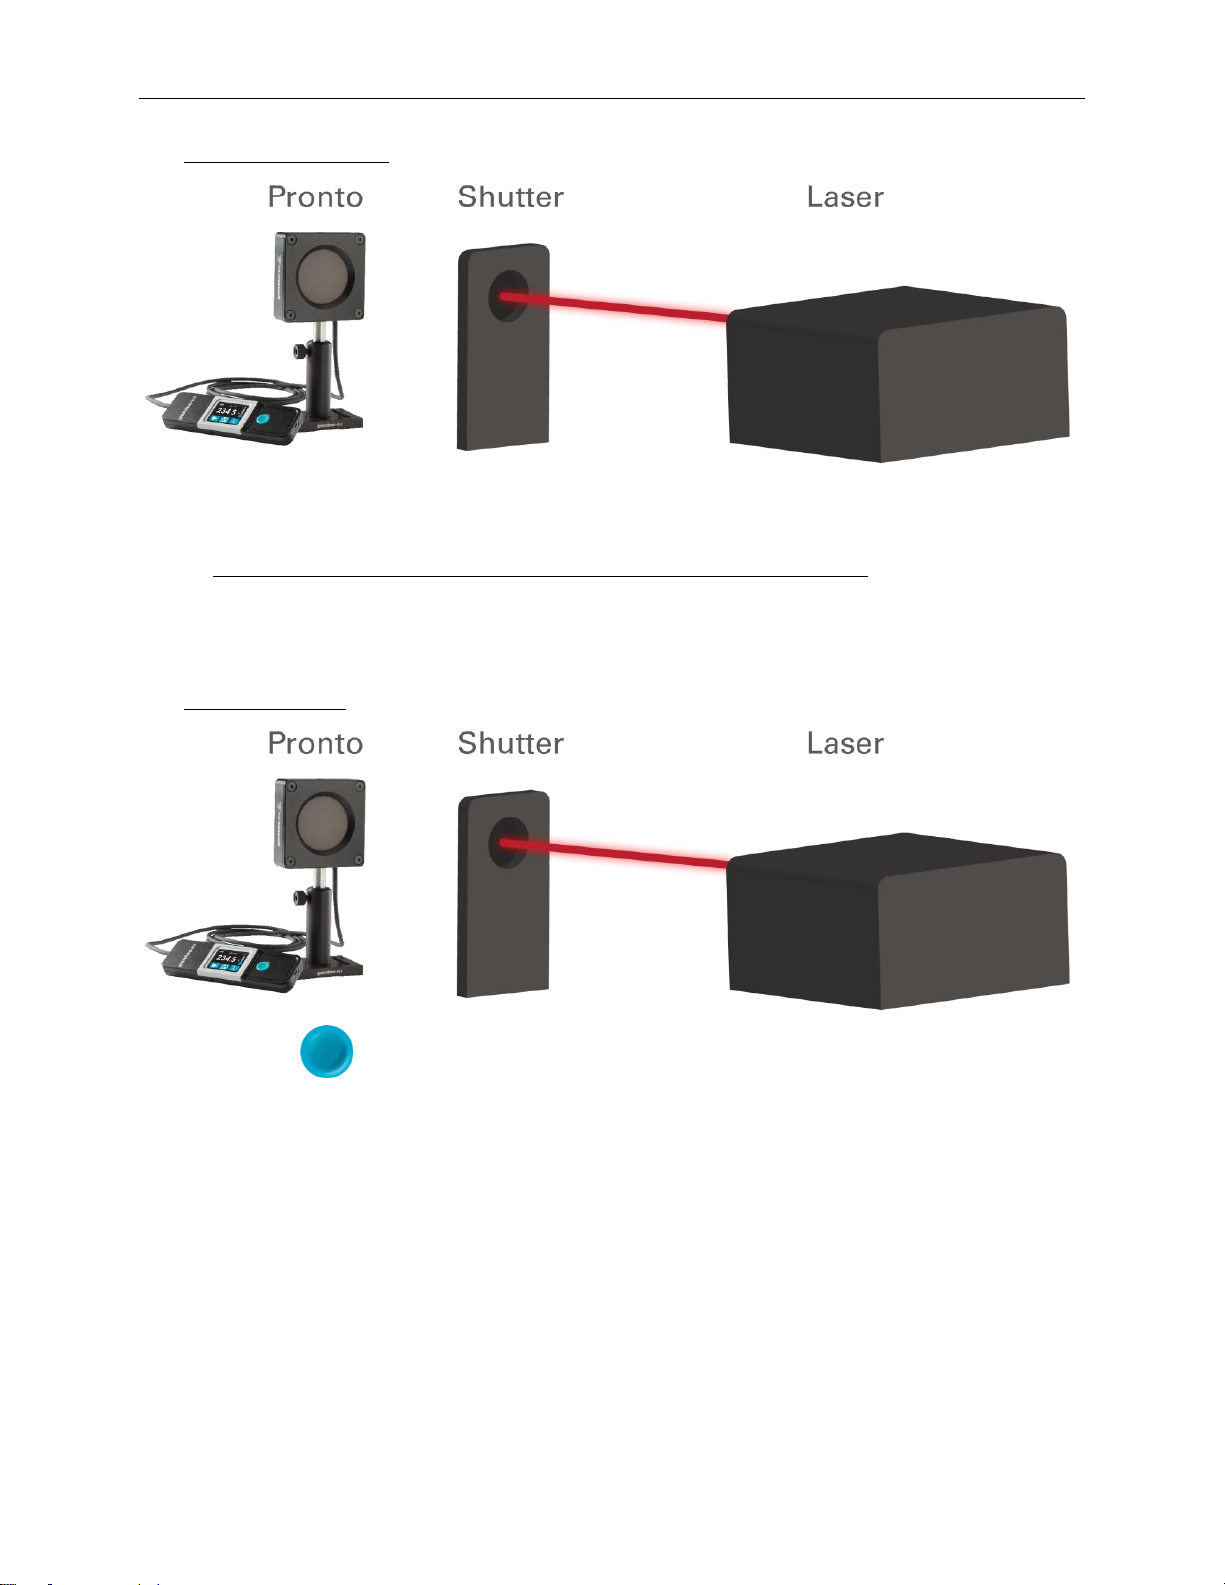
1.4.2. Basic operating instructions for the single-shot energy mode (SSE)............................................... 9
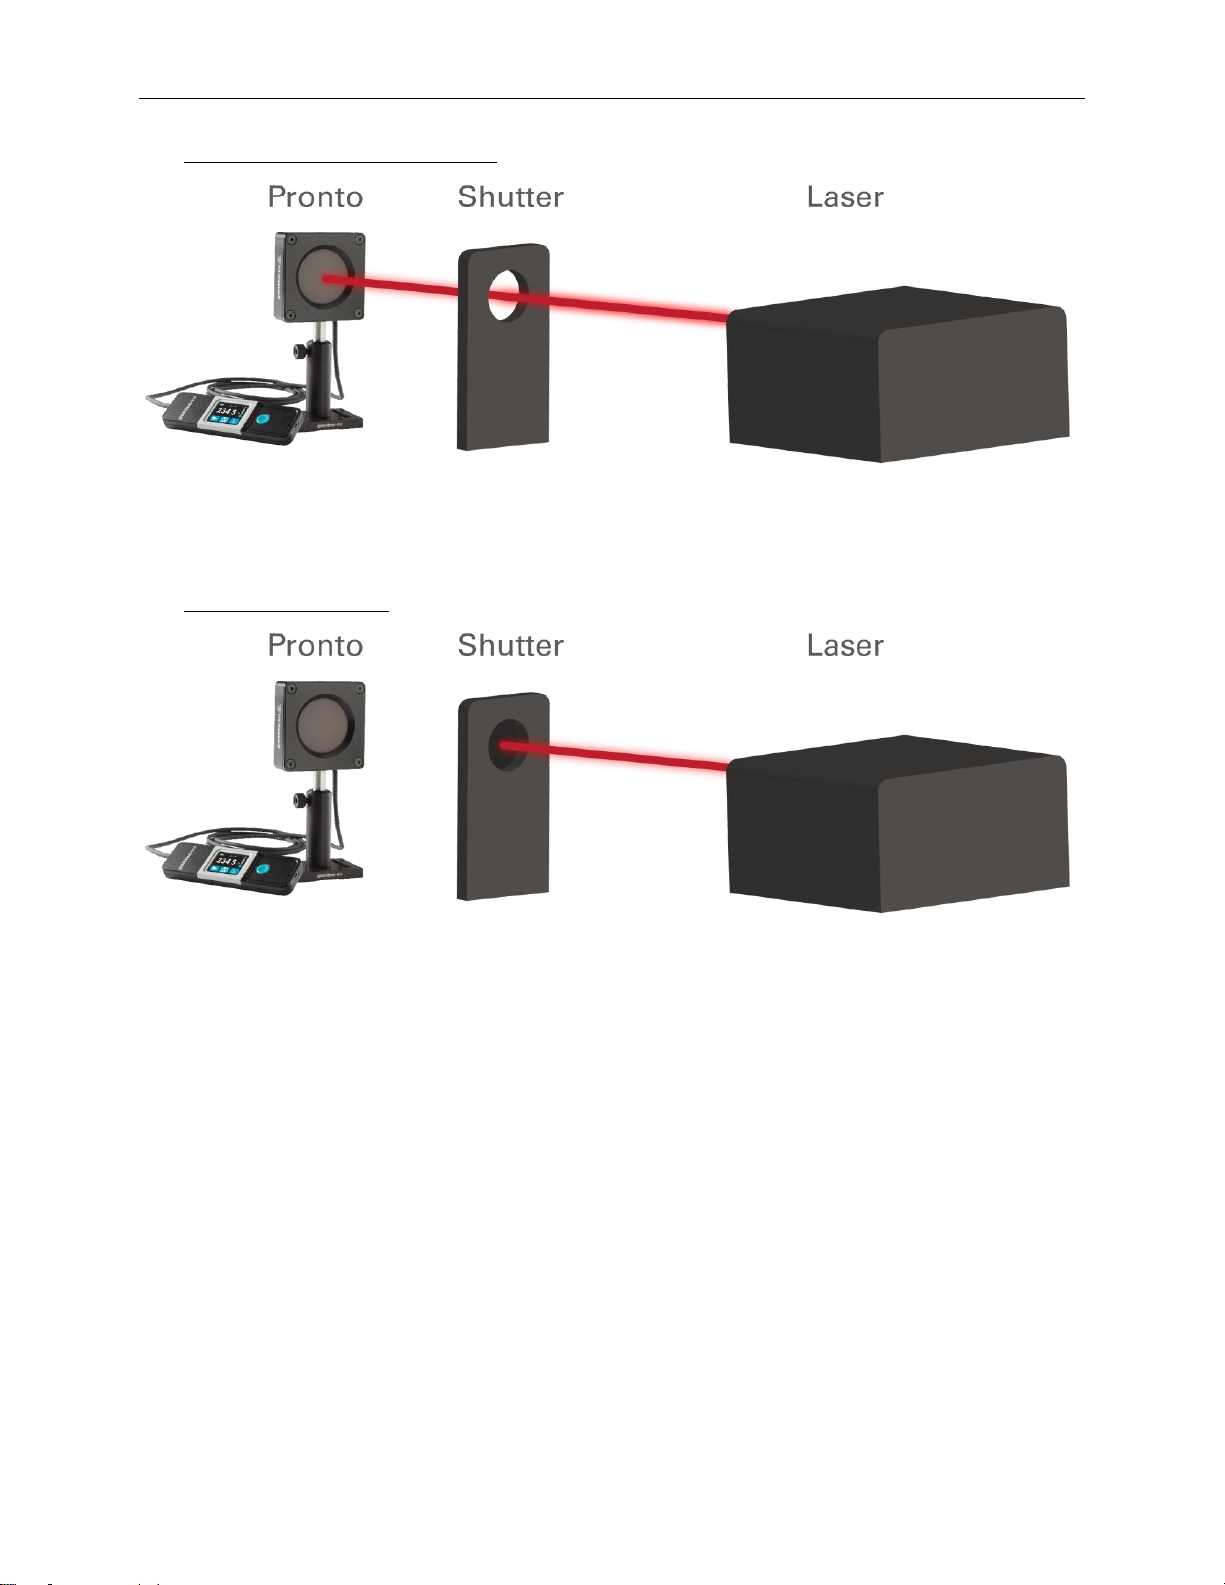
1.4.3. Basic operating instructions for continuous mode (CWP)............................................................... 11
1.5. PRONTO-HIGH-POWER series specifications ............................................................................................ 12
1.5.1. Power detectors ....................................................................................................................................... 12
1.5.2. Energy detectors ...................................................................................................................................... 14
1.5.3. Mechanical description........................................................................................................................... 15
2. Operating instructions ............................................................................................................................................. 16
2.1. User interface.................................................................................................................................................... 16
2.2. Turning the device on and off ........................................................................................................................ 16
2.3. Changing the settings...................................................................................................................................... 17
2.3.1. Opening and closing the settings menu .............................................................................................. 17
2.3.2. Settings icons ........................................................................................................................................... 17
2.3.3. Changing the orientation of the screen................................................................................................ 17
2.3.4. Changing the brightness of the screen................................................................................................ 17
2.3.5. Adjusting the correction factor.............................................................................................................. 18
2.3.6. Getting information about the device................................................................................................... 18
2.4. Changing the wavelength ............................................................................................................................... 19
2.5. Making a measurement (SSP mode only)................................................................................................... 20
2.6. Acquiring, transferring and deleting data..................................................................................................... 21
2.6.1. Acquiring data........................................................................................................................................... 21
2.6.2. Transferring data...................................................................................................................................... 21
2.6.3. Deleting data............................................................................................................................................. 21
3. Operating instructions (PRONTO-500 and PRONTO-500-IPL)......................................................................... 22
3.1. Zeroing (CWP mode on PRONTO-500 only)................................................................................................ 22
3.2. Setting the scale (SSE modes only).............................................................................................................. 22
3.3. Setting the trigger level (SSE mode on PRONTO-500-IPL only) .............................................................. 23
3.4. Making a measurement .................................................................................................................................. 24
3.4.1. SSP mode.................................................................................................................................................. 24
3.4.2. CWP mode................................................................................................................................................. 24

PRONTO-HIGH-POWER series user manual - revision 1.8 5
3.4.3. SSE mode on PRONTO-500-IPL............................................................................................................ 24
4. USB communication ................................................................................................................................................ 25
4.1. Description......................................................................................................................................................... 25
4.2. Setting up communication to the PRONTO ................................................................................................ 25
4.2.1. Connect the PRONTO.............................................................................................................................. 25
4.2.2. To echo commands ................................................................................................................................ 25
4.2.3. Test the connection................................................................................................................................. 25
4.3. Serial command format .................................................................................................................................. 26
4.3.1. Serial protocol rules................................................................................................................................. 26
4.3.2. Text mode rules........................................................................................................................................ 26
4.4. List of serial commands for the PRONTO (summary) .............................................................................. 27
4.5. Detailed description of the serial commands for PRONTO (complete)................................................. 28
4.5.1. Display........................................................................................................................................................ 28
4.5.2. Data acquisition........................................................................................................................................ 31
4.5.3. Setup .......................................................................................................................................................... 34
4.5.4. Control........................................................................................................................................................ 35
4.5.5. Instrument and detector information................................................................................................... 40
4.6. Error messages................................................................................................................................................. 44
5. General information ................................................................................................................................................. 45
5.1. General information......................................................................................................................................... 45
5.2. Safety operation notes .................................................................................................................................... 45
5.3. Damage to the optical absorber material .................................................................................................... 45
5.4. Not exceeding the maximum sensor temperature.................................................................................... 47
6. USB driver installation.............................................................................................................................................. 48
7. Maintenance.............................................................................................................................................................. 48
7.1. Free firmware update ...................................................................................................................................... 48
8. Declaration of conformity ....................................................................................................................................... 49
9. UKCA declaration of conformity............................................................................................................................ 50
10. Appendix A –WEEE directive................................................................................................................................. 51
11. Appendix B –Installing the ProntoDataTransfer software .............................................................................. 52
12. Appendix C –Updating the PRONTO firmware.................................................................................................. 55

PRONTO-HIGH-POWER series user manual - revision 1.8 6
1. PRONTO-HIGH-POWER SERIES HANDLED LASER PROBE
1.1. INCLUDED WITH YOUR PRONTO-HP
The following items are included with PRONTO-HP.
Description
Part name
Part number
PRONTO-HP laser power monitor
USB-A to USB-mini cable
MAE-USB
202372
Carrying case
102045
Calibration certificate
1.2. INTRODUCTION
Gentec-EO introduces the PRONTO-HIGH-POWER series of touchscreen laser probes. These portable
devices allow for quick yet precise measurements of laser power up to 10,000 W (depending on the model)
with very short cooling time between two measurements. The series also includes the
PRONTO-500-IPL model, which measures the energy of individual pulses of light up to 350 J. All models
include a detector head with a surface absorber that is designed for use at high average power densities,
and the heads are connected by a 1.5-meter-long flexible cable to a monitor with user-friendly touchscreen
controls. Other useful features include data logging and data transfer to a PC via USB.
PRONTO-HIGH-POWER detectors can be supplied with a stand (optional).
The various PRONTO-HIGH-POWER detectors can be operated in different modes, depending on the model:
single-shot power mode (SSP), single-shot energy mode (SSE) and continuous power mode (CWP). Basic
operating instructions for each mode are presented in Section 1.4.
PRONTO-500: single-shot power mode (SSP) and Continuous mode (CWP)
PRONTO-500-IPL: single-shot energy mode (SSE)
PRONTO-3K/6K/10K: single-shot power mode (SSP)
If the desired wavelength is outside the calibrated spectral range, you can use the correction factor function
to adjust the displayed measures.
Call your nearest Gentec-EO distributor to repair or to recalibrate the PRONTO. To find the nearest
Gentec-EO office or distributor in your country, go to www.gentec-eo.com/contact-us.

PRONTO-HIGH-POWER series user manual - revision 1.8 7
1.3. WARNINGS AND DISCLAIMER
Laser power detection is completely automatic. There is no need for an external timer.
Warnings
WHEN HOT APPEARS ON THE SCREEN, REMOVE THE DEVICE FROM
THE BEAM IMMEDIATELY TO AVOID DAMAGING THE SENSOR.
Be careful not to exceed the maximum levels and densities stated in the
specifications.
In no event shall Gentec-EO or any of its affiliates be liable for any indirect, special, incidental or
consequential injury to persons or damage to property caused by the use of any of our products. By
purchasing from Gentec-EO or any of its affiliates, you hereby indicate that you understand and agree to the
following:
Disclaimer
I am fully responsible for the safe application and use of this detector and
agree to such by completing the sales process.
I will not use a laser device without wearing approved laser safety goggles
designed for such a purpose.
I am aware and responsible for safely dealing with any back reflections.
I will not use the detector in violation of any local, state or federal law, and I
understand that it is my responsibility to know and abide by those laws
relating to the ownership and use of the detector in my jurisdiction.

PRONTO-HIGH-POWER series user manual - revision 1.8 8
1.4. BASICS OPERATING INSTRUCTIONS (PRONTO-500/3K/6K/10K)
1.4.1. Basics operating instructions for the single-shot power mode (SSP)
These are available on all models (except PRONTO-500-IPL).
In the SSP mode, the PRONTO-HIGH-POWER takes a single measurement of laser power in a few seconds.
A. Prepare the device
Press the home button to turn on the device.
Set the PRONTO in SSP mode.
Make sure that the laser is off, or the laser beam is blocked.
Press the play button to start a new measurement.
B. Expose the device to the laser beam
Aim the laser at the center of the absorber.
Turn on the laser beam and allow an exposure at least as long as the response time of the
PRONTO.

PRONTO-HIGH-POWER series user manual - revision 1.8 9
C. Read the measurement
Turn off or block the laser beam and read the power measurement on the PRONTO screen.
More details about the operating instructions are explained in Section 2.
1.4.2. Basic operating instructions for the single-shot energy mode (SSE)
These are only available on the PRONTO-500-IPL.
In the SSE mode, the PRONTO-500-IPL takes single measurements of the energy contained in a short pulse
of light.
A. Prepare the device
Press the home button to turn on the device.
Set the PRONTO in SSE mode.
Set the trigger level as desired.

PRONTO-HIGH-POWER series user manual - revision 1.8 10
B. Expose the device to a pulse of light
Aim the light at the center of the absorber.
Turn on the light source and allow the PRONTO to be exposed to a single pulse.
The PRONTO will detect automatically when it receives a pulse.
C. Read the measurement
Turn off or block the light source and read the energy measurement on the PRONTO screen.
More details about the operating instructions are explained in Section 3.

PRONTO-HIGH-POWER series user manual - revision 1.8 11
1.4.3. Basic operating instructions for continuous mode (CWP)
These are only available on PRONTO-500.
In the continuous mode, the PRONTO-500 continually updates the laser power measurement (valid for lower
laser powers than the SSP mode).
A. Prepare the device
Press the home button to turn ON the device.
Set the PRONTO in CWP mode.
Make sure that the laser is off, or the laser beam is blocked.
Zero the device by pressing the button.
B. Expose the device to the laser beam
Aim the laser at the center of the absorber.
Turn on the laser beam and allow an exposure at least as long as the response time of the
PRONTO.
C. Read the measurement
In CWP mode the measured power is updated continuously, so you do not need to block the laser between
measurements.

PRONTO-HIGH-POWER series user manual - revision 1.8 12
1.5. PRONTO-HIGH-POWER SERIES SPECIFICATIONS
1.5.1. Power detectors
These products have a calibration at 1064 nm (YAG) and can be calibrated at 10.6 µm (CO2) on custom
demands only. They also have a traceable wavelength correction to complete the calibrated spectral range.
The following specifications are based on a one-year calibration cycle, an operating temperature of 15 ºC
to 28 ºC (59 ºF to 82 ºF) and a relative humidity not exceeding 80%. Monitors must be stored in an
environment between 10 ºC to 60 ºC (50 ºF to 140 ºF) and a relative humidity not exceeding 90%.
Specifications are subject to change without notice.
PRONTO-5001
PRONTO-3K
PRONTO-6K
PRONTO-10K
Aperture
55 mm Ø
Spectral range
0.19 - 20 µm
Calibrated spectral range2
0.248 - 2.5 µm
Available extra calibrated range
10.6 µm
Programmed spectral range3
0.193 - 10.6 µm
Power range in SSP mode
1 - 500 W
5 - 3000 W
20 - 6000 W
30 - 10 000 W
Power range in CWP mode
0.1 - 40 W
N/A
Typical response time
5 s
(2 s in CWP mode)
10 s
5 s
5 s
Calibration uncertainty
3%
(± 2.5% in CWP mode)
5%
5%
5%
Noise level in SSP mode
0.1 W
5 W
20 W
30 W
Damage thresholds and laser limits
Maximum average power density
(1064 nm CW)
At 100 W average power
At 500 W average power
At 3000 W average power
At 6000 W average power
At 10000 W average power
25 kW/cm2
5.0 kW/cm2
7.0 kW/cm2
5.0 kW/cm2
8.0 kW/cm2
7.0 kW/cm2
7.0 kW/cm2
5.5 kW/cm2
Maximum allowable absorber
temperature
65 °C
65 °C
75 °C
75 °C
Maximum number of readings (in SSP
mode) before probe must be cooled
assuming an exposure of 8 seconds
[for 25 °C starting temp. see Section 5.4
for more information]
100 W 25
200 W 12
300 W 8
500 W 5
0.5 kW 6
1 kW 3
1.5 kW 2
3 kW 1
1 kW 6
2 kW 3
3 kW 2
6 kW 1
1 kW 10
2 kW 5
5 kW 2
10 kW 1
1
The PRONTO-500-IPL has the same specifications as the PRONTO-500 except for the measurement accuracy and wavelength range.
2
The PRONTO-HIGH-POWER standard units are calibrated at one wavelength and have a NIST-traceable wavelength correction factor
to cover the complete calibrated spectral range. The PRONTO-HIGH-POWER units can also be calibrated at 10.6 µm on custom
demand only.
3
Available wavelengths in the user interface.

PRONTO-HIGH-POWER series user manual - revision 1.8 13
PRONTO-5001
PRONTO-3K
PRONTO-6K
PRONTO-10K
Physical characteristics
Dimensions [mm] (head)
88 x 88 x 32
88 x 88 x 43
88 x 88 x 36
88 x 88 x 46
Dimensions [mm] (monitor)
41 W x 140 L x 16 D
Cable length [m]
1.5
Weight [g]
680
1015
1215
1910
Monitor mounting holes
1 x 8-32
Operating conditions
10 °C to 40 °C < 80% relative humidity
Storage conditions
10 °C to 60 °C < 90% relative humidity
Battery type
USB rechargeable Li-ion
Battery life
17 hours or 4200 measurements (with brightness set at 25%)
Charge time: 7.5 hours when totally empty
Maximum battery cycle count
(amount of charge cycles before the
battery loses its efficiency)
Approximately 500 full charges (0-100%)
Lithium battery transport compliance
UN: Recommendations on the Transport of Dangerous Goods, Manual of
Tests and Criteria, ST/SG/AC.10/11/Rev.6/Amend.1 Section 38.34
User interface
Interface
Touchscreen
Display
Color LCD 28 mm x 35 mm (128 x 160 pixels)
Data acquisition and transfer
Maximum of 50 000 measurements
Acquisition frequency
6.8 Hz in
CWP mode
N/A
Screen personalization
Four screen orientations and four brightness levels
Saved settings
Screen orientation, screen brightness, wavelength, correction factor and
trigger level
Display numerical resolution
4 digits5
Available measurement modes
SSP and CWP
SSP
SSP
SSP
4
UN38.3 certificate available upon request.
5
For values above 10 kW, the numerical resolution is 0.1 kW.

PRONTO-HIGH-POWER series user manual - revision 1.8 14
1.5.2. Energy detectors
See the PRONTO-500 specifications for operating and storage temperature ranges, as well as physical
characteristics and the user interface.
Unit
PRONTO-500-IPL
Spectral range
µm
0.19 - 2.5
Calibrated wavelength
nm
1064
Optical aperture
cm2
23.76
mm
Ø 55
Typical sensitivity
mV/J
0.013
Response time
s
2
Minimum repetition period
s
15
Maximum pulse width
ms
433
Energy range
(1064 nm; 10 ms pulse)
J
2 - 350
Maximum average power density
(1064 nm CW at 10 W)
kW/cm2
45
Pulsed laser damage thresholds
(10 ms)
J/cm2
175
Noise equivalent energy
mJ
500
Calibration uncertainty
%
± 5
Available measurement mode
SSE

PRONTO-HIGH-POWER series user manual - revision 1.8 15
1.5.3. Mechanical description
Absorber
The laser must be centered on the absorber when making a measurement.
Mounting holes
There is an 8-32 mounting hole on the monitor and two 1/4-20 mounting holes on the head to
fit the device on a post for a safe use during the measurements.
Touchscreen display and controls
The touchscreen interface controls the device.
On/off/settings button
This button is used to power the device on (press when the device is off) and off (press and
hold for 3 seconds when the device is on). It is also used to access the settings menu (press
when the device is on).
USB port
The Mini-B USB2.0 port is used to transfer data from the device to a PC and to charge the
battery.
Overheating indicator
The central part of the yellow sticker on the rear face turns to black when the temperature of
the device exceeds 65 °C (150 °F). This indicates that the detector was probably damaged due
to overheating. In this case, contact your local Gentec-EO representative.
5

PRONTO-HIGH-POWER series user manual - revision 1.8 16
2. OPERATING INSTRUCTIONS
2.1. USER INTERFACE
Figure 1. User interface
Device state
The top portion of the display shows the battery level and the selected wavelength.
In the PRONTO-500, the top portion also indicates the measurement mode. Its default
mode is SSP, which works like the PRONTO-3K/6K/10K.
Measured value
The central part of the display shows the last measured value.
In the PRONTO-500/500-IPL, this section also serves as a button to access the scales
menu in SSE modes.
Temperature
The thermometer icon shows the head temperature.
If the thermometer is red, and the screen displays HOT, block the laser
IMMEDIATELY and let the instrument cool down.
Controls
The first button at the bottom of the display is specific to the measurement mode. In SSP
mode, this button (play) is used to get the device ready to make a measurement. The
second button (save) is for data acquisition, and the third button (wavelength) opens the
wavelength menu.
2.2. TURNING THE DEVICE ON AND OFF
Turn on:Press the on/off/settings button .
Turn off: Press and hold the on/off/settings button for 3 seconds.
Tip
The device will automatically turn off after 5 minutes of inactivity, except if data
are being acquired. When the device is plugged into a PC via the USB cable, it
will power on and stay on until it is manually turned off or unplugged.

PRONTO-HIGH-POWER series user manual - revision 1.8 17
2.3. CHANGING THE SETTINGS
2.3.1. Opening and closing the settings menu
When the device is on, short press the on/off/settings button to access the menu. Pressing the
button again will close it and save whatever settings have been changed.
2.3.2. Settings icons
The following icons are presented in the settings menu. The measurement mode options are only available
with the PRONTO-500, since the PRONTO-3K/6K/10K always works in single-shot power mode, and the
PRONTO-500-IPL always works in single-shot energy mode.
Icon
Name
Description
Screen orientation
Indicates the screen orientation (four options)
Press →toggles to the next orientation
Brightness
Indicates the screen’s brightness level (four options)
Press →toggles to the next brightness level
Correction factor
Press →opens the correction factor (user calibration) menu
About
Press →opens the about menu
for PRONTO-500 only
More
Press →switches to the secondary menu
Single-shot power
Continuous power
Single-shot energy
Press →goes to the single-shot power mode
Press →goes to the continuous power mode
N/A
2.3.3. Changing the orientation of the screen
There are four possible screen orientations: up, down, left and right. The button displays the current
orientation, for example, up: . To change the orientation, simply press the button, and the next choice
will appear. The changes will be saved once you exit the settings menu.
2.3.4. Changing the brightness of the screen
There are four possible brightness levels: 100%, 75%, 50% and 25%. The button displays the current
brightness, for example, 75%: . To change the brightness, simply press the button, and the next choice
will appear. The changes will be saved once you exit the settings menu.

PRONTO-HIGH-POWER series user manual - revision 1.8 18
2.3.5. Adjusting the correction factor
It is possible to adjust the calibration of the device. You can do so by applying a correction factor to the
measurements. To access the correction factor menu, simply press the CAL button . The number
displayed is the multiplication factor that will be applied to the measurements. A factor of 1.000 keeps the
calibration unchanged. You can enter any number between 0.500 and 2.500.
The four digits of the correction factor are changed individually. For example, if the correction factor
is 1.000 and you want to change it to 1.200, just press the first 0 (make sure it turns blue, like this )
and then increment it twice with the up button.
Initial setting
Select the digit
Change the digit
using the up button
The last measured value
(145.3 W) is displayed between
the up/down buttons.
The selected digit turns blue.
The adjusted power value
(174.4 W) is displayed between
the up/down buttons.
Once the value is entered, press the on/off/settings button to exit the menu and automatically save your
new settings.
2.3.6. Getting information about the device
Relevant information about the device is stored in the about menu . This information can be useful
when returning the device for repairs or recalibration. These include the model name, the serial number, the
firmware version and the last calibration date.
Figure 2. The about menu shows information about the device
Press the on/off/settings button to exit the menu and go back to the measurement screen.

PRONTO-HIGH-POWER series user manual - revision 1.8 19
2.4. CHANGING THE WAVELENGTH
Before making a measurement, it is important that you adjust the calibration of the device to the wavelength
of the source to be measured. To do so, press the wavelength button to display a list of presets.
Figure 3. The six wavelength buttons can be customized by the user
There are six presets in the wavelength menu. The values can be set to any wavelength between 193 nm
and 10.6 μm. To change a value, press it until the screen changes to the set wavelength menu. Each digit is
changed individually by selecting it and pressing the up/down arrows. For example, if you want to
change 10.6 μm to 532 nm, you need to do the following:
1. Select the units. Make sure they turn blue and use the up or down button to
change them to nm.
2. Select the first number. Make sure it turns blue and use the down button to
reduce it to 0.
3. Select the second number. Make sure it turns blue and use the up button to
increase it to 5.
4. Select the third number. Make sure it turns blue and use the down button to
reduce it to 3.
5. Select the fourth number. Make sure it turns blue and use the down button
to reduce it to 2.
6. You're done!
Once the desired value is entered, press the on/off/settings button to exit the menu and automatically save
your new settings.
10.60 μm
1060 nm
0060 nm
0560 nm
0530 nm
0532 nm

PRONTO-HIGH-POWER series user manual - revision 1.8 20
2.5. MAKING A MEASUREMENT (SSP MODE ONLY)
Once all the settings are adjusted, you are ready to make a measurement. Just follow the step-by-step
instructions below.
Tip
We recommend placing the device on an optical stand or on a horizontal surface
when making a measurement.
Be careful to conform to all the recommended specifications for beam size,
placement and laser power.
1. Turn the device on.
2. Press the PLAY button, a sequence of dots will appear. This indicates that the device is waiting for a laser
beam to trigger the measurement.
Note: At any time during the measurement sequence, you can press the stop button. The device will stop
the measurement process and go back to its initial state (displaying the last measured value).
3. Place the device in the laser beam path, with the laser beam centered on the absorber.
4. As soon as the device detects a laser beam, it will automatically start the 5-second countdown for the
measurement. Leave the device in the beam path for the entire countdown period, which will be indicated on the
screen.
5. Once the countdown is finished, the measurement will appear. You can remove the device from the beam path.
6. The reading will stay on the display until the next measurement, even if you turn the device off and on again.
7. To make a new measurement, go back to step 2.
This manual suits for next models
5
Table of contents
Other Gentec-EO Measuring Instrument manuals

Gentec-EO
Gentec-EO MIRO ALTITUDE User manual

Gentec-EO
Gentec-EO PRONTO-Si User manual

Gentec-EO
Gentec-EO PRONTO-50 Series User manual

Gentec-EO
Gentec-EO Original Series User manual

Gentec-EO
Gentec-EO PRONTO-50 Series User manual

Gentec-EO
Gentec-EO PRONTO-250-PLUS User manual

Gentec-EO
Gentec-EO TUNER User manual

Gentec-EO
Gentec-EO SDX-1239 User manual

Gentec-EO
Gentec-EO PRONTO-250 User manual

Gentec-EO
Gentec-EO INTEGRA Series User manual