Gentec-EO SDX-1239 User manual

SDX-1239 Operating Instructions
Rev - 3/21/2017 Page 1 of 22
SDX-1239 Energy Meter
Operating Instructions

SDX-1239 Operating Instructions
Rev - 3/21/2017 Page 2 of 22
Contents
Introduction ....................................................................................................................... 3
Installing the USB Driver ................................................................................................. 4
Power Source ..................................................................................................................... 7
Probe Connection .............................................................................................................. 7
Indicator LED’s ................................................................................................................ 8
USB ..................................................................................................................................... 8
AOM Voltage ..................................................................................................................... 8
Energy Voltage .................................................................................................................. 8
ARM Control ..................................................................................................................... 8
Turning the Unit On ......................................................................................................... 9
Power on Tests................................................................................................................... 9
SDX-1239 Function ........................................................................................................... 9
SDX-1239 Pulse Width Correction................................................................................ 11
SDX-1239 AOM Control in Control Mode ................................................................... 11
SDX-1239 Commands ..................................................................................................... 12
Reading SDX-1239 Data ................................................................................................. 18
Reading SDX-1239 Pulse Memory ................................................................................ 20

SDX-1239 Operating Instructions
Rev - 3/21/2017 Page 3 of 22
Introduction
Figure 1 shows the SDX-1239 front panel. Figure 2 shows the SDX-1239 back panel.
Figure 1, SDX-1239 Front Panel
Figure 2, SDX-1239 Back Panel

SDX-1239 Operating Instructions
Rev - 3/21/2017 Page 4 of 22
Installing the USB Driver
Do not plug the SDX-1239 into your PC yet.
The USB Drivers for the SDX-1239 are the same as are used for the Mach 6 Joulemeter.
The can be downloaded from the Gentec-eo website.
https://www.gentec-eo.com/downloads
These drivers are not certified by Microsoft. The will need to be installed with driver
signing enforcement turned off.
How to Disable Driver Signature Verification on 64-Bit Windows 8.1 or 10
To disable driver signature verification, we’re going to need to get into the
Troubleshooting options from the boot manager. Simply select Restart from the
power options menu (on Windows 8 that’s under Charms or on the login screen, and
in Windows 10 it’s on the Start Menu).
Hold down the SHIFT key while you click Restart.
(Again, you can use this trick on any of the power menus in Windows 8 or 10,
whether on the login screen, Charms bar, Start Menu, or Start Screen)
Once your computer has rebooted you will be able to choose the Troubleshoot
option.

SDX-1239 Operating Instructions
Rev - 3/21/2017 Page 5 of 22
Then select Advanced options.
Then Startup Settings.

SDX-1239 Operating Instructions
Rev - 3/21/2017 Page 6 of 22
Since we are modifying boot time configuration settings, you will need to restart
your Computer one last time.
Finally, you will be given a list of startup settings that you can change. The one we
are looking for is “Disable driver signature enforcement”. To choose the setting, you
will need to press the F7 key.

SDX-1239 Operating Instructions
Rev - 3/21/2017 Page 7 of 22
Your PC will then reboot and you will be able to install unsigned drivers without any
error message
Power Source
The SDX-1239 system is supplied with a 10V, 1.5A universal power module. It will
accept voltages from +9V to +15V provided they supply at least 1A and the plug is
5.5mm outer diameter, 2.1 mm inner diameter, and 11mm in length, with the center being
positive. Plug the supply into the DC power jack located on the front panel.
Probe Connection
The SDX-1239 probes use a 7-pin locking connector. Plug in the probe by lining up the
red reference dots and pushing the connector until it latches into its locked position. To
remove the probe, power down the unit and pull on the outer sleeve. The connector will
unlock and disengage.

SDX-1239 Operating Instructions
Rev - 3/21/2017 Page 8 of 22
Indicator LED’s
There are 4 LED’s on the SDX-1239 front panel as shown in figure 1.
The Power LED is illuminated whenever an external supply is plugged into the DC
power jack.
The Trigger LED illuminated when the SDX-1239 is triggered. This LED functions at all
times, whether the SDX-1239 is armed or not.
The Armed LED illuminated when the unit has been armed for data collection. Note that
the unit can be armed even if no triggers are present.
The Out of Range LED illuminates when the internal ADC detects a voltage outside of its
measurement range. This LED is only updated when the unit is armed and triggered.
USB
The SDX-1239 communicates with the host PC via a USB port. The device supports full
speed USB 2.0. The host P.C must have the Mach 6 USB drivers installed. These drivers
are on Gentec-eo website. The USB cable can be unplugged from the SDX-1239 during
operation at any time, but the applications software will not function in this state other
than to wait for a SDX-1239 to be connected to the USB.
AOM Voltage
The AOM Voltage Output provides a buffered signal from the SDX-1239. The range is
0V to 1V. In Measure and Monitor Mode, this voltage is set via USB commands. In
Control mode, this voltage is set by the SDX-1239 to minimize the error between the
target energy and the measured mean energy.
Energy Voltage
The Energy voltage is set by reading the valve of the voltage on the BNC. The input
range is 0V to 10V. 0V represents 0% of the set scale, and 10V represents 100% of the
set scale.
ARM Control
SDX-1239 will arm for measurements when this signal is set to 3V (TTL compatible) or
higher. The ARM Control signal is tested at the AOM update rate. This will be 10Hz to
10kHz

SDX-1239 Operating Instructions
Rev - 3/21/2017 Page 9 of 22
Turning the Unit On
Before turning the SDX-1239 on, be sure that the probe in use is plugged in. When the
SDX-1239 powers up, it reads the probe memory to obtain required information for
correct operation. SDX-1239 cannot detect a probe removal, so hot swapping the probe is
not permitted. Doing so will not cause damage, but the probe information will not be
updated. Once the probe and power supply are connected, turn the unit on by setting the
Power Switch to ON. The Power LED will illuminate. The remaining LEDS will turn on
briefly as the SDX-1239 performs internal self-tests, then they will turn off. The SDX-
1239 is now ready to use.
Power on Tests
When powered on, the SDX-1239 tests its internal memory and its control circuitry to
ensure it can accurately measure data. If the internal memory fails its test, the SDX-1239
will flash the Over Temp LED. If the control circuitry fails its test, the SDX-1239 will
flash the Over Temp LED. Should either of these conditions occur, contact GENTEC-EO
for service of the unit.
SDX-1239 Function
The SDX-1239 is a control system to monitor the energy of the laser. The block diagram
of the system is shown in figure 3.
Figure 3, SDX-1239 Control System

SDX-1239 Operating Instructions
Rev - 3/21/2017 Page 10 of 22
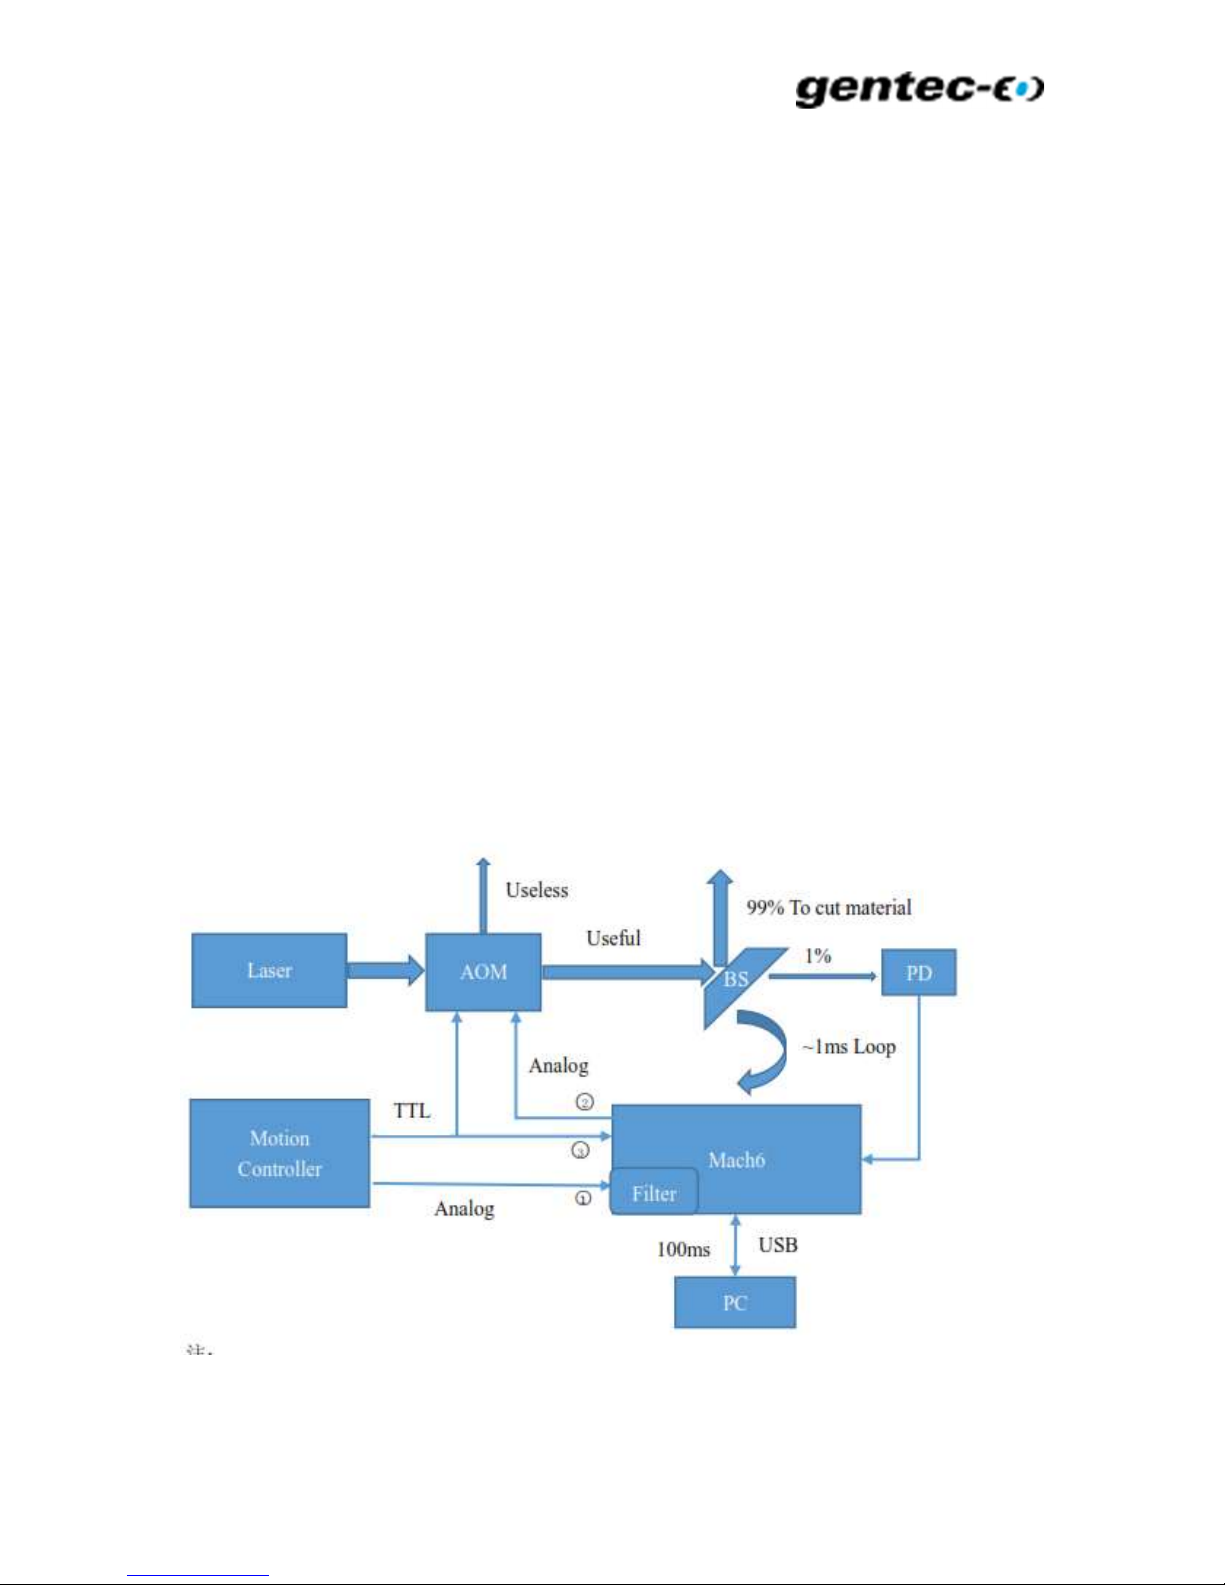
The SDX-1239 supports 3 modes of operation:
1. Measure Mode.
a. This is the same as Live Mode used on Mach 6. ARM BNC3 will control the SDX-
1239.
b. The AOM control voltage on BNC2 will be set with USB commands from the PC
software.
c. Every 100ms the SDX-1239 will send the most recent energy measure to the USB
2. Monitor Mode.
a. The AOM control voltage on BNC2 will be set with USB commands from the PC
software.
b. The target energy will be read from BNC1.
c. The tolerance of the measurement will be set using the USB commands from the PC
Software.
d. The SDX-1239 will stabilize at the requested target energy and tolerance within 1
second.
e. BNC3 will control the SDX-1239. If it is high, measurement will continue. If it is low,
measurement will stop
f. When measurement is stopped by the signal on BNC3, the last AOM control voltage
on BNC2 will be held unchanged.
g. The SDX-1239 will measure for a minimum of 2 hours at pulse repetition rates up to
90kHz.
h. Every 100ms, the SDX-1239 will send statistics as defined in the spec to the PC
software, and the statistics will restart a new batch.
3. Control Mode.
a. The AOM control voltage on BNC2 will be set by the SDX-1239 based on the error of
the measured mean energy and the target energy.
b. The target energy will be read from BNC1.
c. The tolerance of the measurement will be set using the USB command from the PC
Software.
d. BNC 3 will control the SDX-1239. If it is high, measurement will continue. If it is low,
measurement will stop
e. When measurement is stopped by the signal on BNC3, the last AOM control voltage
on BNC2 will be held unchanged.
f. The AOM Control voltage will be updated at a rate between 0Hz and 10kHz.
g. The AOM control voltage update rate will be set with the USB command from the PC
Software.
h. Every 100ms, the SDX-1139 will send statistics as defined in the spec to the PC
software, and the statistics will restart a new batch.

SDX-1239 Operating Instructions
Rev - 3/21/2017 Page 11 of 22
SDX-1239 Pulse Width Correction
The SDX-1239 must measure pulse with widths varying from 95ns to 180ns, at rep rates
from 40kHz to 90kHz. This will introduce measurement nonlinearity due to integration
error in the head. The SDX-1236 is calibrated with a pulse width of 10ns. To make sure
the measured energy is accurate at these long pulse widths, the SDX-1239 will correct the
measurements. It will measure the period counter between pulses and apply a 2nd order
polynomial correction. This correction is the best fit to the measurement variation.
The correction equation is:
A*(period counts)^2 + B * period counts + C
The values of A, B, and C can be set with the PLY command. To disable corrections,
send 0 for A and B, and 1.00 for C.
It is recommended that the values be left at the defaults ones. Note than when the SDX-
1239 powers on it will always reset to the default values.
SDX-1239 AOM Control in Control Mode
If the SDX-1239 is in control mode, it must adjust the AOM voltage so that the mean
error stays as close to 0 % as possible. Changing the AOM Voltage to a new voltage will
let more or less radiation through the AOM.
The SDX-1239 uses a simple proportional control. Max AOM Voltage is 1V, which
allows 100% transmission of light. Min AOM Voltage is 0V, which allows 0%
transmission of light, but the transfer curve is not linear.
Positive mean error means energy is lower than target, need to increase energy, so the
SDX-1239 will turn UP the AOM Voltage.
Negative mean error means energy is higher than target, need to decrease energy, so the
SDX-1239 will turn DOWN the AOM Voltage
The SDX-1239 uses a PID controller with P gain only. The value of proportional gain is
set with the POR command. Higher gains will converge faster, but may overshoot. Lower
gains will not overshoot, but will converge more slowly. The method is shown below.
adjustment value = proportional gain * mean error;
adjusted value = aom voltage + adjustment value;

SDX-1239 Operating Instructions
Rev - 3/21/2017 Page 12 of 22
if ((adjusted value >= 0.000) AND (adjusted value <= 1.000))
{
aom voltage = adjusted value;
}
The default value is 5mV/% Error. The SDX-1239 always powers on with the default
value.
SDX-1239 Commands
All commands and replies are followed by a carriage return (0x0D) and a line feed
(0x0A). If a command is used with no arguments, it will become a query. All commands
(with noted exceptions) reply with:
Ok if the command executed correctly.
Err if the command could not be executed.
All Queries reply with the item that was queried or Err if the query could not be executed.
With the exceptions noted below, the host software should wait for an instrument reply
before executing a subsequent command or query.
Commands/queries are case insensitive.
VER Queries the Firmware Version. Arguments used are 0 for the
Blackfin version, 1 for the MSP version.
Example.
Send: verCRLF
Reply: 1.00.00CRLF
IDN Queries the instrument identification.
Example.
Send: idnCRLF
Reply: SDX-1239 InstrumentCRLF
TST Tests the internal pulse memory.
Example.
Send: tstCRLF
Reply: SDRAM PASSED ACCESS TESTS CRLF
Or SDRAM FAILED ACCESS TESTS CRLF
Note that the instrument runs this test automatically on power up and
will not function if it fails.

SDX-1239 Operating Instructions
Rev - 3/21/2017 Page 13 of 22
DMP Reads the pulse memory v content to the USB. Arguments used are
Offset and number of pulses to read.
Example.
Send: dmp,5000,20000CRLF
Reply: 20,000 pulse data starting at offset pulse 5000. The first 500
pulses in memory will not be sent. If there are not 25000 pulses in
memory, then the amount then are saved will be sent instead.
The pulse memory is capable of storing up to 4,194,303 pulses. This
is a large volume of data and it can be time consuming to retrieve all
of it at once. The pulse offset and number of pulses to make this
manageable. As an example, suppose there are 2 million pulses in the
memory. The user can ask for this data in batches of 500,000 pulses
at a time in 4 batches:
Read 1, pulse offset = 1, number of pulses to retrieve = 500,000
Read 2, pulse offset = 500,001, number of pulses to retrieve =
500,000
Read 3, pulse offset = 1,000,001, number of pulses to retrieve =
500,000
Read 4, pulse offset = 1,500,001, number of pulses to retrieve =
500,000
CLR Erases the internal pulse memory.
Example.
Send: clrCRLF
Reply: OK
CNT Queries the number of pulses stored in the SDRAM
Example.
Send: cntCRLF
Reply: The number of pulses stored.
This command is used in conjunction with the arm, clr, and dmp
commands to manage pulse memory.
RNG Sets or Queries the instrument range
Example.
Send rng7CRLF sets the range to index 7, the 20µJ range. See table
below for ranges versus indices

SDX-1239 Operating Instructions
Rev - 3/21/2017 Page 14 of 22
rngCRLF queries the current range.
Example
rngCRLF Reply 7CRLF
TRG Sets or queries the trigger level for internal trigger
Example.
Send trg10CRLF sets the range to level to 10% of the set range.
trgCRLF queries the current level.
Example
trgCRLF
Reply 10CRLF
HLD Set the trigger hold off in µs. This is the hold off in microseconds for
the trigger event. After a trigger event the instrument will not trigger
again until the hold off expires. This is useful for bursts of pulses at a
given rep rate. Supposed there are bursts of 5 pulses occurring every
10us and the bursts themselves occur every 200us. Setting to hold off
to 50us will cause only the first pulse in the 5-pulse burst to be
measured.
Setting the trigger hold off to zero disables trigger hold off.
Example.
Send: hld233CRLF
Reply: OKCRLF
Send: hldCRLF
Reply: 233CRLF
MAX Query only. Returns the maximum range index for the head in use.
Example
Send maxCRLF
Reply 17CRLF
MIN Query only. Returns the minimum range index for the head in use.
Example
Send minCRLF
Reply 12CRLF
MRD Query only. Returns the maximum reading for the head in use.

SDX-1239 Operating Instructions
Rev - 3/21/2017 Page 15 of 22
Example
Send mrdCRLF
Reply 216.7E-6CRLF, The maximum reading is 216.7uJ.
WAV Sets the currently used wavelength. Argument is the wavelength to
use in nm.
Example.
Send: wav633CRLF
Reply: min range, max range, current rangeCRLF
Send: wavCRLF
Reply: 633CRLF
Since the sensor responsivity varies with wavelength, turning
Wavelength Compensation on with the wavelength set to any value
other than the calibration wavelength may cause a rescale of the
available ranges. If this occurs, the instrument will set itself to the
same currently set range if it is still available. If it is not, the
instrument will set itself to the next available range. In either case, it
will return the current set of ranges in use as well as the range in use.
WCM Sets the wavelength compensation on/off. Argument is 0 for off, 1 for
on
Example.
Send: wcm1CRLF
Reply: min range, max range, current rangeCRLF
Send: wcmCRLF
Reply: 1CRLF
Since the sensor responsivity varies with wavelength, turning
Wavelength Compensation on with the wavelength set to any value
other than the calibration wavelength may cause a rescale of the
available ranges. If this occurs, the instrument will set itself to the
same currently set range if it is still available. If it is not, the
instrument will set itself to the next available range. In either case, it
will return the current set of ranges in use as well as the range in use.
TRQ Requests trigger state. Query only, returns 1 if the instrument is
triggered, 0 if it is not.
Example.
Send: trqCRLF
Reply: 1CRLF

SDX-1239 Operating Instructions
Rev - 3/21/2017 Page 16 of 22
FAC Requests wavelength correction factor. Query only, returns the
correction being applied by Mach 5/6 for the user selected
wavelength. 1.00 if the wavelength is the calibration wavelength or of
wavelength correction is off.
Example.
Send: facCRLF
Reply: 1.000CRLF
RST Reset the secondary processor to force a probe eeprom read. Returns
the MSP firmware version after the rest is complete.
Example.
Send: rstCRLF
Reply: 1.00.00CRLF
SMD Sets the mode of operation.
0 is Measure mode
1 is Monitor Mode
2 is Control Mode
Example.
Send SMD2CRLF
Reply: OK
Send SMD
Reply 2CRLF
The SMD command side effects the AOM update rate. Setting the
Mode to Measure will set the AOM update rate to 10Hz. Setting it to
Monitor or Control will set it to 1kHz.The Update rate can then be set
to any desired value with the UPD command
AOM Sets the AOM control voltage in Measure and Monitor Modes.
Example.
Send AOM0.55CRLF
Reply: OK
Send AOM
Reply 0.55CRLF
UPD Sets the AOM control voltage update rate in Hz. The range is 10Hz to
10kHz.

SDX-1239 Operating Instructions
Rev - 3/21/2017 Page 17 of 22
Example.
Send UPD25.5CRLF
Reply: OK
Send UPD
Reply 25.5CRLF
TOL Sets the Target Energy Tolerance in %. The range is 0% to 100%.
Example.
Send TOL1.5CRLF
Reply: OK
Send TOL
Reply 1.5CRLF
TAR Sets the Target Energy Voltage in Measure and Monitor Modes Only.
The range is 0Vto 10V.
In Control Mode, this value is read from the BNC.
Example.
Send TAR5.00CRLF
Reply: OK
Send TAR
Reply 5.00CRLF
PRO Sets the AOM Convergence Gain Voltage in Control Mode Only.
The range is 0mV/% Error to 100mV/% Error.
This is the proportional gain coefficient for the AOM control. The
SDX-1239 measures the Mean Energy Error % and uses this gain to
compute the new AOM Voltage based on the error. Setting the gain
to 0 will disable AOM corrections. Set this value to change the speed
of the error correction. The default value is 5mV/% error
Example.
Send PRO1.00CRLF
Reply: OK
Send PRO
Reply 1.00CRLF
PLY Sets the Pulse Width correction coefficients. There is no query for
these values.

SDX-1239 Operating Instructions
Rev - 3/21/2017 Page 18 of 22
Example.
Send PLY8.20337E-9, -4.99267e-5, 1.09595CRLF
Reply: OK
PRV Read the sensor responsivity in V/J. Query only.
Example.
Send: prvCRLF
Reply: 12345.00CRLF
Reading SDX-1239 Data
In Measure Mode, the SDX-1239 Sends data at 100ms intervals. The data is sent in
the format:
Pulse Data, Pulse Period CRLF
Pulse Data
FRDDD
F is the error code.
R is the range index.
DDD are the pulse data counts with 3072 being full scale.
Period Data
PPPPPPPP
PPPPPPPP is the value of the Period Counter. To convert it into the period, divide it by
135E6.

SDX-1239 Operating Instructions
Rev - 3/21/2017 Page 19 of 22
Example.
Pulse Data = 0x08269
The error flag is 0x0, or no errors. Errors are:
Error Value Error
0 No error
1 One or more pulses out of range. Increase the range setting
2 One of more pulses measured with the head over temperature. Reduce
the average power
3 Error 1 and 2 set.
4 Pulse memory is full. Clear the pulse memory.
5 Error 1 and 4 are set.
6 Error 2 and 4 are set.
7 Error 1, 2, and 4 are set.
The range index is 0x8, or a range of 3 200µJ.
The pulse data is 0x269, or 617 counts. The energy will be 617 / 3072 x 200µJ = 40.17µJ
The period is 0x000009F3, or 2547 counts. 39417 / 135E6 = 18.868us, or 53,000 Hz
In Monitor and Control Mode, the SDX-1239 Sends data at 100ms intervals. The
data is sent in ASCII format:
mean error % , max error %, min error %, standard deviation CRLF
Computed as:
The statistical data is computed at the update rate sent with the UPD command. With an
update rate of 1kHz, a new batch will be calculated every 1ms. The newest batch is sent
at the 100ms interval.

SDX-1239 Operating Instructions
Rev - 3/21/2017 Page 20 of 22
Reading SDX-1239 Pulse Memory
Data Format used by SDX-1239. Data is sent in hexadecimal strings
FRDDDPPPPPPPPEECRLF
F is the error code.
R is the range index.
DDD are the pulse data counts with 3072 being full scale.
PPPPPPPP are the pulse period data.
EE is the pulse period exponent + 128.
Example.
Data = 0x082694BB03D4F72
The error flag is 0x0, or no errors. Errors are:
Error Value Error
0 No error
1 One or more pulses out of range. Increase the range setting
2 One of more pulses measured with the head over temperature. Reduce
the average power
3 Error 1 and 2 set.
4 Pulse memory is full. Clear the pulse memory.
5 Error 1 and 4 are set.
6 Error 2 and 4 are set.
7 Error 1, 2, and 4 are set.
The range index is 0x8, or a range of 3 200µJ.
The pulse data is 0x269, 0r 617 counts. The energy will be 617 / 3072 x 200µJ = 40.17µJ
The period is 0x4BB03D4F, or 39417 counts. 1,269,841,231
The exponent is 0x72, or 114. 114 – 128 = -14.
The time stamp for this pulse is 1,269,841,231 x 10-14 = 12.698µs.
The pulse frequency can be found by measuring the timestamps between adjacent pulses.
Table of contents
Other Gentec-EO Measuring Instrument manuals

Gentec-EO
Gentec-EO PRONTO-50 Series User manual

Gentec-EO
Gentec-EO TPM-300-CE User manual

Gentec-EO
Gentec-EO TUNER User manual

Gentec-EO
Gentec-EO PRONTO-250 User manual

Gentec-EO
Gentec-EO Original Series User manual

Gentec-EO
Gentec-EO Pronto Series User manual

Gentec-EO
Gentec-EO INTEGRA Series User manual

Gentec-EO
Gentec-EO MIRO ALTITUDE User manual

Gentec-EO
Gentec-EO PRONTO-250-PLUS User manual

Gentec-EO
Gentec-EO PRONTO-50 Series User manual