GENWEC GW03 24 04 01 User manual

Español
®
Manual de instrucciones
Instruction manual
DISPENSADOR DE PAPEL DE TOALLA INOX AUTOMÁTICO
PAPER TOWEL STAINLESS STEEL DISPENSER, AUTOMATIC
Ref.: GW03 24 04 01
GW03 24 04 01.indd 1GW03 24 04 01.indd 1 21/12/20 12:3921/12/20 12:39

GW03 24 04 01.indd 2GW03 24 04 01.indd 2 21/12/20 12:3921/12/20 12:39

Español
CARACTERÍSTICAS
COMPONENTES
MONTAJE
•Con una carcasa de acero inoxidable es robusto, estable y fácil de limpiar.
•Con un sensor infrarrojo permite dispensar el papel automáticamente.
•El no utilizar las manos evita la contaminación cruzada.
•1 segundo entre cada dispensación, evitando gastar papel extra.
•Longitud ajustable con 200mm, 250mm, y 300mm.
•Acepta papel con anchos entre 195-200mm y diámetro de 200mm.
•Recargar el nuevo rollo automáticamente cuando se acaba el viejo. Esto evita gastar un rollo sin ser
nalizado y que falte papel.
Abra la tapa frontal con la llave, taladre 4 agujeros de 6 mm. de diámetro como se muestra en la Figura 2
y je el dispensador a la pared con la tornillería y tacos incluidos.
Nota: No instale el dosicador en un sitio que tenga luz directa o encima de algún elemento que haga
reejo.
Gracias por adquirir este dispensador automático de papel. Hecho de acero inoxidable 304 con
acabado satinado, manejado por una placa inteligente y sensor infrarrojos.
Es robusto, sensitivo y ahorra energía. Es una elección idónea para sitios públicos.
1. Base
2. Parte superior soporte papel
3. Parte inferior soporte papel
4. Tapa de baterías
5. Barra de transferencia
6. Rueda de goma
7. Rueda pequeña
8. Sensor
9. Interruptor
10. Carcasa
11. Cierre
1
3
4
5
6
7 8 9
10
11
2
Figura 2
165 mm
Tornillo
Suelo
Altura de
referencia
Taco
190 mm1300 mm
GW03 24 04 01.indd 3GW03 24 04 01.indd 3 21/12/20 12:3921/12/20 12:39

Español
INSTALACIÓN DE PILAS
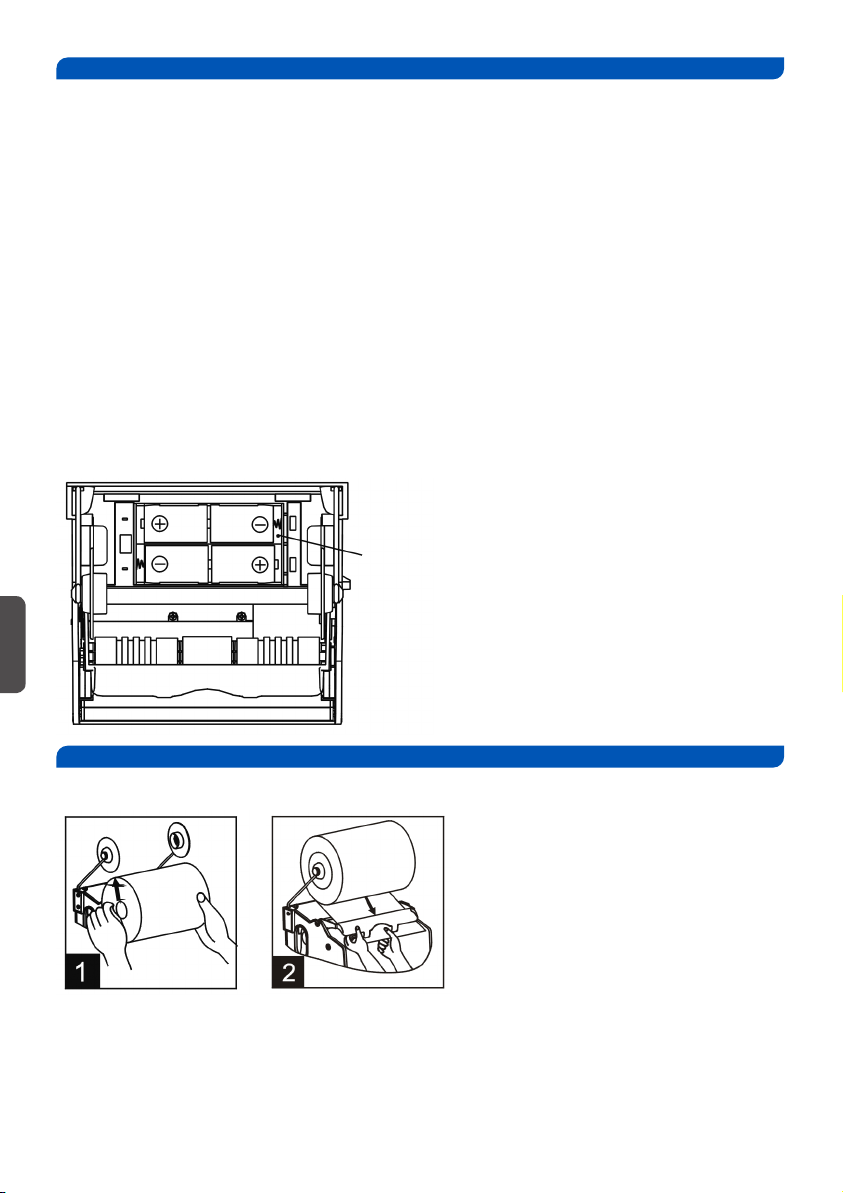
INSTALACIÓN DEL ROLLO DE PAPEL
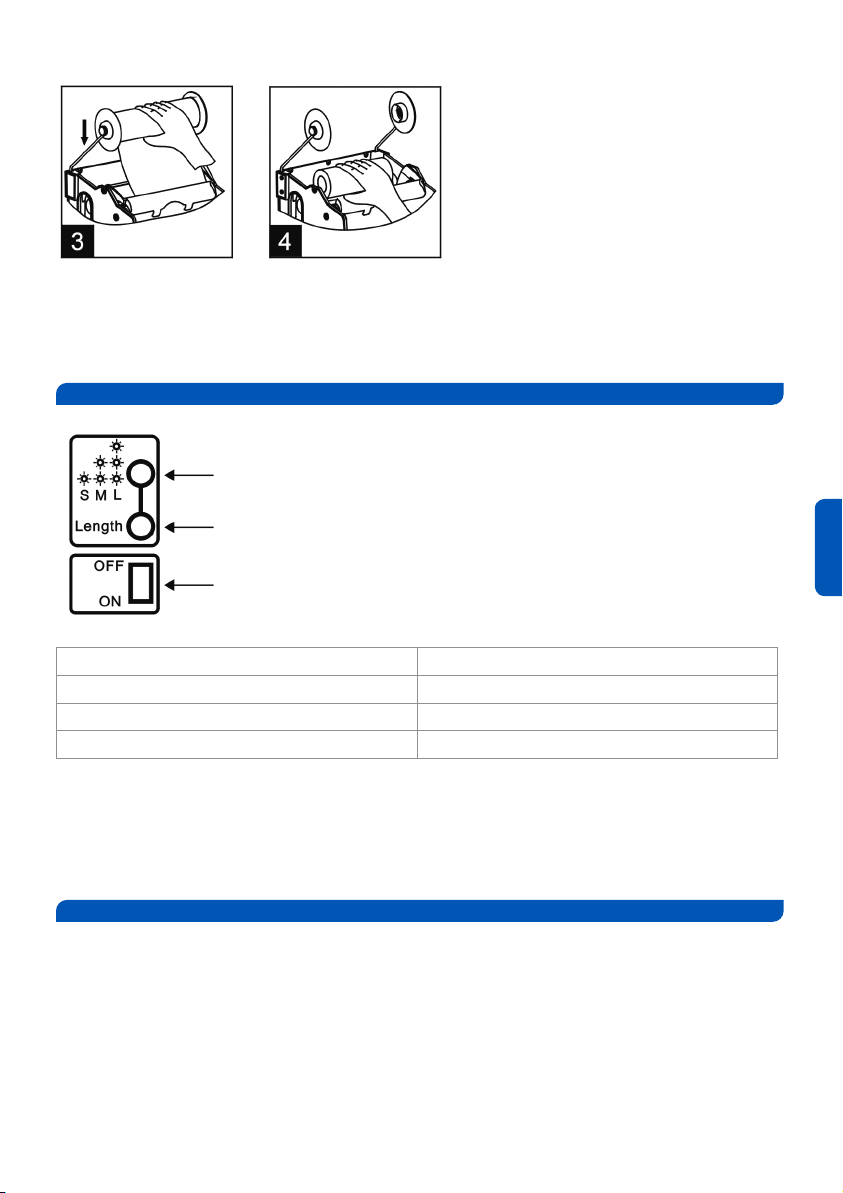
Siga el paso 1 y 2 para instalar el rollo de papel.
1. Tire ligeramente de las ruedas del soporte de papel de ambos lados y coloque un nuevo rollo de
papel toalla.
2. Una mano levanta la barra de transferencia, la otra tira el papel entre la barra de transferencia y la
rueda de goma (la distancia desde el margen del papel a la rueda de goma es de aproximadamente 30
mm), baje la barra de transferencia y cierre la tapa.
1. Abra la tapa del compartimento de baterías, y ponga 4 x LR20 pilas siguiendo los símbolos “+” “-”,
y vuelva a poner la tapa del compartimento.
2. Si hay un rollo de papel en el dispensador, este debe quitarse antes de instalar las pilas.
Alimentación DC (no incluido)
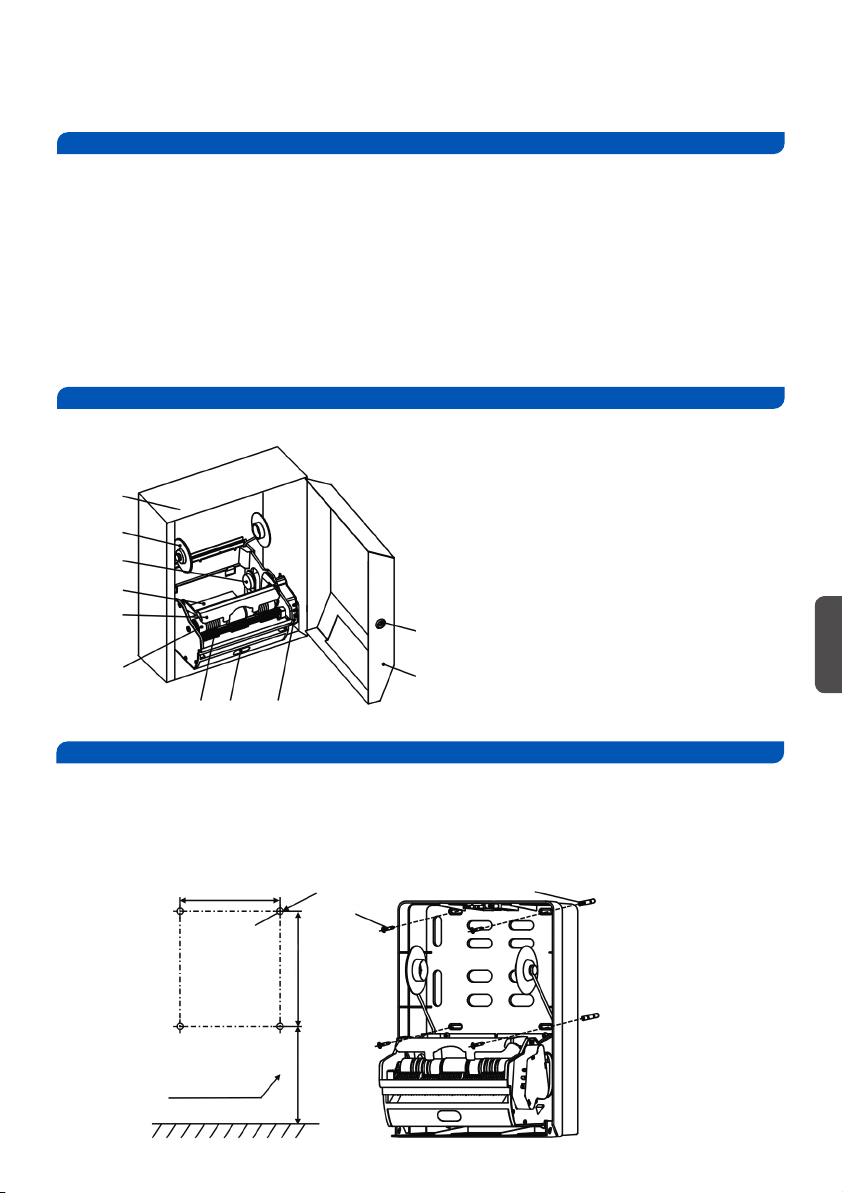
El dispensador tiene un sistema que selecciona automáticamente la forma de alimentación.
Si el transformador DC está enchufado, las baterías no funcionan. Si el transformador deja de funcionar,
las pilas automáticamente empezarían a funcionar.
Revise que el transformador DC está correctamente conectado (ver Figura3)
Notas:
1. El dispensador no funcionará si se instalan las pilas incorrectamente.
2. Para evitar una rotura del dispensador, no mezcle diferentes tipos de pilas.
3. Cuando el dispensador está en batería baja, la luz del indicador parpadeará 1 vez por segundo.
El dispensador puede seguir funcionando, pero debe reemplazar las pilas. Cuando parpadee 2 veces por
segundo dejará de funcionar, debiendo reemplazar las pilas.
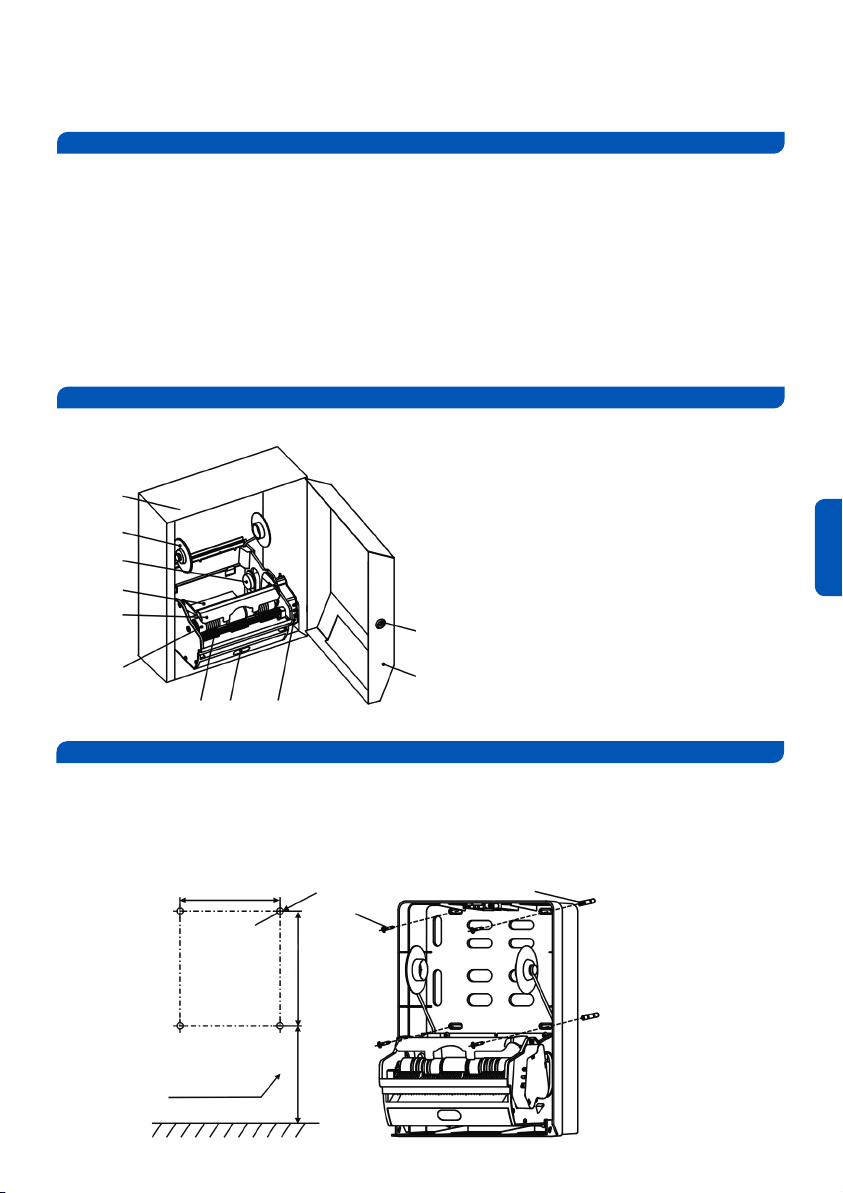
Tapa de la batería
Figura 3
GW03 24 04 01.indd 4GW03 24 04 01.indd 4 21/12/20 12:3921/12/20 12:39

Español
USO
REGULACIÓN DE LONGITUD
Encienda la alimentación, use el botón “Regulación
de longitud” para ajustar, hay 3 tipos de longitud
que se pueden elegir. Cada vez que presiona el
botón, muestra una longitud diferente de diferentes
maneras. Como sigue:
1. Después de terminar la instalación, encienda la unidad y el dispensador automático funcionará.
2. El dispensador dispensará automáticamente cuando las manos se coloquen 8 ± 1 cm más cerca
del sensor. Al retirar las manos, el dosicador dejará de funcionar. Hay un intervalo de 1 segundo
después de una dispensación.
3. Tire la toalla de papel de izquierda a derecha según el símbolo de la carcasa.
Cuando el diámetro del rollo sea <10 mm, siga los pasos 3 y 4 para cambiar un rollo nuevo
3. Retire el rollo restante de las ruedas del soporte del papel.
4. Tire del rollo restante entre los soportes del rollo. Luego, siga los pasos 1 y 2 para instalar un nuevo
rollo de toalla de papel.
Indicador
Regulación de longitud
Interruptor
Longitud de dispensación Estado del indicador
200 mm (7 7/8 “) - S Parpadea una vez
250 mm (9 7/8 “) - M Parpadea dos veces de forma continua
300 mm (11 7/8 “) - L Parpadea tres veces de forma continua
Notas:
1. El indicador sigue encendido cuando el sensor ha sido cubierto por papel o cosas no transparentes.
Esto debería eliminarse.
2. Cuando la energía de las baterías está en diferentes condiciones, la longitud de la toalla de papel
dispensada será un poco diferente.
GW03 24 04 01.indd 5GW03 24 04 01.indd 5 21/12/20 12:3921/12/20 12:39

Español
MAL FUNCIONAMIENTO
ESPECIFICACIÓN
PAQUETE
Si el dispensador no funciona normalmente, verique:
1. Si las baterías están instaladas correctamente y si tienen suciente carga.
2. Si hay algo bloqueando la salida del papel.después de una dispensación.
3. Si el rollo gira libremente.
Si el dispensador aún no funciona después de vericar las 3 situaciones anteriores, comuníquese con
nuestra compañía o los distribuidores, o busque un electricista calicado.
•Transformador DC: Entrada AC110-120V / 220-240V Salida DC 6V> 3VA
• Batería: DC 4 x 1,5 V R20S
• Distancia de detección: 8 ± 1 cm
• Longitud de entrega del papel: 200 mm, 250 mm, 300 mm (7 7/8 “, 9 7/8”, 11 7/8 “)
• Dimensión de la toalla en rollo aceptada: ancho <195 mm-200 mm (7 5/8 “-7 7/8”),
diámetro 200 mm (7 7/8 “).
•Un dispensador.
•Una copia del manual de usuario.
• Un paquete de 4 tacos de ø 6 mm, 4 tornillos de 4 x 25, 2 llaves.
GW03 24 04 01.indd 6GW03 24 04 01.indd 6 21/12/20 12:3921/12/20 12:39

English
FEATURES
COMPONENTS
INSTALLATION
•With stainless steel cover, it is durable, steady, and easy to clean.
• With infrared sensor, dispense paper towel automatically.
•Without hand touch it prevents cross infection.
•1 second between every dispense, avoiding wasting the paper towel.
•Adjustable length dispensed with 200mm, 250mm, and 300mm.
•Accepts roll with 195-200mm wide and 200mm diameter.
• Reload a new roll automatically when nished one roll. This avoids wasting partial roll and lack of
paper towel.
Unlock the cover with the key, drill 4 hales of 6mm diameter as shown in Figure2 and x the dispenser
on the wall with plugs and screws attached.
Note: Do not install the dispenser at the place which is with direct sunlight or above the sta with strong
reection.
Thank you for purchasing this auto roll towel dispenser. Made of 304 stainless steel with brushed
nish, controlled by an intelligent PCB with infrared sensor.
It is steady, sensitive, and saves power. It is an ideal choice for public places.
1. Base
2. Top paper holder wheel
3. Bottom paper holder
4. Battery cover
5. Transfer bar
6. Rubber wheel
7. Small wheel
8. Sensor
9. Switch
10. Cover
11. Lock
1
3
4
5
6
7 8 9
10
11
2
Figure 2
165 mm
Screw
Ground
Reference
height
Plug
190 mm1300 mm
GW03 24 04 01.indd 7GW03 24 04 01.indd 7 21/12/20 12:3921/12/20 12:39

English
Battery cover
BATTERY INSTALLATION
LNSTALLATION OF ROLL PAPER TOWEL
Follow Step 1 and 2 to install the roll paper towel.
1. Pull the paper holder wheels from both sides slightly and pull a new roll of paper towel into it.
2. On hand lifts the transfer bar, the other one pulls the paper towel out between the transfer bar and
the rubber wheel (the distance from paper margin to rubber wheel is about 30mm), pull down the
transfer bar and close the cover.
1. Open the cover of the battery box and put 4 x LR20 batteries correctly according “+” “-”, and pull
back the cover.
2. If there is a roll of paper towel in the dispenser, remove it before install the batteries.
DC Power supply (not included)
This dispenser introduces automatic power supply switch mode.
When DC transformer works, batteries do not. While DC transformer stops working, batteries start to
work automatically.
Please make sure DC transformer is well connected with appliance receptacle (see Figure 3).
Notes:
1. The dispenser will not work if install the batteries improperly.
2. To avoid breaking the dispenser, do not mix dierent kind of batteries to use.
3. When the dispenser is low battery, the indicator will ash one time per second. The dispenser can still
work but should replace he batteries. When the indicator ashes twice per second, it will stop working,
must replace the batteries.
Figure 3
GW03 24 04 01.indd 8GW03 24 04 01.indd 8 21/12/20 12:3921/12/20 12:39

English
APPLICATION
LENGTH REGULATION
Switch on the power, use the “Length Regulation”
button to adjust, there are 3 kinds of length can be
choose. Every time press the button, shows dierent
length in dierent ways. As follows:
1. Alter nish the installation, switch on the power, and the auto paper towel dispenser will work.
2. The dispenser will dispense paper towel automatically when hands are placed 8 ± 1 cm closer to
the sensor. When remove the hands, the dispenser will stop working. There is 1 second interval alter
a dispensation.
3. Toss the paper towel from left or right according the symbol on the casing.
When the diameter of roll is <10mm, follow the step 3 and 4 to change a new roll
3. Remove the remaining roll from the paper holder wheels
4. Pull the remaining roll between the roll holders. Then follow Step 1 and 2 to install a new roll of
paper towel.
Indicator
Length regulation
Switch
Dispense length State of indicator
200 mm (7 7/8 “) - S Flash one time
250 mm (9 7/8 “) - M Flash two times continuously
300 mm (11 7/8 “) - L Flash three times continuously
Notes:
1. The indicator keeps on lighting when the sensor has been covered by paper or not transparent things.
This should be removed.
2. When the batteries power is in dierent condition, the length of paper towel dispensed will be a little
bit dierent.
GW03 24 04 01.indd 9GW03 24 04 01.indd 9 21/12/20 12:3921/12/20 12:39

English
MALFUNCTION
SPECIFICATION
PACKAGE
lf the roll towel dispenser does not work normally, please check:
1. If the batteries are installed correctly, and if the batteries have enough power.
2. If there is something blocking the paper towel outlet.
3. If the roll is turning freely.
lf the dispenser is still not working after checking the 3 situations above, please contact our com-
pany or the dealers, or nd a qualied electrician.
•DC Transformer: Input AC110-120V / 220-240V Output DC 6V > 3VA
•Battery: DC 4 x 1.5V R20S
• Sensing distance: 8 ± 1cm
• Paper delivering length: 200mm ,250mm,300mm (7 7/8” ,9 7/8”, 11 7/8”)
• Accepted roll towel dimension: width < 195mm-200mm (7 5/8”-7 7/8”), diameter 200mm (7 7/8”).
•One set of roll towel dispenser.
•One copy of user manual.
• One pack of 4pcs of ø 6mm plugs, 4pcs of 4 x 25 self - thread screws, 2pcs of keys.
GW03 24 04 01.indd 10GW03 24 04 01.indd 10 21/12/20 12:3921/12/20 12:39

GW03 24 04 01.indd 11GW03 24 04 01.indd 11 21/12/20 12:3921/12/20 12:39

Av. Joan Carles I, 46-48
08908 L´Hospitalet de Llobregat - Barcelona - (SPAIN)
www.genwec.com
WA
SHROOM EQUIPMENT & COMP.
®
GW03 24 04 01.indd 12GW03 24 04 01.indd 12 21/12/20 12:3921/12/20 12:39
Table of contents
Languages:
Other GENWEC Dispenser manuals
Popular Dispenser manuals by other brands

DRESSER Wayne
DRESSER Wayne 3/V390/U Installation

Delfield
Delfield Shelleymatic FFSC-2 Specifications

BOWMAN
BOWMAN BD105-0012 Assembly instructions

KWC
KWC EXOS600EX Installation and operating instructions

Sanitame
Sanitame MKC-HSS-P-2020-WB-003 Assembly instructions

Lavo Solutions
Lavo Solutions MiniWash 100 instruction manual