Geokon 4800 Series User manual

©2021, GEOKON. All rights reserved.
Document Revision: Z | Release date: 06/23/21
Model 4800 Series
VW Earth Pressure Cells
Instruction Manual


WARRANTY STATEMENT
GEOKON warrants its products to be free of defects in materials and workmanship,
under normal use and service for a period of 13 months from date of purchase. If the
unit should malfunction, it must be returned to the factory for evaluation, freight
prepaid. Upon examination by GEOKON, if the unit is found to be defective, it will be
repaired or replaced at no charge. However, the WARRANTY IS VOID if the unit shows
evidence of having been tampered with or shows evidence of being damaged as a
result of excessive corrosion or current, heat, moisture or vibration, improper specifi-
cation, misapplication, misuse or other operating conditions outside of GEOKON's
control. Components that wear or are damaged by misuse are not warranted. This
includes fuses and batteries.
GEOKON manufactures scientific instruments whose misuse is potentially dangerous.
The instruments are intended to be installed and used only by qualified personnel.
There are no warranties except as stated herein. There are no other warranties,
expressed or implied, including but not limited to the implied warranties of merchant-
ability and of fitness for a particular purpose. GEOKON is not responsible for any
damages or losses caused to other equipment, whether direct, indirect, incidental,
special or consequential which the purchaser may experience as a result of the instal-
lation or use of the product. The buyer's sole remedy for any breach of this agreement
by GEOKON or any breach of any warranty by GEOKON shall not exceed the purchase
price paid by the purchaser to GEOKON for the unit or units, or equipment directly
affected by such breach. Under no circumstances will GEOKON reimburse the
claimant for loss incurred in removing and/or reinstalling equipment.
Every precaution for accuracy has been taken in the preparation of manuals and/or
software, however, GEOKON neither assumes responsibility for any omissions or
errors that may appear nor assumes liability for any damages or losses that result
from the use of the products in accordance with the information contained in the
manual or software.
No part of this instruction manual may be reproduced, by any means, without the written consent of GEOKON. The
information contained herein is believed to be accurate and reliable. However, GEOKON assumes no responsibility
for errors, omissions or misinterpretation. The information herein is subject to change without notification.
The GEOKON® wordmark and logo are registered trademarks with the United States Patent and Trademark Office.


I
TABLE OF CONTENTS
1. INTRODUCTION............................................................................................................................................1
1.1 THEORY OF OPERATION...............................................................................................................1
1.2 EARTH PRESSURE CELL DESIGN.........................................................................................2
1.3 EARTH PRESSURE CELL CONSTRUCTION ..................................................................3
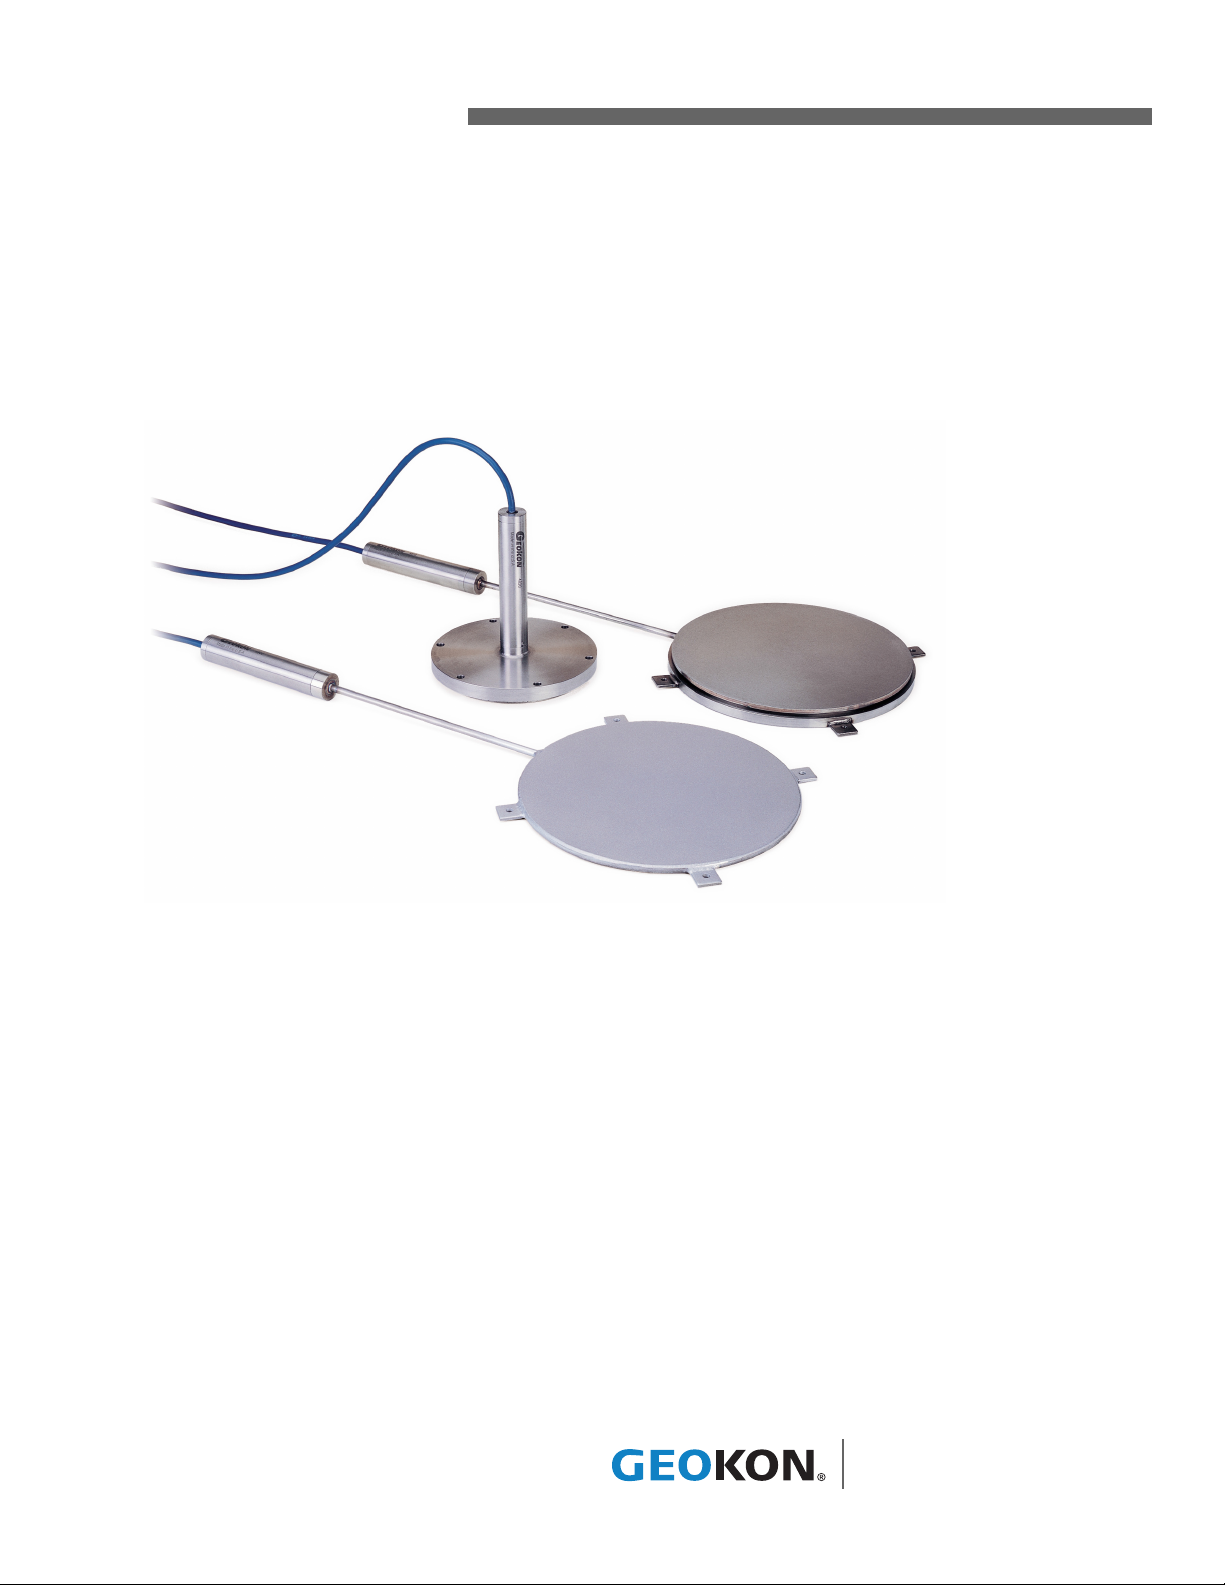
1.3.1 MODEL 4800 EARTH PRESSURE CELLS.................................................................................3
1.3.2 MODEL 4810 CONTACT ("FAT BACK") PRESSURE CELL.................................................4
1.3.3 MODEL 4815 HYDRAULIC LOAD CELL ...................................................................................4
1.3.4 MODEL 4820 EARTH PRESSURE "JACKOUT" CELL ..........................................................5
1.3.5 MODEL 4830 PUSH-IN PRESSURE CELL ................................................................................5
2. INSTALLATION..............................................................................................................................................6
2.1 PRELIMINARY TESTS......................................................................................................................6
2.2 PRESSURE CELL INSTALLATION .........................................................................................6
2.2.1 INSIDE FILLS AND EMBANKMENTS ........................................................................................6
2.2.2 INSTALLATION OF MODEL 4810 CONTACT ("FAT BACK") PRESSURE CELL.........8
2.2.3 INSTALLATION OF MODEL 4815 HYDRAULIC LOAD CELL ....................................... 10
2.2.4 INSTALLATION OF MODEL 4820 JACKOUT PRESSURE CELL IN SLURRY
TRENCHES........................................................................................................................................ 10
2.2.5 INSTALLATION OF CELLS TO MEASURE EARTH PRESSURE AT THE BASE
OF FOOTINGS, FLOOR SLABS, PAVEMENTS, ETC......................................................... 11
2.2.6 INSTALLATION OF PUSH-IN PRESSURE CELLS TO MEASURE LATERAL
EARTH PRESSURES ..................................................................................................................... 12
2.3 CABLE INSTALLATION AND SPLICING ...................................................................... 13
2.4 ELECTRICAL NOISE ....................................................................................................................... 14
2.5 INITIAL READINGS ........................................................................................................................ 14
3. TAKING READINGS ............................................................................................................................. 15
3.1 OPERATING THE GK-404 ......................................................................................................... 15
3.2 GK-405 VIBRATING WIRE READOUT............................................................................ 15
3.2.1 CONNECTING SENSORS WITH 10-PIN BULKHEAD CONNECTORS
ATTACHED ....................................................................................................................................... 16
3.2.2 CONNECTING SENSORS WITH BARE LEADS................................................................... 16
3.2.3 OPERATING THE GK-405 ........................................................................................................... 16
3.3 MEASURING TEMPERATURES ........................................................................................... 16
4. DATA REDUCTION ................................................................................................................................17
4.1 PRESSURE CALCULATION...................................................................................................... 17
4.2 TEMPERATURE CORRECTION ............................................................................................. 18
4.3 BAROMETRIC CORRECTION ................................................................................................. 18
5. TROUBLESHOOTING .......................................................................................................................... 20
APPENDIX A. SPECIFICATIONS .................................................................................................. 21

II
A.1 EARTH PRESSURE CELLS ....................................................................................................... 21
A.2 STANDARD TEMPERATURE THERMISTOR............................................................. 21
APPENDIX B. THERMISTOR TEMPERATURE DERIVATION ....................... 22
APPENDIX C. TEMPERATURE EFFECT ON EARTH PRESSURE
AND CONCRETE STRESS CELLS........................................................ 23
C.1 FORMULAS............................................................................................................................................ 23
C.2 EXAMPLES............................................................................................................................................. 25
APPENDIX D. IMPROVING CALCULATED PRESSURE ACCURACY... 27

III
FIGURES
FIGURE 1: STRESS REDISTRIBUTION, WEAK SOIL WITH STIFF CELL ..........................1
FIGURE 2: STRESS REDISTRIBUTION, STRONG SOIL WITH STIFF CELL ......................2
FIGURE 3: STRESS REDISTRIBUTION, STIFF SOIL WITH WEAK CELL ..........................2
FIGURE 4: MODEL 4800 RECTANGULAR EARTH PRESSURE CELL ..............................3
FIGURE 5: MODEL 4800 CIRCULAR EARTH PRESSURE CELL .......................................3
FIGURE 6: MODEL 4810 CONTACT PRESSURE CELL .....................................................4
FIGURE 7: MODEL 4815 HYDRAULIC LOAD CELL .........................................................4
FIGURE 8: MODEL 4820 JACKOUT LOAD CELL ..............................................................5
FIGURE 9: MODEL 4830 PUSH-IN PRESSURE CELL ......................................................5
FIGURE 10: MODEL 4800 EARTH PRESSURE CELL INSTALLATION .............................7
FIGURE 11: ATTACHMENT OF MODEL 4810 TO CONCRETE FORM .............................9
FIGURE 12: MODEL 4810 CONTACT PRESSURE CELL INSTALLATION ........................9
FIGURE 13: MODEL 4815 HYDRAULIC LOAD CELL MEASURING LOADS .................10
FIGURE 14: MODEL 4820 JACKOUT PRESSURE CELL INSTALLATION ......................11
FIGURE 15: MODEL 4800-1-1P EARTH PRESSURE CELL INSTALLATION ..................12
FIGURE 16: GK-404 READOUT .......................................................................................15
FIGURE 17: LEMO CONNECTOR TO GK-404 .................................................................15
FIGURE 18: GK-405 READOUT .......................................................................................15
FIGURE 19: SAMPLE MODEL 4800 CALIBRATION SHEET ..........................................19
FIGURE 20: RADIUS (R) AND THICKNESS (D) ..............................................................23

IV
TABLES
TABLE 1: RATIOS FOR TWO GROUT MIXES....................................................................8
TABLE 2: 4830 WIRING CHART.......................................................................................13
TABLE 3: ENGINEERING UNITS MULTIPLICATION FACTORS.....................................17
TABLE 4: EARTH PRESSURE CELL SPECIFICATIONS...................................................21
TABLE 5: 3KΩ THERMISTOR RESISTANCE....................................................................22
TABLE 6: TYPICAL VALUES OF VARIOUS CELL PARAMETERS ..................................25

V
EQUATIONS
EQUATION 1: TERZAGHI’S PRINCIPLE OF EFFECTIVE STRESS..................................... 1
EQUATION 2: DIGITS CALCULATION .............................................................................. 17
EQUATION 3: CONVERT DIGITS TO PRESSURE ............................................................ 17
EQUATION 4: TEMPERATURE CORRECTION................................................................. 18
EQUATION 5: 3KΩ THERMISTOR RESISTANCE............................................................. 22
EQUATION 6: EXPANSION OF LIQUID FOR A 1° C TEMPERATURE RISE .................. 23
EQUATION 7: COMPRESSION OF LIQUID...................................................................... 23
EQUATION 8: EXPANSION OF LIQUID............................................................................ 23
EQUATION 9: DEFORMATION AT THE CENTER ............................................................ 23
EQUATION 10: DEFORMATION AT THE EDGE .............................................................. 24
EQUATION 11: DIFFERENCE IN DEFORMATION .......................................................... 24
EQUATION 12: AVERAGE TOTAL EXPANSION OF THE CELL....................................... 24
EQUATION 13: COMBINED EQUATIONS ....................................................................... 24
EQUATION 14: TOTAL EMBEDMENT.............................................................................. 24
EQUATION 15: TOTAL EMBEDMENT FOR CONTACT PRESSURE CELLS ................... 24
EQUATION 16: PRESSURE CALCULATION WITH SECOND ORDER POLYNOMIAL .. 27
EQUATION 17: “LINEARITY (%F.S.)” ON CALIBRATION SHEET .................................. 27
EQUATION 18: CALCULATING C USING THE ZERO PRESSURE READING ................ 27

VI

MODEL 4800 SERIES VW EARTH PRESSURE CELLS | INTRODUCTION | 1
1. INTRODUCTION
1.1 THEORY OF OPERATION
Earth Pressure Cells, sometimes called Total Pressure Cells or Total Stress Cells
are designed to measure stresses in soil or the pressure of soil on structures.
Cells will respond not only to soil pressures but also to ground water pressures
or to porewater pressure, hence the term total pressure or total stress. A
simultaneous measurement of pore water pressure (μ), using a piezometer, is
necessary to separate the effectivestress (σ') from the total stress (σ)as
defined by Terzaghi's principle of effective stress:
σ' = σ- μ
EQUATION 1: Terzaghi’s Principle of Effective Stress
These parameters coupled with the soil strength characteristics will determine
soil behavior under loads.
Earth pressure cells of the type described here are the hydraulic type; two flat
plates are welded together at their periphery and are separated by a small gap
filled with ahydraulic fluid. The earth pressure acts to squeeze the two plates
together thus building up a pressure inside the fluid. If the plates areflexible
enough (i.e., if they are thin enough relative to their lateral extent), then at the
center of the plate the supporting effect of the welded periphery is negligible,
and it can be stated that at the center of the cell the external soil pressure is
exactly balanced by the internal fluid pressure.
This is true only if the deflection of the plates is kept to a minimum and thus it is
important that the cell be stiff. This in a practical sense means that the fluid
inside the cell should be as incompressible as possible and that the pressure
transducer required to measure the fluid pressure should also be stiff having
very little volume change under increasing pressure.
Tests conducted by various researchers (as reported by Dunnicliff, 1988) have
shown that the introduction of a flat stress cell into a soil mass will alter the
stress field in a way dependent on the relative stiffness of the cell, with respect
to the soil, and also with respect to the aspect ratio of the cell, i.e., the ratio of
the width of the cell to its thickness. A thick cell will alter the stress more than a
thin cell. For these reasons, a thin, stiff cell is best, and studies have shown an
aspect ratio of at least 20 to 1 to be desirable.
Ideally, the cell ought to be as stiff (compressible) as the soil, but in practice this
is difficult to achieve. If the cell is stiffer (less compressible) than the soil, then it
will over register the soil pressure because of a zone of soil immediately around
the cell which is "sheltered" by the cell and therefore does not experience the full
soil pressure. This can be represented schematically as shown in Figure 1.
1:
FIGURE 1: Stress Redistribution, Weak Soil with Stiff Cell
Cell
0
Mean
Stress

2| INTRODUCTION | GEOKON
As can be seen there is a stress concentration at the rigid rim but in the center of
the cell the soil stress is only slightly higher than the mean soil stress, i.e., only
slightly higher than the stress which would obtain were the cell not present.
In a stronger soil, the distressed zone around the edge of the cell is more
extensive; therefore, the degree of over registration of the mean stress is greater
at the center of the cell. This is represented schematically in Figure 2.
2:
FIGURE 2: Stress Redistribution, Strong Soil with Stiff Cell
In a stiff soil the cell may be less stiff (more compressible) than the soil, in which
case the cell will under register the mean soil stress as the stresses in the soil
tend to "bridge" around the cell. This is represented schematically in Figure 3.
3:
FIGURE 3: Stress Redistribution, Stiff Soil with Weak Cell
Tests conducted at the University of Ohio (USA) with several different soil types
have shown that for GEOKON cells the maximum degree of over or under
registration amounts to 15% of the mean soil stress.
Other factors should be kept in mind. The inherent variability of soil properties,
which give rise to varying soil stresses at different locations, and a
corresponding difficulty in getting a good sample of the mean stress from a
limited number of cell locations. In addition, the response of the cell to its
immediate surroundings depends mostly on how closely the soil mass
immediately around the cell has the same stiffness or compressibility or the
same degree of compaction as the undisturbed soil mass. Installation
methods will need to pay particular attention to this detail.
1.2 EARTH PRESSURE CELL DESIGN
Earth Pressure Cells are constructed from two stainless steel plates welded
together around the periphery to leave a narrow space between them. This
space is filled with de-aired hydraulic oil, which is connected hydraulically to a
pressure transducer. The pressure transducer converts the oil pressure into an
electrical signal, which is transmitted through a signal cable to the readout
location.
In general, GEOKON Earth Pressure Cells use an all welded construction; this
means the space confining the oil is entirely metal and does not require any o-
Cell
0
Mean
Stress
Cell
0
Mean
Stress

MODEL 4800 SERIES VW EARTH PRESSURE CELLS | INTRODUCTION | 3
rings, which tend to trap air and reduce the cell stiffness. The oil is de-aired
using a Nold DeAerator,which materially improves the fluid stiffness and the
performance of the cell. The pressure transducer normally employed is the
GEOKON Model 4500H, which is available in several different pressure ranges
(see Appendix A). The cable is attached to the transducer in a sealed, waterproof
manner. For earth pressure cells located inside a soil mass, the cable may be
armored and provided with strain relief at the cell to reduce the likelihood of
pullout.
Located inside the vibrating wire pressure transducer housing is a thermistor for
the measurement of temperature at the cell location. In addition, a tripolar
plasma surge arrestor inside the transducer housing protects the vibrating wire
pluck and read coils from electrical transients such as may be induced by direct
or indirect lightning strikes.
Alternative pressure transducers with voltage (0-100 mV, 0-5 VDC, 0-10 VDC) or
current (4 - 20 mA) output are also available for dynamic readout capability.
Consult the factory for additional information.
1.3 EARTH PRESSURE CELL CONSTRUCTION
1.3.1 MODEL 4800 EARTH PRESSURE CELLS
Model 4800 Earth Pressure Cells may be rectangular or circular in shape. The
standard size for the rectangular Model 4800 is 150 mm × 250 mm (6" × 10"),
for the circular it is 230 mm (9") in diameter. Standard thickness for both styles is
6 mm (aspect ratio ≈40). For laboratory tests, smaller, thinner cells can be
manufactured. Contact the factory for additional information.
4:
FIGURE 4: Model 4800 Rectangular Earth Pressure Cell
5:
FIGURE 5: Model 4800 Circular Earth Pressure Cell
Pressure Cell Transducer Housing Instrument Cable
(4 conductor, 22 AWG)
Side View
Top View
6"
150 mm
10"
250 mm
Pressure Cell Transducer Housing Instrument Cable
(4 conductor, 22 AWG)
Side View
Top View
9"
230 mm

4| INTRODUCTION | GEOKON
1.3.2 MODEL 4810 CONTACT ("FAT BACK") PRESSURE CELL
Model 4810 Earth Pressure Cells are designed for measuring soil pressures on
structures. One of the plates is thick and designed to bear against the external
surface of the structure in a way that will prevent flexure of the cell. The other
plate is thin and reacts to the soil pressure.
6:
FIGURE 6: Model 4810 Contact Pressure Cell
1.3.3 MODEL 4815 HYDRAULIC LOAD CELL
Model 4815 Hydraulic Load Cell has been used for the measurement of loads in
piles and of concentrated loads on tunnel linings. The pressure transducer
housing is connected directly and perpendicular to the thick back plate.
7:
FIGURE 7: Model 4815 Hydraulic Load Cell
Pressure Cell
Transducer Housing Instrument Cable
(4 conductor, 22 AWG)
Side View
Top View
9"
230 mm
Mounting Lugs (4 places)
Thin Pressure Sensitive Plate

MODEL 4800 SERIES VW EARTH PRESSURE CELLS | INTRODUCTION | 5
1.3.4 MODEL 4820 EARTH PRESSURE "JACKOUT" CELL
Model 4820 Earth Pressure Cells are designed specifically for the measurement
of soil pressures on the back side of slurry walls. The pressure transducer
housing is connected directly and perpendicular to the thick back plate.
8:
FIGURE 8: Model 4820 Jackout Pressure Cell
1.3.5 MODEL 4830 PUSH-IN PRESSURE CELL
Model 4830 Push-In Pressure Cells are designed to be pushed in place for the
measurement of total pressures in soils and earth fills. The semiconductor
pressure transducer enables measurement of dynamic pressures. A thread is
provided on the end of the cell to allow for installation using lengths of pipe or
drill rods.
9:
FIGURE 9: Model 4830 Push-In Pressure Cell
Pressure Cell
Transducer Housing
Instrument Cable
(4 conductor, 22 AWG)
Bottom View Side View
6"
150 mm
Back Plate (with mounting holes)
5"
125 mm
(6 places, 6.75 mm ID)
Mounting Hole

6| INSTALLATION | GEOKON
2. INSTALLATION
2.1 PRELIMINARY TESTS
It is always wise, before installation commences, to check the cells for proper
functioning. Each cell is supplied with a calibration sheet, which shows the
relationship between readout digits and pressure, as well as the initial no load
zero reading. (Figure 19 in Section 4 shows a typical calibration sheet.)The cell
electrical leads (usually the red and black leads) are connected to a readout box
(see Section 3) and the zero reading given on the calibration sheet is compared
to the current zero reading. The two readings should not differ by more than 50
digits after due regard to corrections made for different temperatures,
barometric pressures and height above sea level and actual cell position
(whether standing up or laying down).
By pressing on the cell, it should be possible to change the readout digits,
causing them to fall as the pressure is increased.
Checks of electrical continuity can also be made using an ohmmeter. Resistance
between the gauge leads should be approximately 180 ohms, ± 5%. Check the
resistance between the two thermistor wires (usually white and green). Using
Table 5 in Appendix B, convert the resistance to temperature. Compare the
result to the current ambient temperature. Resistance between any conductor
and the shield should exceed 20 megohms. Remember to add cable resistance
when checking (22 AWG stranded copper leads are approximately 14.7Ωper
1,000 feet (48.5Ωper km), multiply by two for both directions).
2.2 PRESSURE CELL INSTALLATION
2.2.1 INSIDE FILLS AND EMBANKMENTS
Earth pressure cells are normally installed with the flat surfaces horizontal to
measure vertical stresses. However, they can be placed at other orientations,
inside the fill, to measure stresses in other directions e.g., a cell placed with the
flat surfaces vertical will measure horizontal stresses in a direction perpendicular
to the plates of the cell. They are sometimes placed at angles of 45 degrees.
Experience has shown that attempts to measure earth pressures in fills
frequently meets with failure. The problem is twofold. First, the stress
distribution in the fill can be inherently variable due to varying properties of the
ground and varying degrees of compaction of the ground. Thus, the soil stress
at one location may not be typical of the surrounding locations. Secondly, a cell
installed directly in the fill could result in the creation of an anomalous zone
immediately around the cell where there may be a different, more fine-grained
material, under less compaction. (The material around the cell may be poorly
compacted because of the need to avoid damage to the cell.)
In an earth fill, this zone of poor compaction would not be expected to be a
problem since the earth above might be expected to move downwards to fill the
voids and consolidate the ground. However, under the influence of rainwater
and vibration, any spaces in the soil immediately around, and especially under,
the cell may grow, causing the cell to become completely decoupled from the
soil around it. In such situations, the internal soil stresses go around the cell
instead of through it. The cell will then register only a very low pressure, which
does not change much as the loads increase. This situation occurs frequently.

MODEL 4800 SERIES VW EARTH PRESSURE CELLS | INSTALLATION | 7
WEAK GROUT METHOD
One way to avoid the problem is to cast the cell inside a weak grout. A method
used successfully in South Africa, by Oosthuizen et al, essentially uses the
techniques similar to the one described in Section 2.2.5. Installation of the cells
begins when the fill has reached a height of one meter above the instrument
level. The Instrument location and the cable trenches are excavated one meter
deep, the instrument pocket, with 45° sloping sides (see Figure 10).
10:
FIGURE 10: Model 4800 Earth Pressure Cell Installation
The cells (Model 4800-1-1P, complete with pinch tubes and lugs) are positioned
on a thin layer of non-shrink, sand cement grout, and are nailed in position using
the lugs on the cells provided for this purpose. The excavated pocket is then
backfilled to a depth of 300 mm with a weak concrete in 100 mm layers,
vibrated with a poker vibrator. After 24 hours, the cells are pressurized by
pinching the pinch tubes until the pressure in the cell, displayed on a connected
readout box, starts to change.
The instrument location containing the grouted cells and the cable trench is then
backfilled in 250 mm layers, using the same material as the main fill placed by
hand and compacted with pneumatic or gasoline backfill tampers, or vibratory
trench rollers. After this, standard construction filling and compaction practices
can continue.
Earth pressure cell clusters, placed according to the methods outlined above,
may be installed either in trenches, below the temporary embankment grade, or
in ramps above the temporary embankment grade. In dams, for example, it is
usually convenient to install in trenches in the impervious rolled fill core, and in
ramps in the filter zones and compacted rockfill shell zones. In earth
embankments, it is convenient to install in trenches. By doing so, adequate

8| INSTALLATION | GEOKON
degrees of compaction of the backfill can be more easily obtained without
damage to the cell clusters or cable arrays. As the cells are being covered and
compacted, repeated readings should be taken to ensure that the cells are
continuing to function properly.
See Section 2.3 for cable installation and protection. 1:
TABLE 1: Ratios for Two Grout Mixes.
ALTERNATIVE METHOD
In this method, the pressure cell used to monitor vertical earth pressures is
placed directly in the fill. The procedures are similar to those in the Weak Grout
Method section above, except that the pressure cell does not have a pinch tube
and the layer of weak grout is dispensed with. Instead, the cell is placed on a
pad of quick-setting mortar. This is done to ensure uniform contact with the soil
at the bottom of the trench. The cell is then covered by soil placed in 300 mm
layers and compacted as before.
2.2.2 INSTALLATION OF MODEL 4810 CONTACT ("FAT BACK") PRESSURE
CELL
This section details installation instructions for Model 4810 earth pressure cells,
which are used for the measurement of earth pressures on structures. In
backfills for piers, piles, bridge abutments, retaining walls, culverts and other
structures the cells may be installed either inside a concrete structure being
poured or directly on the surface of an existing structure. For slurry walls, the
Model 4820 earth pressure cell is used as described in Section 2.2.4.
INSTALLATION IN POURED CONCRETE
When pouring concrete, the cells can be held to the forms using nails through
the lugs welded to the edge of the cell. Position the cell so that the thin pressure
sensitive plate is directly against the concrete form. Nail the plates to the form
lightly in such a manner that they engage the concrete sufficiently and will not
pull out of the concrete when the forms are removed. Route the cable inside the
concrete to a convenient readout location or to a block out inside where excess
cable can be coiled. Protect the cable from damage during concrete placement
and vibration by tying it to adjacent rebar. See Figure 11.
Application Grout for Medium to Hard Soils Grout for Soft Soils
Materials Weight Ratio by Weight Weight Ratio by Weight
Water 30 gallons 2.5 75 gallons 6.6
Portland Cement 94 lbs. (one sack) 1 94 lbs. (one sack) 1
Bentonite 25 lbs. (as required) 0.3 39 lbs. (as required) 0.4
Notes
The 28-day compressive strength of this mix is about
50 psi, similar to very stiff to hard clay. The modulus
is about 10,000 psi
The 28-day strength of thismix is about 4 psi,
similar to very soft clay.

MODEL 4800 SERIES VW EARTH PRESSURE CELLS | INSTALLATION | 9
11:
FIGURE 11: Attachment of Model 4810 to Concrete Form
INSTALLATION ON EXISTING STRUCTURES
The lugs welded to the edge of the cell can be used to hold the cell against the
structure using nails, lag bolts, tie wire, etc. Even if the surface is smooth, but
especially when the surface is rough or irregular, a mortar pad between the cell
and the structure is required. See Figure 12 below.
12:
FIGURE 12: Model 4810 Contact Pressure Cell Installation
Concrete Form
Excess Cable
(coiled inside blockout)
Double Headed Nails
(through mounting lugs, 4 places)
Pressure Cell
Side View Front View
Mortar Pad
Pipe Straps & Conduit
Zone with large aggregate removed
Concrete Nails
(4 places)
Side View Front View

10 | INSTALLATION | GEOKON
Use the lugs on the cell as a template to locate the position for drilling holes for
the installation of expanding anchors or install the anchors nearby and use wire
to hold the cells in place. Alternately, the cell may be nailed in place using the
lugs as a guide.
Mix up some quick-setting cement mortar or epoxy cement. Trowel this onto the
surface then push the cell into the cement so that the excess cement extrudes
out of the edges of the cell. Hold the cell in place while the cement sets up then
complete the installation by adding the lag bolts (using the expansion anchors)
and tightening or nailing the cell in place. Protect the cell, transducer housing,
and cable from direct contact with large chunks of rock by covering them with a
fine-grained fill material from which all pieces larger than about 10 mm (0.5")
have been removed. This material is kept near the cell and cable as the fill is
placed. Additional cable protection can be achieved by using metal conduit
strapped to the surface of the structure.
2.2.3 INSTALLATION OF MODEL 4815 HYDRAULIC LOAD CELL
A particular installation, shown in Section 13, used the Model 4815 Hydraulic
Load Cell to measure the concentrated load on a tunnel lining from an existing
wooden pile (supporting a building above) that had been cut short by the tunnel
excavation in frozen ground. The load cell was designed to measure any
increase of load on the tunnel lining that might occur when, at the end of tunnel
construction, the ground was allowed to thaw out. The load cell was positioned
below the bottom of the pile and temporarily held in place with lugs and a
mortar pad until the shotcrete tunnel lining was sprayed.
13:
FIGURE 13: Model 4815 Hydraulic Load Cell Measuring Tunnel Lining Loads
2.2.4 INSTALLATION OF MODEL 4820 JACKOUT PRESSURE CELL IN
SLURRY TRENCHES
The Jackout Pressure Cell (JOPC) first needs to be assembled into the Jackout
frame (GEOKON part #4820-5 or 4820-6). The assembly is shown in Figure 14.
The support plate has a circular hole cut in it and bolt holes to fit the jackout
pressure cell and is connected to one end of a double-acting hydraulic jack by
means of steel struts. The support plate and reaction plate are cambered top
and bottom to prevent them from snagging on the sides of the slurry trench. The
reaction plate is attached to the other side of the double-acting hydraulic jack.
The jack is attached firmly to the rebar cable and arranged so that the plates are
This manual suits for next models
4
Table of contents
Other Geokon Industrial Equipment manuals