manuals.online logo
Brands
  1. Home
  2. •
  3. Brands
  4. •
  5. GEONAUTE
  6. •
  7. Pedometer
  8. •
  9. GEONAUTE PEDOMETER DISTA F700 User manual

GEONAUTE PEDOMETER DISTA F700 User manual

Dista F700
Podomètre, pulsemètre
Pedometer, pulsometer
Réf notice : 482.092
CNPJ : 02.314.041/0001-88 uLire attentivement la notice avant utilisation uPlease read guidelines carefully
before use uLea atentamente las instrucciones antes de su uso uLesen Sie vor
Gebrauch die Anleitung aufmerksam durch uLeggere attentamente le istruzioni
prima dell’uso uLees voor het gebruik zorgvuldig de handleiding uLer
atentamente as instruções antes da utilização uPrzed użyciem przeczytaj
uważnie instrukcję uHasználat elõtt figyelmesen olvassa el a használati utasítást
uПеред использованием изделия внимательно ознакомьтесь с
инструкцией uΔιαβάστε προσεκτικά τις οδηγίες πριν τη χρήση
uൗႯఴሴ༬ᄎ؇නଃඇ
Notice Dista F700tll.qxp:Mise en page 1 4/01/07 18:02 Page 1
19
Congratulations for the purchase of your DISTA F700
pedometer. This accurate and easy to use product is
designed to simultaneously read all the information
related to your exercise: number of steps distance
covered, calories spent and exercise times.
The pulse meter function allows measuring your heart-
rate while exercising so as to control the intensity of your
effort. Be careful however, this data is given on an
informative basis; it cannot be used within the scope of
medical surveillance.
Please read the notice attentively before use and keep it
for further reference.
Recycling
The “ crossed-out wastebasket ”symbol indicates that
this product and the batteries it contains should not be
thrown away with household waste. They are subject to a
specific type of sorting. Deposit the batteries and your
unusable electronic product in an authorized collection area for recy-
cling. This treatment of your electronic waste will protect the environ-
ment and your health.
18
EN
EN
Notice Dista F700tll.qxp:Mise en page 1 4/01/07 18:02 Page 18
21
Precautionary care
•Do not submerge the appliance in water. If the appliance
comes in contact with water, dry it with a dry, soft and
lint-free cloth.
•Do not clean the appliance with abrasive or corrosive
products.
•Avoid exposing the appliance to shocks, dust, excessive
temperatures and humidity. This would give rise to malfunc-
tions of the appliance and it would reduce its service life.
•Do not touch the appliance’s internal components. This
would cancel the warranty and risk causing damage. The
appliance has no parts capable of being repaired by the
user.
•Only use new batteries of the type indicated in this notice.
Do not mix new and used batteries for this would damage
the appliance.
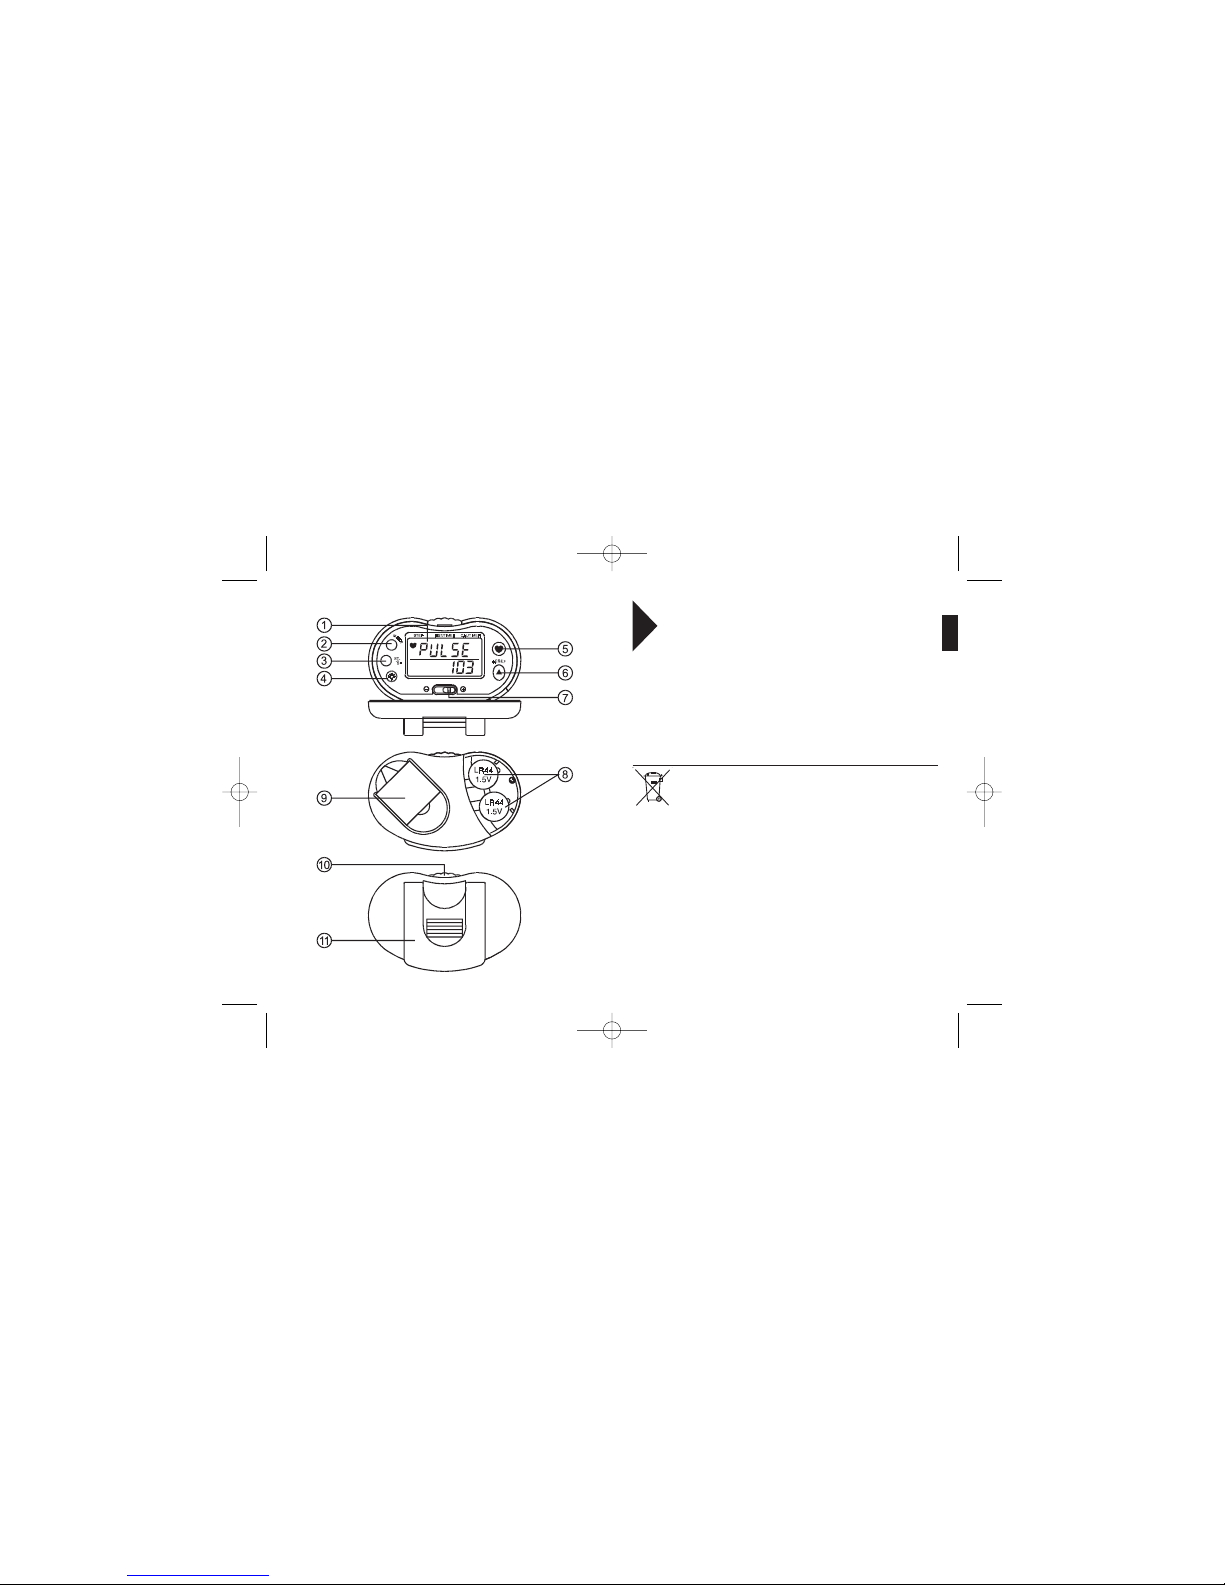
Available functions and displays
Functions available
• Pulse-rate meter
• Pedometer
• 12/24 h clock
• Total distance covered in km or miles
• Calorie expenditure
• Step length in cm or inches
• Stopwatch (99 hours – 59 minutes – 59 seconds)
• Low batteries indicator
• Backlighting
• Measurement sensitivity setting
Limited warranty
Your DISTA F700 pedometer is guaranteed against
manufacturing flaws and defects of material as well as
against breaking and malfunction within the scope of
normal use, for 2 years starting on the date of purchase.
This guarantee does not cover the misuse of the pedometer,
abuses, modifications or the dismantling of the appliance.
During the period of guarantee, DECATHLON will repair or
replace the appliance, at its convenience, within the scope
of a standard exchange. DECATHLON will repay the
purchase price if repairs or replacements are not possible.
The guarantee does not cover the batteries nor cracked or
broken cases or those showing visible traces of shocks.
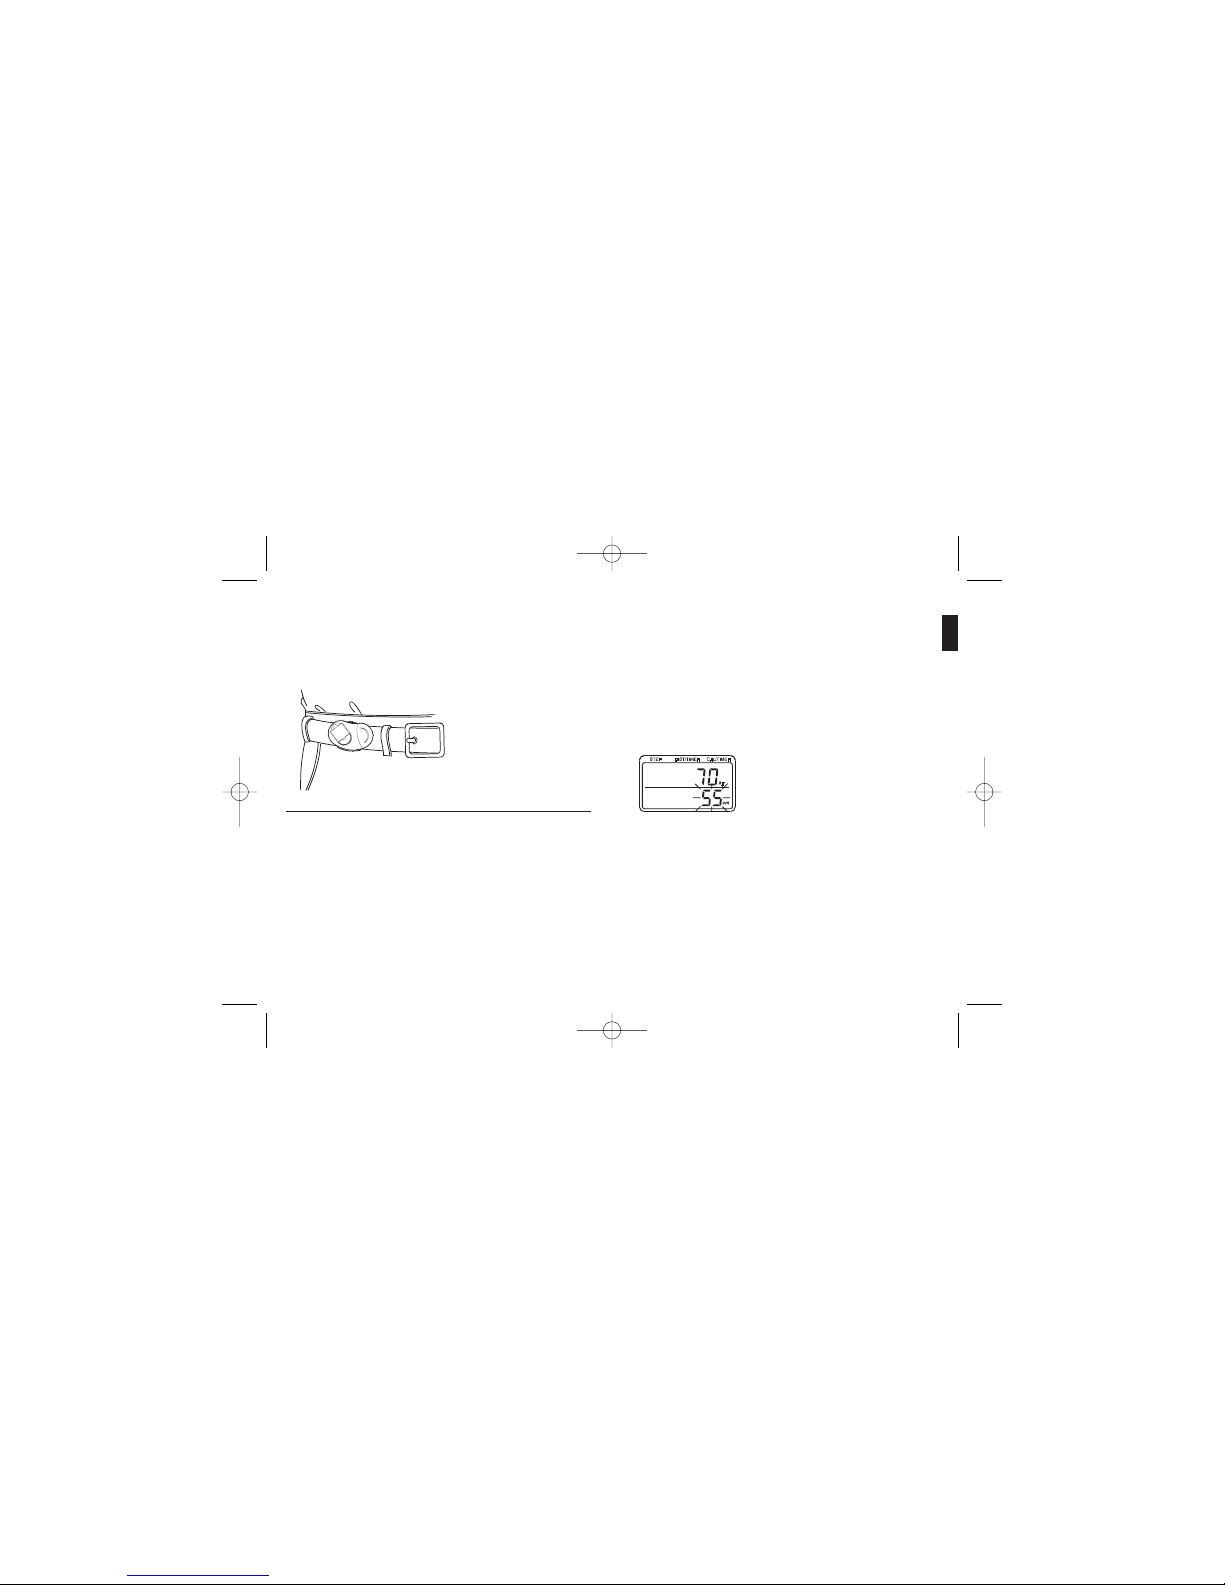
Use/Precautions
Description of conditions of normal use
Place this pedometer as close as possible to your body’s
center of gravity, on the right or left of your belt buckle.
To have reliable indications, it is important to maintain
a steady rate and pace, avoid making sharp close curves.
The pedometer’s technology limits its use to scarcely rough
broken land.
Avoid any contact of the pedometer with water, it is not
waterproof.
20
EN
Notice Dista F700tll.qxp:Mise en page 1 4/01/07 18:02 Page 20
23
- CAL/TIMER : display of the number of calories burnt on the
upper line and of the stopwatch on the lower line.
- PULSE : : displays the pulse rate on the lower line.
This appliance has 4 different display modes:
- STEP : display of the number of steps on the upper line
and of the time on the lower line.
- DIST/TIMER : display of the distance on the upper line
and of the stopwatch on the lower line.
22
EN
Notice Dista F700tll.qxp:Mise en page 1 4/01/07 18:02 Page 22
25
First use
Inserting the batteries
The appliance operates with two LR44, 1.5v batteries
On first use:
1. Gently press and remove the battery compartment’s cover.
2. Remove the plastic strip
3. Place the cover back on again
The low battery icon will remain visible as long as the
batteries are low and need to be changed. When the
batteries are worn out, replace them with two new LR44,
1.5v batteries.
Note : Protect the environment by depositing worn out
batteries in appropriate collection sites.
Time setting
1. Press the MODE button to switch between the STEP,
DIST/TIMER and CAL/TIMER display modes.
2. In STEP mode, press the MODE button for 2 seconds.
The 12 hours value flashes. Select the 12H or 24H format
with the RESET button..
3. Press the MODE button once again. The hour figures
flash. Set the hour value with the RESET button. Press the
RESET button without releasing it for faster setting.
4. Press the MODE button once again. The minutes figures
flash. Set the minutes value with the RESET button. Press
the RESET button without releasing it for faster setting.
5. Press the MODE button once again. The seconds figures
flash. Press the RESET button to reset the seconds to zero.
Description of the appliance
1. Screen
Two-line display of three different modes or pulse-rate
display.
2. Mode Button
Allows alternating the various display modes.
3. START/STOP Button
To start or stop the calculating of exercising times.
4. Screen light button
Lights the screen for use in the dark.
5. Pulse Button
Allows entering the pulse-rate mode.
6. Reset button
Allows resetting all the display modes to zero.
Increases the value of settings when setting or changing the
data.
7. Sensitivity switch
Increases or decreases the appliance’s sensitivity for
pedometer measurements.
8. Batteries compartment
Insert two LR44, 1.5v batteries.
9. Finger emplacement
For pulse-rate measurement.
10. Cover opening button
Press it to open the protection cover.
11. Belt clip
Allows clipping the appliance on a belt or on clothes.
24
EN
Notice Dista F700tll.qxp:Mise en page 1 4/01/07 18:02 Page 24
27
Setting the distance unit (km or miles)
1. Press the MODE button to select the DIST/TIMER mode.
2. Hold down the MODE button for 2 seconds. The distance
unit of measure (km or mile) flashes.
3. Press the RESET button to select the unit you want.
4. Press the MODE button to confirm your choice and exit
the settings mode.
To enter the step length and the bodily length:
1. Press the MODE button to select the CAL/TIMER mode.
2. Press the MODE button for 2 seconds. The screen
displays the weight value on the upper line and the step
length on the lower line. The step length figure flashes.
NB :
If you choose km as the distance unit, the weight unit is kg
and the step length unit is cm. If you choose miles as the
distance unit, the weight unit is lb and the step length unit is
inches.
3. Press the RESET button to set the step length. Press the
RESET button without releasing it for faster setting.
Press the MODE button to confirm the setting and exit the
time setting mode.
Placing the appliance
Place the appliance at waist level on the belt, on clothing or
on the equipment. Keep it in a horizontal position and attach
it well.
Pedometer use
Setting personal data
To use the distance calculating function, the step length
should previously be set.The more accurate the step length
measurement and the more the distance covered
calculation will be reliable. To do so, count the number of
steps that you do (NS) to cover a known distance (D), 10 or
20 meters for example. Divide the distance by the number
of steps, you thus obtain your step length: SL = D/NS
Example: 13 steps to cover 10 meters (being 1000 cm),
your step length is
1000/13 = 75 cm
To use the calorie function, the person’s weight should
previously be set.
26
EN
Notice Dista F700tll.qxp:Mise en page 1 4/01/07 18:02 Page 26
29
4. The screen’s upper line gives the total number of calories
burnt.
5. Press the RESET button to erase the data. The number
of steps, the total distance and the number of calories burnt
are related to one another. If you erase one data by pres-
sing the RESET button, the rest of the data is also erased.
Using the stopwatch
The stopwatch function counts exercising time-lengths up to
a maximum of 99 hours, 59 minutes and 59 seconds.
1. Press the MODE button to select the DIST/TIMER or
CAL/TIMER display modes.
2. Start the stopwatch by pressing the START/STOP
button.
3. Press the START/STOP button once again to stop the
stopwatch.
4. Press the RESET button to reset the stopwatch to zero.
Using the pulse-rate sensor
The pulse-rate function allows you to measure your heart
rate in number of pulsations per minute and thus control the
intensity of your effort.
To measure your pulse-rate:
1. Press the PULSE button, the screen displays an icon in
the shape of a heart and PULSE on the upper line (see
chapter 4.3.)
4. Press the MODE button once again. The bodily weight
figure flashes.
5. Press the RESET button to set the weight. Press the
RESET button without releasing it for faster setting.
6. Press the MODE button to confirm the setting and exit
the setting mode.
Using the step meter
The pedometer function counts the number of steps that a
person covers on a distance.
1. Press the MODE button to switch between the STEP,
DIST/TIMER and CAL/TIMER modes.
2. Select the STEP mode display
3. Press the RESET button, the steps meter resets to zero.
Setting the sensitivity of the steps measurement
sensor: use the setting switch to adjust the appliance’s
measuring sensitivity. To find a suitable sensitivity level
suited to the type of step, several different settings will have
to be tested
Using the distance and calories calculations
This appliance calculates the total distance covered and the
number of calories burnt.
1. Press the MODE button to select the DIST/TIMER dis-
play mode.
2. The screen’s upper line gives the total distance covered.
3. Press the MODE button once again to select the
CAL/TIMER display mode.
28
EN
Notice Dista F700tll.qxp:Mise en page 1 4/01/07 18:02 Page 28
31
Specifications
Time 12/24 hours with HH/MM/SS display
Steps meter 0 to 99,999 steps
Distance covered 0 to 999.99 km (0 to 61.5 miles)
Stopwatch 0 to 99 hours, 59 minutes and 59 seconds
Step length 28 to 152 cm (11 to 60 inches)
Weight range 27 to 154 kg (60 to 340lb)
Pulse-rate 40 to 206 heartbeats per minute
Operating temperature: -10°C to 40°C
Storage temperature: -20°C to 60°C
Power supply: two LR44, 1.5v batteries
Appliance’s size: 32 x 41 x 63 mm
Weight: 32.2 g without batteries
2. Place your right hand index finger on the finger sensor.
Make sure the inner side of your last phalange is correctly
placed on the sensor.
3. Keep a stable posture, if the pressure you exert is too
weak or too strong, the measurement may be wrong.
4. If your finger is correctly placed, the heart icon on the
screen flashes. This means that the appliance is correctly
detecting the heartbeats. The appliance displays your
pulse-rate in heartbeats per minute at that moment.
5. If, for any reason whatever, the appliance cannot mea-
sure the pulse-rate the display automatically returns to the
previous display mode.
6. To exit the pulse-rate calculation mode, press the PULSE
button to return to the previous mode.
30
EN
Notice Dista F700tll.qxp:Mise en page 1 4/01/07 18:02 Page 30
33
Problems Cause Operation / Procedure
1 – No screen display 1.1 – Wrong placing of batteries. Check the position and polarity of batteries
1.2 – The batteries are dead. Replace the batteries with the same type as described in the notice,
respecting the procedure defined as well as the polarity of batteries.
2 – The value displayed is false 2.1 – The appliance is not correctly attached. Position the pedometer as close as possible to the center of your body,
at belt level (on the left or right of the buckle)
2.2 –Your length is not constant Try to regulate your stride, the value is more accurate on slightly rough broken land.
2.3 – The value parameterized is incorrect, Check that the belt is well tightened and that the electrodes are well humidified,
reset the parameters as indicated in the notice belt friction sends a signal that does not correspond to the pulse-rate.
3 – The pulse rate displayed seems 3.1 – The finger is not well positioned for taking Check your finger’s position on the sensor and apply sufficient pressure.
incoherent measurements.
4 – The appliance operates abnormally 4.1 – The keys do not activate the right functions, Press the appliance’s reset button and check the functions again.
or the appliance’s operation seems abnormal.
Contact
Our engineers are interested in your remarks and suggestions. Do not
hesitate to get in touch with them. This way you can contribute in the
designing and development of new electronic products.
• In France, please call the customer service center at: 0810 080808
(local call rate)
• For any other country, please leave a message under the relevant
heading on our website: www.decathlon.com
We promise to answer you promptly.
32
EN
Notice Dista F700tll.qxp:Mise en page 1 4/01/07 18:02 Page 32

Other GEONAUTE Pedometer manuals

GEONAUTE PEDOMETER DISTA T500 User manual

GEONAUTE

GEONAUTE PEDOMETER DISTA T500 User manual

GEONAUTE PEDOMETER DISTA D300 User manual

GEONAUTE

GEONAUTE PEDOMETER DISTA D300 User manual

GEONAUTE ONwalk 500 User manual

GEONAUTE

GEONAUTE ONwalk 500 User manual

GEONAUTE PEDOMETER DISTA F100 User manual

GEONAUTE

GEONAUTE PEDOMETER DISTA F100 User manual

GEONAUTE On step 600 User manual

GEONAUTE

GEONAUTE On step 600 User manual

Popular Pedometer manuals by other brands

Omron GOsmart HJ-112 instruction manual

Omron

Omron GOsmart HJ-112 instruction manual

Accusplit Eagle 120XL operating instructions

Accusplit

Accusplit Eagle 120XL operating instructions

Ozeri TRI-AXIS user manual

Ozeri

Ozeri TRI-AXIS user manual

Citizen TW600 instruction manual

Citizen

Citizen TW600 instruction manual

Denver SW-152 user manual

Denver

Denver SW-152 user manual

Insportline 5061 user manual

Insportline

Insportline 5061 user manual

Oregon Scientific PE326CA user manual

Oregon Scientific

Oregon Scientific PE326CA user manual

EKHO TWO owner's manual

EKHO

EKHO TWO owner's manual

NEW LIFESTYLES SW-700 DIGI-WALKER instructions

NEW LIFESTYLES

NEW LIFESTYLES SW-700 DIGI-WALKER instructions

Bodytronics Cobalt instructions

Bodytronics

Bodytronics Cobalt instructions

Smart Lab walk user manual

Smart Lab

Smart Lab walk user manual

IROX PE101S operating instructions

IROX

IROX PE101S operating instructions

Silva ex10 instruction manual

Silva

Silva ex10 instruction manual

HiTRAx Pulse Operating	 instruction

HiTRAx

HiTRAx Pulse Operating instruction

PaceKeeper 3D Quick start guide and user manual

PaceKeeper

PaceKeeper 3D Quick start guide and user manual

Crivit KH 260 operating instructions

Crivit

Crivit KH 260 operating instructions

Silva ex30 series Product information

Silva

Silva ex30 series Product information

Omron HJ-150 instruction manual

Omron

Omron HJ-150 instruction manual

manuals.online logo
manuals.online logoBrands
  • About & Mission
  • Contact us
  • Privacy Policy
  • Terms and Conditions

Copyright 2025 Manuals.Online. All Rights Reserved.