GEONAUTE PEDOMETER DISTA T500 User manual

PODOMETREDISTAT500PART1.qxd:Mise en page 1 20/03/07 15:40 Page 21699

EN
191918
s
e
t
r
e
s
e
t
m
o
d
e
Congratulations and thank you for purchasing a DISTA T500
pedometer. This complete product allows you to monitor
your training. It measures your number of steps and
calculates the distance you cover, the calories you expend,
exercise time and average speed. It uses two stride lengths to
adapt automatically to your type of activity (walking or running).
Its “data” mode can record information from five training sessions.
For the distance to be calculated accurately, you will need to follow
the stride length setting procedure carefully. Read the instructions
carefully before use and keep them for the entire life of the product.
5
Bottom view
EN
Side view Top view
1
6
2
43
PODOMETREDISTAT500PART1.qxd:Mise en page 1 20/03/07 15:41 Page 18

EN
21
- Do not subject the device to impacts, or expose it to dust, extremes
of temperature or liquid. This may cause the device to malfunction
and reduce its life.
- Do not touch the inner workings of the device. This would void the
warranty and may cause damage. No part of the device can be
repaired by the user.
- Only use new batteries of the type indicated in these instructions.
Do not combine new and used batteries, as this may damage the
device.
Functions available
This device has four different display modes.
Go from one mode to another by pressing the Mode button.
1. TIME: 12/24 hour clock, date
2. STEP: Calculates step number, distance covered, average
speed, calories expended, total number of steps and total
distance covered.
3. DATA: 5 memory files with date and exercise duration, number of
steps, distance covered and calories expended.
4. ALARM: daily alarm
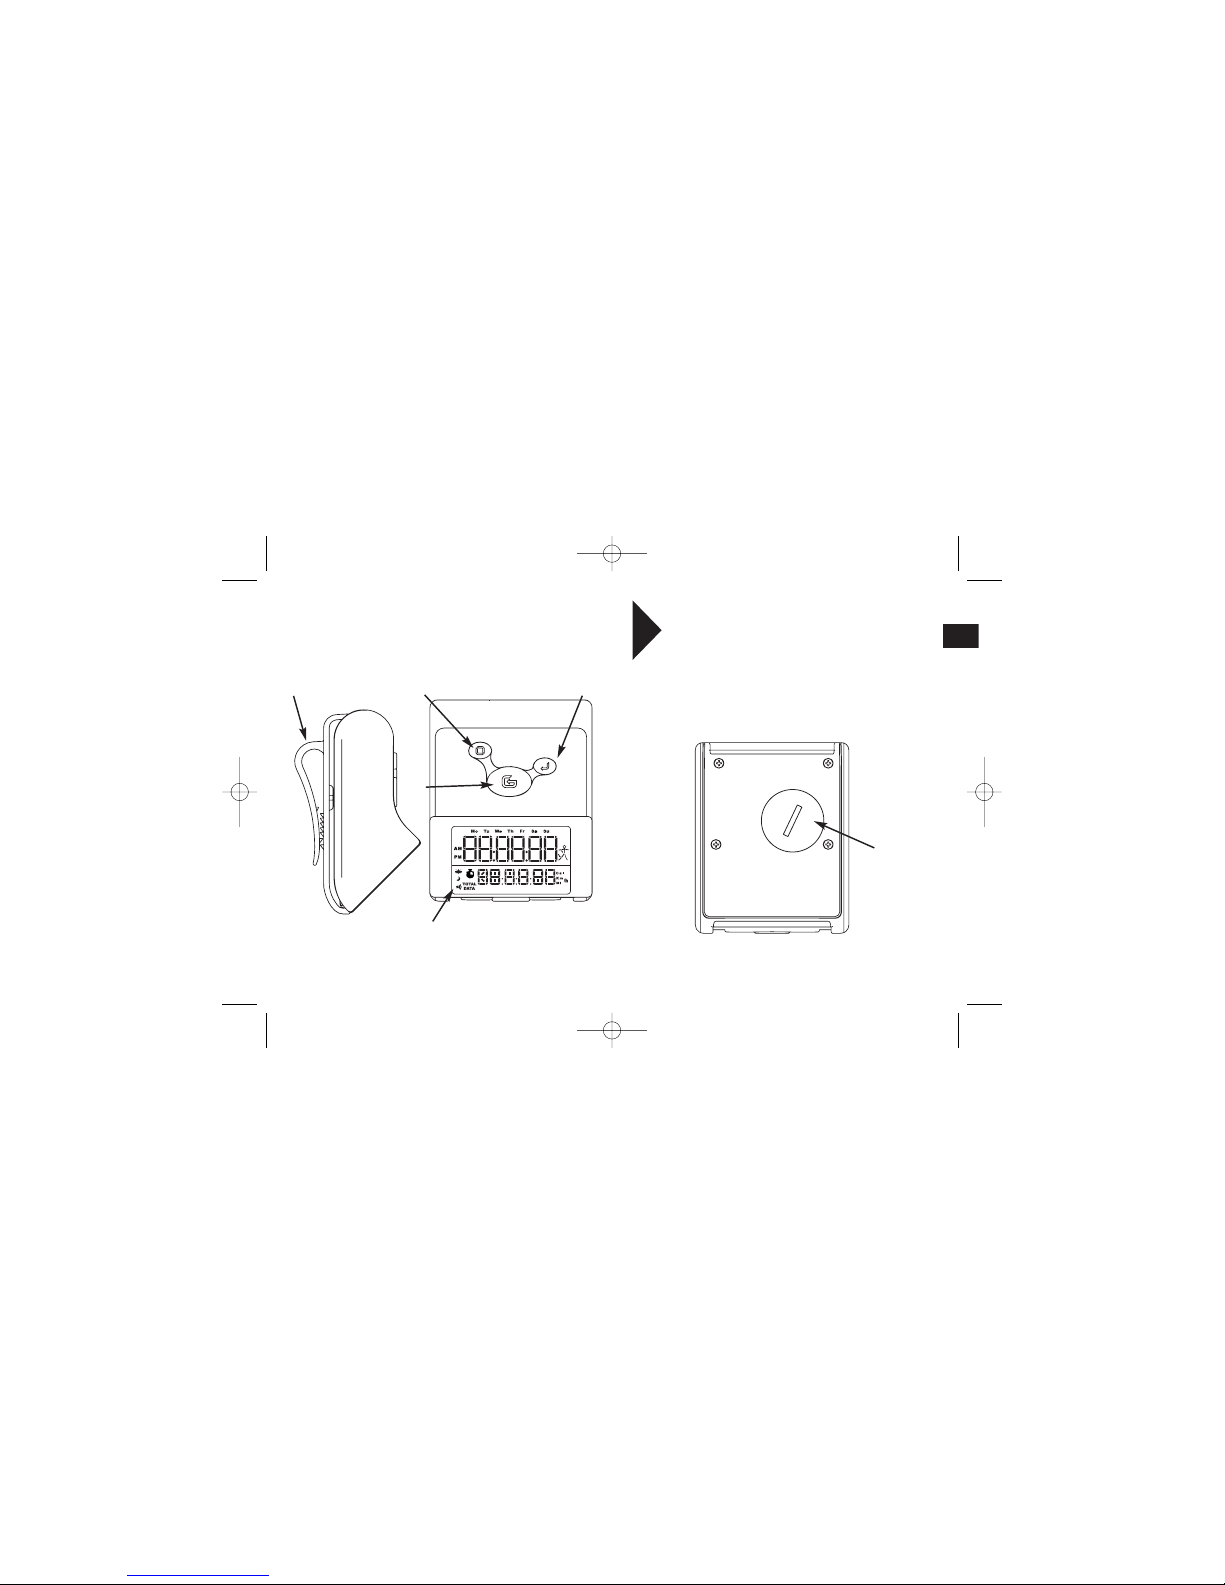
Description of the device
The numbers refer to the button numbers on pages 2 and 3.
1. Screen
Two-line display in the 4 modes
2. Mode button
Allows you to swap between the different display modes.
3. Set button
Allows you to set each mode
4. Reset button
Allows you to reset each display mode to zero. Increases the
setting values when entering or modifying data.
5. Battery compartment
1 CR2032 3V battery
6. Belt clip
Allows you to fasten the device to your belt or clothing.
LIMITED WARRANTY
GEONAUTE guarantees the initial purchaser of this device that it will be
free from defects of materials or manufacture for a period of two years
from the date of purchase. Please keep your receipt as proof of
purchase.
- This guarantee does not cover damage resulting from misuse, from a
failure to respect the precautions for use, from accidents, from improper
maintenance or from commercial use.
- This warranty does not cover damage resulting from repairs carried out
by persons not authorised by GEONAUTE.
- The guarantees contained herein explicitly replace all other guarantees
including the implicit guarantee of merchantability and/or suitability for
use. GEONAUTE cannot under any circumstances be held liable for
any damage, whether direct or indirect, general or specific, caused by
or related to these instructions for use or the products they describe.
- During the warranty period, the item will either be repaired free of
charge by an authorised repair service or replaced free of charge
(depending on the retailer).
- The warranty does not cover batteries or cracked or broken casings
where signs of a blow are evident.
USE / RECOMMENDATIONS FOR USE
Normal conditions of use
- Wear the pedometer as close as possible to your body’s centre of
gravity, just to the right or left of your belt buckle.
- For reliable readings, it is important to keep your speed steady and
to maintain a regular stride. Avoid short, sharp turns.
- The pedometer’s technology limits its use on uneven ground.
USAGE RESTRICTIONS /
RECOMMENDATIONS FOR USE
- Do not submerge the device in water. If the device comes into
contact with water, dry it with a soft, dry, non-fluffy cloth
- Do not clean the device using abrasive or corrosive products.
20
PODOMETREDISTAT500PART1.qxd:Mise en page 1 20/03/07 15:41 Page 20

EN
23
- In TIME mode, pressing the RESET button activates or deactivates
the hourly beep. When active, a bell symbol is displayed on the left
of the screen and the device beeps on the hour.
Setting the pedometer
To use the distance calculator function, you first need to set your stride
length. The more accurate your stride length is, the more reliable the
distance calculation will be. To do this:
- Count the number of steps you take (NP) to cover a known distance (L),
10 or 20 metres for example.
- Divide this distance (L) by the number of steps (NP) to calculate your
stride length: Stride length (LP) = L/NP. For example: If you take 13
steps to cover 10 metres (1000cm), your stride length (1000/13) =
75cm. The device has an automatic walking/running mode. It
automatically detects your stride type and adapts its calculations
accordingly. It is therefore necessary to set a walking stride length,
symbolised by a picture of a walker on the right of the screen, and a
running stride length (symbolised by a picture of a runner). To calculate
calories expended, you need to enter your weight.
Recycling
The “crossed-out bin” symbol indicates that this product
and the batteries it contains cannot be disposed of with
household waste. They are subject to a specific type of
sorting. Deposit the batteries and your unusable
electronic product in an authorised collection area for recycling. This
treatment of your electronic waste will protect the environment and
your health.
SETTING THE PEDOMETER
NB: When setting the device, if no operation is made for 30 seconds,
the pedometer automatically exits setting mode.
NB: When one system of units is selected in one of the modes, it is
then applied to the other modes.
Example: If stride length is set in cm, then the distance covered is
displayed in km.
Setting the time
- Press the MODE button to change between TIME, STEP, DATA
and ALARM display modes.
- In TIME mode, hold down the SET button for 2 seconds. The hour
flashes. Set the desired value using the RESET button.
- Confirm your setting by pressing the MODE button. The minutes
flash. Set the desired value using the RESET button.
- Confirm your setting by pressing the MODE button. Repeat the
same procedure to set the seconds; in this operation the seconds
automatically change to zero.
- Confirm your setting by pressing the MODE button.Repeat the
procedure to set the year, month, day and 12/24 hour mode. The
day of the week is automatically displayed on the top line.
- Confirm your setting by pressing the MODE button. Then activate
the backlighting (LI-ON). If this is active, a moon symbol is
displayed on the left of the screen and every time a button is
pressed the screen lights up for 3 seconds.
- Press the SET button to end the setting procedure.
22
PODOMETREDISTAT500PART1.qxd:Mise en page 1 20/03/07 15:41 Page 22

EN
25
USING THE PEDOMETER
Placing the device
Clip the device at waist height to your belt, clothing or other
equipment. Keep it well attached in a horizontal position.
Using the STEP mode
After correctly attaching the device to your belt, the pedometer counts
every step taken from the beginning to the end of your walk or run.
Accessing the various data:
In STEP mode, the top line shows the number of steps taken. The
bottom line shows either the distance covered in km or miles, the
average speed in km/h or mph, the calories expended in kcal, the
time elapsed (hr: min: sec) or the total number of steps and the total
distance. Use the SET button to go from one display to the next.
Stopwatch:
The exercise stopwatch starts automatically when you take your first
step. You do not need to activate it manually. It stops automatically
as soon as it registers that you have stopped for several seconds.
Average speed:
Average speed is calculated and displayed every minute on the
basis of the distance covered in the previous completed minute. The
device does not therefore calculate your average speed over total
distance covered. As average speed is calculated over a minute, the
device does not display data during the first minute of exercise or
after stopping.
To set the pedometer:
- Press the MODE button to select STEP mode. Hold down the SET
button for 2 seconds. The distance unit display flashes. Select cm
or inches using the RESET button. The distance covered will be
displayed either in km or miles.
- Confirm your setting by pressing the MODE button. The weight
figure flashes. If you have selected cm, weight will be displayed in
kg. If you have selected inches, weight will be displayed in lb. Set
the value using the RESET button. Hold down the RESET button
to increase the value quickly.
- Confirm your setting by pressing the MODE button. The walking
stride length display flashes. Set the calculated value using the
RESET button.
- Repeat the same procedure for running. Press the SET button to
end the setting process.
Setting the alarm
To set the alarm:
- Press the MODE button to select ALARM mode.
- Hold down the SET button for 2 seconds. The hour flashes. Set the
desired value using the RESET button.
- Confirm your setting by pressing the MODE button. The minutes
flash. Set the value using the RESET button. Press the SET button
to end the setting process.
- After setting the alarm, activate it by pressing the RESET button.
When the alarm is active, ALM on is displayed on the bottom line
and a symbol appears in the bottom-left part of the screen in all
modes.
To stop the alarm, press one of the three buttons.
24
PODOMETREDISTAT500PART1.qxd:Mise en page 1 20/03/07 15:41 Page 24

EN
27
Resetting to zero:
Hold down the RESET button for 2 seconds to reset all STEP mode
functions to zero. The total number of steps and the total distance
covered are not reset to zero so that the cumulative totals are
calculated.
To reset the total number of steps and the total distance covered to
zero, select total display in STEP mode using the SET button and
then hold down the RESET button for 2 seconds.
Using the DATA mode
The pedometer allows you to store data from five training sessions
in the memory, along with the date and duration of the session, the
number of steps, the distance covered and the calories expended.
Saving information:
As soon as you reset to zero in STEP mode, the information is
automatically saved in DATA mode. The last session completed is
always saved in the R1 file. When a new session is saved in R1, the
information in the memory is moved to file R2, and then R3. When
the five memories are in use, the oldest session (saved in R5) will
be deleted when the new session is saved.
Consulting the saved information:
- Select DATA mode using the MODE button.
- The top line displays the date (day: month) and the file number
(R1, R2, etc). The bottom line displays the exercise time for the
saved session
- Select the file that you want to consult by pressing the RESET
button.
- You can then check the saved data by pressing the SET button.
The number of steps and the distance covered are displayed.
Press SET again to see the calories expended and the exercise
time.
Total number of steps and total distance covered:
The device displays the cumulative number of steps and distance
covered during your various sporting activities. This function allows
you to keep track of the distance covered during a week, a month or
a year, for example. If you do not reset this function to zero, the data
will continue to be compiled. To ensure that you do not miss this
information, TOTAL is displayed in the bottom-left of the screen.
Automatic walking/running mode:
The pedometer automatically recognises your activity mode:
running or walking. It can therefore use the appropriate stride length
(walking or running) to calculate the distance covered. When you
alternate between walking and running during the same session,
this function guarantees that the distance is correct. If you do not
want to use this function because you are using the pedometer only
for walking or running, you can set the same stride length for the two
types of activity. The distance will then be calculated using the same
stride length.
When walking, a symbol in the shape of a walker is displayed on the
right of the screen and your walking stride length is used to calculate
distance. When running, a symbol in the shape of a runner is
displayed on the right of the screen and your running stride length is
used to calculate distance.
26
PODOMETREDISTAT500PART1.qxd:Mise en page 1 20/03/07 15:41 Page 26

EN
29
Resetting saved information to zero:
- Select the file you want to delete by pressing the RESET button.
- Hold down the RESET button for 2 seconds. “DEL” is briefly
displayed on the screen, and the file is deleted.
- The next archived file then takes the place of the deleted file. (If
you delete file R3, file R4 will take its place in the memory)
- If you hold the RESET button down for a further 2 seconds, all files
will be deleted. In this case “No” will be displayed on the screen: all
5 memories are empty.
TECHNICAL INFORMATION
Changing the battery
The device uses a CR2032 3V battery
To replace the battery:
1. Open the lid of the battery compartment using a coin.
2. Replace the used battery.
3. Replace the lid of the battery compartment and close it without
forcing it.
NB: Protect the environment by returning your used batteries to
appropriate collection areas.
Battery
Contacts
- When consulting the data in a file, you can check the same data in
the next file by pressing RESET. (E.g.: if you are interested in the
calories in file R1, press RESET to see the calories in file R2).
R5R1 R2
RESET
RESET
RESET
RESET
RESET
RESET
RESET
Steps and
calories
SET
SET
SET
RESET
Steps and
distance
Steps and
calories
SET
SET
SET
Steps and
exercise
time
Steps and
distance
Steps and
calories
SET
SET
SET
Date, “R1”,
exercise
time
Date, “R2”,
exercise
time
Date, “R5”,
exercise
time
Steps and
exercise
time
Steps and
exercise
time
DATA
SET
SET SET
Steps and
distance
28
PODOMETREDISTAT500PART1.qxd:Mise en page 1 20/03/07 15:41 Page 28

EN
31
CONTACT
So that we continue to develop improved products which meet your
needs, we are pleased to hear your feedback with regard to the
quality, functionality and usage of our products.
• In France, you can contact the customer relations centre on: 0810
080808 (price of a local call)
• For other countries, you can leave a message on the appropriate
section of our website at www.decathlon.com
We will reply as soon as possible.
Specifications
12/24 hour with H/M/S display
Step counter from 0 to 999,999 steps
Distance covered from 0 to 9,999.99 km (0 to 6,209.99 miles)
Stride length from 15 to 200cm (6 to 79 inches)
Weight … from 20 to 200kg (44 to 440 lb)
Operating temperature: -10°C to 40°C.
Storage temperature: -20°C to 60°C.
Power supply: 1 CR2032 3V battery
Factory mode
This mode allows you to check the device should it not function
correctly.
To restart the pedometer:
1. Hold down all three buttons simultaneously (MODE, SET and
RESET) for 3 seconds. All digits display on the screen.
2. Press the SET button to return to TIME mode; the pedometer is
reset to zero.
30
PODOMETREDISTAT500PART1.qxd:Mise en page 1 20/03/07 15:41 Page 30

EN
3332
Problems experienced Possible causes
1. The screen display is blank
1.1 It could be that there are no batteries in the device.
1.2 The batteries are wrongly positioned in the compartment. Check the polarities.
1.3 The batteries may be run down. They need to be replaced. See the paragraph headed “Changing the batteries”.
2. The product does not function correctly
or part of the screen is blank
Begin an automatic check of the device by going to the paragraph headed “Factory Mode”.
If the procedure is unsuccessful, return your device to your nearest retailer.
If the procedure is successful, replace the batteries by going to the paragraph headed “Changing the batteries”.
3. When I walk, the number of steps does
not increase
3.1 The device may be wrongly positioned. Ideally, it should be clipped horizontally and worn on your belt (the closest position to your centre of gravity). Firstly, check
that the motion sensor (which measures your steps) is working:
• Set the device to STEP mode.
• Hold the device upright in your hand with the screen in a vertical position.
• Move the motion sensor downwards (once or twice per second).
• Check that the number of steps increases on the screen.
3.2 Your walking rhythm is not high enough to detect your steps. In this case, contact your retailer to check the sensitivity of the device. To check that the
device functions when walking quickly:
• Set the device to STEP mode.
• Clip the device in a vertical position on your belt.
• Walk quickly and check that the number of steps increases on the screen.
4. When I walk, the speed is not shown Remember, average speed is calculated over a minute, so the device does not display data during the first minute of exercise or after stopping.
5. When I walk, the speed seems wrong Average speed is calculated and displayed every minute according to the distance covered during the previous completed minute. It is an average speed rather than an
instant speed.
6. The distance covered shown is wrong
or imprecise
6.1 The device does not immediately measure distance. Distance is calculated from the number of steps. Distance is measured to an accuracy of +/- 10%
depending on the stride length setting and the type of exercise. See the paragraph headed “Setting stride length” to reset your stride length, and try to
maintain regular strides. The value is more accurate on flatter ground.
6.2 Your device may not be set to the correct distance unit (miles and km). See the paragraph headed “Setting the distance unit”.
7. The device is in running mode when
I’m walking
7.1 The device has an automatic walking / running mode. It automatically detects your striding mode and adapts its calculating method accordingly. It may be
that the device goes to running mode when you are walking quickly. In this case, change the running mode settings according to your stride when you are
walking quickly.
8. The accuracy varies between walking
and running modes
Your stride length differs according to whether you are walking or running. Don’t forget to set your stride length for each mode by going to the paragraph
headed “Setting the pedometer”.
PODOMETREDISTAT500PART1.qxd:Mise en page 1 20/03/07 15:41 Page 32
Table of contents
Other GEONAUTE Pedometer manuals