Gerstner 1600 Tote Case User manual

prep parts and Work Area before starting
• Make sure you are working on a sturdy, flat work surface
that will not scratch or damage the parts while handling.
• Lightly sand and deburr the part edges if needed.
• It is recomended to dry fit (construct without glue) the
parts to familiarize yourself with the assembly process.
1600 Tote Case DIY Kit Instruction Manual
Recommended Tools for Chest Construction
• Wood Glue
• 18" Bar Clamps (2-3)
• #2 Philips Screw Driver
• Rubber Mallet or Hammer
• Electric Drill
• Router (Optional) with flush cut bit
• 1/8" Roundover Bit
• 100 and 150 Grit Sandpaper
• Scale or Ruler
• 90 Degree Square
• Choice of Stain/Finish
• 3/32" and 3/16" Drill Bits
*Caution: We use veneer plywood on the top of this case. The plywood gives the box stability through everchanging conditions of humidity.
Please note that you must exercise great care when sanding the top surface. The veneer is .010" thick and excessive sanding on the top can
cause a sand-thru, to the plywood core below the veneer. We suggest you sand the solid wood just enough to meet the surface of the veneer.

Bottom Assembly
1Locate the box sides as shown. You will notice that each
of the sides have been marked with either R (right side)
or L (left side). The thinner part, located towards the top
of the photo on the next page, are the top pieces. The
lower larger section of parts are the main box parts. It
is recommended that you maintain right, left, front and
back orientation while assembling the box parts
together.
2Lay the lower box parts on the table as shown. Note
that the right side is to the right and the back is to the
back and so on. The back is pre-drilled for hinges and
the front is pre-drilled on center for the draw latch. The
bottom of the box is the light-colored birch plywood.
Add glue to the parts for assembly.
Check bottom flushness. This is to make sure the
bottom is not in upside down.
3Clamp box as shown and wipe off excess glue. Check
assembly for squareness with 90-degree square. Allow
time for glue to dry before handling and double check to
make sure the bottom is flush with the frame
components.
4Locate, glue and install tray support rails in both the
right and left sides. The supports should stay in place
after pressing them in. If they move or fall out of the
groove a couple pieces of masking tape can be used to
hold them in place.

Top Assembly
5Lay top parts out. Add glue to the parts for assembly.
Make sure top is flush with frame parts and not
installed upside down.
Glue and clamp in the same way that the bottom
section was completed in Step 3. Remove excess glue
and check top for square.
Tray Assembly
6Next, assemble the tray as shown. The tray bottom is
1/8" hardboard (or birch plywood in some kits) and is
installed in the 1/8" groove cut in the tray parts. Please
note the tray bottom will not be flush with the tray
frame parts. The bottom is recessed into the tray as
shown in the pictures below.
7Check the fit of the tray in the box, it should slide freely
front to back. If the fit is too tight you might have to
sand a little off of the tray to ensure proper fit.

Sanding
8Fill any open joints or imperfections with the quality
wood filler of your choice.
9Sand the surfaces flush using your preferred method.
An orbital sander will greatly reduce the amount of
work required. We sand chests with 120-150 grit paper
before applying the stain and finish. USE CAUTION
when sanding the top veneer, as it is very thin and
can be damaged easily!
10 Round over edges with hand sanding block to prep the
chest for corner hardware.
OPTIONAL: Gerstner typically rounds over exterior
edges to soften the feel of the product. This can be
achieved with a 1/8" roundover bit.
Hardware Installation
11 Check proper fit of top lid to the box. Sand edge to
remove tool marks and uneven gap if present
12 Use the supplied hardware to check the top lid fitting.
The holes should line up with the hardware if the top
was properly fit.
13 Check round over with corner hardware. An initial pilot
hole has been drilled in the top for the corners. You will
have to drill the remaining holes for each of the corners
provided. Now is a good time to drill these remaining
screw holes. Drill all the hardware screw holes with a
3/32" drill bit (excluding the top lid tack).
Rubber bumpers attach with the bottom corner hardware.
NOTE: Some hardware may vary slightly from the images shown
due to availability.

Staining & Finishing
Many options exist for adding a
protective finish to your wood
project. Select the finish of your
choice and apply as desired. If
using the recommended Gerstner
Classic Wood Stains with lacquer
top coat, please follow the
directions listed below.
14 Prior to finishing, remove any hardware that was
installed during drilling. Lightly re-sand the exterior
surfaces to remove any scratches or contamination
(oils from your skin). This will allow for a quality finish.
15 Apply stain to inside edges, and exterior surfaces as
desired. Wipe excess stain from the surface and make
sure the color has been evenly applied.
16 Apply a lacquer finish to the chest. Lightly sand the first
coat, or seal coat, once dry with 320 grit sand paper.
Apply top coat to parts as desired and let finish fully
cure before handling.
17
Install the Gerstner nameplate where desired. We
typically place the nameplate on the front for this style
of chest. After installation, remove the protective
film to expose the beauty and luster of the nameplate.
Felt Installation
.
18 Install large flat sections of felt first.
19 After all felt has been installed, let the chest sit open for
a few hours to dry.
A 50/50 mix of white glue
and water can be used for felt
installation. We recommend
Gerstner Whew Glue for all felt
applications, as it holds reliably,
yet easy to replace if you ever
need to re-felt in the coming
years. It is the only felt glue we
use in our workshop.

Did you Enjoy BUILDING YOUR
NEW 1600 TOTE CASE?
Check out all of the other Gerstner
Workshop DIY Kits at www.GerstnerUSA.com.
Congratulations!
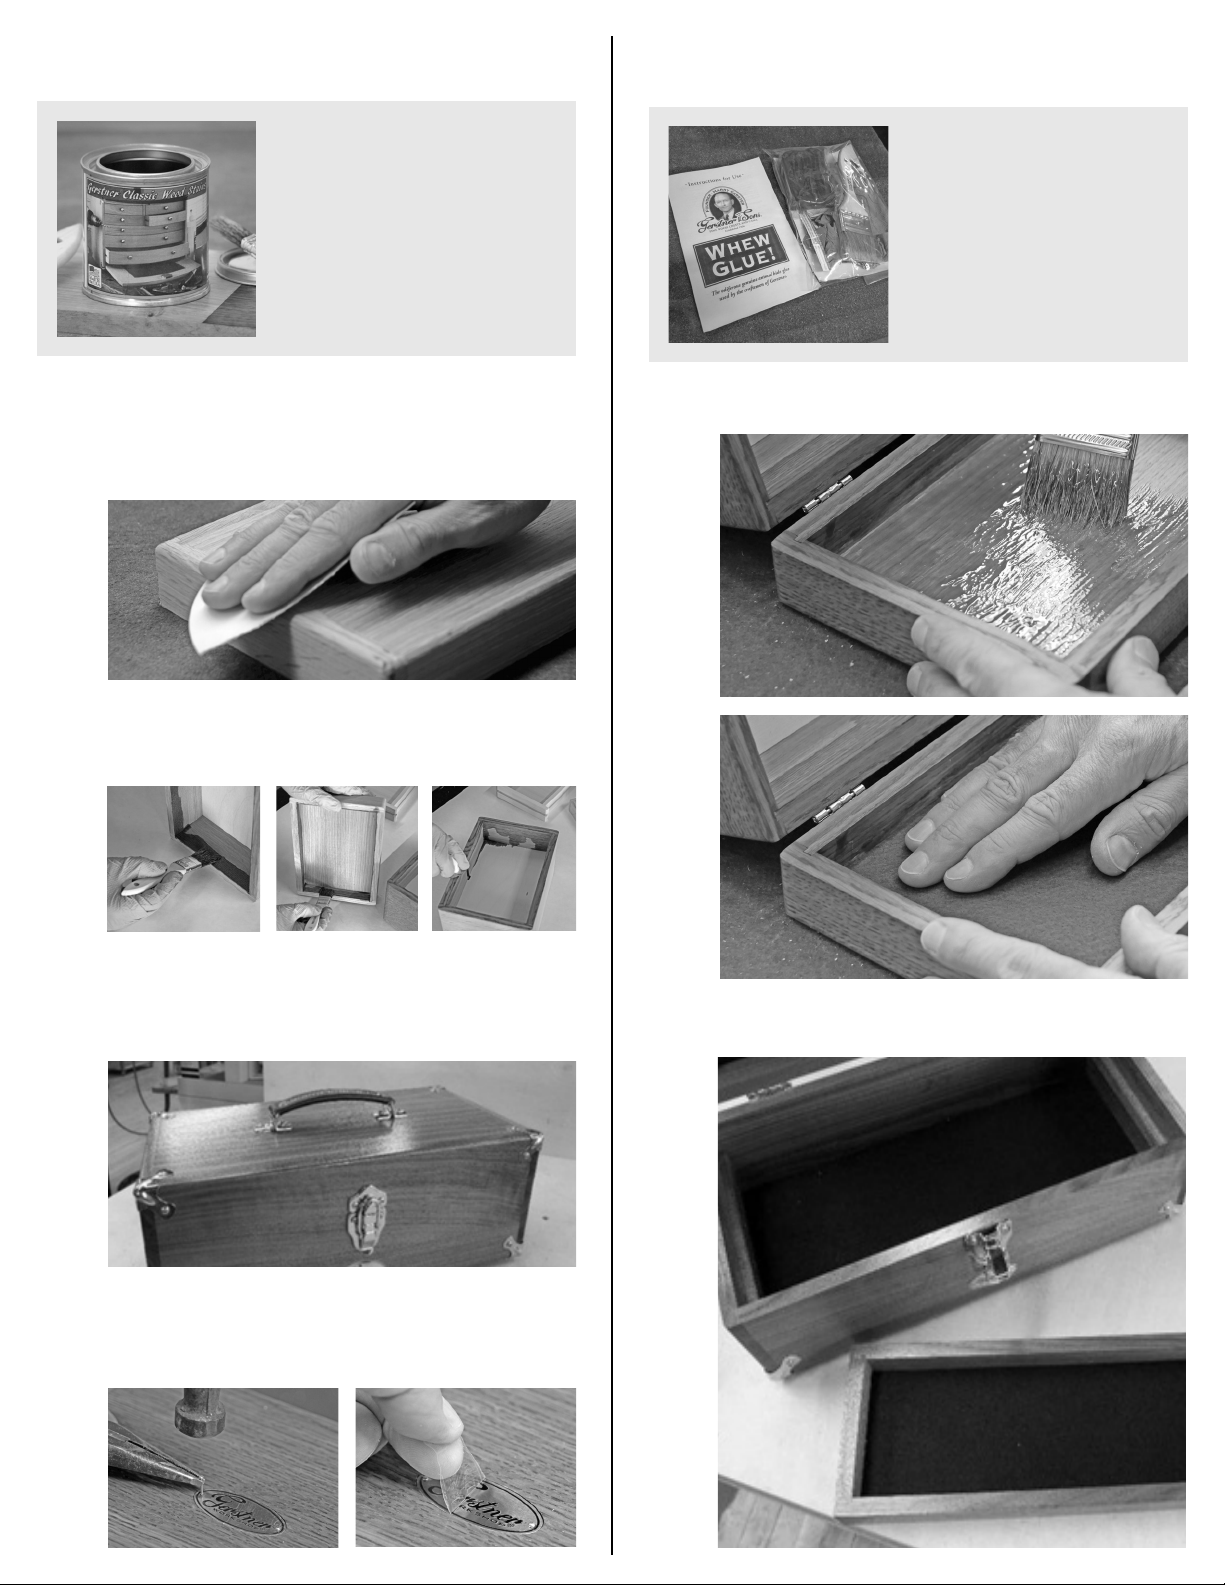
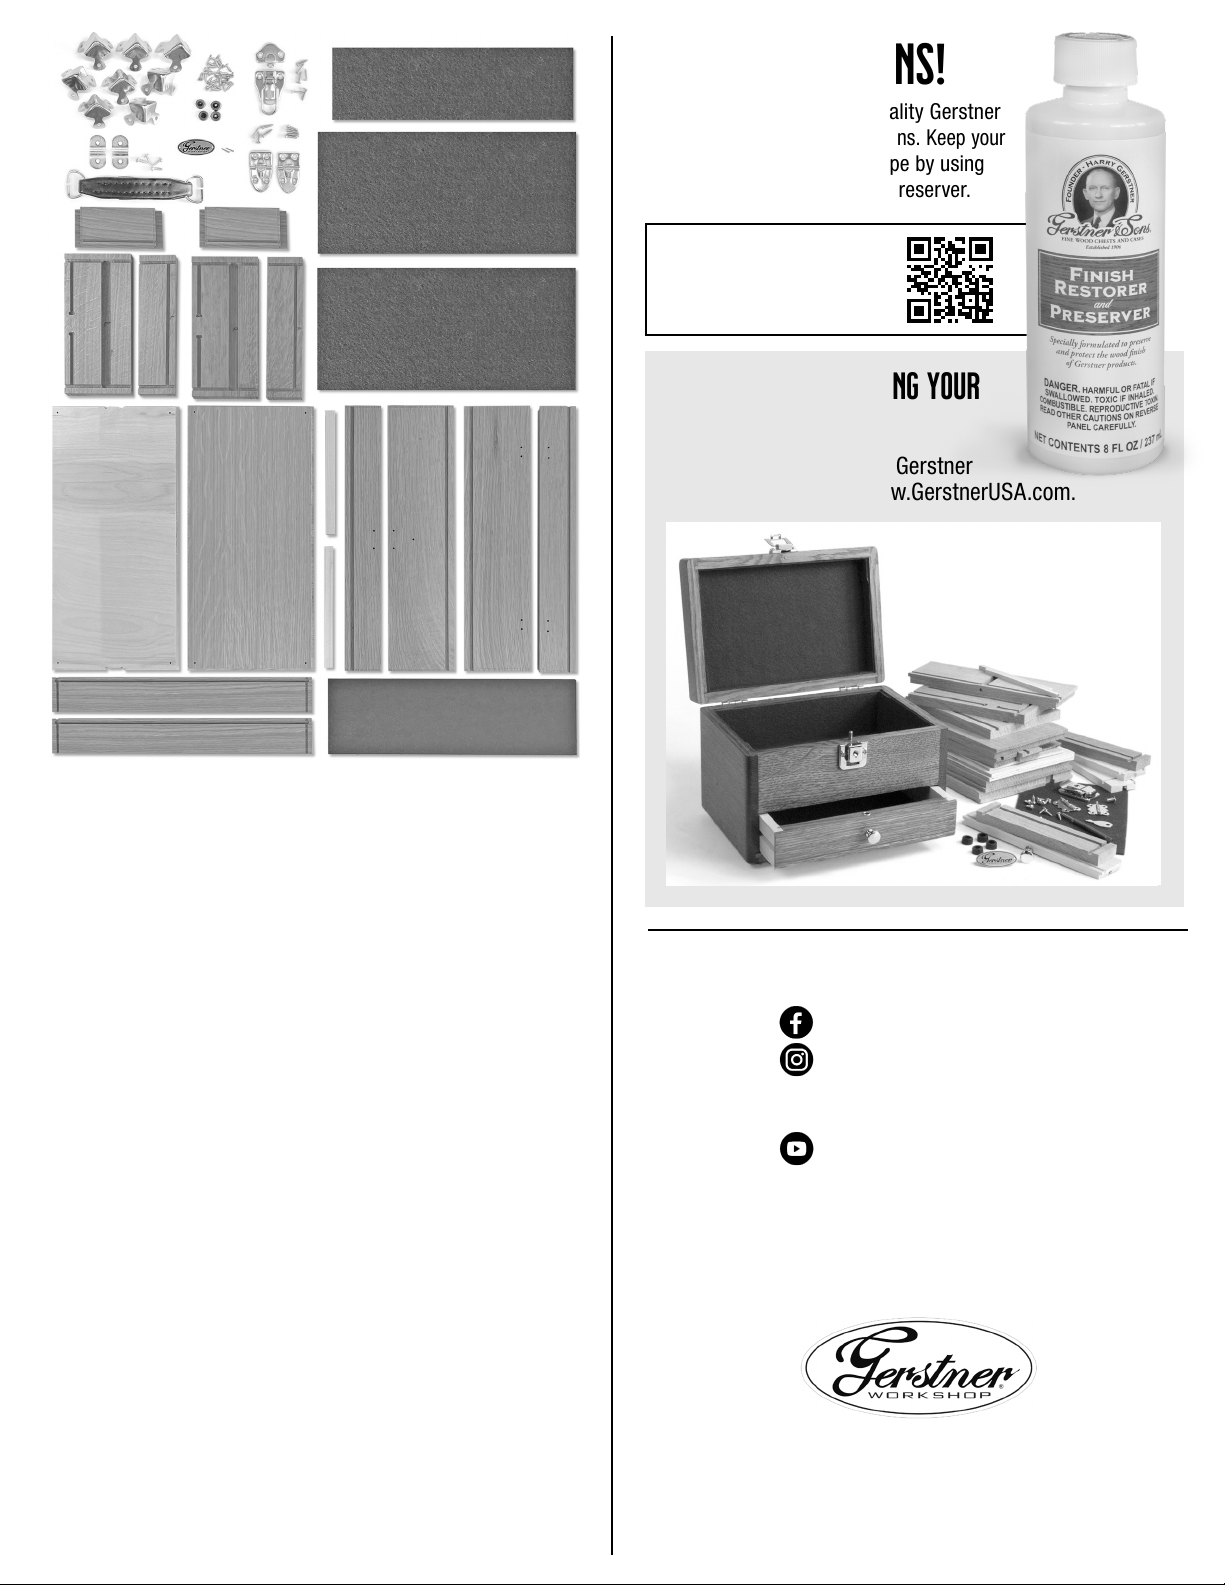
You have built an heirloom quality Gerstner
chest that will last for generations. Keep your
fine wood chest in tip top shape by using
Gerstner Finish Restorer and Preserver.
Scan to watch a brief video
demonstration of
cleaning
with Gerstner Finish Restorer
and Preserver
Parts List Quantity
• Bottom front – oak .........................1
• Bottom side – Left – oak ....................1
• Bottom side – Right – oak ...................1
• Birch plywood bottom ......................1
• Tray support rails – poplar ...................2
• Lid front – oak ............................1
• Lid side – Left ............................1
• Lid side – Right ...........................1
• Lid top – oak .............................1
• Tray front and back – oak....................2
• Tray sides – oak...........................2
• Tray bottom - 1/8" material ..................1
• Felt – top lid – Brown.......................1
• Felt – tray - Brown .........................1
• Felt – bottom – Brown . . . . . . . . . . . . . . . . . . . . . .1
• Black leather top handle with Nickel D-rings ......1
• Nickel handle plate.........................2
• Nickel – #5 x 3/8" PH screws................24
• Nickel – #8 x 1/2" PH screws .................4
• Nickel – #5 x 5/8" FLT screws ...............13
• Nickel catch ..............................1
• Nickel 1" stop hinge ........................2
• Nickel 3-leg corner.........................8
• Rubber bumpers...........................4
• Nameplate with 2 nails......................1
We would love to see your Gerstner Workshop
project pictures! Post and visit us at:
Facebook.com/GerstnerUSA
Instagram.com/GerstnerUSA
Find helpful Gerstner tips and tricks at:
Youtube.com/Gerstner2010
For any questions or additional supplies,
please contact customer service.
Email: GerstnerDIYsupport@GerstnerUSA.com
Customer Support line: (937) 228-1662
Gerstner Workshop is a division of
H. Gerstner & Sons, Inc.
20 Gerstner Way, Dayton, Ohio 45402
GerstnerUSA.com
J1001
Just Right Box
DIY Kit
Table of contents
Popular Storage manuals by other brands

Quectel
Quectel LTE Module Series installation guide

Apricorn
Apricorn Aegis Padlock A25-PLE256 256GB user manual

Dell
Dell PowerVault LTO user guide

EKF
EKF C42-SATA technical information

HP
HP Surestore Disk Array 12h - And FC60 Configuration

Western Digital
Western Digital WD1500HLFS - VelociRaptor 150 GB Hard Drive Product specifications

Qualstar
Qualstar RLS-8350 Technical & service manual

Hitachi
Hitachi 9900 Series Architecture guide

Dell
Dell PowerVault 700N Administrator's guide

Exabyte
Exabyte EXB-8205 owner's manual

Compaq
Compaq 157767-001 - AIT Drive 50/100 Tape reference guide

ATTO Technology
ATTO Technology FastStream SC 5300 Performance Benchmark