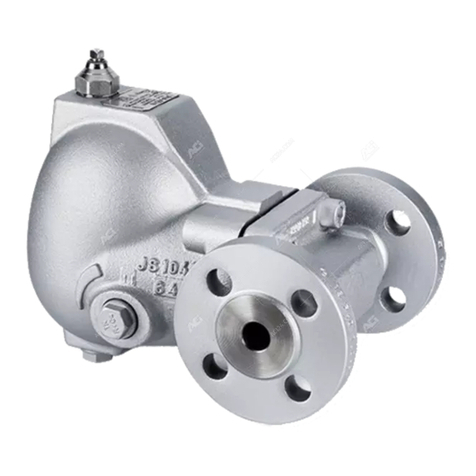
GESTRA UNA 38 User manual

Ball-float steam trap
UNA 38
UNA 39
Original Installation Instructions
818603-03

Contents
Foreword ............................................................................................................................................3
Availability.............................................................................................................................................3
Formatting features in the document ......................................................................................................3
Safety..................................................................................................................................................3
Use for the intended purpose .................................................................................................................3
Basic safety notes .................................................................................................................................4
Information on property damage or malfunctions .....................................................................................4
Qualification of personnel.......................................................................................................................5
Protective gear......................................................................................................................................5
Typographic features of warning notes....................................................................................................5
Formatting features for warnings of property damage ..............................................................................5
Description .........................................................................................................................................6
Scope of supply and equipment specification ..........................................................................................6
Task and function................................................................................................................................11
Storing and transporting the equipment.........................................................................................12
Storing the equipment .........................................................................................................................12
Transporting the equipment .................................................................................................................12
Mounting and connecting the equipment.......................................................................................13
Preparing installation ...........................................................................................................................13
Orientation of the equipment ................................................................................................................13
Connecting the equipment ...................................................................................................................14
Operation ..........................................................................................................................................16
After operation .................................................................................................................................17
Removing external dirt deposits............................................................................................................18
Maintaining the equipment...................................................................................................................18
Servicing the equipment and installing spare parts ................................................................................26
Troubleshooting ...............................................................................................................................31
Putting the equipment out of operation ..........................................................................................33
Removing harmful substances..............................................................................................................33
Removing the equipment .....................................................................................................................33
Re-using equipment after storage.........................................................................................................34
Disposing of the equipment..................................................................................................................35
Technical data..................................................................................................................................36
Dimensions and weights ......................................................................................................................36
Pressure & temperature ratings............................................................................................................40
Manufacturer's declaration.............................................................................................................45

3
Foreword
This installation & operating manual will help you
use the following types of equipment safely and
efficiently for their intended purpose.
UNA 38
UNA 39
These steam traps will be called equipment in this
document.
This installation & operating manual is intended for
anyone commissioning, using, operating, servicing,
cleaning or disposing of this equipment and, in
particular, for professional after-sales service
technicians, qualified personnel and authorised and
trained staff.
All of these persons must read and understand the
content of this installation & operating manual.
Following the instructions given in this installation &
operating manual helps avoiding danger and
increases the reliability and service life of the
equipment. Please note that in addition to the
instructions given in this installation & operating
manual you must also observe all locally applicable
rules and regulations concerning the prevention of
accidents as well as approved safety guidelines for
good professional practice.
Availability
Keep this installation & operating manual together
with the plant documentation for future reference.
Make sure that this installation & operating manual
is available to the operator.
The installation & operating manual is part of the
equipment. Please hand over this installation &
operating manual when selling the equipment or
passing it on.
Formatting features in the
document
Certain text elements of this installation & operating
manual feature a specific typographic design. You
can easily distinguish the following text elements:
Standard text
Cross-reference
Listing
Sub-items in listings
Steps for action.
Here you will find additional useful
information and tips ser
ving to assist you
in using the equipment to its fullest
potential.
Safety
Use for the intended purpose
The following types of ball-float steam trap are used
to remove condensate from steam and other gases
or gas mixtures in steam-heated consumers in
high-pressure applications.
UNA 38
UNA 39
The equipment must only be used within the
allowable pressure and temperature limits and only
if the chemical and corrosive influences on the
equipment are taken into account.
Correct use includes compliance with the
instructions given in this installation & operating
manual, in particular obedience to all safety
instructions.
Any other use of the equipment is considered to be
improper.
Note that the equipment is also used incorrectly if
the materials of the equipment are not suitable for
the fluid.

4
Basic safety notes
Risk of severe injuries
The equipment is under pressure during
operation and may be hot. Before carrying out
any work on the equipment make sure that the
following requirements are met:
The pipes must be depressurized (0 bar).
The fluid must be completely removed from
the pipes and the equipment.
During work on the equipment the
installation must be switched off and
protected against unauthorised or
unintended activation.
The pipes and the equipment must have
cooled down to room temperature (approx.
20 °C).
If the equipment is used in contaminated areas
there is a risk of severe injuries or death caused
by harmful substances in or on the equipment.
Before working on the equipment make sure
that it is completely decontaminated. Always
wear the protective clothing prescribed for
contaminated areas when working on the
equipment.
The equipment must only be used with fluids
that do not attack the material and the gaskets
and sealings of the equipment. Otherwise leaks
may occur and hot or toxic fluid could escape.
The equipment and its component parts must
only be mounted or removed by qualified
personnel. A qualified person must be
acquainted with and experienced in the
following:
Making pipe connections.
Selecting suitable lifting gear and
understanding the rules for its safe use.
Working with dangerous (contaminated, hot
or pressurized) fluids.
If the admissible temperature and pressure
limits are exceeded the equipment may be
destroyed and hot or pressurized fluid may
escape. Make sure that the equipment is only
operated within the admissible service range
and limits.
For more information on limits and pressure &
temperature ratings see name plate and the
section "
Technical Data
".
Risk of minor injuries
Sharp edges on internals present the danger of
cuts to hands. Always wear industrial gloves
when servicing the equipment.
If the support of the equipment during
installation is insufficient the equipment might
fall down, thereby causing bruises or injuries.
Make sure the equipment is safely held in place
during installation and cannot fall down. Wear
protective safety footwear.
The shape of the equipment means that it can
roll on the flange's outside diameter. This can
squash parts of the body.
Therefore, only store and transport the
equipment lying on its side.
Information on property damage
or malfunctions
Malfunctions will occur if the equipment is
installed in a wrong position or with the flow
arrow pointing in the opposite direction of the
fluid flow. This may result in damage to the
equipment or the installation. Make sure that
the flow arrow on the equipment body matches
the indicated direction of the fluid flow in the
pipe.
If the material is unsuitable for the fluid,
increased wear may occur and fluid may
escape. Make sure that the material is suitable
for the fluid used in your installation.
5
Qualification of personnel
A qualified person must be acquainted with and
experienced in the following:
the pertinent on-site rules and regulations for
preventing fire and explosions as well as
industrial safety regulations
working on pressure equipment
making pipe connections
working with dangerous (hot or pressurized)
fluids
lifting and transporting loads
observing all notes and instructions in this
installation & operating manual and the
applicable documents
Protective gear
The operator must ensure that anyone working on
the equipment must wear the required protective
clothing and safety gear stipulated for the site of
installation. The protective clothing must be suitable
for the used media and must protect the wearer
against safety and health hazards associated with a
particular job to be carried out at the site of
installation. Protective clothing & equipment must
provide protection from potential hazards, in
particular from injuries to:
Head
Eyes
Body
Hand
Feet
Hearing
Note that this list is not exhaustive. The operator
must establish personal protective equipment
guidelines and specify any additional protective
gear that is required if the worker is exposed to a
specific risk at the site of installation.
Typographic features of warning
notes
DA
NGER
Notes with the heading DANGER warn
against imminent dangerous situations that
can lead to death or serious injuries.
WARNING
Notes with the heading WARNING warn
against possibly dangerous situations that
could lead to death or serious injuries.
CAUTION
Notes with the heading CAUTION warn
against dangerous situations that could
lead to minor or moderate injuries.
Formatting features for warnings
of property damage
Attention!
This information warns of a situation
leading to property damage.

6
Description
Scope of supply and equipment
specification
Scope of supply
Our equipment is delivered packed and ready for
assembly.
Equipment specification
UNA 38
No.
Designation
1
Hex nuts
2
Sleeves
3
Body
4
Body gasket
5
Set screws
6
Bimetallic vent
7
SIMPLEX control unit
8
DUPLEX control unit
No.
Designation
9
Cover
10
Rating plate
11
Drain with screw plug
12
SIMPLEX AO 80 MAX control unit
13
DUPLEX AO 80 MAX control unit
14
Direction of flow arrow

7
UNA39
No.
Designation
14
Direction of flow arrow
15
Body
16
Set screws
17
Body gasket
18
SIMPLEX control unit
19
Cover
No.
Designation
20
Manual vent valve
21
Rating plate
22
Sleeves
23
Hex nuts
24
Drain with screw plug
25
SIMPLEX AO 140 MAX control unit

8
Possible orifices
The following orifices (AO) are available, depending
on the differential pressure ∆PMX:
AO type
∆PMX
[bar]
UNA 38
UNA 39
AO 50
50
×
–
AO 64
64
×
–
AO 80
80
×
×
AO 80 MAX
80
×
–
AO 110
110
–
×
AO 140
140
–
×
AO 140 MAX
140
–
×
Optional extras
The following items are available as optional extra:
Optional equipment for UNA 38
No.
Designation
26
Manual vent valve with socket wrench
27
Sealing ring for manual vent valve
28
Manual lifting lever with socket wrench
29
Sealing ring for manual lifting lever
In equipment with control unit SIMPLEX the
hand
-vent valve is included as standard.
Optional equipment for UNA 39
No.
Designation
30
Lever for manual lifting lever
31
Manual lifting lever

9
Direction of flow
Thanks to the different versions of the UNA 38, you
can adapt the equipment's direction of flow to suit
your system. The following installation positions are
possible:
Position "v" for installation in vertical pipes with
direction of flow from top to bottom
Position "hl" for direction of flow to the left
Position "hr" for direction of flow to the right
(optional)
The UNA 39 can only be installed in horizontal pipes
with flow from the top.
End connections
The equipment is available with the following end
connections:
Flanges
Socket-weld ends
Butt-weld ends
Butt-weld ends via transition pieces
Name plate
The following items are indicated on the name
plate:
Manufacturer
Type designation
Design
Nominal size
Pressure rating
Design temperature
Design pressure
Max. admissible differential pressure
CE marking
Date of manufacturing
The following items are indicated on the equipment
body:
Material
Batch code
Direction of flow
The following items are indicated on the end
connections:
Flange size
Flange face type (RJ number)
The limiting conditions and pressure &
temperature ratings specified in this
installation manual are applicable for
standard equipment. Note that these
values may differ for modified or
customized equipment.
All equipment specific values are indicated
on the nameplate.

10
Application of European Directives
Pressure Equipment Directive
The equipment conforms to this directive (see
"Manufacturer's Declaration" section) and can be
used for the following media:
Fluids of group 1
Fluids of group 2
ATEX Directive
The equipment does not have its own potential
ignition source and is not subject to this directive
(see "Manufacturer's Declaration" section).
When installed, static electricity may arise between
the equipment and the connected system.
When used in potentially explosive atmospheres,
the plant manufacturer or plant operator is
responsible for discharging or preventing possible
static charge.
If it is possible for medium to escape, e.g. through
actuating mechanisms or leaks in threaded joints,
the plant manufacturer or plant operator must take
this into consideration when dividing the area into
zones.

11
Task and function
Purpose
Type UNA 38 and UNA 39 units are used to remove
condensate from steam and other condensable
gases in steam-heated consumers in high-pressure
applications.
UNA 38 units with DUPLEX control unit are
especially suitable for saturated and hot steam.
Units with DUPLEX control unit are additionally used
for venting the system.
Units with SIMPLEX control unit are especially
suitable for cold condensate and superheated
steam.
A special MAX control unit is available for high
condensate flowrates.
Function
The float (33) opens the orifice (32) based on the fill
level. This regulates the drainage rate. With the
orifice opened to maximum, the drainage rate
depends on the diameter of the orifice (AO).
The DUPLEX control unit consists of the float and an
additional, temperature-dependent bimetallic vent
(6).
You can lift the float manually using the optional
manual lifting lever.
The optional manual vent valve allows you to vent
the pipe manually.
The diagram below shows a UNA 38 with DUPLEX
control unit. The DUPLEX control unit is only
supplied for the UNA 38.
A special MAX control unit is available for high
condensate flowrates.
If the float (33) is raised while the fill level is rising,
first of all the nozzle needle (34) is pulled out of the
pilot valve. This causes a small amount of medium
to flow through the pilot valve. The medium
squeezes the bellows (39) of the control unit, which
in turn fully opens the orifice (40).
A pressure relief line (36) connects the control
chamber (38) to the pressure relief orifice (35) on
the pilot valve. When the fill level falls, the float
causes the orifice to close. The pressure relief hole
(37) equalises the pressure between the control
chamber and the interior. The bellows expand and
close the orifice.
The diagram below shows a UNA
39 unit
with SIMPLEX AO
140 MAX control unit.
The special components of the UNA
38
units with SIMPLEX AO
80 MAX control
unit are identical in terms of design and
function.

12
Storing and transporting the
equipment
Caution
Risk
of injury: Parts of the body can be
squashed by unstable equipment during
transport or storage!
Always store and transport the
equipment lying on its side.
The shape of the equipment means that it can roll
on the flange's outside diameter.
Attention!
Equipment can be damaged if stored or
transported improperly.
Close all openings with the sealing
plugs or covers supplied with the
equipment or use similar sealing
covers.
Protect the equipment against
moisture and corrosive atmospheres.
Please contact the manufacturer if the
specified transport and/or storage
requirements cannot be met.
Storing the equipment
Please observe the following items when storing
the equipment:
Do not store the equipment for more than 12
months.
Use the supplied sealing plugs or other suitable
seal caps in order to seal off all openings of the
equipment.
Protect the sealing surfaces and contact areas
against mechanical damage.
Protect the equipment and all components
against hard shocks and impacts.
Store the equipment only in closed rooms that
meet the following environmental conditions:
Air humidity below 50 %, not condensing
Indoor air: clean, salt-free and non-corrosive
Temperature 5–40 °C.
Make sure that all these requirements are
always met when storing the equipment.
Please contact the manufacturer if you cannot
comply with the recommended storage
conditions.
Transporting the equipment
CAUTION
Do not drop the equipment. If it falls down
it may cause b
ruises and injuries.
To transport and mount the equipment
safely use suitable lifting gear.
Connect the noose strap of the lifting
gear to the body.
Provide sufficient support for the
equipment during transport and
installation.
Wear protective safety footwear.
Lightweight equipment may be transported and
mounted without using any lifting gear.
To lift equipment the weight of which exceeds
approx. 25 kg, you need the help of a second
person or suitable lifting gear.
Your physical strength and on-site regulations and
conditions determine what weight can be lifted and
if support is required.
Meet the requirements for storage also when
transporting the equipment.
Prior to transport seal off connections with
sealing plugs.
If you do not have the sealing plugs
supplied with the equipment use
appropriate seal caps to seal off the
connections.

13
For short distances (only a few metres) you can
transport the equipment unpacked.
When transporting the equipment over larger
distances use the original packaging.
If you do not have the original packaging use a
box that protects the equipment adequately
against corrosion and physical damage.
For a short period of time the equipment
may be transported eve
n if the
temperature is below 0
°C, provided that
the equipment is completely empty and
dry.
Mounting and connecting the
equipment
Preparing installation
Take the equipment out of the transport
packaging.
Check the equipment for transport damage.
Contact the manufacturer if you detect any kind
of shipping damage.
When supplied by the factory, the connections may
be sealed off with sealing plugs.
Remove sealing plugs before mounting the
equipment.
Keep the sealing plugs and the packing for
further use.
DANGER
Personnel working on pipes are exposed to
safety risks and may suffer severe injuries,
poisoning or even loss of life.
Make sure that no hot or hazardous
fluid is in the equipment or the pipes.
Make sure that the pipes upstream
and downstream of the equipment are
depressurised.
Make sure that the installation is
switched off and protected against
unauthorised or unintended activation.
Make sure that the equipment and the
pipes have cooled down to room
temperatures.
Wear protective clothing that is
suitable for the fluid and, if necessary,
wear protective gear.
For more information on suitable protective clothing
and safety gear refer to the safety data sheet of the
fluid in question.
Drain pipes until they are empty.
Switch the installation off and protect it against
unauthorised or unintended re-activation.
The manual vent valve of the UNA 39 is not fitted on
delivery.
To install the manual vent valve, proceed as
described on page 29.
Orientation of the equipment
The different versions of the UNA 38 equipment
allow you to adapt the direction of flow to suit your
system. The following installation positions are
possible:
Positions "hl" and "hr" for installation in
horizontal pipes
Position "v" for installation in vertical pipes with
direction of flow from top to bottom

14
Attention!
Malfunctions may occur if the control unit
is installed incorrectly.
When installing the equipment make
sure that the name plate on the cover
is on top and the float arm is free to
move up and down.
To avoid malfunctions make sure the following
requirements are met when mounting the
equipment:
The flow arrow on the equipment body must
match the fluid flow direction.
The name plate on the cover must point
upwards.
Contact the manufacturer if you want to mount
the equipment in a different position of
installation.
Detach the cover from the body as described on
page 20.
Remove the control unit as described on
page 21.
Turn the control unit by 90° or 180° into the
desired position of installation.
Make sure that the float arm is free to move up
and down.
Fix the control unit to the body as described on
page 22.
Attach the cover to the body as described on
page 24.
Connecting the equipment
DANGER
I
ncorrectly connected equipment can
cause fatal accidents or severe injuries.
Make sure that only qualified skilled
personnel connect the equipment to
pipes.
Make sure that the flow arrow on the
equipment body matches the direction
of flow in the pipe.
Specialist personnel must be highly qualified and
fully experienced in making pipe connections for the
respective type of end connection.
CAUTION
Do not drop the equipment. If it falls down
it may cause bruises and injuries.
To transport and mount the equipment
safely use suitable lifting gear.
Connect the noose strap of the lifting
gear to the body.
Provide sufficient support for the
equipment during transport and
installation.
Wear protective safety footwear.
Lightweight equipment may be transported and
mounted without using any lifting gear.
To lift equipment the weight of which exceeds
approx. 25 kg, you need the help of a second
person or suitable lifting gear.
Your physical strength and on-site regulations and
conditions determine what weight can be lifted and
if support is required.

15
Attention!
Equipment will be damaged if the end
connections are undersized.
Make sure that the connections are
strong and rigid enough to support the
weight of the equipment and to
withstand the forces that occur during
operation.
Consider space required for servicing the
equipment and/or exchanging components and
observe the necessary withdrawal distance to
remove the cover. For more information on the
required withdrawal distances see section
"
Dimensions and weights
" on page 36.
Some applications require that the
equipment is fitted with an air
-balance
pipe:
Equipment with control unit SIMPLEX MAX,
float traps for compressed air line drainage
and equipment installed in plants where
condensate is lifted upstream of the
equipment.
In this case connect the air balance pipe
to the bore on top of the cover.
Make sure that the pipe system of the plant is
clean.
Make sure that the equipment is free from
foreign matter.
Mount the equipment in the desired installation
position.
Make sure that pipes satisfy the following
conditions:
Pipes must be routed such as to avoid water
pockets.
Pipes must always be on a downward incline.
Balancing pipes must have a minimum cross
section of DN 8 (¼ ").
For units with SIMPLEX control unit, a balancing
pipe must be connected to the hole for the
manual vent valve.
If you are unable to satisfy one or more of these
requirements, please contact the manufacturer.
Connect the end connections of the equipment
properly to the pipes.
If necessary, connect the air balance pipe to the
equipment as shown in the following drawing.
Make sure that the equipment is safely mounted
and that all connections are made correctly.

16
Operation
WARNING
Hot liquids and steam can cause scalding.
Wear protective clothing that is
suitable for the fluid and, if necessary,
wear protective gear.
Protective clothing and protective gear must protect
the whole body against contact with escaping hot
steam.
For more information on suitable protective clothing
and safety gear refer to the safety data sheet of the
fluid in question.
You can carry out the following work during
operation:
Open and close the optional manual vent valve
Open and close the optional manual lifting lever
The UNA 38 comes with its own tool, a socket
wrench with material number 526110.
The UNA 39 is supplied with a lever for operating
the manual vent valve or manual lifting lever.
The optional hand vent valve allows manual air
venting.
To air vent the equipment turn the hand-vent
valve (viewed from top) anticlockwise.
To close the hand-vent valve after air-venting
turn it clockwise.
Fasten the hand-vent valve hand tight.
The optional float-lifting lever allows the float to be
manually lifted irrespective of the liquid level. It can
be used to purge any dirt away from the seat area
and out of the equipment by opening the orifice and
draining the liquid.
The correct direction of rotation differs in the
UNA 38 and the UNA 39.
For the UNA 38, proceed as follows:
Turn the socket wrench clockwise to open.
Turn the socket wrench anti-clockwise to close.
For the UNA 39, proceed as follows:
Turn the socket wrench anti-clockwise to open.
Turn the socket wrench clockwise to close.
You can check the correct functioning of the
equipment during operation using the GESTRA
ultrasonic measuring unit VAPOPHONE®or
TRAPTEST®(VKP 40 and VKP 40plus).
For more details refer to the installation &
operating manual of the ultrasonic measuring
unit.

17
After operation
DANGER
If fluid escapes personnel may suffer
severe injuries, poisoning or even loss of
life.
After working on the equipment make
sure that all connections and valves
are tight.
Make sure that the gaskets of the
body are leakproof.
DANGER
Personnel working on pipes are exposed to
safety risks and may suffer severe injuries,
poiso
ning or even loss of life.
Make sure that no hot or hazardous
fluid is in the equipment or the pipes.
Make sure that the pipes upstream
and downstream of the equipment are
depressurised.
Make sure that the installation is
switched off and protected against
unauthorised or unintended activation.
Make sure that the equipment and the
pipes have cooled down to room
temperatures.
Wear protective clothing that is
suitable for the fluid and, if necessary,
wear protective gear.
For more information on suitable protective clothing
and safety gear refer to the safety data sheet of the
fluid in question.
D
ANGER
If the equipment is used in contaminated
areas there is a risk of severe injuries or
death caused by harmful substances in or
on the equipment.
Only qualified personnel are allowed to
perform work on contaminated
equipment.
Always wear the protective clothing
prescribed for contaminated areas
when working on the equipment.
Make sure that the equipment is
completely decontaminated before
carrying out any service work.
Follow the pertinent instructions for
handling the hazardous substances in
question.
Attention!
Frost damage may occur when the
installation is shut down.
Drain the equipment if ambient
temperatures below 0 °C (frost) are to
be expected.

18
Make sure that medium exiting the system is
caught.
Open the screw plug (11) at the bottom of the
body.
Wait until the equipment has drained fully.
Clean the sealing surfaces of the screw plug
and cover.
Insert a new gasket (41) in the hole in the cover.
The necessary torque for tightening the screw plug
varies depending on type.
To close the screw plug of the UNA 39, tighten
it to a torque of 170 Nm.
To close the screw plug of the UNA 38, tighten
it to a torque of 70 Nm.
Removing external dirt deposits
To remove dirt deposits rinse the equipment
with fresh water and wipe it with a clean, lint-
free cloth.
To remove any persistent residues use a
cleaning agent that is suitable for the material
and carefully wipe the equipment with a clean,
lint-free cloth.
Maintaining the equipment
You require the following tools for working on the
equipment:
Type B combination spanner to DIN 3113, in
sizes
10
11
16 (UNA 39 only)
17
18 (UNA 39 only)
27
30
32
36
46)
Torque wrench to DIN ISO 6789
10–60 Nm
60–120 Nm
120–300 Nm
Allen key to DIN ISO 2936 in sizes
4
6
8

19
The torques required for tightening threaded
connections vary depending on the type of
equipment and connection.
Designation
Torque [Nm]
UNA 38
UNA 39
Set screws
20
20
Hex nuts on set screws
270
340
Allen screws on control
unit
–
40
Regulating nut
120
–
Bimetallic vent
90
–
Manual vent valve
70
170
Manual lifting lever
110
–
Screw plug
110
–
Drainage screw plug
70
170
Malfunctions may occur if the equipment is
used with different types of condensate:
The following condensates in particular
cause problems:
very oily condensates
condensates that resinify or become
gummy
condensates that recrystallize
condensates that contain solid matter.
In these cases check the equipment at
regular intervals for contamination and, if
necessary, remove dirt deposits.
To reduce contamination we recommend
installing a sedimen
tation vessel or a dirt
pocket arrangement upstream of the
equipment.
Normally you do not have to clean the internal parts
of the equipment.
To clean the equipment completely take off the
cover and remove the control unit.

20
Removing cover
The jobs described in this section differ
depending on the type of equipment.
To remove the cover of the UNA 38, proceed as
follows:
Remove the four hex nuts (1).
Remove the four sleeves (2) from the four set
screws (5).
Remove the cover (9) from the body (3).
Take the body gasket out of the body.
Dispose of the gasket in accordance with
regulations at the location of use.
To remove the cover of the UNA 39, proceed as
follows:
Remove the twelve hex nuts (23).
Remove the twelve sleeves (22) from the set
screws (16).
Remove the cover (19) from the body (15).
Take the body gasket out of the body.
Dispose of the gasket in accordance with
regulations at the location of use.
This manual suits for next models
1
Table of contents
Other GESTRA Industrial Equipment manuals

GESTRA
GESTRA BK 45 User manual

GESTRA
GESTRA VKP 40Ex Manual

GESTRA
GESTRA QuickCC User manual

GESTRA
GESTRA NRG 16-41 User manual

GESTRA
GESTRA TA 50 User manual

GESTRA
GESTRA UNA 45 User manual

GESTRA
GESTRA RHOMBUSline MK 45-1 User manual

GESTRA
GESTRA FPS 11 User manual

GESTRA
GESTRA NRG 26-60 Installation instructions