Detailed video manual on the web site GF1.com
3
GREENHOUSE FACTORY All rights reserved. Full or partial copying is prohibited.
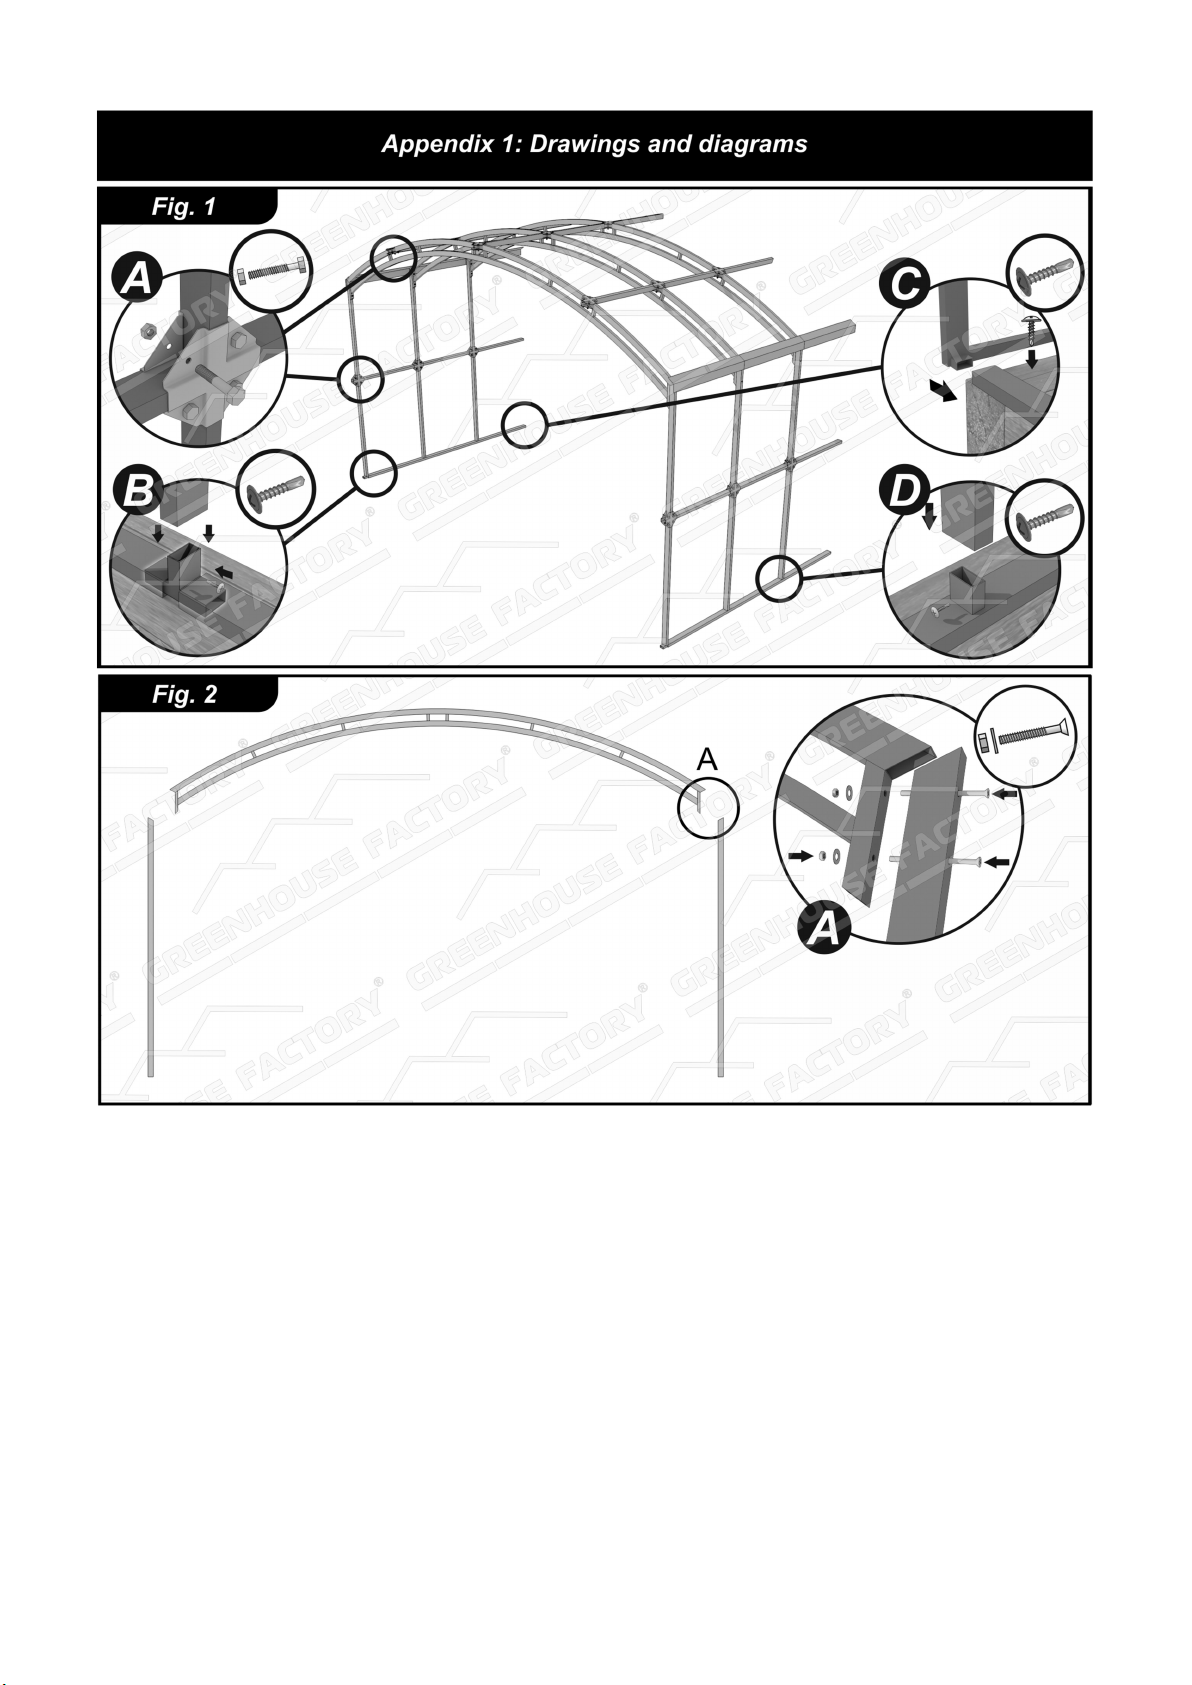
system (Fig. 1 Callout A). Install the gable (Fig. 1 Callout
C). Fasten with angles.
4.7. After assembling the frame, check its verticality with
a level and, if necessary, align the position of the frame with
the surface. If necessary, align the diagonals of the frame,
check the tightness of all screws.
4.8. Remove the protective film from the polycarbonate
and, for convenience, mark the front side with UV protection
with a marker (the side is marked with the corresponding
information). Lay a sheet of “ROOF” polycarbonate (Fig. 3,
4) on top of the arcs and gable up. The edge of the sheet
should protrude above the upper part of the gable, forming a
visor of 4-5 cm. Secure the laid material with roofing screws
through the galvanized band at the edges of the roof.
NOTE! Before placing the galvanized band, we rec-
ommend covering the edges of the polycarbonate with an
U-shaped End profile (not included in the delivery set, ask
for an End profile in the sales department). To prevent
condensation from collecting in the honeycomb, we rec-
ommend drilling two holes in the profile with a thin drill.
4.9. Attach polycarbonate sheets "SIDE 1" and "SIDE 2"
(Fig. 3, 4) with roofing screws on the sides of the greenhouse
with the right side out. Polycarbonate should not protrude
beyond the gables by more than 2-3 cm. Holes are provided
for fixing the side sheets on the greenhouse frame.
Before fastening the sheets, we also recommend cover-
ing them from above with an U-shaped end profile (the end
profile is not included in the delivery set).
9. REQUIREMENTS FOR OPERATION
CONDITIONS.
9.1. The greenhouse can withstand significant snow and
wind loads. In the case of a snow cap with a height of more
than 15 cm, it is recommended to clean the greenhouse from
snow.
ATTENTION!!! It is NOT SAFE to enter the greenhouse
with a snow cap. If necessary, clean the greenhouse from
the outside, not by “tapping” from the inside of the green-
house.
When snowdrifts 1 m or more in height are formed adja-
cent to the walls of the greenhouse, they should be cleared.
9.2. The greenhouse is designed for a crosswind with a
speed of no more than 20 m / s.
9.3. In the presence of strong winds (when installing the
greenhouse on a beams), it is necessary to provide for addi-
tional fastening to the ground of the greenhouse with a foun-
dation (for example, secure it with metal pins driven into the
ground).
ATTENTION!!! In strong winds, it is necessary to close
the doors and vents of the greenhouse to prevent the poly-
carbonate from falling off.
9.4. The assembled greenhouse must be installed on a
previously prepared flat tamped surface along the perimeter
of the bottom of the greenhouse
9.5. Installation on frozen ground is prohibited.
9.6. Greenhouse installation should be carried out strictly
according to the instructions.
ATTENTION!!! It is forbidden to use sulfur bricks and
fertilizers inside the greenhouse that can cause the de-
struction of the zinc coating and corrosion of the metal.
9.7. It is forbidden to install the greenhouse near build-
ings where snow or icicles can fall from the roof onto it.
9.8. It is forbidden to install the greenhouse less than 2 m
from fences and walls.
NOTE! During operation, slight traces of corrosion may
appear on the frame. They do not affect the strength of the
greenhouse and are not a significant disadvantage.
On a greenhouse in the "Decor" version, up to 5% of
unpainted surface is allowed.
10. STORAGE REQUIREMENTS OF
DISASSEMBLED GREENHOUSE
10.1. These requirements come into force if the acquired
greenhouse is stored unassembled for a period of more than
three days.
10.2. Greenhouse components (including polycarbonate)
should be stored in a place protected from rain, snow, direct
sunlight, open flames and corrosive chemicals (alkaline
solutions, chlorine, ethers, aldehydes, organic acids, etc.)
10.3. Avoid situations when parts of greenhouses lie in
puddles for a long time or freeze in ice.
11. WARRANTY
11.1. The warranty applies to the strength of the frame,
subject to the requirements and standards described in the
passport frame greenhouse.
11.2. The manufacturer guarantees the assemblability of
the greenhouse frames. Warranty on the assemblability of
the frame - 2 years from the date of purchase.
11.3. The manufacturer guarantees the specified strength
of the frame of the greenhouse in accordance with external
influences.
11.4. The frame warranty does not apply if:
- The assembly and installation of the greenhouse was
not
carried out in strict accordance with the requirements of
the assembly instructions.
- There were violations of unassembled storage
requirements.
- The rules for operating the greenhouse were violated.
- The greenhouse was used for other purposes.
- Changes were made to the design of the greenhouse
that were not recommended by the manufacturer.
- The greenhouse was deformed due to soil displace-
ment.
- The greenhouse was damaged by a hurricane, flood or
other natural disasters.
- The greenhouse was installed near houses and struc-
tures, fences, trees from which ice formations, snow, and
other objects may fall or fall off.
11.5. Warranty obligations apply only if the greenhouse is
installed on the foundation recommended by the
manufacturer.
GREENHOUSE FACTORY reserves the right to make
changes to the design of the greenhouse that do not impair
its consumer qualities.