Giada DN75-3399R42E5G User manual
- 1 -

Statement
The copyright of this manual belongs to Shenzhen JEHE Technology Development Co., Ltd. (Giada,
JEHE’s global brand) and all rights are reserved. The company reserves the right to change this
manual at any time without notification. Specifications here are for reference only, please take the
real product as standard.
Without official authorization of Giada, other company or individual may not copy, plagiarize,
translate or disseminate this manual for commercial purpose.
The information provided in this manual is accurate and reliable. The company does not take any
legal responsibility for the consequences of infringement use of this manual.
Safety Notice
• Read the user manual carefully before setting up the Giada product.
• Disconnect the power cord before installing the internal components
• Most electronic components are sensitive to static electrical charge, please wear a wrist-grounding
strap when installing the internal components.
• Don’t disconnect the power cord when the system is running to avoid damage to the sensitive
components by instantaneous surge voltage.
Contact Information
Shenzhen JEHE Technology Development Co., Ltd.
Website: www.giadatech.com
Phone: +86-755-3330 0336
Email: support@giadatech.com
Address: 1~3/F, Block A, Tsinghua Information Harbor, North Section, Shenzhen Hi-tech
Park, Nanshan District, Shenzhen, China

- 2 -
Table of Contents
1. Product Introduction ........................................................................................ 3
2. Interface Description and Hardware Specifications ...................................... 3
2.1 Interface Description ...................................................................................... 3
2.2 Hardware Specifications ................................................................................ 4
3. Accessories Installation Steps ........................................................................... 6
3.1 3G/4G Installation .......................................................................................... 6
3.2 SIM Card Installation ..................................................................................... 7
4. How to use GiadaHdmiIn APP ....................................................................... 8
5. How to play different videos on two screens ................................................ 10
6. Firmware Upgrade Guide .............................................................................. 11
6.1 Preparation ................................................................................................. 11
6.2 Upgrade the firmware .................................................................................12
6.2.1. Install the driver in your host PC by following steps .......................12
6.2.2. Connect the motherboard with host PC ...........................................13
6.2.3. Start the firmware updating ..............................................................14
7. JAHC APP ........................................................................................................15
7.1 JAHC APP function ...................................................................................15
7.2 Startup (open) & shutdown (close) time setup ...........................................15
8. ADB SOP ..........................................................................................................18

- 3 -
1. Product Introduction
Giada DN75 adopts RK3399 Dual-core ARM Cortex-A72 and Quad-core ARM Cortex-A53 CPU,
Onboard memory and eMMC. The dual HDMI display outputs support 1*4K and 1*2K resolution
separately. With HDMI input, it can play the content from external device. Featured with Android 8.1
operation system, the player is suitable to be applied in high-end Android digital signage
applications.
2. Interface Description and Hardware Specifications
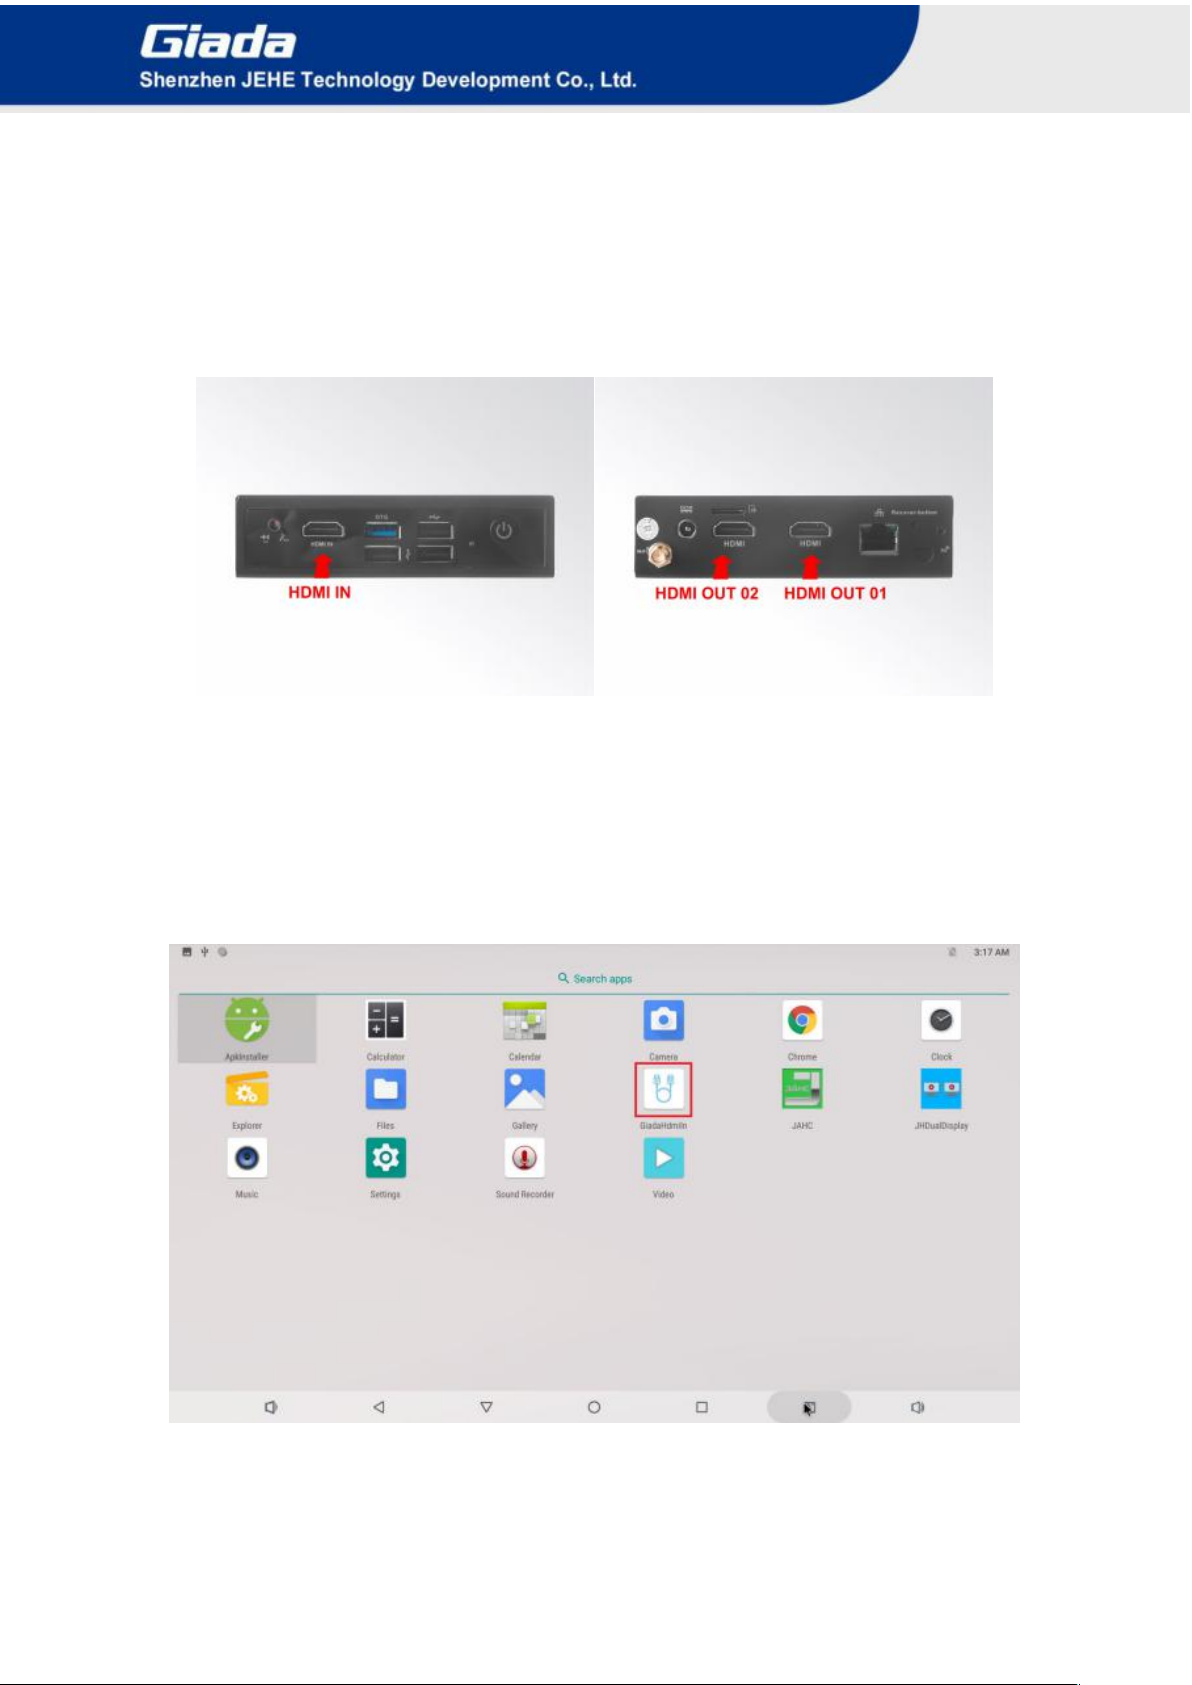
2.1 Interface Description
Front I/O Port
Rear I/O Port
- 4 -
Right I/O port
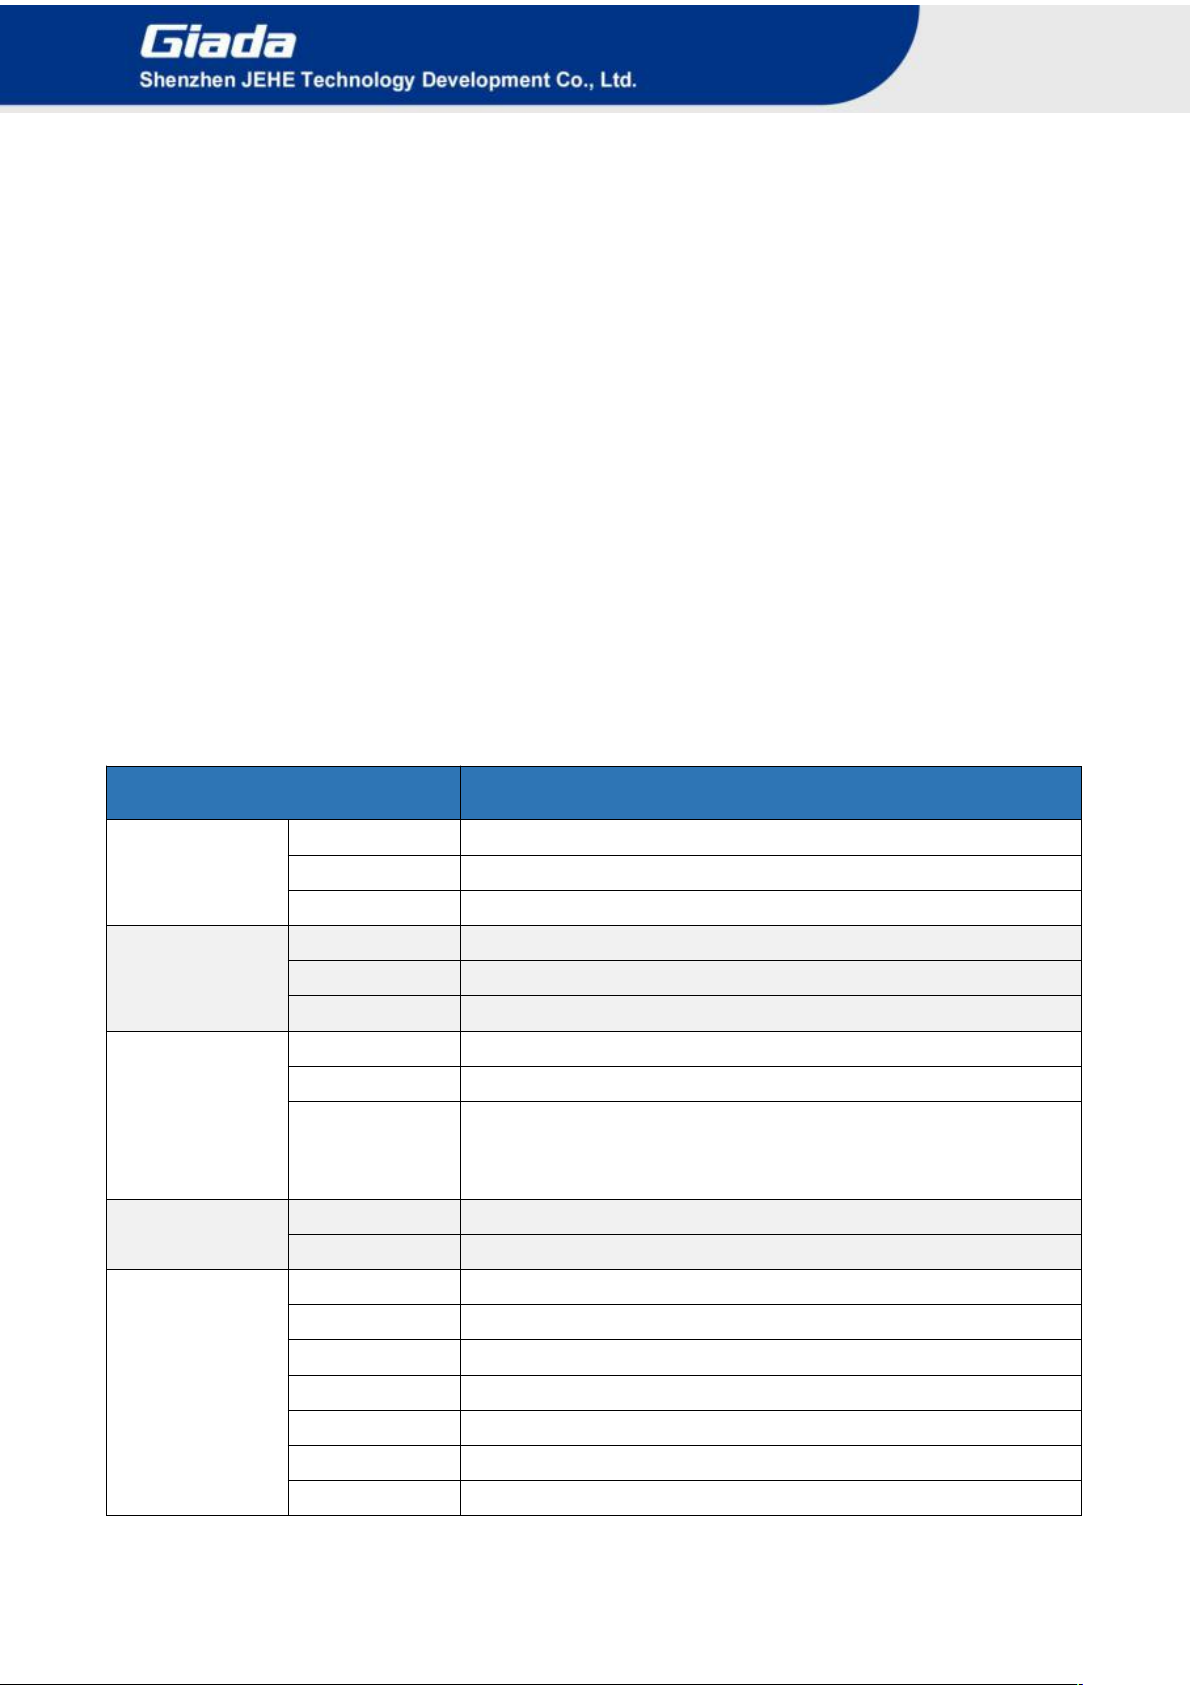
2.2 Hardware Specifications
DN75
DN75-3399R42E5G
Processor
CPU
RK3399 Dual-core ARM Cortex-A72 and Quad-core ARM Cortex-A53 CPU
Frequency
Up to 1.8GHz
Chipset
SOC
Memory
Type
LPDDR4 support 2 channels
Socket
Onboard
Capacity
4GB(Optional: 2GB)
Graphics
GPU
Mali-T860MP4 GPU
Graphic Engine
4K H.264/H.265 video decoder
HDMI
1 x HDMI (Max 4K@60Hz), support CEC
1 x HDMI (Max 2K@30Hz)
1 x HDMI-IN (Max. 2k@30Hz)
Network
Controller
Realtek RTL8211E Gigabit Ethernet
Interface
1 x RJ45
I/O Interface
USB
1 x USB3.0 (OTG), 3 x USB2.0
Serial Port
1 x RS232
Audio
1x 2- in 1 Headset (1 x MIC-IN, 1 x AUDIO-OUT)
Mini-PCIe
1 x Full-size Mini-PCIe for 3G/4G
WiFi+BT Module
WiFi+BT Module Onboard (WiFi 5GHz) (Optional: 2.4GHz)
SIM Slot
1 x SIM Slot
LED Indicator
1 x HDD LED, 1x Power LED
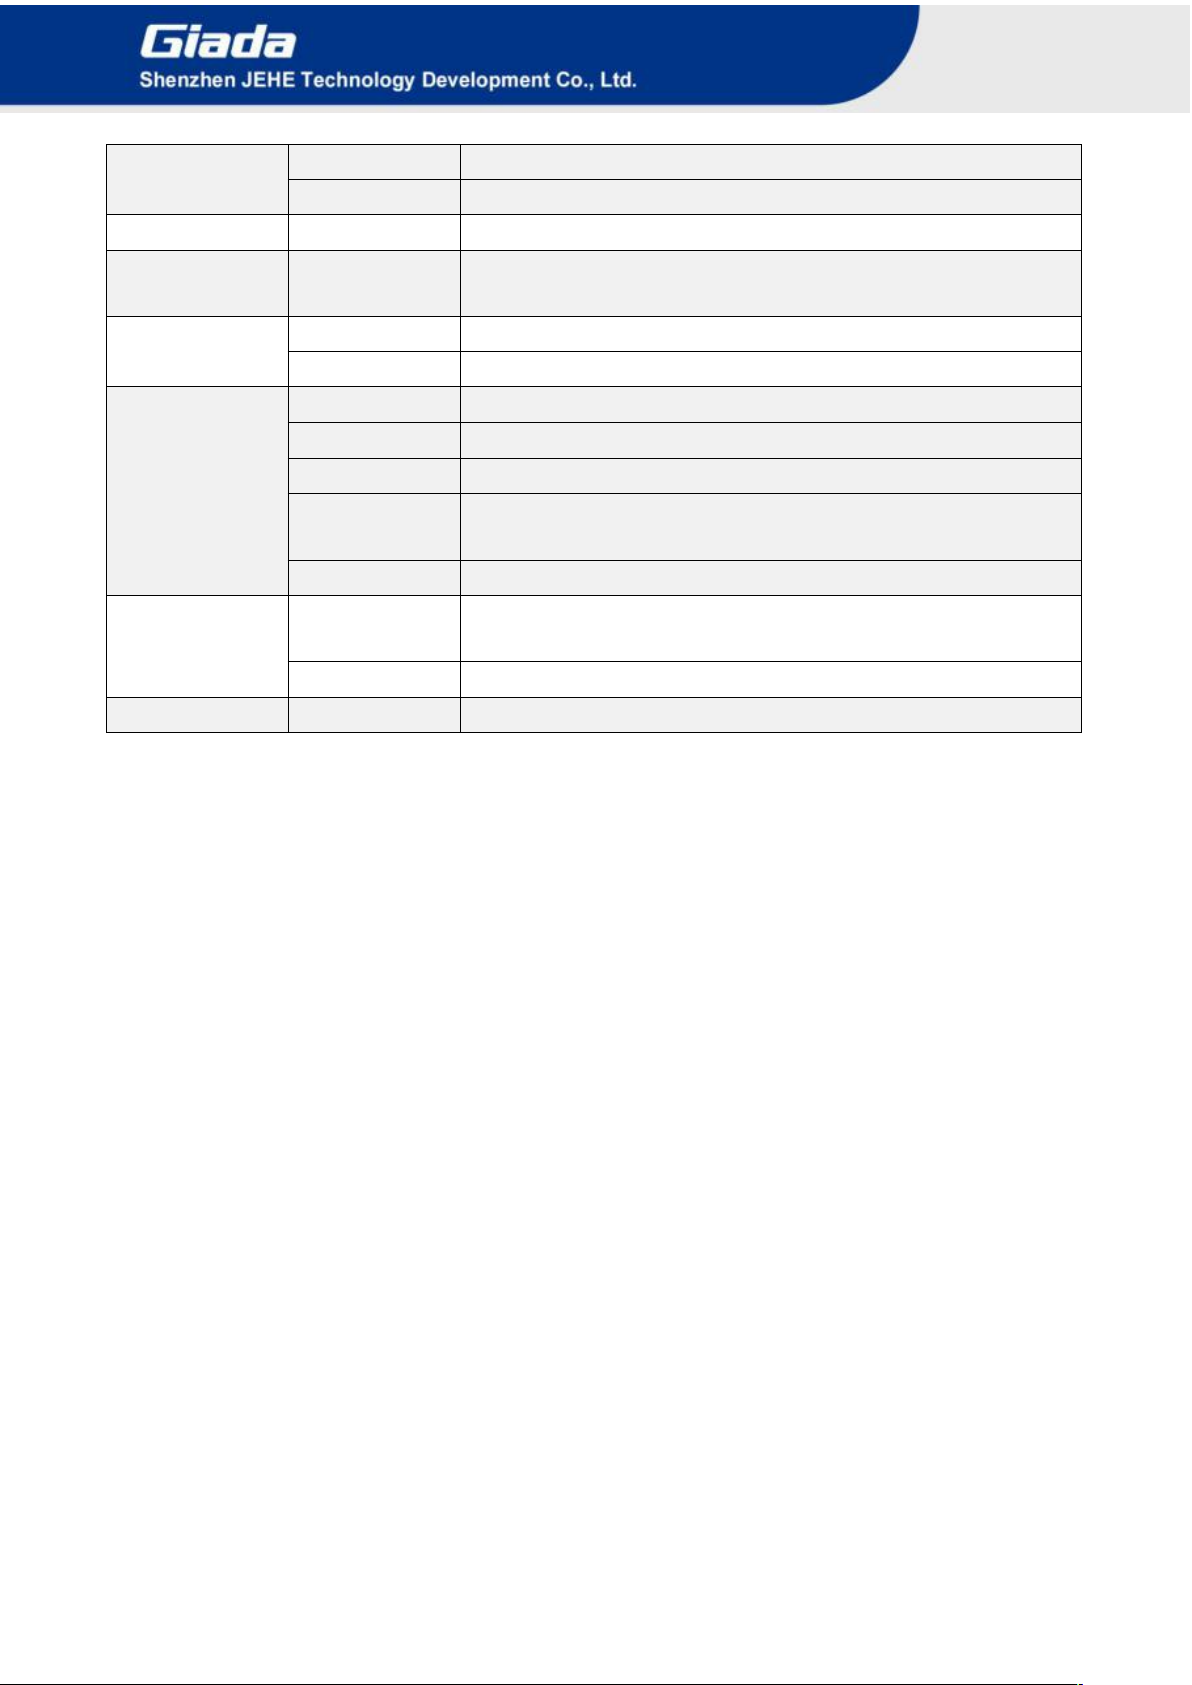
- 5 -
Storage
eMMC
Onboard eMMC 32GB (Optional: 16G)
TF Card Reader
1 x TF Card Reader
JAHC
JAHC
Auto power on/IR Remote Control / RTC
Operation
System
OS
Android8.1
Power
Power Type
DC-IN
Input Voltage
12V/2A
Mechanical
Construction
Metal
Fanless
Yes
Mounting
Desk/VESA Mounting(JC530)
Dimension
(W x D x H)
116.6mm x 107.4mm x 30mm
Color
Black
Environment
Operating
Temperature
0-40℃at 0.7m/s Air Flow
Relative Humidity
95%@40℃(non-condensing)
Certification
CE/FCC

- 6 -
3. Accessories Installation Steps
For safety reasons, please ensure that the power cord is disconnected before opening the case.
How to open bottom cover
Unscrew the four screws and remove the bottom cover. (mini PCIE slot for 3G/4G and SIM card slot
are on this side)
3.1 3G/4G Installation
Default SMA connector and cable is for WIFI. Please change to 3G/4G SMA connector and cable.
1. Plug the 3G/4G module into the mini PCIE slot.
2. Secure the module to the carrier by tightening up the screw.
3. Connect the cable to Main and install the antenna.

- 7 -
3.2 SIM Card Installation
This product supports standard SIM card with the size of 25mm × 15mm.
1. [Open] the SIM card holder and pull it up.
2. Insert the SIM card.
3. [Lock] the card holder.
- 8 -
4. How to use Giada HdmiIn APP?
With HDMI input and two HDMI outputs on DN75, the device can support clone display and PIP display or
extended mode. You can set the different display modes on two screens by following setup:
a. Connect DN75 HDMI OUT 01 and HDMI OUT 02 with two HDMI screens and connect DN75
HDMI_IN with an external device to provide video source (Please refer to FIG1).
FIG1
b. Click ‘Giada HdmiIn’ APP, the input signal from the external device is switched automatically to
DN75. There are two choices:
Show on two screens: two screens display HDMI input signal with clone mode.
Show on vice screen only: two screens show different HDMI signal. The HDMI 02 would show
HDMI input signal from external device and HDMI 01 would show its’ own signal (Please refer
to FIG2)

- 9 -
FIG2
c. Record is used for recording HDMI input signal and the PIP is used for picture-in-picture
function. When you choose the clone mode or use only one monitor, you can set PIP to support
picture insert picture display (Please refer to FIG3 and FIG4)
FIG3
Table of contents
Other Giada Computer Hardware manuals


Popular Computer Hardware manuals by other brands

EMC2
EMC2 VNX Series Hardware Information Guide

Panasonic
Panasonic DV0PM20105 Operation manual

Mitsubishi Electric
Mitsubishi Electric Q81BD-J61BT11 user manual

Gigabyte
Gigabyte B660M DS3H AX DDR4 user manual

Raidon
Raidon iT2300 Quick installation guide

National Instruments
National Instruments PXI-8186 user manual


