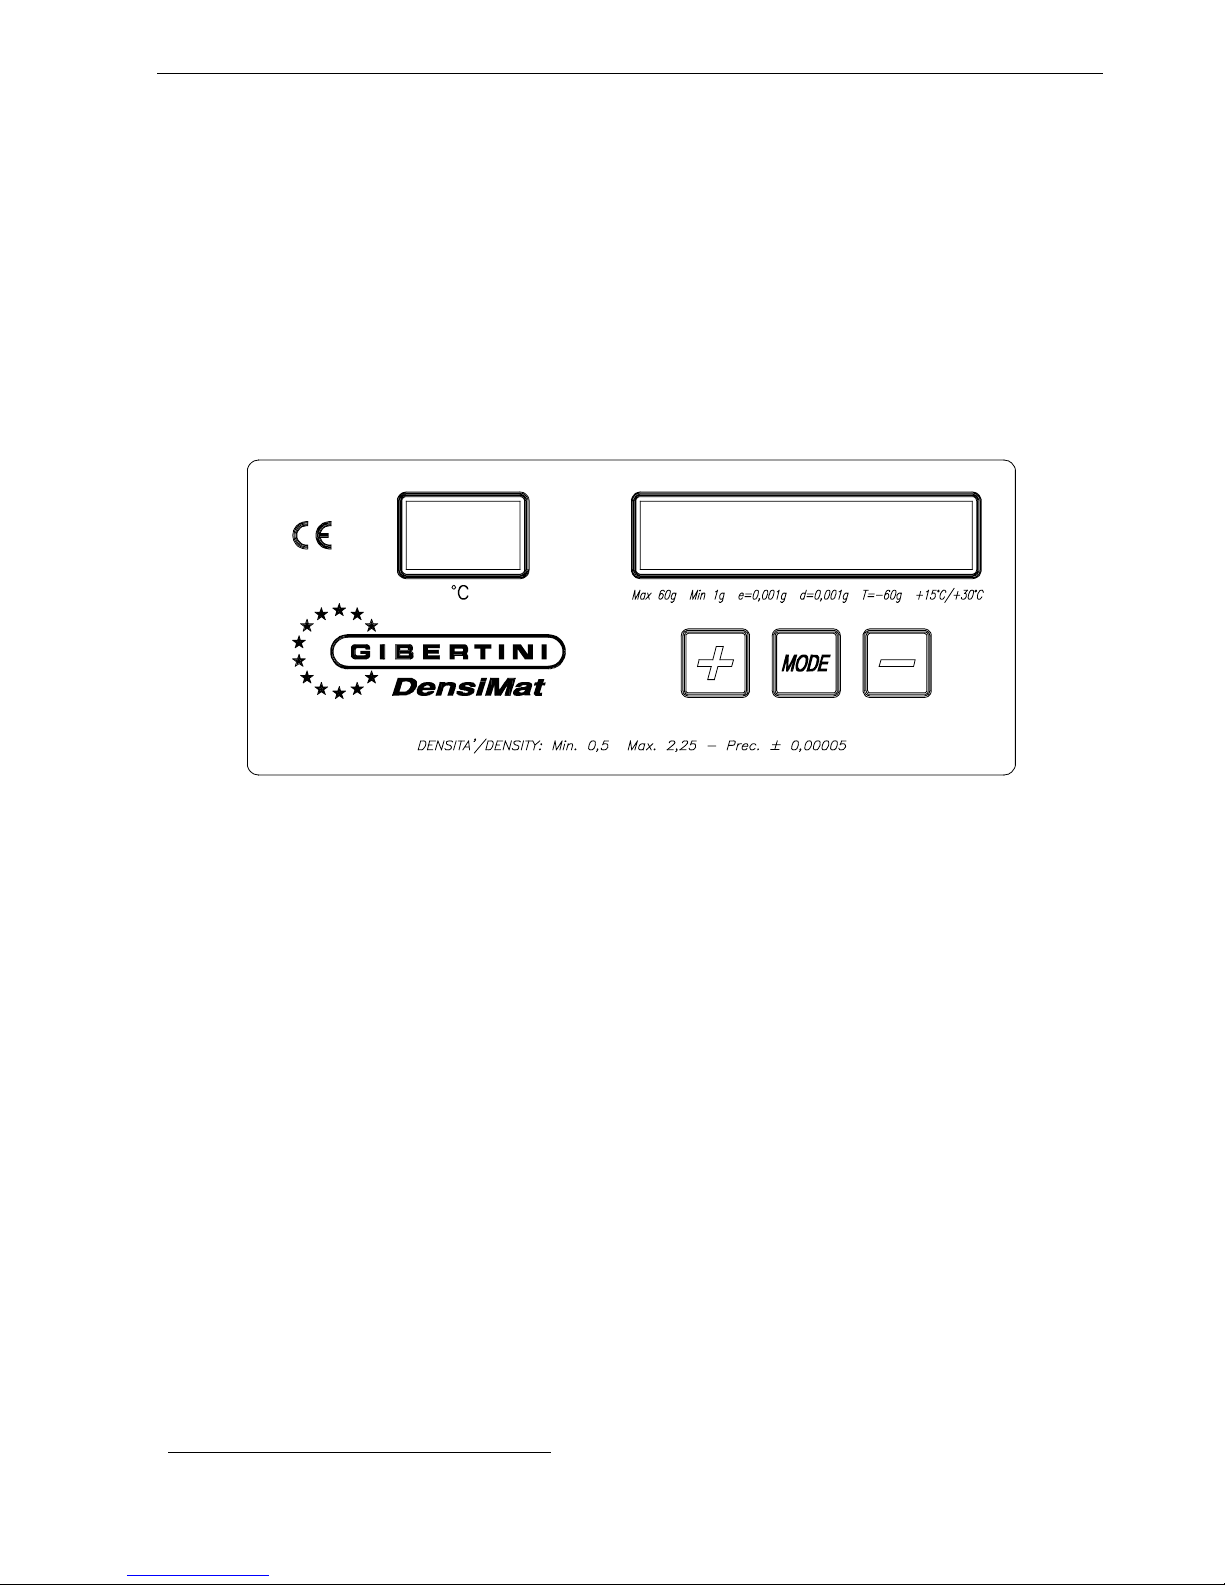
Gibertini densimat User manual

INSTRUCTION MANUAL
INSTRUCTION MANUAL
INSTRUCTION MANUAL
INSTRUCTION MANUAL
INSTRUCTION MANUAL
INSTRUCTION MANUAL
INSTRUCTION MANUAL
INSTRUCTION MANUAL
INSTRUCTION MANUAL
INSTRUCTION MANUAL
INSTRUCTION MANUAL
INSTRUCTION MANUAL
INSTRUCTION MANUAL
INSTRUCTION MANUAL
INSTRUCTION MANUAL
INSTRUCTION MANUAL
INSTRUCTION MANUAL
INSTRUCTION MANUAL
INSTRUCTION MANUAL
INSTRUCTION MANUAL
INSTRUCTION MANUAL
INSTRUCTION MANUAL
INSTRUCTION MANUAL
INSTRUCTION MANUAL
INSTRUCTION MANUAL
INSTRUCTION MANUAL
INSTRUCTION MANUAL
INSTRUCTION MANUAL
DensiMat
Hydrostatic Balance

60.50.375 Ed. 2 - June 2009
All rights reserved.
Forbidden any form of print, duplication, reproduction and publication
of this instructions, or part of it, without the written agreement of
GIBERTINI ELETTRONICA Srl
INDEX
1. IMPORTANT WARNINGS.................................................................................................3
2. GENERAL DESCRIPTION AND TECHNICAL CHARACTERISTICS................................4
3. INSTALLATION.................................................................................................................5
3.1 PROCEDURE INSTALLATION..........................................................................................5
3.2 DENSIMAT KEYBOARD....................................................................................................7
4. MEASUREMENTS WITH DENSIMAT...............................................................................7
4.1 DETERMINATION OF SPECIFIC GRAVITY D20/20 OF A LIQUID...................................8
4.2 DETERMINATION OF THE DENSITY OF A LIQUID AT 20°C...........................................9
4.3 COMPENSATION OF FLOATER IN USE........................................................................10
5. BEHAVIOUR OF THE INSTRUMENT WHEN SWITCHING ON AND CONDITIONS FOR
OPTIMAL MEASUREMENTS.........................................................................................11
6. APPENDIX A: LIST OF PRINCIPAL MESSAGES DISPLAYED .....................................13
7. APPENDIX B: POSSIBLE OPTIONS FROM DENSIMAT KEYBOARD...........................14
8. APPENDIX C: USE OF THE CYLINDER FOR MEASUREMENTS IN CONTINUOUS ....15
8.1 INSTALLATION...............................................................................................................15
8.2 OPERATING INSTRUCTION...........................................................................................16
9. APPENDIX D: REFERENCE TO LEGAL METROLOGY.................................................17
9.1 METROLOGICAL CHECKING OF DENSIMAT................................................................17
10. DISPOSAL – INFORMATION FOR USERS....................................................................19

DensiMat ENGLISH
- 3 -
- ATTENTION -
READ CAREFULLY THIS MANUAL, WHICH IS INTEGRAL PART OF THE
INSTRUMENT, BEFORE INSTALLING THE BALANCE
1. IMPORTANT WARNINGS
N.B. - These "WARNINGS" are integral part of the instrument
This instrument is to be used strictly for scientific purposes and/or for internal factory control only.
The use of our instruments is forbidden in the cases provided by art. 1, point 2, letter a) of directive
90/384, except for those models approved with CE mark (legal metrology).
THIS INSTRUMENT IS NOT TO BE USED IN AREAS EXISTING DANGER OF EXPLOSION.
It is important to note the following points for correct operation of the instrument:
1. Read the technical instructions given in the operating manual carefully. This manual contains information
about installation and use. If these instructions are not carried out precisely, the accuracy of results may be
affected. If in doubt, please consult the supplier’s engineers.
2. In common with any electrical equipment, installation should be carried out by a competent person. In
particular:
- ensure that the instrument is correctly earthed;
- do not install the instrument in areas of high fire risk, for example, in the presence of inflammable gases
and vapours;
- switch off and disconnect the power supply before removing any cover;
- do not touch the instrument with wet hands.
3. Install the instrument on a vibration free base and away from draughts or sources of heat. Check the
instrument with test weighing after installation or after repositioning.
4. Avoid connection to a power supply showing high voltage variations due to other loads. The instrument
should not be connected to the same electrical circuit as other high power consuming equipment as large
fluctuations may cause some inaccuracy.
5. The instrument should be checked every 6 months for correct functioning, calibration and accuracy of the
internal calibration mass by a suitable qualified person.
6. A routine calibration check should be carried out each day before use, using a standard mass. This mass
should be independently checked monthly.
7. Check the zero function before each weighing operation.
8. If in doubt about any function please call a qualified person. Avoid interference by non-qualified persons.
9. If the instrument is used for weighing food or drink, ensure that other substances are not weighed on the
unit which might cause contamination.
10. If the instrument is used for weighing chemicals and other similar substances ensure that it is cleaned and
any spillage removed to avoid potentially dangerous reactions.
11. Always clean the instrument after use to avoid subsequent inaccuracies and/or damage to the equipment.
12. Gibertini Elettronica s.r.l. does not accept any legal liability for damages or other consequences due to
mishandling of the instrument or its accessories.
ADDITIONAL PROCEDURES FOR WEIGHING SUBSTANCE WITH GREAT ACCURACY
Gibertini Instruments are manufactured to be reliable in use with high accuracy. However, reduced accuracy is
always possible due to ambient conditions, incorrect installation or improper use. Where greater accuracy is
required, the following procedures should be observed:
- use modern instruments (manufactured within three years) which are fully maintained;
- use certified calibration masses before each weighing operation;
- make at least two measurements;
- install the instrument in a draught-free, constant temperature cabinet: consider the use of two
instruments installed together and make weighings on both units, otherwise use calibrated masses with
a certificate of calibration from a recognised institute.
ALL ELECTRONIC BALANCES, WHICH ARE SENSITIVE TO CHANGES OF GRAVITY, MUST BE
CHECKED AND CALIBRATED IN THE PLACE WHERE THEY ARE TO BE USED (EEC 90/384).
ALL OUR INSTRUMENTS MEET INTERNATIONAL EMC-EMI-RFI STANDARDS ACCORDING TO 2004/108
EEC DIRECTIVE ON ELECTROMAGNETIC COMPATIBILITY.

ENGLISH DensiMat
- 4 -
2. GENERAL DESCRIPTION AND TECHNICAL CHARACTERISTICS
The instrument consists of an electronic hydrostatic balance DENSIMAT, with a
sensitivity of fifth decimal points.
GENERAL SPECIFICATIONS
Warm-up time ≥15 minutes
Operating temperature +15°C / +30°C
Data output RS232 I/O
Operating voltage 220 V - 15% / + 10 % (110 V optional)
Power consumption 10 VA
Dimensions and weight 210x355x360 mm - 7,5 kg ~
HYDROSTATIC BALANCE SECTION
Relative density Measuring range: 0.5 - 2.25
Readability 0.00005
Repeatability +/- 0.00005
Auto-calibration With internal mass
Response time 6 sec.
THERMOMETER SECTION
Measuring temperature Range 8 ÷ 32 °C
Sensitivity 0.025 °C
Readability 0.1 °C
Repeatability +/- 0.05 °C (range 10 ÷30 °C)
Thermometric probe Pt 100 1/3 DIN
EQUIPMENT
Standard 2 floaters (plungers) calibrated
for weight (50 g) and volume (20 ml)
2 double wall 70 ml cylinders - Power supply
On request Cylinder for measurements in continuous
Pan for metrological control
Certificated masses - Certificated floaters
FLOATERS INTERCHANGEABLE IN MASS AND VOLUME
Particular care must be paid in the construction and calibration of floaters.
They are all interchangeable in mass and in volume in order to facilitate utilization; for
example to determine the specific gravity of a must or a given wine and the relative
ASV, 2 separate floaters can be used without problem to avoid contamination
(preliminary check of the compensation factor; see chapter 4.3).
To obtain the above both the suspension1wire and the surface of the glass have been
subject of many studies in order to resolve the problems caused by surface tension,
from the volume of wire and from electrostatic charges.
1Realized with an antimagnetic material, inoxidizable and a diameter lower or equal of 0,20 mm

DensiMat ENGLISH
- 5 -
The wire is made with an antimagnetic material, inoxidizable and a diameter lower or
equal of to 0,20 mm.
The volume of floaters, on request, can be certified by the competent European
Institutes such as the L.N.E. of Paris, the I.M.G.C. of Turin, the PTB in Germany etc.
3. INSTALLATION
Densimat was designed and made to resist and to function even under difficult
conditions. However, it is advisable to install Densimat:
on a rigid support without vibrations
in a stable room temperature and without excessive ventilation
utilizing a separate electrical supply.
NOTE: if the Densimat stops working because of an incorrect operation on the
keyboard, the plug must be removed and connected again to the socket while
pressing the " + " key. When the instrument is switched on again the following
message appears
P n o r
which indicates the return to use of the parameters of standard functioning.
1- Floater knob
2- Cylinder and floater
3- Rubber mat
4- Keyboard
5- Transformer
6- Plug
7- Knob to adjust the
cylinder-balance
8- Centering plate
9- Knob for blocking
balance (to transport)
10- Thermo probe
11- Levelling feet
Figure 1
3.1 PROCEDURE INSTALLATION
Level the balance by adjusting the back supports in order to centre the air bubble in
the middle of the circle.
unlock the balance by rotating the knob in an anticlockwise direction and when it
stops it comes to rest on the right side of the instrument (Fig. 1 n. 9 and Fig. 2).

ENGLISH DensiMat
- 6 -
UNLOCKED LOCKED ( Only to transport )
Figure 2
Insert the connector of the thermo probe in the place indicated in figure 1 (n. 10),
keeping the locking pin in an upright position and pushing it till its complete
insertion: the connector is in the correct position if, trying to pull it out, it does not
come. To pull it out press the locking pin.
Connect the circular socket of the transformer (fig. 3 n. 6) to the connector of
Densimat (fig. 3 n. 3) keeping the flat side of pin upwards. Connect the transformer
to the socket (fig. 3 n. 5) of the electric mains.
Figure 3
Rear view of DENSIMAT
1- RS323 serial connection
2- Serial number
3- Transformer socket
4- Adjustable supports
5- Mains plug
6- Transformer plug

DensiMat ENGLISH
- 7 -
3.2 DENSIMAT KEYBOARD
The Densimat keyboard (fig. 4) has two displays and three keys. On the left display it
appears the temperature read by thermo probe; on the right display it appears:
a. specific gravity, with the parameters of standard functioning;
b. messages for user (see Chapter 6 - Appendix A: List of principal messages
visualised by Densimat);
c. this is selectable by means of three keys "MODE", " + " and " - ". The activated
functions through these keys are described in Chapter 7 - Appendix B: Selecting
options from the Densimat keyboard.
Figure 4
4. MEASUREMENTS WITH DENSIMAT
DENSIMAT allows to determine:
directly:
the specific gravity d20/20 of a liquid
the density of a liquid at 20°C (by a simple calculation)
indirectly, through the tables2:
the degree Baumé, degree Babo, degree Brix and the degree Oechsle of a must;
the ASV (Alcoholic Strength by Volume) of wines, musts and spirit drinks;
the total dry extract of a must/wine.
The measurements must be carried out at exactly 20°C
N.B. Indications on the best conditions to carry out the measurements with Densimat
are indicated in Chapter 4. The behaviour of the instrument when switching it on and
the conditions for optimal measurement.
2See R. Becchetti, "Methods of analysis of wines and spirit drinks", Gibertini Elettronica

ENGLISH DensiMat
- 8 -
4.1 DETERMINATION OF SPECIFIC GRAVITY D20/20 OF A LIQUID
The determination of the specific gravity is carried out at 20°C exactly. It follows that
the product to examined is brought in advance3to a temperature near to 20°C. In this
case a thermostatic bath (manufactured by Gibertini Elettronica) is useful.
It is operated as follows:
1. degas if necessary the samples rich a CO2by agitation or vacuum filtration or
through filter paper;
2. fill the double coated cylinder with the liquid, whose density is to be measured, up to
the level (about 70 ml);
3. immerse the thermal probe into the liquid;
4. immerse the clean and dry floaters carefully;
Figure 5 Thermostatic bath Gibertini Elettronica
5. slowly move the floater for a few seconds, with a circular movement, into the
cylinder, in order to obtain a uniform temperature of the liquid (be carefully not to
create air bubbles which might falsify the measurement);
6. once 20°C has been reached (left display) the reading is carried out: e.g. 0.98480
Figure 6
1. Knob to adjust the cylinder position
2. Centering plate
3For this scope a thermostatic bath (manufactured by Gibertini Elettronica), where the vessel
containing the liquid under examination is be put, is useful.

DensiMat ENGLISH
- 9 -
a. push the cylinder against of centering plate (figure 1 n.8 or figure 6 n. 2);
b. wait that the instrument has brought itself to zero (if this should not occur it carry
out a zeroing manual operation by pressing the key " - " of keyboard): on the right
display appears
0 0 0
c. hang the floater in suspension (figure 7 n.1) and verify that it not touch the internal
walls of the cylinder or the thermoprobe. If necessary, correct the position of the
centering plate loosening its fastening knobs and repositioning it carefully (fig.6 n.
1).
d. read the specific gravity d2020 of the liquid on the right display;
0 . 9 8 4 8 0
At the end of the determination, always replace the floater in use, clean and dry, on
the appropriate hooks (figure 7 n.2).
Figure 7
1- Suspension
2- Hooks to replace the
floaters not in use
4.2 DETERMINATION OF THE DENSITY OF A LIQUID AT 20°C
To calculate the density of a liquid at 20 °C multiply its specific gravity d20/20 read by
the Densimat by the density of the water at 20 °C, that is:
d20/20liq x 0,998203

ENGLISH DensiMat
- 10 -
4.3 COMPENSATION OF FLOATER IN USE
By means of the procedure of "Compensation of floater" it does not modify either
mass or the volume of floater in use.
"Compensate", instead, the behaviour of every floater in such way that all floaters
show the same in the same standard conditions. Such conditions are the determination
of the specific gravity d20/20 of the distilled water and/or a water-alcohol solution with a
known titre, furnished on request by our company.
"Compensation" occurs by modifying from the keyboard the answer of the Densimat in
standard conditions controlling the correspondence between read value and theoretical
value.
Regular checks of this correspondence is advisable.
It is operated as follow:
determine the specific gravity d20/20 of the distilled water or a water-alcohol solution
with a known titre (procedure mentioned in the precedent chapter);
if the read value is 1,00000 (theoretical d20/20 H2O) or coincides with the d20/20
indicated on the bottle label of the water-alcohol solution then we are in conditions
of ideal reading: the measurements can be carried out;
if the read value is various(different) from 1.00000 or from the theoretical value
d20/20 on the bottle label then it actives the procedure of " Compensation of
floater" since in this situation the readings are not reliable.
Procedure of "Compensation of the floater"
free the suspension, used with the floater;
operate always at a temperature of 20 ±0.1 °C;
press the key "MODE" until the message "CorrP" appears on the right display of
DENSIMAT;
confirm with the key " + ", on the display reappears:
0 0 0
hang floater in the suspension, read the value of specific gravity d20/20 of the
distilled water or of the water-alcohol solution with a known titre, on the display
appears as for example:
0 . 9 9 9 9 0.
the point on the right of the display shows that the CorrP option is active;
the keys " + " and " - " increase and decrease respectively the value of density
read to 5 units at a time: press the keys until making to coincide the value read on
the display with the theoretical value d20/20 of the distilled water or of the water-
alcohol solution used like reference;

DensiMat ENGLISH
- 11 -
the compensation remains memorized even when the instrument is switched off;
remove the suspension and exit from the procedure "Compensation of floater":
press the key "MODE": "CorrP"appears on the display; press the key " - ".
N.B. - When the water-alcohol solution with a known titre is used, it is advisable, in
order to stabilize the value, to wait a few seconds more before reading the specific
gravity.
5. BEHAVIOUR OF THE INSTRUMENT WHEN SWITCHING ON AND
CONDITIONS FOR OPTIMAL MEASUREMENTS
At the moment when Densimat is switched on, the following message appears on the
right display:
d x – x x
where X-XX are the numerical values that indicate the installed release on instrument,
giving therefore an useful indication for technical service if it is necessary.
After around two seconds the following message appears:
H E L L O
and immediately after this all segments of both displays for the test are switched on and
flashing for a few seconds. In this case the following message appears:
r e C A L
successively flashing for a few seconds, to indicate that it is carrying out the first phase
of a calibration. The appearance of the following messages on the display
L O A d and C A L C
indicates the passage to the second phase of calibration.
At the end of calibration and in the conditions of rest, the right display shows:
0 0 0
to indicate that the instrument is in zero condition, or
- 0 0 0 and + 0 0 0
to indicate that it is near zero.

ENGLISH DensiMat
- 12 -
At the same time on the left display it appears firstly the message " HI ", and after this
the value of temperature (in °C) recorded by thermo probe.
The instrument automatically, after approximately 10 minutes of rest, starts the
calibration procedure: on the display of right appears that as already described
previously. During the calibration cannot be use the instrument.
At the moment of switching on of the Densimat a period of ten minutes of thermal
stabilization is needed4during which the instrument carries out automatically a
calibration each minute and, even
if possible, it is not advisable to carry out measurements.
After this period of thermal stabilization Densimat it is in the better conditions to
work.
Other periods for thermal stabilization are not requested until the instrument remains
connected to the mains/electricity. It is advised therefore to maintain the Densimat
always electrically connected.
ATTENTION:
carry out always the measurements in the zero condition of the instrument;
for eventual anomalies found during the installation of the instrument (as for
example on display appear the flashing messages "- HI -" or "UnLd" or "Lo")
consult the Chapter 6 - Appendix A: List of the principal messages displayed.
4The necessary time for the thermal stabilization varies in function of the difference of
temperatures between Densimat and the ambience

DensiMat ENGLISH
- 13 -
6. APPENDIX A: LIST OF PRINCIPAL MESSAGES DISPLAYED
The fixed messages warn the operator that some process is in progress. No
intervention is needed.
The flashing messages warn of an anomalous condition or they ask for an
intervention of the operator.
RIGHT
DISPLAY INFORMATION MESSAGE ON THE STATE OF
THE HYDROSTATIC BALANCE
Dx-xx Release or revision level of the internal program (Firmware). The
letters " x " are replaced by the current values
- - - - Zero setting phase. It is activated by pressing the key " - ".
000 Zero of the balance
Er18 Weight not stable during the zero setting phase. Press the key " - " to
cancel. The previous zero value is valid.
If it occurs at the switching on of the instrument, it is not possible to
cancel it. Switch off for some second and switch on again; if it
appears again, the instrument is broken or exists an excessive
ventilation.
Er19 Weight not stable during a calibration phase. Press the key " - " to
cancel. The previous calibration value is valid. The cause can be an
excessive ventilation.
ErrC Calibration error. Press the key " - " to cancel.
The previous calibration value is valid.
- HI - Suspension overloaded. Remove the cause to cancel.
If the suspension is engaged during the 2 phases: "rECAL" and
"LOAd" (see below) the display shows "- HI -". Remove the floater.
in the end shows "ErrC".
- Lo - The instrument is locked or incorrectly installed. Remove the cause to
cancel.
UnLd Indicates the phase during which the internal calibration mass is
unloaded.
It can indicates an overload on the suspension; remove the cause to
continue.
RECAL Zero setting phase during a calibration. Flashing message and
subsequently fixed for a few seconds.
LOAd Indicates the phase during which the internal calibration mass is
loaded.
CALC Indicates the phase during which the internal calibration mass is
weighed and the calibration factor is being calculated. After this,
appears "2,49995" follow from "000" or the "ErrC" message (see
above).
Fuori SCALA The internal diagnostic of the instrument detects an anomaly that
could impair its accuracy. It is advisable to do a careful check. Press
the key " - " to continue.
Pnor This is appeared when the instrument is switched on again
holding(keeping) pressed the key " + " to indicate the return to use of
the parameters of standard functioning, as previously explained.

ENGLISH DensiMat
- 14 -
7. APPENDIX B: POSSIBLE OPTIONS FROM DENSIMAT KEYBOARD
Pressing the key MODE it enters in following options:
OFF CorrP CorrC PAr CAL LuLd
and that it shows in order pressing repeatedly the key MODE. To activate one of them
press the key " + ". To return to operative mode press the key " - ".
OPTION CHARACTERISTIC OF OPTION
OFF It switches off the display of the instrument leaving it connected to the
mains/electricity in order to conserve its thermal condition. In this
situation the instrument is not active: to bring back into use the operative
condition press the key " + " .
CorrP It allows the compensation of the floater by means of distilled water, or a
water-alcohol solution with a known titre, at a temperature of 20 °C +/-
0.1 °C. See Chapter 3.3 Compensation of floater in use.
CorrC It allows the compensation of the temperature indication.
The thermometer division is calibrated in the factory to comply with a
centesimal sample thermometer : although it is advisable to activate
this procedure only in the case of proved necessity and however having
a thermometer of an adequate precision. It is activated by pressing the
key "MODE" till the message "CorrC" appears on the display and
confirming with the key " + " .
It is possible to carry out only one compensation for each activation:
pressing the key " + " or the key " - " , it increases or decreases of
0.025°C the temperature indication. To obtain a variation of 0.1 °C it may
be necessary to repeat three or four times the operation pressing the key
"MODE" (till the message "CorrC" appears on the display), then the key
" + " therefore the key " + " or the key " - "
If the option is activated but it does not want to carry out any
compensation or it is carried out the compensation and it want to exit
from "CorrC", press again the key "MODE" till the "CorrC" appears on
the display and then the key " - " .
PAr It introduces a menu of the options of the functioning of the instrument.
The values of parameters (P0 – P6) are memorized in the testing phase
of the instrument. In the case of a particular necessity our technical
service can be contact. To deactivate the option "PAr" press the key
"MODE" till the message "Par" appears on the display and then the key
" - " .
CAL It allows the execution of a supplementary calibration. It activates
pressing the key "MODE" till the message "CAL" appears on the
display and confirming with key " + " .
LuLd It consists of a service function and it must be never be activated by the
user. If it enters because of an error in this option, press the key
"MODE" to deactivate it till the message "LuLd" appears on the display
and then key " - " .

DensiMat ENGLISH
- 15 -
NOTE: if the Densimat stops working because of an incorrect manoeuvre on the
keyboards, remove the plug and connect it again in the socket keeping pressed
the key " + ". As soon as the instrument is switched on again the following
message appears: P n o r
that indicates the return to use of the parameters of standard functioning.
8. APPENDIX C: USE OF THE CYLINDER FOR MEASUREMENTS IN
CONTINUOUS
8.1 INSTALLATION
Put in place the second centre-cylinder over the one already existent and fix it with
the relative knobs.
Fix the support of floater with the two screws (Figure 9).
The function of support is to hold the floater when it is not used, allowing therefore the
Densimat to carry out the automatic calibration.
Figure 8
1- Floater support
2- Cylinder for measurements in
continuo
3- Spring for cylinder fixing
3- Overflow tube
4- Tap
5- Overflow
6- "Y" pipe connector

ENGLISH DensiMat
- 16 -
Fix the cylinder on the Densimat with the spring as shown in figure 8.
Connect the tubes to the cylinder for measurements in continuo.
Insert into the inside of the cylinder the appropriate " net to break bubbles ", pushing
it to the bottom. The "net to break bubbles", as the name suggests, has the function
to avoid the formation of bubbles.
Insert the tail pipe (Figure 8 n.6) in an appropriate container.
Verify that the floater moves easily in the centre of the cylinder.
Figure 9
8.2 OPERATING INSTRUCTION
Put the floater in place, to the inside of the cylinder for measurements in
continuous, on the " support for floater".
Close the tap (Figure 8 n. 5)
Fill up the cylinder pouring the liquid into the funnel. The excess liquid is eliminated
through the "overflow" tube (Figure 8 n. 4)
The liquids under examination must have the same temperature as the floater.
Being careful not to create air bubbles adhering to the floater or to the wire of the
floater which might falsify the measurement.
Hang the floater in suspension and read the specific gravity on the display.
At the end of the measurement replace the floater on the support for floater (Figure
8 n.1) and open the tap to empty the cylinder.

DensiMat ENGLISH
- 17 -
9. APPENDIX D: REFERENCE TO LEGAL METROLOGY
9.1 METROLOGICAL CHECKING OF DENSIMAT
The Densimat hydrostatic balance can be checked at anytime by using certified
masses from the authorized agencies ( such as the I.M.G.C. of Turin, the BIPM to
Paris, the PTB in Germany, Namas in UK, etc). Also the thermo probe is verifiable by
using a calibrated and certified thermometer from recognized agencies.
9.1.1 Procedure of the metrological control of Densimat
The check must be carried out at least 1 hour after the switching on of the
instrument using certified masses in E2 class.
Press the key "MODE" on Densimat until the display shows "PAr" and confirm with
the key " + "; the display shows "P0=00".
Press again "MODE" until the display shows "P4=00".
By the key " + " increase the value from "P4=00" to "P4=06".
Confirm pressing the key " - ": the display will indicate the value in grams "0.000".
The key " - " can be used to reset the reading value.
To carry out the check with the certified masses it is recommended to use the
appropriate pan shown in figure 10.
Figure 10

ENGLISH DensiMat
- 18 -
The weight of the pan (10 g) must be zeroset: in this case the available capacity is
50 g.
Carry out the measurements at 10, 20, 30, 40 and 50 g (maximum tolerance ±1
mg).
To read again the density on display:
press MODE until the display shows "PAr" and confirm with key " + "; on
the display appears "P4=06"
press the key " + ": on the display appears " P4=00 ".
press the key " - "; on the display appears " 000 ".
IMPORTANT! When on the Densimat display the value in grams is visualized, the
instrument does not carry out the automatic calibration that therefore must be
carried out by the keyboard.
For that purpose press the key MODE until the display shows " CAL " and confirm with
the key " + ".
9.1.2 SIT Calibration
The Gibertini Elettronica is SIT CENTER n. 94 (law 273/91) accredited for the
characterization of electronic balances with capacity till 30 kg.
The certifications issued have an official value: they are documents that, according to
the law, can be used for all the procedures of certification, homologations and
accreditation of products, services and systems of business quality.
The Gibertini, therefore, can emit the calibration certificate which guarantees:
the maintenance of the referral of apparatus used by the Centre with national
samples of unity of the International System of Unities (S.I.);
the metrological correctness of the measuring procedure adopted by the Centre.
9.2 LEGAL METROLOGICAL APPROVAL OF THE DENSIMAT
The use of the Densimat hydrostatic balance, to determine the Alcoholic Strength by
Volume (alcoholic strength), is included. in the utilizations of the "weighing instruments
" that involve the obligation of CE seal (art. 2 subsection 2 letter a) of the EEC 90/384
Directive acknowledged with the Legislative Decree 517/92).
The mod. Densimat hydrostatic balances are sealed " CE ": the Metric Central Office of
Rome has issued an approval certificate CE of the type n. the 96-011, in virtue of this
the Gibertini company provides the affixing of the nameplate " CE " with the Lead Seal
of the Metric Office ("seal") on the balance.
The balance must be verified periodically by the Metric Office of the competent local
Chamber of Commerce .

DensiMat ENGLISH
- 19 -
10. DISPOSAL – INFORMATION FOR USERS
According to the 2002/95/CE, 2002/96/CE and 2003/108/CE
Directives, concerning the reduction in the use of hazardous
substances in electrical and electronic apparatus, as well as the
disposal of waste materials
The symbol of a crossed box applied on the apparatus or on the packaging indicates
that the product must be collected separately from other waste materials at the end of
its useful life.
The separate waste collection of the apparatus which has reached the end of its useful
life is organized and managed by the producer. The user who desires to get rid of
present apparatus must therefore contact the seller and follow the given instructions.
Suitable separate waste collection for future sending of the disused apparatus for
recycling, treatment and environmentally friendly disposal, contributes towards
preventing any possible negative effects on the environment and on health and
encourages the reuse and recycling of the materials the apparatus is made of.
Unauthorised disposal of the product by the user will lead to payment of the
administrative sanctions in force in the country were it is put on the market.

Table of contents
Popular Analytical Instrument manuals by other brands

Gradient Lens
Gradient Lens Hawkeye Pro MicroFlex quick start guide

VOLTCRAFT
VOLTCRAFT 10 10 61 operating instructions

Hach
Hach Lange ORBISPHERE 3100 Basic user manual

MarMonix
MarMonix MLD-705 user manual

Bante Instruments
Bante Instruments D0scan10 instruction manual

Teledyne
Teledyne 3010PAC operating instructions