GIGAMEDIA GGM KITWIFI2CB User manual

VIDEOSURVEILLANCE
GGM KITWIFI2CB
(NVR)
USER
MANUAL
www.gigamedia.net
Please follow the instructions in this manual to obtain the optimum results from this unit.
We also recommend that you keep this manual handy for future reference.

USER MANUAL
2
Chapter 1 Safety Instruction ............................................................................... 4
Chapter 2 Product Overview............................................................................... 5
1.1
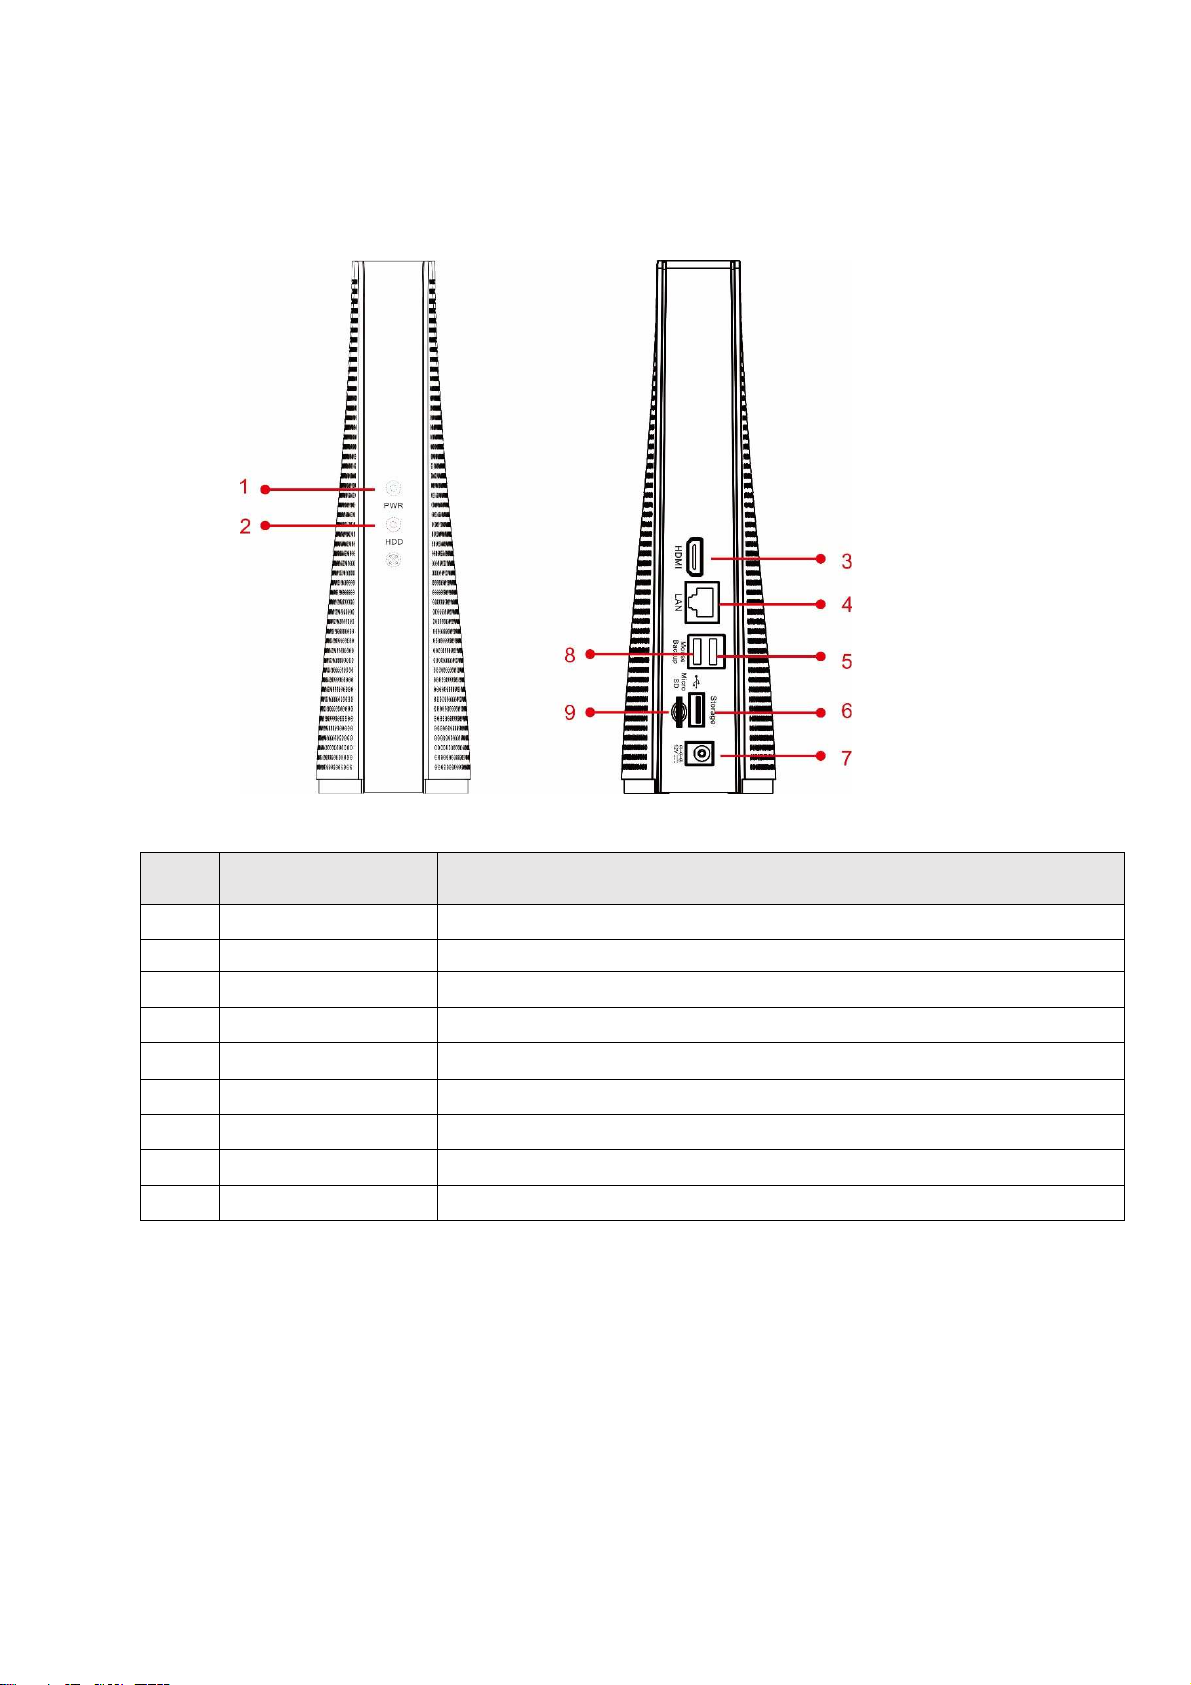
Rear Panel ............................................................................................................ 5
1.2 Remote Controller (For Reference Only) .................................................................. 6
Chapter 3 WIRELESS NVR Common Operations ............................................ 7
3.1 Using the S pplied Mo se ....................................................................................... 7
3.2 Using the Virt al Keyboard ...................................................................................... 7
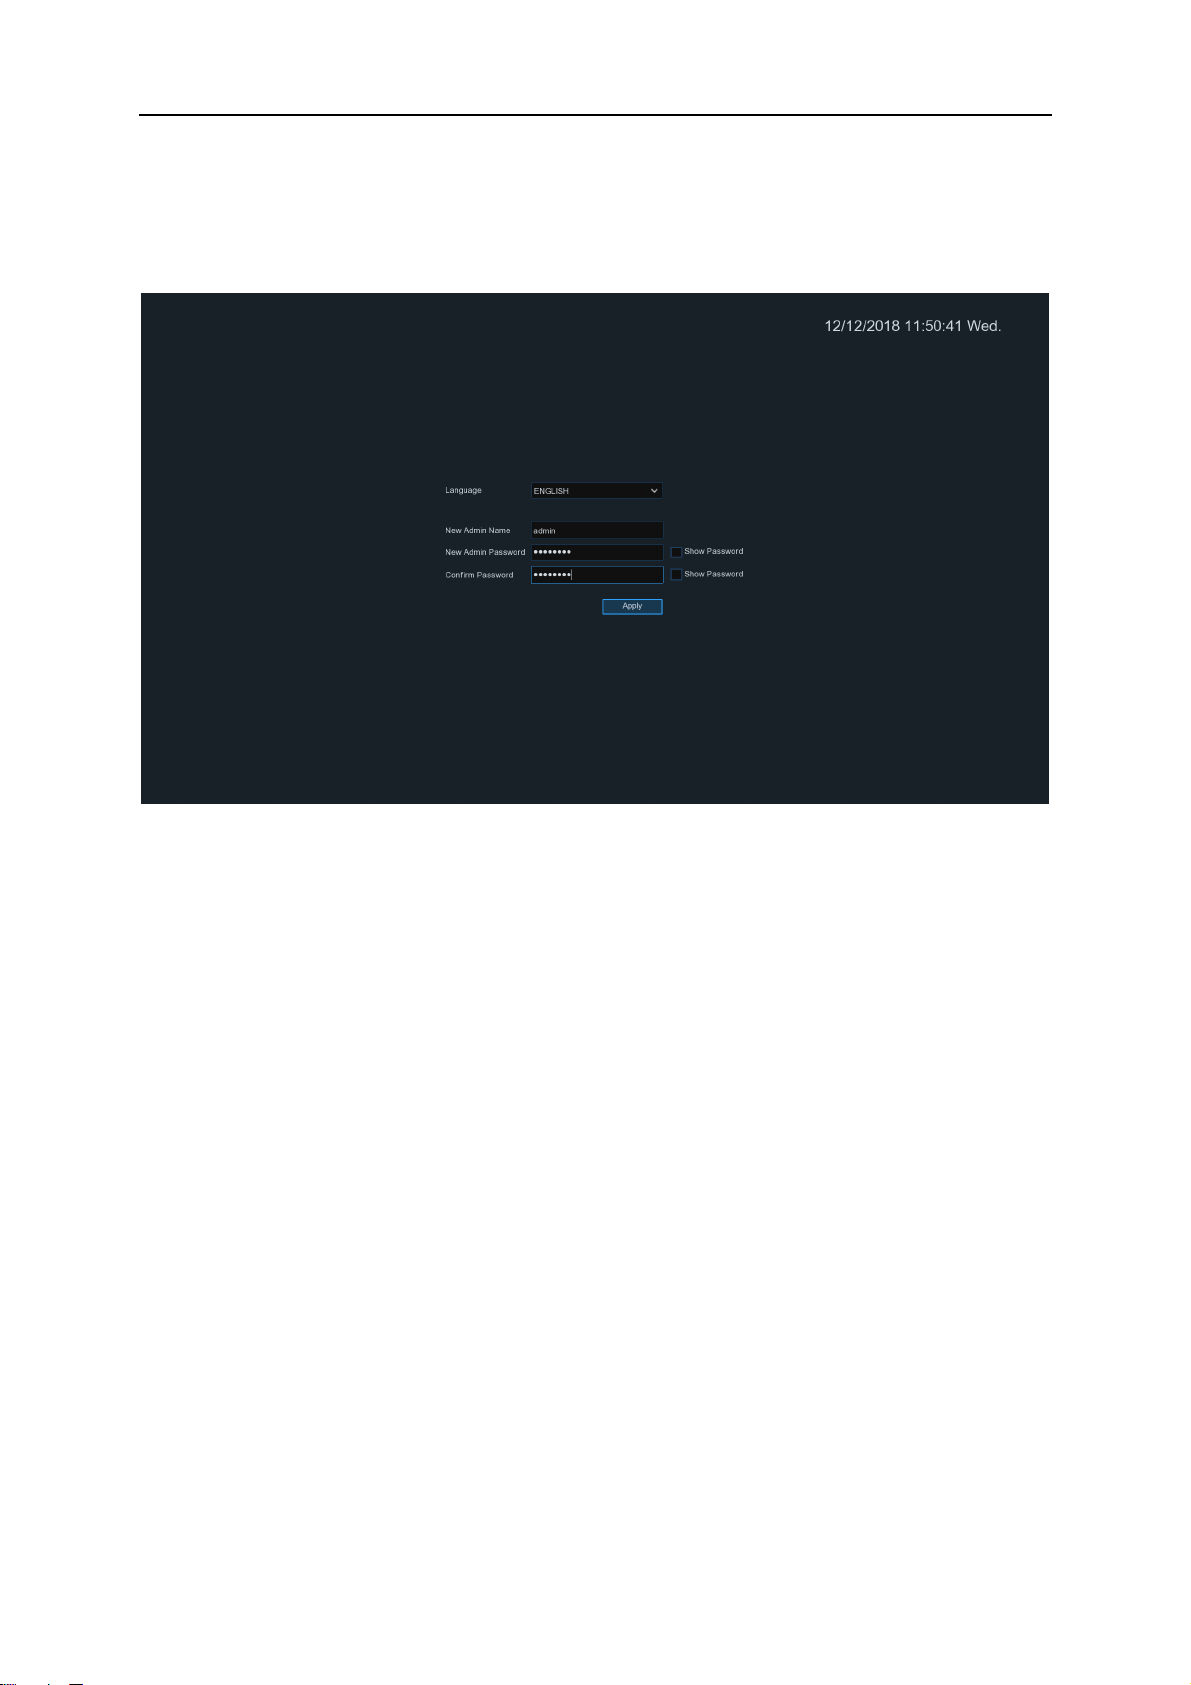
3.3 Password .................................................................................................................. 8
Chapter 4 WIRELESS NVR Starting up ............................................................. 9
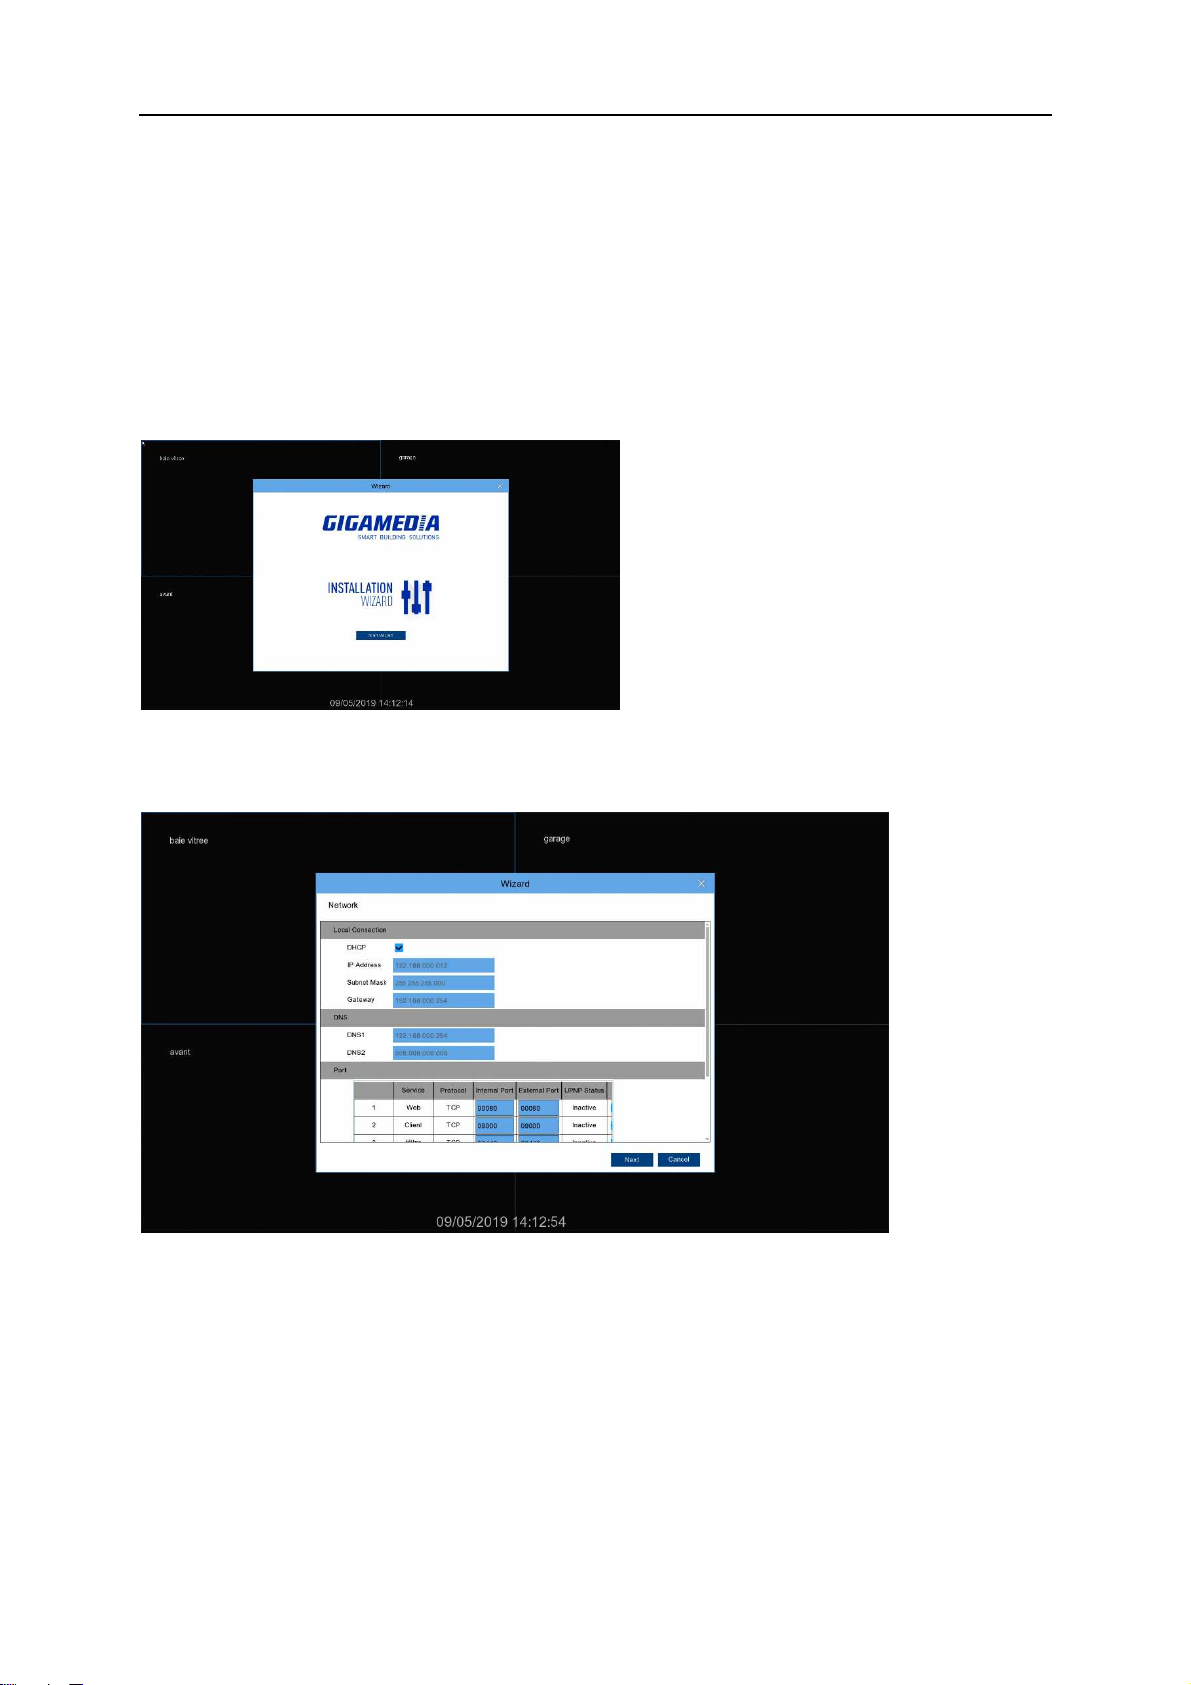
4.1 Start p Wizard ......................................................................................................... 9
4.1.1 Start Wizard ....................................................................................................... 9
4.1.2 Network Config ration ...................................................................................... 9
4.1.3 Date/Time ........................................................................................................ 11
4.1.4 Disk .................................................................................................................. 12
4.1.5 Resol tion ........................................................................................................ 13
4.1.6 Mobile.............................................................................................................. 13
4.1.7 S mmary.......................................................................................................... 14
4.2 Live Viewing Screen ................................................................................................ 14
4.2.1 Camera Q ick Toolbar ..................................................................................... 15
4.2.2 Taskbar ............................................................................................................. 15
4.2.3 Start Men ....................................................................................................... 16
Chapter 5 WIRELESS NVR System Setup ...................................................... 18
5.1 Channel .................................................................................................................. 19
5.1.1 Channel ............................................................................................................ 19
5.2 Record .................................................................................................................... 20
5.2.1 To config re Record parameters. .................................................................... 20
5.2.2 To configure Record Schedule .................................................................. 21
5.3 Alarm ...................................................................................................................... 22
5.3.1 ......................................................................................................................... 22
5.3.2 Exception ......................................................................................................... 24
5.4 Network .................................................................................................................. 25
5.4.1 General ........................................................................................................... 25
5.4.2 DDNS ................................................................................................................ 27
5.4.3 Email ................................................................................................................ 28
5. 5 Device .................................................................................................................... 29
5. 5.1 Disk ................................................................................................................. 30
5.6 System .................................................................................................................... 31
5.6.1 General ............................................................................................................ 31
5.6.2 O tp t Config ration ...................................................................................... 34
5.6.3 M lti- ser ........................................................................................................ 35

USER MANUAL
3
5.6.4 Maintenance .................................................................................................... 38
5.6.5 System Information ......................................................................................... 43
Chapter 6 Search, Playback & Backup ........................................................... 44
6.1 Event Search, Playback & Back p ....................................................................... 44
Chapter 7 Remote Access via Web Client ...................................................... 47
7.1 Web Pl gin Download and Installation .................................................................. 48
7.2 Web Client Manager .............................................................................................. 51
7.2.1 Live Interface ................................................................................................ 51
7.2.2 Playback ........................................................................................................ 52
7.3.3 Remote Setting ............................................................................................ 55
7.3.4 Local Setting ................................................................................................. 55
Chapter 8 Appendix ........................................................................................... 56
8.1 Tro bleshooting ..................................................................................................... 56
8.2 Usage Maintenance ............................................................................................... 57
8.3 Accessories (For reference only) ............................................................................ 58
Battery directive
WEEE regulation
This product is covered by the WEEE II Directive (Directive 2012/19 / EU). It should not be thrown in the trash or dumped. Substances
in the product may be hazardous to human health or the environment. Disposal may be done by returning the product to your dealer
or leaving it a collection point provided for this purpose.
This product contains batteries. The logo indicates that they should not be thrown in the trash or landfill. Batteries may contain
substances that may be hazardous to human health and the environment and heavy metals that have the following designations:
Cd = Cadmium, Hg = Mercury, Pb = Lead. To facilitate the treatment and recycling of used batteries, you can return them to your
dealer, deposit them in a collection bin provided for this purpose or return them to your municipal waste which is obliged to
recover them.
This product bears the CE mark which certifies its conformity with the directives LVD 2014/35/EU ; EMC 2014/30/EU and RoHS
2011/65/EU.
Compliance has been assessed in accordance with applicable standards in effect.

USER MANUAL
4
Chapter 1 Safety Instruction
Please carefully read the following safety instruction so as to avoid personal injuries and
prevent the equipment and other connection devices from being damaged.
1. Power sources (note: please use the power supply attached or specified by the
manufacturer)
Never operate the equipment by using unspecified power supply.
2. Never push objects of any kind through openings of WIRELESS NVR
Never push objects of any kind through openings of WIRELESS NVR so as to avoid
electric shock or other accidents.
3. Do not put the equipment in the dusty field
Do not put the equipment in the dusty field.
4. Do not place the equipment under rain or humid environment
Do not place the equipment under humid environment like basement. If the equipment is
accidentally in contact with water, please unplug the power cable and immediately contact
your local dealer.
5. Keep the surface of the equipment clean and dry
Use soft damp cloth to clean the outer case of WIRELESS NVR (do not use liquid aerosol
cleaners)
6. Do not operate if any problems are found
If there are any strange smell or sound from WIRELESS NVR, unplug the power cable
and contact the authorized dealer or service center.
7. Do not try to remove the upper cover
Warning: Do not remove the cap of WIRELESS NVR so as to avoid electric shock.
8. Handle with care
If WIRELESS NVR does not work normally because of hitting on the hard object, please
contact the authorized dealer for repair or replacement.
9. Use standard lithium battery (Note: Use the batteries attached or specified by the
manufacturer)
After cutting off the power supply, if the system clock cannot continue to work, please
replace the standard 3V lithium battery on the main board.
Warning: Turn off WIRELESS NVR before replacing the batteries, or you may be suffered
from serious electric shock. Please properly dispose of the used batteries.
10. Put the equipment in a place with good ventilation
The WIRELESS NVR system includes HDD, which produces large amount of heat during
operation. As a result, do not block the ventilation openings (on the top, bottom, both sides
and the reverse side) for cooling the system during operation. Install or put the equipment
in the place with good ventilation.
11. The attached power adapter can only be used for 1 set of WIRELESS NVR. Do not
connect more equipment, or WIRELESS NVR may be restarted repeatedly because
of insufficient power.
12. Prevent the equipment from water dropping or splashing. Do not place objects
containing water, such as flower vase, on the equipment.

5
Chapter 2 Product Overview
1.1 Rear Panel
NO Physical interface connection
1 PWR Power status light
2 HDD HDD status light
3 HDMI Connect with HDMI display devices, such as PC monitor.
4 LAN LAN network interface
5 mouse Connect USB mouse
6 Storage Plug USB Disk
7 Power port Connect attached the power supply
8 Backup Plug USB Disk
9 Micro SD Plug Micro SD card

USER MANUAL
6
1.2 Remote Controller (For Reference Only)
No. Icon Description
1 1-8 Numeric keys
Press to display channel 1~8
2 9、0 Numeric keys
3 ALL Press to display all channels
Multiple display mode
4 Menu Press to enter or exit the Main Menu
5 Mute Mute On/off (not support this function)
6 Submenu Go to submenu
7 Up arrow key; Volume increase
8 SEL Press to enter the selected menu item and
edit the setting
9 Left/Right key; Decrease/increase parameter
value of control bar.
10 Down arrow key; Volume decrease
11 Press to rewind during video playback
12 Press to fast forward during video playback
13 Press to play recorded video or enter the
recording search menu
14 Press to start manual recording
15 Press to stop manual recording or stop the
video playback
16
Press to pause the video playback or enter
frame-playback mode
Table 2-1
1
2
3 4
5 6
7
8
9
10
9
11 12
13
14 15
16

USER MANUAL
7
Chapter 3 WIRELESS NVR Common Operations
3.1 Using the Supplied Mouse
Left Button of Mouse Right Button of Mouse
Click once to choose an item in the menus and confirm your
selection.
Click once to open the pop-up
menu on the Live Viewing
screen and to
e it from the
menus.
Click once upon a channel on Live Viewing screen to open
Camera Quick Toolbar
Double-click on the channel on the e it from the menus. Live
Viewing screen to view the channel in full screen mode.
Double-click again to e it the full screen mode.
Click nd hold to drag an area on motion mode or adjust the
values of sliders and scales on menu mode.
3.2 Using the Virtu l Keybo rd
You will see the virtual keyboard automatically on the screen when you need to enter data
Click to delete a
character
Click to complete
the enter
Click to toggle the keyboard to
upper case and more punctuation
Move the cursor to left
Move the cursor to right

USER MANUAL
8
3.3 Password
For the first time when you run the WIRELESS NVR, you must be required to set your own
password immediately in order to protect your privacy. Please be sure to record your username
and password and save them in a secure place.
Language: Choose an OSD language
New Admin name: To set your own administrator name.
New Admin Password: To set your own password. The password must be a combination of 8
characters.
Confirm Password: Enter your own password again.
Click Apply to confirm your settings and goes to the login interface. Draw an unlock pattern or
Enter your user name & password to Login the WIRELESS NVR system.
NOTE: If you forget your password, you will be unable to login the
system, please contact your reseller to reset the password.

USER MANUAL
9
Chapter 4 WIRELESS NVR Starting up
4.1 Startup Wizard
Startup Wizard will help to configure the system and get the WIRELESS NVR works quickly.
4.1.1 Start Wizard
Click the Start Wizard to proceed to the next step
4.1.2 Network Configuration
If you connect to a router allows to use DHCP, please check the DHCP box. The router will assign
automatically all the network parameters for your WIRELESS NVR. Unless the network is
manually addressed below parameters:
IP Address: The IP address identifies the WIRELESS NVR in the network. It consists of four
groups of numbers between 0 to 255, separated by periods. For example, “192.168.001.100”.
Subnet Mask: Subnet mask is a network parameter which defines a range of IP addresses that
can be used in a network. If IP address is like a street where you live then subnet mask is like a
neighborhood. The subnet address also consists of four groups of numbers, separated by periods.
For example, “255.255.000.000”.

USER MANUAL
10
Gateway: This address allows the WIRELESS NVR to access the Internet. The format of the
Gateway address is the same as the IP Address. For example, “192.168.001.001”.
DNS1/DNS2: DNS1 is the primary DNS server and DNS2 is a backup DNS server. Usually should
be enough just to enter the DNS1 server address.
Port
Web Port: This is the port that you will use to log in remotely to the WIRELESS NVR (e.g. using
the Web Client). If the default port 80 is already taken by other applications, please change it.
Client Port: This is the port that the WIRELESS NVR will use to send information through (e.g.
using the mobile app). If the default port 9000 is already taken by other applications, please
change it.
RTSP Port: This is the port that the WIRELESS NVR will be allowed to transmit real-time
streaming to other device (e.g. using a streaming Media player.).
UPNP: If you want to log in remotely to the WIRELESS NVR using Web Client, you need to
complete the port forwarding in your router. Enable this option if your router supports the UPnP. In
this case, you do not need to configure manually port forwarding on your router. If your router does
not support UPnP, make sure the port forwarding is completed manually in your router.

USER MANUAL
11
4.1.3 Date/Time
This menu allows you to configure the Date, Time, Date Format, Time Format, Time Zone, NTP
and DST.
Date and Time
Click on the calendar icon to set the current system date.
Date: Click on the calendar icon to set the system date.
Time: Click to set the system time.
Date Format: Choose from the dropdown menu to set preferred date format.
Time Format: Choose time format between 24Hour and 12Hour.
Time Zone: Set the correct time zone.
NTP
NTP stands for Network Time Protocol. This feature allows you to synchronize the date and time
automatically on the WIRELESS NVR over Internet. Therefore, the WIRELESS NVR needs to be
connected to the Internet.
Check the “NTP” box, and select the NTP server.

USER MANUAL
12
DST
DST stands for Daylight Savings Time.
DST: Enable if Daylight Saving Time (DST) is observed in your region
Time Offset: Select the amount of time to offset for DST
Time Mode: Choose to set the daylight saving time in weeks or in days
Start Time/End Time: Set the start time and end time for daylight saving
4.1.4 Disk
If the HDD is installed in the WIRELESS NVR for the first time, it must be formatted. Select the
HDD and then click Format HDD button to format the HDD.
Overwrite: Use this option to overwrite the old recordings on the HDD when the HDD is full. For
example, if you choose the option 7 days then only the last 7 days recordings are kept on the HDD.
To prevent overwriting any old recordings, select Disable. If you have disabled this function, please
check the HDD status regularly, to make sure the HDD is not full.

USER MANUAL
13
4.1.5 Resolution
Choose an output resolution matches to your monitor. The WIRELESS NVR supports to adjust the
output resolution automatically to match the best resolution of your monitor when the system is
starting up.
4.1.6 Mobile
If your WIRELESS NVR come with a P2P ID, you can scan the QR code with your mobile app to
view the WIRELESS NVR remotely.

USER MANUAL
14
4.1.7 Summary
You can check the system summary information you had set in the start wizard and finish the
wizard.
Tick “Don't show this window next time" if you don’t want to display Start Wizard when system
reboot next time. Click Finish button to save & exit.
4.2 Live Viewing Screen
Status Icons
Camera Quick Toolbar
Status Icons
Task Menu Bar System Date & Time

USER MANUAL
15
This indicates that the WIRELESS NVR is currently recording. If you installend HDD to
NVR the indicates is show of Normal Recording, if not, the indicates isn’t show
This icon appears when the camera has detected motion.
This icon indicates that the HDD is in error to work
This icon indicates the HDD is nformatted
This icon indicates the HDD is f ll.
Hard disk not fo nd.
4.2.1 Camera Quick Toolbar
In live viewing, click the left button of your mouse on a connected camera to display the Camera
Quick Toolbar.
Click to manually record the channel immediately. If the manually recording is in process, the
icon will be in red color. Click one more time to stop manual record.
Click to enter pairing.
4.2.2 Taskbar
Click to open the Start Men
Click to choose different layo t for live view
Click to start viewing channels in a seq ence
Q ick playback. Yo can choose to play the latest recording for all channels from the beginning
of the day, or yo can choose the playback from the latest 5s, 10s, 30s, 1Min, 5Min.
Click to adj st the vol me
This icon will appear if the network is disconnected.
To start or stop Man al Record .
To view system information, and network state.

USER MANUAL
16
4.2.3 Start Menu
With the start menu, you can switch user, search & playback, enter system setup menu, lock &
unlock the screen, shut down, reboot & logout the system.
4.2.3.1 Unlock nd Lock Screen
4.2.3.2 Shutdown
Search & Playback. View more on Chapter 6 Search, Playback & Backup
NVR System Setup. View on Chapter 5 NVR System
Lock & unlock screen. View on 4.2.3.1 Unlock and Lock Screen.
Shutdown, reboot & logout the system. View on 4.2.3.2 Shutdown.
The screen will be locked to protect unauthorized OSD operation while
the NVR is not in menu operation 1 minute.
If necessary, you can also lock the screen operation manually. To do so,
go to Star Menu, and then click the Lock Screen icon to lock the
system immediately.
If the system is locked, you can click the Unlock icon to unlock the
system for further operation.
To switch user. To enable multi-user, please view on 5.6.3 Multi-user.

USER MANUAL
17
Click the Shutdown button from Star Menu, and the check the further action you want to move.
Click OK button, system will require to input the Admin password to authenticate.
If you choose Logout the system, the live viewing screen will be disappeared. You will need to
login the system for further operations.

USER MANUAL
18
Chapter 5 WIRELESS NVR System Setup
You are able to configure the WIRELESS NVR for Channel, Record, Alarm, Network, Device &
System from Start Menu Setup.

USER MANUAL
19
5.1 Channel
In this section, you are allowed to configure the Wireless camera, live view display, manage
Wireless cameras motion setup, Video Cover.
5.1.1 Channel
Channel: This
is
changeless.
Channel Name: You may edit the channel name
Pair: Click the channel button to do pairing.
Camera : You may select ON or OFF to enable or disable camera .
Camera version: Camera firmware version .

USER MANUAL
20
Camera Post Recording:
1. If you install HDD, the camera is connected the power , you may select Continuous option,
or select 10s、20s、30s , default is 10s. record type will have a Normal Record and Motion
Record
2. If you only install SD card, Not install HDD, Continuous option will not in the invalid, or the
camera is not connect the power, you only select 10s、20s、30s, record type will have a
Motion
Audio: You may select Enable or Disable, Default is Disable.
Check: Click a channel is show the camera power number in the battery list, for example:
Battery: The camera on line is show Power percentage, such as 90%, The camera off line is show:
The camera off-line.
5.2 Record
5.2.1 To configure Record parameters.
Channel: Display channel number.
Record Switch: Default is ON, or click select OFF to Disable record.
Resolution: Default is 1920X1080(1080P), or click select other resolution.
Table of contents
Other GIGAMEDIA DVR manuals