Gigaset Maxwell 10 Setup guide

1. Maxwell 10 online manual . . . . . . . . . . . . . . . . . . . . . . . . . . . . . . . . . . . . . . . . . . . . . . . . . . . . . . . . . . . . . . . . . . . . . . . . . . . . . . . . . . . . . 2
1.1 Overview . . . . . . . . . . . . . . . . . . . . . . . . . . . . . . . . . . . . . . . . . . . . . . . . . . . . . . . . . . . . . . . . . . . . . . . . . . . . . . . . . . . . . . . . . . . . . . 4
1.2 Using the phone in different scenarios . . . . . . . . . . . . . . . . . . . . . . . . . . . . . . . . . . . . . . . . . . . . . . . . . . . . . . . . . . . . . . . . . . . . . . . 7
1.3 First steps . . . . . . . . . . . . . . . . . . . . . . . . . . . . . . . . . . . . . . . . . . . . . . . . . . . . . . . . . . . . . . . . . . . . . . . . . . . . . . . . . . . . . . . . . . . . . 9
1.4 Web configurator – configuring the phone on a PC . . . . . . . . . . . . . . . . . . . . . . . . . . . . . . . . . . . . . . . . . . . . . . . . . . . . . . . . . . . . . 12
1.5 Network and connectors . . . . . . . . . . . . . . . . . . . . . . . . . . . . . . . . . . . . . . . . . . . . . . . . . . . . . . . . . . . . . . . . . . . . . . . . . . . . . . . . . . 14
1.6 Telephony . . . . . . . . . . . . . . . . . . . . . . . . . . . . . . . . . . . . . . . . . . . . . . . . . . . . . . . . . . . . . . . . . . . . . . . . . . . . . . . . . . . . . . . . . . . . . 20
1.7 Services . . . . . . . . . . . . . . . . . . . . . . . . . . . . . . . . . . . . . . . . . . . . . . . . . . . . . . . . . . . . . . . . . . . . . . . . . . . . . . . . . . . . . . . . . . . . . . 28
1.8 System settings . . . . . . . . . . . . . . . . . . . . . . . . . . . . . . . . . . . . . . . . . . . . . . . . . . . . . . . . . . . . . . . . . . . . . . . . . . . . . . . . . . . . . . . . . 33
1.9 Checking the status of the phone . . . . . . . . . . . . . . . . . . . . . . . . . . . . . . . . . . . . . . . . . . . . . . . . . . . . . . . . . . . . . . . . . . . . . . . . . . . 38

Maxwell 10 online manual


SD card
In order to extend the internal memory and store personal data, images, videos or music, you can insert a microSD card (not included) into your
phone.
Display key
You can use the display key to switch the display on or off, or to capture a screenshot of the display currently shown.
If the screenshot feature is activated: A screenshot of the display currently shown is captured.
If the screenshot feature is not activated: The display is switched on/off.
The screenshot feature must be activated in the Web configurator .
The screenshots are stored in the app.Gallery
The display key is located behind the right cover on the back of the device.

Additional information about your phone
Using the phone:
Video films on your device
On the start screen: -> -> Helper

1.
2.
3.
4.
5.
6.
7.
8.
Using the phone in different scenarios
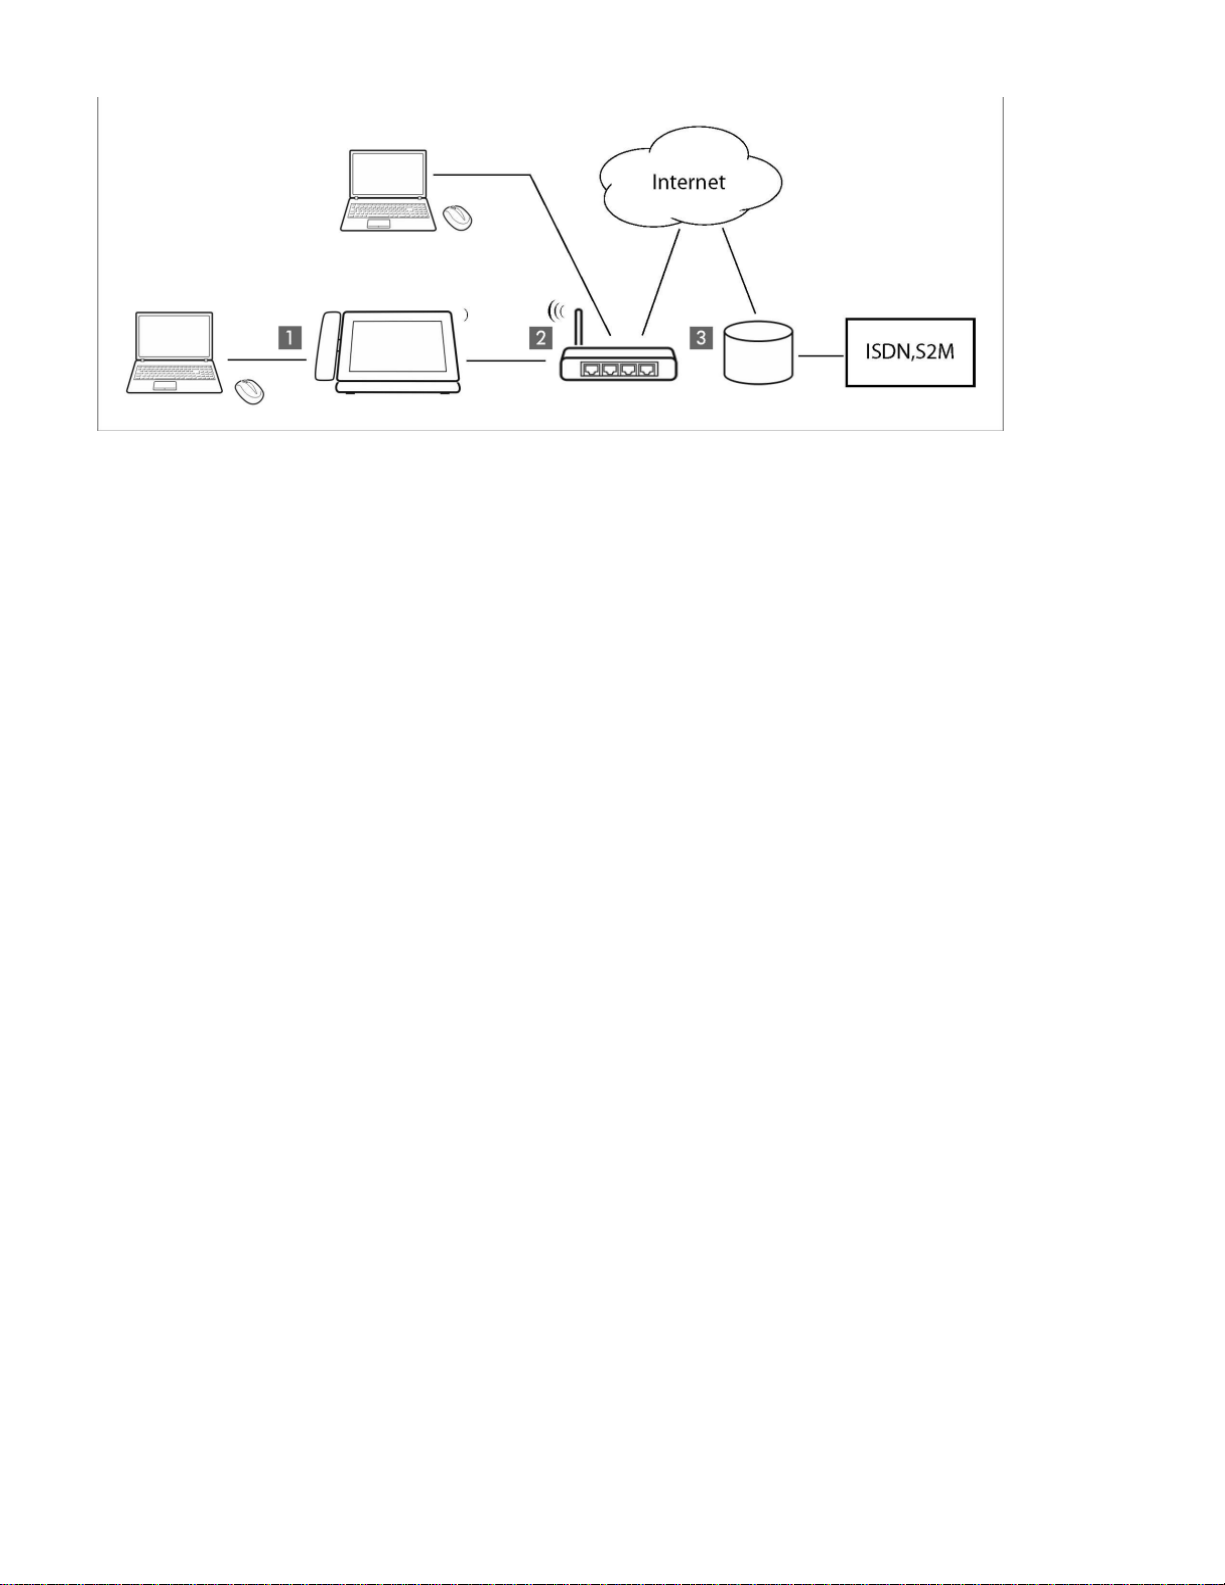
Using your phone in a professional environment with phone system and server structure
If you use your Maxwell 10 in a corporate network with a telephone infrastructure, your phone incor porates functions and data from the phone
system and servers.
In a corporate environment, the VoIP accounts and most of the settings are configured centrally by the phone system.
Gigaset IP telephone
Gigaset IP telephone with integrated gigabit switch (Maxwell 10). Your PC is connected directly to the phone, providing you with an
additional LAN connection in your network.
DECT Multicell System for connetion to up to 100 DECT handsets.
DECT base for connection to DECT handsets.
Ethernet switchSupports Quality of Service (QoS), Gigabit Ethernet and PoE (Power over Ethernet).
Phone system (e.g., Gigaset T500 PRO)Forms Internet telephony, ISDN or S2M connections. Analogue devices can be connected. A net
work connection is established using Ethernet.
Gateway to the Internet for all connected devices. Routes VoIP calls from the phone system to the Internet.
File, e-mail and workgroup servers, or NAS systems, can be wirelessly integrated into the phone system architecture. As a result:
- Invitations to conference calls can be organised via the phone system
- The phone system can be backed up to a server or the system can be started via the network
- Online directories (LDAP) can be managed centrally
Using your phone in a simplified environment without a phone system
You can also use your Maxwell 10 without a phone system.

1.
2.
3.
Gigaset IP telephone with integrated gigabit switch (Maxwell 10). Your PC is connected directly to the phone, providing you with an
additional LAN connection in your network.
Gateway to the Internet for the connected devices. Routes VoIP calls from the phone to the Inter net. You establish the connection to the
gateway via cable or wirelessly via WI-Fi.
The SIP provider transfers calls from the Internet and establishes a connection with the standard telephone network.
In this scenario, you must the VoIP accounts for your phone. You can create up to 12 VoIP accounts on your phone.manually configure

First steps
Setting the language
Registering the handset (DECT)
Establishing a connection to the local network
Connecting via Ethernet
Connecting via Wi-Fi
Configuring Internet telephony
For information on unpacking and installing the device please refer to the Maxwell 10 Installation Guide and/or the How To install
videos
Your device will start as soon as it is connected to the mains power supply. Please be aware that if the device is powered by PoEautomatically
(Power over Ethernet) it is supplied with power as soon as it is connected to an Ethernet switch with PoE-functionality.
Setting the language
On the Start screen tap on to open the list of available apps. -> Select Setting
Scroll down and select ->Tap on -> Select your desired language.Language & input Language
Registering the handset (DECT)
If you use a DECT handset you need to register it on the phone.
Install the handset as described in the Installation Guide and place it in the cradle in order to charge the battery.
On the Start screen tap on to open the list of available apps. -> Select .Settings
Select -> Tap on . DECT Register DECT Handset
The registration process may take some time. If the registration is successful a message is output.
Establishing a connection to the local network
Your phone must be connected to the local network before it can connect to a phone system or the Internet and before you can operate it from a
PC. You can connect the phone to the local network via Ethernet or Wi-Fi.
Connecting via Ethernet
Make sure that the phone's LAN port is connected to an Ethernet switch/router by an Ethernet cable.
On the Start screen tap on to open the list of available apps. -> Select Settings.
Select -> Drag switch by to the right to switch on Ethernet function.Ethernet Ethernet

The network connection is established if the phone has automatically been assigned an IP address from a DHCP server in the network.
If your device is assigned a static IP address, your net work administrator must tell you the IP address of your device. You then assign this
address to your phone manually.
Ethernet configuration
Tap on . Ethernet configuration
If the network connection is established, the configu ration information, e.g. the IP address, is displayed.
If the network connection has not been established automatically, you can enter the configuration data manually.
Proxy configuration
When a connection to internal or external network resources is made via a proxy server, you must enter the proxy server data. Proxy settings are
used by the browser but may not be used by other apps.
Tap on . Proxy Configuration
Enter the data of your proxy server.
Connecting via Wi-Fi
On the Start screen tap on to open the list of available apps. -> Select .Settings
Select -> Drag switch by to the right to switch on Wi-Fi function.Wi-Fi Wi-Fi
Please be sure to switch off Ethernet to be able to get a WiFi connection!

The phone attempts to connect with a Wi-Fi in range. Once a connection has been established, you will see the Wi-Fi icon in the toolbar. It
displays the signal strength.
A list of Wi-Fis in range of your phone is displayed. An icon indicates the signal strength. Secure networks are identified with a lock icon.
If necessary, tap on context menu -> to update the list. Scan
Tap on the desired Wi-Fi. -> Enter password/net work key.
Tap on . Connect
Adding another Wi-Fi
Wi-Fis that are not in range or that withhold the SSID and are therefore not displayed in the list can be entered manually. You will require the
network name (SSID), the security protocol used and the network key. Once the tablet is in range of one of these Wi-Fis, the connection is
established.
Select -> Tap on -> Enter . Wi-Fi Network SSID
Select security protocol ( , , , None WEP WPA/WPA2 PSK 802.1x EAP).
Enter password/network key. -> .Save
Configuring Internet telephony
Before you can use the device to phone anyone you need the services of a VoIP provider.
Prerequisite:
You have a phone system in your network that provides VoIP accounts for your device, or
You have registered with a VoIP provider (e.g., via your PC) and set up a VoIP account.
The device searches the network for a provisioning file and checks whether VoIP accounts already exist. If the telephone has existing VoIP
accounts, these accounts are configured automatically. You can now make calls with your phone via the Internet.
If the telephone has no existing VoIP accounts, you must configure them manually. The Web config urator will help you with this.

Web configurator – configuring the phone on a PC
Starting the Web configurator
The Web configurator provides you with a user interface that you can use to configure your Maxwell 10 on the PC.
Prerequisites:
Your phone is connected to the local network.
The Web server is enabled.
Enabling the web server
On the Start screen tap on to open the list of available apps. -> Select .Settings
Select WebUI -> Drag switch by WebUI to the right to switch on the Web server function.
Starting the Web configurator
To start the Web configurator you will need the IP address for your phone. You will find this via the phone display, in the Ethernet or WLAN
settings for the device:
If connected via Ethernet:
On the Start screen tap on -> Select -> .Settings Ethernet -> Ethernet configuration
If connected via Wi-Fi:
On the Start screen tap on -> Select Tap on the network your phone is connected to.Settings -> Wi-Fi ->
The IP addresses are also displayed on the status page:
-> -> Settings -> WebUI.
The IP address can sometimes change, depending on the settings of the DHCP server in your network.
Accessing the Web configurator:
Launch the Internet browser on your PC.
Enter the IP address in the browser's address field. Example:
The login screen appears.
Select the appropriate language from the drop-down list.
Enter the password. Default: admin
Click on .Login
The Web configurator will now start.
Select the function that you wish to use.
Use the tab to set or change individual functions on your phone.Settings
Open the tab to obtain information about the status of your phoneStatus

For your security, you should change the default passwords

Network and connectors
All of the settings for connecting your phone to the local network must be correct to enable commu nication with other devices in the network and
phone calls via the Internet.
If you use the Web configurator, your phone is already connected to the local network. You can use the menu toNetwork and Connections
change and extend these settings. You can also create set tings for phone connections:
LAN settings
VLAN tagging
Prioritising VLANs
Own HTTP server settings
Phone Systems
Call Manager
QoS settings (Quality of Service)
VoIP settings
Security settings
Remote management
Security settings
LAN settings
If an error occurs when you are changing the LAN settings, the PC connection to the phone may be cancelled and you will no
longer have access to the Web configurator.
If this happens, you must re-establish phone access to the local network via the display
Settings -> Network and Connections -> Local Area Network (LAN)
VLAN tagging
A local network can be divided into logical subnetworks known as VLANs (VLAN = Virtual Local Area Network, Standard IEEE 802.1Q). Multiple
VLANs share a physical network and its components, e.g., switches. Data packets from a VLAN are not forwarded to another VLAN. VLANs are
often used to sep arate the data traffic of different services (Internet telephony, Internet TV etc.) and to define different priorities for the data
traffic.
You can operate your phone and a PC connected to the PC port on your phone in two different VLANs. In this case, you enter the VLAN
identifiers (VLAN tags) for your VLAN. Your network operator will supply you with this data.
If you operate the PC in a different VLAN from the phone, you will no longer have direct access to the Web configurator of the
phone from the PC.
Select one of the following options for :Use VLAN tagging
If you are not using a VLAN (default)No LAN Port only
If you are operating the phone and PC in the same VLAN.
LAN and PC Port
If you are operating the phone and PC in dif ferent VLANs.
Enter the VLAN identifier for your virtual network in the VLAN
field. Identifier (1..4094)
When selecting , enter the different VLANLAN and PC Port
identifiers under and .VLAN LAN Port VLAN PC Port
Value range: 1 – 4094

If you enter the wrong value for , you will need to restore the phone to the default settings:VLAN Identifier (1..4094)
-> -> .Settings Backup & reset -> Factory data reset
You will then need to reinstate the phone's access to the local network.
Select the required priorities for voice and data transmission for the LAN port from the and menus. Voice Priority Data Priority
If you selected , select the for the transmission of PC data as well. LAN and PC Port VLAN Priority
Prioritising VLANs
Data packets from VLANs can be prioritised. The priority determines whether the data traffic from a VLAN is given preferential treatment by the
network components. You can define the priority for voice and data separately. In the case of a local network with a lot of data traffic, you can
achieve bet ter quality phone connections by giving a high priority to voice data. Using a high priority for data services you can achieve better
quality for displaying info services such as webcam images or maps.
Range of values and assignment of values to service classes (according to IEEE 802.1p):
0 No priority (Best Effort)
1 Background services, e.g., news ticker (Background)
2 Not defined
3 General data services (Excellent Effort)
4 Control services, e.g., routing (Controlled Load)
5 Video
6 Voice data (Voice)
7 Top priority for network control software (Network Control)

Further options for optimising the voice quality are available under QoS settings (Quality of Service)
Own HTTP server settings
If you operate your own HTTP server, enter the communication data.
HTTP port
Enter the number for the port to be used for communication by the HTTP server. The default setting is 80.
HTTPS port
Enter the number for the port to be used for secure connections by the HTTP server. The default setting is 443.
HTTP connection type
Select which connections can be established:
HTTP Unsecured connection
HTTPS Secure connection
HTTP + HTTPS Both secure and unsecured connections
Automatically logout (min.)
Enter the time (in minutes) after which an HTTP connection should automatically end if no entries are made.
Saving settings
Click on to save your settings on the screen.Save Local Area Network (LAN)
Phone Systems
If you operate a phone system in your local network, use this screen to configure access to your phone.
Settings -> Network and Connections -> Phone Systems
If your phone is connected to a phone system, select what type of phone system it is, e.g.
Gigaset T500/300 The phone is connected to a Gigaset T500 PRO or Gigaset T300 PRO.
Call Manager
If your phone is connected to a phone system, you can decide how to handle incoming and outgoing calls for different situations. The availability
of the following options depends on the selected phone system.
For the following situations:
Incoming calls that are transferred by the phone system's call manager ( , Accept call directly)
Incoming calls that are not transferred by the call manager ,(Incoming Calls without Call Manager)
Calls that you initiate via a function key (Outgoing Calls via function key)
Other outgoing calls ( ), Execute call
you have the following options to accept/execute the call:
via headset orvia handsfree
not at all ( ) (incoming calls)No
BLF list IP address (URI) (only for Broadsoft)
Busy Lamp Field (BLF) features allow users to view the status of phone lines that are associated with specific phone features. Using BLF pickup,
it is possible to answer an incoming call for all lines on the Maxwell 10 that the phone is allowed to monitor. Which BLF features are configured for
the phone is defined on the phone system.
In the field, enter the IP address (URI) of the server providing the list of devices for which the phone is able to acceptBLF list user
incoming calls.
This function is only available if supported by the phone system.

Extended service platform PBX of service provider
If your provider provides extended PBX services, enter the and the phone sytem account data, e.g. andServer Address UCI Login-ID
the . The necessary data to be entered depend on the selected phone system. UCI Password
Saving settings
Click on to save your settings on the screen.Save Phone Systems
QoS settings (Quality of Service)
On this screen you can optimise the voice quality of your IP telephone.
The voice quality depends on the priority of the voice data in the IP network. Prioritising the VoIP data packets is done using the QoS protocol
DiffServ (Differentiated Services). DiffServ defines a number of classes for the quality of service and, within these classes, various priority levels
for which specific prioritisation procedures are defined.
You can specify different QoS values for SIP and RTP packets. SIP packets (Session InitiationProtocol) contain the signalling data, while RTP
(Real-time Transport Protocol) is usedfor the voice transfer.
-> Settings -> Network and Connections Quality of Service (QoS)
Enter your chosen QoS values in the SIP ToS/Diffserv (Range: 0 - 63)
and fields.RTP ToS/Diffserv (Range: 0 - 63)
Value range: 0 - 63.
Common values for VoIP (default setting):
SIP 34 High service class for fast switching of the data flow
(Expedited Flow)
RTP 46 Highest service class for fast forwarding of data packets
(Expedited Forwarding)
Do not change these values without consulting your network operator first. A higher value does not necessarily mean a higher
priority. The value determines the service class, not the priority. The prioritisation procedure used in each case meets the
requirements of this class and is not necessarily suitable for transferring voice data.
Detailed information on the Diffserv protocol can be found in and .RFC 2474 RFC 3168
Saving settings
Click on to save your settings on the screen.Save Quality of Service (QoS)
VoIP settings
On this screen you configure the ports for establishing VoIP connections.
Settings -> Network and Connections -> VoIP

"Listen ports" for VoIP connections
Select the ports on which your phone expects incoming VoIP
connections.
Use random ports
Select if the phone should use any available ports for the SIP port and RTP port instead of fixed ports. Yes
The use of random ports is advisable if you want multiple phones to be operated on the same router/gateway with NAT. The phones must
then use different ports so that the NAT for the router/gateway is only able to forward incoming calls and voice data to one (the intended)
phone.
If you click on , the phone uses the ports specified in and .No SIP port RTP port
SIP port
Specify the local communication port that the phone should use to send and receive signalling data. Specify a number between 1024 and 49152.
The default port number for SIP signalling is 5060.
RTP port
Specify the local communication port that the phone should use to receive voice data. Enter an even number between 1024 and 49152. The port
number must not be the same as the port num ber in the SIP port field. If you enter an odd number, the next lowest even number will be selected
automatically (e.g., if you enter 5003, then 5002 is set automatically). The default port number for voice transmission is 5004.
ICE enabled
Choose whether or not to use ICE (Interactive Connectivity Establishment). ICE is similar to STUN (a Session Initiation Protocol (SIP) method for
overcoming NAT firewalls.
Saving settings
Click on to save your settings on the screen.Save VoIP Settings
Security settings
This screen is where you create security settings for your phone.
Settings -> Network and Connections -> Security Settings
Remote management
Select whether you want to ( ) or not ( ).Allow access from other networks to the web configurator Yes No
If you permit , this increases the risk of unauthorised access to yourdevice settings.Remote Management
Select the network protocol to be used for the communication:
TLS (Transport Level Security)
UDP (User Datagram Protocol
UDP (Transmission Control Protocol)
Security settings
On this screen you can download server certificates onto your phone, delete downloadedcertificates and specify how invalid certificates should be
handled.
Server certificates allow a server to be digitally identified via SSL (Secure Sockets Layer). Operating a server with SSL requires a server
certificate both for one-way authentication (server to the client) and for two-way authentication (between client and server). A server certificate has
to be downloaded onto your device so that the device can carry out authentication.
The and lists contain all downloaded certificates.Server certificates CA certificates

Select a certificate from one of the lists.
Click on to delete the certificate from the list.Remove
Click on to display information about the certificate.Details
Click on to temporarily deactivate/activate the certificate./ Disable Enable
Import a local certificate
In order for a certificate to be downloaded to your phone, it must be available in your network.
Click on to search for the file on your PC or in your network. Select the required file.Browse
Click on Upload to download the file onto the device.
The connection to the handset may be interrupted when transferring or removing a certificate.
Secure Real Time Protocol (SRTP)
The Secure Real-Time Transport Protocol (SRTP) allows you to encrypt voice data transmitted using the Real-Time Transport Protocol (RTP).
Activate or deactivate the .Secure Real Time Protocol (SRTP)
Select whether you want to or not. If this function is activated, you also accept incoming calls from a numberAccept non-SRTP calls
that does not use SRTP.
Saving settings
Click on to save your settings on the screen.Save Security Settings

Telephony
Connections
Connections
Configuring a VoIP account
DTMF in VoIP connections
Audio settings
Time interval for RTP packets
Voice quality
Silence suppression
Video settings
Call divert
Local settings
Dialling plans
Do Not Disturb (DND)
Call records
Voice mail services
Connections
You can establish up to 12 telephony connections (VoIP accounts) for your phone.
Settings ->Telephony -> Connections
On this screen you can
See the status of the configured connections
Activate or deactivate individual connections
Define which of the connections are used by default for outgoing calls
Change the configuration of connections or establish new connections
Delete existing connections
Connections
The following information is shown for each configured connection:
Name/provider Name or number of the VoIP connection / Name of the VoIP
provider
Status Status of the connection. The following statuses are possible:
Registered The connection is registered with the provider.
Not Registered The connection is not registered with the provider.
Registration Failed An error occurred during registration.
Server Not Accessible The registrar server specified during configuration is not
available.
Disabled The connection is disabled.
Activating/deactivating connections
Only activated connections can be used for Internet telephony.
To use a configured connection, select .Active
Specifying a default line for outgoing calls
Select for the connection that you want to use as the default line for your phone calls. Only one can be selected.Default send account
Establishing new connections or editing existing ones
Click on in the row of a configured connection to change its configuration.Edit
Click on in a row without a configured connection to establish a new connection. Edit
Other manuals for Maxwell 10
3
Table of contents
Other Gigaset Tablet manuals

Gigaset
Gigaset QV1030 User manual

Gigaset
Gigaset QV1030 User manual

Gigaset
Gigaset QV1030 User manual

Gigaset
Gigaset QV1030 User manual

Gigaset
Gigaset QV830 User manual

Gigaset
Gigaset QV830 User manual

Gigaset
Gigaset QV1030 User manual

Gigaset
Gigaset QV830 User manual

Gigaset
Gigaset QV830 User manual

Gigaset
Gigaset QV1030 User manual