Gigaset A116 User manual

2
Template Go, Version 1, 01.07.2014 / ModuleVersion 1.0
Contents
Gigaset A116 / LUG GR-MEA-International en / A31008-M2801-R101-1-8N19 / A116_NEOIVZ.fm / 7/27/16
Contents
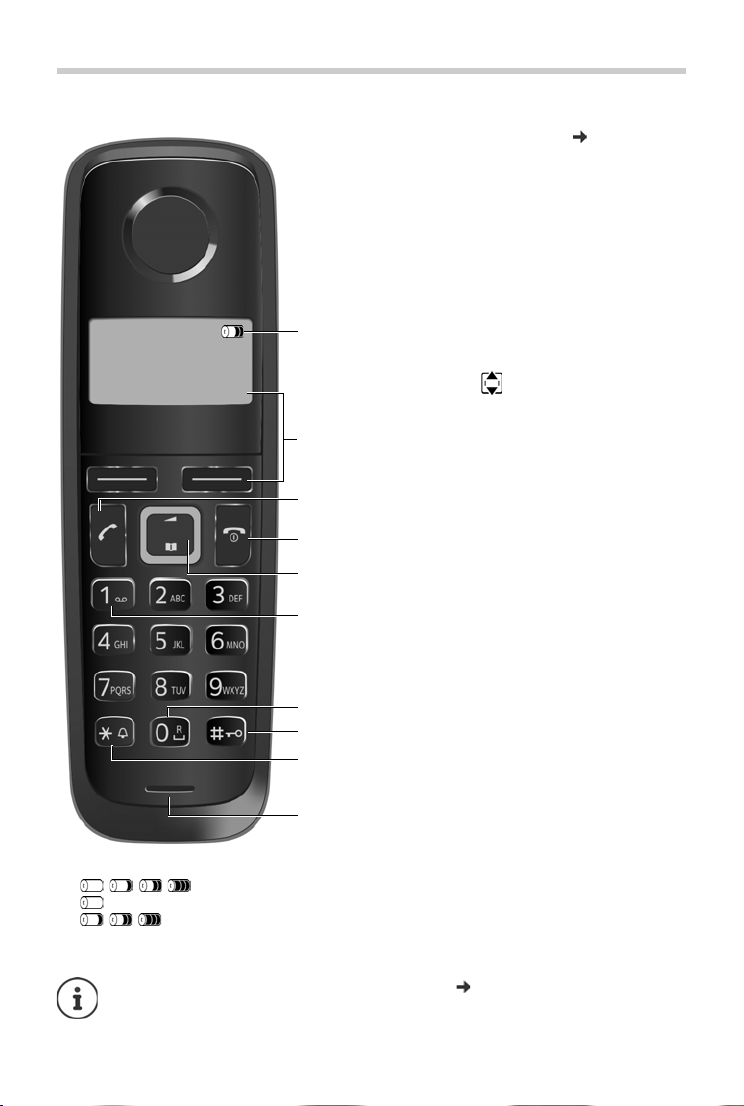
Brief overview of the handset . . . . . . . . . . . . . . . . . . . . . . . . . . . . . . . . . . . . . . . . . . . . . . . . . . . . . . . . . 3
Illustration in the user guide . . . . . . . . . . . . . . . . . . . . . . . . . . . . . . . . . . . . . . . . . . . . . . . . . . . . . . . . . . . 4
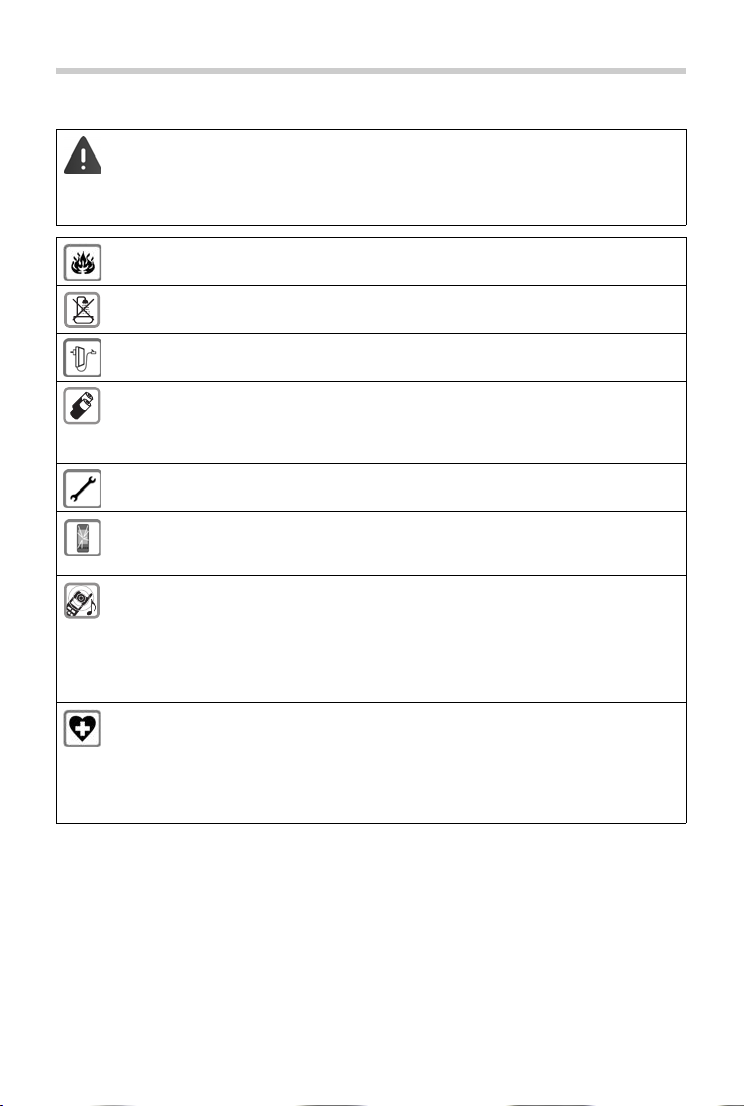
Safety precautions . . . . . . . . . . . . . . . . . . . . . . . . . . . . . . . . . . . . . . . . . . . . . . . . . . . . . . .. . . . . . . . . . . . . 5
Getting started . . . . . . . . . . . . . . . . . . . . . . . . . . . . . . . . . . . . . . . . . . . . . . . . . . . . . . . .. . . . . . . . . . . . . . . 6
Contents of the package . . . . . . . . . . . . . . . . . . . . . . . . . . . . . . . . . . . . . . . . . . . . . . . . . . . . . . . . . . . . . . . . 6
Setting up the base . . . . . . . . . . . . . . . . . . . . . . . . . . . . . . . . . . . . . . . . . . . . . . . . . . . . . .. . . . . . . . . . . . . . .6
Connecting the base. . . . . . . . . . . . . . . . . . . . . . . . . . . . . . . . . . . . . . . . . . . . . . . . . . . . . . . . . . . . . . . . . . . . 6
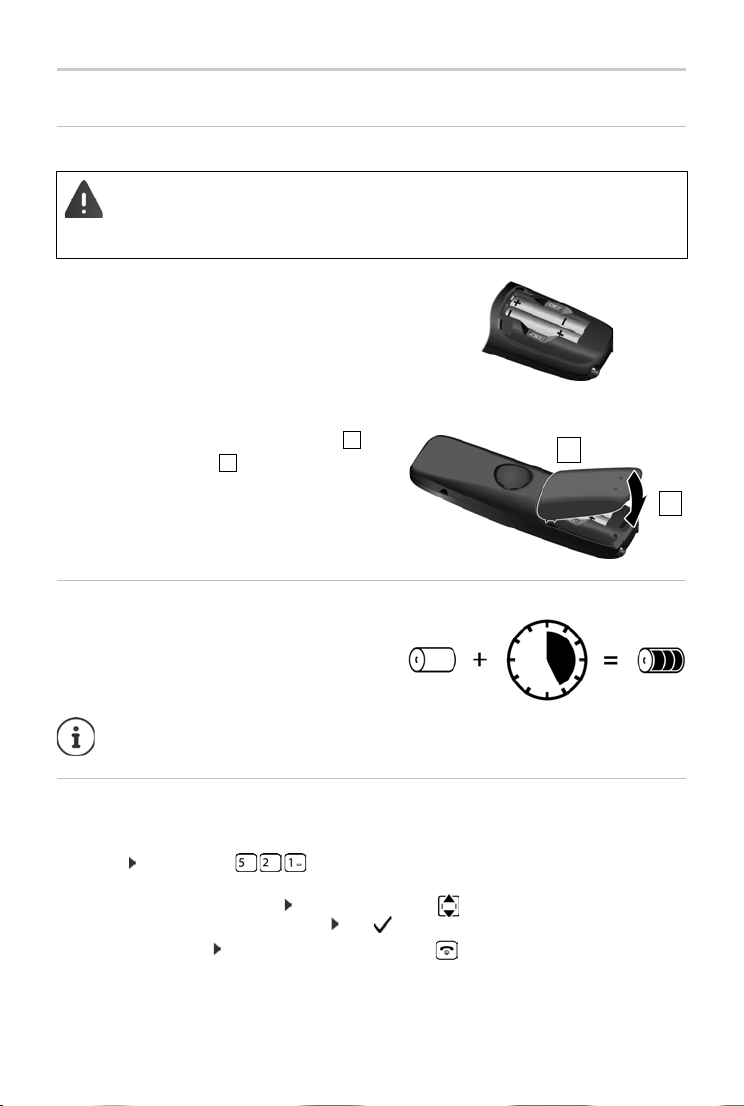
Setting up the handset for use . . . . . . . . . . . . . . . . . . . . . . . . . . . . . . . . . . . . . . . . . . . . . . . . .. . . . . . . . . 7
Making calls . . . . . . . . . . . . . . . . . . . . . . . . . . . . . . . . . . . . . . . . . . . . . . . . . . . . . . . . . .. . . . . . . . . . . . . . . . 8
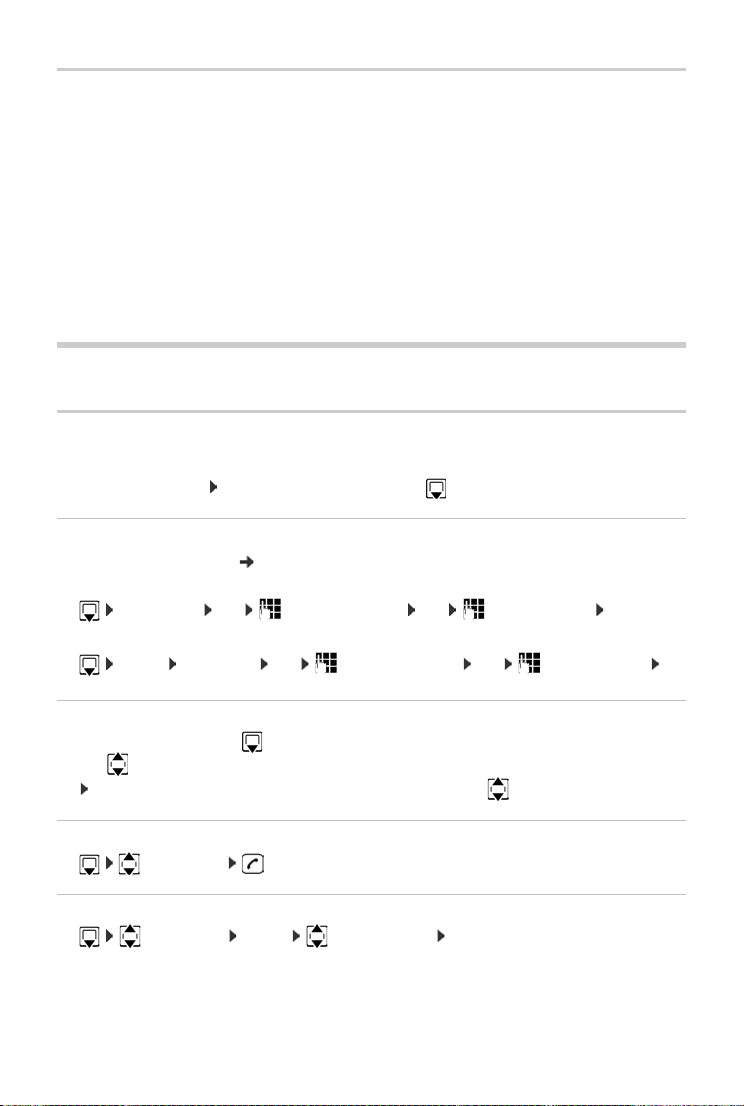
Making a call . . . . . . . . . . . . . . . . . . . . . . . . . . . . . . . . . . . . . . . . . . . . . . . . . . . . . . . . . . . . . . . . . . . . . . . . . . . 8
Accepting a call. . . . . . . . . . . . . . . . . . . . . . . . . . . . . . . . . . . . . . . . . . . . . . . . . . . . . . . . . . . . . . . . . . . . . . . . . 8
Information about the caller . . . . . . . . . . . . . . . . . . . . . . . . . . . . . . . . . . . . . . . . . . . . . . . . . .. . . . . . . . . . 9
Directory and lists . . . . . . . . . . . . . . . . . . . . . . . . . . . . . . . . . . . . . . . . . . . . . . . . . . . . . .. . . . . . . . . . . . . . 9
Directory . . . . . . . . . . . . . . . . . . . . . . . . . . . . . . . . . . . . . . . . . . . . . . . . . . . . . . . . . . . . . . . . . . . . . . . . . . . . . . . 9
Redial list. . . . . . . . . . . . . . . . . . . . . . . . . . . . . . . . . . . . . . . . . . . . . . . . . . . . . . . . . . .. . . . . . . . . . . . . . . . . . . 10
Message lists . . . . . . . . . . . . . . . . . . . . . . . . . . . . . . . . . . . . . . . . . . . . . . . . . . . . . . . . . . . . . . . . . . . . . . . . . . 10
Additional functions . . . . . . . . . . . . . . . . . . . . . . . . . . . . . . . . . . . . . . . . . . . . . . . . . . . . . . . . . . . . . . . . . 11
Network mailbox . . . . . . . . . . . . . . . . . . . . . . . . . . . . . . . . . . . . . . . . . . . . . . . . . . . . . . . . . . . . . . . . . . . . . . 11
Alarm clock. . . . . . . . . . . . . . . . . . . . . . . . . . . . . . . . . . . . . . . . . . . . . . . . . . . . . . . . . . . . . . . . . . . . . . . . . . . . 12
ECO DECT . . . . . . . . . . . . . . . . . . . . . . . . . . . . . . . . . . . . . . . . . . . . . . . . . . . . . . . . . . . . . . . . . . . . . . . . . . . . . 12
Phone settings . . . . . . . . . . . . . . . . . . . . . . . . . . . . . . . . . . . . . . . . . . . . . . . . . . . . . . . . . . . . . . . . . . . . . . 12
Tones and signals. . . . . . . . . . . . . . . . . . . . . . . . . . . . . . . . . . . . . . . . . . . . . . . . . . . . . . . .. . . . . . . . . . . . . . 12
Changing the display language . . . . . . . . . . . . . . . . . . . . . . . . . . . . . . . . . . . . . . . . . . . . . . . . . . . . . . . . 13
Resetting the handset . . . . . . . . . . . . . . . . . . . . . . . . . . . . . . . . . . . . . . . . . . . . . . . . . . . . . . . . . . . . . . . . . 13
Changing the system PIN . . . . . . . . . . . . . . . . . . . . . . . . . . . . . . . . . . . . . . . . . . . . . . . . . . . . . . . . . . . . . . 13
Resetting the base. . . . . . . . . . . . . . . . . . . . . . . . . . . . . . . . . . . . . . . . . . . . . . . . . . . . . . . . . . . . . . . . . . . . . 13
Advanced settings. . . . . . . . . . . . . . . . . . . . . . . . . . . . . . . . . . . . . . . . . . . . . . . . . . . . . . . .. . . . . . . . . . . . . 14
Appendix . . . . . . . . . . . . . . . . . . . . . . . . . . . . . . . . . . . . . . . . . . . . . . . . . . . . . . . . . . . . . . . . . . . . . . . . . . . 15
Customer service & assistance. . . . . . . . . . . . . . . . . . . . . . . . . . . . . . . . . . . . . . . . . . . . . . . . . .. . . . . . . . 15
Authorisation. . . . . . . . . . . . . . . . . . . . . . . . . . . . . . . . . . . . . . . . . . . . . . . . . . . . . . . . . . . . . . . . . . . . . . . . . . 15
Environment . . . . . . . . . . . . . . . . . . . . . . . . . . . . . . . . . . . . . . . . . . . . . . . . . . . . . . . . . . . . . . . . . . . . . . . . . . 15
Care. . . . . . . . . . . . . . . . . . . . . . . . . . . . . . . . . . . . . . . . . . . . . . . . . . . . . . . . . . . . . . . . . . . . . . . . . . . . . . . . . . . 16
Contact with liquid . . . . . . . . . . . . . . . . . . . . . . . . . . . . . . . . . . . . . . . . . . . . . . . . . . . . . . . . . . . . . . . . . . . . 16
Technical details . . . . . . . . . . . . . . . . . . . . . . . . . . . . . . . . . . . . . . . . . . . . . . . . . . . . . . . . . . . . . . . . . . . . . . . 17
Entering letters and characters . . . . . . . . . . . . . . . . . . . . . . . . . . . . . . . . . . . . . . . . . . . . . . . . .. . . . . . . . 18
Menu overview. . . . . . . . . . . . . . . . . . . . . . . . . . . . . . . . . . . . . . . . . . . . . . . . . . . . . . . . . .. . . . . . . . . . . . . . 19
Not all functions described in the user guide are available in all countries or from all
network providers.

3
Gigaset A116 / LUG GR-MEA-International en / A31008-M2801-R101-1-8N19 / overview.fm / 7/27/16
Template Go, Version 1, 01.07.2014 / ModuleVersion 1.0
Brief overview of the handset
1Charge level of the batteries
Empty to fully charged
Flashing: Batteries almost empty
Flashing: Charge process
1
3
4
5
6
7
8
2
10
1
MENUINT
11:05 16:52
9
2Display keys and functions ( p. 4)
Various functions, depending on the operating
situation
3 Talk key
Accept call; select number displayed
Open the redial list ¥Press briefly
Start dialling ¥Press and hold
4 End call key and On/Off key
End call; cancel function
Go back one menu level ¥Press briefly
Return to idle status ¥Press and hold
Switch the handset on and
off (in idle status)
¥Press and hold
5Control key ()
Navigate in menus and entry fields;
access functions (depending on the situation)
Open the directory ¥Press down on
the key
Set the call volume ¥Press up on
the key
6Key 1
Dial network mailbox ¥Press and hold
7Key 0/Recall key
Consultation call (flash) ¥Press and hold
8Hash key/Lock key
Enable/disable keypad lock
(in idle status)
¥Press and hold
Toggle between upper/
lower case and digits
(when inputting text)
¥Press briefly
Insert a dialling pause ¥Press and hold
9Star key
Switch the ringtones on/off ¥Press and hold
Enter special characters ¥Press briefly
Switch from pulse dialling to
tone dialling (for the existing
connection)
¥Press briefly
10 Microphone
New messages in the call list/ network mailbox list ( p. 10) are shown on the display
by message New messages.

4
Template Go, Version 1, 01.07.2014 / ModuleVersion 1.0
Illustration in the user guide
Gigaset A116 / LUG GR-MEA-International en / A31008-M2801-R101-1-8N19 / overview.fm / 7/27/16
Display keys and functions
¤Press the display key . . . The function shown above it on
the display is called.
Display functions accessed from the control key
Illustration in the user guide
Procedures
Example: Switching Auto answer on/off:
¤MENU Settings OK Handset OK Auto Answer OK ( =enabled)
Display Meaning on keypress
INT No function on Gigaset A116
MENU Open the main menu/submenu
( Menu overview, p. 19)
OK Confirm menu function or save the entry
Back one menu level
Delete character by character to the left
Display Meaning on keypress
Use to scroll up/down and to set the volume
Move the cursor left and right with
Warnings, the non-adherence to which can result in damage to devices or personal
injury.
Important information regarding function and appropriate handling or functions
that could generate costs.
Additional helpful information.
Step Follow this procedure
¤MENU Press the display key MENU.
¤Settings
¤OK
Use the control key to navigate to entry Settings.
Press OK to confirm. The submenu Settings opens.
¤Handset
¤OK
Select the Handset entry using the control key .
Press OK to confirm. The submenu Handset opens.
¤Auto Answer Select the Auto Answer entry using the control key .
¤OK Enable or disable it using OK. Function is enabled .
MENU

5
Gigaset A116 / LUG GR-MEA-International en / A31008-M2801-R101-1-8N19 / security.fm / 7/27/16
Template Go, Version 1, 01.07.2014 / ModuleVersion 1.0
Safety precautions
Safety precautions
Read the safety precautions and the user guide before use.
The device cannot be used in the event of a power failure. In case of a power failure it
is also not possible to make emergency calls.
Emergency numbers cannot be dialled if the keypad/display lock is activated!
Do not use the devices in environments with a potential explosion hazard
(e.g. paint shops).
The devices are not splashproof. For this reason do not install them in a damp envi-
ronment such as bathrooms or shower rooms.
Use only the power adapter indicated on the device.
Use only rechargeable batteries that correspond to the specification (see "Specifica-
tions"). Never use a conventional (non-rechargeable) battery or other battery types
as this could result in significant health risks and personal injury. Rechargeable bat-
teries, which are noticeably damaged, must be replaced.
Remove faulty devices from use or have them repaired by our Service team, as these
could interfere with other wireless services.
Do not use the device if the display is cracked or broken. Broken glass or plastic can
cause injury to hands and face. Send the device to our Service department to be
repaired.
Do not hold the rear of the handset to your ear when it is ringing or when speaker
mode is activated. Otherwise you risk serious and permanent damage to your hear-
ing.
The phone may cause interference in analogue hearing aids (humming or whistling)
or cause them to overload. If you require assistance, please contact the hearing aid
supplier.
Using your telephone may affect nearby medical equipment. Be aware of the techni-
cal conditions in your particular environment, e.g. doctor's surgery. If you use a med-
ical device (e.g. a pacemaker), please contact the device manufacturer. They will be
able to advise you regarding the susceptibility of the device to external sources of
high frequency energy (for the specifications of your Gigaset product see "Specifica-
tions").

6
Template Go, Version 1, 01.07.2014 / ModuleVersion 1.0
Getting started
Gigaset A116 / LUG GR-MEA-International en / A31008-M2801-R101-1-8N19 / operating.fm / 7/27/16
Getting started
Contents of the package
One base, one power adapter, one handset, one phone cable, two batteries, one battery cover
and the operating guide.
Setting up the base
Connecting the base
¤First connect the power adapter .
¤Then connect the phone jack and
lay the cables into the cable ducts.
Position the base on a level, non-slip surface at a central point in the flat or house.
You can also fit the base to a wall.
The range of the base is 300 metres outdoors and 50 metres indoors.
The base is designed for use in enclosed, dry rooms and within a temperature range
of +5 °C to +45 °C.
The device's feet do not usually leave any marks on surfaces. However, due to the
multitude of different varnishes and polishes used on furniture, contact marks on the
surfaces cannot be completely ruled out.
Never expose the telephone to heat sources, direct sunlight or other electrical
devices.
Protect your telephone from moisture, dust, corrosive liquids and vapours.
The power adapter must always be connected as the phone does not work without
a power supply.
Use only the supplied power adapter and phone cable. The pin assignments of
phone cables can vary.
2
1
1
2

7
Gigaset A116 / LUG GR-MEA-International en / A31008-M2801-R101-1-8N19 / operating.fm / 7/27/16
Template Go, Version 1, 01.07.2014 / ModuleVersion 1.0
Getting started
Setting up the handset for use
Inserting the batteries
¤Insert the batteries with the polarity in the right
direction.
Note the polarity shown on the battery
compartment.
¤First insert the battery cover on the top .
¤Then press the cover until it clicks into place.
¤To open it again, place your fingernail in the
notch on the underside of the casing and pull
the battery cover up.
Charging the batteries
¤Fully charge the batteries in the base prior to
initial use.
Changing the display language
You can change the display language, if the telephone has been set to an incomprehensible
language.
¤MENU Press the keys slowlyin succession . . . the language set (e. g. English) is
displayed
¤To select a different language: Press the control key until the language required is
selected on the display, e. g. Francais OK ( =selected)
To revert to idle status: Press and hold the End call key
Only use rechargeable batteries, as this could otherwise result in significant health
risks and personal injury. For example, the outer casing of the batteries could be
destroyed or the batteries could explode. The device could also malfunction or be
damaged as a result of using batteries that are not of the recommended type.
Batteries may heat up during charging. This is not dangerous.
After a time, the charge capacity of the batteries will decrease for technical reasons.
2
1
1
2
5h

8
Template Go, Version 1, 01.07.2014 / ModuleVersion 1.0
Making calls
Gigaset A116 / LUG GR-MEA-International en / A31008-M2801-R101-1-8N19 / operating.fm / 7/27/16
Setting time and date
The time and date must be set correctly so they can be assigned correctly to incoming calls, and
so that you can use the alarm.
¤MENU Settings OK Date/Time OK Enter the date in 6-digit format (day,
month and year) OK Enter the time in 4-digit format (hours and minutes) OK
(Display: Saved)
To move the entry position left/right: Press up/down on the control key
To revert to idle status: Press and hold the End call key
Switching the handset on and off
¤Press and hold the End call key
When you place a switched-off handset into the base, it switches on automatically after about
30 seconds.
Making calls
Making a call
¤Enter the number Press the Talk key . . . The number is dialled
or
¤Press and hold the Talk key . . . The dial tone can be heard Enter the number
To change the receiver volume during a call: Use to set the volume
To end call / cancel dialling: Press the End call key .
Accepting a call
¤Press the Talk key
Function Auto Answer enabled: Simply take the handset out of the base
Enabling function Auto Answer:
¤MENU Settings OK Handset OK Auto Answer OK ( =enabled)

9
Gigaset A116 / LUG GR-MEA-International en / A31008-M2801-R101-1-8N19 / operating.fm / 7/27/16
Template Go, Version 1, 01.07.2014 / ModuleVersion 1.0
Directory and lists
Information about the caller
When there is an incoming call, the number or, if stored in the directory, the name of the caller
is shown on the display.
Prerequisites:
•You have authorised your network provider to show the number of the caller (CLIP) on your
display
•The caller has authorised the network provider to send the phone number (CLI)
Display:
Directory and lists
Directory
Up to 50 phone numbers (max. 22 digits) with associated names (max. 14 characters).
To open the directory: Press down on the control key
Saving a number in the directory
Entering letters/characters: p. 18.
First entry:
¤New Entry? OK Enter the number OK Enter the name OK
More numbers:
¤MENU New Entry OK Enter the number OK Enter the name OK
Selecting a directory entry
¤Open the directory with .
¤Use to scroll to the entry until the required name is selected.
or: Enter the first character of the name, scroll as required with to the entry.
Dialling from the directory
¤Select entry
Using other functions
¤Select entry MENU Select function OK
Possible functions: New Entry | Show Number | Show Name | Edit Entry | Use Number | Delete
Entry | Delete List | Shortcut
External call: You have not requested call number display
Unavailable: Calling line identification has been suppressed or not requested by the caller

10
Template Go, Version 1, 01.07.2014 / ModuleVersion 1.0
Directory and lists
Gigaset A116 / LUG GR-MEA-International en / A31008-M2801-R101-1-8N19 / operating.fm / 7/27/16
Using the quick dial keys (Shortcut)
Assign entries from the directory to keys 2 to 9.
¤Select entry MENU Shortcut OK
¤Select key OK ( = selected)
or: Press the key to which the entry is to be saved
Dial a number: Press and hold the quick dial key
Redial list
This list contains the last 10 dialled numbers.
Dialling from the redial list
¤press briefly Select entry
Managing entries in the redial list
¤press briefly Select entry MENU Select function OK
Possible functions: Use Number | Copy to Dir. | Delete Entry | Delete List
Message lists
The phone saves messages about incoming and missed calls, and calls on the network mailbox.
Open list selection: MENU Messages OK CallsList | Netw.MBX
If new messages are available, only lists with new messages are displayed.
Scroll through the available lists:
An advisory tone sounds as soon as a new entry arrives in the call list / network
mailbox. The display shows message New messages.
If calls are stored in the network mailbox, you receive a message when the setting is
configured (dependent on the network provider).

11
Gigaset A116 / LUG GR-MEA-International en / A31008-M2801-R101-1-8N19 / operating.fm / 7/27/16
Template Go, Version 1, 01.07.2014 / ModuleVersion 1.0
Additional functions
Call list
Prerequisite: CLIP p. 9
Depending on the list type set, the numbers of the most recent incoming calls (All Calls) are dis-
played, or only the missed calls (Missed Calls).
Setting the list type
¤MENU Settings OK Base OK Call list type OK Missed Calls | All
Calls OK
Opening the call list
¤MENU Messages OK CallsList
Information on the call list is displayed:
CallsList Number of new entries + number of old, read entries
To open the list: Press the display key OK . . . The most recent incoming call is displayed
¤If required, select another entry with
Using other functions
¤Select entry MENU Select function OK
Possible functions: Delete Entry | Copy to Dir. | Date/Time | Status | Delete List
Calling back a caller from the call list
¤MENU Messages OK CallsList 01+02 OK Select entry
Network mailbox list
You can use the network mailbox list to listen to messages on the network mailbox ( p. 11).
Additional functions
Network mailbox
The network mailbox is the answer machine in the phone network of your provider. Contact the
provider for information. You can only use the network mailbox once you have requested it from
your provider.
Entering the number of the network mailbox in the phone
¤MENU Answer Machine OK Net Mailbox Enter the number OK
Listening to messages on the network mailbox
From the menu: ¤MENU Answer Machine OK Play Messages
From key 1: ¤Press and hold key
From the message list: ¤MENU Messages OK Netw.MBX OK
CallsList 01+02

12
Template Go, Version 1, 01.07.2014 / ModuleVersion 1.0
Phone settings
Gigaset A116 / LUG GR-MEA-International en / A31008-M2801-R101-1-8N19 / operating.fm / 7/27/16
Alarm clock
Switching the alarm clock on and off
¤MENU Alarm Clock OK Activation OK ( = switched on)
If no wake-up time is entered yet: Enter the wake-up time in 4-digit format OK
If the alarm clock is enabled, the alarm clock icon and wake-up time are displayed instead of
the date.
When the alarm rings, switch it off for 24 hours by pressing any key.
Setting the wake-up time
¤MENU Alarm Clock OK Wake-up time OK Enter the wake-up time in
hours and minutes OK
ECO DECT
During a call, the wireless power automatically adjusts to the distance between the handset and
the base. The shorter the distance, the lower the wireless power (radiation).
When the phone is in idle status, the wireless power of the handset is switched off. The base
maintains contact with the handset with only low wireless signals.
These wireless signals are also deactivated with the No Radiation setting.
¤MENU Settings OK Base OK ECO DECT OK No Radiation OK
( = radiation deactivated, icon in top left of the display)
Phone settings
Tones and signals
Changing the call volume
The receiver volume can be set at 5 levels.
¤MENU Audio Settings OK Handset Volume OK Select volume
( =selected)
Changing the ringer volume
Adjust the volume of the ringtone on 5 levels or select the Crescendo tone.
¤MENU Audio Settings OK Ringer Volume OK Select volume or
Crescendo ( =selected)
For speedy set-up of connections for incoming calls, the handset keeps switching to
“ready to receive” momentarily. This increases the power consumption and so
reduces the standby and talk times.

13
Gigaset A116 / LUG GR-MEA-International en / A31008-M2801-R101-1-8N19 / operating.fm / 7/27/16
Template Go, Version 1, 01.07.2014 / ModuleVersion 1.0
Phone settings
Change ringtone melody
Set the ringtone melody for external calls and/or the alarm.
¤MENU Audio Settings OK Ringer Melody OK Select External Calls or
Alarm Clock OK Select required ringtone ( = selected)
Enabling/disabling advisory tones, battery tone and ringtone
An advisory tone is sounded for different events, such as when a new message arrives. The
battery tone sounds when the charge level of the battery falls below a certain value during a call.
Advisory tones, the battery tone and the ringtone for incoming calls can be enabled/disabled
separately.
¤MENU Audio Settings OK AdvisoryTones | Battery Low | Ring Tones OK
( =enabled)
Changing the display language
¤MENU Settings OK Handset OK Language OK Select
language OK ( = selected)
If you accidentally choose a language you do not understand:
¤MENU Press the keys in succession Select language OK
Resetting the handset
You can reset individual settings. Entries in the directory and call list, and the handset’s
registration to the base, are preserved.
¤MENU Settings OK Handset OK Reset Handset OK Reset?
OK
To cancel the reset:
Changing the system PIN
¤MENU Settings OK Base OK System PIN OK Enter the
current 4-digit system PIN (default: 0000) OK Enter the new 4-digit system PIN OK
Resetting the base
A reset disables the No Radiation mode, deletes all lists and resets individual settings.
The time and date are not affected. The system PIN is not reset.
¤MENU Settings OK Base OK Base Reset OK Reset? OK

14
Template Go, Version 1, 01.07.2014 / ModuleVersion 1.0
Phone settings
Gigaset A116 / LUG GR-MEA-International en / A31008-M2801-R101-1-8N19 / operating.fm / 7/27/16
Advanced settings
Operation with a router
When operating on the analogue connection of a router, echoes potentially occurring can be
reduced by enabling Echo mode. If there are no problems with echoes, this function should be
deactivated.
¤MENU Settings OK Base OK Additional OK Echo mode OK
( = enabled)
Operation with a PABX
The following settings are only necessary when your PABX requires them; refer to the PABX user
guide. Enter the digits slowly one after the other.
Changing the dialling mode
¤MENU Thedigitfor the dialling mode set flashes:
0= Tone dialling (DTMF); 1= Pulse dialling (PD) Enter digit OK
Setting the flash time
¤MENU The digit for the current flash time flashes:
0= 80 ms; 1= 100 ms; 2= 120 ms; 3= 400 ms; 4= 250 ms; 5= 300 ms; 6= 600 ms;
7= 800 ms Enter digit OK
Changing pause after line seizure
You can set the length of the pause inserted between pressing of the Talk key and sending
of the call number.
¤MENU The digit for the current pause length flashes:
1= 1 sec.; 2= 3 sec.; 3= 7 sec. Enter digit OK
Changing pause after Recall key
¤MENU The digit for the current pause length flashes:
1= 800 ms; 2= 1600 ms; 3= 3200 ms Enter digit OK

15
Gigaset A116 / LUG GR-MEA-International en / A31008-M2801-R101-1-8N19 / appendix_legal.fm / 7/27/16
Template Go, Version 1, 01.07.2014 / ModuleVersion 1.0
Appendix
Appendix
Customer service & assistance
If you have any further questions, your phone retailer will be happy to assist.
Authorisation
This device is intended for analogue phone lines in your network.
Country-specific requirements have been taken into consideration.
Hereby, Gigaset Communications GmbH declares that the radio equipment type Gigaset A116
is in compliance with Directive 2014/53/EU.
The full text of the EU declaration of conformity is available at the following internet address:
www.gigaset.com/docs.
This declaration could also be available in the "International Declarations of Conformity" or
“European Declarations of Conformity” files.
Therefore please check all of these files.
Environment
Environmental management system
Gigaset Communications GmbH is certified pursuant to the international standards
ISO 14001 and ISO 9001.
ISO 14001 (Environment): Certified since September 2007 by TÜV SÜD Management
Service GmbH.
ISO 9001 (Quality): Certified since 17/02/1994 by TÜV SÜD Management Service GmbH.
Problem Cause Solution
Nothing on the
display.
The handset is not switched on. Press the End call key for
about 5 seconds or place the handset
into the base.
The batteries are empty. Charge or replace the batteries.
No wireless
connection to the
base, Base flashes
on the display.
The handset is outside the
range of the base.
Move the handset closer to the base.
The base is not switched on. Check the mains plug on the base
p. 6.
You cannot hear a
ring or dial tone
from the fixed line
network.
The phone cable supplied has
not been used or it has been
replaced by a new cable with
the wrong pin connections.
Please always use the telephone cable
supplied or ensure that the pin
connections are correct when
purchasing from a retailer.: 3-4
assignment of phone wires /
EURO CTR37.

16
Template Go, Version 1, 01.07.2014 / ModuleVersion 1.0
Appendix
Gigaset A116 / LUG GR-MEA-International en / A31008-M2801-R101-1-8N19 / appendix_legal.fm / 7/27/16
Disposal
Batteries should not be disposed of in general household waste. Observe the local waste dis-
posal regulations, details of which can be obtained from your local authority.
All electrical and electronic equipment must be disposed of separately from general household
waste using the sites designated by local authorities.
If a product displays this symbol of a crossed-out rubbish bin, the product is subject to
European Directive 2012/19/EU.
The appropriate disposal and separate collection of used equipment serve to prevent
potential harm to the environment and to health. They are a precondition for the re-
use and recycling of used electrical and electronic equipment.
For further information on disposing of your used equipment, please contact your local author-
ity or your refuse collection service.
Care
Wipe the device with a damp cloth or an antistatic cloth. Do not use solvents or microfibre
cloths.
Never use a dry cloth; this can cause static.
In rare cases, contact with chemical substances can cause changes to the device’s exterior. Due
to the wide variety of chemical products available on the market, it was not possible to test all
substances.
Impairments in high-gloss finishes can be carefully removed using display polishes for mobile
phones.
Contact with liquid
If the device comes into contact with liquid:
1Disconnect the power supply.
2Remove the batteries and leave the battery compartment open.
3 Allow the liquid to drain from the device.
4 Pat all parts dry.
5 Place the device in a dry, warm place for at least 72 hours (not in a microwave, oven etc.)
with the battery compartment open and the keypad facing down (if applicable).
6Do not switch on the device again until it is completely dry.
When it has fully dried out, you will normally be able to use it again.

17
Gigaset A116 / LUG GR-MEA-International en / A31008-M2801-R101-1-8N19 / appendix_technical.fm / 7/27/16
Template Go, Version 1, 01.07.2014 / ModuleVersion 1.0
Technical details
Technical details
Batteries
Handset operating times/charging times
The operating time of your Gigaset depends on the capacity of the battery, its age and the way
it is used. (All times are maximum possible times.)
General specifications
Technology: 2 x AAA nickel metal hydride (NiMH)
Voltage: 1.2 V
Capacity: 300 - 1000 mAh
Standby time (hours) 130 / 90 *
Talktime (hours) 12
Operating time with 1.5 hours of calls per day (hours) 80 / 55 *
Charging time in charging cradle (hours) 5
* No Radiation switched on/off, without display backlight in idle status
DECT standard supported
Radio frequency range: 1880-1900 MHz
Range Up to 300 m outdoors, up to 50 m indoors
Power supply to base 230 V ~/50 Hz
Environmental conditions for operation +5°C to +45°C, 20 % to 75 % relative humidity
Transmission power 10 mW average power per channel,
250 mW pulse power
Power consumption of the base
In standby mode
– Handset in charging cradle
– Handset away from charging cradle
approx. 1.0 W
approx. 0.8 W
During a call approx. 1.0 W

18
Template Go, Version 1, 01.07.2014 / ModuleVersion 1.0
Entering letters and characters
Gigaset A116 / LUG GR-MEA-International en / A31008-M2801-R101-1-8N19 / appendix_technical.fm / 7/27/16
Entering letters and characters
Standard characters
¤Press the relevant key several
times.
¤Briefly press the Hash key to
switch from mode “Abc” to “123”,
from “123” to “abc” and from “abc”
to “Abc”.
Cyrillic
¤Press the relevant key several
times.
¤Briefly press the Hash key to
switch from mode “ABC” to “123”
and from “123” to “ABC”.
Turkish
¤Press the relevant key several
times.
¤Briefly press the Hash key to
switch from mode “Abc” to “123”,
from “123” to “abc” and from “abc”
to “Abc”.
1) Space
1x 2x 3x 4x 5x 6x 7x 8x 9x 10x 11x 12x 13x 14x 15x
1£$¥¤
abc2äáàâãç
def3ëéèê
ghi4ïíìî
jkl5
mno6öñóòôõ
pqr s 7ß
tuv8üúùû
wx y z9ÿ ýæøå
.,?!0+-:¿¡"’;_
*/()<=>%
#@\ &§
1)
1) Space
1x 2x 3x 4x 5x 6x 7x 8x 9x 10x 11x 12x 13x
1$
AБВГ2ABC
ДЕËЖЗ 3DE F
ИЙКЛ4GH I
МНО 5 J K L
ПРС6MNO
ТYФX7PQRS
ЦЧШЩЪ8 TUV
ЬL Ь Э Ю Я9WXYZ
.,?!0+-:"’;_
*/( )<=>%
#@\ &§
1)
1) Space
1x 2x 3x 4x 5x 6x 7x 8x 9x 10x 11x 12x 13x
1
abcç2äáàâã
def3ëéèê
gğh
ıi4ïíìî
jkl5
mnoö6ñóòôõ
prsş7qß
tuüv8úùû
yz9wxÿæøå
.,?!0+-:"’;_
*/()<=>%
#@\ &§
1)

19
Gigaset A116 / LUG GR-MEA-International en / A31008-M2801-R101-1-8N19 / menutree.fm / 7/27/16
Template Go, Version 1, 01.07.2014 / ModuleVersion 1.0
Menu overview
Menu overview
Your phone has many functions, and they are available to you from menus.
Select function:
¤When the phone is in idle status, press MENU Use the control key to scroll to the
required function Confirm with OK
Return to idle status: Press and hold the key
*) No function on Gigaset A116
Messages __ CallsList p. 11
Netw.MBX p. 11
Alarm Clock __ Activation p. 11
Wake-up time p. 12
Audio Settings __ Handset Volume p. 12
Ringer Volume p. 12
Ringer Melody __ External Calls p. 13
Internal Calls *)
Alarm Clock p. 13
AdvisoryTones p. 13
Battery Low p. 13
Ring Tones p. 13
Answer Machine __ Play Messages p. 11
Net Mailbox p. 11
Settings __ Date/Time p. 8
Handset __ Language p. 7
Auto Answer p. 8
Reset Handset p. 13
Base __ Call list type __ Missed Calls p. 11
All Calls p. 11
System PIN p. 13
Base Reset p. 13
Additional __ Echo mode p. 14
ECO DECT __ No Radiation p. 12
Listening in *)
Not all functions described in this user guide are available in all countries.
Other manuals for A116
1
Table of contents
Other Gigaset Telephone manuals

Gigaset
Gigaset A120 User manual

Gigaset
Gigaset C610H User manual

Gigaset
Gigaset 5040 User manual

Gigaset
Gigaset DA210 User manual

Gigaset
Gigaset SL910h User manual

Gigaset
Gigaset C620 User manual

Gigaset
Gigaset Gigaset M49AM User manual

Gigaset
Gigaset Fusion User manual

Gigaset
Gigaset AL110 User manual

Gigaset
Gigaset A510H User manual

Gigaset
Gigaset E290 User manual

Gigaset
Gigaset allrounder A694 User manual

Gigaset
Gigaset 120 GE User manual

Gigaset
Gigaset A540 User manual

Gigaset
Gigaset A130 User manual

Gigaset
Gigaset S820A User manual

Gigaset
Gigaset Gigaset 5010 User manual

Gigaset
Gigaset E630 A User manual

Gigaset
Gigaset CL660A User manual

Gigaset
Gigaset Gigaset 5005 User manual