3. Remove the water reservoir cap and pour the water into the water reservoir. Be
sure to accurately measure the amount of water needed. Do not fill to the top of
the reservoir or there will not be enough area to generate steam.
CAUTION: Do not pour water into the tank while the appliance is on. Check to
make sure the control knob is in the “OFF” position.
4. Screw the cap back on top of the water reservoir. Make sure it is on tight.
PREPARING THE COFFEE
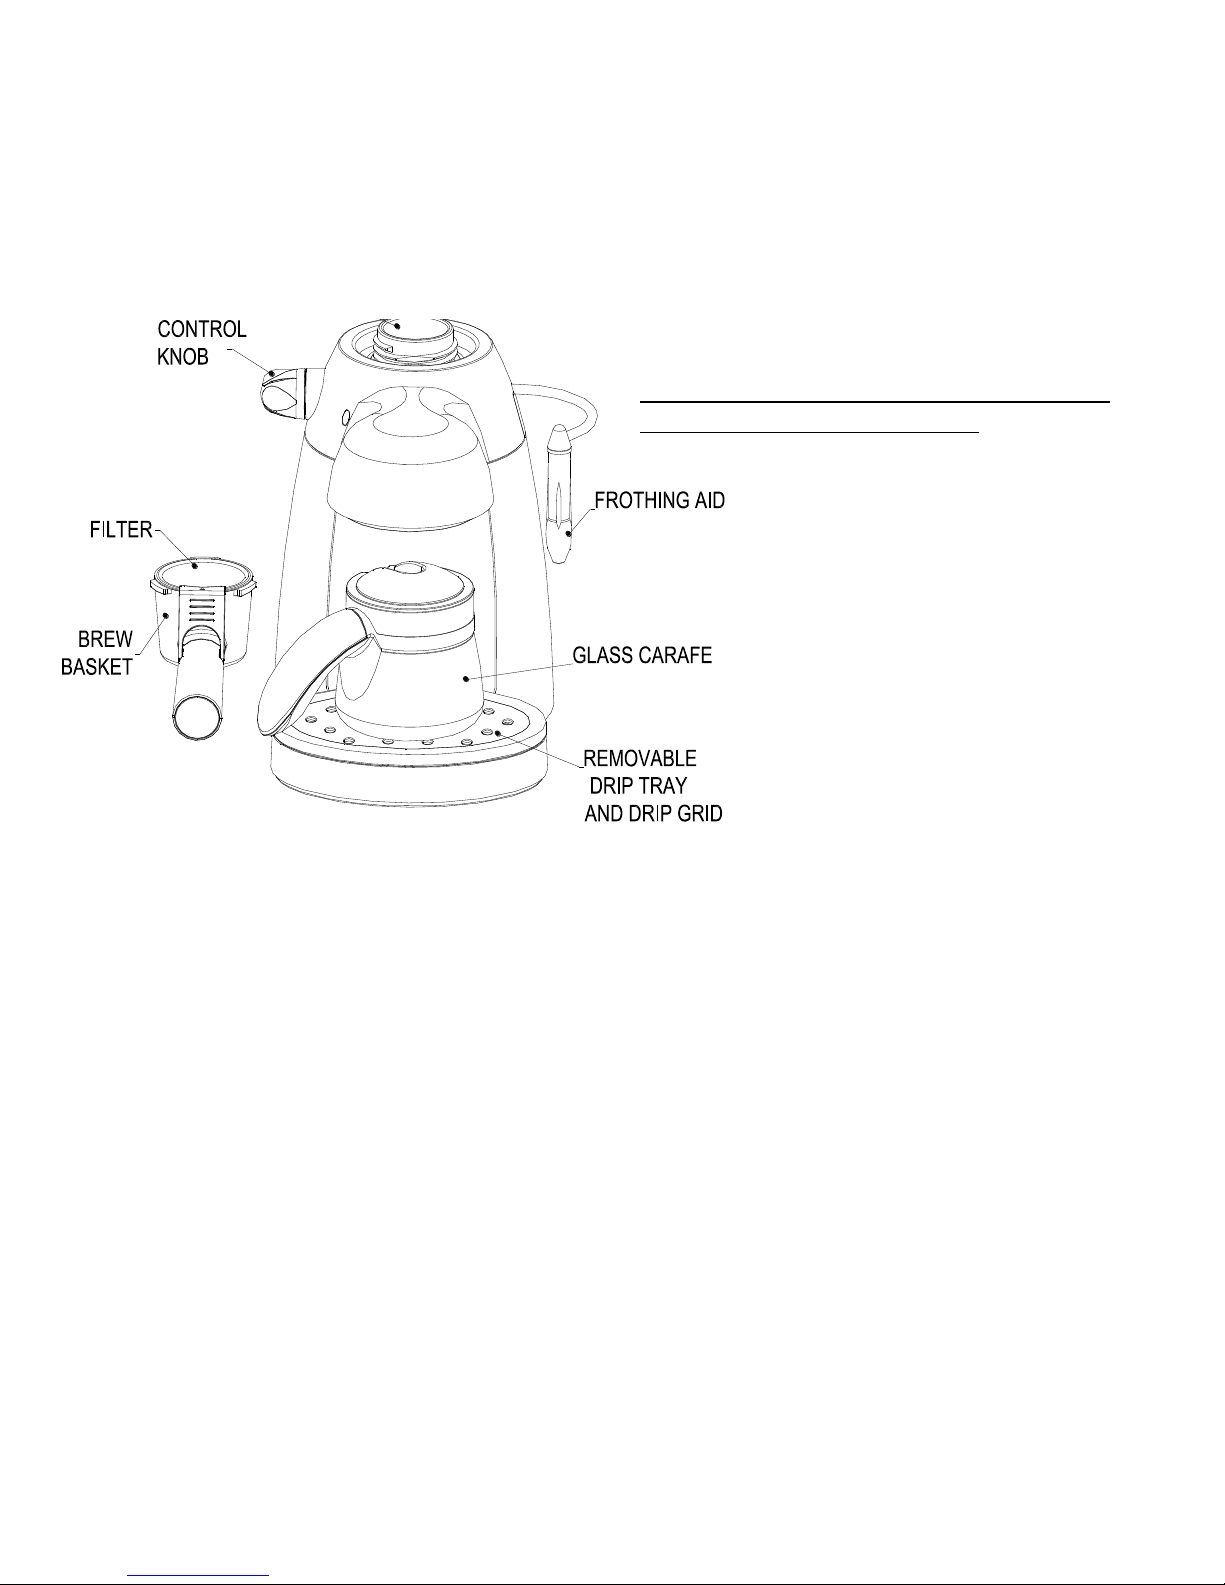
1. Place the filter in the brew basket.
2. Fill with fresh, fine ground espresso coffee to the 2 or 4 cup mark of the filter. Do
not fill above the 4 cup markings. Clean any excess coffee from the rim of the
filter holder. Thos will assure proper fit under the brew head.
ATTENTION:
Gently tamp or compress coffee. Do not overfill the filter basket.
This might cause clogging or overflow.
3.Position brew basket underneath the brew head, attach brew basket by first moving
retainer clip back, position handle to far left until it fits into the groove. Then, slowly
turn to right until brew basket is located at lock position.
BREWING THE ESPRESSO
ATTENTION: IF YOU ARE PLANNING TO MAKE CAPPUCCINO, PLEASE REFER
TO THE NEXT SECTION “HOW TO MAKE CAPPUCINO.”
1. Make sure the drip grid is in place on the drip tray.
2. Place the cover on the carafe so the lid opening faces the spout, and it on the
drip tray. The handle of the brew basket and the handle of the decanter should
be in alignment.
3. Make sure the control knob is in the “OFF” position.
4. Plug the power cord into an electrical outlet and rotate the control knob upward to
the symbol, which begins the brewing process. The light will illuminate to
let you know that the machine is on.
5. Espresso will begin to flow into the carafe in about three to five minutes.
6. When the espresso has stopped flowing into the carafe, turn thee control knob to
the “OFF” position. Unplug the power cord and allow the machine to cool. Do not
remove reservoir cap or brew basket until the pressure in the making has been
released. Follow procedures in the section marked “CAUTION: PRESSURE”.
Caution: Do not remove reservoir cap or brew basket at any time while the
appliance is under pressure or until the appliance has cooled down. Follow the
procedures marked “CAUTION: PRESSURE” relieve the pressure before
removing the reservoir cap or brew basket.
7. After the machine has cooled down and all pressure has been relieved, remove
the brew basket from the brew head. Using the retainer clip to secure the filter
holder, turn the brew basket upside down to empty. Rinse the filter and brew
basket with water.
CAUTION: The metal parts of the brew basket might still be very hot. Make sure
to use the filter retainer clip when discarding the grounds. Cool these parts by
running under cold water.
HOW TO MAKE CAPPUCCINO
Cappuccino is espresso topped with steamed and frothed milk. Frothing milk for
cappuccino takes practice. Do not be discouraged if it is not perfect the first time. The
milk should be half steamed (bottom of pitcher) and half froth (top of pitcher). It may
take a few times before you perfect this process.
For best results, we recommend frothing the milk in a separate pitcher and pouring
the milk into your coffee. The milk and pitcher should be cold. Do not use a pitcher
which has just been washed in warm water. We also recommend a stainless steel
frothing pitcher and a beverage thermometer, if you own one, for preparing the best
froth and steamed milk.
1. The first step in making cappuccino is to make espresso. Therefore, fill the glass
carafe with cold water to the designated marking for the desired number of
servings. Never use warm or hot water to fill the water reservoir (see chart from
“how to brew espresso” )
2. Follow steps 1-5 in “brewing espresso”.
3. Fill a small stainless steel or ceramic pitcher 1/2 full with cold milk and milk and
set next machine. Skim or 2%milk will be the easiest to froth.
4. If making 2 servings, stop brewing espresso at the 2-4 and 4-cup mark. Turn the
control knob to the off position. If making 4 servings, stop brewing espresso at
the 4-cup mark. Turn the control knob to the off position.
5. You are now ready to froth and steam your milk. Hold the pitcher under the
frothing tube so that the frothing aid is slightly immersed in the milk. Turn the
control knob slowly to the “STEAM” position. Gently move the pitcher in a circular
motion around the steam nozzle for about 45 seconds. REMEMBER: the milk