Giraffe AW40 User manual

RETRACTABLE
HOSE REEL
Model AW40
Read before use & keep for future reference.


3

PRODUCT INFORMATION
Thank you for choosing Giraffe Tools’ retractable hose reel. Our product uses a 130 ft reinforced
hose (this measurement includes both the main hose and leader hose) for extra strength
and durability. It also features a multifunction hose nozzle. Before using the retractable hose
reel, please read the following installation instructions and refer to them when necessary.
Hose Measurements
Temperature Range
Maximum Pressure
Shipping Weight
Shipping Box Size
1/2 inch x 130 ft
0℉- 104℉
1.2 MPA
14.8 kg
22.44” x 11.81” x 19.48”
4

1 x Retractable Hose Reel with 125ft Hose
1 x 5ft Leader Hose
1 x Bracket
1 x 9-Mode Nozzle
4 x Ribbed Plastic Anchors: Φ12x50
4 x Screw (Long): Φ8x70
1 x Screw (Short)
1 x Owner’s Manual
WHAT’S INCLUDED
5

OPEN-BOX CHECK
INSTALLATION
Choosing A Location
REQUIRED TOOLS
● Electric drill (1/2"or 5/16")
● Hammer
● Socket set or a Phillips head screwdriver
1. Confirm that the above parts are included in your package.
2. Check for any scratches or damage done to the product.
3. If your product is missing parts or has visible damage upon receipt, please contact
the Giraffe Tools customer service team.
Note: If you notice an initial aroma upon opening your package, this is due to the sealed environment
in which the package traveled overseas.
Due to the weight of the filled reel and the pulling force during use, the bracket must be
installed on a solid surface that can withstand 50kg of force. As a matter of convenience,
be sure to choose a location close to your chosen water source, and ensure the hose end
connector can reach the water source’s faucet prior to mounting the hose reel.
6

Mounting The Bracket
To Mount To A Wall
7
2.Use a 1/2" diameter 2.26in long drill bit to drill the 4 marked holes. Hole depth is
important. You may choose to measure a 1.96in depth on the drill bit itself and mark
it with a small piece of tape so you know when you’ve drilled the appropriate depth
into the wall. Using a correctly sized drill bit will ensure a secure installation of the
wall bracket. To make sure the wall anchors have a secure fit, you may choose to
drill a slightly smaller hole first, then size up if it proves too small for the wall anchor
1. Once you’ve chosen a location for your retractable hose reel, use the bracket
installation template on the page 3 of this manual to mark the location of 4 holes
for drilling, or place the mounting bracket itself up to the wall to mark the location of
the screw holes for drilling.
Diagram A: 1-Bracket, 2-Wall anchors, 3-Screws

1. Once you’ve chosen a location for your retractable hose reel, use the bracket installation
bracket. Screw in the screws with either a socket set or a Phillips screwdriver.
To Mount To A Wooden Post
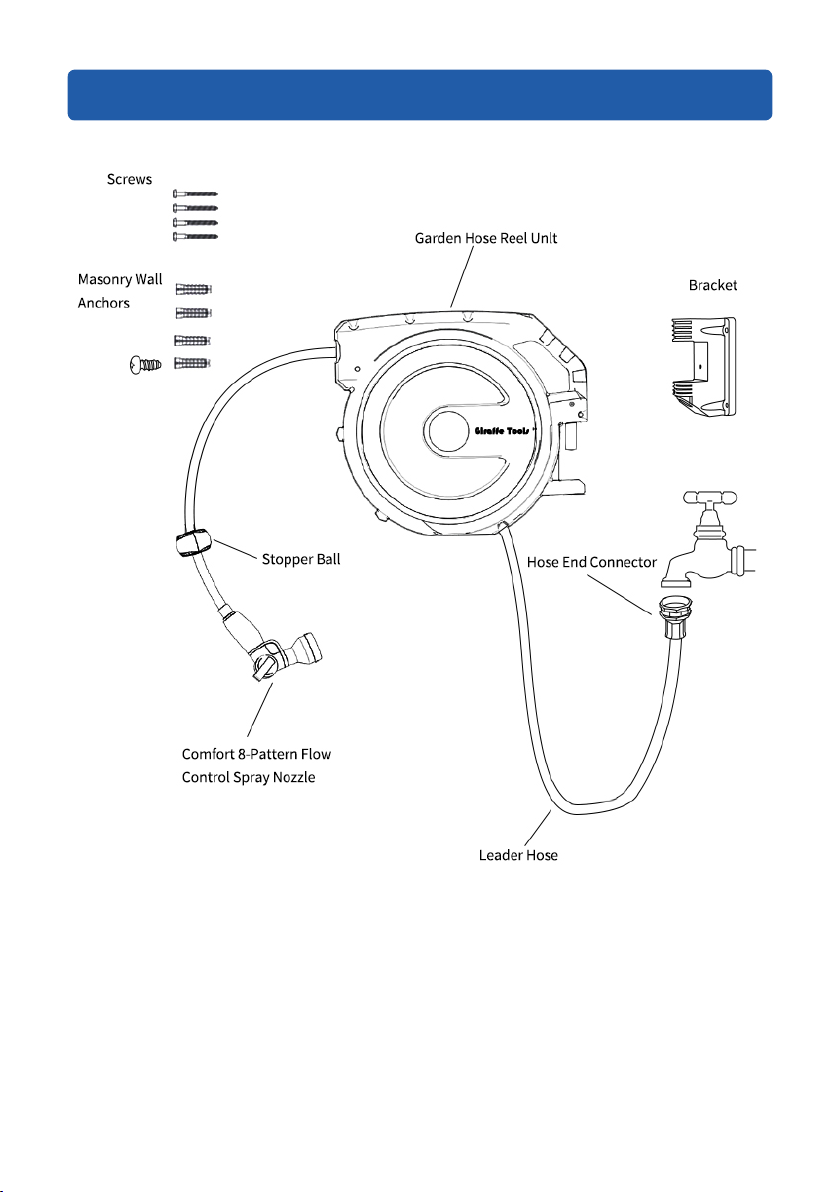
Installing & Securing the Hose Reel
1. Lift the reel and slide the rod into the bracket.
2. Tighten the screw on the front of the bracket.
3. Connect the faucet connector to the faucet and hose reel.
4. Screw the nozzle to the hose.
5. Tighten the nozzle and hose connector near the hose reel.
Your hose reel is now installed and ready to use!
2. Use a 5/16"diameter 2.26in long drill bit to drill the 4 marked holes. Hole depth is
the bracket. Screw in the screws with either a socket set or a Phillips screwdriver.
Note: You will not need the provided wall anchors when installing onto a wooden post, as the screws
provided will drill securely into wood.
template on the page 3 of this manual to mark the location of 4 holes for
drilling, or place the mounting bracket itself up to the wall to mark the location of the
screw holes for drilling.
8
important. You may choose to measure a 1.96in depth on the drill bit itself and mark
it with a small piece of tape so you know when you’ve drilled the appropriate depth
into the post. Using a correctly sized drill bit will ensure a secure installation of the wall
bracket. You may choose to drill a slightly smaller hole first, then size up if it proves too
small for the screws.
3. Place the bracket to the wall, aligning the pre-drilled holes with the designated holes in
3. Hammer the wall anchors into the 4 pre-drilled holes.
4. Place the bracket to the wall, aligning the wall anchors with the designated holes in the

PRODUCT TESTING
HOW TO
To unlock the hose and start retraction, give the hose a small tug. To stop retraction, simply
stop at the new desired position to allow the hose to lock into place.
Always retract the hose fully after use.
Do not let go of the hose while retracting, as this may damage the hose, reel unit, and
nozzle. When walking with the retracting hose at a steady speed, the reel’s self-segmenting
mechanism inserts the hose and weaves it neatly into the reel to ensure it’s free from kinks/
tangles.
1. Check for leakage at the faucet and hose reel connecting points.
2. Check for nozzle leakage.
3. Confirm that the hose retracts automatically with ease and that the retraction is able to
be paused.
4. Check to confirm that there is a washer in the brass connection.
If you have any question about the above points, contact customer service at contact@giraffetools.
com and provide your order number and an accompanying video or photos of the issue at hand.
9
Lock the Hose
To lock the hose at a desired length, simply release the tension. The hose will lock in place
at that length.
Extend the Hose
To extend the hose further, simply begin pulling the hose. Release the tension again when
you reach your new desired length.
Retract / Shorten the Hose
Before retracting the hose, turn the faucet and squeeze the nozzle trigger to release
additional pressure.

The bracket fell off the wall
Check that the bracket is installed correctly.
Remove the Hose Reel From Bracket
Use a screwdriver to remove the screw located on the front of the bracket. Lift the hose reel
out of the bracket.
PROBLEM GUIDE
10
in the cover plate? Is the hose reel box cracked or broken?
The hose cannot be retracted or extended
It is possible for the hose to become jammed if it retracts unassisted. To free the hose of a
jam, pull the hose firmly until it is fully extended. It should now be able to retract once again.
Be sure to walk with the hose in hand at a slow speed as it retracts, until it is fully stowed.
Leakage near the entry point of the hose
If leakage occurs where the hose is connected to the reel, try to tighten it and ensure that
the connector is threaded correctly when screwing tight. You may also want to check to
make sure there is a washer in the brass connection.
Does the reel make a hoarse sound? Are there obvious cracks
The hose will not retract to its full length
1. Turn off the faucet and pull out the hose completely.
2. Squeeze the nozzle trigger to release excess pressure.
3. Unscrew the nozzle and disconnect it from the hose.
4. Retract the hose into the reel.
The hose is too hard to pull
Confirm that the hose reel is installed at a high enough height to be parallel to the user. If it
is too low, the hose may rub on the opening, making it difficult to pull.
5. Check for physical damage.

If you continue to have issues, please contact customer service at doris@giraffetools.com
and provide your order number and an accompanying video or photos of the issue at hand.
Hose kinks
Low water pressure
1. Extend the hose and fully open the faucet to eliminate any kinks.
2. Make sure that the hose reel is installed high enough. A hose that is too low will rub
against the opening and cause kinks.
3. Be sure to pull out the hose as needed as opposed to all at once. Do not step on the hose
nore let the hose gather or tangle on the ground, as this may lead to kinks.
1. Remove the nozzle, checking the water pressure as you do so to ensure the pressure issue
is not related to the nozzle.
2. Fully extend the hose, check for kinks, and open the faucet completely for full water flow
to eliminate possible pinch points.
3. Connect the nozzle end of the hose to the faucet, making the water flow in the opposite
direction in the hose to clear any blockages.
MAINTENANCE
This may damage the hose reel and nozzle. Always walk the hose back to the hose reel at a
steady pace.
DO NOT ALLOW THE HOSE TO RETRACT AT HIGH SPEED UNASSISTED.
Bracket Cracking
If your bracket cracks, please contact customer service at contact@giraffetools.com with
your order number and an accompanying photo of the cracked product.
11

Unscrewing the case will void the warranty. The internal spring mechanism is held under
tension and is dangerous if released. If leaking or retraction problems occur, please contact
Giraffe Tools’ customer service team for advice and assistance.
Wipe the hose with a damp cloth to keep the hose clean. This will prevent dust and sand
from being pulled into the reel, which could damage the lock and shrink back mechanism.
For the preservation of your hose and reel housing, do not use any corrosive, acidic, or
alkaline heavy liquids or substances on this product.
Do not immerse the hose reel in water for cleaning. It is easy to wipe the reel housing with a
damp cloth. The outer shell of the hose reel has been treated with UV stabilization and can
be used continuously.
This will put the hose under unnecessary water pressure.
Internal metal parts are irreplaceable.
Exposing this product to extreme cold weather conditions can cause the plastic cover to
become brittle. Additionally, water within the hose will expand and contract, which may
freeze and crack the hose.
DO NOT OPEN THE HOSE REEL CASING.
CLEAN THE HOSE REGULARLY.
DO NOT USE ANY HARSH CHEMICALS ON THIS PRODUCT.
DO NOT IMMERSE THE HOSE REEL IN WATER.
DO NOT LEAVE THE FAUCET TURNED ON WHEN NOT IN USE.
DO NOT DISASSEMBLE THE HOSE REEL BY YOURSELF.
DO NOT EXPOSE THE HOSE AND/OR HOSE REEL TO WINTER WEATHER
CONDITIONS.
12

WARRANTY
Thiswarrantycoverseachproduct andwarrantsthem tobefreefromdefectsin workmanship,
under normal use and service, for the defined period of time from the date of purchase
by the first end-user. Under this warranty, Giraffe Tools will repair or replace, at its option,
any unit that fails to perform according to Giraffe Tools’ published specifications during the
warranty period.
This Warranty does not apply to damage caused by accident, abuse, misuse, fire, earthquake,
or other external cause, or to cosmetic damage, including but not limited to scratches,
dents and broken plastic on ports unless failure has occurred due to a defect in materials or
workmanship.
WHAT IS COVERED BY THIS WARRANTY?
WHAT IS NOT COVERED BY THIS WARRANTY?
Warranty Period: TWO (2) years
Additional Legal Rights for Consumers
For consumers who are covered by consumer protection laws or regulations in their country
of purchase or, if different, their county of residence, the benefits conferred by our limited
warranty are in addition to all rights and remedies conveyed by such consumer protection
laws and regulations, including but not limited to these additional rights.
ACQUIRING WARRANTY SERVICE
Should the product prove to be defective within the warranty period, return the product
to the retail store you purchased the product(s), and Giraffe Tools will at its option, repair
or replace the product, to whatever extent Giraffe Tools deems necessary to restore the
product to proper operating condition, without any charge to you.
13

RECOMMENDED PRODUCTS
14

WE WILL DO THE HEAVY LIFTING
To purchase Giraffet Tools products and more, visit giraffetools.com or
search for Giraffe Tools on Amazon.com.
giraffetools.com
contat@giraffetools.com
Table of contents
Other Giraffe Tools manuals
Popular Tools manuals by other brands

Victaulic
Victaulic VE450FSD Operating and maintenance instruction manual

SYIC
SYIC BT Series Instructions for use

Milwaukee
Milwaukee Rattle Stick owner's manual

Harbor Freight Tools
Harbor Freight Tools ICON 56683 Owner's manual & safety instructions

Hellermann Tyton
Hellermann Tyton Autotool AT2000 Short manual

Best Choice Products
Best Choice Products SKY635 instruction manual

Power Fist
Power Fist 8916793 instructions

C.R. Laurence
C.R. Laurence TAPER-LOC TLEX1 user manual

Aero-motive
Aero-motive 1100M Series Service manual

Central Pneumatic
Central Pneumatic 95801 Assembly and operation instructions

Power Fist
Power Fist 8873358 manual

Aero-motive
Aero-motive RB2 Series Service manual