manuals.online logo
Brands
  1. Home
  2. •
  3. Brands
  4. •
  5. GivMohr Sling
  6. •
  7. Personal Care Product
  8. •
  9. GivMohr Sling GMS-PED User manual

GivMohr Sling GMS-PED User manual

Benefits:
 Reduces shoulder subluxation
 Reduces shoulder pain
 Supports the arm in a functional position
 Facilitates improved posture
 Facilitates improved balance
 Facilitates improved gait
 Protects the flaccid arm and shoulder joint
 Allows controlled arm swing
 Improves activities of daily living
 Easy application by user
Fitting the GivMohr Sling
1. Orient sling on a flat surface with Blue Stripe (inside) up
2. Place uninvolved arm through the shoulder loop
3. Lay sling across back and drape anterior strap over involved shoulder
4. Position 4-Tab low on back between shoulder blades
5. Position hand into Handpiece
6. Locate Elbow Strap horizontally 1” below elbow
7. Adjust both straps at buckles to reduce subluxation
8. Slide Axillary (Arm Pit) Pad to a comfortable position
9. Reposition 4-Tab for optimum comfort and function (see back)
10. Lock 4-Tab (instructions on back)
11. Adjust Handpiece if needed (instructions on back)
Adjust posterior strap to bring shoulder into neutral rotation
Proper Fit
Initial fitting by PT or OT is recommended to ensure proper fit.
Check the following:
 Shoulder subluxation is reduced
 Shoulder in neutral rotation
 4-Tab optimally positioned and locked (see instructions on back)
 Axillary Pad in a comfortable position
 Elbow in less than 30 degrees of flexion
 Elbow Strap positioned 1" below elbow and horizontal
 Wrist Cross centered over wrist (see instructions on back)
 Handpiece position accommodates contour of hand
 Blue Stripe against body
Steps 5 and 6
Step 8
Steps 9 and 10
5/2015
LATEX FREE
USPatents
6945945
D688,977
Ped(GMS‐PED)
XS(GMS‐00)
S(GMS‐10)
M(GMS‐20)
L(GMS‐30)
XL(GMS‐40)






GivMohr User Guide:
GivMohr Web Site:
Step 1
BLUE STRIPE
Hand Opening Adjustment
(to accommodate girth/size of hand and position of wrist diamond)
Optimal wrist control is achieved when wrist cross is directly over
the wrist joint.
 Find Velcro attachments inside hand piece
 Carefully detach one side of elastic at Velcro connection
 Stretch or Release elastic to loosen or tighten as needed
 Reattach elastic at Velcro connection
 Repeat the above adjustment on the other side of the Handpiece
Wrist Adjustments
These adjustments are rarely needed and should be made by a therapist.
Ulnar/Radial Deviation
(to evenly distribute pressure on hand)
 Release one side of elastic from Velcro and stretch/shorten to adjust pressure
on left or right side of hand
 Reattach elastic to Velcro
 Repeat for other side as needed
Flexion/Extension
 Release both sides of Velcro
 Rotate elastic position relative to Handpiece to increase flexion or extension
 Reattach elastic to Velcro
Handpiece Adjustment Instructions (Optional)
For best results, these adjustments should be made by a therapist
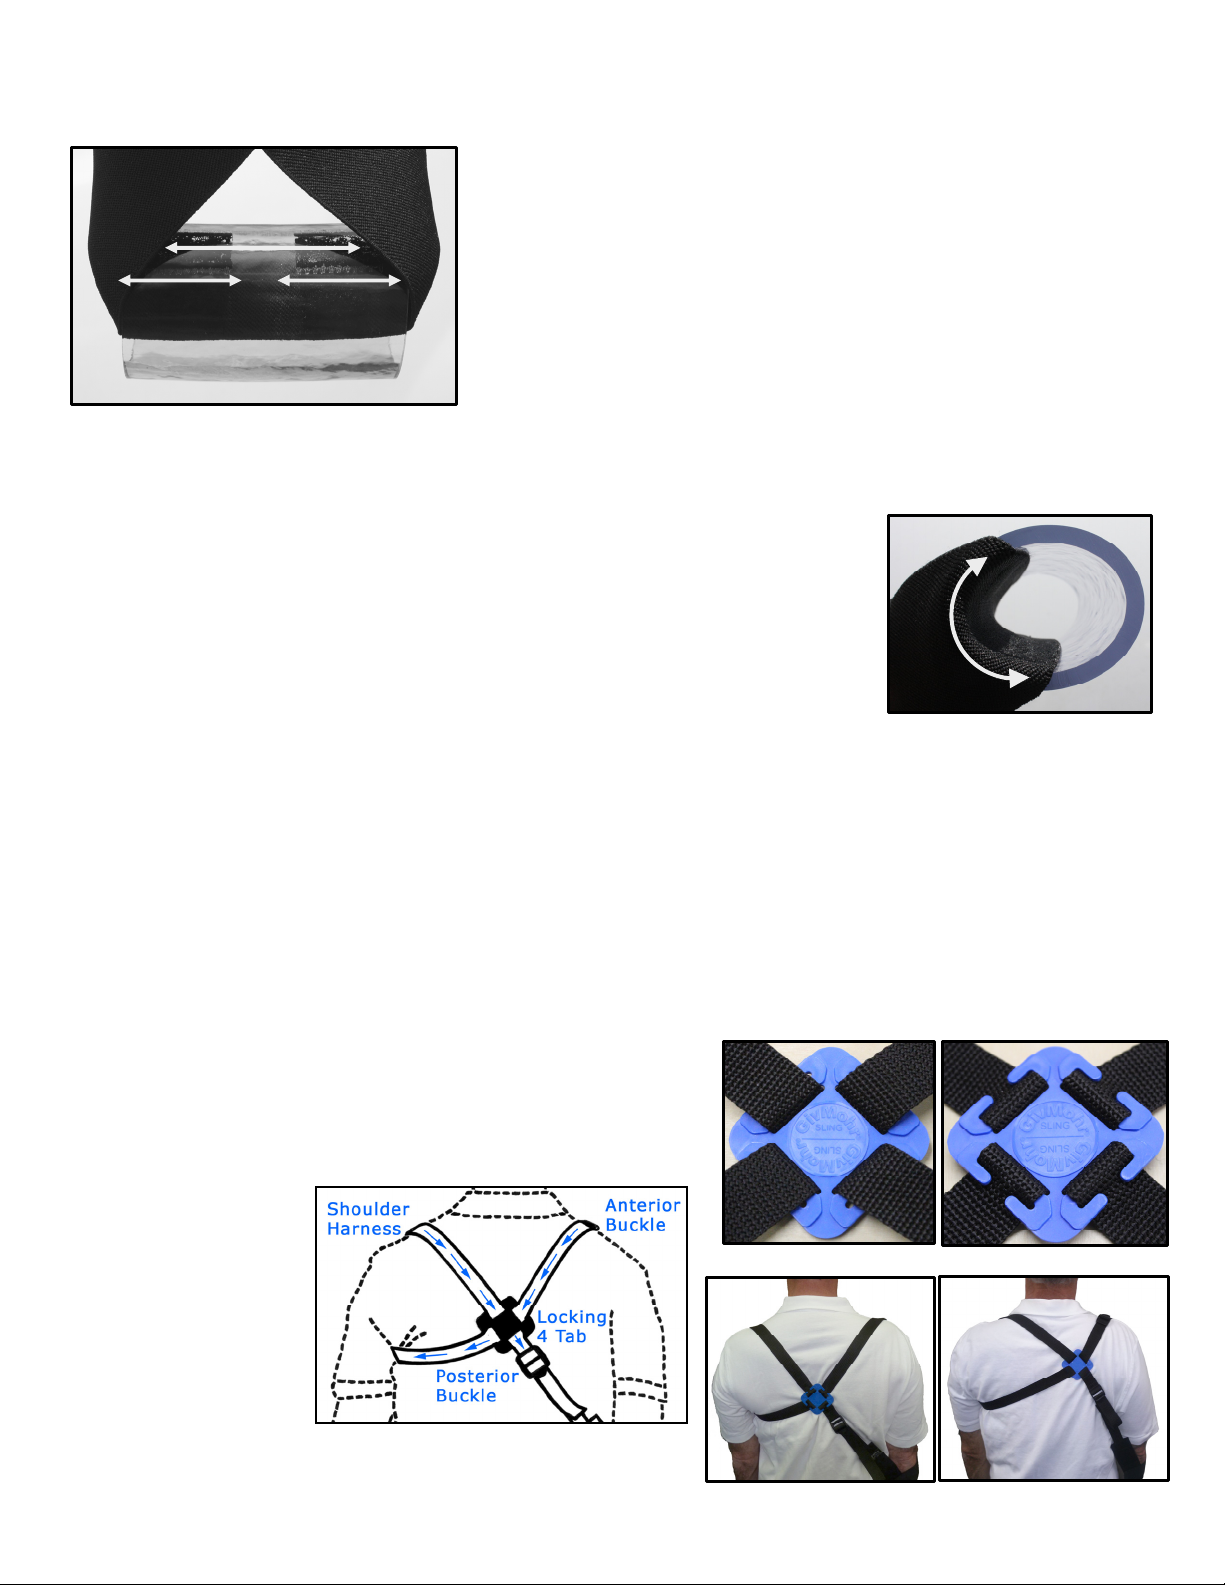
4-Tab Locking Instructions (Recommended)
FOR MAXIMUM BENEFIT, Lock the 4-Tab of your GivMohr Sling
1. Correctly position GivMohr Sling
2. Position the “unlocked” 4-Tab for optimum comfort and function. AVOID placing 4-Tab on base of the
neck. Greater comfort is typically achieved with the 4-Tab located low on the back (about the level of the
bottom of the shoulder blade). ALTERNATE POSITION: Locate the 4-Tab over the lower half of the
shoulder blade of the involved shoulder. AVOID placement over any boney prominence.
3. Lock the 4-Tab in place by snapping the webbing under the locking hooks on ALL 4 SIDES
4. Re-check the overall fit of the GivMohr Sling and repeat if
needed
Occasionally, lower 4-Tab position can be achieved by shifting
webbing from front to back (see below). To do this, move
anterior buckle toward the 4-Tab, work the extra webbing
through the 4-Tab,
around uninvolved
axilla (readjust axillary
pad position) and
through the 4-Tab again
toward the posterior
buckle. The 4-Tab can
then be moved lower on
the back. This
adjustment can also be
used to relocate the
anterior buckle.
5/2015
Hand Opening & Ulnar/Radial Deviation
Flexion/Extension
Shifting webbing front to back
Unlocked Locked
Typical Position Alternate Position

This manual suits for next models

5

Popular Personal Care Product manuals by other brands

Zelmer 33Z015 user manual

Zelmer

Zelmer 33Z015 user manual

EQL AURO Mask user manual

EQL

EQL AURO Mask user manual

cecotec BAMBA PrecisionCare TwistGroom instruction manual

cecotec

cecotec BAMBA PrecisionCare TwistGroom instruction manual

Lumex WHISPER LITE WL0208 Specifications

Lumex

Lumex WHISPER LITE WL0208 Specifications

Hydas Nature Well-Being Light instructions

Hydas

Hydas Nature Well-Being Light instructions

CS MITELLA COTTON instruction sheet

CS

CS MITELLA COTTON instruction sheet

Bose Noise-Masking Sleepbuds owner's guide

Bose

Bose Noise-Masking Sleepbuds owner's guide

Voxelight UVReveal user manual

Voxelight

Voxelight UVReveal user manual

Orliman THERA GO TGO484 Use and maintenance instructions

Orliman

Orliman THERA GO TGO484 Use and maintenance instructions

WENKO Imperial Instructions for use

WENKO

WENKO Imperial Instructions for use

MOB MF3003 user manual

MOB

MOB MF3003 user manual

Dometic 972 instruction manual

Dometic

Dometic 972 instruction manual

Comper SkinEnergy user manual

Comper

Comper SkinEnergy user manual

aidapt VM933B Usage and maintenance instructions

aidapt

aidapt VM933B Usage and maintenance instructions

bort medical X-Walker short Instructions for use

bort medical

bort medical X-Walker short Instructions for use

Isotronic L1 Instructions for use

Isotronic

Isotronic L1 Instructions for use

ESTELLE ESRFLDFCDVA user guide

ESTELLE

ESTELLE ESRFLDFCDVA user guide

Mobiak 0806235 user manual

Mobiak

Mobiak 0806235 user manual

manuals.online logo
manuals.online logoBrands
  • About & Mission
  • Contact us
  • Privacy Policy
  • Terms and Conditions

Copyright 2025 Manuals.Online. All Rights Reserved.